kubernetes云平台管理实战: 自动加载到负载均衡(七)
一、如何实现外界能访问
外界访问不了
1、启动svc
[root@k8s-master ~]# cat myweb-svc.yaml
apiVersion: v1
kind: Service
metadata:
  name: nginx
spec:
  type: NodePort
  ports:
    - port: 80
      nodePort: 30001
  selector:
    app: myweb
[root@k8s-master ~]# kubectl create -f myweb-svc.yaml
service "nginx" created
2、查看svc状态
[root@k8s-master ~]# kubectl get all
NAME       DESIRED   CURRENT   READY     AGE
rc/myweb   3         3         3         19m

NAME             CLUSTER-IP       EXTERNAL-IP   PORT(S)        AGE
svc/kubernetes   10.254.0.1       <none>        443/TCP        22h
svc/nginx        10.254.205.175   <nodes>       80:30001/TCP   27s

NAME             READY     STATUS    RESTARTS   AGE
po/myweb-7m76h   1/1       Running   0          18m
po/myweb-kzq8c   1/1       Running   0          18m
po/myweb-mnf7x   1/1       Running   0          18m
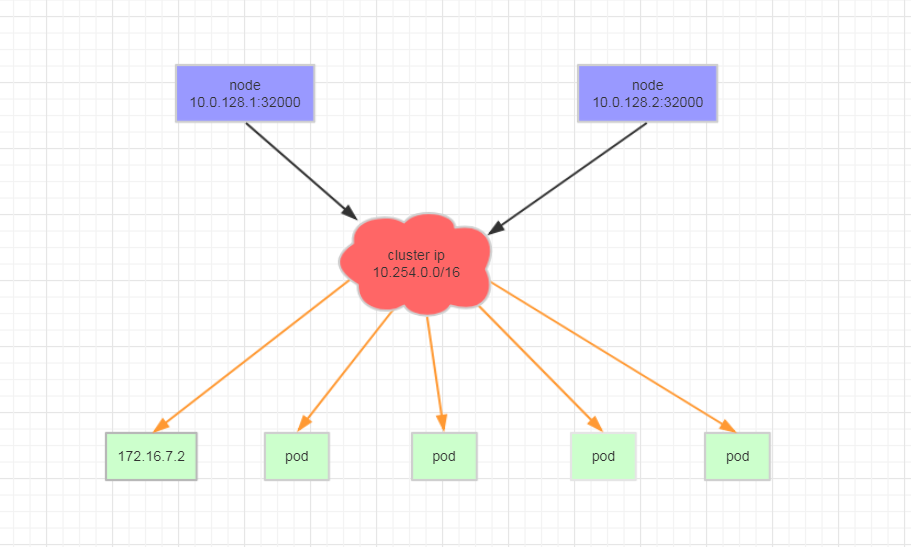
3、被外界访问原理图

二、为什么是30001?
1、修改为3000看看是否正常?
[root@k8s-master ~]# vim myweb-svc.yaml
更改端口为:3000
[root@k8s-master ~]# kubectl delete svc/nginx
service "nginx" deleted
[root@k8s-master ~]# kubectl create -f myweb-svc.yaml
The Service "nginx" is invalid: spec.ports[0].nodePort: Invalid value: 3000:
provided port is not in the valid range. The range of valid ports is 30000-32767
2、端口更改为30001
[root@k8s-master ~]# vim myweb-svc.yaml
更改端口为:30001
[root@k8s-master ~]# kubectl create -f myweb-svc.yaml
service "nginx" created
[root@k8s-master ~]# kubectl get all
NAME       DESIRED   CURRENT   READY     AGE
rc/myweb   3         3         3         25m

NAME             CLUSTER-IP      EXTERNAL-IP   PORT(S)        AGE
svc/kubernetes   10.254.0.1      <none>        443/TCP        22h
svc/nginx        10.254.145.15   <nodes>       80:30027/TCP   8s

NAME             READY     STATUS    RESTARTS   AGE
po/myweb-7m76h   1/1       Running   0          24m
po/myweb-kzq8c   1/1       Running   0          24m
po/myweb-mnf7x   1/1       Running   0          25m
默认不填写,自动分配30000-32767内任意一端口
三、自动加载到负载均衡里面
1、修改svc副本数为1
[root@k8s-master ~]# kubectl get pod -o wide
NAME          READY     STATUS    RESTARTS   AGE       IP            NODE
myweb-7m76h   1/1       Running   0          26m       172.16.10.2   k8s-node1
myweb-kzq8c   1/1       Running   0          26m       172.16.48.4   k8s-node2
myweb-mnf7x   1/1       Running   0          26m       172.16.48.2   k8s-node2


[root@k8s-master ~]# kubectl edit rc myweb
  replicas: 1
replicationcontroller "myweb" edited

[root@k8s-master ~]# kubectl get pod -o wide
NAME          READY     STATUS    RESTARTS   AGE       IP            NODE
myweb-mnf7x   1/1       Running   0          28m       172.16.48.2   k8s-node2
[root@k8s-master ~]# kubectl  describe svc nginx
Name:			nginx
Namespace:		default
Labels:			<none>
Selector:		app=myweb
Type:			NodePort
IP:			10.254.145.15
Port:			<unset>	80/TCP
NodePort:		<unset>	30027/TCP
Endpoints:		172.16.48.2:80
Session Affinity:	None
No events.
2、修改svc副本数为5
[root@k8s-master ~]# kubectl edit rc myweb
  replicas: 5
replicationcontroller "myweb" edited
[root@k8s-master ~]# kubectl  describe svc nginx
Name:			nginx
Namespace:		default
Labels:			<none>
Selector:		app=myweb
Type:			NodePort
IP:			10.254.145.15
Port:			<unset>	80/TCP
NodePort:		<unset>	30027/TCP
Endpoints:		172.16.10.2:80,172.16.10.3:80,172.16.48.2:80 + 1 more...
Session Affinity:	None
No events.
[root@k8s-master ~]# kubectl get pod -o wide
NAME          READY     STATUS    RESTARTS   AGE       IP            NODE
myweb-415zs   1/1       Running   0          9s        172.16.48.3   k8s-node2
myweb-7bw5f   1/1       Running   0          9s        172.16.10.3   k8s-node1
myweb-7kzh2   1/1       Running   0          9s        172.16.48.4   k8s-node2
myweb-j45xb   1/1       Running   0          9s        172.16.10.2   k8s-node1
myweb-mnf7x   1/1       Running   0          30m       172.16.48.2   k8s-node2
四、上网测试截图
1、node1 web截图

2、node2 web截图

作者:罗阿红
出处:http://www.cnblogs.com/luoahong/
本文版权归作者和博客园共有,欢迎转载,但未经作者同意必须保留此段声明,且在文章页面明显位置给出原文连接。

