性能优化:MySQL 表分区实例
下面用一个MySQL表分区脚本对MySQL进行表分区,该脚本来自以下地址。
- http://blog.hbis.fr/2013/01/31/zabbix-mysql_partitioning/
1.表分区脚本
脚本下载(参照https://github.com/itnihao/zabbix-book/blob/master/03-chapter/)命令如下。
- shell# wget https://raw2.github.com/cdand/zabbixdbpartitioning/master/partitiontables.sh
脚本具备的功能如下。
① 备份数据库。
② 对表进行分区间。
③ 添加定时任务。
注:该脚本在Zabbix 2.0.6 和Zabbix 2.2.2 中均测试通过,适合于已经安装过Zabbix,但未分区的数据库;对于已经在线运行的环境,Zabbix 数据库中的表数据量会较大,执行此脚本时间会非常长,笔者测试过的有10 多个小时还在执行,故建议读者先清空表数据(注意历史记录会全部被清空,或者备份数据库),再执行,清空语句如下。
mysql> use zabbix;
mysql> truncate table history;
mysql> optimize table history;
mysql> truncate table history_str;
mysql> optimize table history_str;
mysql> truncate table history_uint;
mysql> optimize table history_uint;
mysql> truncate table trends;
mysql> optimize table trends;
mysql> truncate table trends_uint;
mysql> optimize table trends_uint;
mysql> truncate table events;
mysql> optimize table events;
另外,需要注意脚本中保存天数的设置,读者可以参考脚本的注释自行设置。
2.运行表分区脚本
为了防止网络中断后引起脚本运行中断而造成数据库故障,我们应该选用screen 后台执行的方法。如果没有screen 程序,请先安装(运维人员要处处持有谨慎的态度)。
shell# screen -R zabbix
shell# bash partitiontables.sh
退出screen,脚本将在后台执行,方法如下:
按组合键CRTL+A之后再按组合键CRTL+D
进入screen,可以查看后台运行的任务:
shell# screen -R zabbix
输入用户名为zabbix,密码为zabbix,选择备份数据库,连续按两次回车键(见图3-46 和图3-47),观察/tmp/zabbix.sql 会逐渐增大。

当脚本中用zabbix 用户去连接数据库时,会出现访问被拒绝的提示,主要是因为以下两条SQL 语句无法执行,解决方法是可以忽略,直接按回车键即可。
mysql -B -h $DBHOST -u $DBADMINUSER -p$DBADMINPASS -e "GRANT CREAT
E ROUTINE ON zabbix.* TO '$DBUSER'@'localhost';"
mysql -h $DBHOST -e "GRANT LOCK TABLES ON zabbix.* TO '$DBUSER'@'$
DBHOST' IDENTIFIED BY '$DBPASS';"
注意:严禁在脚本执行的过程中断脚本的运行,否则可能造成表的损坏。脚本运行完毕后,会添加定时任务(用于每天创建新的表空间)。
[root@localhost ~]# cat /etc/cron.daily/zabbixhousekeeping
#!/bin/bash
/usr/local/zabbix/cron.d/housekeeping.sh
[root@localhost ~]# cat /usr/local/zabbix/cron.d/housekeeping.sh
#!/bin/bash
MAILTO=Y
tmpfile=/tmp/housekeeping$$
date >$tmpfile
/usr/bin/mysql --skip-column-names -B -h localhost -u zabbix -pzab
bix zabbix -e "CALL create_zabbix_partitions();" >>$tmpfile 2>&1
/usr/bin/mail -s "Zabbix MySql Partition Housekeeping" $MAILTO <$t
mpfile
rm -f $tmpfile
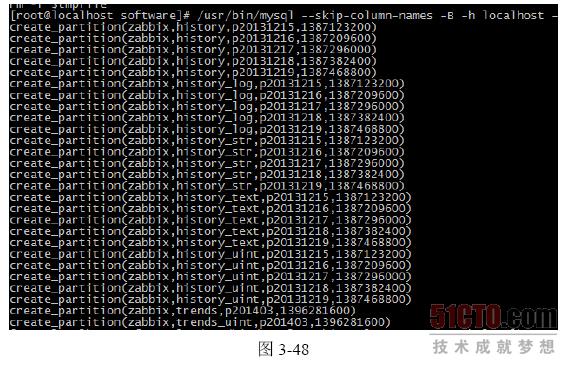
为了验证表分区的SQL 触发器能否正常运行(如果你的MySQL 是自己编译安装,由于sock 文件等位置为非标准,会导致此SQL 语句执行失败,需要修改此脚本,可增加--soket=路径),通过手动方式运行命令调用触发器,验证表分区能否正常创建,命令如下。
shell# mysql --skip-column-names -B -h localhost -u zabbix -pzabb
ix zabbix -e "CALL create_zabbix_partitions();" #如图3-48所示
验证是否分表成功,可以查看History 的表结构,如图3-49 所示。
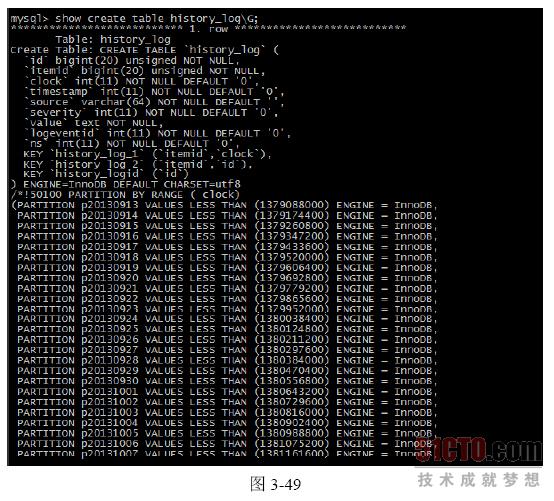
在图3-49 中,时间戳使用的是数值,可以通过Linux 下的date 命令直接进行转换。
时间转换为数值格式如下。
shell# date -d "2014-06-09" +%s
1402243200
数值转换为时间格式如下。
shell# date -d @1402243200 "+%Y-%m-%d"
2014-06-09
下面的例子是查询指定时间段的数据。
mysql> select count(*) from history_log where timestamp>138643200
0 and timestamp<1386518400;
+----------+
| count(*) |
+----------+
| 6194 |
+----------+
1 row in set (0.13 sec)
mysql> select count(*) from history_log where timestamp>138660480
0 and timestamp<1386691200;
+----------+
| count(*) |
+----------+
| 6302 |
+----------+
1 row in set (0.13 sec)
至此,表分区已经完成,对提高数据库的性能具有重要的作用。对MySQL的优化还可以通过调整本身的配置参数来进行。
若读者想了解更多关于表分区的知识,可以参考以下链接。
