服务器安全之iptables
1.1 iptables防火墙简介
Netfilter/Iptables(以下简称Iptables)是unix/linux自带的一款优秀且开放源代码的安全自由的**基于包过滤的防火墙工具**,它的功能十分强大,使用非常灵活,可以对流入和流出服务器的数据包进行很精细的控制。特别是它可以在一台非常低的硬件配置下跑的非常好
Iptables是Linux2.4及2.6内核中集成的服务。其功能与安全性比其**ipfwadm,ipchains**强大的多,iptables主要工作在OSI七层的二、三、四层,如果重新编译内核,iptables也可以支持**7层控制**(squid代理+iptables)
1.2 iptables 名词和术语
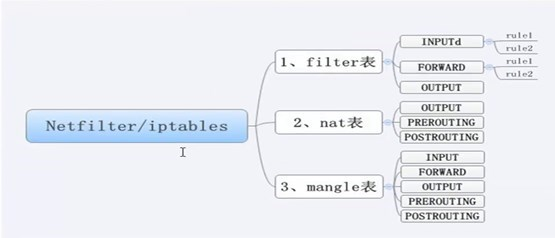
容器:包含和被包含的关系
iptables是表的容器
iptables包含表 (4张表)表是链的容器,每个表都包含若干个链
链是规则的容器,真正过滤规则是属于链里面的
级别介绍
iptables国家
表省
链 市
规则 县
1.3 iptables工作流程
iptables是采用数据包过滤机制工作的,所以它会对请求的数据包的包头数据进行分析,并根据我们预先设定的规则来进行匹配是否可以进入到主机。
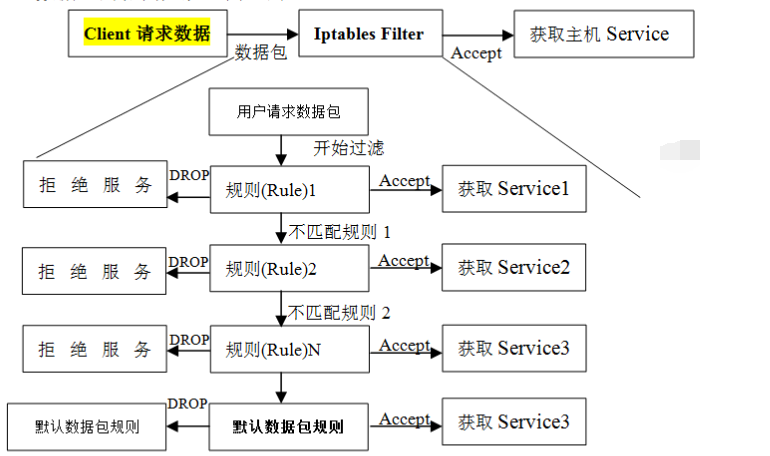
iptables工作流程小结
1.防火墙是一层层过滤的。实际是按照配置规则的顺序从上到下,从前到后进行过滤的。
2.如果匹配上规则,即明确表是阻止还是通过,此时数据包就不在向下匹配新规则了。
3.如果所有规则中没有明确是阻止还是通过这个数据包,也就是么有匹配上新规则,向下进行匹配,直到匹配默认规则得到明确的组织还是通过
4.防火墙的默认规则是对应链的所有规则执行完才会执行的。
1.4 iptables表(tables)和链(chains)
iptables根据功能和表的定义划分包含三个表,filter,nat,mangle,其每个表又包含不同的操作链(Chains)
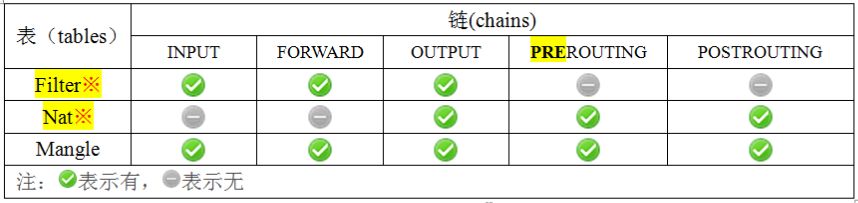
Filter表 是真正的防火墙功能 INPUT 进服务器 OUTPUT出服务器 FORWARD 流经服务器 Nat 表 负责数据包改写 网关共享上网、IP和端口映射
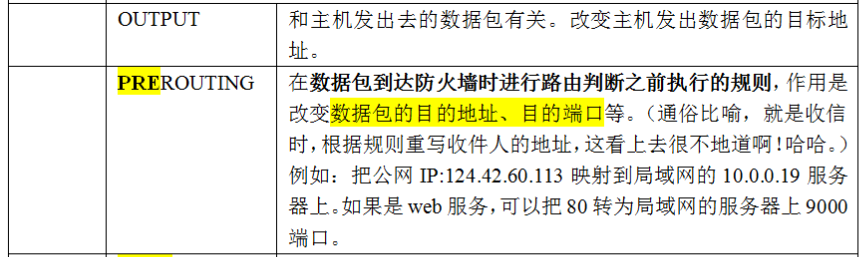
OUTPUT
PREROUTING
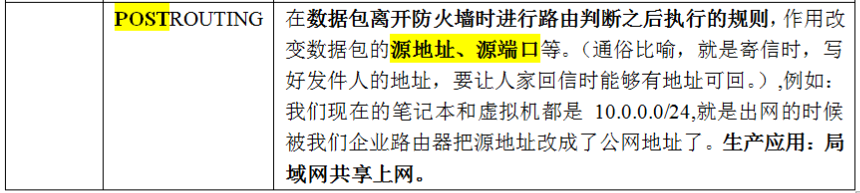
POSTROUTING
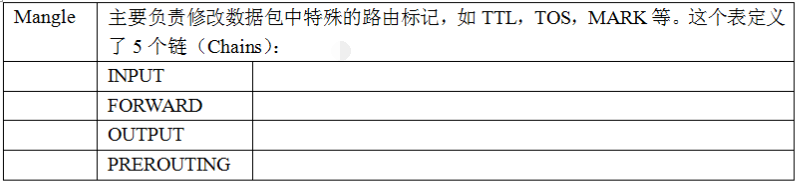
Mangle表 路由标记 用的不多
####所有链全有
RAW 表 用处很少和Mangle一样
我们可以通过man iptables 来获取
1.5 表介绍
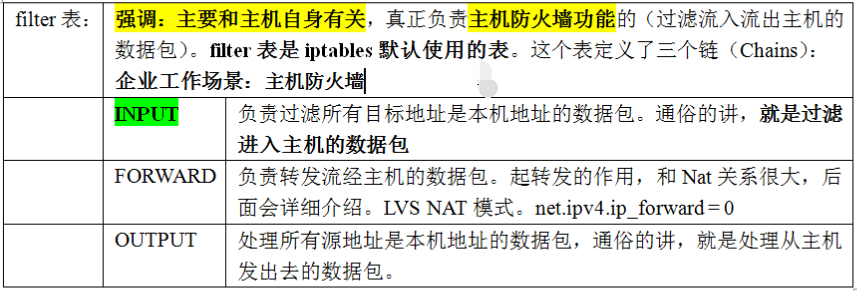
对于filter表的控制是我们实现本机防火墙的重要手段,特别是对INPUT链的控制 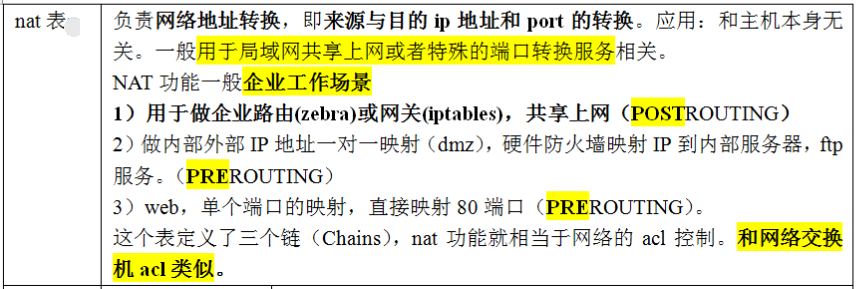
1.6 iptables表和链工作流程图
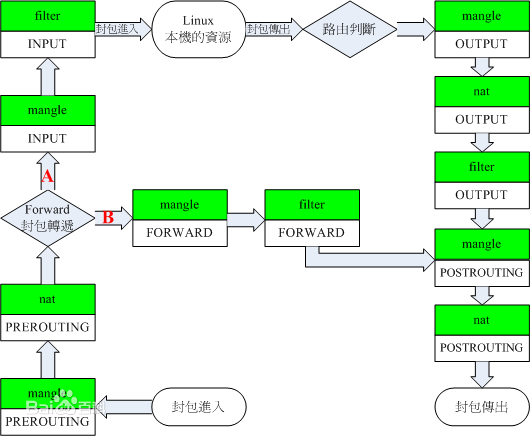
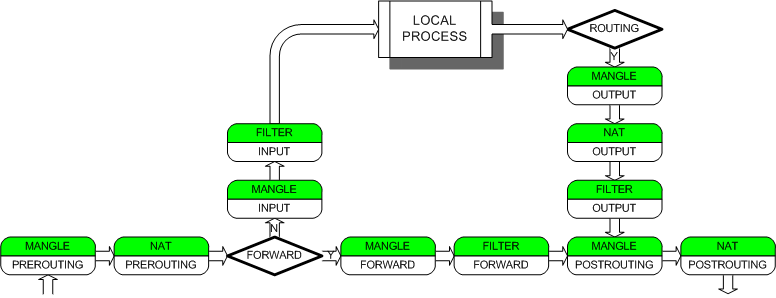
提示: iptables主要由2个作用,第一是防火墙,第二是路由。
NAT功能:
企业案例:1)局域网上网共享(路由和网关)NAT POSTROUTING
2)外部IP和端口映射为内部IP和端口(DMZ功能),NAT PREROUTING
Filter功能:
即防火墙FILTER INPUT FORWARD
企业案例:主要应用于服务器防火墙
2.1 配置iptables
iptables默认已经安装
1 2 3 4 5 6 | [root@web02 ~]# iptables -Viptables v1.4.7[root@web02 ~]# rpm -qa iptablesiptables-1.4.7-16.el6.x86_64[root@web02 ~]# /etc/init.d/iptables statusiptables: Firewall is not running. |
查看iptables规则
1 2 | [root@web02 ~]# iptables -nLChain INPUT (policy ACCEPT) |
表示针对input链 ACCEPT是默认规则,默认是运行通过的
1 2 3 4 5 6 7 8 9 10 11 12 | target prot opt source destinationinput链下面具体的规则ACCEPT all -- 0.0.0.0/0 0.0.0.0/0 state RELATED,ESTABLISHEDACCEPT icmp -- 0.0.0.0/0 0.0.0.0/0ACCEPT all -- 0.0.0.0/0 0.0.0.0/0ACCEPT tcp -- 0.0.0.0/0 0.0.0.0/0 state NEW tcp dpt:22REJECT all -- 0.0.0.0/0 0.0.0.0/0 reject-with icmp-host-prohibitedChain FORWARD (policy ACCEPT)target prot opt source destinationREJECT all -- 0.0.0.0/0 0.0.0.0/0 reject-with icmp-host-prohibitedChain OUTPUT (policy ACCEPT)target prot opt source destination |
如果没有指定表,默认就是filfer表
iptables默认加载的内核模块
1 2 3 4 | [root@web02 ~]# lsmod |egrep "nat|filter|ipt"ipt_REJECT 2351 2iptable_filter 2793 1ip_tables 17831 1 iptable_filter |
加载如下模块到linux内核
1 2 3 4 5 6 7 | modprobe ip_tablesmodprobe iptable_filtermodprobe iptable_natmodprobe ip_conntrack 连接跟踪modprobe ip_conntrack_ftp 连接跟踪modprobe ip_nat_ftpmodprobe ipt_state |
再次过滤,查看生效情况
1 2 3 4 5 6 7 8 9 10 | [root@web02 ~]# lsmod |egrep "nat|filter|ipt"nf_nat_ftp 3443 0nf_conntrack_ftp 11953 1 nf_nat_ftpiptable_nat 5923 0nf_nat 22676 2 nf_nat_ftp,iptable_natipt_REJECT 2351 2nf_conntrack_ipv4 9154 5 iptable_nat,nf_natnf_conntrack 79206 6 nf_nat_ftp,nf_conntrack_ftp,iptable_nat,nf_nat,nf_conntrack_ipv4,xt_stateiptable_filter 2793 1ip_tables 17831 2 iptable_nat,iptable_filter |
清空所有的规则,只留下默认规则
1 2 3 | [root@web02 ~]# iptables -F[root@web02 ~]# iptables -X[root@web02 ~]# iptables -Z |
iptables -F 清除所有规则
iptables -X 删除用户自定义规则
iptables -Z 链的计数器清零
2.2 禁止规则
查看端口
1 2 3 | [root@web02 ~]# netstat -lntup|grep sshtcp 0 0 0.0.0.0:22 0.0.0.0:* LISTEN 1329/sshdtcp 0 0 :::22 :::* LISTEN 1329/sshd |
命令如下:
1 | iptables -t filter -A INPUT -p tcp --dport 22 -j DROP |
-A 添加规则到指定链的结尾,最后一条 -I 添加规则到指定链的开头,第一条 -t 指定表,也可以不指定默认是filter -p 指定协议(all.tcp,udp.icmp)默认all --dport 指定端口 -j 处理的行为
ACCPET接收、DROP丢弃、REJECT拒绝
最好使用ACCPET和DROP,因为拒绝会返回给用户信息。 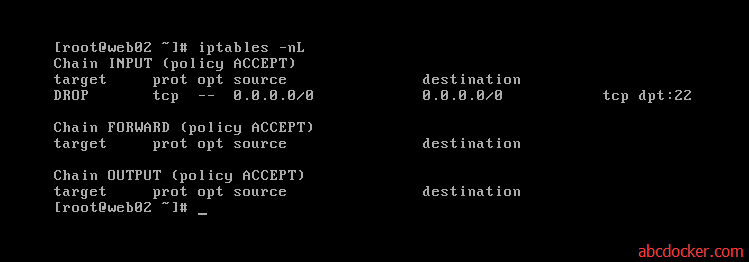
清除规则可以使用iptables -F
还可以使用iptables -D INPUT 1 -D指定删除的链 --line-number 显示序列号 iptables -nl --line-number 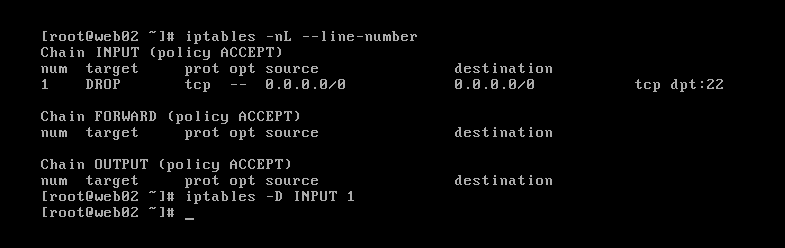
提示:需要写上链和序列号
温馨提示:恢复刚才断掉的SSH连接
1)去机房重启系统或登录服务器删除刚才的禁止规则
2)让机房人员重启服务器或者让机房人员拿用户密码登录进去
3)通过服务器的远程管理卡管理(推荐)
4)先写一个定时任务,每5分钟就停止防火墙
5)测试环境测试好,写成脚本,批量执行
企业案例
3.1: 加-A和-I的区别
1 2 | [root@web02 ~]# iptables -A INPUT -p tcp --dport 80 -j DROP[root@web02 ~]# iptables -I INPUT -p tcp --dport 80 -j ACCEPT |
按照iptables匹配规则,首先会先匹配第一行,依次向下。这样设置拒绝就没有用
如果想在中间插入可以指定插入行号
1 2 3 4 5 6 7 8 9 | [root@web02 ~]# iptables -nLChain INPUT (policy ACCEPT)target prot opt source destinationACCEPT tcp -- 0.0.0.0/0 0.0.0.0/0 tcp dpt:80DROP tcp -- 0.0.0.0/0 0.0.0.0/0 tcp dpt:80Chain FORWARD (policy ACCEPT)target prot opt source destinationChain OUTPUT (policy ACCEPT)target prot opt source destination |
还可以通过序列号插入iptables 命令
1 2 3 4 5 6 7 8 9 10 11 | [root@web02 ~]# iptables -I INPUT 2 -p tcp --dport 80 -j ACCEPT[root@web02 ~]# iptables -nL --line-numberChain INPUT (policy ACCEPT)num target prot opt source destination1 ACCEPT tcp -- 0.0.0.0/0 0.0.0.0/0 tcp dpt:802 ACCEPT tcp -- 0.0.0.0/0 0.0.0.0/0 tcp dpt:803 DROP tcp -- 0.0.0.0/0 0.0.0.0/0 tcp dpt:80Chain FORWARD (policy ACCEPT)num target prot opt source destinationChain OUTPUT (policy ACCEPT)num target prot opt source destination |
小结:总结下删除规则的方法
1. iptables -D INPUT -p tcp --dport 8080 -j DROP
2. iptables -F 删所有规则
3. /etc/init.d/iptables restart (用iptables命令行配置的命令都是临时生效)
4. iptables -D INPUT 规则序号
3.2:禁止10.0.0.0网段接入
基于客户端网段控制
1 | [root@web02 ~]# iptables -A INPUT -s 10.0.0.0/24 -j DROP |
-s指定源地址
还可以使用不是这个网段的进行操作
1 | [root@web02 ~]# iptables -A INPUT ! -s 10.0.0.0/24 -j DROP |
案例:控制22端口 eth0网卡进来的数据
1 2 | iptables -A INPUT -p tcp --dport 22 -i eth0 ! -s 10.0.0.0/24 -j DROPiptables -A INPUT -p tcp --dport 22 -i eth0 ! -s 192.168.1.1 -j DROP |
封掉3306端口
1 | iptables -A INPUT -p tcp --dport 3306 -j DROP |
匹配指定的协议
1 2 | iptables -A INPUT -p tcpiptables -A INPUT -p udp |
匹配指定协议外的所有协议
1 | iptables -A INPUT ! -p tcp |
``匹配单一端口**
1 2 | iptables -A INPUT -p tcp --sport 22 源端口iptables -A INPUT -p udp --dport 22 目的端口 |
匹配端口范围:
1 2 3 4 5 6 | iptables -A INPUT -p tcp --sport 22:80iptables -A INPUT -p tcp --dport 21,22,23 -j DROP---->错误语法iptables -I INPUT -p tcp -m multiport --dport 22,23,24,25 -j DROPiptables -I INPUT -p tcp -m multiport ! --dport 22,23,24,25 -j DROPiptables -I INPUT -p tcp --dport 3306:8809 -j ACCEPTiptables -I INPUT -p tcp --dport 18:80 -j DROP <----最佳方法 |
匹配ICMP类型
1 | iptables -A INPUT -p icmp-type 8 |
icmp中有很多类型,其中8代表ping
例:
1 2 | iptables -A INPUT -p icmp --icmp-type 8 -j DROPiptables -A INPUT -p icmp -m icmp --icmp-type any -j ACCEPT |
因为icmp类型很多可以使用any,icmp的所有类型全禁
1 | iptables -A INPUT -s 192.168.1.0/24 -p icmp -m icmp --icmp-type any -j ACCEPT |
企业场景禁ping
1 | iptables -A INPUT -p icmp --icmp-type 8 -s 10.0.0.0/24 -j ACCEPT |
根据需求来设定
匹配网络状态
1 2 3 4 5 6 | -m state --stateNEW:已经或启动新的连接ESTABLISHED:已建立的连接RELATED:正在启动的新连接INVALID:非法或无法识别的FTP服务是特殊的,需要配状态连接 |
允许关联的状态包通过(Web服务不要使用FTP服务)
允许关联的状态包
1 2 | iptables -A INPUT -m state --state ESTABLISHED,RELATED -j ACCEPTiptables -A OUTPUT -m state --state ESTABLISHED,RELATED -j ACCEPT |
限制指定时间包的允许通过数量及并发数
1 | -m limit --limit n/{second/minute/hour} |
指定时间内的请求速率“n”为速率,后面为时间分别为:秒、分、时
1 | --limit-burst [n] |
在同一时间内允许通过的请求“n”为数字,不指定默认为5
1 | iptables -I INPUT -s 10.0.1.0/24 -p icmp --icmp-type 8 -m limit --limit 5/min --limit-burst 2 -j ACCEPT |
手动执行iptables命令配置企业生产环境防火墙
生产环境配置主机防火墙的两种模式
1. 允许所有程序,对操作伤害的进行拒绝操纵 应用场景:企业配置上网网关路由
2. 拒绝所有操作,允许指定的操作 应用场景:服务器主机防火墙
配置企业主机防火墙
1 2 3 | [root@web02 ~]# iptables -F[root@web02 ~]# iptables -X[root@web02 ~]# iptables -Z |
1.设置允许SSH登录端口
1 2 | [root@web02 ~]# iptables -A INPUT -p tcp --dport 22 -j ACCETP[root@web02 ~]# iptables -A INPUT -p tcp -s 10.0.0.1/24 -j ACCEPT |
2.设置允许本机lo通信规则
1 2 | [root@web02 ~]# iptables -A INPUT -i lo -j ACCEPT[root@web02 ~]# iptables -A OUTPUT -o lo -j ACCEPT |
3.设置默认规则
1 2 3 | [root@web02 ~]# iptables -P INPUT DROP[root@web02 ~]# iptables -P OUTPUT ACCEPT[root@web02 ~]# iptables -P FORWARD DROP |
轻松应对IDC机房带宽突然暴涨问题
查看规则(现在的服务器是最安全的)
1 2 3 4 5 6 7 8 9 10 11 | [root@web02 ~]# iptables -nL --line-numberChain INPUT (policy DROP)num target prot opt source destination1 ACCEPT tcp -- 0.0.0.0/0 0.0.0.0/0 tcp dpt:222 ACCEPT tcp -- 10.0.0.0/24 0.0.0.0/03 ACCEPT all -- 0.0.0.0/0 0.0.0.0/0Chain FORWARD (policy DROP)num target prot opt source destinationChain OUTPUT (policy ACCEPT)num target prot opt source destination1 ACCEPT all -- 0.0.0.0/0 0.0.0.0/0 |
4.开启信任的IP网段
允许IDC LAN/WAN 和办公网IP的访问,及对外合作机构访问
1 2 3 4 5 | iptables -A INPUT -s 124.23.62.96/27 -p all -j ACCEPT #办公室固定IP段iptables -A INPUT -s 192.168.2.0/24 -p all -j ACCEPT #IDC机房的内网网段iptables -A INPUT -s 10.0.0.0/24 -p all -j ACCEPT #其他机房的内网网段iptables -A INPUT -s 203.82.24.0/24 -p all -j ACCEPT #IDC机房的外网网段iptables -A INPUT -s 203.82.23.0/24 -p all -j ACCEPT #其他IDC机房的外网网段 |
现在还只是我们可以访问,对外还无法访问
5.允许icmp类型协议通过
1 | iptables -A INPUT -p icmp -m icmp-type any -j ACCEPT |
提示:如果不想开,就不执行此命令
1 | iptables -A INPUT -p icmp -s 10.0.0.0/24 -m icmp --icmp-type any -j ACCEPT |
6.允许关联的状态包通过(Web服务不要使用FTP服务)
1 2 | iptables -A INPUT -m state --state ESTABLISHED,RELATED -j ACCEPTiptables -A OUTPUT -m state --state ESTABLISHED,RELATED -j ACCEPT |
提示:以上配置就是合格服务器应该配置的
保存
默认使用iptables并没有永久保存,重启失效。
第一种方法:
1 | /etc/init.d/iptables save 保存到/etc/sysconfig/iptables 下面 |
显示如下格式
1 2 3 4 5 6 7 8 9 10 11 12 13 14 15 16 17 18 19 | [root@web02 ~]# cat /etc/sysconfig/iptables# Generated by iptables-save v1.4.7 on Mon Aug 15 01:33:44 2016*nat:PREROUTING ACCEPT [1413:153792]:POSTROUTING ACCEPT [132:8834]:OUTPUT ACCEPT [132:8834]COMMIT# Completed on Mon Aug 15 01:33:44 2016# Generated by iptables-save v1.4.7 on Mon Aug 15 01:33:44 2016*filter:INPUT DROP [1798:662465]:FORWARD DROP [0:0]:OUTPUT ACCEPT [288:21100]-A INPUT -p tcp -m tcp --dport 22 -j ACCEPT-A INPUT -s 10.0.0.0/24 -p tcp -j ACCEPT-A INPUT -i lo -j ACCEPT-A OUTPUT -o lo -j ACCEPTCOMMIT# Completed on Mon Aug 15 01:33:44 2016 |
第二种方法:
1 | [root@web02 ~]# iptables-save >/etc/sysconfig/iptables |
推荐使用第一种方式
测试:我通过其他服务器扫描我们配置的防火墙
使用nmap工具进行分析,此工具需要安装
1 | [root@web02 ~]# yum -y install nmap |
使用如下:更多可以使用nmap --help
1 2 3 4 5 6 7 8 9 10 | [root@web02 ~]# nmap 10.0.0.8 -p 1-65535Starting Nmap 5.51 ( http://nmap.org ) at 2016-08-15 04:28 CSTNmap scan report for 10.0.0.8Host is up (0.0000070s latency).Not shown: 65532 closed portsPORT STATE SERVICE22/tcp open ssh80/tcp open http3306/tcp open mysqlNmap done: 1 IP address (1 host up) scanned in 14.21 seconds |
生产维护
(1)确定的规则;
编辑/etc/sysconfig/iptables
加入想要的规则:例如
1 2 | -A INPUT -p tcp -m tcp --dport 873 -j ACCEPT/etc/init.d/iptables reload |
或者改配置的同时命令在执行,也是永久生效。
(2)命令试错,没问题了,然后放配置文件,这时不需要重启了
恶意IP封杀
封IP,在第一行封。10.0.0.1 这个机器攻击我们服务器或者在BBS里发垃圾帖子
手工封IP:
1 2 3 | iptables -I INPUT -s 10.0.0.1 -j DROP #粗,范围大,外部攻击者Iptables -I INPUT -s 10.0.0.1 -j DROPiptables -I INPUT -p tcp -s 10.0.0.1 --dport 80 -j DROP #细,范围小。内部 |
自动封IP:分析Web或应用日志或者网络连接状态封掉垃圾IP
脚本:
1 2 3 4 5 6 7 8 9 10 11 12 13 14 15 16 17 18 19 20 21 22 23 24 25 26 27 28 29 30 | #!/bin/bash#this is a server firewall created by oldboy 17:03 2006-7-26# e_mail:31333741@qq.com# qqinfo:49000448# function: a server firewall# version:1.1################################################# oldboy trainning info.# QQ 1986787350 70271111# site: http://www.etiantian.org# blog: http://oldboy.blog.51cto.com# oldboy trainning QQ group: 208160987 45039636#################################################define variable PATHIPT=/sbin/iptables#Remove any existing rules$IPT -F$IPT -X$IPT -Z#setting default firewall policy$IPT --policy OUTPUT ACCEPT$IPT --policy FORWARD DROP$IPT -P INPUT DROP#setting for loopback interface$IPT -A INPUT -i lo -j ACCEPT$IPT -A OUTPUT -o lo -j ACCEPT#setting access rules#one,ip access rules,allow all the ips of$IPT -A INPUT -s 10.0.10.0/24 -p all -j ACCEPT$IPT -A INPUT -s 10.0.0.0/24 -p all -j ACCEPT |
##下面的是重复的,作为知识点保留,单个服务的配置
1 2 3 4 5 6 7 8 9 10 11 12 13 14 15 16 17 18 19 20 21 22 23 24 25 26 | #second,port access rules#nagios$IPT -A INPUT -s 10.0.10.0/24 -p tcp --dport 5666 -j ACCEPT$IPT -A INPUT -s 10.0.0.0/24 -p tcp --dport 5666 -j ACCEPT#db$IPT -A INPUT -s 10.0.0.0/24 -p tcp --dport 3306 -j ACCEPT$IPT -A INPUT -s 10.0.0.0/24 -p tcp --dport 3307 -j ACCEPT$IPT -A INPUT -s 10.0.10.0/24 -p tcp --dport 3306 -j ACCEPT$IPT -A INPUT -s 10.0.10.0/24 -p tcp --dport 3307 -j ACCEPT#ssh difference from other servers here.>>$IPT -A INPUT -s 10.0.0.0/24 -p tcp --dport 52113 -j ACCEPT$IPT -A INPUT -s 10.0.10.0/24 -p tcp --dport 52113 -j ACCEPT$IPT -A INPUT -p tcp --dport 22 -j ACCEPT#http$IPT -A INPUT -p tcp --dport 80 -j ACCEPT#snmp$IPT -A INPUT -s 10.0.0.0/24 -p UDP --dport 161 -j ACCEPT$IPT -A INPUT -s 10.0.10.0/24 -p UDP --dport 161 -j ACCEPT#rsync$IPT -A INPUT -s 10.0.0.0/24 -p tcp -m tcp --dport 873 -j ACCEPT$IPT -A INPUT -s 10.0.10.0/24 -p tcp -m tcp --dport 873 -j ACCEPT#icmp#$IPT -A INPUT -p icmp -m icmp --icmp-type any -j ACCEPT#others RELATED$IPT -A INPUT -m state --state ESTABLISHED,RELATED -j ACCEPT$IPT -A OUTPUT -m state --state ESTABLISHED,RELATED -j ACCEPT |
企业案例:写一个脚本解决DOS攻击生产案例
提示:根据web日志或者或者网络连接数,监控当某个IP并发连接数或者短时内PV达到100,即调用防火墙命令封掉对应的IP,监控频率每隔3分钟。防火墙命令为:iptables -I INPUT -s 10.0.1.10 -j DROP
本脚本使用测试文件进行编写
1 2 3 4 5 6 7 8 9 10 11 12 13 14 15 16 17 18 19 20 21 22 23 24 25 26 27 28 29 30 31 32 33 34 35 36 37 38 39 40 41 42 43 44 45 46 47 48 49 50 51 52 53 54 55 56 | [root@db02 scripts]# cat test_6.sh#!/bin/sh#[ -f /etc/init.d/functions ] && . /etc/init.d/functionsIP_file="/server/scripts/ddos.txt"IP_filter_command="iptables -I INPUT -j DROP -s"IP_recover_command="iptables -D INPUT -j DROP -s"function IP_check(){grep "EST" ${IP_file}|awk -F "[ |:]+" '{print $6}'|sort |uniq -c|sort -rn -k1 > /server/scripts/ip.txt}function IP_filter(){exec < /server/scripts/ip.txtwhile read linedoIP_count=`echo $line|awk '{print $1}'`IP=`echo $line|awk '{print $2}'`IP_fil=`iptables -L -n|grep "\b${IP}\b"|wc -l`if [ ${IP_count} -gt 25 -a ${IP_fil} -eq 0 ];then${IP_filter_command} ${IP}echo "${IP}" >> /server/scripts/ip_filtered.txtaction "Filter ${IP}" /bin/truefidone}function IP_recover(){exec < /server/scripts/ip.txtwhile read linedoIP_count=`echo $line|awk '{print $1}'`IP=`echo $line|awk '{print $2}'`IP_fil=`iptables -L -n|grep "\b${IP}\b"|wc -l`if [ ${IP_count} -le 25 -a ${IP_fil} -eq 1 ];then${IP_recover_command} ${IP}echo "${IP}" >> /server/scripts/ip_filtered.txtaction "Recover ${IP}" /bin/truefidone}function main(){case "$1" infilter)IP_checkecho "$(date +%F-%H:%M:%S) filtered by $(whoami)" >> /server/scripts/ip_filtered.txtIP_filter;;recover)IP_checkecho "$(date +%F-%H:%M:%S) recovered by $(whoami)" >> /server/scripts/ip_filtered.txtIP_recover;;*)echo "USAGE:$0 {filter|recover}"exit 1esac}main $* |
生产环境iptables脚本讲解
技巧:具备外网IP的服务器不对外的服务最好要做源地址限制。对外提供的服务,不能做源地址限制,例如:80 端口
问题:企业硬件防火墙和IPTABLES防火墙是否要同时用。
解决:可以同时使用企业硬件防火墙一般放在网关位置,相当于大厦的保安,但是楼里的每个屋子还是需要有人锁门的iptables
问题: IDC机房部署了硬件防火墙,我们的服务器可以不开防火墙吗?
解答:绝对不可以,大厦有了保安,你的办公室门就不锁了吗?
NAT表设置
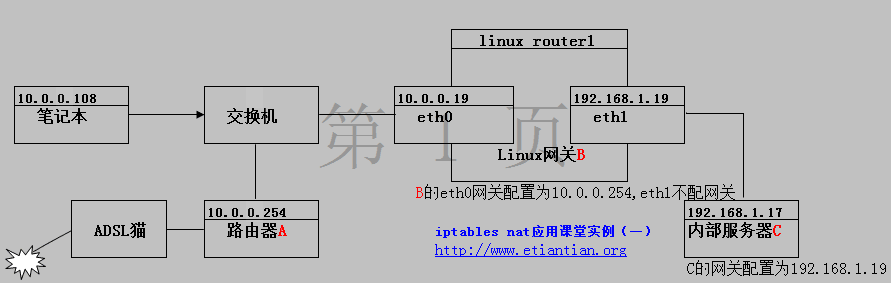
共享上网设置
linux网关B:
局域网共享的两条命令方法:
方法1:适合于有固定外网地址的:
1 | iptables -t nat -A POSTROUTING -s 192.168.1.0/24 -o eth0 -j SNAT --to-source 10.0.0.7 |
(1)-s192.168.1.0/24 办公室或IDC内网网段。
(2)-oeth0 为网关的外网卡接口。
(3)-jSNAT --to-source 10.0.0.7 是网关外网卡IP地址。
方法2:适合变化外网地址(ADSL):
1 | iptables -t nat -A POSTROUTING -s 192.168.1.0/24 -j MASQUERADE ç伪装。 |
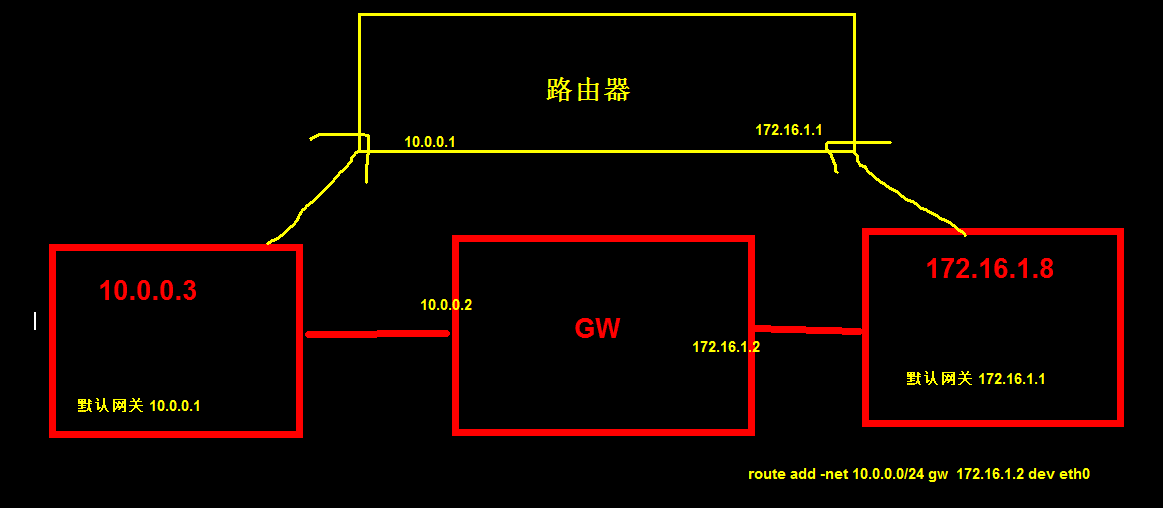
配置如下
第一步:外网服务器配置
1 2 | [root@lb01 ~]# iptables -t nat -A POSTROUTING -s 172.16.1.0/24 -j SNAT --to-source 10.0.0.5[root@lb01 ~]# iptables -t nat -L -n |
开启内核转发
1 2 | net.ipv4.ip_forward = 1vim /etc/sysctl.conf |
sysctl -p 生效
需要上网服务器设置
添加路由
1 | route add default gw 172.16.1.5 |
#此处写提供外网的IP地址
1 | vim /etc/resolv.conf |
添加 nameserver 223.5.5.5 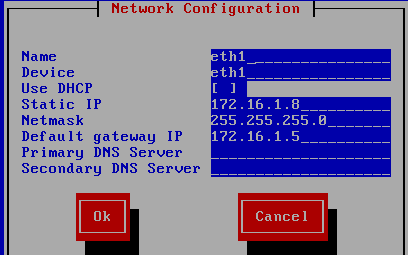
route -n 检查
案例2:实现把访问10.0.0.5:80的请求转到172.16.1.8:80
1 2 | [root@web02 ~]# iptables -t nat -A PREROUTING -d 10.0.0.5 -p tcp --dport 80 -j DNAT --to-destination 172.16.1.8:80[root@web02 ~]# iptables -P FORWARD DROP |

iptables常用企业案例:
1、Linux主机防火墙(表:FILTER 控制链:INPUT)
2、局域网机器共享上网(表:NAT 控制链:POSTROUTING)
1 | iptables -t nat -A POSTROUTING -s 192.168.1.0/24 -o eth0 -j SNAT --to-source 10.0.0.7 |
3、外部地址和端口,映射为内部地址和端口(表:NAT 控制的链:PREROUTING)
1 | iptables -t nat -A PREROUTING -d 10.0.0.7 -p tcp --dport 80 -j DNAT --to-destination 192.168.1.8:9000 |
企业案例:实现外部IP 124.42.34.112 一对一映射到内部server 10.0.0.8
网关Ip:eth0:124.42.60.109 eth1:10.0.0.254
首先在路由网关上绑定VIP 124.42.34.112,可以是别名或辅助IP的方式。
1 2 3 | -A POSTROUTING -s 10.0.0.0/255.255.240.0 -d 124.42.34.112 -j SNAT --to-source 10.0.0.254-A PREROUTING -d 124.42.34.112 -j DNAT --to-destination 10.0.0.8-A POSTROUTING -s 10.0.0.8 -o eth0 -j SNAT --to-source 124.42.34.112 |
相关文章
(1)生产环境大于254台机器网段划分及路由解决方案详解01
(2) linux route命令深入浅出与实战案例精讲[1]
(3) linux route命令深入浅出与实战案例精讲[2]
iptables 生产应用场景
1)局域网共享上网(适合做企业内部局域网上网网关,以及IDC机房内网的上网网关[nat POSTROUTING])
2)服务器防火墙功能(适合IDC机房具有外网IP的服务器)(主要是filter INPUT的控制)
3)把外部IP及端口映射到局域网内部(可以一对一IP映射,也可以针对某一个端口映射)也可能是IDC把网站的外网VIP及网站端口映射到负载均衡器上(硬件防火墙)。(nat PREROUTING)
4)办公路由器+网关功能(zebra路由+iptables过滤及NAT+squid正向透明代理)80+ntop/iftop/iptraf流量查看+tc/cbq流量控制限速
5)邮件的网关
iptables防火墙的应用
1)主机防火墙
2)网关的应用(IP映射,端口映射)
3)过滤信息,监控限制流量及员工上网行为(squid(正向代理缓存加过滤)+ntop(图形流量监控)+通常(流量限制)+iptraf/iftop(流量查看))
如果IPTABLES的服务器升级内核可以实现类似squid的过滤功能
4)网关装杀毒软件监听9999端口,(网关杀毒)
1 | iptables -A PREROUTING -i eth0 -d 211.167.253.109 -p tcp -m tcp --dport 25 -j DNAT --to-destination 192.168.10.6:9025 |
5)结合zebra配置企业级路由器
映射多个外网IP上网
1 2 3 | iptables -t nat -A POSTROUTING -s 10.0.0.1/255.255.255.0 -o eth0 -j SNAT --to-source 124.42.60.11-124.42.60.16iptables -t nat -A POSTROUTING -s 172.16.1.0/255.255.255.0 -o eth0 -j SNAT --to-source 124.42.60.103-124.42.60.106#iptables -t nat -A postrouting -S 192.168.1.0/22 -o eth0 -j SNAT --to-source 10.0.0.241-10.0.0.249 |
问题:
1、2000人被封
2、可用65535端口资源有限
企业案例: ip_conntrack: table full, dropping packet.的错误提示
以下是我的生产环境的某个服务器的配置:
1 2 3 4 5 6 7 8 9 10 11 | net.ipv4.tcp_fin_timeout = 2net.ipv4.tcp_tw_reuse = 1net.ipv4.tcp_tw_recycle = 1net.ipv4.tcp_syncookies = 1net.ipv4.tcp_keepalive_time = 600net.ipv4.ip_local_port_range = 4000 65000net.ipv4.tcp_max_syn_backlog = 16384net.ipv4.tcp_max_tw_buckets = 36000net.ipv4.route.gc_timeout = 100net.ipv4.tcp_syn_retries = 1net.ipv4.tcp_synack_retries = 1 |
#5、dmesg里面显示ip_conntrack: table full, dropping packet.的错误提示.如何解决。
#以下参数是对iptables防火墙的优化,防火墙不开会提示,可以忽略不理。
1 2 3 4 5 6 7 8 9 10 11 12 13 14 15 16 17 | c58: net.ipv4.ip_conntrack_max = 25000000net.ipv4.netfilter.ip_conntrack_max=25000000net.ipv4.netfilter.ip_conntrack_tcp_timeout_established=180net.ipv4.netfilter.ip_conntrack_tcp_timeout_time_wait=120net.ipv4.netfilter.ip_conntrack_tcp_timeout_close_wait=60net.ipv4.netfilter.ip_conntrack_tcp_timeout_fin_wait=120################################################################ C64: net.nf_conntrack_max = 25000000net.netfilter.nf_conntrack_max = 25000000net.netfilter.nf_conntrack_tcp_timeout_established = 180net.netfilter.nf_conntrack_tcp_timeout_time_wait = 120net.netfilter.nf_conntrack_tcp_timeout_close_wait = 60net.netfilter.nf_conntrack_tcp_timeout_fin_wait = 120 |
调整内核参数/etc/sysctl.conf后,需执行/sbin/sysctl -p使得修改生效。
强调:如果并发比较大,或者日PV多的情况下,开启防火墙要注意,很可能导致网站访问缓慢
大并发(并发1万,PV日3000万)要么购买硬件防火墙,要么不开iptables防火墙
iptables 参数简介
-n数字-L列表-F清除所有规则,不会处理默认规则-X删除用户自定义的链-Z链的计数器清零-A添加规则到指定链的结尾,最后一条-I添加规则到指定链的开头,第一条-t指定表,也可以不指定默认是filter-p指定协议(all.tcp,udp.icmp)默认all-P设置默认规则-s指定源地址-d目的地址--dport指定端口-j处理的行为ACCPET接收、DROP丢弃、REJECT拒绝-iinput 匹配进入的网卡接口-ooutput 匹配出去的网卡接口-mstate --state 匹配网络状态-mlimit --limitn/{second/minute/hour}限制限定时间包的允许通过数量及并发数


【推荐】国内首个AI IDE,深度理解中文开发场景,立即下载体验Trae
【推荐】编程新体验,更懂你的AI,立即体验豆包MarsCode编程助手
【推荐】抖音旗下AI助手豆包,你的智能百科全书,全免费不限次数
【推荐】轻量又高性能的 SSH 工具 IShell:AI 加持,快人一步
· 10年+ .NET Coder 心语,封装的思维:从隐藏、稳定开始理解其本质意义
· .NET Core 中如何实现缓存的预热?
· 从 HTTP 原因短语缺失研究 HTTP/2 和 HTTP/3 的设计差异
· AI与.NET技术实操系列:向量存储与相似性搜索在 .NET 中的实现
· 基于Microsoft.Extensions.AI核心库实现RAG应用
· TypeScript + Deepseek 打造卜卦网站:技术与玄学的结合
· 阿里巴巴 QwQ-32B真的超越了 DeepSeek R-1吗?
· 【译】Visual Studio 中新的强大生产力特性
· 10年+ .NET Coder 心语 ── 封装的思维:从隐藏、稳定开始理解其本质意义
· 【设计模式】告别冗长if-else语句:使用策略模式优化代码结构