
spring注入:xml配置和注解。
一:xml配置
1,新建maven项目HelloSpring
2, pom.xml引入jar包
<project xmlns="http://maven.apache.org/POM/4.0.0" xmlns:xsi="http://www.w3.org/2001/XMLSchema-instance"
    xsi:schemaLocation="http://maven.apache.org/POM/4.0.0 http://maven.apache.org/xsd/maven-4.0.0.xsd">
    <modelVersion>4.0.0</modelVersion>
    <groupId>com.aluo</groupId>
    <artifactId>HelloSpring</artifactId>
    <version>0.0.1-SNAPSHOT</version>
    <build />
    <dependencies>

        <!-- Spring Core -->
        <!-- http://mvnrepository.com/artifact/org.springframework/spring-core -->
        <dependency>
            <groupId>org.springframework</groupId>
            <artifactId>spring-core</artifactId>
            <version>4.1.4.RELEASE</version>
        </dependency>

        <!-- Spring Context -->
        <!-- http://mvnrepository.com/artifact/org.springframework/spring-context -->
        <dependency>
            <groupId>org.springframework</groupId>
            <artifactId>spring-context</artifactId>
            <version>4.1.4.RELEASE</version>
        </dependency>

    </dependencies>
</project>
3,创建接口Hello
package com.aluo.spring.hello;

public interface Hello {
  void sayHello();
}
4,创建HelloService
package com.aluo.spring.hello;

import org.springframework.beans.factory.annotation.Autowired;
import org.springframework.stereotype.Component;

public class HelloService {
    private Hello hello;

    public Hello getHello() {
        return hello;
    }

    public void setHello(Hello hello) {
        this.hello = hello;
    }

}
5,创建HelloImp
package com.aluo.spring.hello;

import org.springframework.stereotype.Component;

public class HelloImp implements Hello {

    public void sayHello() {
        System.out.println("hello world");
    }

}
6,beans.xml,路径:/HelloSpring/src/main/resources/beans.xml
<beans xmlns="http://www.springframework.org/schema/beans"
    xmlns:xsi="http://www.w3.org/2001/XMLSchema-instance" xmlns:context="http://www.springframework.org/schema/context"
    xsi:schemaLocation="http://www.springframework.org/schema/beans
                        http://www.springframework.org/schema/beans/spring-beans.xsd
                        http://www.springframework.org/schema/context
    http://www.springframework.org/schema/context/spring-context.xsd">
    <!-- xml配置 -->
    <bean id="helloImp" class="com.aluo.spring.hello.HelloImp"></bean>
        <bean id="HelloService" class="com.aluo.spring.hello.HelloService"> <property
        name="hello" ref="helloImp" /> </bean>
    <!-- <context:annotation-config/> 注解注入 -->
    <!-- <context:component-scan base-package="com.aluo" /> -->
</beans>
7,测试类MainApp
package com.aluo.spring;

import org.springframework.context.ApplicationContext;
import org.springframework.context.support.ClassPathXmlApplicationContext;

import com.aluo.spring.hello.Hello;
import com.aluo.spring.hello.HelloService;

public class MainApp {
    public static void main(String[] args) {
        ApplicationContext context = new ClassPathXmlApplicationContext("beans.xml");

        HelloService service = (HelloService) context.getBean("HelloService");

        Hello hw = service.getHello();

        hw.sayHello();
    }

}
结构如图:
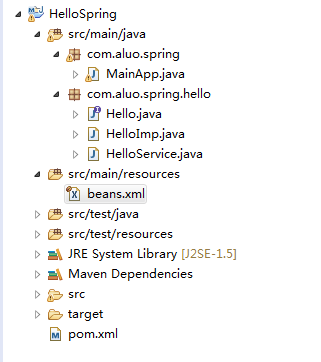
运行,output: hello world
aop:
1,添加HelloAop
package com.aluo.spring.hello;
public class HelloAop {
   public void before(){
       System.out.println("before hello");
   }

   public void after(){
       System.out.println("after hello");
   }
}
2,bean,xml
<beans xmlns="http://www.springframework.org/schema/beans"
    xmlns:xsi="http://www.w3.org/2001/XMLSchema-instance" xmlns:aop="http://www.springframework.org/schema/aop"
    xsi:schemaLocation="http://www.springframework.org/schema/beans
                        http://www.springframework.org/schema/beans/spring-beans.xsd
                         http://www.springframework.org/schema/aop
       http://www.springframework.org/schema/aop/spring-aop.xsd">
    <!-- xml配置 -->
    <bean id="helloImp" class="com.aluo.spring.hello.HelloImp"></bean>
    <bean id="HelloService" class="com.aluo.spring.hello.HelloService">
        <property name="hello" ref="helloImp" />
    </bean>
    <bean id="helloAop" class="com.yiibai.tutorial.spring.helloworld.HelloAop">
    </bean>
    <!--配置切入点 -->
    <aop:config>
        <aop:pointcut id="pointcut"
            expression="execution(public * *..Hello.sayHello(..))" />
<!-- 另一種表達:expression="execution(* com.aluo.spring.hello.Hello.*(..))" /> -->
       <aop:aspect ref="helloAop">
            <aop:before method="before" pointcut-ref="pointcut" />
            <aop:after method="after" pointcut-ref="pointcut" />
        </aop:aspect>
    </aop:config>
</beans>
3,需加入xml配置信息,pom.xml加入:
<dependency>
            <groupId>org.springframework</groupId>
            <artifactId>spring-aop</artifactId>
            <version>4.1.4.Release</version>
        </dependency>
        <dependency>
            <groupId> org.aspectj</groupId>
            <artifactId> aspectjweaver</artifactId>
            <version> 1.8.7</version>
        </dependency>
運行:before hello
hello world
after hello
另:aop参考这篇http://www.cnblogs.com/xrq730/p/4919025.html,写的不错
二:注解注入:
引用上面的例子,进行修改。
1、修改beans.xml,注解加入以下代码来扫描包
<context:component-scan base-package="com.aluo" />
还要再加入:
xmlns:context="http://www.springframework.org/schema/context"
在xsi加入:
http://www.springframework.org/schema/context/spring-context.xsd
修改后beans.xml如下:
<beans xmlns="http://www.springframework.org/schema/beans"
    xmlns:xsi="http://www.w3.org/2001/XMLSchema-instance" xmlns:context="http://www.springframework.org/schema/context"
    xsi:schemaLocation="http://www.springframework.org/schema/beans
                        http://www.springframework.org/schema/beans/spring-beans.xsd
                        http://www.springframework.org/schema/context
    http://www.springframework.org/schema/context/spring-context.xsd">
    <!-- xml配置 -->
    <!-- <bean id="helloImp" class="com.aluo.spring.hello.HelloImp"></bean>
        <bean id="HelloService" class="com.aluo.spring.hello.HelloService"> <property
        name="hello" ref="helloImp" /> </bean> -->
    <!-- <context:annotation-config/> 注解注入 -->
    <context:component-scan base-package="com.aluo" />
</beans>
2,HelloService加上注解
package com.aluo.spring.hello;

import org.springframework.beans.factory.annotation.Autowired;
import org.springframework.stereotype.Component;

@Component
public class HelloService {
     @Autowired
    private Hello hello;

    public Hello getHello() {
        return hello;
    }

    public void setHello(Hello hello) {
        this.hello = hello;
    }

}
3,HelloImp加上注解
package com.aluo.spring.hello;

import org.springframework.stereotype.Component;
@Component
public class HelloImp implements Hello {

    public void sayHello() {
        System.out.println("hello world");
    }

}
4,MainApp
package com.aluo.spring;

import org.springframework.context.ApplicationContext;
import org.springframework.context.support.ClassPathXmlApplicationContext;

import com.aluo.spring.hello.Hello;
import com.aluo.spring.hello.HelloService;

public class MainApp {
    public static void main(String[] args) {
        ApplicationContext context = new ClassPathXmlApplicationContext("beans.xml");

        HelloService service = (HelloService) context.getBean(HelloService.class);

        Hello hw = service.getHello();

        hw.sayHello();
    }

}
运行,output: hello world

 浙公网安备 33010602011771号