spring cloud项目08:Consul初体验
Ubuntu 18.04.1 LTS
Consul v1.10.2
JAVA 8
Spring Boot 2.5.3(Spring Cloud 2020.0.3)
Chrome浏览器
---
1、Consul官网:
https://www.consul.io/
2、Github地址:
https://github.com/hashicorp/consul
consul n. 领事;
目录
3、Spring Cloud使用Consul做服务注册和发现
Consul是HashiCorp公司开发的一款软件,Go语言 编写,提供了分布式系统的服务注册和发现、配置等功能。
提供了一种完整的服务网格( Service Mesh)解决方案(服务网格 尚未玩过,copy from 参考文档1)。
和Spring Cloud结合,可以用来做 1)服务注册和发现,2)中心化配置(简版)。
本文介绍 Consul的安装和开发模式使用、服务注册和发现。
下面的页面有一些Linux系统的Consul安装命令:来自博客园
https://www.consul.io/downloads
Ubuntu的安装命令:
curl -fsSL https://apt.releases.hashicorp.com/gpg | sudo apt-key add -
sudo apt-add-repository "deb [arch=amd64] https://apt.releases.hashicorp.com $(lsb_release -cs) main"
sudo apt-get update && sudo apt-get install consul
逐个执行上面的命令皆可在Ubuntu上安装好Consul。
安装Consul过程
ben@ben-VirtualBox:~$ curl -fsSL https://apt.releases.hashicorp.com/gpg | sudo apt-key add -
[sudo] password for ben:
OK
ben@ben-VirtualBox:~$
ben@ben-VirtualBox:~$ sudo apt-add-repository "deb [arch=amd64] https://apt.releases.hashicorp.com $(lsb_release -cs) main"
Hit:1 http://cn.archive.ubuntu.com/ubuntu bionic InRelease
Ign:2 https://repo.clickhouse.tech/deb/stable main/ InRelease
Get:3 https://repo.clickhouse.tech/deb/stable main/ Release [749 B]
Get:4 https://repo.clickhouse.tech/deb/stable main/ Release.gpg [836 B]
Get:5 https://repo.clickhouse.tech/deb/stable main/ Packages [207 kB]
Get:6 https://apt.releases.hashicorp.com bionic InRelease [4,421 B]
Get:7 https://apt.releases.hashicorp.com bionic/main amd64 Packages [31.9 kB]
Ign:8 https://repo.mongodb.org/apt/ubuntu bionic/mongodb-org/5.0 InRelease
Get:9 https://repo.mongodb.org/apt/ubuntu bionic/mongodb-org/5.0 Release [5,380 B]
Get:10 https://repo.mongodb.org/apt/ubuntu bionic/mongodb-org/5.0 Release.gpg [801 B]
Get:11 https://repo.mongodb.org/apt/ubuntu bionic/mongodb-org/5.0/multiverse amd64 Packages [7,847 B]
Get:12 https://repo.mongodb.org/apt/ubuntu bionic/mongodb-org/5.0/multiverse arm64 Packages [7,366 B]
Fetched 266 kB in 14s (18.8 kB/s)
Reading package lists... Done
ben@ben-VirtualBox:~$
ben@ben-VirtualBox:~$ sudo apt-get update && sudo apt-get install consul
Hit:1 http://cn.archive.ubuntu.com/ubuntu bionic InRelease
Ign:2 https://repo.mongodb.org/apt/ubuntu bionic/mongodb-org/5.0 InRelease
Hit:3 https://repo.mongodb.org/apt/ubuntu bionic/mongodb-org/5.0 Release
Hit:5 https://apt.releases.hashicorp.com bionic InRelease
Ign:6 https://repo.clickhouse.tech/deb/stable main/ InRelease
Hit:7 https://repo.clickhouse.tech/deb/stable main/ Release
Reading package lists... Done
Reading package lists... Done
Building dependency tree
Reading state information... Done
The following NEW packages will be installed:
  consul
0 upgraded, 1 newly installed, 0 to remove and 3 not upgraded.
Need to get 38.1 MB of archives.
After this operation, 105 MB of additional disk space will be used.
Get:1 https://apt.releases.hashicorp.com bionic/main amd64 consul amd64 1.10.2 [38.1 MB]
Fetched 38.1 MB in 46s (827 kB/s)
Selecting previously unselected package consul.
(Reading database ... 127955 files and directories currently installed.)
Preparing to unpack .../consul_1.10.2_amd64.deb ...
Unpacking consul (1.10.2) ...
Setting up consul (1.10.2) ...
ben@ben-VirtualBox:~$
安装好之后,可以使用consul命令。
初次使用consul命令
ben@ben-VirtualBox:~$ consul
Usage: consul [--version] [--help] <command> [<args>]

Available commands are:
    acl            Interact with Consul's ACLs
    agent          Runs a Consul agent
    catalog        Interact with the catalog
    config         Interact with Consul's Centralized Configurations
    connect        Interact with Consul Connect
    debug          Records a debugging archive for operators
    event          Fire a new event
    exec           Executes a command on Consul nodes
    force-leave    Forces a member of the cluster to enter the "left" state
    info           Provides debugging information for operators.
    intention      Interact with Connect service intentions
    join           Tell Consul agent to join cluster
    keygen         Generates a new encryption key
    keyring        Manages gossip layer encryption keys
    kv             Interact with the key-value store
    leave          Gracefully leaves the Consul cluster and shuts down
    lock           Execute a command holding a lock
    login          Login to Consul using an auth method
    logout         Destroy a Consul token created with login
    maint          Controls node or service maintenance mode
    members        Lists the members of a Consul cluster
    monitor        Stream logs from a Consul agent
    operator       Provides cluster-level tools for Consul operators
    reload         Triggers the agent to reload configuration files
    rtt            Estimates network round trip time between nodes
    services       Interact with services
    snapshot       Saves, restores and inspects snapshots of Consul server state
    tls            Builtin helpers for creating CAs and certificates
    validate       Validate config files/directories
    version        Prints the Consul version
    watch          Watch for changes in Consul

ben@ben-VirtualBox:~$
ben@ben-VirtualBox:~$ consul version
Consul v1.10.2
Revision 3cb6eeedb
Protocol 2 spoken by default, understands 2 to 3 (agent will automatically use protocol >2 when speaking to compatible agents)

ben@ben-VirtualBox:~$
执行 consul --help <command> 可以查看命令的帮助信息:来自博客园
ben@ben-VirtualBox:~$ consul --help agent
Usage: consul agent [options]

  Starts the Consul agent and runs until an interrupt is received. The
  agent represents a single node in a cluster.

HTTP API Options

  -datacenter=<value>
     Datacenter of the agent.

Command Options

  -advertise=<value>
     Sets the advertise address to use.

  -advertise-wan=<value>
     Sets address to advertise on WAN instead of -advertise address.

  -allow-write-http-from=<value>
     Only allow write endpoint calls from given network. CIDR format,
     can be specified multiple times.
---省略若干行---
现在,运行consul——开发模式:
ben@ben-VirtualBox:~$ consul agent -dev
==> Starting Consul agent...
           Version: '1.10.2'
           Node ID: '2122ee41-2e36-0436-3492-5e7f6a4804b4'
         Node name: 'ben-VirtualBox'
        Datacenter: 'dc1' (Segment: '<all>')
            Server: true (Bootstrap: false)
       Client Addr: [127.0.0.1] (HTTP: 8500, HTTPS: -1, gRPC: 8502, DNS: 8600)
      Cluster Addr: 127.0.0.1 (LAN: 8301, WAN: 8302)
           Encrypt: Gossip: false, TLS-Outgoing: false, TLS-Incoming: false, Auto-Encrypt-TLS: false

==> Log data will now stream in as it occurs:

2021-09-27T20:34:25.476+0800 [INFO]  agent.server.raft: initial configuration: index=1 servers="[{Suffrage:Voter ID:2122ee41-2e36-0436-3492-5e7f6a4804b4 Address:127.0.0.1:8300}]"
2021-09-27T20:34:25.479+0800 [INFO]  agent...
---省略若干行---
启动成功。
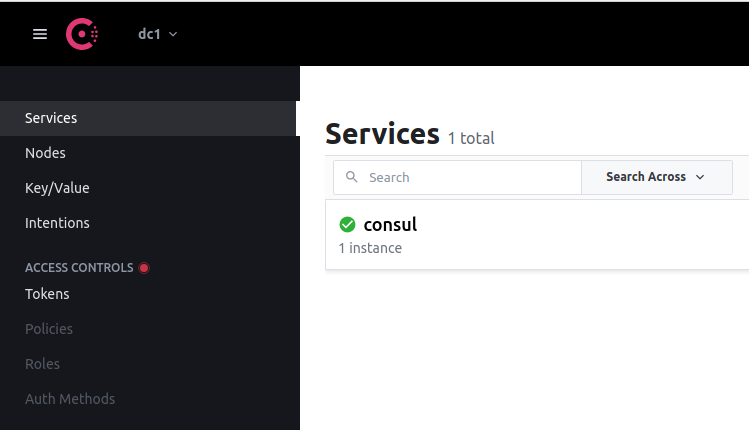
不过,此时只能本机访问——浏览器打开 localhost:8500,会跳转到 /ui/dc1/services。

注,使用Firefox打不开页面,后来在Ubuntu安装Chrome才成功 自动跳转到了 /ui/dc1/services。
上面提到了 “只能本机访问”。关闭consul,使用下面的命令启动即可允许其它主机(我的Windows 10)访问:-client选项
此时,Client Addr中的IP地址变为了 192.168.0.110,其它主机就可以使用 192.168.0.110:8500 访问consul了。
# 192.168.0.110 是 Ubuntu主机的网卡IP地址
$ consul agent -dev -client=192.168.0.110
==> Starting Consul agent...
           Version: '1.10.2'
           Node ID: 'e0b9a2d8-fd79-8137-5344-37e867ea214c'
         Node name: 'ben-VirtualBox'
        Datacenter: 'dc1' (Segment: '<all>')
            Server: true (Bootstrap: false)
       Client Addr: [192.168.0.110] (HTTP: 8500, HTTPS: -1, gRPC: 8502, DNS: 8600)
      Cluster Addr: 127.0.0.1 (LAN: 8301, WAN: 8302)
           Encrypt: Gossip: false, TLS-Outgoing: false, TLS-Incoming: false, Auto-Encrypt-TLS: false

==> Log data will now stream in as it occurs:

2021-09-27T20:49:53.959+0800 [INFO]  agent.server.raft: initial configuration: index=1 servers="[{Suffrage:Voter ID:e0b9a2d8-fd79-8137-5344-37e867ea214c Address:127.0.0.1:8300}]"
2021-09-27T20:49:53.960+0800 [INFO]  agent.s
---省略若干行---
是否可以把这里的 IP地址配置到 hosts文件中,再通过域名方式来访问consul呢?可以!
# hosts文件
192.168.0.110 mylinux
访问 mylinux:8500:

疑问:
上面启动的consul运行在开发模式,那么,还有什么其它模式呢?怎么运行?线上怎么运行?
集群模式怎么配置?多数据中心怎么配置?
本文不涉及。
代理(Agent)
一直运行在Consul集群中每个节点上的守护进程,通过运行consul agent命令来启动。
客户端(Client)
所有RPC转发到服务端的代理。
服务端(Server)
具有扩展责任的代理,包括参与Raft选举、维护集群状态、想要RPC查询...
数据中心(Data Center)
多个客户端和服务端构成。来自博客园
共识(Consensus)
表示 对当选领导者的协议 以及 交易顺序的协议。
Gossip
Consul建立在 Serf的基础上,提供了一个完整的Gossip协议。(不懂)
LAN Gossip
局域网Gossip
WAN Gossip
广域网Gossip
远程调用(RPC)
一个允许客户端请求服务端的请求-响应机制。
更多内容,可以看看 参考文档1 或 官方文档。
作者的知识盲点:Raft、Serf、Gossip
百度图片 搜索 “consul 架构”,可以看到很多Consul的架构图。
3、Spring Cloud使用Consul做服务注册和发现
consul前面运行起来了,本节使用其服务注册和发现功能。
两个应用(都是Web服务):
data-provider 服务提供者 端口30000
data-consumer 服务消费者 端口30001
都注册到consul,并实现 data-consumer 访问 data-provider提供的服务。
data-provider应用
添加依赖包:
<dependency>
	<groupId>org.springframework.boot</groupId>
	<artifactId>spring-boot-starter-web</artifactId>
</dependency>
<dependency>
	<groupId>org.springframework.cloud</groupId>
	<artifactId>spring-cloud-starter-consul-discovery</artifactId>
</dependency>
修改配置 application.properties:
server.port=30000

spring.application.name=data-provider

#
# consul配置
spring.cloud.consul.host=mylinux
spring.cloud.consul.port=8500注,mylinux配置在hosts中,执行consul服务运行的Ubuntu主机。
添加接口:
	@GetMapping(value="/hello")
	public String hello() {
		return "data-provider now=" + new Date();
	}
启动应用:成功。
访问 localhost:30000/hello 端点:成功。来自博客园
>curl localhost:30000/hello
data-provider now=Mon Sep 27 22:41:33 CST 2021
检查consul的Web界面:
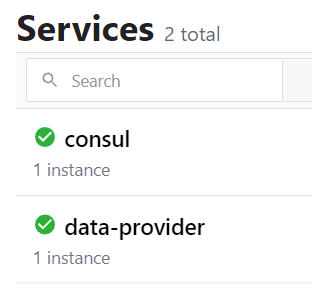
Services下多了一个 data-provider。
不过,前面有一个 红底的×图标,为什么呢?缺少健康检查(heahth check)!

添加 spring-boot-starter-actuator 包依赖:
<dependency>
	<groupId>org.springframework.boot</groupId>
	<artifactId>spring-boot-starter-actuator</artifactId>
</dependency>
启动项目,检查consul的Web控制台:还是 红底的X号!
检查应用启动日志,发现下面的:
o.s.c.c.s.ConsulServiceRegistry          : Registering service with consul:
NewService{id='data-provider-30000', name='data-provider', tags=[], address='DESKTOP-BDNTQQ3',
meta={secure=false}, port=30000, enableTagOverride=null, check=Check{script='null',
dockerContainerID='null', shell='null', interval='10s', ttl='null',
http='http://DESKTOP-BDNTQQ3:30000/actuator/health', method='null', header={}, tcp='null',
timeout='null', deregisterCriticalServiceAfter='null', tlsSkipVerify=null, status='null',
grpc='null', grpcUseTLS=null}, checks=null}
其中有一个URL——http://DESKTOP-BDNTQQ3:30000/actuator/health ,看起来是做 健康检查的。只不过,这个hosts是不存在的,直接使用了主机名。
之前使用Eureka时,有一个prefer-ip-address配置,consul是否也有呢?
果然有!添加配置:
spring.cloud.consul.discovery.prefer-ip-address=true启动日志中,上面的URL 变为:
http://192.168.0.109:30000/actuator/health
检查consul的Web控制台:data-provider终于和consul服务自身一样——正常了。

注,除了使用 actuator的 /actuator/health 端点,也可以自己编写,再使用配置 spring.cloud.consul.discovery.health-check-url 更改。
data-consumer应用
添加依赖包:比 data-provider 多了一个 spring-cloud-starter-openfeign
<dependency>
	<groupId>org.springframework.boot</groupId>
	<artifactId>spring-boot-starter-web</artifactId>
</dependency>
<dependency>
	<groupId>org.springframework.cloud</groupId>
	<artifactId>spring-cloud-starter-consul-discovery</artifactId>
</dependency>
<dependency>
	<groupId>org.springframework.boot</groupId>
	<artifactId>spring-boot-starter-actuator</artifactId>
</dependency>
<dependency>
	<groupId>org.springframework.cloud</groupId>
	<artifactId>spring-cloud-starter-openfeign</artifactId>
</dependency>
添加配置:来自博客园
server.port=30001

spring.application.name=data-consumer

#
# consul配置
spring.cloud.consul.host=mylinux
spring.cloud.consul.port=8500
#spring.cloud.consul.discovery.service-name=data-consumer
spring.cloud.consul.discovery.prefer-ip-address=true
使用FeignClient:@EnableFeignClients + @FeignClient
@SpringBootApplication
// 使能FeignClient
@EnableFeignClients
@RestController
public class DataConsumerApplication {
// 省略
}

# data-provider 服务的Feign
@FeignClient(name = "data-provider")
public interface DataProviderFeign {

	@GetMapping(value="/hello")
	String hello();

}
主类中添加接口:/callHello
@SpringBootApplication
@EnableFeignClients
@RestController
public class DataConsumerApplication {

	@Autowired
	private DataProviderFeign dpfeign;

	public static void main(String[] args) {
		SpringApplication.run(DataConsumerApplication.class, args);
	}

	@GetMapping(value = "/callHello")
	public String callHello() {
		return dpfeign.hello();
	}

}
启动应用:成功。
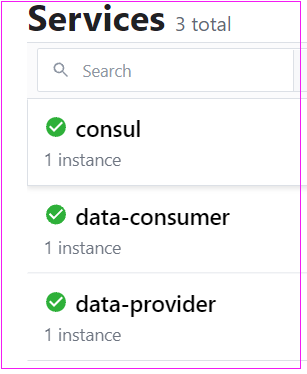
检查consul的Web控制台:多了data-consumer服务

调用/callHello:成功。来自博客园
curl localhost:30001/callHello
data-provider now=Mon Sep 27 23:10:39 CST 2021
搞定。
》》》全文完《《《
一切都很顺利,可是,为何要用Consul取代Eureka呢?
Consul的服务注册和发现 和 Eureka的 有什么区别?优势在哪里?来自博客园
参考文档1 中说到,“目前大部分企业级应用都使用Consul作为服务注册中心”,果真如此?大厂吗?国外吗?
去年(2020年)5、6月时,Consul的公司HashiCorp发了一个声明,说是禁止中国大陆使用他家的软件(https://baijiahao.baidu.com/s?id=1668278485732225429),后来,当然是更改了。
还有什么?Consul做服务配置中心,还有动态刷新配置了。
更多优化配置还没完过呢!
consul集群、多数据中心还没玩过呢!
继续前进...
1、《深入理解Spring Cloud与微服务构建》
书,作者:方志鹏
2、spring cloud eureka和HashiCorp consul对比
作者:云烟img
3、


