
[springmvc]springmvc超详细总结笔记
springMvc
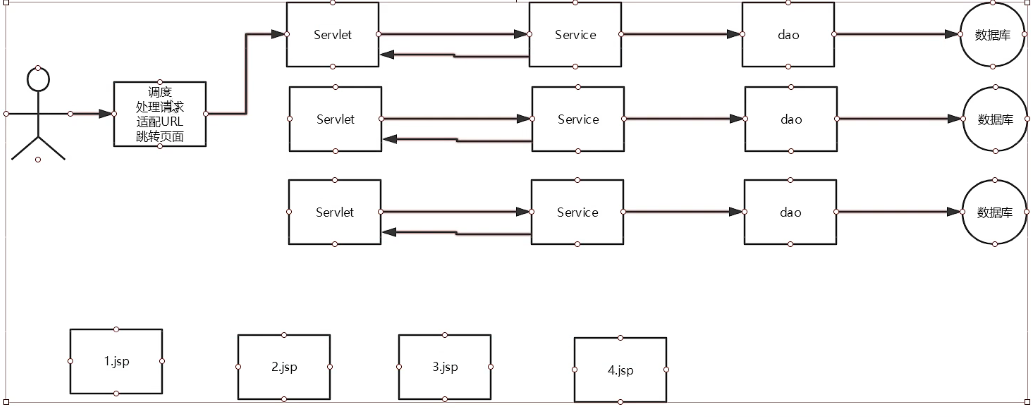
1.回顾mvc
模型
- 模型(dao,service):业务逻辑,保存数据的状态
视图
- 视图(jsp,html……):展示页面
控制器
- 控制(servlet):取得表单数据,调用业务逻辑,转向指定的页面
2.认识springMvc
- 轻量级,简单易学
- 高效,基于请求响应
- 与spring可以无缝结合
- 约定优于配置
- 功能强大:restful风格,数据验证,格式化,本地化
- 简洁灵活
在以前的学习中,我们总是根据不同的需求请求不同的servlet,那么对于用户来说,这一步骤就非常麻烦,要不断的转换请求,为了解决这一问题,在原有的架构基础上面加上一层,专门用来处理这些请求,用户只需要请求 上面的一层即可。它就是DispatcherServlet
实际上这个DispatcherServlet它本身也是一个servlet。
实现原理:


快速搭建一个springmvc项目
方式一 实现类
(1)配置web文件
<?xml version="1.0" encoding="UTF-8"?>
<web-app xmlns="http://xmlns.jcp.org/xml/ns/javaee"
         xmlns:xsi="http://www.w3.org/2001/XMLSchema-instance"
         xsi:schemaLocation="http://xmlns.jcp.org/xml/ns/javaee http://xmlns.jcp.org/xml/ns/javaee/web-app_4_0.xsd"
         version="4.0">

    <!--配置dispatchServlet 这是springmvc的核心 请求分发器,相当于在servlet请求的
       层次加一层分发
       -->
    <servlet>
        <servlet-name>springmvc</servlet-name>
        <servlet-class>org.springframework.web.servlet.DispatcherServlet</servlet-class>
        <!--绑定spring配置文件-->
        <init-param>
            <param-name>contextConfigLocation</param-name>
            <param-value>classpath:springmvc-servlet.xml</param-value>
        </init-param>

        <!--启动级别 服务器启动时启动 -->
        <load-on-startup>1</load-on-startup>

    </servlet>

    <!--
     / 和 /* 的区别在于
     /只会处理dispatchservlet的请求
     /* 会匹配所有的请求还有界面
     -->

    <servlet-mapping>
        <servlet-name>springmvc</servlet-name>
        <url-pattern>/</url-pattern>
    </servlet-mapping>


</web-app>
(2)配置spring核心文件
<?xml version="1.0" encoding="UTF-8"?>
<beans xmlns="http://www.springframework.org/schema/beans"
       xmlns:xsi="http://www.w3.org/2001/XMLSchema-instance"
       xsi:schemaLocation="http://www.springframework.org/schema/beans
      http://www.springframework.org/schema/beans/spring-beans-4.3.xsd">

    <!-- 配置处理器映射 -->
    <bean name="/firstController" class="com.spring.controller.HelloController"/>
    <!-- 处理器映射器 -->
    <bean class="org.springframework.web.servlet.handler.BeanNameUrlHandlerMapping"/>
    <!-- 处理器适配的方法 -->
    <bean class="org.springframework.web.servlet.mvc.SimpleControllerHandlerAdapter"/>
    <!-- 视图解析器 -->
    <bean class="org.springframework.web.servlet.view.InternalResourceViewResolver"/>

    <bean id="viewResolver"    class="org.springframework.web.servlet.view.InternalResourceViewResolver">
            <property name="prefix" value="WEB-INF/jsp/"/>
        <property name="suffix" value=".jsp"/>

    </bean>


    <bean id="/h1" class="com.spring.controller.HelloController"/>
</beans>
(3)调用控制器层跳转
package com.spring.controller;
import org.springframework.web.servlet.ModelAndView;
import org.springframework.web.servlet.mvc.Controller;
import javax.servlet.http.HttpServletRequest;
import javax.servlet.http.HttpServletResponse;
/**
* @author panglili
* @create 2022-07-25-12:01
*/
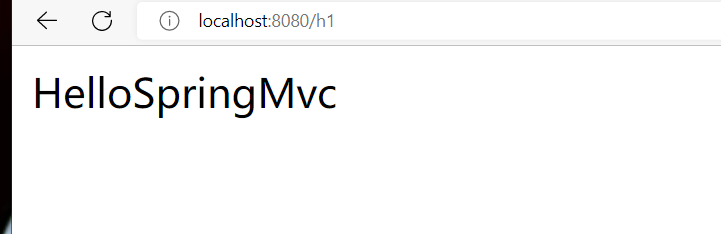
public class HelloController implements Controller {
public ModelAndView handleRequest(HttpServletRequest httpServletRequest, HttpServletResponse httpServletResponse) throws Exception {
ModelAndView view = new ModelAndView();
//业务代码
String result="HelloSpringMvc";
view.addObject("msg",result);
//视图跳转
view.setViewName("WEB-INF/jsp/test.jsp");
return view;
}
}
(4)视图层接受数据传给用户
<%--
  Created by IntelliJ IDEA.
  User: 塔塔
  Date: 2022/7/25
  Time: 13:22
  To change this template use File | Settings | File Templates.
--%>
<%@ page contentType="text/html;charset=UTF-8" language="java" %>
<html>
<head>
    <title>Title</title>
</head>
<body>
${msg}
</body>
</html>
方式二 注解实现
(1)配置web文件
- 跟上面实现类的相同
(2)配置spring文件
<?xml version="1.0" encoding="UTF-8"?>
<beans xmlns="http://www.springframework.org/schema/beans"
       xmlns:xsi="http://www.w3.org/2001/XMLSchema-instance"
       xmlns:context="http://www.springframework.org/schema/context"
       xmlns:mvc="http://www.springframework.org/schema/mvc"
       xsi:schemaLocation="http://www.springframework.org/schema/beans
      http://www.springframework.org/schema/beans/spring-beans-4.3.xsd
      http://www.springframework.org/schema/context
      http://www.springframework.org/schema/context/spring-context-4.3.xsd http://www.springframework.org/schema/mvc https://www.springframework.org/schema/mvc/spring-mvc.xsd">
    <!-- 指定扫描的包 -->
    <context:component-scan base-package="com.spring.controller"/>
    <mvc:default-servlet-handler/>
    <mvc:annotation-driven/>

    <!-- 配置视图解析器 -->
    <bean id="viewResolver"
          class="org.springframework.web.servlet.view.InternalResourceViewResolver">
        <property name="prefix" value="/WEB-INF/jsp/" />
        <property name="suffix" value=".jsp" />
    </bean>
</beans>
(3)控制器类实现界面跳转
package com.spring.controller;

import org.springframework.stereotype.Controller;
import org.springframework.ui.Model;
import org.springframework.web.bind.annotation.RequestMapping;

/**
 * @author panglili
 * @create 2022-07-25-13:15
 */
@Controller
public class hello {

    @RequestMapping("/hello")
    public String hello(Model md){
        md.addAttribute("msg","helloooo");
        return "hello";
    }
}
(4)视图跳转
- 同实现类相同
3.restful风格
RESTFUL是一种网络应用程序的设计风格和开发方式,基于HTTP,可以使用XML格式定义或JSON格式定义。
RESTFUL适用于移动互联网厂商作为业务接口的场景,实现第三方OTT调用移动网络资源的功能,动作类型为新增、变更、删除所调用资源。
实现url的定义
在发起请求的时候可以加上参数
package com.spring.controller;
import org.springframework.stereotype.Controller;
import org.springframework.ui.Model;
import org.springframework.web.bind.annotation.PathVariable;
import org.springframework.web.bind.annotation.RequestMapping;
/**
* @author panglili
* @create 2022-07-25-13:15
*/
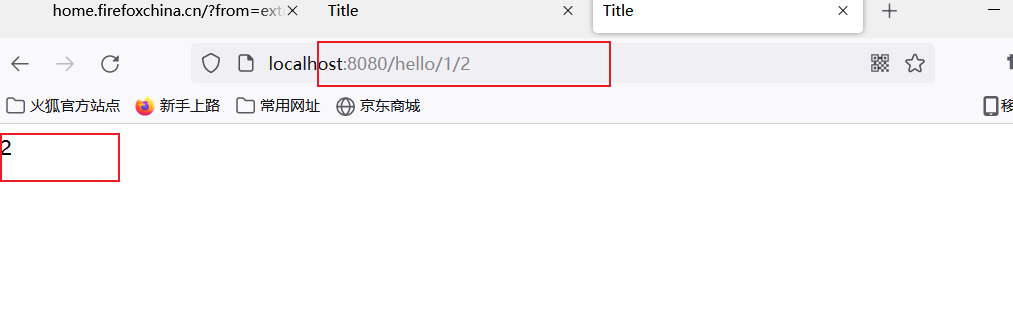
@Controller
public class hello {
@RequestMapping("/hello/{a}/{b}")
public String hello(@PathVariable int a,@PathVariable int b, Model md){
int res=a*b;
md.addAttribute("msg",res);
return "hello";
}
}
restful的优点
- 简洁,高效,安全性更高
也可以通过不同的请求方式实现请求路径的复用。
4.重定向与请求转发
使用servlet的请求转发
@RequestMapping("/servlet")
@ResponseBody
public String test1(HttpServletResponse res, HttpServletRequest req){
    req.setAttribute("msg","helloservlet");
    req.getRequestDispatcher("/hello");
    return "hello";
}
使用servlet的重定向
@RequestMapping("/servlet")
@ResponseBody
public String test1(HttpServletResponse res, HttpServletRequest req) throws IOException {
    req.setAttribute("msg","helloservlet");
    //req.getRequestDispatcher("/hello");
    res.sendRedirect("/hello");
    return "hello";
}
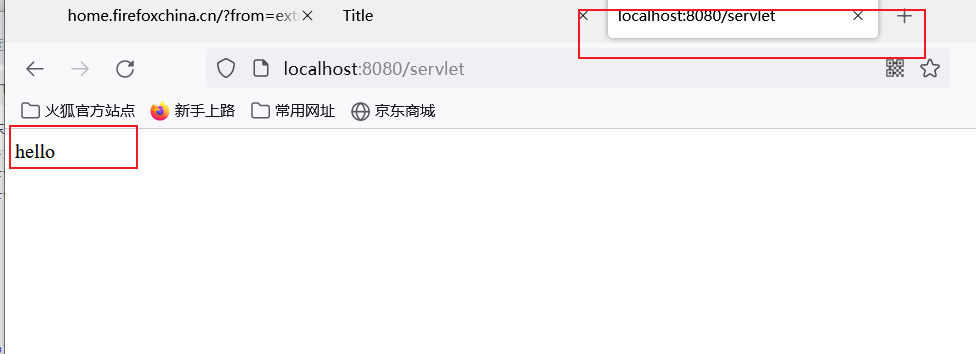
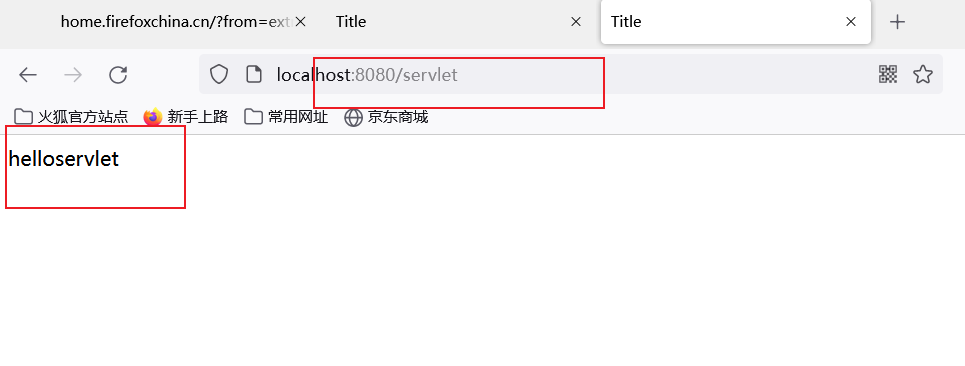
5.使用servlet实现控制器转发请求
在控制器类使用此请求方法,实现与Model方法一样的效果
@RequestMapping("/servlet")
public String test1(HttpServletResponse res, HttpServletRequest req){
    req.setAttribute("msg","helloservlet");

    return "hello";
}
6.接收请求参数以及数据回显
接收普通参数
参数名与前端传递的参数名相同时
前端表单名name=name
<%--
  Created by IntelliJ IDEA.
  User: 塔塔
  Date: 2022/7/25
  Time: 13:07
  To change this template use File | Settings | File Templates.
--%>
<%@ page contentType="text/html;charset=UTF-8" language="java" %>
<html>
  <head>
    <title>$Title$</title>
  </head>
  <body>
  <form action="/hello">
    <p>username:<input type="text" name="name" placeholder="please print name:"></p>
    <p><input type="submit" value="submit"></p>
  </form>
  </body>
</html>
后端收到的参数名String name
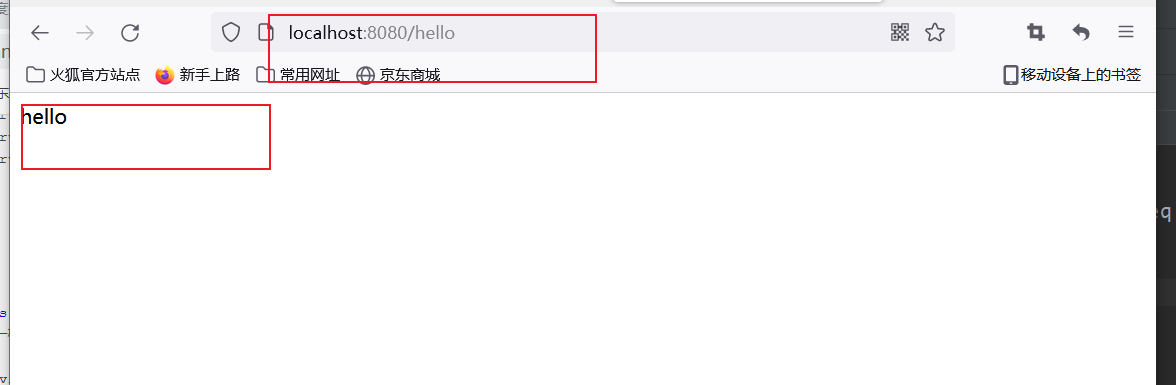
@RequestMapping("/hello")
public String hello(String name, Model md){

    md.addAttribute("msg",name);
    return "hello";
}
因此可以直接将前端的参数拿到
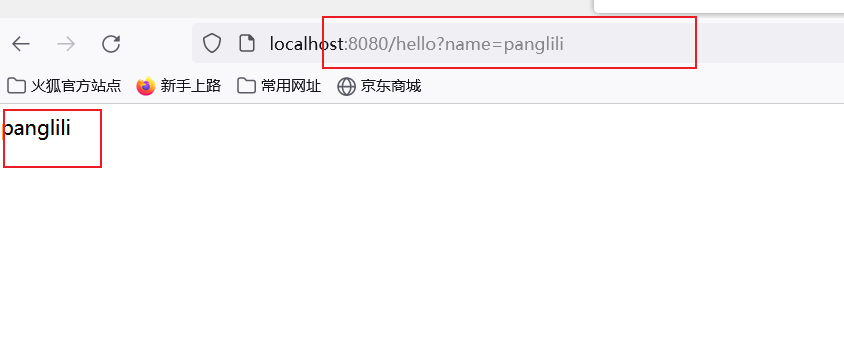
参数名与前端传递的参数名不同时或者有多个参数取一个时
-
名字相同时可以直接取到
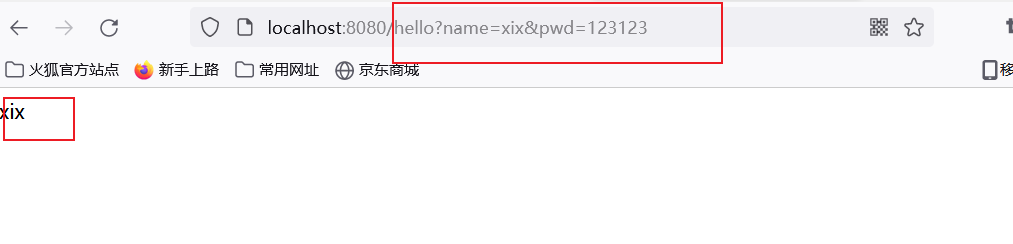
@RequestMapping("/hello") public String hello(String name, Model md){ md.addAttribute("msg",name); return "hello"; }![image-20220725193356255]()
-
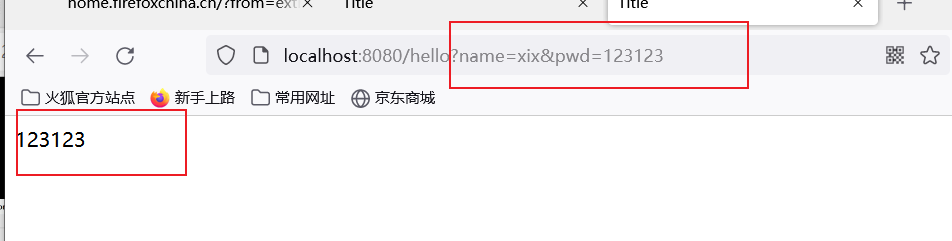
在参数前面加上你要取得前端参数名称,就可以取到指定的数据
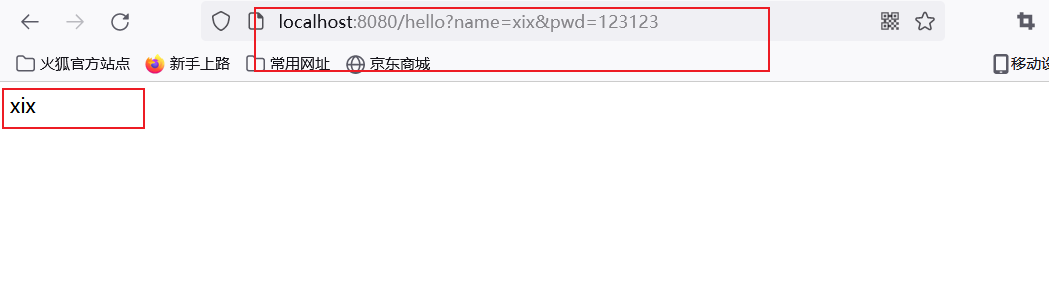
@RequestMapping("/hello")
public String hello(@RequestParam("name") String name, Model md){

    md.addAttribute("msg",name);
    return "hello";
}
@RequestMapping("/hello")
public String hello(@RequestParam("pwd") String name, Model md){

    md.addAttribute("msg",name);
    return "hello";
}
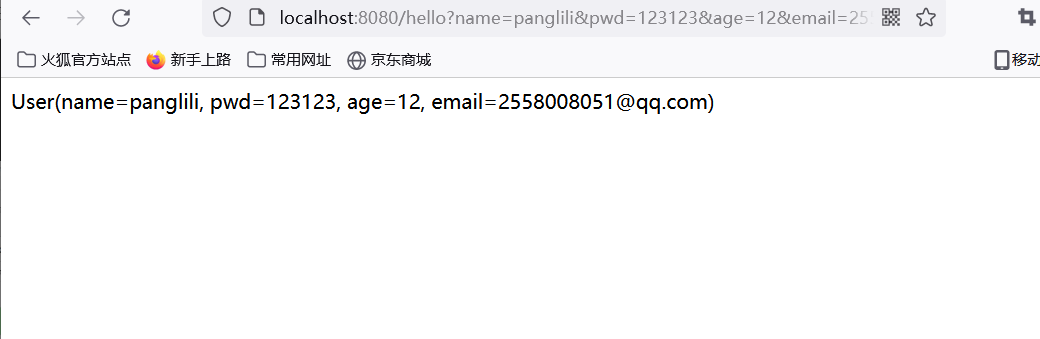
接收对象
前端数据与对象数据名严格匹配,不配时使用@RequestParam,传入的属性不对应时缺少的属性会为空。
对象实体类
package com.spring.pojo;

import lombok.Data;

/**
 * @author panglili
 * @create 2022-07-25-19:45
 */
@Data
public class User {
    private String name;
    private String pwd;
    private int age;
    private String email;
}
前端界面
<%--
  Created by IntelliJ IDEA.
  User: 塔塔
  Date: 2022/7/25
  Time: 13:07
  To change this template use File | Settings | File Templates.
--%>
<%@ page contentType="text/html;charset=UTF-8" language="java" %>
<html>
  <head>
    <title>$Title$</title>
  </head>
  <body>
  <form action="/hello">
    <p>username:<input type="text" name="name" placeholder="please print name:"></p>
    <p>password:<input type="text" name="pwd" placeholder="please print pwd"></p>
    <p>password:<input type="text" name="age" placeholder="please print age"></p>
    <p>password:<input type="text" name="email" placeholder="please print email"></p>
    <p><input type="submit" value="submit"></p>
  </form>
  </body>
</html>
后台接受
@RequestMapping("/hello")
public String hello(User user, Model md){

    md.addAttribute("msg",user);
    return "hello";
}
界面显示
7.乱码问题
在web服务器配置中直接加上下面的过滤处理
<!--配置编码过滤器-->
    <filter>
        <filter-name>encoding</filter-name>
        <filter-class>org.springframework.web.filter.CharacterEncodingFilter</filter-class>
        <!--设置编码格式-->
        <init-param>
            <param-name>encoding</param-name>
            <param-value>utf-8</param-value>
        </init-param>
        <!--设置编码格式的生效范围-->
        <init-param>
            <param-name>forceEncoding</param-name>
            <param-value>true</param-value>
        </init-param>
    </filter>
    <filter-mapping>
        <filter-name>encoding</filter-name>
        <url-pattern>/*</url-pattern>
    </filter-mapping>
8.json
- 前后端分离时代,前后端工程师约定的方便数据交换格式
JSON(JavaScript Object Notation, JS对象简谱)是一种轻量级的数据交换格式。采用完全独立于编程语言的文本格式来存储和表示数据。简洁和清晰的层次结构使得 JSON 成为理想的数据交换语言。 易于人阅读和编写,同时也易于机器解析和生成,并有效地提升网络传输效率。
json转换为js对象
//将json转json
 var obj =JSON.parse(json);
 console.log(obj);
js对象转换为json字符串
 //将js转换为json
var json= JSON.stringify(people);
console.log(json);
<%--
  Created by IntelliJ IDEA.
  User: 塔塔
  Date: 2022/7/25
  Time: 20:16
  To change this template use File | Settings | File Templates.
--%>
<%@ page contentType="text/html;charset=UTF-8" language="java" %>
<html>
<head>
    <title>Title</title>
    <script type="text/javascript">
        var people={
            name:"哔哩哔哩",
            age:100,
            address:"www.bilibili.com"
        };

        //将js转换为json
       var json= JSON.stringify(people);
       console.log(json);

       //将json转json
        var obj =JSON.parse(json);
        console.log(obj);
    </script>
</head>
<body>

</body>
</html>
jackson使用
导包
<dependency>
    <groupId>com.fasterxml.jackson.core</groupId>
    <artifactId>jackson-core</artifactId>
    <version>2.13.3</version>
</dependency>
<dependency>
    <groupId>com.fasterxml.jackson.core</groupId>
    <artifactId>jackson-databind</artifactId>
    <version>2.13.3</version>
</dependency>
Jackson转换java和json数据格式
package com.spring.controller;

import com.fasterxml.jackson.core.JsonProcessingException;
import com.fasterxml.jackson.databind.ObjectMapper;
import com.spring.pojo.User;
import org.springframework.stereotype.Controller;
import org.springframework.web.bind.annotation.PostMapping;
import org.springframework.web.bind.annotation.RequestMapping;
import org.springframework.web.bind.annotation.ResponseBody;

/**
 * @author panglili
 * @create 2022-07-25-20:36
 */
@Controller
public class JsonController {
    //produces = "application/json;charset=utf-8"
    //json提供的数据编码处理
    @ResponseBody
    @RequestMapping(value = "/json",produces = "application/json;charset=utf-8")
    public String json1() throws JsonProcessingException {
        //jsckson 提供的将一个json字符与java对象自动转换的类
        ObjectMapper mapper = new ObjectMapper();

        //创建对象
        User user=new User("小镇",19,"男");
        //交给mapper转换
        String s = mapper.writeValueAsString(user);

        return s;


    }
}
json处理乱码还有一种方式,直接配置在mvc中,不需要每个请求上面都去搞
<mvc:annotation-driven>
   <mvc:message-converters register-defaults="true">
       <bean class="org.springframework.http.converter.StringHttpMessageConverter">
           <constructor-arg value="UTF-8"/>
       </bean>
       <bean class="org.springframework.http.converter.json.MappingJackson2HttpMessageConverter">
           <property name="objectMapper">
               <bean class="org.springframework.http.converter.json.Jackson2ObjectMapperFactoryBean">
                   <property name="failOnEmptyBeans" value="false"/>
               </bean>
           </property>
       </bean>
   </mvc:message-converters>
</mvc:annotation-driven>
fastjson的使用
- Fastjson是一个Java语言编写的JSON处理器,由阿里巴巴公司开发。
导包
<dependency>
    <groupId>com.alibaba</groupId>
    <artifactId>fastjson</artifactId>
    <version>1.2.72</version>
</dependency>
直接调用它提供的JSON对象
@RequestMapping("/j2")
@ResponseBody
public String json(){
    User user=new User("小镇",19,"男");
    String s = JSON.toJSONString(user);
    return s;
}
9.ssm整合框架
此整合没有具体的业务,因为ssm整合最难的点就在于配置文件的整合,因此这里只详细记录配置文件的整合
- spring和dao整合将mybatis的配置文件的数据库连接和sqlsessionfactory的功能
- spring和service整合将业务层的事务和日志利用aop实现
- spring和mvc整合实现视图跳转
总之,spring这个大容器将所有的事情包揽,统一的控制
1.spring和dao
<?xml version="1.0" encoding="UTF-8"?>
<beans xmlns="http://www.springframework.org/schema/beans"
xmlns:xsi="http://www.w3.org/2001/XMLSchema-instance"
xsi:schemaLocation="http://www.springframework.org/schema/beans
https://www.springframework.org/schema/beans/spring-beans.xsd
">
<!--整合mybatis的数据库 -->
<bean id="dataSource" class="org.springframework.jdbc.datasource.DriverManagerDataSource">
<property name="driverClassName" value="com.mysql.jdbc.Driver"/>
<property name="url" value="jdbc:mysql://localhost:3306/shop?useSSL=false&useUnicode=true&characterEncoding=utf-8"/>
<property name="username" value="root"/>
<property name="password" value="123123"/>
</bean>
<!--整合mybatis的SQLSessionFactory -->
<bean id="sqlSessionFactory" class="org.mybatis.spring.SqlSessionFactoryBean">
<property name="dataSource" ref="dataSource"/>
<!--绑定mybatis配置文件 -->
<property name="configLocation" value="classpath:mybatis-config.xml"/>
<property name="mapperLocations" value="classpath:mapper/*.xml"/>
</bean>
<bean id="sqlSession" class="org.mybatis.spring.SqlSessionTemplate">
<!--只能用构造器注入 没有set方法 -->
<constructor-arg index="0" ref="sqlSessionFactory"/>
</bean>
<bean class="org.mybatis.spring.mapper.MapperScannerConfigurer" id="configurer">
<property name="sqlSessionFactoryBeanName" value="sqlSessionFactory"/>
<property name="basePackage" value="mapper"/>
</bean>
</beans>
<?xml version="1.0" encoding="UTF-8" ?>
<!DOCTYPE configuration
        PUBLIC "-//mybatis.org//DTD Config 3.0//EN"
        "http://mybatis.org/dtd/mybatis-3-config.dtd">
<configuration>

    <settings>
        <setting name="logImpl" value="STDOUT_LOGGING"/>
    </settings>
    <typeAliases>
        <package name="pojo"/>
    </typeAliases>

<!--整合给spring管理 不再需要这里声明-->
    <!--<mappers>-->
        <!--<mapper class="mapper.BookMapper"/>-->
    <!--</mappers>-->
</configuration>
2.spring和service
<?xml version="1.0" encoding="UTF-8"?>
<beans xmlns="http://www.springframework.org/schema/beans"
       xmlns:xsi="http://www.w3.org/2001/XMLSchema-instance"
       xmlns:aop="http://www.springframework.org/schema/aop"
       xmlns:context="http://www.springframework.org/schema/context"
       xmlns:tx="http://www.springframework.org/schema/tx"
       xsi:schemaLocation="http://www.springframework.org/schema/beans
       http://www.springframework.org/schema/beans/spring-beans.xsd
       http://www.springframework.org/schema/aop
       http://www.springframework.org/schema/aop/spring-aop.xsd
       http://www.springframework.org/schema/tx
       http://www.springframework.org/schema/tx/spring-tx.xsd
       http://www.springframework.org/schema/context
       http://www.springframework.org/schema/context/spring-context.xsd">

    <!--将service的包扫描-->
    <context:component-scan base-package="service"/>
    <bean id="bookServiceImpl" class="service.BookServiceImpl">
        <property name="bookMapper" ref="bookMapper"/>
    </bean>
    <!--横切事务-->
    <tx:advice id="txAdvice">
        <tx:attributes>
            <tx:method name="get*" read-only="true"/>
            <tx:method name="*"/>
        </tx:attributes>
    </tx:advice>

    <aop:config>

        <aop:pointcut id="serviceOperation"
                      expression="execution(*  mapper.BookMapper.*.*(..))"/>

        <aop:advisor pointcut-ref="serviceOperation" advice-ref="txAdvice"/>

    </aop:config>

</beans>
3.spring和mvc
<?xml version="1.0" encoding="UTF-8"?>
<beans xmlns="http://www.springframework.org/schema/beans"
       xmlns:xsi="http://www.w3.org/2001/XMLSchema-instance"
       xmlns:context="http://www.springframework.org/schema/context"
       xmlns:mvc="http://www.springframework.org/schema/mvc"
       xsi:schemaLocation="http://www.springframework.org/schema/beans
       http://www.springframework.org/schema/beans/spring-beans.xsd
       http://www.springframework.org/schema/mvc
       http://www.springframework.org/schema/mvc/spring-mvc.xsd
       http://www.springframework.org/schema/context
       http://www.springframework.org/schema/context/spring-context.xsd">

<!--mvc层 扫描包 开启注解和处理器支持-->
    <context:component-scan base-package="controller"/>
    <mvc:default-servlet-handler/>
    <mvc:annotation-driven/>
    <!--配置视图解析器-->
    <bean class="org.springframework.web.servlet.view.InternalResourceViewResolver" id="viewResolver">
        <property name="suffix" value=".jsp"/>
        <property name="prefix" value="WEB-INF/jsp/"/>
    </bean>

    <context:component-scan base-package="controller"/>
</beans>
最后将这几个spring的配置文件导入到一个applicationContext的配置文件即可
<?xml version="1.0" encoding="UTF-8"?>
<beans xmlns="http://www.springframework.org/schema/beans"
       xmlns:xsi="http://www.w3.org/2001/XMLSchema-instance"
       xsi:schemaLocation="http://www.springframework.org/schema/beans
       http://www.springframework.org/schema/beans/spring-beans.xsd
    ">

    <import resource="spring-mvc.xml"/>
    <import resource="spring-service.xml"/>
    <import resource="spring-dao.xml"/>
</beans>
10.Ajax异步请求
- Ajax即Asynchronous Javascript And XML(异步JavaScript和XML在 2005年被Jesse James Garrett提出的新术语,用来描述一种使用现有技术集合的‘新’方法 。 使用Ajax技术网页应用能够快速地将增量更新呈现在用户界面上,而不需要重载(刷新)整个页面,这使得程序能够更快地回应用户的操作。
总之就是异步无刷新的请求
使用jQuery的库实现ajax
<%--
  Created by IntelliJ IDEA.
  User: 塔塔
  Date: 2022/7/25
  Time: 20:34
  To change this template use File | Settings | File Templates.
--%>
<%@ page contentType="text/html;charset=UTF-8" language="java" %>
<html>
  <head>
    <title>ajax</title>
    <script src="${pageContext.request.contextPath}/js/jquery-3.5.1.js"></script>
  </head>
  <body>
  <script>
    function ajax() {
        $.post({
            url:"${pageContext.request.contextPath}/ajax/j1",
            data:{"name":$("#username").val()},
            success:function(data){
                alert(data);
            }
        })
    }
  </script>
 <p>name:<input type="text" id="username" onblur="ajax()"></p>
  </body>
</html>
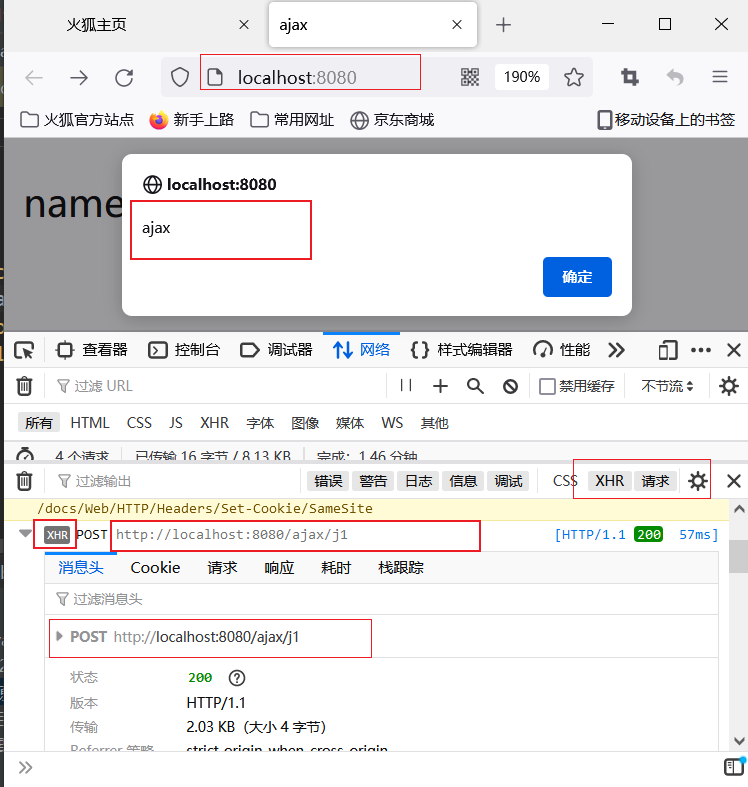
@RequestMapping("/ajax/j1")
@ResponseBody
public void ajax(String name, HttpServletResponse res) throws IOException {
    System.out.println(name+"this is name value");
    if(name.equals("panglili")){
        res.getWriter().write("true");
    }else{
        res.getWriter().write("false");
    }

}
在表单失去焦点的一瞬间,前端就向后台发起了ajax异步请求
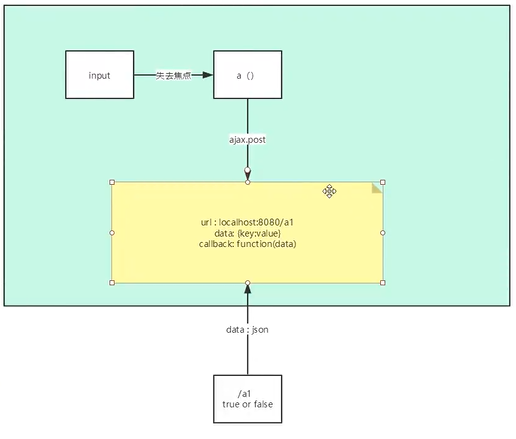
使用ajax实现前后台对象数据交换
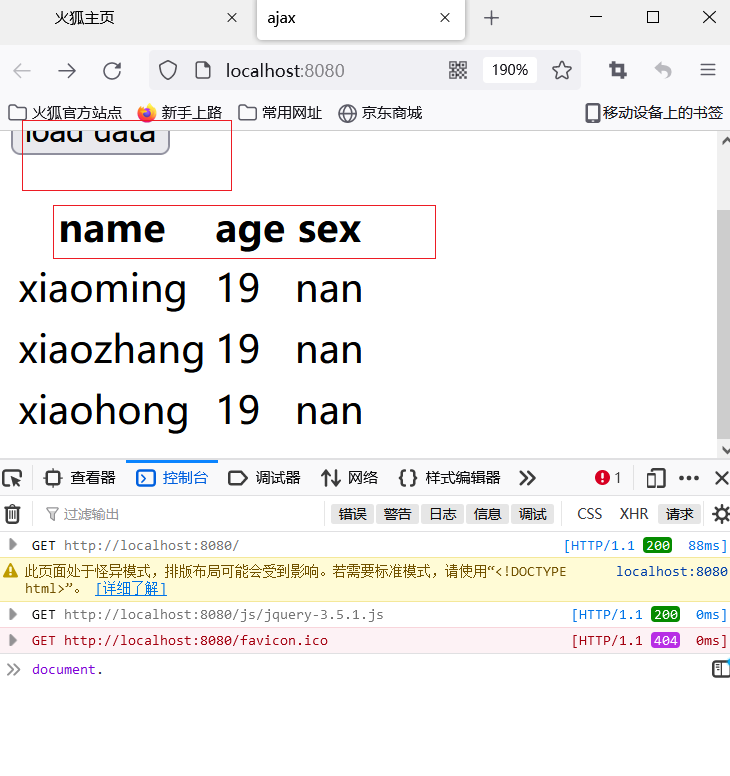
- 下面是jsp代码,当前台点击加载数据的时候,就会异步处理去后台拿取到所有用户的数据显示在前台
<%--
  Created by IntelliJ IDEA.
  User: 塔塔
  Date: 2022/7/25
  Time: 20:34
  To change this template use File | Settings | File Templates.
--%>
<%@ page contentType="text/html;charset=UTF-8" language="java" %>
<html>
  <head>
    <title>ajax</title>
    <script src="${pageContext.request.contextPath}/js/jquery-3.5.1.js"></script>
  </head>
  <body>
  <script>
    function ajax() {
        $.post({
            url:"${pageContext.request.contextPath}/ajax/j2",
            // data:{"name":$("#username").val()},

            success:function(data){
                var html="";
               for(var i=0;i<data.length;i++){
                   html+="<tr>"+
                       "<td>"+data[i].name+"</td>"+
                       "<td>"+data[i].age+"</td>"+
                           "<td>"+data[i].sex+"</td>"+
                       "</tr>"
               }
               $("#tab").html(html);
            }
        });
    }
  </script>
  <p><input type="button" id="btn" value="load data" onclick="ajax()"></p>
 <table>
    <tr>
      <th>name</th>
      <th>age</th>
      <th>sex</th>
    </tr>
   <tbody id="tab">

   </tbody>
  </table>

  </body>
</html>
- 下面是后台代码,当收到前端请求,返回所有数据,在前后台分离时代,前端与后台只需做好各自的事情,实现相应的交接即可。
@RequestMapping("/ajax/j2")
@ResponseBody
public List<User> ajax2(){
    //模拟实体类为数据库数据
    ArrayList<User> users = new ArrayList<User>();
    User user1 = new User("xiaoming",19,"nan");
    User user2 = new User("xiaozhang",19,"nan");
    User user3 = new User("xiaohong",19,"nan");
    users.add(user1);
    users.add(user2);
    users.add(user3);
    return users;
}
11.拦截器
- 只会拦截controller的请求,对于静态资源不处理
被spring代理的拦截器实现只需要两步:
1.实现一个拦截器类
package com.spring.config;

import org.springframework.web.servlet.HandlerInterceptor;
import org.springframework.web.servlet.ModelAndView;

import javax.servlet.http.HttpServletRequest;
import javax.servlet.http.HttpServletResponse;

/**
 * @author panglili
 * @create 2022-07-26-13:43
 */
//继承一个拦截器
public class MyInterceptor implements HandlerInterceptor {

    //true 放行
    //false 不放行
    public boolean preHandle(HttpServletRequest request, HttpServletResponse response, Object handler) throws Exception {
        System.out.println("处理前-------------");
        return true;
    }

    public void postHandle(HttpServletRequest request, HttpServletResponse response, Object handler, ModelAndView modelAndView) throws Exception {
        System.out.println("处理后-------------");
    }

    public void afterCompletion(HttpServletRequest request, HttpServletResponse response, Object handler, Exception ex) throws Exception {

        System.out.println("清理—--------------");
    }
}
2.配置拦截器
<!--拦截器配置-->
<mvc:interceptors>
    <mvc:interceptor>
        <mvc:mapping path="/**"/>
        <bean class="com.spring.config.MyInterceptor"/>
    </mvc:interceptor>
</mvc:interceptors>

 浙公网安备 33010602011771号