pytest+allre框架搭建
转载自:https://blog.csdn.net/qq_42610167/article/details/101204066
文章目录
博主:微信hz223336,加微信领最新接口自动化源码,加入群聊大神多多哦,欢迎你的加入
一:pytest的介绍,安装,框架结构,执行方式
-
- 1,特点
- 2,安装
- 3, pytest的框架结构
- 4,执行方式
- 二:Pytest -断言、跳过及运行
-
- 1,Pytest -断言、跳过及运行
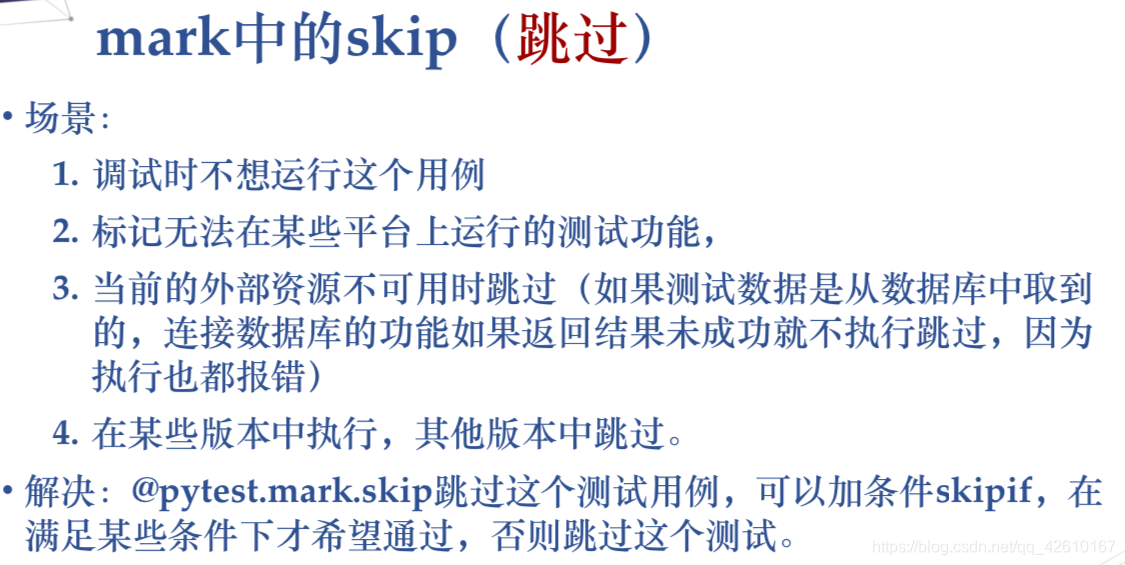
- 2,mark中的skip(跳过)
- 3,mark中的xfail(失败)
- 4,使用自定义标记mark只执行部分用例
- 5,文件名类名方法执行部分用例
- 6,-k 组合调用执行部分用例
- 三, Pytest -fixture
-
- 1. 如下: 定义一个函数名叫open_url的fixture前后置,前置为打开链接,后置为退出浏览器
- 2.在我们要用这个前后置的类前面 我们用@pytest.mark.usefixtures(fixture函数名)
- 3.进阶方法:conftest中定义多个fixture,一个fixture可以是另一个fixture的前后置,期间还是用field隔开前后置
- 4.说到上面的多个fixture调用,很多人就会疑惑,会不会fixture之间相互冲突。
- 5,fixture的自动应用autouse
- 四,参数化与数据驱动框架实现
-
- 参数化1
- 参数化2
- 参数化3
- 参数化3*3
- 五,第三方插件
-
- 1,调整测试用例的执行顺序
- 2, 执行用例遇到错误停止
- 3,执行用例失败后重新运行
- 4,多条断言前面报错后面依然执行
- 5,多线程并行与分布式执行
- 6,其他有意思的插件
- 7,使用pytest执行unittest的测试用例
- 8,pytest-html生成报告
- 六,日志管理及代码覆盖率
-
- 1, pytest中logging的应用
- 2, 日志及级别的含义
- 3, 代码覆盖率-多用在单元测试中
- 4,allure测试报告框架
- 5,定制报告
- 6,pytest运行指定用例
- 7,按重要性级别进行一定范围测试
- 8, 为测试添加详说明@allure.description;@allure.title;
- 9, 链接@allure.link @allure.issue @allure.testcase
- 七, 单元自动化测试pytest和allure在测试中应用 自动执行
-
- 1, 单元测试测试报告展示
- 2, conftest中编写driver,范围session,使用 addfinalizer在测试结束后关闭浏览器
- 3, 前端自动化测试-百度搜索功能实战演示
- 4,源码:Github:https://github.com/linda883/py_techDemo
- 5, CI/CD使用jenkins进行持续集成
- 八,天蝎座的测试之旅
一:pytest的介绍,安装,框架结构,执行方式
**
1,特点
:1. 简单灵活,容易上手;支持参数化; 测试用例的skip和xfail 处理;
2. 能够支持简单的单元测试和复杂的功能测试,还可以用来做 selenium/appium等自动化测试、接口自动化测试 (pytest+requests);
3. pytest具有很多第三方插件,并且可以自定义扩展, 比较好 用的如 pytest-allure(完美html测试报告生成) pytest-xdist (多CPU分发)等;
4. 可以很好的和jenkins集成;**
5.
**
2,安装
:pytest安装,导入相关依赖库
Pip install –U pytest U表示升级
Pip install sugar
pip install pytest-rerunfailures
Pip install pytest-xdist
Pip install pytest-assume
Pip intall pytest-html …
Pip list查看
Pytest –h 帮助**
3, pytest的框架结构
Pytest框架结构
Import pytest 类似的setup,teardown同样更灵活,还有个session()
模块级 (setup_module/
teardown_module) 不在类中的函数有用
函数级 (setup_function/
teardown_function) 不在类中的函数有用
类级 (setup_class/
teardown_class)只在 类中前后运行一次。
方法级 (setup_method/
teardown_methond) 运行在类中方法始末
4,执行方式
pytest的执行方式
Pytest/py.test(终端,命令行,pycharm可配置pytest方式执行)
- Pytest –v (最高级别信息—verbose)
- pytest -v -s filename 3.Pytest-q (静默)
(输出打印)
多种执行方式
1.pytest将在当前目录及其子目录中运行test _ * .py或* test.py形 式的所有文件。
2.以test_开头的函数,以Test开头的类,以test_开头的方法。所有包 package都要有__init_.py文件。
3.Pytest可以执行unittest框架写的用例和方法
二:Pytest -断言、跳过及运行
1,Pytest -断言、跳过及运行
2,mark中的skip(跳过)
3,mark中的xfail(失败)
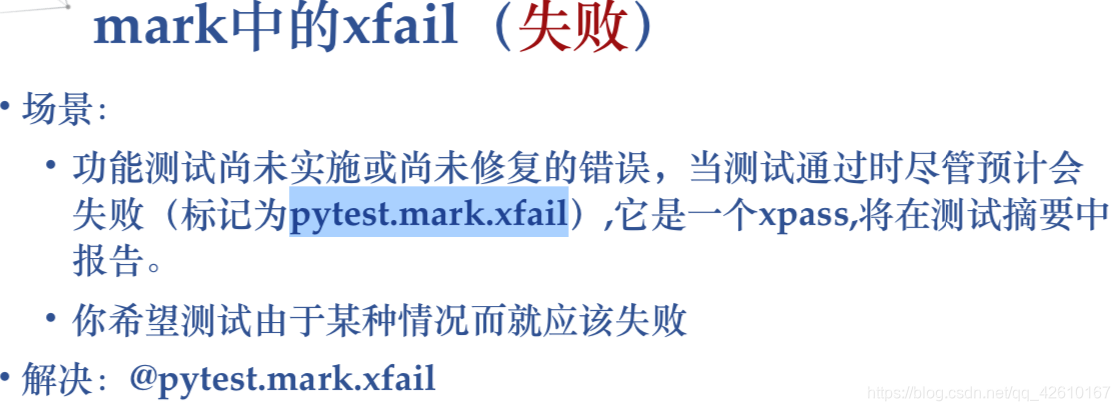
pytest.xfail()
我们已经掌握了如果跳过执行测试用例,其中有一种方法是在测试函数中用pytest.skip()方法。我们现在要学的pytest.xfail()和pytest.skip()有些相似,只不过他的含义是:将该用例标记成xfail失败,并且该用例中的后续代码不会执行。
老规矩,上荔枝:我们在测试用例中调用pytes.xfail()方法,可以选择传入reason参数表示原因。
#test_Pytest.py文件
#coding=utf-8

import pytest

class Test_Pytest():

        def test_one(self,):
                print("----start------")
                pytest.xfail(reason='该功能尚未完成')
                print("test_one方法执行" )
                assert 1==1

        def test_two(self):
                print("test_two方法执行" )
                assert "o" in "love"

        def test_three(self):
                print("test_three方法执行" )
                assert 3-2==1

if __name__=="__main__":
    pytest.main(['-s','-r','test_Pytest.py','test_Pytest.py'])
- 1
- 2
- 3
- 4
- 5
- 6
- 7
- 8
- 9
- 10
- 11
- 12
- 13
- 14
- 15
- 16
- 17
- 18
- 19
- 20
- 21
- 22
- 23
- 24
运行结果如下图:我们可以看到该用例中pytest.xfail()方法之前的代码运行了,之后的不再运行;结果中有一天用例被标记为xfail。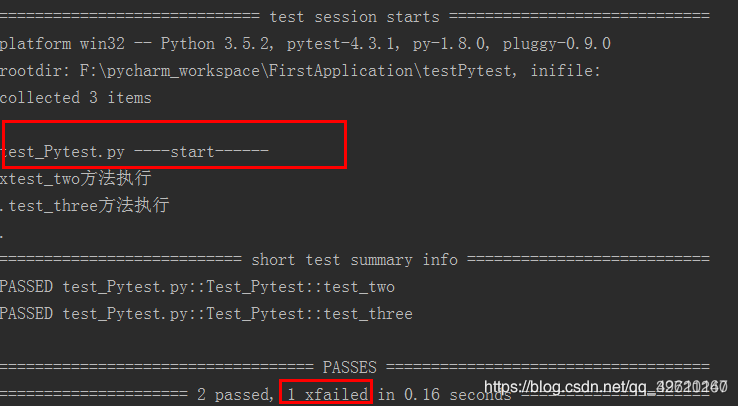
这个方法是我们直接将用例标记为失败,那什么情况我们会这么做呢?功能未完成、已知有问题。除此之外,就是用例的执行需要前置条件或操作,如果前置条件或操作失败,那么我们就可以直接将该用例设为失败,也就是xfail。
@pytest.mark.xfail
除了上面学习的pytest.xfail(),xfai还有一种使用方法。就是@pytest.mark.xfail标签,他的含义是期望测试用例是失败的,但是不会影响测试用例的的执行。如果测试用例执行失败的则结果是xfail(不会额外显示出错误信息);如果测试用例执行成功的则结果是xpass。
吃个荔枝:我们直接在测试用例上加上@pytest.mark.xfail标签。
#test_Pytest.py文件
#coding=utf-8

import pytest

class Test_Pytest():

        @pytest.mark.xfail
        def test_one(self):
                print("test_one方法执行" )
                assert 1==2

        def test_two(self):
                print("test_two方法执行" )
                assert "o" in "love"

        def test_three(self):
                print("test_three方法执行" )
                assert 3-2==1

if __name__=="__main__":
    pytest.main(['-s','test_Pytest.py'])
- 1
- 2
- 3
- 4
- 5
- 6
- 7
- 8
- 9
- 10
- 11
- 12
- 13
- 14
- 15
- 16
- 17
- 18
- 19
- 20
- 21
- 22
运行结果如下图:可以看到我们标记的用例确实运行了;因为断言失败所以结果是xfailed,也没有像正常一样显示出错误用例及具体信息。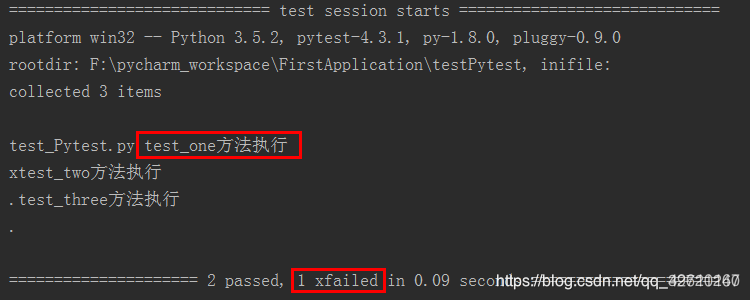
我们把断言改成正确的,再运行一次,结果如下图:尽管我们的用例正常运行通过,但是仍被标记为xpassed,而不是passed。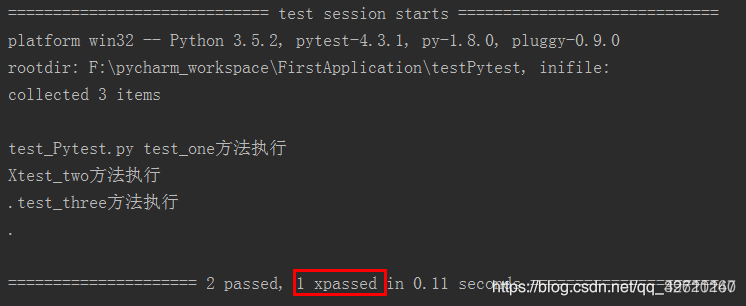
4,使用自定义标记mark只执行部分用例
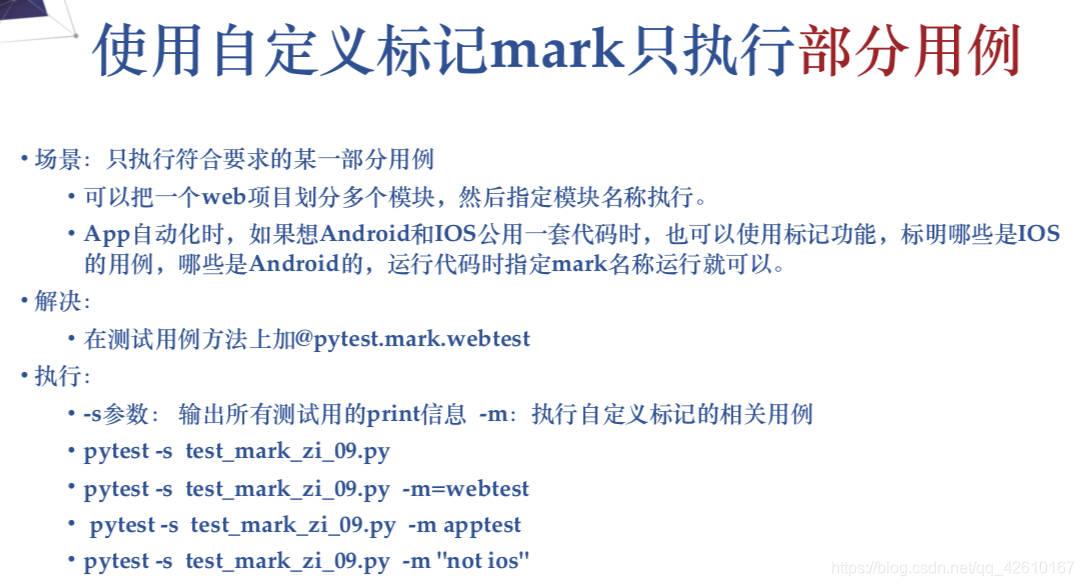
1.mark标记
以下用例,标记test_send_http()为webtest
# content of test_server.py

import pytest

@pytest.mark.webtest
def test_send_http():
    pass # perform some webtest test for your app

def test_something_quick():
    pass

def test_another():
    pass

class TestClass:
    def test_method(self):
        pass

if __name__ == "__main__":
    pytest.main(["-s", "test_server.py", "-m=webtest"])
只运行用webtest标记的测试,cmd运行的时候,加个-m 参数,指定参数值webtest

```py
pytest -v -m webtest
- 1
- 2
- 3
- 4
- 5
- 6
- 7
- 8
- 9
- 10
- 11
- 12
- 13
- 14
- 15
- 16
- 17
- 18
- 19
- 20
- 21
- 22
- 23
- 24
如果不想执行标记webtest的用例,那就用”not webtest”
pytest -v -m “not webtest”
- 1
import pytest

@pytest.mark.webtest
def test_send_http():
    pass # perform some webtest test for your app
def test_something_quick():
    pass
def test_another():
    pass
class TestClass:
    def test_method(self):
        pass

if __name__ == "__main__":
    pytest.main(["-s", "test_server.py", "-m='not webtest'"])
- 1
- 2
- 3
- 4
- 5
- 6
- 7
- 8
- 9
- 10
- 11
- 12
- 13
- 14
- 15
- 16
5,文件名类名方法执行部分用例
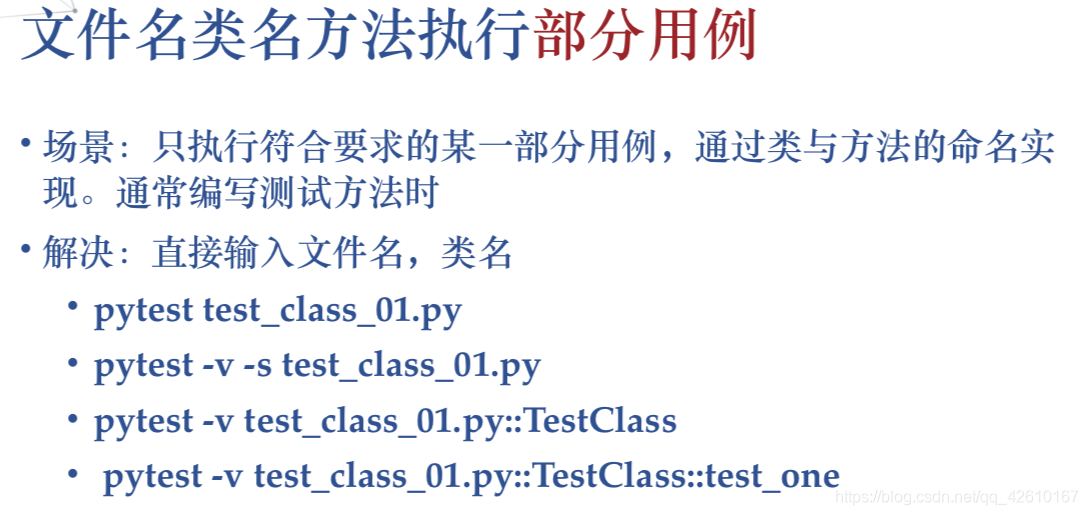
2.-v 指定的函数节点id
如果想指定运行某个.py模块下,类里面的一个用例,如:TestClass里面testmethod用例
每个test开头(或_test结尾)的用例,函数(或方法)的名称就是用例的节点id,指定节点id运行用-v 参数
pytest -v test_server.py::TestClass::test_method
- 1
当然也能选择运行整个class
pytest -v test_server.py::TestClass
- 1
也能选择多个节点运行,多个节点中间空格隔开
pytest -v test_server.py::TestClass test_server.py::test_send_http
- 1
6,-k 组合调用执行部分用例
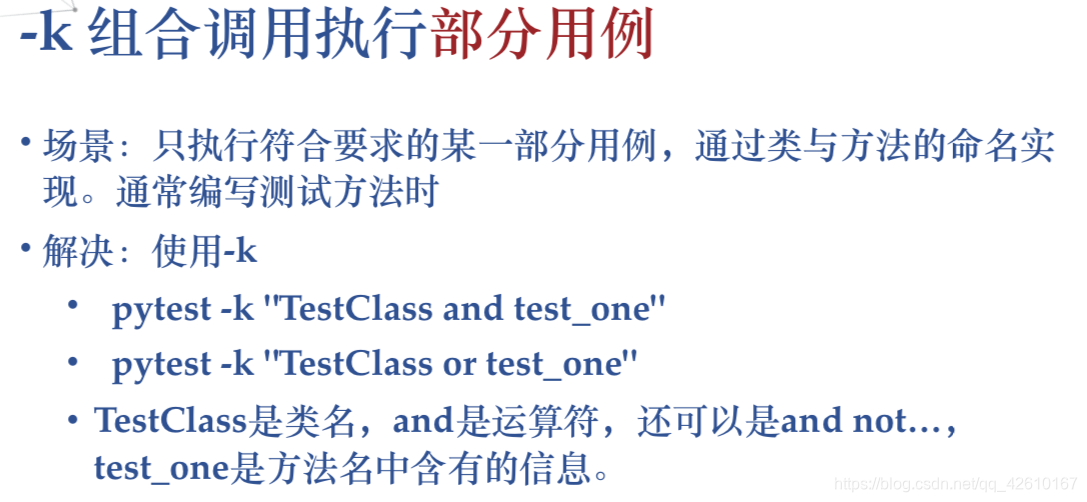
.-k 匹配用例名称
可以使用-k命令行选项指定在匹配用例名称的表达式
pytest -v -k http
- 1
您也可以运行所有的测试,根据用例名称排除掉某些用例:
pytest -k “not send_http” -v
- 1
也可以同时选择匹配 “http” 和“quick”
pytest -k “http or quick” -v
- 1
三, Pytest -fixture
下面都有实战很详细-fixture确实牛逼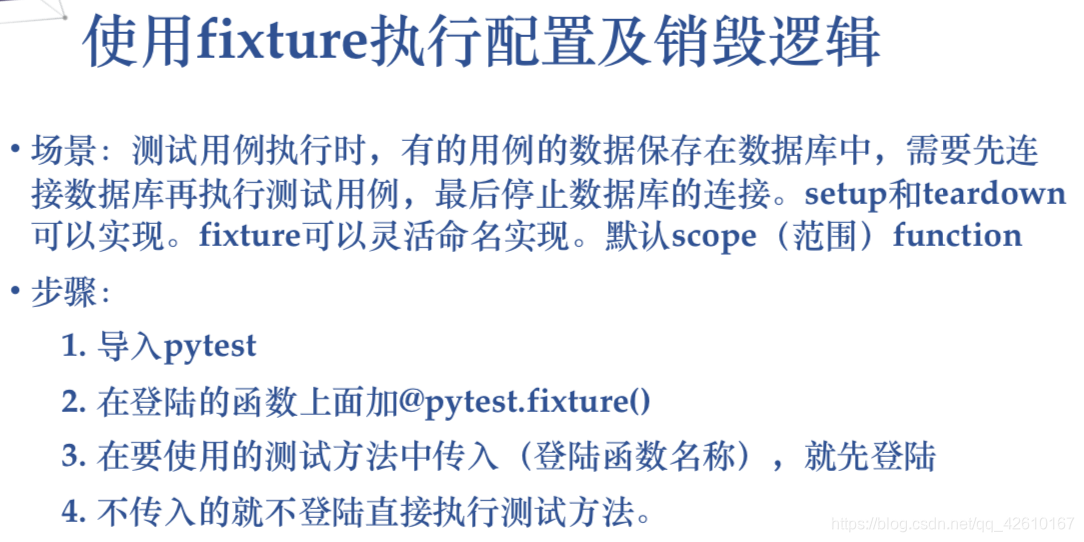


pytest 相较于 unittest 最为跳跃的一点应该就是 fixture 机制
对于unittest来说,每个用例的类中都需要去写入setUp和tearDown。也就是我们所说的前置和后置,
而不可避免的,很多用例的前置和后置都是一样(例如很多用例都需要前置登录,后置退出),于是我们需要重复的复制粘贴,这样导致工作量增加,代码量也增加,界面也显得冗杂。
所以此时pytest中fixture机制便要闪亮登场了。
通俗的讲: fixture = 前置+后置
而方便的是:如果很多用例都有同样的前置和后置,那么我就只实现一个,然后需要的用例就去调用就好了。
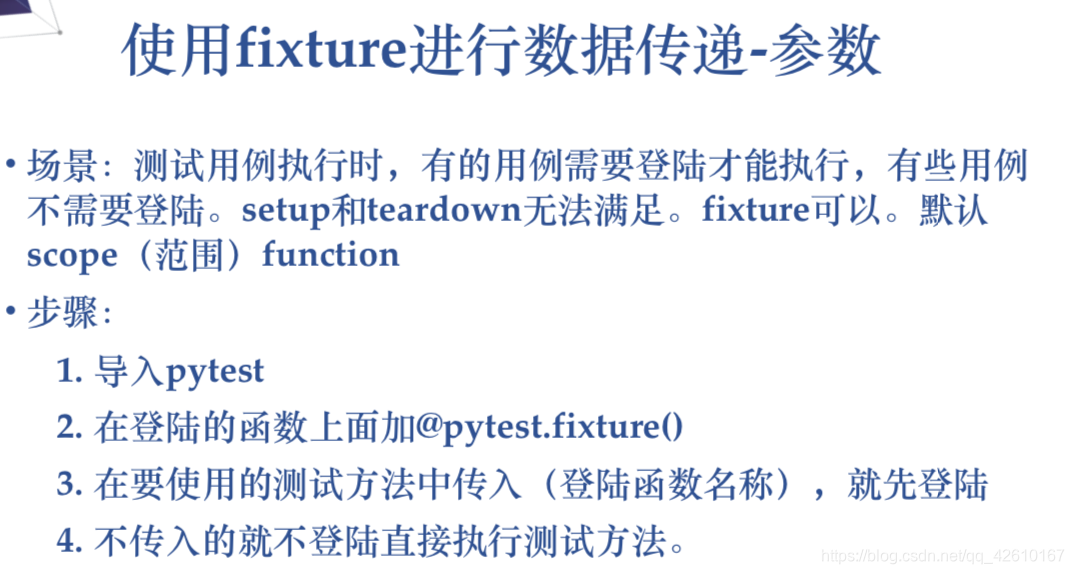
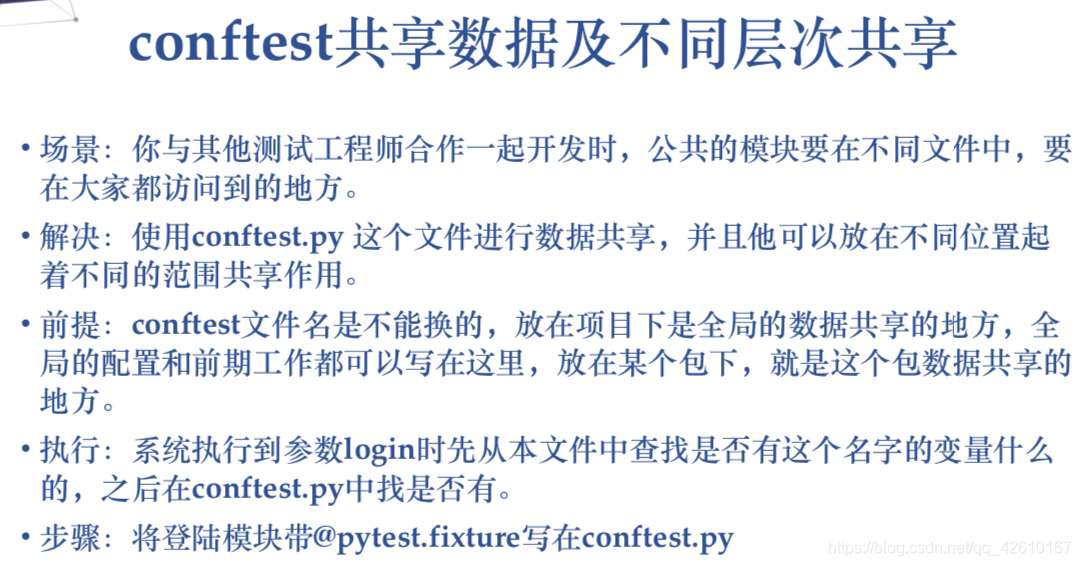
1.机制:与测试用例同级,或者是测试用例的父级,创建一个conftest.py文件。
2.conftest.py文件里:放所有的前置和后置。 不需要用例.py文件主动引入conftest文件。
3.定义一个函数:包含前置操作+后置操作。
4.把函数声明为fixture :在函数前面加上 @pytest.fixture(作用级别=默认为function)
5.fixture的定义。
如果有返回值,那么写在yield后面。(yield的作用就相当于return)
在测试用例当中,调用有返回值的fixture函数时,函数名称就是代表返回值。
在测试用例当中,函数名称作为用例的参数即可。
1. 如下: 定义一个函数名叫open_url的fixture前后置,前置为打开链接,后置为退出浏览器
@pytest.fixture(scope=“class”) #定义scope的范围
  def open_url():
    # 前置
    driver = webdriver.Chrome()
    driver.get(url) #url为链接地址
    yield driver    #yield之前代码是前置,之后的代码就是后置。
    # 后置
    driver.quit()
- 1
- 2
- 3
- 4
- 5
- 6
- 7
这样我们就定义了一个叫做 open_url 的 fixture
2.在我们要用这个前后置的类前面 我们用@pytest.mark.usefixtures(fixture函数名)
就可以直接调用上面定义好的这个前后置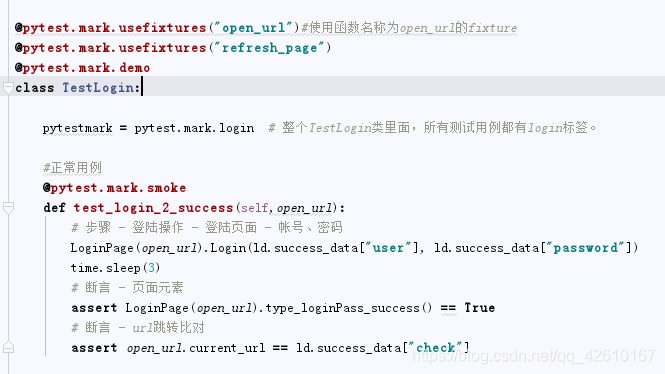
可以看到 在TestLogin 这个类中 我们不再去编写setup 和 teardown. 直接写我们的中间过程就可以了。是不是很方便了?
3.进阶方法:conftest中定义多个fixture,一个fixture可以是另一个fixture的前后置,期间还是用field隔开前后置
如上图中可以看到我class中另外还引用了一个名为refresh_page的fixture,直接上代码:
# 刷新页面 - 定义的第二个fixture
@pytest.fixture
def refresh_page(open_url):
    yield
    open_url.refresh()
- 1
- 2
- 3
- 4
- 5
直接将open_url作为了另一个fixture的前置引用进来,用yield隔开,当用例中执行完open_url前后置后,再执行了一次refresh的后置。
执行顺序: open_url yield 之前代码 – 用例代码 – open_url yield 之后代码 --》 refresh_page yield 之后代码
是不是很妙,可以解决许多用例流程环环相扣时的麻烦。
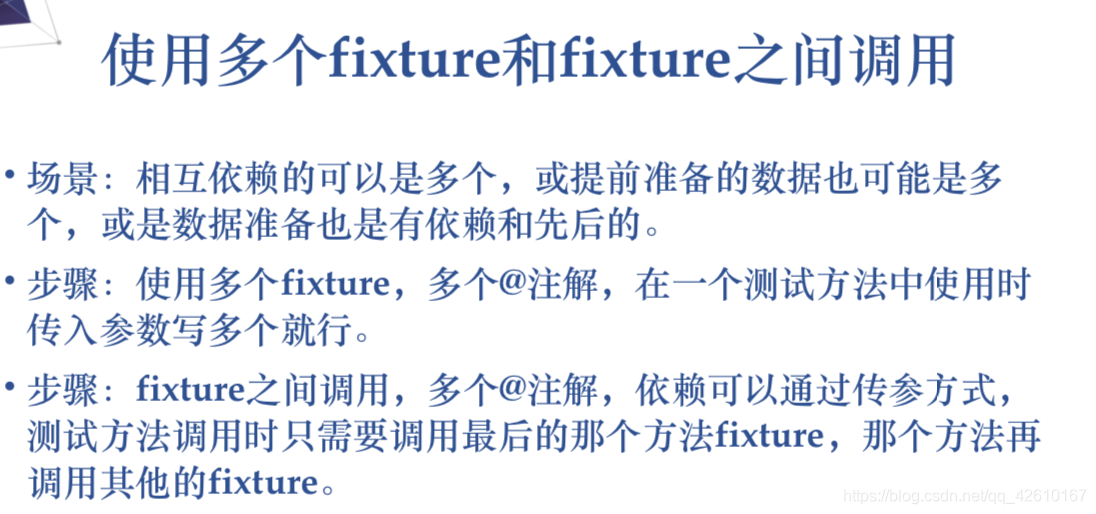
4.说到上面的多个fixture调用,很多人就会疑惑,会不会fixture之间相互冲突。
当然是不会了,fixture在conftest.py当中就已经决定了他的用例域,他会主动去区分你这个fixture是作用在哪个用例域。
首先我们看一下框架中对于fixture函数的定义: 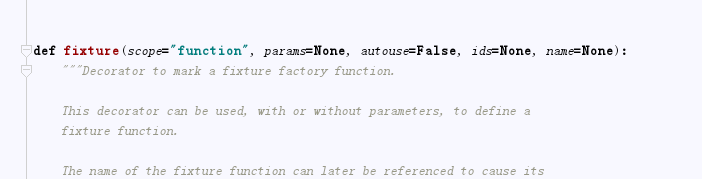
scope便是定义用例域的范围:
function:默认范围,每一个函数或方法都会调用,不填写时便是它
class:每一个类调用一次
module: 每一个.py文件调用一次,文件中可以有多个function和class
session:多个文件调用一次,可以跨文件,如在.py文件中,每一个.py文件就是module
范围:
session > module > class > function
所以在调用时各个fixture之间并不会相互冲突。
5,fixture的自动应用autouse
autouse调用例子:**
当管理用例比较多的时候,这种方法比较方便高效,但是用该功能时也要小心,一定要注意fixture的作用范围。需要注意的是,当使用这种方式时,就不能使用返回值的功了。autouse默认设置为False。当默认为False,就可以选择用上面两种方式来试用fixture。当设置为True时,所有的test都会自动调用这个fixture。autouse遵循scope="关键字参数"规则:当scope="session"时,无论怎样定义只运行一次;当scope="module"时,每个py文件只运行一次;当scope="class"时,每个class只运行一次(但是一个文件中包括function和class时,会在每个function(不在class中)运行一次);当scope="function"时,每个function运行一次;
‘’’
平常写自动化用例会写一些前置的fixture操作,用例需要用到就直接传该函数的参数名称就行了。当用例很多的时候,每次都传这个参数,会比较麻烦。
fixture里面有个参数autouse,默认是Fasle没开启的,可以设置为True开启自动使用fixture功能,这样用例就不用每次都去传参了
设置autouse=True
autouse设置为True,自动调用fixture功能
start设置scope为module级别,在当前.py用例模块只执行一次,autouse=True自动使用[图片]open_home设置scope为function级别,
每个用例前都调用一次,自动使用
import pytest

@pytest.fixture(scope="module",autouse=True)
def start(request):
    print("\n----开始执行module------")
    print('module : %s'% request.module.__name__)
    print('------启动浏览器-------')
    yield
    print("------结束测试 end!----------")

@pytest.fixture(scope="function",autouse=True)
def open_home(request):
    print("function:%s \n--回到首页--"% request.function.__name__)

def test_01():
    print('----用例01-----')

def test_02():
    print('----用例02-----')

if __name__ == '__main__':
    pytest.main(["-s","autouse.py"])
- 1
- 2
- 3
- 4
- 5
- 6
- 7
- 8
- 9
- 10
- 11
- 12
- 13
- 14
- 15
- 16
- 17
- 18
- 19
- 20
- 21
- 22
- 23
执行结果
----开始执行module------
module : autouse
------启动浏览器-------
function:test_01
--回到首页--
.----用例01-----
function:test_02
--回到首页--
.----用例02-----
------结束测试 end!----------
- 1
- 2
- 3
- 4
- 5
- 6
- 7
- 8
- 9
- 10
四,参数化与数据驱动框架实现
参数化1
import pytest


@pytest.mark.parametrize('test_input,expected',[('3+5',8),
                         ('2-1',1),('7*5',30)])
def test_eval(test_input,expected):
    assert eval(test_input)==expected    ----eval把字符串转换成表达式


est_param.py::test_eval[2-1-1]
test_param.py::test_eval[7*5-30] PASSED [ 33%]PASSED [ 66%]FAILED [100%]
test_param.py:3 (test_eval[7*5-30])
35 != 30

Expected :30
Actual :35
<Click to see difference>

test_input = '7*5', expected = 30

@pytest.mark.parametrize('test_input,expected',[('3+5',8),
('2-1',1),('7*5',30)])
def test_eval(test_input,expected):
> assert eval(test_input)==expected
E assert 35 == 30          ----提示把30改成35

test_param.py:7: AssertionError

Assertion failed
- 1
- 2
- 3
- 4
- 5
- 6
- 7
- 8
- 9
- 10
- 11
- 12
- 13
- 14
- 15
- 16
- 17
- 18
- 19
- 20
- 21
- 22
- 23
- 24
- 25
- 26
- 27
- 28
- 29
参数化2
import pytest
test_user_data=['linda','sai','tom']
@pytest.fixture(scope='module')
def login(request):
user=request.param
print('打开首页登陆%s'%user)
return user
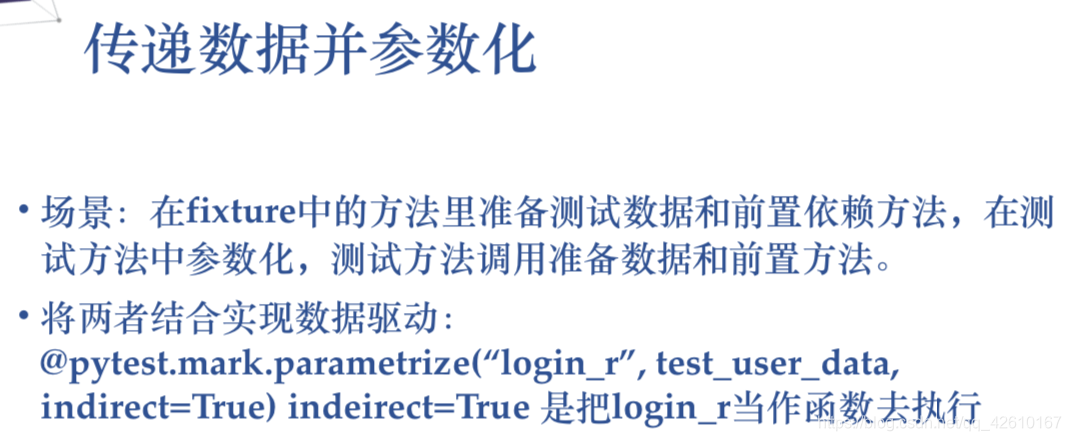
#indirect=True是把login当作函数去执行
@pytest.mark.parametrize('login',test_user_data,indirect=True)
def test_cart(login):
usera=login
print('不同用户添加购物车%s'%usera)
assert usera!=''
Process finished with exit code 0
打开首页登陆linda
PASSED [ 33%]不同用户添加购物车linda
打开首页登陆sai
PASSED [ 66%]不同用户添加购物车sai
打开首页登陆tom
PASSED [100%]不同用户添加购物车tom
- 1
- 2
- 3
- 4
- 5
- 6
- 7
- 8
- 9
- 10
- 11
- 12
- 13
- 14
- 15
- 16
- 17
- 18
- 19
- 20
- 21
- 22
- 23
参数化3
import pytest
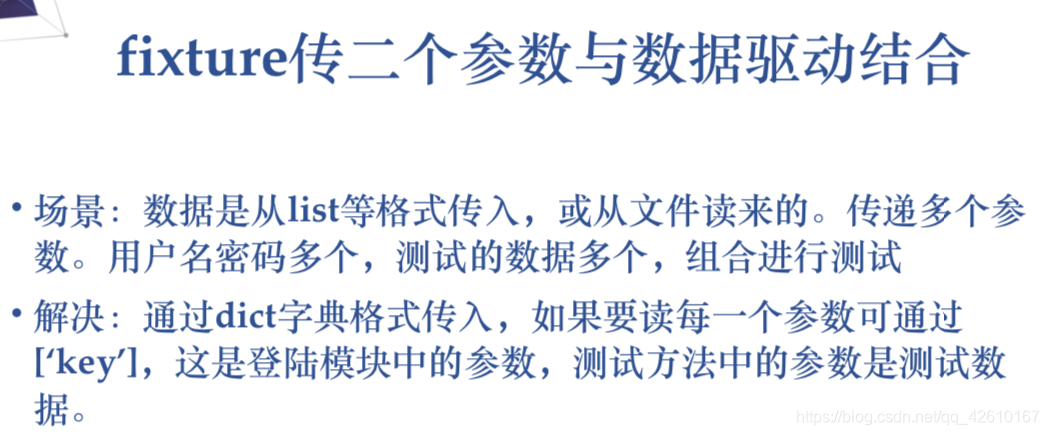
test_user_data=[
{'user':'linda','password':'8888'},
{'user':'servenruby','password':'123456'},
{'user':'test01','password':''}
]
@pytest.fixture(scope='module')
def login_r(request):
#可以通过dict形式,虽然传递一个参数,但通过key的方式可以达到累死传入多个参数的效果
user=request.param['user']
pwd=request.param['password']
print('\n打开首页准备登陆,登陆用户%s,密码%s'%(user,pwd))
if pwd:
return True
else:
return False
#这是pytest参数化驱动,indeirect=True是把login_r当作函数去执行
@pytest.mark.parametrize('login_r',test_user_data,indirect=True)
def test_cart(login_r):
#登陆用例
a=login_r
print('测试用例中login_r的返回值%s'%a)
assert a,'失败原因,密码为空'
开首页准备登陆,登陆用户linda,密码8888
PASSED [ 33%]测试用例中login_r的返回值True
打开首页准备登陆,登陆用户servenruby,密码123456
PASSED [ 66%]测试用例中login_r的返回值True
打开首页准备登陆,登陆用户test01,密码
FAILED [100%]测试用例中login_r的返回值False
打开首页准备登陆,登陆用户linda,密码8888
PASSED [ 33%]测试用例中login_r的返回值True
打开首页准备登陆,登陆用户servenruby,密码123456
PASSED [ 66%]测试用例中login_r的返回值True
打开首页准备登陆,登陆用户test01,密码
FAILED [100%]测试用例中login_r的返回值False
test_mark_param_request2.py:19 (test_cart[login_r2])
login_r = False
@pytest.mark.parametrize('login_r',test_user_data,indirect=True)
def test_cart(login_r):
#登陆用例
a=login_r
print('测试用例中login_r的返回值%s'%a)
> assert a,'失败原因,密码为空'
E AssertionError: 失败原因,密码为空
E assert False
- 1
- 2
- 3
- 4
- 5
- 6
- 7
- 8
- 9
- 10
- 11
- 12
- 13
- 14
- 15
- 16
- 17
- 18
- 19
- 20
- 21
- 22
- 23
- 24
- 25
- 26
- 27
- 28
- 29
- 30
- 31
- 32
- 33
- 34
- 35
- 36
- 37
- 38
- 39
- 40
- 41
- 42
- 43
- 44
- 45
- 46
- 47
- 48
- 49
- 50
- 51
- 52
- 53
- 54
- 55
- 56
参数化3*3
import pytest
test_user_data1=[{'user':'linda','password':'888888'},
                 {'user':'servenruby','password':'123456'},
                 {'user':'test01','password':''}]
test_user_data2=[{'q':'中国平安','count':3,'page':1},
                 {'q':'阿里巴巴','count':2,'page':2},
                 {'q':'pdd','count':3,'page':1}]
@pytest.fixture(scope='module')
def login_r(request):
    #这是接受不了输入的参数,接收一个参数
    user=request.param['user']
    pwd=request.param['password']
    print('\n用户名:%s,密码:%s'%(user,pwd))

@pytest.fixture(scope='module')
def query_param(request):
    q=request.param['q']
    count=request.param['count']
    page=request.param['page']
    print('查询的搜索词%s'%q)
    return request.param

#这是pytest的数据驱动,indeirect=True是把login_r当作函数去执行
#从下往上执行
#两个数据进行组合测试,有3*3个测试用例执行(test_user_data1的个数*test_user_data2的个数
@pytest.mark.parametrize('query_param',test_user_data2,indirect=True)
@pytest.mark.parametrize('login_r',test_user_data1,indirect=True)
def test_login(login_r,query_param):
    #登陆用例
    print(login_r)
    print(query_param)


pytest_mark_request3.py::test_login[login_r1-query_param0] ✓ 44% ████▌ 查询的搜索词pdd
None
{'q': 'pdd', 'count': 3, 'page': 1}

pytest_mark_request3.py::test_login[login_r1-query_param2] ✓ 56% █████▋
用户名:linda,密码:888888
None
{'q': 'pdd', 'count': 3, 'page': 1}

pytest_mark_request3.py::test_login[login_r0-query_param2] ✓ 67% ██████▋
用户名:test01,密码:
None
{'q': 'pdd', 'count': 3, 'page':