
flink源码分析之启动过程分析
今天阅读了一下flink v1.14的代码,首先分析一下flink启动的过程。
首先分2种,一种是SessionClusterEntrypoint,一种是JobClusterEntrypoint。分别对应session 模式和per-job模式。
session模式就是一次启动,可以执行多个job,执行完job还有后台进程在等待用户提交新的job。
per-job模式就是一次启动,执行一个job,执行完成就退出全部程序。
SessionClusterEntrypoint又分为(1)YarnSessionClusterEntryPoint;(2) KubernetesSessionClusterEntrypoint;(3)StandaloneSessionClusterEntrypoint;
见名知意:
第一个是基于Yarn的ResourceManager来管理集群,然后是启动后可以执行多次job;
第二个是基于Kubernetes来管理集群,然后是启动后可以执行多长job;
第三个是基于Flink自己的ResourceManager来管理集群,然后也是启动后可以执行多次job;
JobClusterEntrypoint又分为(1)YarnJobClusterEntrypoint;(2)StandaloneJobClusterEntrypoint;(3)MesosJobClusterEntrypoint;
见名知意:
第一个是基于Yarn的ResourceManager来管理集群,然后是一次运行一个job,运行完成一个job就退出整个集群;
第二个是基于Flink自己的ResourceManager来管理集群,然后是一次运行一个job,运行完成一个job就退出整个集群;
第三个是基于Mesos来管理集群,然后是一次运行一个job,运行完成一个job后就退出整个集群;
我们今天用StandaloneSessionClusterEntrypoint类来分析flink如何启动的。
打开StandaloneSessionClusterEntrypoint类,找到main()方法;
        // startup checks and logging
        EnvironmentInformation.logEnvironmentInfo(
                LOG, StandaloneSessionClusterEntrypoint.class.getSimpleName(), args);
        SignalHandler.register(LOG);
        JvmShutdownSafeguard.installAsShutdownHook(LOG);

        final EntrypointClusterConfiguration entrypointClusterConfiguration =
                ClusterEntrypointUtils.parseParametersOrExit(
                        args,
                        new EntrypointClusterConfigurationParserFactory(),
                        StandaloneSessionClusterEntrypoint.class);
        Configuration configuration = loadConfiguration(entrypointClusterConfiguration);

        StandaloneSessionClusterEntrypoint entrypoint =
                new StandaloneSessionClusterEntrypoint(configuration);

        ClusterEntrypoint.runClusterEntrypoint(entrypoint);
    }
这里就是启动的所有代码,最核心的我们看最后一行
ClusterEntrypoint.runClusterEntrypoint(entrypoint);
这行代码,我们点runClusterEntrypoint进入ClusterEntrypoint类的runClusterEntrypoint(ClusterEntrypoint clusterEntrypoint) 方法;
runClusterEntrypoint(ClusterEntrypoint clusterEntrypoint) 方法中有
clusterEntrypoint.startCluster();
这行代码,我们点击startCluster进入ClusterEntrypoint类的startCluster()方法;
startCluster()方法中有
runCluster(configuration, pluginManager);
这行代码,我们点击runCluster进入ClusterEntrypoint类的runCluster(Configuration configuration, PluginManager pluginManager)方法;
runCluster(Configuration configuration, PluginManager pluginManager)方法中有
initializeServices(configuration, pluginManager);
这行代码,我们点击initializeServices进入ClusterEntrypoint类的initializeServices(Configuration configuration, PluginManager pluginManager)方法;
initializeServices(Configuration configuration, PluginManager pluginManager)方法中有几个重要的核心启动方法,截图如下:

上面的截图中最重要的是做了几件事情:
(1):从configuration中获取配置的RPC地址和portRange参数,根据配置地址和端口信息创建集群所需的公用的commonRpcService服务。更新configuration中的address和port配置,支持后续的集群高可用服务。

(2):创建ioExecutor线程池,用于集群组件的I/O操作,如本地文件数据读取和输出等。
(3):创建并启动haService,向集群组件提供高可用支持,集群中的组件都会通过haService创建高可用服务。
(4):创建并启动blobServer,存储集群所需要的Blob对象数据,例如JobGraph中的Jar包等。blobServer中存储的数据能够被JobMaster和TaskManager访问。
(5):创建heartbeatServices,主要用于创建集群组件之间的心跳检测,例如ResourceManager与JobManager之间的心跳服务。
(6):创建metricRegistry服务,用于注册集群监控指标收集。
(7):创建archivedExecutionGraphStore服务,用于压缩并存储集群中的ExecutionGraph,主要有FileArchivedExecutionGraphStore和MemoryArchivedExecutionGraphStore两种实现类型。
执行完initializeServices方法后,回到上面的runCluster(Configuration configuration, PluginManager pluginManager)方法里,这个方法里还有一行代码比较重要:
            final DispatcherResourceManagerComponentFactory
                    dispatcherResourceManagerComponentFactory =
                            createDispatcherResourceManagerComponentFactory(configuration);
核心是调用了createDispatcherResourceManagerComponentFactory(configuraion)方法,这个方法点进去,会发现它是一个抽象类方法,具体的实现类有好多种:

实现类:
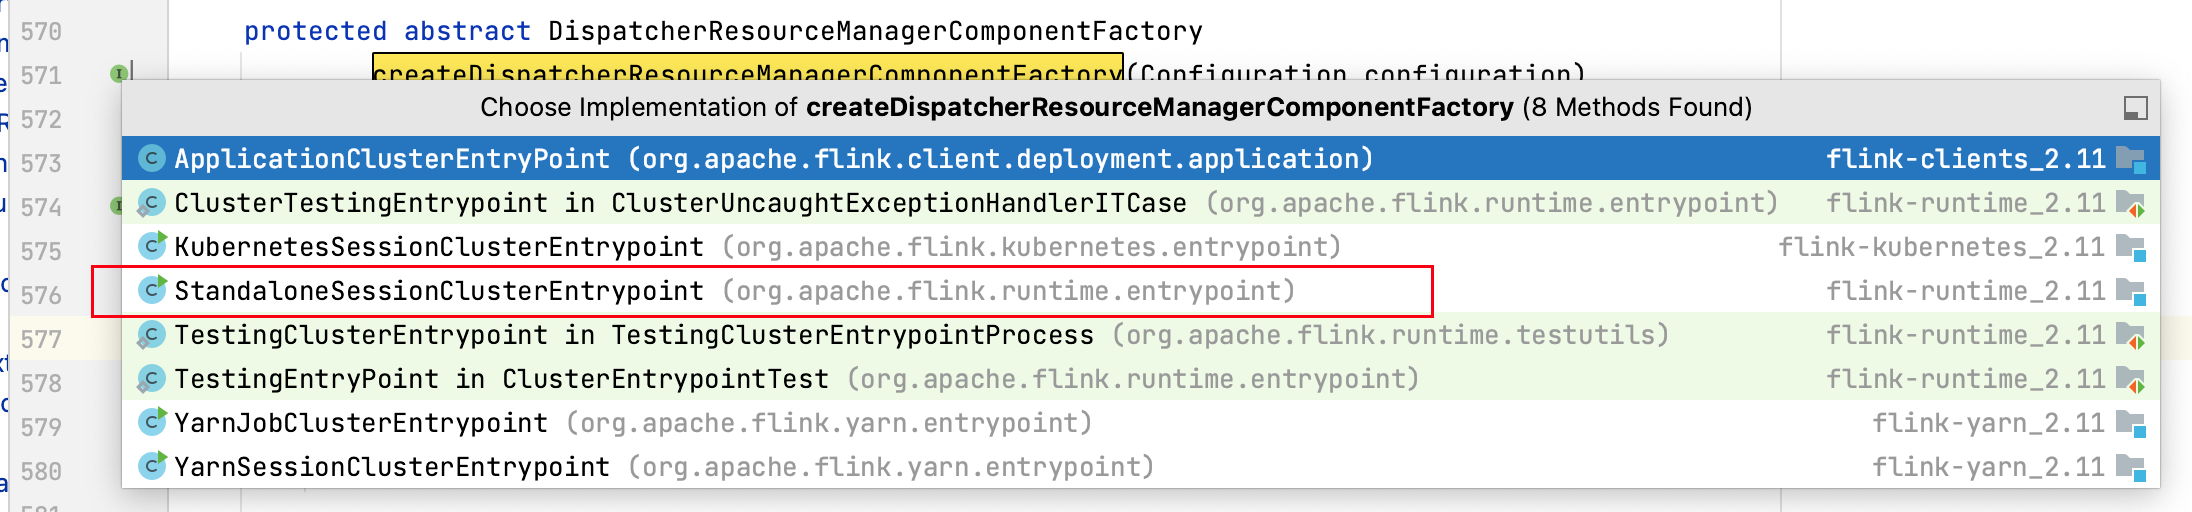
我们今天只分析StandaloneSessionClusterEntrypoint类,所以进去StandaloneSessionClusterEntrypoint类,找到createDispatcherResourceManagerComponentFactory(Configuration configuration) 方法:
    @Override
    protected DefaultDispatcherResourceManagerComponentFactory
            createDispatcherResourceManagerComponentFactory(Configuration configuration) {
        return DefaultDispatcherResourceManagerComponentFactory.createSessionComponentFactory(
                StandaloneResourceManagerFactory.getInstance());
    }
这里会发现StandaloneResourceManagerFactory.getInstance(),会返回一个StandaloneResourceManagerFactory类单例对象。
StandaloneResourceManagerFactory顾名思义就是用来创建StandaloneResourceManager的一个工厂对象。这是后边要用到的一个工厂对象,不过呢现在被包在更大的DefaultDispatcherResourceManagerComponentFactory类里了

可以看到createDispatcherResourceManagerComponentFactory方法返回的类型是DefaultDispatcherResourceManagerComponentFactory类,顾名思义,DefaultDispatcherResourceManagerComponentFactory是用于创建DefaultDispatcherResourceManagerComponent对象的工厂。
接着我们去看看DefaultDispatcherResourceManagerComponentFactory这个工厂对象的create()方法,在这个方法里,首先会创建和启动WebMointorEntrypoint对象,作为Dispatcher对应的Rest entrypoint,通过Rest API将JobGraph提交到Dispatcher上,同时,WebMonitorEndpoint也会提供Web UI需要的Rest API接口实现。
紧接着,DefaultDispatcherResourceManagerComponentFactory这个工厂对象的create()方法里还调用了创建ResourceManager组件的方法,创建了ResourceManager并启动。如下图
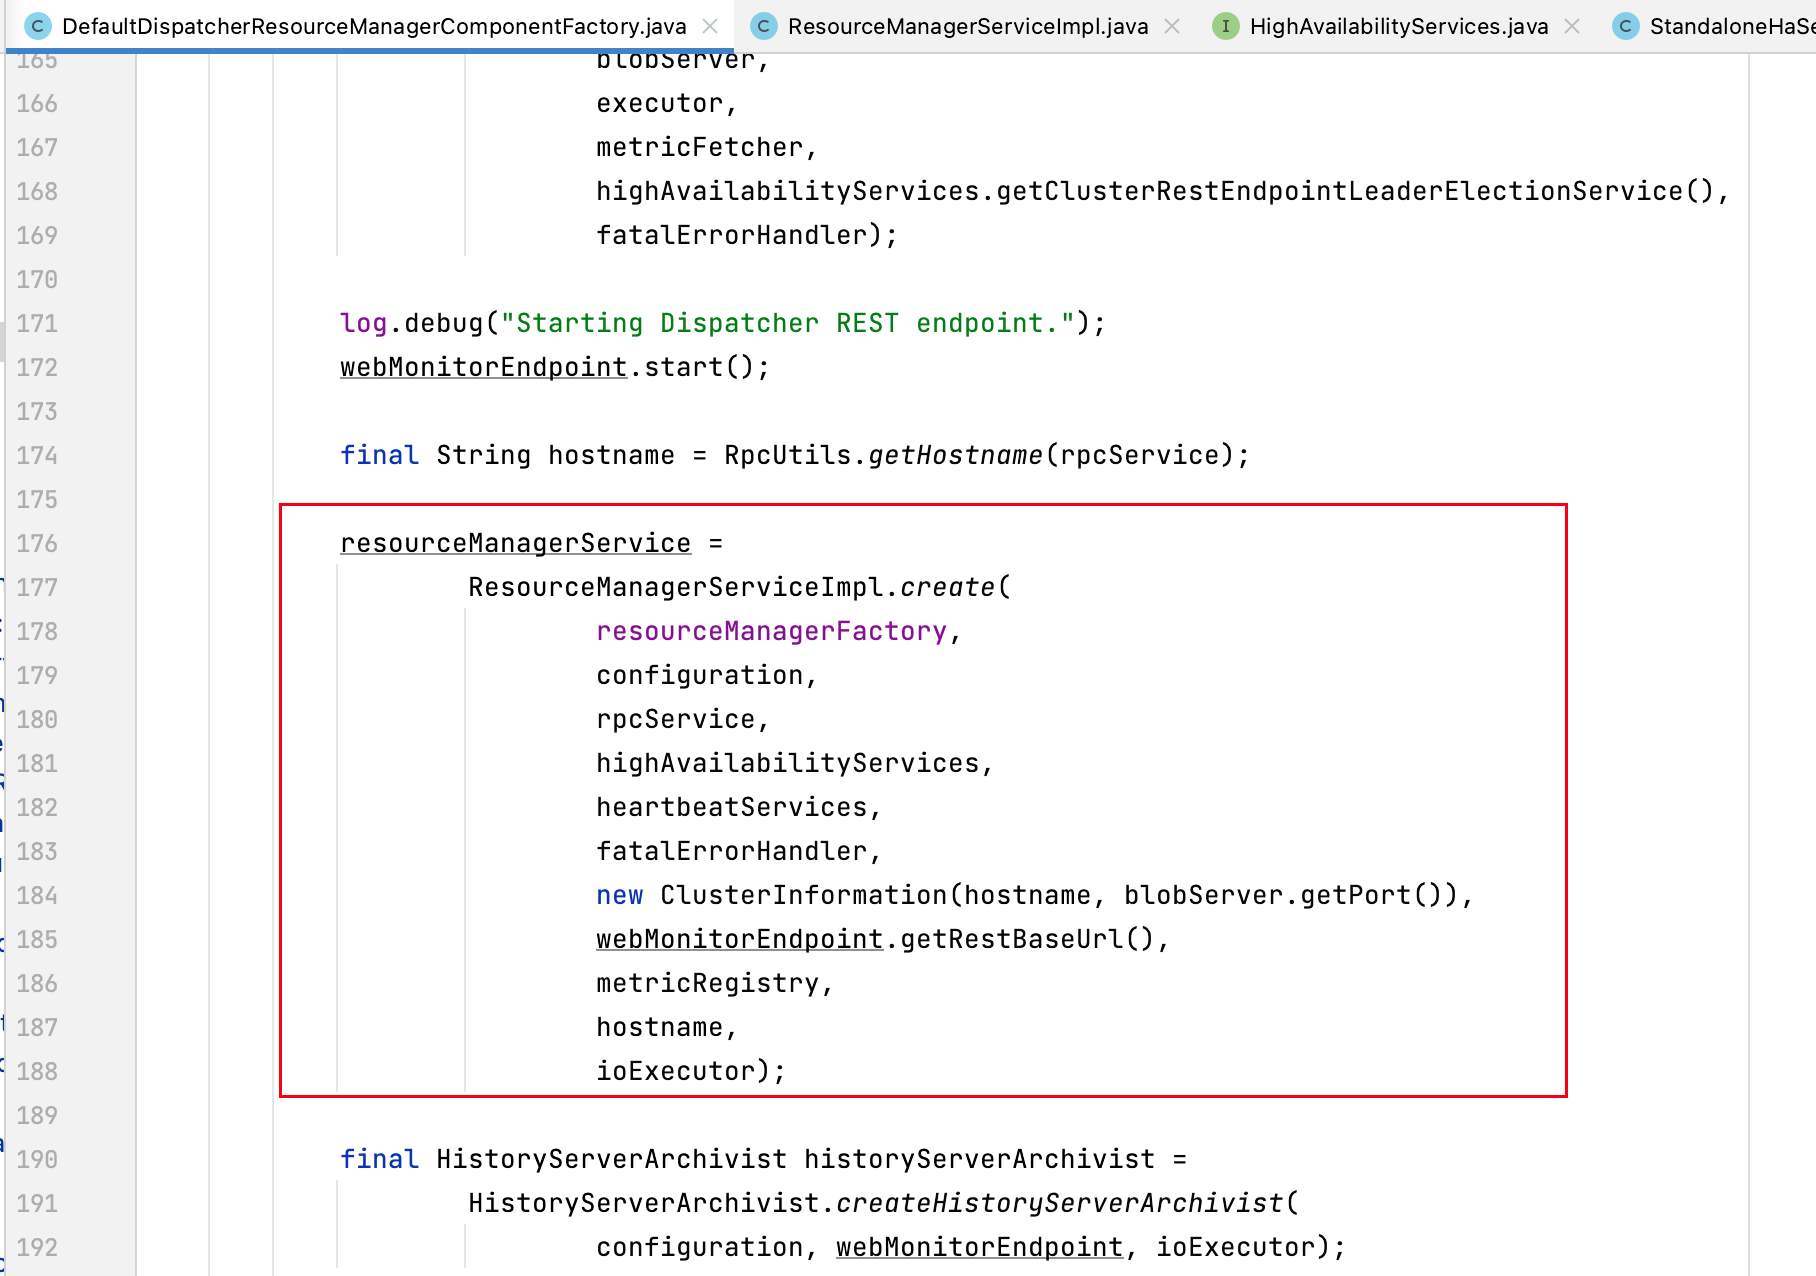
紧接着,DefaultDispatcherResourceManagerComponentFactory这个工厂对象的create()方法里还调用了创建DispatcherRunner组件的方法,创建了DispatcherRunner并启动。如下图
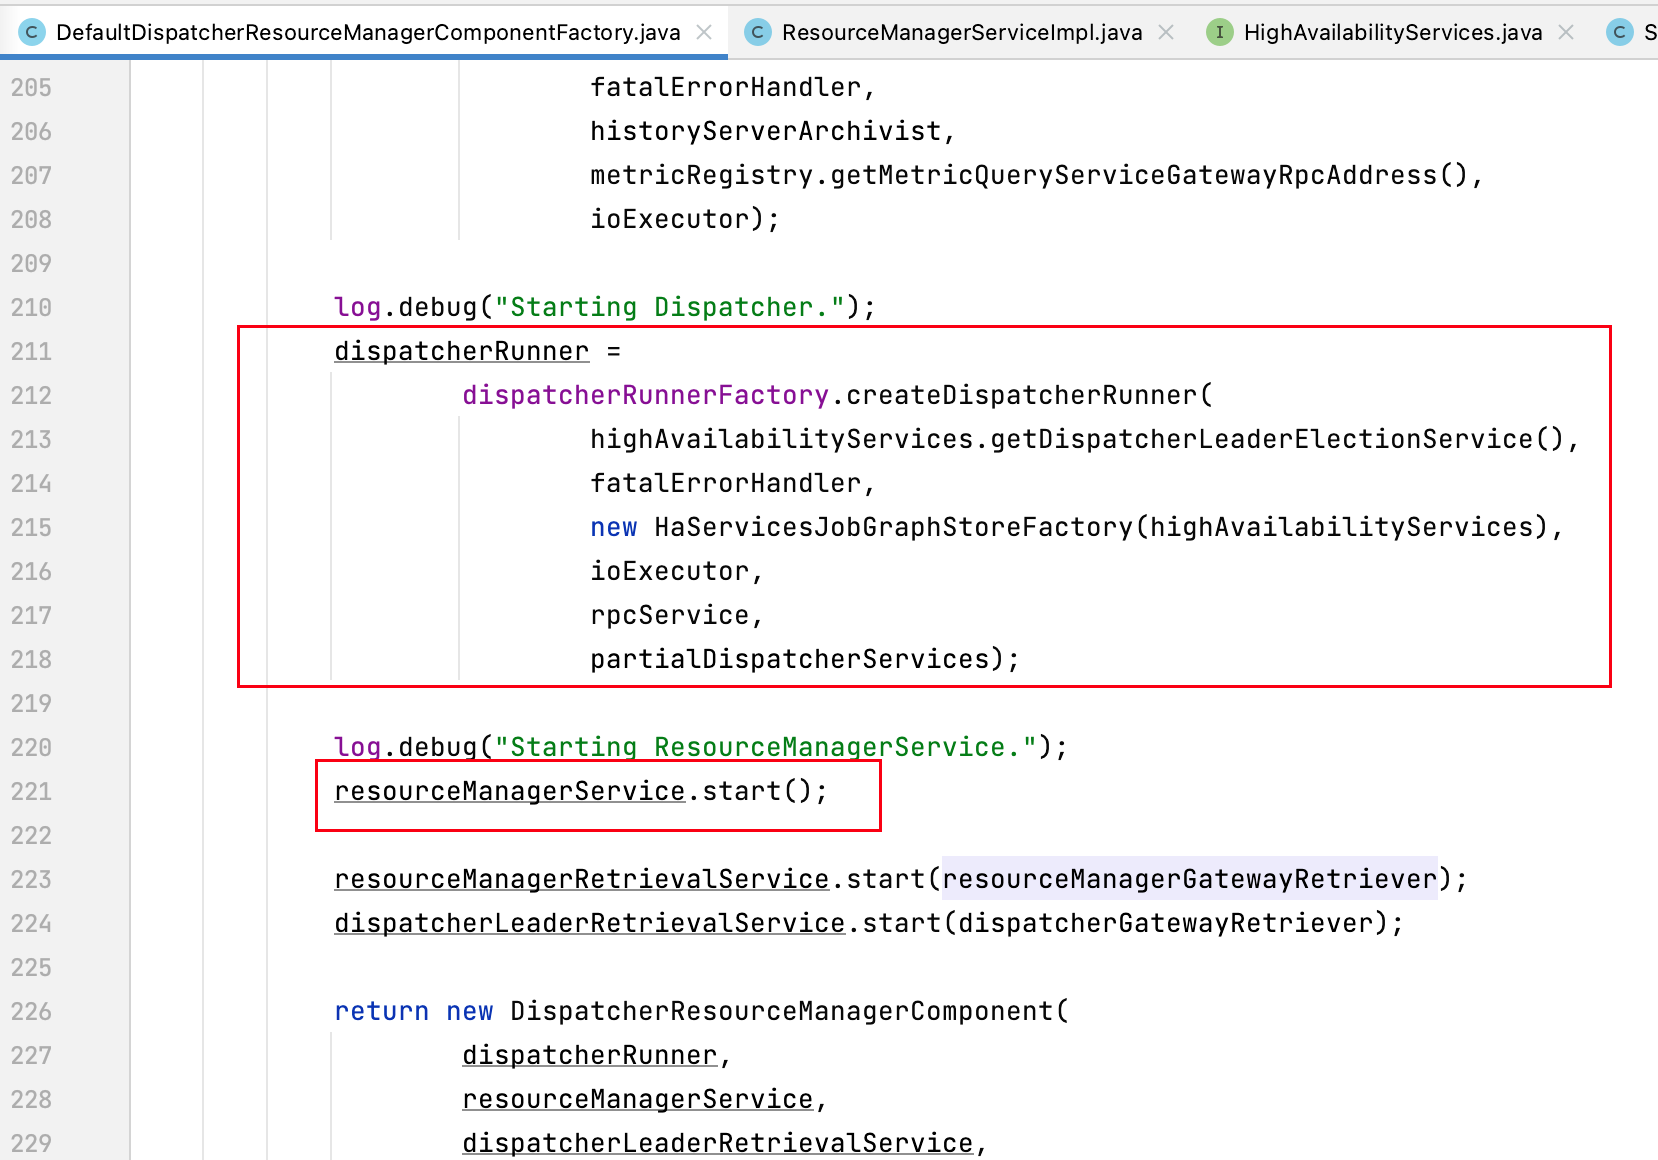
在上图中还有
resourceManagerService.start();
这句代码点进去看看,会进入到ResourceManagerService接口的start()方法,ResourceManagerService接口类中有一个实现类是ResourceManagerServiceImpl类。
所以看一下ResourceManagerServiceImpl类的start()方法
    @Override
    public void start() throws Exception {
        synchronized (lock) {
            if (running) {
                LOG.debug("Resource manager service has already started.");
                return;
            }
            running = true;
        }

        LOG.info("Starting resource manager service.");

        leaderElectionService.start(this);
    }
最后一行代码leaderElectionService.start(this);点进去
会进入到LeaderElectionService接口类的start()方法;该接口类有几种类的实现,其中一种是DefaultLeaderElectionService类。
我们看看DefaultLeaderElectionService类的start()方法:
    @Override
    public final void start(LeaderContender contender) throws Exception {
        checkNotNull(contender, "Contender must not be null.");
        Preconditions.checkState(leaderContender == null, "Contender was already set.");

        synchronized (lock) {
            leaderContender = contender;
            leaderElectionDriver =
                    leaderElectionDriverFactory.createLeaderElectionDriver(
                            this,
                            new LeaderElectionFatalErrorHandler(),
                            leaderContender.getDescription());
            LOG.info("Starting DefaultLeaderElectionService with {}.", leaderElectionDriver);

            running = true;
        }
    }
在该方法中,我们重点关注一下createLeaderElectionDriver(···)方法,我们跟踪进去:
会进入到LeaderElectionDriverFactory接口类的createLeaderElectionDriver()方法,该接口类也有几种实现,其中一种是ZooKeeperLeaderElectionDriverFactory类,我们来看看这个类的createLeaderElectionDriver方法实现。
    @Override
    public ZooKeeperLeaderElectionDriver createLeaderElectionDriver(
            LeaderElectionEventHandler leaderEventHandler,
            FatalErrorHandler fatalErrorHandler,
            String leaderContenderDescription)
            throws Exception {
        return new ZooKeeperLeaderElectionDriver(
                client, path, leaderEventHandler, fatalErrorHandler, leaderContenderDescription);
    }
可以看到最核心的代码是
new ZooKeeperLeaderElectionDriver(
                client, path, leaderEventHandler, fatalErrorHandler, leaderContenderDescription);
我们跟踪进去ZooKeeperLeaderElectionDriver(···)方法,会进入到ZooKeeperLeaderElectionDriver类的ZooKeeperLeaderElectionDriver()方法,该方法的具体实现我们看一下:
    public ZooKeeperLeaderElectionDriver(
            CuratorFramework client,
            String path,
            LeaderElectionEventHandler leaderElectionEventHandler,
            FatalErrorHandler fatalErrorHandler,
            String leaderContenderDescription)
            throws Exception {
        checkNotNull(path);
        this.client = checkNotNull(client);
        this.connectionInformationPath = ZooKeeperUtils.generateConnectionInformationPath(path);
        this.leaderElectionEventHandler = checkNotNull(leaderElectionEventHandler);
        this.fatalErrorHandler = checkNotNull(fatalErrorHandler);
        this.leaderContenderDescription = checkNotNull(leaderContenderDescription);

        leaderLatchPath = ZooKeeperUtils.generateLeaderLatchPath(path);
        leaderLatch = new LeaderLatch(client, leaderLatchPath);
        this.cache =
                ZooKeeperUtils.createTreeCache(
                        client,
                        connectionInformationPath,
                        this::retrieveLeaderInformationFromZooKeeper);

        running = true;

        leaderLatch.addListener(this);
        leaderLatch.start();

        cache.start();

        client.getConnectionStateListenable().addListener(listener);
    }
这里核心关注2行代码:
        leaderLatchPath = ZooKeeperUtils.generateLeaderLatchPath(path);
        leaderLatch = new LeaderLatch(client, leaderLatchPath);
可以看到选举也是用了LeaderLatch机制,这个机制其实好多分布式软件都在用,大家可以去了解一下LeaderLatch选主节点的机制。
