Spring Session
Session 会话管理概述
Web 中的 Session 和 Cookie 回顾
Session 机制
由于HTTP协议是无状态的协议,一次浏览器和服务器的交互过程就是:
浏览器:你好吗?
服务器:很好!
这就是一次会话,对话完成后,这次会话就结束了,服务器端并不能记住这个人,下次再对话时,服务器端并不知道是上一次的这个人,所以服务端需要记录用户的状态时,就需要用某种机制来识别具体的用户,这个机制就是 Session。
Cookie
服务端如何识别特定的客户?
这个时候需要使用 Cookie。每次 HTTP 请求的时候,客户端都会发送相应的 Cookie 信息到服务端。
实际上大多数的应用都是用 Cookie 来实现 Session 跟踪的,第一次创建 Session 时,服务端会在 HTTP 协议中向客户端 Cookie 中记录一个Session ID,以后每次请求把这个会话 ID 发送到服务器,这样服务端就知道客户端是谁了。
url 重写(了解)
那么如果客户端的浏览器禁用了 Cookie 怎么办?
一般这种情况下,会使用一种叫做 URL 重写的技术来进行 session 会话跟踪,即每次 HTTP 交互,URL 后面都会被附加上一个诸如 sessionId=xxxxx 这样的参数,服务端据此来识别客户端是谁。
注意:以上url 重写方式,基本不用了!如果用户浏览器禁用了 Cookie,一般会要求用户重新开启 Cookie!
Session 会话管理及带来的问题
在 Web 项目开发中,Session 会话管理是一个很重要的部分,用于存储与记录用户的状态或相关的数据。
通常情况下 session 交由容器(tomcat)来负责存储和管理,但是如果项目部署在多台 tomcat 中,则 session 管理存在很大的问题:
-
多台 tomcat 之间无法共享 session,比如用户在 tomcat A 服务器上已经登录了,但当负载均衡跳转到 tomcat B 时,由于tomcat B 服务器并没有用户的登录信息,session 就失效了,用户就退出了登录。
-
一旦 tomcat 容器关闭或重启也会导致 session 会话失效。
因此如果项目部署在多台 tomcat 中,就需要解决 session 共享的问题。
Session 会话共享方案
- 第一种是使用容器扩展插件来实现,比如基于 Tomca t的 tomcat-redis-session-manager 插件,基于Jetty 的 jetty-session-redis插件、memcached-session-manager 插件;这个方案的好处是对项目来说是透明的,无需改动代码,但是由于过于依赖容器,一旦容器升级或者更换意味着又得重新配置。其底层是,复制 session 到其它服务器,所以会有一定的延迟,也不能部署太多的服务器。
- 第二种是使用 Nginx 负载均衡的 ip_hash 策略实现用户每次访问都绑定到同一台具体的后台 tomcat 服务器实现 session 总是存在。这种方案的局限性是 ip 不能变,如果手机从北京跳到河北,那么 ip 会发生变化;另外负载均衡的时候,如果某一台服务器发生故障,那么会重新定位,也会跳转到别的机器;而且当 ip 不同时,分配到的服务器可能相同,可能造成个别服务器压力过大。
- 第三种是自己写一套 Session 会话管理的工具类,在需要使用会话的时候都从自己的工具类中获取,而工具类后端存储可以放到 Redis 中,这个方案灵活性很好,但开发需要一些额外的时间。(不推荐,需要考虑各种情况,功能比较弱)
- 第四种是使用框架的会话管理工具,也就是我们要介绍的 Spring session,这个方案既不依赖 tomcat 容器,又不需要改动代码,由 Spring session 框架为我们提供,可以说是目前非常完美的 session 共享解决方案。(目前最完美的,推荐使用)
Spring Session 入门
Spring Session 简介
- Spring Session 是 Spring 家族中的一个子项目,它提供一组 API 和实现,用于管理用户的 session 信息。
- 它把 servlet 容器实现的 httpSession 替换为 spring-session,专注于解决 session 管理问题,Session 信息存储在 Redis 中,可简单快速且无缝的集成到我们的应用中;
- 特性:
- 提供用户 session 管理的 API 和实现
- 提供 HttpSession,以中立的方式取代 web 容器的 session,比如 tomcat 中的 session
- 支持集群的 session 处理,不必绑定到具体的 web 容器去解决集群下的 session 共享问题
- 官网:https://spring.io/
入门案例
步骤:
-
创建一个 maven web 项目,完善目录结构,添加下列依赖,修改编译级别,刷新 pom。
<!-- servlet依赖的jar包start --> <dependency> <groupId>javax.servlet</groupId> <artifactId>javax.servlet-api</artifactId> <version>3.1.0</version> </dependency> <!-- servlet依赖的jar包start --> <!-- jsp依赖jar包start --> <dependency> <groupId>javax.servlet.jsp</groupId> <artifactId>javax.servlet.jsp-api</artifactId> <version>2.3.1</version> </dependency> <!-- jsp依赖jar包end --> <!--jstl标签依赖的jar包start --> <dependency> <groupId>javax.servlet</groupId> <artifactId>jstl</artifactId> <version>1.2</version> </dependency> <!--jstl标签依赖的jar包end --> -
创建两个 servlet,一个往 session 中写数据,一个从 session 中读取数据。
@WebServlet("/nset")
public class SetServlet extends HttpServlet {
    @Override
    protected void doGet(HttpServletRequest req, HttpServletResponse resp) throws ServletException, IOException {
        req.getSession().setAttribute("key", "new data");
        resp.getWriter().println("set new data ok");
    }

    @Override
    protected void doPost(HttpServletRequest req, HttpServletResponse resp) throws ServletException, IOException {
        super.doPost(req, resp);
    }
}
@WebServlet("/nget") public class GetServlet extends HttpServlet { @Override protected void doGet(HttpServletRequest req, HttpServletResponse resp) throws ServletException, IOException { String data = (String) req.getSession().getAttribute("key"); resp.getWriter().println(data); } @Override protected void doPost(HttpServletRequest req, HttpServletResponse resp) throws ServletException, IOException { super.doPost(req, resp); } } -
为这个项目配置两个不同访问端口的 tomcat(项目访问上下文路径相同,都是/),如 8081 和 8082,启动;
-
输入访问地址进行测试:
先用 8081 端口分别进行数据存和取操作,再用 8082 端口直接进行取的操作,发现无法 8082 无法获取数据;
以上测试,演示了 Session 丢失现象!
下面进行 Spring Session 集成,实现数据共享!
Spring Session 集成配置
-
在 pom.xml 中,添加 Spring Session 相关依赖,并刷新 pom
<!-- Spring session redis 依赖start --> <dependency> <groupId>org.springframework.session</groupId> <artifactId>spring-session-data-redis</artifactId> <version>1.3.1.RELEASE</version> </dependency> <!-- Spring session redis 依赖end --> <!-- spring web模块依赖 start --> <dependency> <groupId>org.springframework</groupId> <artifactId>spring-web</artifactId> <version>4.3.16.RELEASE</version> </dependency> <!-- spring web模块依赖end --> -
在 web.xml 文件中配置 springSessionRepositoryFilter 过滤器
<?xml version="1.0" encoding="UTF-8"?> <web-app xmlns="http://xmlns.jcp.org/xml/ns/javaee" xmlns:xsi="http://www.w3.org/2001/XMLSchema-instance" xsi:schemaLocation="http://xmlns.jcp.org/xml/ns/javaee http://xmlns.jcp.org/xml/ns/javaee/web-app_4_0.xsd" version="4.0"> <!--配置 springSessionRepositoryFilter 过滤器--> <filter> <filter-name>springSessionRepositoryFilter</filter-name> <filter-class>org.springframework.web.filter.DelegatingFilterProxy</filter-class> </filter> <filter-mapping> <filter-name>springSessionRepositoryFilter</filter-name> <url-pattern>/*</url-pattern> </filter-mapping> <!--这个配置是可选,实际工作通常是使用SpringMVC开发web项目,而SpringMVC不需要启动监听器--> <context-param> <param-name>contextConfigLocation</param-name> <param-value>classpath:applicationContext.xml</param-value> </context-param> <listener> <listener-class>org.springframework.web.context.ContextLoaderListener</listener-class> </listener> </web-app> -
在 resources 下创建 applicationContext.xml 和 springsession.xml 文件
在 applicationContext.xml 中导入 springsession.xml
<?xml version="1.0" encoding="UTF-8"?>
<beans xmlns="http://www.springframework.org/schema/beans"
       xmlns:xsi="http://www.w3.org/2001/XMLSchema-instance"
       xsi:schemaLocation="http://www.springframework.org/schema/beans http://www.springframework.org/schema/beans/spring-beans.xsd">

    <import resource="classpath:springsession.xml"/>
</beans>
配置 springsession.xml:
<?xml version="1.0" encoding="UTF-8"?> <beans xmlns="http://www.springframework.org/schema/beans" xmlns:xsi="http://www.w3.org/2001/XMLSchema-instance" xmlns:context="http://www.springframework.org/schema/context" xsi:schemaLocation="http://www.springframework.org/schema/beans http://www.springframework.org/schema/beans/spring-beans.xsd http://www.springframework.org/schema/context http://www.springframework.org/schema/context/spring-context.xsd"> <!-- 启动Spring注解支持,因为SpringSession中使用到Spring的相关注解,所以需要启动Spring的注解; 通常工作时我们会使用 <context:component-scan base-package="xxx"/> 进行包扫描,此标签中 已经包含了 <context:annotation-config /> 的功能,所以,如果项目中使用了包扫描器,那么此 启动Spring注解支持的步骤就可以省略! --> <context:annotation-config /> <!-- Spring session 的配置类 只配置RedisHttpSessionConfiguration的Bean就可以实现同域名同项目的Session共享! 适合于我们Nginx集群模式下的p2p项目部署。 --> <bean class="org.springframework.session.data.redis.config.annotation.web.http.RedisHttpSessionConfiguration"> <!--配置Session的最大生命周期,单位是秒,默认值为1800,表示30分钟--> <!--<property name="maxInactiveIntervalInSeconds" value="1800"/>--> </bean> <!-- 配置jedis连接工厂,用于连接redis(可选的步骤,如果项目已经配置过redis连接信息,则这里就不用配置) --> <bean id="jedisConnectionFactory" class="org.springframework.data.redis.connection.jedis.JedisConnectionFactory"> <property name="hostName" value="192.168.154.128"/> <property name="port" value="6379"/> <!--<property name="password" value=""/>--> </bean> </beans> -
先启动 redis 服务,再启动项目
-
如果启动项目,后台报错,没有找到 Spring Session 的配置类,则进行如下操作!
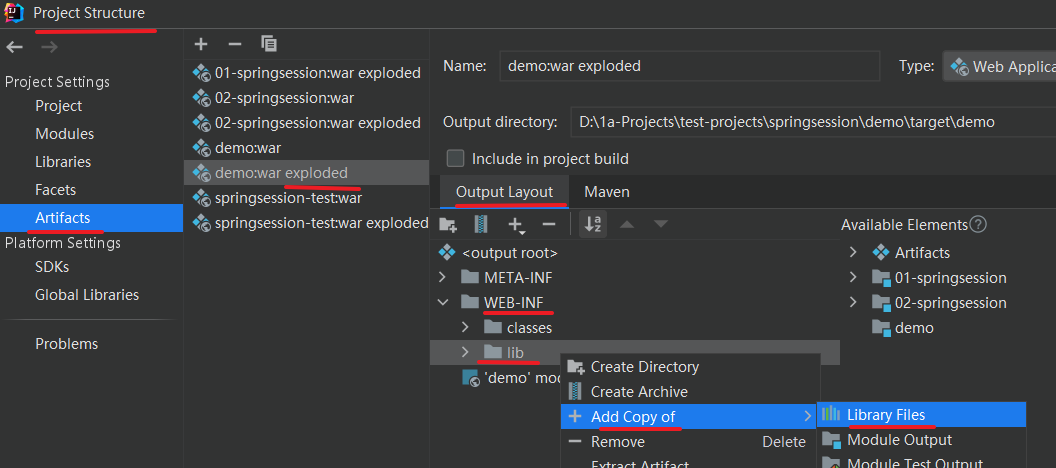
进入项目结构 Project Structure,选择 Artifacts,选中项目(带exploded后缀的),在右边 Output Layout 下,点开 WEB-INF,选择 lib,右键后,选择 Add Copy of ==》Library Files,将所有的 Libraries 全部选中,确定,确定;重启应该就能解决Spring Session 的配置类 RedisHttpSessionConfiguration 没有找到的问题。
-
启动配置了 8081 和 8082 的 tomcat(项目访问上下文路径相同,都是/),输入访问地址进行测试:
先用 8081 端口分别进行数据存和取操作,再用 8082 端口直接进行取的操作,发现可以获取到数据;
以上测试,说明两个服务器实现了 Session 共享。
Spring Session 常见应用场景
同域名下相同项目(集群环境)实现 Session 共享
-
在同一个域名下,比如:www.p2p.com
同一个项目,部署了多台 tomcat,这就是典型的集群。
以上的入门案例就属于这种应用场景,只不过在实际开发的过程中,我们如果存在了 tomcat 集群,那么肯定会使用 nginx 进行负载均衡。
示例架构:

同域名下不同项目实现 Session 共享
以上入门案例,同一个项目,部署了多台 tomcat,IP 和项目访问上下文路径相同,端口不同,即为同一域名下的相同项目;
环境模拟:
将两个 tomcat 中,项目的访问上下文路径(context-path)分别改为 /web1 和 /web2,IP 相同,均为 localhost,则是同一域名下的不同项目,此时就无法完成 Session 共享!
需要进行以下配置:
实现步骤:
-
在以上入门案例的环境下,在 springsession.xml 中添加如下配置:
-
注入一个 cookie 序列化规则对象;
-
指定 SpringSession 的 SessionId 存放在域名的根目录下;
-
<?xml version="1.0" encoding="UTF-8"?>
<beans xmlns="http://www.springframework.org/schema/beans"
       xmlns:xsi="http://www.w3.org/2001/XMLSchema-instance"
       xmlns:context="http://www.springframework.org/schema/context"
       xsi:schemaLocation="http://www.springframework.org/schema/beans
       http://www.springframework.org/schema/beans/spring-beans.xsd
       http://www.springframework.org/schema/context
       http://www.springframework.org/schema/context/spring-context.xsd">

    <!--
        启动Spring注解支持,因为SpringSession中使用到Spring的相关注解,所以需要启动Spring的注解;

        通常工作时我们会使用 <context:component-scan base-package="xxx"/> 进行包扫描,此标签中
        已经包含了 <context:annotation-config /> 的功能,所以,如果项目中使用了包扫描器,那么此
        启动Spring注解支持的步骤就可以省略!
    -->
    <context:annotation-config />


    <!--
        Spring session 的配置类
	==========只配置RedisHttpSessionConfiguration的Bean就可以实现同域名同项目的Session共享!=========
     -->
    <bean class="org.springframework.session.data.redis.config.annotation.web.http.RedisHttpSessionConfiguration">
        <!--配置Session的最大生命周期,单位是秒,默认值为1800,表示30分钟-->
        <!--<property name="maxInactiveIntervalInSeconds" value="1800"/>-->
        <!--######注入一个cookie序列化规则对象#####-->
        <property name="cookieSerializer" ref="defaultCookieSerializer"/>
    </bean>

    <bean id="defaultCookieSerializer" class="org.springframework.session.web.http.DefaultCookieSerializer">
        <!--  ############指定SpringSession的SessionId存放在域名的跟目录下,用于实现同域名,不同项目的Session共享#########  -->
        <property name="cookiePath" value="/"/>
    </bean>

    <!-- 配置jedis连接工厂,用于连接redis(可选的步骤,如果项目已经配置过redis连接信息,则这里就不用配置) -->
    <bean id="jedisConnectionFactory" class="org.springframework.data.redis.connection.jedis.JedisConnectionFactory">
        <property name="hostName" value="192.168.154.128"/>
        <property name="port" value="6379"/>
        <!--<property name="password" value=""/>-->
    </bean>

</beans>
同根域名不同二级子域名下的项目实现 Session 共享
如 www.58.com 58 同城网站,登陆后,切换到不同城市,其二级子域名不同,但登陆状态还能保持!
环境模拟:(基于同域名下不同项目实现 Session 共享案例)
修改本地 hosts 文件,添加本地 dns 映射:
地址:C:\Windows\System32\drivers\etc\hosts
在最后面添加:
127.0.0.1 web1.myweb.com
127.0.0.1 web2.myweb.com
配置后 we1.myweb.com 和 web2.myweb.com 就相当于 localhost 的二级域名
启动项目,在同域名不同项目实现 Session 共享的前提下,输入下述访问地址进行测试,发现无法实现跨域 Session 共享!
浏览器测试的访问地址对应改为:
web1.myweb.com:8081/web1/nset(原来是 localhost:8081/web1/nset)
web1.myweb.com:8081/web1/nget(原来是 localhost:8081/web1/nget)
web2.myweb.com:8082/web2/nget(原来是 localhost:8082/web2/nget)
要实现共享,则需要进行以下配置:
实现步骤:
-
在 springsession.xml 中添加如下配置:
指定 SpringSession 的 SessionId 存放在根域名下!
<?xml version="1.0" encoding="UTF-8"?>
<beans xmlns="http://www.springframework.org/schema/beans"
       xmlns:xsi="http://www.w3.org/2001/XMLSchema-instance"
       xmlns:context="http://www.springframework.org/schema/context"
       xsi:schemaLocation="http://www.springframework.org/schema/beans
       http://www.springframework.org/schema/beans/spring-beans.xsd
       http://www.springframework.org/schema/context
       http://www.springframework.org/schema/context/spring-context.xsd">

    <!--
        启动Spring注解支持,因为SpringSession中使用到Spring的相关注解,所以需要启动Spring的注解;

        通常工作时我们会使用 <context:component-scan base-package="xxx"/> 进行包扫描,此标签中
        已经包含了 <context:annotation-config /> 的功能,所以,如果项目中使用了包扫描器,那么此
        启动Spring注解支持的步骤就可以省略!
    -->
    <context:annotation-config />

    <!--
        Spring session 的配置类
	==========只配置RedisHttpSessionConfiguration的Bean就可以实现同域名同项目的Session共享!=========
     -->
    <bean class="org.springframework.session.data.redis.config.annotation.web.http.RedisHttpSessionConfiguration">
        <!--配置Session的最大生命周期,单位是秒,默认值为1800,表示30分钟-->
        <!--<property name="maxInactiveIntervalInSeconds" value="1800"/>-->
        <!--######注入一个cookie序列化规则对象#####-->
        <property name="cookieSerializer" ref="defaultCookieSerializer"/>
    </bean>

    <bean id="defaultCookieSerializer" class="org.springframework.session.web.http.DefaultCookieSerializer">
        <!--  ############指定SpringSession的SessionId存放在域名的跟目录下,用于实现同域名,不同项目的Session共享#########  -->
        <property name="cookiePath" value="/"/>
        <!--&&&&&&&&&&
            指定SpringSession的SessionId存放在根域名下,用于实现同根域名不同二级子域名下的Session共享;
            适合应用在Nginx的虚拟主机的多城市站点部署。(如58同城网站)
         &&&&&&&&&-->
        <property name="domainName" value="myweb.com"/>
    </bean>

    <!-- 配置jedis连接工厂,用于连接redis(可选的步骤,如果项目已经配置过redis连接信息,则这里就不用配置) -->
    <bean id="jedisConnectionFactory" class="org.springframework.data.redis.connection.jedis.JedisConnectionFactory">
        <property name="hostName" value="192.168.154.128"/>
        <property name="port" value="6379"/>
        <!--<property name="password" value=""/>-->
    </bean>

</beans>
启动两个 tomcat,输入以下地址,运行测试通过,实现了同根域名不同二级子域名下的 Session 共享!
web1.myweb.com:8081/web1/nset(原来是 localhost:8081/web1/nset)
web1.myweb.com:8081/web1/nget(原来是 localhost:8081/web1/nget)
web2.myweb.com:8082/web2/nget(原来是 localhost:8082/web2/nget)
单点登陆(了解)
-
不同根域名下的项目实现 Session 共享
比如阿里巴巴这样的公司,有多个业务线,多个网站,用户在一个网站登录,那么其他网站也会是登录了的状态,比如:登录了淘宝网,则天猫网也是登录的;
www.taobao.com
www.tmall.com
比如:
www.web.com
www.p2p.com
www.dai.com
对于不同根域名的场景,要实现一处登录,处处登录,Spring Session 不支持!
单点登录(Single Sign On),简称为 SSO,是流行的企业业务整合的解决方案之一,SSO 是指在多个应用系统中,用户只需要登录一次就可以访问所有相互信任的应用系统!
实现比较复杂,不适合两三年的程序员,此处了解即可!
Spring Boot 集成 Spring Session
示例:(同域名下相同项目【集群环境】实现 Session 共享)
-
创建 Spring Boot 项目,选择 Spring Web、Spring Session、Redis 依赖
-
在 application.properties/yml 中配置 redis 连接信息:【看注释提示,可分别配置成不同的Session共享方案】
#redis spring.redis.host=192.168.154.128 spring.redis.port=6379 #spring.redis.password=123 #设置SpringSession的Session生命周期为30m,表示30分钟(默认30分钟) #server.servlet.session.timeout=30m #指定Cookie的存放路径为根路径,用于实现同域名,不同项目的Session共享 #server.servlet.session.cookie.path=/ #指定Cookie的存放域名,用于实现同根域名,不同二级子域名的Session共享 #server.servlet.session.cookie.domain=myweb.com -
创建控制器类,处理请求
@RestController public class SessionController { @RequestMapping("/set") public Object set(HttpSession session) { session.setAttribute("mykey", "我的session数据!"); return "设置session数据成功!"; } @RequestMapping("/get") public Object get(HttpSession session) { String data = (String) session.getAttribute("mykey"); return data; } } -
给项目分别配置 9300 和 9400 两个端口后,分别使用 package 命令进行打包
-
重命名进行区分,如 9300-demo.jar 和 9400-demo.jar;将两个 jar 包上传到 Linux 的 /home/ 下
-
分别使用命令
java -jar 9300-demo.jar &和java -jar 9400-demo.jar后台启动 -
配置
/usr/local/nginx/conf/nginx.conf文件,实现负载均衡(使用默认的轮询策略即可)location / { proxy_pass http://www.test.com; } upstream www.test.com { server 192.168.154.128:9300; server 192.168.154.128:9400; } -
启动 Nginx
/usr/local/nginx/sbin/nginx -c /usr/local/nginx/conf/nginx.conf -
访问测试:
访问
192.168.154.128:Nginx 访问成功访问
192.168.154.128/set:session 中设值成功访问
192.168.154.128/get:session 中取值成功反复刷新取值地址:
192.168.154.128/get,无论怎样的都能正常取值成功!】测试结果:同域名下相同项目【集群环境+负载均衡】实现 Session 共享!
都看到最后了,右下角来个赞鸭!-.- 欢迎评论留言~

 浙公网安备 33010602011771号