
玩转webpack笔记
1.自动清理构建目录产物
rm -rf ./dist && webpack
或者
rimraf ./dist && webpack
clean-webpack-plugin(插件)

{
  plugins: [
      new CleanWebpackPlugin()
  ]
}
create-react-app中

const fs = require('fs-extra');

fs.emptyDirSync(paths.appBuild); //确保目录为空。如果目录不为空,则删除目录内容。如果该目录不存在,则会创建该目录。目录本身不会被删除。
2. 自动补齐css3前缀
postcss-loader

cra中

{
        // Options for PostCSS as we reference these options twice
        // Adds vendor prefixing based on your specified browser support in
        // package.json
        loader: require.resolve('postcss-loader'),
        options: {
          // Necessary for external CSS imports to work
          // https://github.com/facebook/create-react-app/issues/2677
          ident: 'postcss',
          plugins: () => [
            require('postcss-flexbugs-fixes'),
            require('postcss-preset-env')({
              autoprefixer: {
                flexbox: 'no-2009',
              },
              stage: 3,
            }),
            // Adds PostCSS Normalize as the reset css with default options,
            // so that it honors browserslist config in package.json
            // which in turn let's users customize the target behavior as per their needs.
            postcssNormalize(),
          ],
          sourceMap: isEnvProduction && shouldUseSourceMap,
        },
      }
3. 移动端px 自动转化成rem
px2rem-loader

.page {
  font-size: 12px; /*no*/
  width: 375px; /*no*/
  height: 40px;
}

后面有 /*no*/这种注释语法会不进行 rem 的转换
目前官方推荐我们使用vw、vh进行适配,postcss-px-to-viewport
4. 静态资源内联(代码层面、请求层面)
代码层面: 初始化脚本;上报相关打点;css内联避免页面闪动;
请求层面:减少http请求数(url-loader)
raw-loader  内联html,js脚本

index.html

${ require('raw-loader!./meta.html')} // html-webpack-plugin 默认使用ejs引擎的语法,可以用${}; 内联loader也是从右到左执行
css内联
1⃣️借助style-loader
2⃣️html-inline-css-webpack-plugin
5.多页面应用打包通用方案
动态获取entry和设置html-webpack-plugin数量
利用glob.sync  (require('glob'))

function setMPA(){
   let entry = {}
   let HtmlWebpackPlugin = []
  let files = glob.sync(path.join(__dirname, './src/*/index.js'))
   Object.values(files).map( (file) => {
      const match = file.match(/src\/(.*)\/index.js/)
      const pageName = match && match[1]
      entry[pageName] = file
      HtmlWebpackPlugin.push( new HtmlWebpackPlugin({
      ...
      }))
   }
)
  return {
       entry,
    HtmlWebpackPluguin
   }
}

{
     entry: setMPA().entry
}
6. 提取页面公共资源(基础库等的分离也通常用splitChunksPlugin)


7. 代码分割和动态import
1⃣️ 抽离相同代码到一个共享快
2⃣️ 脚本懒加载,使得初始下载的代码更小(require.ensure比较老)
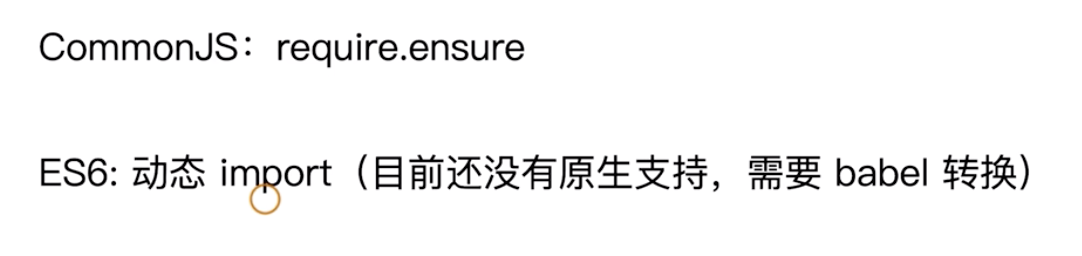
可以使用react-loadable或者自己封住个异步加载的函数,关键代码为 const { default: component } = await import('./index.js')
8. webpack打包库和组件;(支持AMD、CJS、ESM)模块引入
实现一个大整数加法库的打包(33课程)
1⃣️ npm init -y
2⃣️ npm i webpack webpack-cli -D
3⃣️ 创建 webpack.config.js、index.js、src/index.js
具体借鉴(https://github.com/geektime-geekbang/geektime-webpack-course/tree/master/code/chapter03/large-number)
9. 构建配置包设置

待续
10. 初级分析:使用webpack内置的stats(信息颗粒度粗,作用不大)
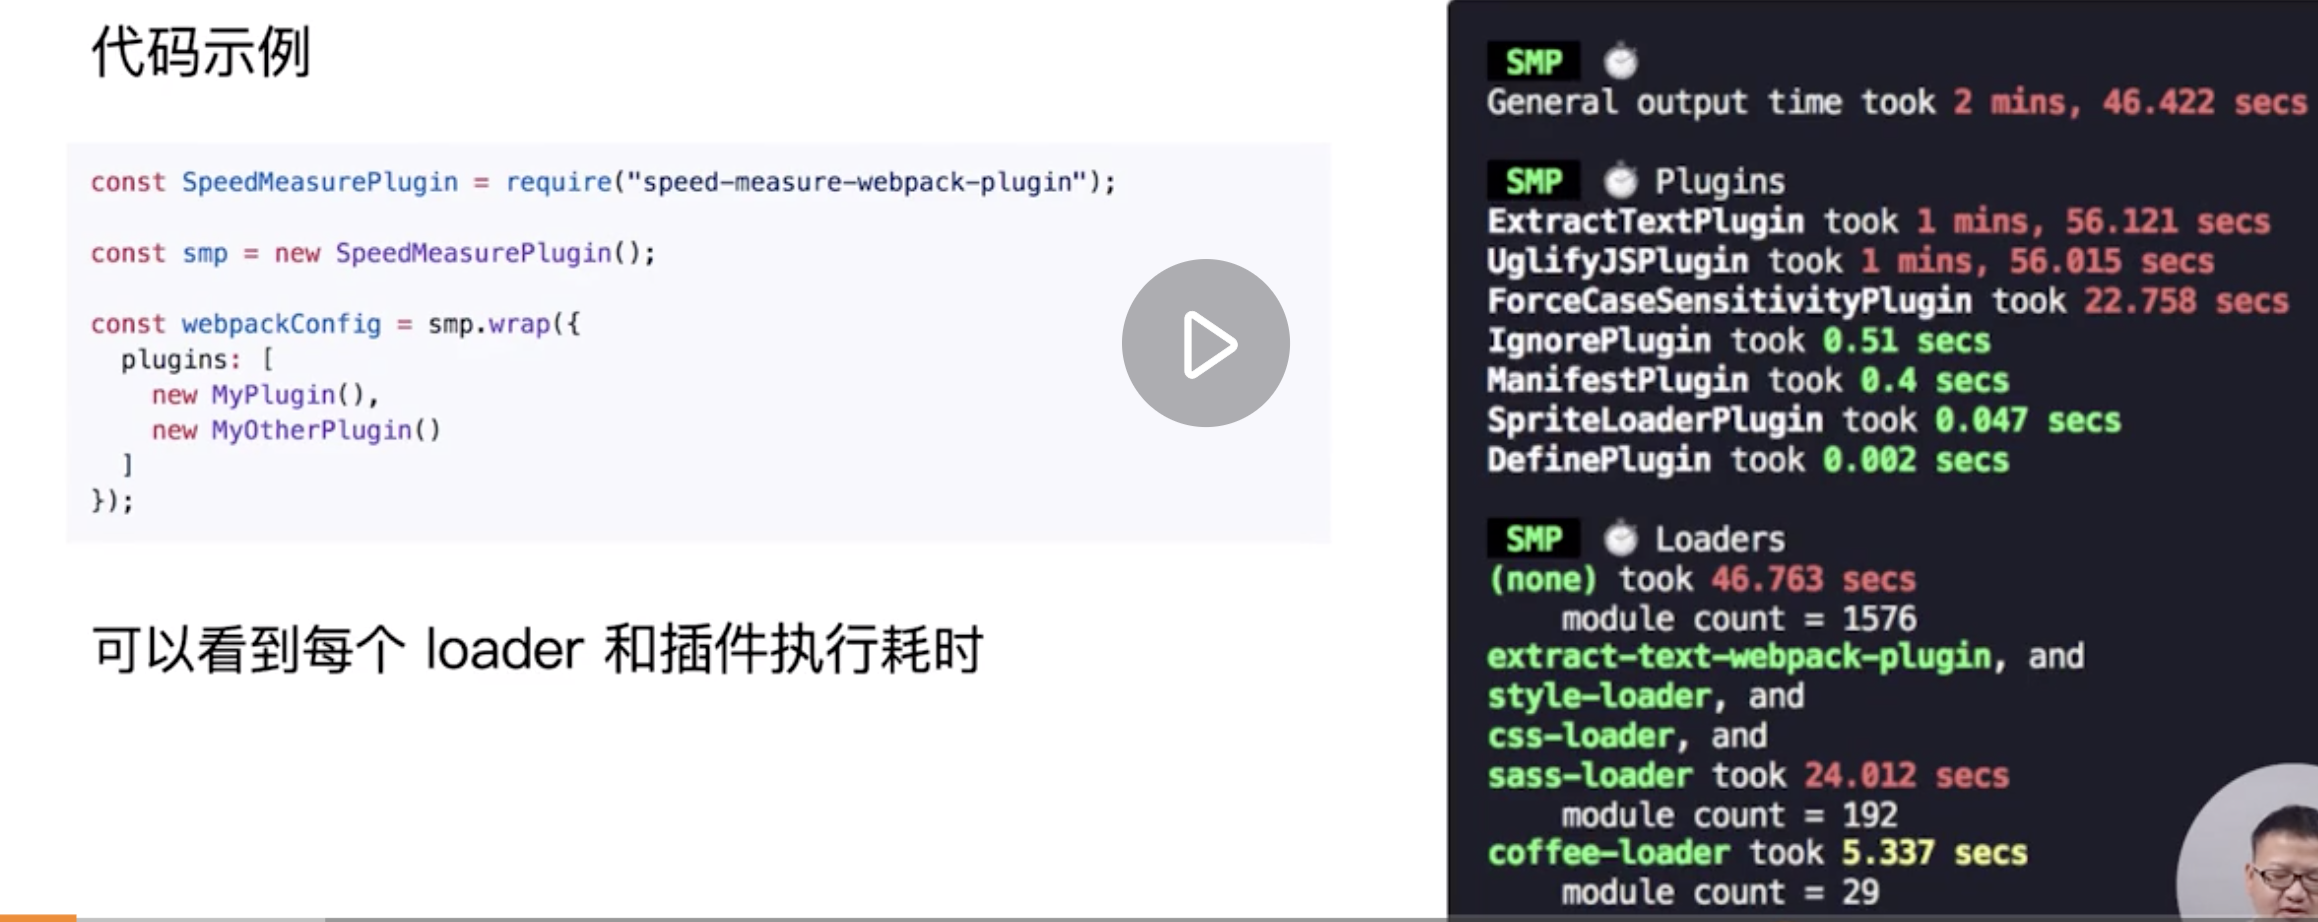
11. 速度分析:speed-measure-webpack-plugin
11. 体积分析:webpack-bundle-analyzer
优化:
1⃣️ 使用高版本的webpack、node.js

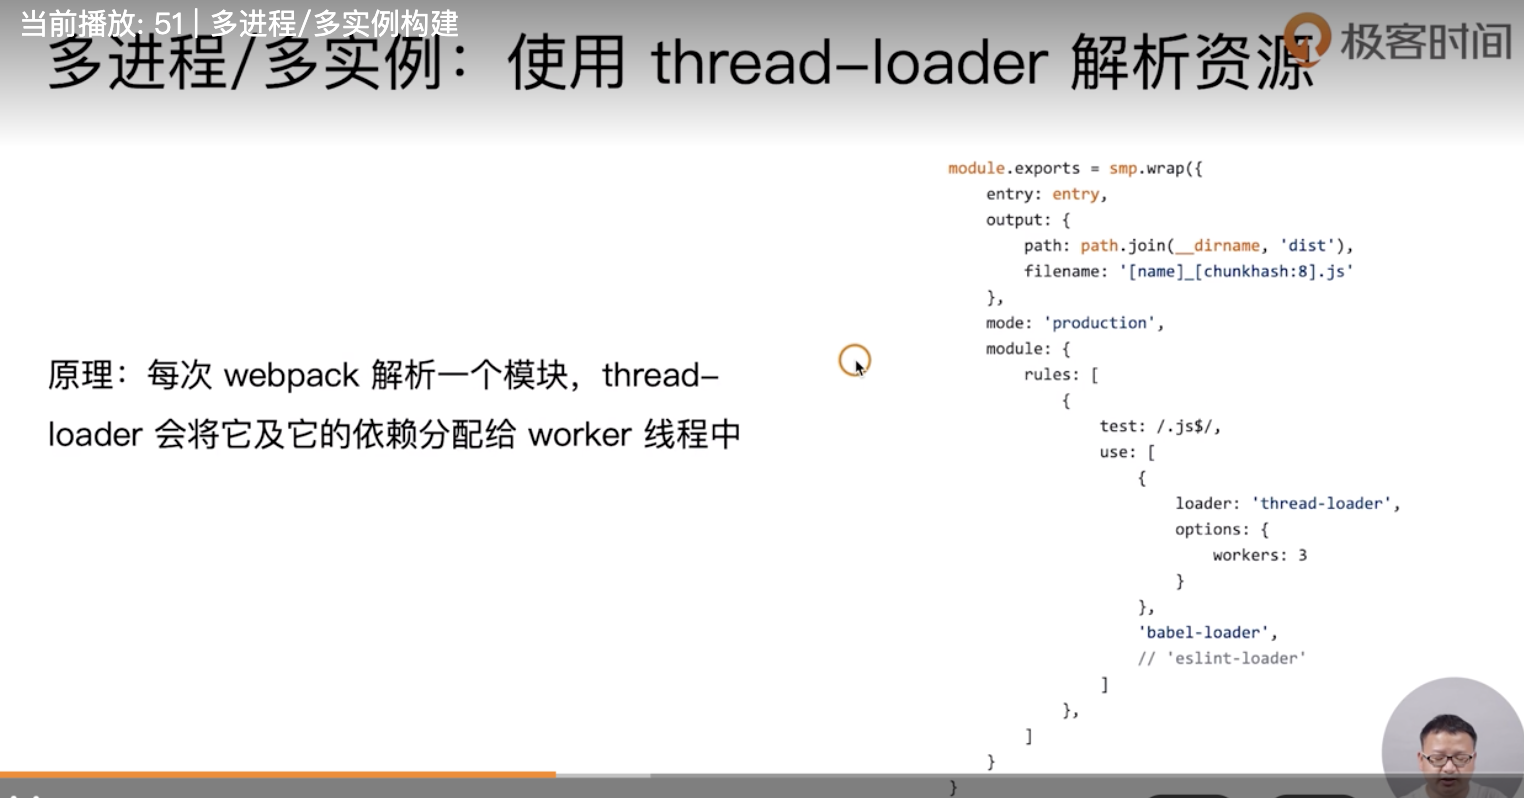
2⃣️ 多进程/多实例构建
HappyPack => webpack3, 对于多个实例,通过ID去匹配
// @file webpack.config.js
exports.plugins = [
  new HappyPack({
    id: 'jsx',
    threads: 4,
    loaders: [ 'babel-loader' ]
  }),

  new HappyPack({
    id: 'styles',
    threads: 2,
    loaders: [ 'style-loader', 'css-loader', 'less-loader' ]
  })
];

exports.module.rules = [
  {
    test: /\.js$/,
    use: 'happypack/loader?id=jsx'
  },

  {
    test: /\.less$/,
    use: 'happypack/loader?id=styles'
  },
]
webpack4 采用官方的thread-loader (workers 默认是require('os').cpus().length - 1)
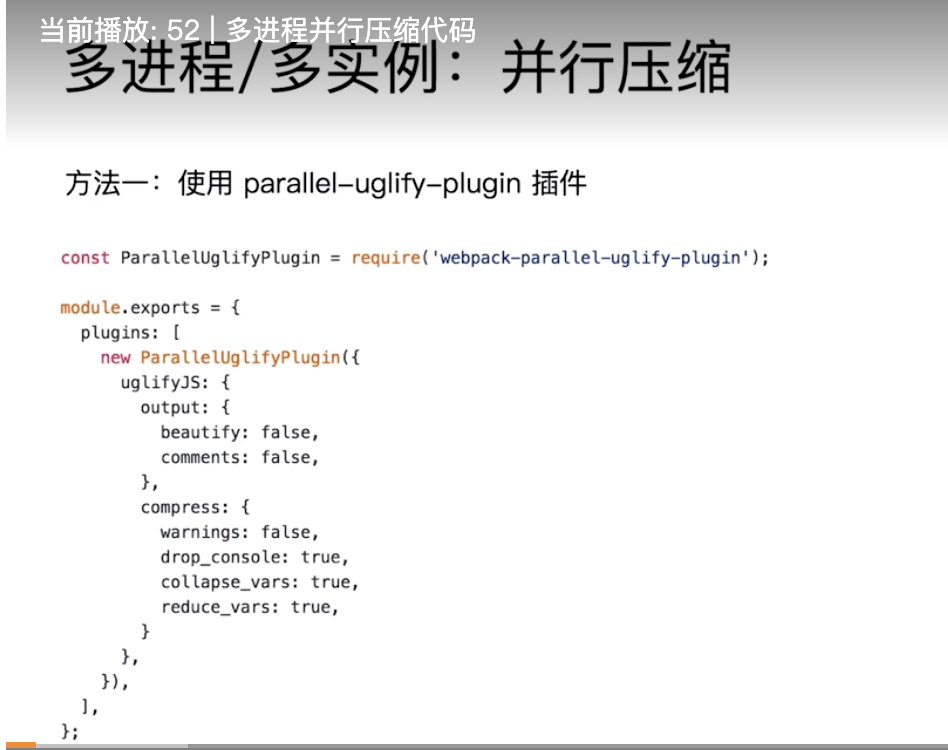
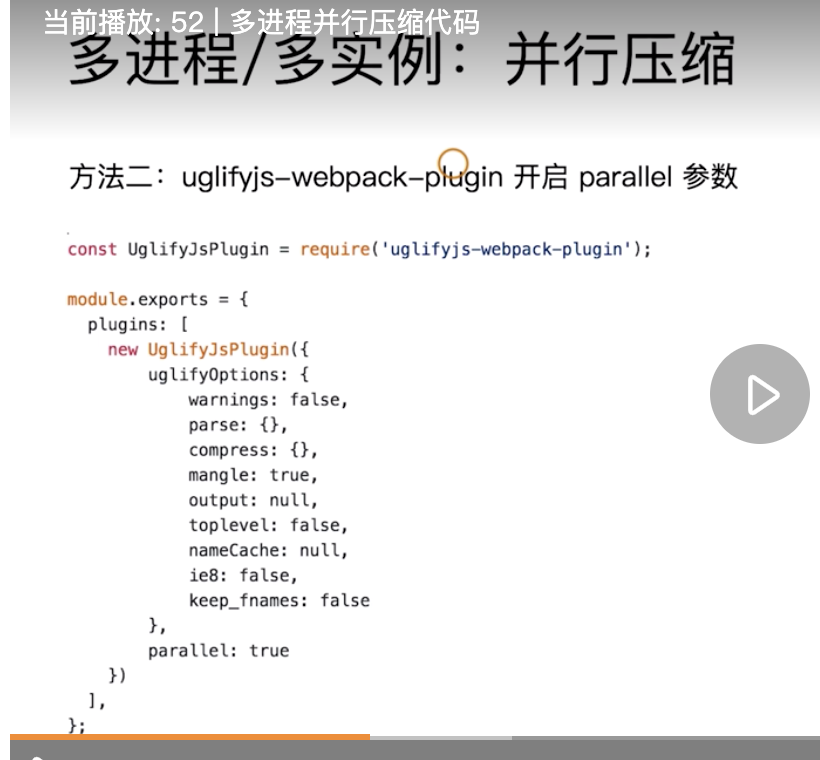
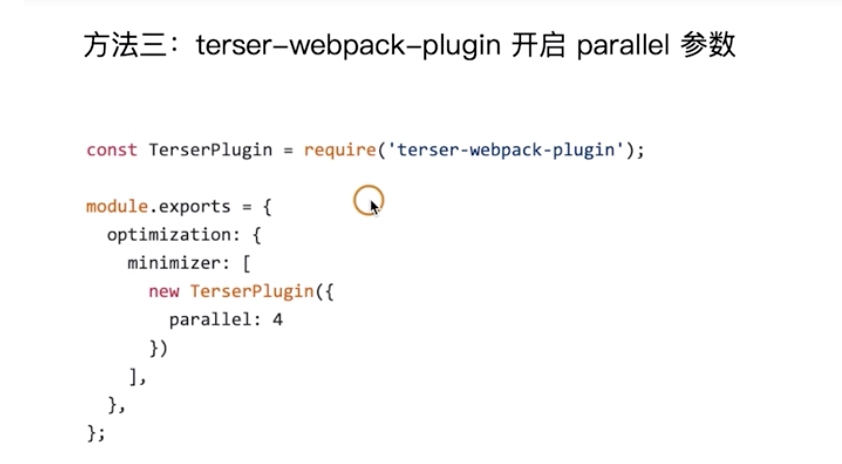
3⃣️ 多进程并行压缩代码(前两种主要针对于webpack3,不支持对es6代码(压缩中)进行压缩; 第三种是webpack4的,支持对es6模块进行压缩)
4⃣️ 预编译资源模块(相比于之前讲的html-webpack-externals-plugin, 每次基础库都要有cdn, splitChunks 每次编译都会解析;会更好)
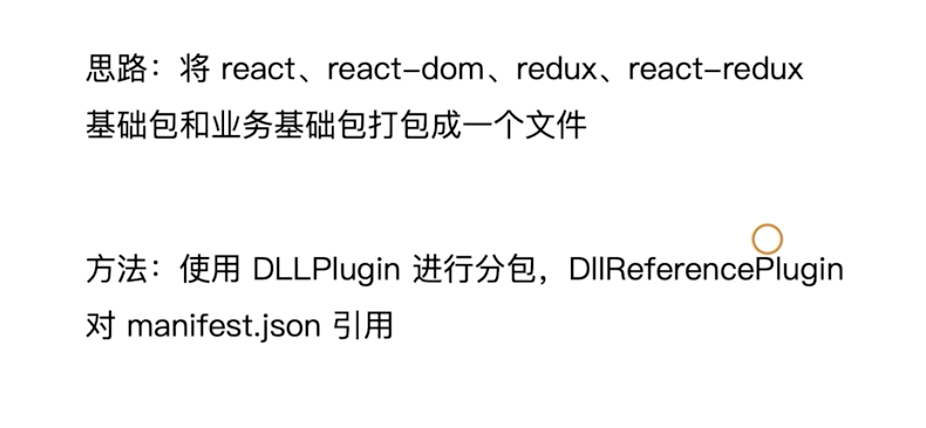
https://webpack.docschina.org/plugins/dll-plugin/
webpack.dll.js
//"dll": "webpack --config webpack.dll.js"

const path = require('path');
const webpack = require('webpack');

module.exports = {
    entry: {
        library: [
            'react',
            'react-dom'
        ]
    },
    output: {
        filename: '[name]_[chunkhash].dll.js',
        path: path.join(__dirname, 'build/library'),
        library: '[name]'
    },
    plugins: [
        new webpack.DllPlugin({
            name: '[name]_[hash]',
            path: path.join(__dirname, 'build/library/[name].json')
        })
    ]
};

// webpack.config.js
new webpack.DllReferencePlugin({
   manifest: require('./build/library/library.json') // 这个文件夹不在打包的压缩文件夹之下
})
5⃣️ 充分利用缓存提升二次构建速度
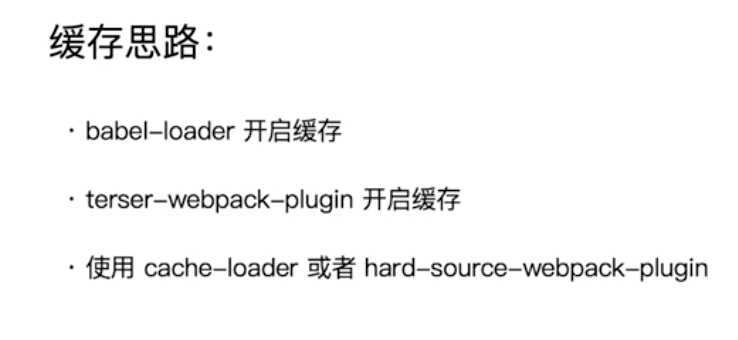
babel-loader?cacheDirectory=true

terser-webpack-plugin  cache: true

hard-source-webpack-plugin
{
    plugins: [
        new HardSourceWebpackPlugin()
      ]
}

这三个一起使用
6⃣️ 减少构建目标

babel-loader 设置 include: paths.appSrc
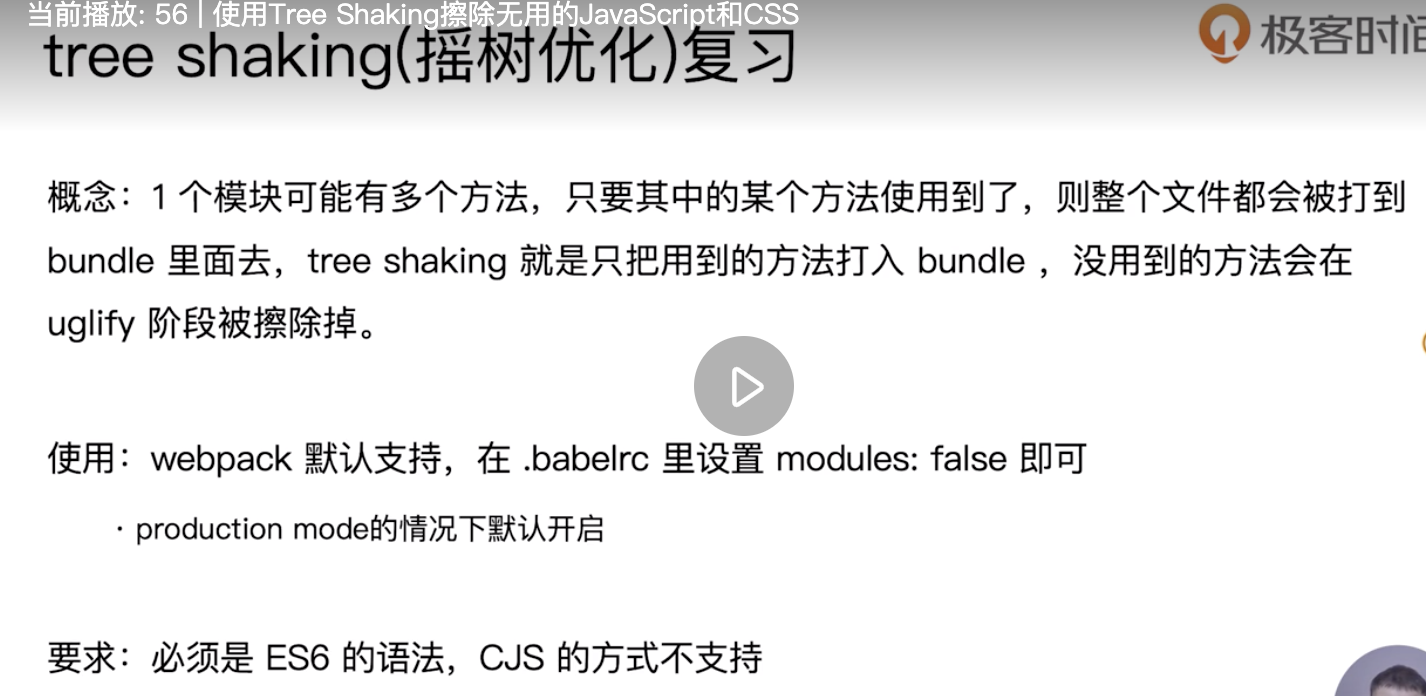
7⃣️ tree-shaking
const path = require('path');
const TerserPlugin = require('terser-webpack-plugin');

module.exports = {
    entry: {
        'tool_sensors': path.resolve(__dirname, './src/index.js'),
        'tool_sensors.min': path.resolve(__dirname, './src/index.js')
    },
    output: {
        filename: '[name].js',
        library: 'initSensor',
        libraryTarget: 'umd',
        libraryExport: 'default'
    },
    mode: 'production',
    optimization: {
        // usedExports: true, //mode: 'production'默认为true; tree-shaking需要开启
        minimize: true,
        minimizer: [
            new TerserPlugin({
                include: /\.min\.js$/,
            })
        ]
    },
    module:{
        rules: [
            {
              test: /\.m?js$/,
              exclude: /(node_modules|bower_components)/,
              use: {
                loader: 'babel-loader',
                options: {
                    presets: [
                        [
                            '@babel/preset-env',
                                {
                                    modules: false
                                }
                            ]
                    ],
                    plugins: ['@babel/plugin-transform-runtime']
                }
              }
            }
        ]
    }
}
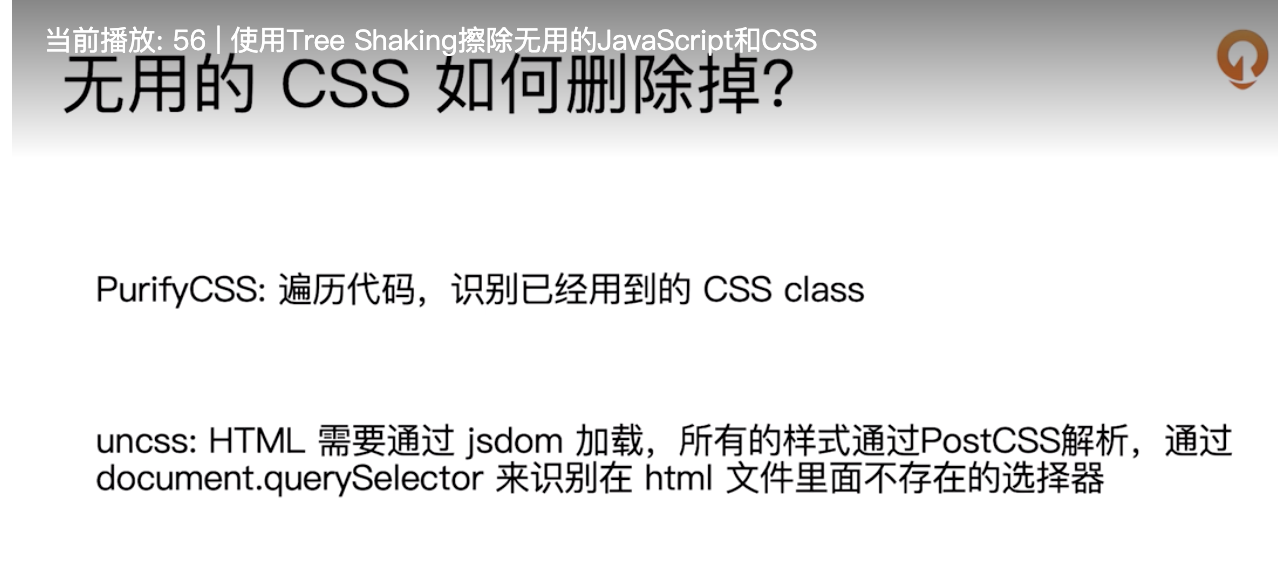
目前purifycss已经不维护,使用purgecss-webpack-plugin、mini-css-extract-plugin实现tree-shaking的效果
{
   plugins: [
    new MiniCssExtractPlugin({
      filename: "[name].css",
    }),
    new PurgecssPlugin({
      paths: glob.sync(`${PATHS.src}/**/*`,  { nodir: true }), // nodir : 只匹配文件
    }),
  ]
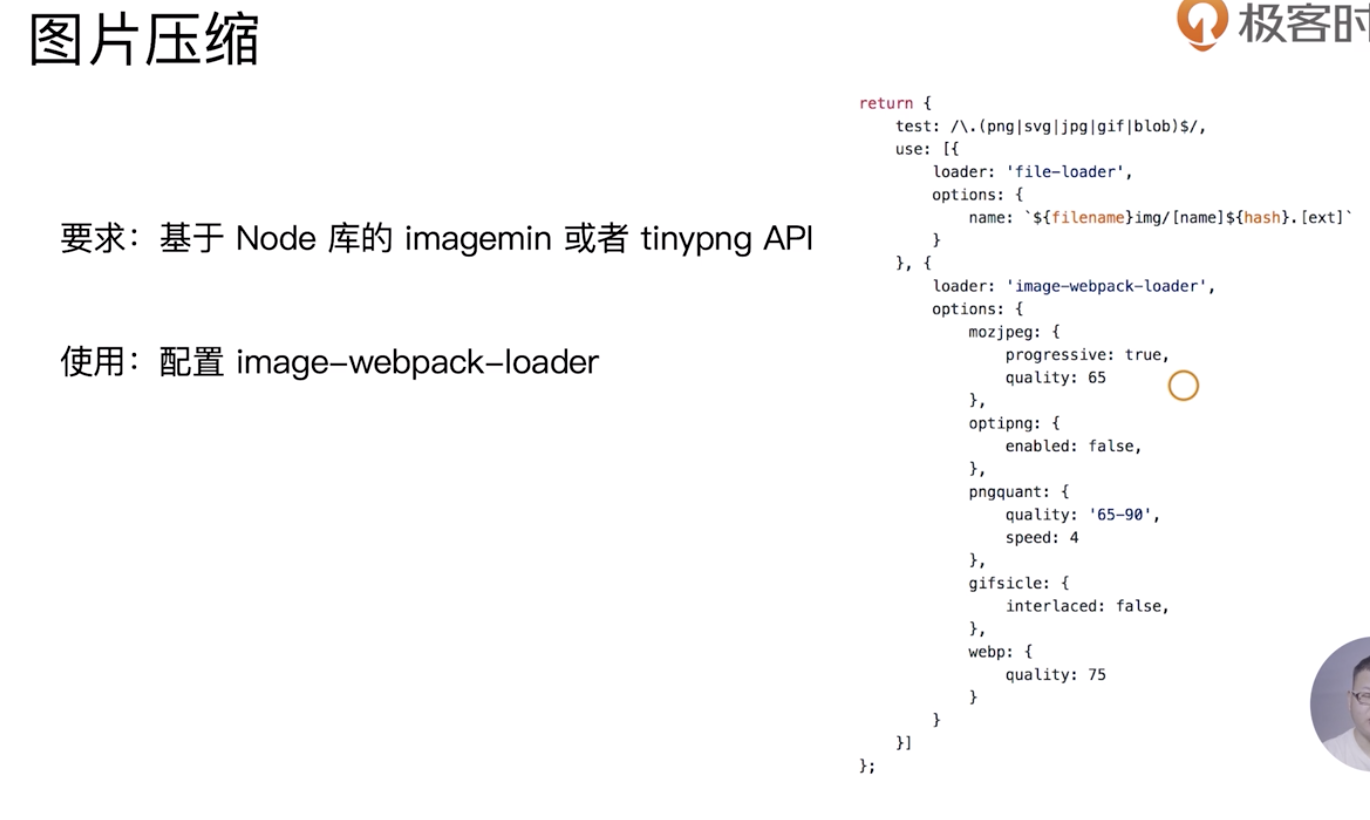
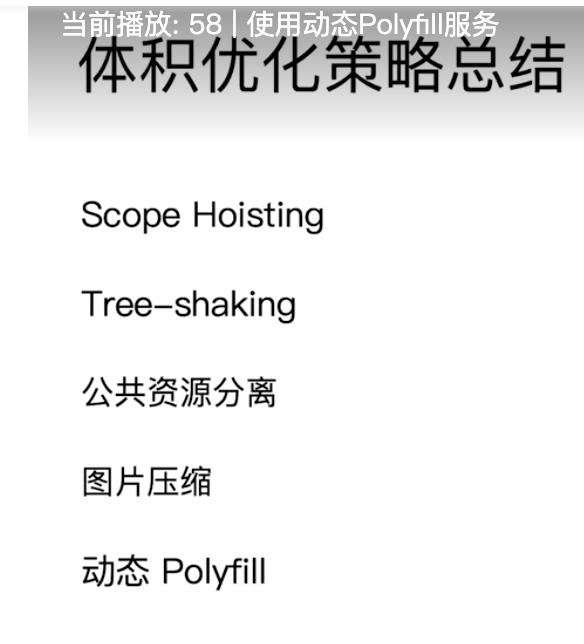
8⃣️使用webpack进行图片压缩
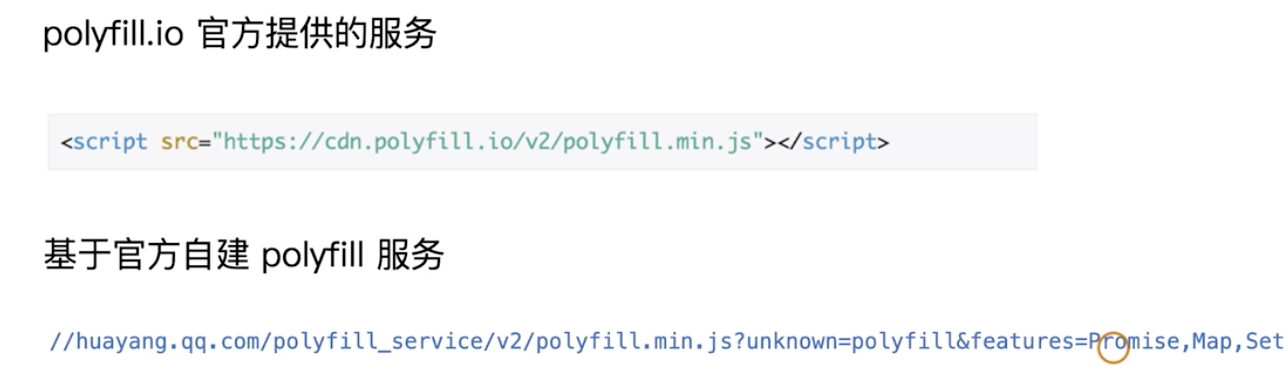
9⃣️ 使用动态Polyfill服务
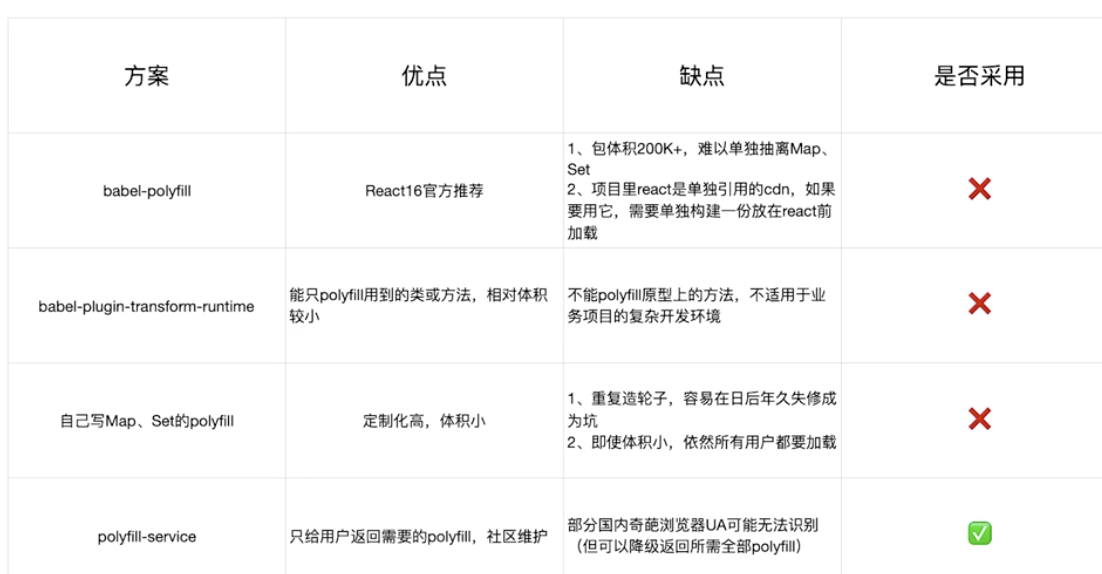
原理:识别userAgent,下发不同的polyfill
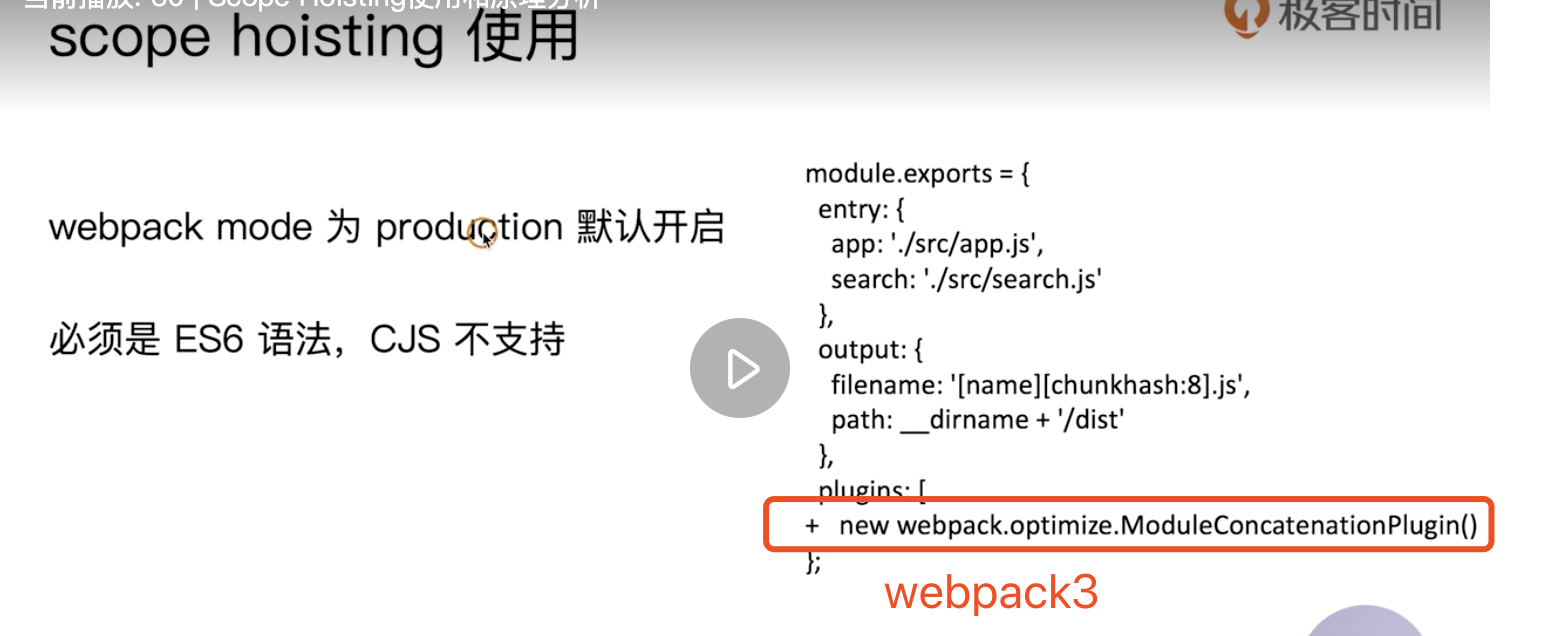
🔟 scope-hoisting
现象:构建后的代码存在大量的闭包代码

 `
`
总结:
12. 自定义loader(第70节)
执行顺序, 串行执行,从右到左(compose = (f, g) => (...args) => f(g(...args))
loader-runner 高效调试loader (作为webpack的依赖,webpack中使用它执行loader)https://github.com/geektime-geekbang/geektime-webpack-course/tree/master/code/chapter07/raw-loader
// 简单的loader
module.exports = function(source) {

    const json = JSON.stringify(source)
        .replace('foo', '')
        .replace(/\u2028/g, '\\u2028')
        .replace(/\u2029/g, '\\u2029');


    return `export default ${json}`;

}
const { runLoaders } = require('loader-runner');
const fs = require('fs');
const path = require('path');

runLoaders({
    resource: path.join(__dirname, './src/demo.txt'),
    loaders: [
        {
            loader: path.join(__dirname, './src/raw-loader.js')
        }
    ],
    context: {
        minimize: true
    },
    readResource: fs.readFile.bind(fs)
}, (err, result) => {
    err ? console.log(err) : console.log(result);
});
通过loader-utils来获取配置项
const loaderUtils = require('loader-utils')

const options = loaderUtils.getOptions(this)
如果回传一个参数可以直接用 return
如果回传多个参数可以采用 this.callback(null, data1, data2) // result.result === [daga1, data2]
异步的loader (通过 this.async() 产生一个函数进行后续调用)
const callback = this.async()

//
fs.readFile(path.join(__dirname, './async.txt'), 'utf-8', (err, data) => {
    if (err) {
        callback(err, '');
    }
    callback(null, data);
});
loader使用缓存(webpack中默认开启)
可以使用this.cacheable(false)关闭缓存
缓存条件:loader的结果在相同的输入下有相同的输出(有依赖的loader无法使用缓存)
13 自定义plugin(插件没有像loader一样的独立运行环境,只能运行在webpack)
// 最简单的plugin
// 必须有apply方法
class MyPlugin {
    apply(compiler){
        compiler.hooks.done.tap('My Plugin', (stats) => {
            console.log('hello world')
        })
    }
}


module.exports = {
    configureWebpack: {
      plugins: [
        new MyPlugin()
      ]
    }
}
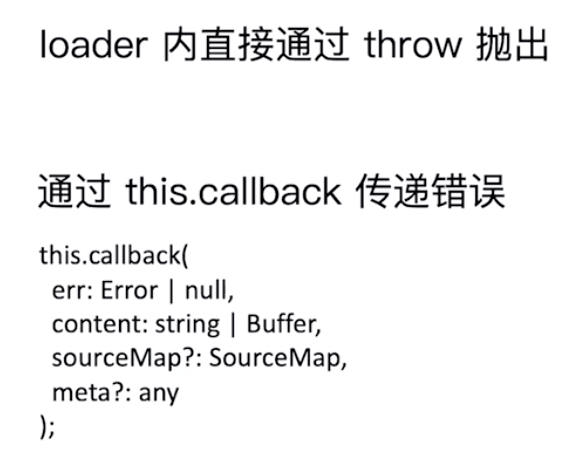
1⃣️ 插件的错误处理
参数校验阶段可以直接throw
throw new Error('Error Message')

通过compilation对象的warnings和errors接收
compilation.warnings.push('warning');
compilation.errors.push('error');
2⃣️ 通过compilation进行文件写入
// 文件写入需要使用webpack-sources
const {RawSource} = require('webpack-sources');

module.exports = class DemoPlugin{
    constructor(options){
        this.options =  options
    }
    apply(compiler){
        const {name} = this.options;
        compiler.hooks.emit.tapAsync('DemoPlugin', (compilation, callback) => {
            //webpack在打包时会生成对应的文件,name为对应的路径
            compilation.assets[name] = new RawSource('demo')
            callback();
       })
   }
}
3⃣️ 实战:将打包生成的dist目录下文件打包
const JSZip = require('jszip');
const path = require('path');
const RawSource = require('webpack-sources').RawSource;
const zip = new JSZip();

module.exports = class ZipPlugin {
    constructor(options) {
        this.options = options;
    }

    apply(compiler) {
        compiler.hooks.emit.tapAsync('ZipPlugin', (compilation, callback) => {
            const folder = zip.folder(this.options.filename);

            for (let filename in compilation.assets) {
                const source = compilation.assets[filename].source();
                folder.file(filename, source);
            }

            zip.generateAsync({
                type: 'nodebuffer'
            }).then((content) => {
                const outputPath = path.join(
                    compilation.options.output.path,
                    this.options.filename + '.zip'
                );

                const outputRelativePath = path.relative(
                    compilation.options.output.path,
                    outputPath
                );
                compilation.assets[outputRelativePath] = new RawSource(content);

                callback();
            });
        });
    }
}
webpack 中许多对象扩展自 Tapable 类。这个类暴露 tap, tapAsync 和 tapPromise 方法,可以使用这些方法,注入自定义的构建步骤,这些步骤将在整个编译过程中不同时机触发。
分别 对应是否是异步还是同步钩子;同步的钩子只能用tap;异步钩子需要callback() 个人觉得可以理解成next()
compiler钩子详细文档介绍(https://webpack.docschina.org/api/compiler-hooks/)
5⃣️ 在输出文件时,动态修改部分文件的内容
class MyPlugin {
    constructor(options){
        this.options =  options
    }
    apply(compiler){
        const {name} = this.options;

        compiler.hooks.emit.tapAsync('MyPlugin', (compilation, callback) => {
            for (let filename in compilation.assets) {
                console.log(filename)
                if(/\.html$/.test(filename)){
                    let source = compilation.assets[filename].source();
                    source = source.replace(/(\/js)|(\/css)/g, '.$1$2'); //修改链接路径
                    compilation.assets[filename] = new RawSource(source)
                }
            }
            callback();
       })
   }
}

 浙公网安备 33010602011771号