Linux基础23 网卡命名规则, 网卡配置文件, 模板机制作, 系统systemd进程管理,service unit文件,开机启动文件rc.local,内核参数管理,ubuntu配置网卡/修改默认网卡名
网卡命名规则
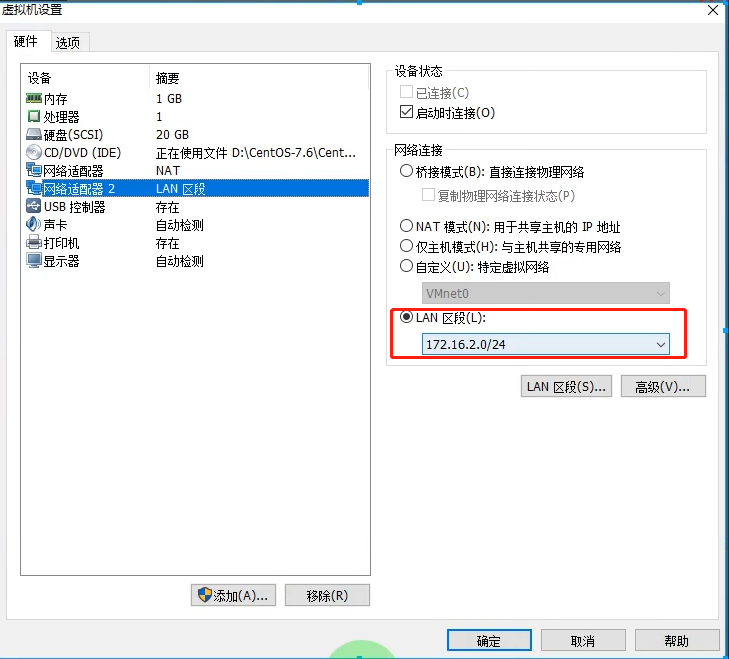
添加网卡,添加lan区段,保证在同一网段下,用于内网通讯

进去安装界面 在安装选项上,按下tab,然后在quiet后输入空格, biosdevname=0 net.ifnames=0
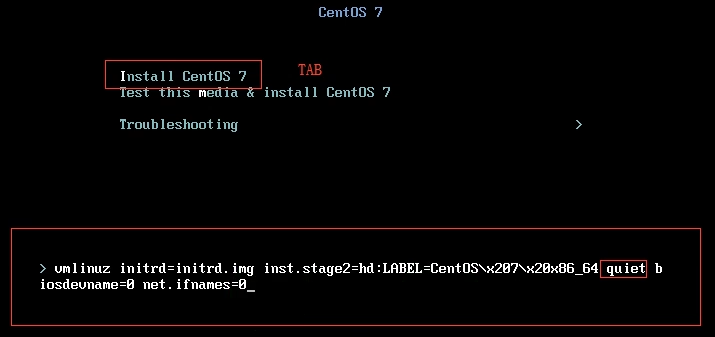
输入完直接回车

在配置网络界面,出现2块网卡 eth0和eth1, 名字已修改完成
网卡配置文件
安装完系统,配置网卡1
vi /etc/sysconfig/network-scripts/ifcfg-eth0
BOOTPROTO    dhcp改成none或者static
IPV6相关配置可以删掉
后期克隆虚拟机,UUID如果一样,网卡会冲突,直接删掉
ONBOOT  开机自动启动,改成yes
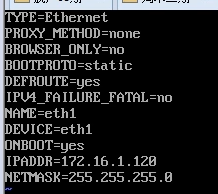
设置ip地址 IPADDR
配置掩码 NETMASK
配置网关 GATEWAY
设置首选备用DNS(尽量使用阿里云的)
DNS1=223.5.5.5
DNS2=223.6.6.6
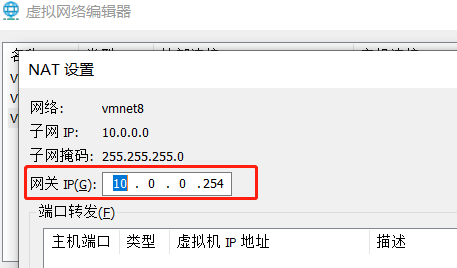 网关地址
网关地址
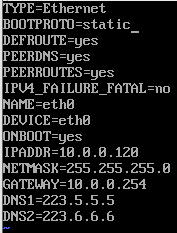
配置网卡2
IPADDR设置为和lan区段相同,最后一位推荐和网卡一最后一位一致
内网网卡不需要网关
systemctl restart network    # 因为本身就启动着的,这里要重启
ip a     # 查看ip是否出现
cat /etc/resolv.conf    # 重启完这个命令能看到2个说明dns配置ok了,加载出来了
#注意,在rocky中,systemctl restart network没有了,需要采用下方nmcli管理

[root@localhost ~]# nmcli c reload                #重新加载NetworkManager配置的命令
[root@localhost ~]# nmcli c down ens33            #停止名为ens33的网络连接的命令
[root@localhost ~]# nmcli c up ens33              #启用名为ens33的网络连接的命令
模板镜像优化
阿里换源
curl -o /etc/yum.repos.d/CentOS-Base.repo https://mirrors.aliyun.com/repo/Centos-7.repo
yum install -y wget tree gcc gcc-c++ glibc vim net-tools telnet

把 /etc/yum.repos.d下除CentOS-Base.repo镜像外都删了,没什么用, 浪费加载时间
find /etc/yum.repos.d/ -type f ! -name 'CentOS-Base.repo'|xargs rm -f

wget -O /etc/yum.repos.d/epel.repo https://mirrors.aliyun.com/repo/epel-7.repo
# 修改主机名命令(不支持下划线,但支持横线)
hostnamectl set-hostname 主机名
# 查看,或者直接输入hostname查看
cat /etc/hostname
写个脚本,修改主机命和ip
vim host_ip.sh#!/bin/bash

. /etc/init.d/functions

read -p '请输入要修改的IP主机位: ' IP
read -p '请输入要修改的主机名: ' H

sed -i "s#120#$IP#g" /etc/sysconfig/network-scripts/ifcfg-eth{0,1}

systemctl restart network
if [ $? -eq 0 ]; then
        action "network" /bin/true
else
        action "network" /bin/false
fi

hostnamectl set-hostname $H

new_name=`cat /etc/hostname`

if [ $new_name -eq $H ];then
        action "hostname" /bin/true
else
        action "hostname" /bin/false
fi
修改selinux
vim /etc/sysconfig/selinux
改为 SELINUX=disabled
关闭防火墙
systemctl stop firewalld
关闭NetworkManager (Centos7有两个网络服务,用的是NetWork, 不是它,有时候2块网卡,会应该这个服务上不了网)
systemctl stop NetworkManager
以后模板机不要启动了,直接管理克隆,选快照,创建连接克隆
启动新镜像
sh host_ip.sh
系统systemd进程管理
什么是systemd
systemd即为system daemon守护进程,systemd主要解决上文的问题而诞生,
systemd的目标是,为系统的启动和管理提供一套完整的解决方案。
systemd优势
1.最新系统都采用systemd管理(RedHat7,CentOS7,Ubuntu15...)
2.CentOS7 支持开机并行启动服务,显著提高开机启动效率
3.CentOS7关机只关闭正在运行的服务,而CentOS6,全部都关闭一次。
4.CentOS7服务的启动与停止不在使用脚本进行管理,也就是/etc/init.d下不在有脚本。
5.CentOS7使用systemd解决原有模式缺陷,比如原有service不会关闭程序产生的子进程。
systemd相关的配置文件
/usr/lib/systemd/system #每个服务最主要的脚本文件目录,类似C6系统的启动脚本目录/etc/init.d/

/run/systemd/system/ #系统执行过程中所产生的服务脚本,比上面目录 优先运行

/etc/systemd/system/ #类似C6系统的/etc/rc.d/rcN.d/    # 默认运行级别,可以通过软链接修改,
# 也可通过systemctl get-default获取,systemctl set-default+级别   进行修改
#管理员建立的执行脚本,类似于centos6中/etc/rcN.d/Sxx的功能,比上面目录优先运行

/etc/systemd/system/multi-user.target.wants/    # 开机自启,可以通过这里加软链接也可以通过命令修改
# systemctl enable sshd增加sshd自启动,systemctl disable sshd停止sshd自启动
systemd相关的命令:
Centos6:
启动服务:
/etc/init.d/服务名 start
service 服务名 start

关闭服务:
/etc/init.d/服务名 stop
service 服务名 stop

[root@oldboyedu ~]# chkconfig --list

设置开机自启动:
[root@oldboyedu ~]# chkconfig 服务名 on
取消开机自启动:
[root@oldboyedu ~]# chkconfig 服务名 off

查看服务的启动状态:
[root@oldboyedu ~]# /etc/init.d/sshd status
Centos7:
启动服务:
systemctl start 服务名

停止服务:
systemctl stop 服务名

设置开机自启动:
[root@oldboyedu ~]# systemctl enable 服务名
Created symlink from /etc/systemd/system/multi-user.target.wants/vsftpd.service to /usr/lib/systemd/system/vsftpd.service.
# systemctl enable --now 服务名 设为开机启动,并且立即启动
取消开机自启动:
[root@oldboyedu ~]# systemctl disable 服务名
Removed symlink /etc/systemd/system/multi-user.target.wants/vsftpd.service.
# systemctl disable --now 服务名 关闭开机启动,并且立即停止
#当文件只有.service时,可以省略(在Loaded:能看是否开机启动)
查看服务的启动状态: [root@oldboyedu ~]# systemctl status vsftpd


重启服务
systemctl restart 服务名
  active(running)  运行
  inactive      不在运行

重载(不会真正重启, 用的比较多)
systemctl reload 服务名

#查看service 服务脚本内容
systemctl cat name.service
service unit文件
unit 文件格式说明
- 以 # 开头的行后面的内容会被认为是注释
- 相关布尔值 1,yes,on,true 等可以表示开启,0,no,off,false 等都可以表示关闭
- 时间单位默认是秒,如果要使用其它时间单位,毫秒(ms),分钟(m) 等须显式说明
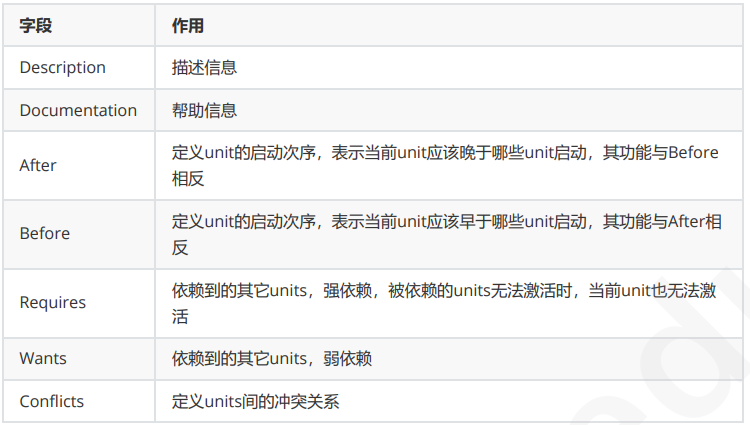
service unit file文件通常由三部分组成

[Unit] 字段中的常用选项
[Service] 字段中的常用选项
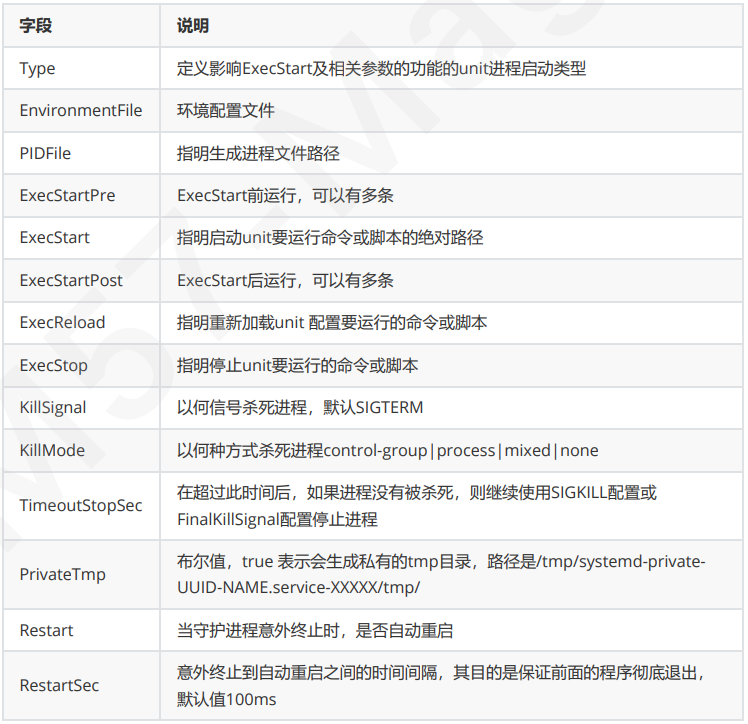
Type字段常用值
simple #默认值, 这个daemon主要由ExecStart接的指令串来启动,启动后常驻于内存中
forking #由ExecStart启动的程序透过spawns延伸出其他子程序来作为此daemon的主要服务,
原生父程序在启动结束后就会终止
oneshot #与simple类似, 不过这个程序在工作完毕后就结束了,不会常驻在内存中
dbus #与simple类似,但这个daemon必须要在取得一个D-Bus的名称后, 才会继续运作,
因此通常也要同时设定BusNname
notify #在启动完成后会发送一个通知消息, 还需要配合NotifyAccess来让Systemd 接收消
息
idle #与simple类似, 要执行这个daemon必须要所有的工作都顺利执行完毕, 这类daemon
通常是开机到最后才执行的服务
[Install] 字段中的常用选项

对于新创建的unit文件,或者修改了的unit文件,要通知systemd重载此配置文件,而后可以选择重启
systemctl daemon-reload

例:自定义service的unit文件
#rocky 系统中通用
[root@ubuntu ~]# vim /lib/systemd/system/hello.service
[Unit]
Description=Hello World

[Service]
TimeoutStartSec=0
ExecStart=/bin/sh -c "while true; do echo Hello World; sleep 1; done"
ExecStop=/bin/kill sh

[Install]
WantedBy=multi-user.target

[root@ubuntu ~]# systemctl daemon-reload

#启用
[root@ubuntu ~]# systemctl enable --now hello
Created symlink /etc/systemd/system/multi-user.target.wants/hello.service →
/lib/systemd/system/hello.service.

#查看状态
[root@ubuntu ~]# systemctl status hello
● hello.service - Hello World
     Loaded: loaded (/lib/systemd/system/hello.service; enabled; vendor preset:
enabled)
     Active: active (running) since Sat 2023-05-20 14:19:04 CST; 39s ago
   Main PID: 5850 (sh)
     Tasks: 2 (limit: 2193)
......
开机启动文件rc.local
想开机时自动运行的命令,可直接放置于/etc/rc.d/rc.local文件中

centos6,7,8:
路径: /etc/rc.d/rc.local

注意:默认Ubuntu 无 /etc/rc.local 文件,需要手动创建并添加可执行权限,首行必须有shebang机制

例:
#创建测试脚本
[root@c6 ~]# vim rc-local-test.sh
#!/bin/bash
sleep 3000

#加执行权限
[root@c6 ~]# chmod a+x rc-local-test.sh

#加入开机启动
[root@c6 ~]# vim /etc/rc.d/rc.local
#!/bin/sh
#
# This script will be executed *after* all the other init scripts.
# You can put your own initialization stuff in here if you don't
# want to do the full Sys V style init stuff.
touch /var/lock/subsys/local
/root/rc-local-test.sh

#重启,测试看是否启动
[root@c6 ~]# ps aux | grep rc-local
root       1843  0.0  0.0 108112  1244 ?       S    19:17   0:00 /bin/bash
/root/rc-local-test.sh
root       1890  0.0  0.0 103152   820 pts/1   S+   19:21   0:00 grep rc-local

[root@c6 ~]# pstree -p | grep rc-local
       |-rc(982)---S99local(1841)---rc-local-test.s(1843)---sleep(1844)
内核参数管理
sysctl 命令用来配置linux 系统内核参数,这些参数以文件的形式显示在 /proc/sys/ 目录中,
配置项就是目录名加文件名,值就是该文件中的内容
注意:不是所有内核参数都是可以被修改的
查看所有配置项
内核参数配置目录
[root@ubuntu ~]# ll /proc/sys
total 0
dr-xr-xr-x   1 root root 0 May 21 08:42 ./
dr-xr-xr-x 294 root root 0 May 21 08:42 ../
dr-xr-xr-x   1 root root 0 May 21 08:48 abi/
dr-xr-xr-x   1 root root 0 May 21 08:48 debug/
dr-xr-xr-x   1 root root 0 May 21 08:48 dev/
dr-xr-xr-x   1 root root 0 May 21 08:43 fs/
dr-xr-xr-x   1 root root 0 May 21 08:42 kernel/
dr-xr-xr-x   1 root root 0 May 21 08:43 net/
dr-xr-xr-x   1 root root 0 May 21 08:48 sunrpc/
dr-xr-xr-x   1 root root 0 May 21 08:48 user/
dr-xr-xr-x   1 root root 0 May 21 08:43 vm/

[root@ubuntu ~]# ll /proc/sys/net/ipv4/ip_forward
-rw-r--r-- 1 root root 0 May 21 08:48 /proc/sys/net/ipv4/ip_forward
[root@ubuntu ~]# cat /proc/sys/net/ipv4/ip_forward
0
sysctl 格式
sysctl [options] [variable[=value] ...]

#常用选项
-a|-A|-x|--all #显示所有内核参数
-p|--load #重载
-N|--names #仅显示参数名称
-n|--values #仅显示参数值
-w|--write #设置内核参数

范例:查看所有参数
[root@ubuntu ~]# sysctl -a | head
abi.vsyscall32 = 1
debug.exception-trace = 1
debug.kprobes-optimization = 1
...

范例:查看指定项
[root@ubuntu ~]# sysctl net.ipv4.ip_forward
net.ipv4.ip_forward = 0

范例:修改内核参数(临时生效)
[root@ubuntu ~]# sysctl -w net.ipv4.ip_forward=1
net.ipv4.ip_forward = 1
#查看
[root@ubuntu ~]# sysctl net.ipv4.ip_forward
net.ipv4.ip_forward = 1
#查看
[root@ubuntu ~]# cat /proc/sys/net/ipv4/ip_forward
1

范例:修改内核参数(临时生效)
[root@ubuntu ~]# echo 123 > /proc/sys/net/ipv4/ip_forward
[root@ubuntu ~]# cat /proc/sys/net/ipv4/ip_forward
123
[root@ubuntu ~]# sysctl net.ipv4.ip_forward
net.ipv4.ip_forward = 123


范例:写配置文件,永久有效
[root@ubuntu ~]# vim /etc/sysctl.conf
.....
net.ipv4.ip_forward=0
#还没有生效
[root@ubuntu ~]# sysctl net.ipv4.ip_forward
net.ipv4.ip_forward = 1
#重载生效
[root@ubuntu ~]# sysctl -p
net.ipv4.ip_forward = 0
可用的配置文件
系统在启动时,会按下列顺序加载配置文件,读取参数值
/run/sysctl.d/*.conf
/etc/sysctl.d/*.conf
/usr/local/lib/sysctl.d/*.conf
/usr/lib/sysctl.d/*.conf
/lib/sysctl.d/*.conf
/etc/sysctl.conf
常用内核参数
net.ipv4.ip_forward #是否开启ipv4地址转发
net.ipv4.icmp_echo_ignore_all #是否禁用ping功能
net.ipv4.ip_nonlocal_bind   #允许应用程序可以监听本地不存在的IP
vm.drop_caches #缓存回收机制 3 回收所有 2 释放数据区和信息节点
1 释放页面缓存
fs.file-max = 1020000 #内核可以支持的全局打开文件的最大数
vm.overcommit_memory = 0 #超分 0表示进程申请内存时会判断,不够则返回错
误,1表示内核允许分配所有的物理内存,而不管当前的内存状态如何,2表示内核允许分配超过所有物理内存
和交换空间总和的内存

vm.swappiness = 10           #使用swap空间时物量内存还有多少可用,10 表示物
理存只有10%时才使用swap
#禁用IPv6
net.ipv6.conf.all.disable_ipv6 = 1
net.ipv6.conf.default.disable_ipv6 = 1
对于网络接口的配置,则会在对应的网络接口出现的时候才会生效,具体来说就是 net.ipv4.conf, net.ipv6.conf,net.ipv4.neigh, net.ipv6.neigh 等参数。
有部份sysctl 参数仅在加载了相应的内核模块之后才可用,因为内核模块是按需动态加载的(例如加入了 新的硬件或启动网络时),所以在 sysctl.conf 文件中无法设置的那些依赖于特定模块的参数。
ubuntu配置网卡
网卡配置文件存在于 /etc/netplan/ 目录中,以 XXX.yaml 的格式来命名路径是固定的,文件命名规则也是固定的
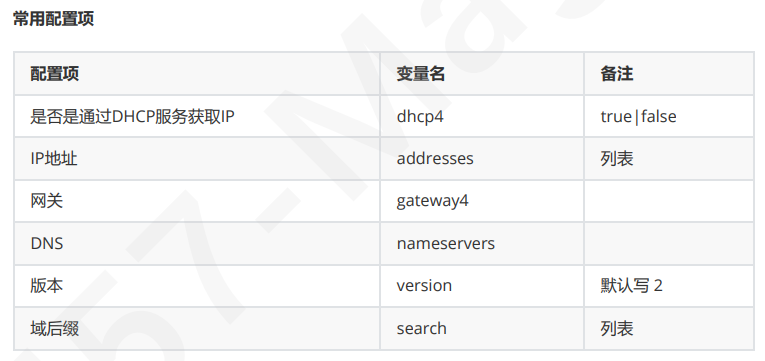
#添加一块网卡,并指定NAT模式
root@ubuntu22:~# cd /etc/netplan/
root@ubuntu22:/etc/netplan# ls
00-installer-config.yaml

#新增网卡配置文件
root@ubuntu22:/etc/netplan# vim eth1.yaml
network:
 renderer: networkd
 ethernets:
   eth1:
     addresses: [10.0.0.6/24,10.0.0.66/24]
     nameservers:
       search: [magedu.com,magedu.org]
       addresses: [10.0.0.2,180.76.76.76]
 version: 2


#让网卡生效
root@ubuntu22:/etc/netplan# netplan apply

#查看
root@ubuntu22:/etc/netplan# ip a show eth1
3: eth1: <BROADCAST,MULTICAST,UP,LOWER_UP> mtu 1500 qdisc fq_codel state UP
group default qlen 1000
   link/ether 00:0c:29:29:55:67 brd ff:ff:ff:ff:ff:ff
   altname enp2s5
   altname ens37
   inet 10.0.0.6/24 brd 10.0.0.255 scope global eth1
       valid_lft forever preferred_lft forever
   inet 10.0.0.66/24 brd 10.0.0.255 scope global secondary eth1
       valid_lft forever preferred_lft forever
   inet6 fe80::20c:29ff:fe29:5567/64 scope link
       valid_lft forever preferred_lft forever


#查看路由
root@ubuntu22:/etc/netplan# apt install -y net-tools
root@ubuntu22:/etc/netplan# route -n

#查看DNS
#这里看不到
root@ubuntu22:/etc/netplan# cat /etc/resolv.conf
#这里能看到
root@ubuntu22:~# resolvectl status
Link 3 (eth1)
   Current Scopes: DNS
         Protocols: +DefaultRoute +LLMNR -mDNS -DNSOverTLS DNSSEC=no/unsupported
Current DNS Server: 10.0.0.2
       DNS Servers: 10.0.0.2 180.76.76.76
       DNS Domain: magedu.com magedu.org
Ubuntu 修改网卡默认名称
#改为eth0起始
vim /etc/default/grub
找到GRUB_CMDLINE_LINUX=""
改为GRUB_CMDLINE_LINUX="net.ifnames=0 biosdevname=0"
然后sudo grub-mkconfig -o /boot/grub/grub.cfg
最后记得重启


【推荐】国内首个AI IDE,深度理解中文开发场景,立即下载体验Trae
【推荐】编程新体验,更懂你的AI,立即体验豆包MarsCode编程助手
【推荐】抖音旗下AI助手豆包,你的智能百科全书,全免费不限次数
【推荐】轻量又高性能的 SSH 工具 IShell:AI 加持,快人一步
· 无需6万激活码!GitHub神秘组织3小时极速复刻Manus,手把手教你使用OpenManus搭建本
· C#/.NET/.NET Core优秀项目和框架2025年2月简报
· Manus爆火,是硬核还是营销?
· 一文读懂知识蒸馏
· 终于写完轮子一部分:tcp代理 了,记录一下