hexo + vercel 构建你的静态页面博客系统(免费)
参考资料
注册vercel、安装hexo: https://blog.chitang.dev/posts/hexo-vercel-blog/
插入图片: https://blog.csdn.net/m0_43401436/article/details/107191688
Quick Start
如果一切都安装完毕了,命令行下进入 hexo 工作目录
新建博文的命令
hexo new bravo
你会在 source/_posts 下看到一个叫 bravo.md 的markdown 文件和一个叫 bravo 的文件夹
你在 bravo.md 里写自己想要的内容,并且把插图放在 bravo 文件夹里
在本地写完以后
清理 hexo 缓存
hexo clean
生成 hexo 静态页面
hexo generate
运行本地服务器
hexo server
你可以去 localhost:4000 查看,此时应该新出现了一个标题为 bravo 的文章
部署到远端
hexo deploy
提交修改到github
git add .
git commit
git push
此时去vercel对应的网页,就可以看到修改已经自动同步到网页上了。
hexo 的安装和使用
安装nodejs
对于 Windows,前往 https://nodejs.org/zh-cn/download/ 下载 64-bit 的 msi 安装包
安装hexo
先创建一个目录,叫 hexo_workspace
在该目录下
npm install hexo-cli -g
hexo init
下载很慢,这里要等大概20分钟
安装完成后,可以输入下面的命令
hexo clean
hexo server
hexo generate
然后访问 localhost:4000, 可以看到 hexo 默认生成的 hello world 页面
hexo 的文件结构
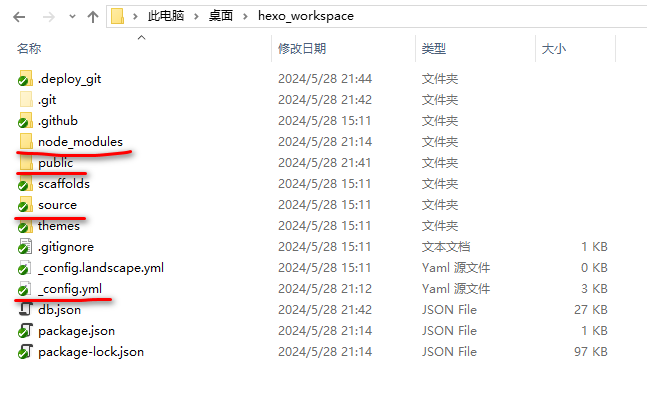
node_modules: 通过npm install
public: hexo generate 生成的html文件等
source: markdown 文件和图片
_config.yaml: 配置文件
注册 vercel
安装 GitHub CLI 和 Git
GitHub CLI: https://github.com/cli/cli#installation
在终端中执行
gh auth login
登录到自己的 GitHub 账号
然后,在当前工作目录hexo_workspace下执行
git init
git add .
git commit -m "Initial commit"
gh repo create
根据提示,创建一个新的 GitHub 仓库并将你的 Hexo 源文件上传到该仓库(可以选择 Private)
https://vercel.com/account/login-connections 连接你的 GitHub 账户
前往 https://vercel.com/new 导入你的 Hexo 仓库
问题
如何配置hexo?
这里只说几个重要的点
- post_asset_folder: true
这个是用来配置媒体资源目录的,true代表允许创建博客的同时创建同名的媒体资源文件夹
# 修改asset属性,支持图片文件夹
post_asset_folder: true
marked:
  prependRoot: true
  postAsset: true
- Deployment
这个确定了 hexo deploy 上传部署的远端地址
# Deployment
## Docs: https://hexo.io/docs/one-command-deployment
deploy:
  type: "git"
  repo: "https://github.com/wangqqiyue/computerhistory.git"
- 其他
网站地址和子链接配置(不重要,自己随喜安排)
# Site
title: Computer History Chinese
subtitle: ""
description: "计算机历史(汉化版)"
keywords:
author: Computer History Team
language: zh-CN
timezone: "Asia/Shanghai"

# URL
## Set your site url here. For example, if you use GitHub Page, set url as 'https://username.github.io/project'
url: https://computerhistory.vercel.app/
permalink: posts/:title/
permalink_defaults:
pretty_urls:
  trailing_index: true # Set to false to remove trailing 'index.html' from permalinks
  trailing_html: true # Set to false to remove trailing '.html' from permalinks
如何插入图片?
参考:https://blog.csdn.net/m0_43401436/article/details/107191688
typora 首选项设置>插入图片时把图片复制到指定路径=> ./${filename} 且优先使用相对路径
主要需要安装一个插件:npm install https://github.com/CodeFalling/hexo-asset-image --save
该插件的作用就是把markdown里面的路径,转换到最后发布时的html路径
typora 破解版
下载地址 https://github.com/markyin0707/typora-activation
跟着上面网站的教程安装和激活,安装后选择不要更新,最新版的typora收费了

 浙公网安备 33010602011771号