

Js+Jquery
内容回顾:
js包含三部分:
1.ESMAScript基础语法
Array()
索引
length
push()
pop(_)
2.DOM
获取DOM的三种方式
(1)id
(2) className
(3)TagName
document.getELementsByClassName('box');
3.BOM
入口函数:
等待着文档和图片都加载完成
window.onload = function(){}


<!DOCTYPE html>
<html>
<head>
    <title></title>
</head>
<body>

    <div class="box">
        哈哈
        <!-- ff0011 -->
    </div>
    <div class="box">
        嘿嘿啊
        <!-- ff0012 -->
    </div>
    <script>

        window.onload = function() {
            // var a;
            // alert(a);
            // var a = 1;
            // alert(a);

            var oBoxs = document.getElementsByClassName('box');

            console.log(oBoxs);
            // oBoxs.push(1);


            // var声明的变量 存在变量提升
            for(var i = 0;i < oBoxs.length; i++){


                oBoxs[i].I = i;

                oBoxs[i].onclick = function() {
                    console.log(oBoxs[this.I].innerText);
                    console.log(this);
                    console.log(this.innerText);
                }
            }
        };

        // window.onload = function() {
        //     alert(3);
        // };


    </script>
</body>
</html>
效果:

2、js案例
1.var 和 let 以及const区别
var 声明的变量 存在变量提升。
let 声明的变量 是块级作用域
const 声明的是常量 一旦声明变量 不可改变
//直接会报错 Uncaught TypeError: Assignment to constant variable.
const a = 1;
a = 2;
//设置标签属性
<div class='box' id='box' title='哈哈哈'></div>
var oDiv = document.getELementsByClassName('box')[0];
oDiv.className+=' active'
oDiv.id
oDiv.title
//样式属性
oDiv.style.width = '200px';
oDiv.style.backgroundColor = 'red';
<!DOCTYPE html>
<html>
<head>
<meta charset="UTF-8">
<title></title>
<style type="text/css">
*{
padding: 0;
margin: 0;
}
ul{
list-style: none;
}
#tab{
width: 480px;
margin: 20px auto;
border: 1px solid red;
}
ul{
width: 100%;
overflow: hidden;
}
ul li{
float: left;
width: 160px;
height: 60px;
line-height: 60px;
text-align: center;
background-color: #cccccc;
}
ul li a{
text-decoration: none;
color:black;
}
li.active{
background-color: red;
}
p{
display: none;
height: 200px;
text-align: center;
line-height: 200px;
background-color: red;
}
p.active{
display: block;
}
</style>
</head>
<body>
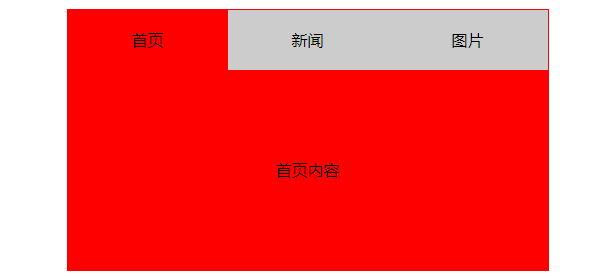
<div id="tab">
<ul>
<li class="active">
<a href="javascript:void(0);">首页</a>
</li>
<li>
<a href="javascript:void(0);">新闻</a>
</li>
<li>
<a href="javascript:void(0);">图片</a>
</li>
</ul>
<p class="active">首页内容</p>
<p>新闻内容</p>
<p>图片内容</p>
</div>
</body>
<script type="text/javascript">
/*
window.onload = function(){
// //需求:鼠标放到上面的li上,li本身变色(添加类),对应的p也显示出来(添加类);
//思路:1.点亮上面的盒子。 2.利用索引值显示下面的盒子。
var tabli = document.getElementsByTagName('li');
var tabContent = document.getElementsByTagName('p')
for(var i = 0; i < tabli.length; i++){ //给每个li添加点击事件
// 绑定索引值(新增一个自定义属性:index属性)
tabli[i].index = i;
tabli[i].onclick = function(){
// 1.点亮上面的盒子。 2.利用索引值显示下面的盒子。(排他思想)
for(var j = 0; j < tabli.length; j++){ //排他
tabli[j].className = '';
tabContent[j].className = '';
}
this.className = 'active'
tabContent[this.index].className = 'active';//【重要代码】
}
}
}
*/
// var a;
// console.log(a);
// {
// a= 1;
// }
// console.log(a);
// console.log(a);
// {
// let a = 1;
// }
// console.log(a)
//es6的let声明变量
const a = 1;
a = 2;
window.onload = function(){
// //需求:鼠标放到上面的li上,li本身变色(添加类),对应的p也显示出来(添加类);
//思路:1.点亮上面的盒子。 2.利用索引值显示下面的盒子。
var tabli = document.getElementsByTagName('li');
var tabContent = document.getElementsByTagName('p')
for(let i = 0; i < tabli.length; i++){ //给每个li添加点击事件
tabli[i].onclick = function(){
// 1.点亮上面的盒子。 2.利用索引值显示下面的盒子。(排他思想)
for(var j = 0; j < tabli.length; j++){ //排他
tabli[j].className = '';
tabContent[j].className = '';
}
}
}
}
</script>
</html>
效果:
3、DOM
#DOM的创建和添加
//创建节点
var oP = document.createElement('p');
//设置文本
// oP.innerText = '<a href="#">123</a>';
oP.innerHTML = '<a href="#">123</a>';
//追加孩子节点
oBox.appendChild(oP);
父节点.insertBefor(新的节点,参考的子节点);
//对属性节点的操作
getAttribute();
setAttribute();
removeAttribute();
python:
def add():
class Person:
<!DOCTYPE html>
<html>
<head>
<meta charset="utf8">
<title></title>
</head>
<body>
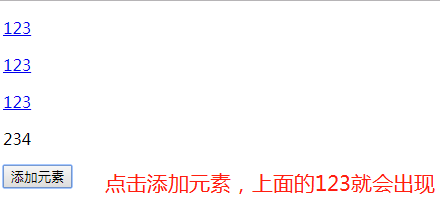
<div id="box">
<!-- <p>123</p> -->
<p id="p1">234</p>
</div>
<button id="btn">添加元素</button>
<script>
//获取的文档
// console.log(document);
// //获取的html对象
// console.dir(document.documentElement);
// console.dir(document.getElementsByTagName('html')[0])
//获取body对象
// console.log(document.body);
// 获取其它的元素标签对象 都是通过三种方法
var oBtn = document.getElementById('btn');
var oBox = document.getElementById('box');
var oP1 = document.getElementById('p1');
console.log(oBox.getAttribute('id'));
oBox.removeAttribute('id');
// console.log(oBox.nextElementSibling.innerHTML);
oBtn.onclick = function() {
//创建节点
var oP = document.createElement('p');
// oP.innerText = '<a href="#">123</a>';
oP.innerHTML = '<a href="#">123</a>';
// oP.style.color = 'red';
// //追加孩子节点
// oBox.appendChild(oP);
//获取父节点
console.log(oP.parentNode);
//获取孩子节点
console.log(oP.children[0]);
// 父节点.insertBefore(新的子节点,作为参考的子节点);
oBox.insertBefore(oP, oP1);
}
</script>
</body>
</html>
效果:
4、模拟hover
<!DOCTYPE html>
<html>
<head lang="en">
    <meta charset="UTF-8">
    <title></title>
    <style>
        button {
            margin: 10px;
            width: 100px;
            height: 40px;
            cursor: pointer;
        }
        .current {
            background-color: red;
        }
    </style>
</head>
<body>
<button>按钮1</button>
<button>按钮2</button>
<button>按钮3</button>
<button>按钮4</button>
<button>按钮5</button>

<script>
    //需求:鼠标放到哪个button上,改button变成黄色背景(添加类)


    var btnArr = document.getElementsByTagName("button");
    //绑定事件
    for(var i=0;i<btnArr.length;i++){   //要为每一个按钮绑定事件,所以用到了for循环
        btnArr[i].onmouseover = function () {
            //【重要】排他思想:先把所有按钮的className设置为空,然后把我(this)这个按钮的className设置为current
            //排他思想和for循环连用
            for(var j=0;j<btnArr.length;j++){
                btnArr[j].className = "";
            }
            this.className = "current";  //【重要】核心代码
        }
    }

    //鼠标离开current时,还原背景色
    for(var i=0;i<btnArr.length;i++){   //要为每一个按钮绑定事件,所以用到了for循环
        btnArr[i].onmouseout = function () { //鼠标离开任何一个按钮时,就把按钮的背景色还原
            this.className = "";
        }
    }

</script>

</body>


</html>
效果:鼠标滑动到谁,谁颜色变红

5、创建对象
#js中创建对象的方式
(1)谁做的事件,这个this指的就是这个对象
1.字面量方式创建
var person = {
name:"张三",
age:18,
fav:function(){}
};
person.name
person.age
person.fav();
2.使用原型(prototype)继承的方式来创建对象
function Person(name,age){
this.name = name;
this.age = age;
};
Person.prototype.showName = function(){
console.log(this);//Person对象
};
JS中使用new关键字来创建对象,没有对象new一个
var p1 = new Person('ZS',19);
js中:
function add(){}
//构造函数
function Person(){}
new Person()
在js中prototype原型 是每个对象的父类
<!DOCTYPE html>
<html>
<head>
<title></title>
</head>
<body>
<script>
//字面量方式创建对象
// var person = {
// name:'张三',
// age:18,
// fav:function() {
// alert(this.name)
// }
// };
//1.普通函数
// function add() {
// // body...
// }
// add();
// //2.函数对象
// var add2 = function() {
// // body...
// };
// add2();
// new Array(params...?: any);
// new String(value: any)
// new Object(value?: any)
// class Person():
/*
//在js中我们使用构造函数的方式创建对象
var person = new Object();
person.name = 'zhangsan';
console.log(person.name);
*/
//工厂模式创建对象
/*
function createPerson(name,age) {
var p = new Object();
p.name1 = name;
p.age1= age;
return p;
};
function createFruit(name,age) {
var f = new Object();
f.name1 = name;
f.age1= age;
return f;
};
var p1 = createPerson('ZS',18);
var f1 = createFruit('西瓜',2);
console.log(p1 instanceof Object);
console.log(f1 instanceof Object);
*/
// new Array(params...?: any)
/*
function student(name, age) {
console.log(this)
this.name = name;
this.age = age;
this.alertName = function(){
alert(this.name)
};
}
function fruit(name, color) {
console.log(this)
this.name = name;
this.color = color;
this.alertName = function(){
alert(this.name)
};
}
var s = new student('这是你敢',17);
var f = new fruit('哈哈哈',18);
//所有的类都是继承Object
console.log(s instanceof student);
console.log(f instanceof fruit);
*/
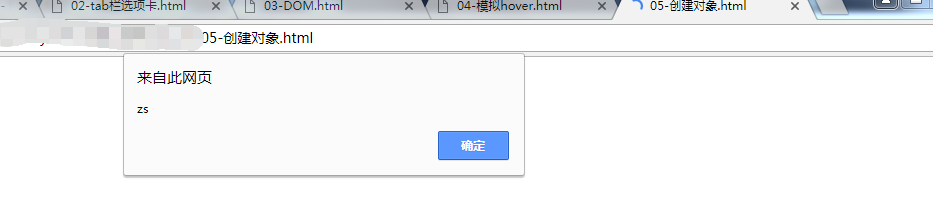
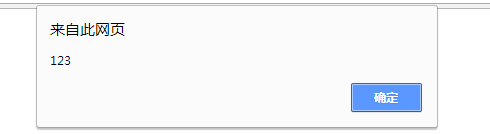
function Student(name,age) {
this.name = name;
this.age = age;
}
Student.prototype.alertName = function(){
alert(this.name);
};
Student.prototype.alertAge = function(){
alert(this.age);
};
var stu1 = new Student('zs',19);
var stu2 = new Student('ddd',20);
console.log(stu1);
console.log(stu2);
stu1.alertName(); //easy
stu2.alertName(); //easy
alert(stu1.alertName == stu2.alertName); //true 二者共享同一函数
</script>
</body>
</html>
效果:弹窗zs、ddd、true
6、箭头函数
function add(){
}
//es6中的函数可以写成箭头函数
function add(a,b){
return a+b
};
var add = function(a,b){
return a+b
}
console.log(add(1,2));
var add = (a,b)=>{
return a+b
}
es5中引入模块的方式 一个js文件就是一个模块
script引入 但是引入的模块,属于同步调用
from xxx import ooo;
es6中引入模块
import ooo from 'xxx'
<!DOCTYPE html>
<html>
<head>
    <title></title>
</head>
<body>
    <!-- 不等待 -->
    <!-- <script src="main.js"></script> -->
    <script src="main2.js"></script>
    <script type="text/javascript">

        import aaa from './main.js'

        // var add = function (a,b) {
        //     return a+b
        // };

        // alert(add(1,2));


        // var add = (a,b)=>{
        //     return a+b
        // }
        // alert(add(2,4));
    </script>

</body>
</html>
var ooo = 123;
alert(ooo);
效果:
7、定时器
<!DOCTYPE html>
<html>
<head>
<title></title>
</head>
<body>
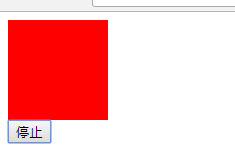
<div id='box' style="width: 100px;height: 100px;background-color: red;">
</div>
<button id="btn">停止</button>
<script>
/*
var a = 0;
function $(id){
return document.getElementById(id);
}
// var oDiv = document.getElementById('box');
// var oBtn = document.getElementById('btn');
var c = setInterval(function() {
// body...
a+=3;
$('box').style.marginLeft = a+'px';
console.log(a);
},50)
$('btn').onclick = function(){
clearInterval(c);
}
*/
//等待2秒之后 fn会去执行 fn我们称为叫回调函数
setTimeout(function() {
// body...
console.log(2222);
}, 2000)
console.log(1111);
</script>
</body>
</html>
效果:
9、BOM
<!DOCTYPE html>
<html>
<head>
    <title></title>
</head>
<body>

<script>
    window.onload = function() {

            console.log(11111);
        setTimeout(function() {
        // body...

        // window.open('http://www.baidu.com','_self');


        console.log(window.navigator);
        //全局刷新 不建议使用 可以测试
        // window.location.reload();

        // 如果想实现局部刷新,必须使用ajax技术

    }, 2000)
        // body...
    }


</script>
</body>
</html>
效果:

10、内容总结
今日内容:

        1.var 和 let 以及const区别
            var 声明的变量 存在变量提升。

            let 声明的变量 是块级作用域

            const 声明的是常量  一旦声明变量 不可改变


            //直接会报错  Uncaught TypeError: Assignment to constant variable.
            const a = 1;

            a  = 2;


            //设置标签属性
            <div class='box' id='box' title='哈哈哈'></div>
            var oDiv = document.getELementsByClassName('box')[0];
            oDiv.className+=' active'
            oDiv.id
            oDiv.title

            //样式属性
            oDiv.style.width = '200px';
            oDiv.style.backgroundColor  = 'red';


        2.DOM的创建和添加
            //创建节点
            var oP = document.createElement('p');

            //设置文本
            // oP.innerText = '<a href="#">123</a>';
            oP.innerHTML = '<a href="#">123</a>';
            //追加孩子节点
            oBox.appendChild(oP);

            父节点.insertBefor(新的节点,参考的子节点);


            //对属性节点的操作
            getAttribute();
            setAttribute();
            removeAttribute();

            python:
                def add():

                class Person:


        3.js中创建对象的方式

            (1)谁做的事件,这个this指的就是这个对象

            1.字面量方式创建
            var person = {
                name:"张三",
                age:18,
                fav:function(){}

            };
            person.name
            person.age
            person.fav();

            4.使用原型(prototype)继承的方式来创建对象

            function Person(name,age){
                this.name = name;
                this.age  = age;
            };
            Person.prototype.showName = function(){

                console.log(this);//Person对象
            };
            JS中使用new关键字来创建对象,没有对象new一个
            var p1 = new Person('ZS',19);


            js中:
                function add(){}

                //构造函数
                function Person(){}

                new Person()


                在js中prototype原型 是每个对象的父类


            function add(){
            }

            //es6中的函数可以写成箭头函数

            function add(a,b){

                return a+b
            };

            var add = function(a,b){
                return a+b
            }
            console.log(add(1,2));


            var add = (a,b)=>{

             return a+b
            }


            es5中引入模块的方式 一个js文件就是一个模块
            script引入  但是引入的模块,属于同步调用


            from xxx import ooo;


            es6中引入模块
            import ooo from 'xxx'


            前端中有三大工具
            grunt工具
            glup工具
            webpack工具
            babel工具能将es6的代码转化成es5的代码

            nodejs


            作用:文件压缩 打包


            nodejs下载

            安装python3 自带pip3
            安装了nodejs 自带了npm   node -v 查看版本

            npm install jquery --save

            var fs = require('fs');

            fs.readFile('/etc/passwd', 'utf8', callback);


            DOM
                1.获取事件源的三种方式
                2.设置标签的属性
                3.设置样式属性
                4.创建节点  追加节点 移除节点
                5.DOM树结构
                         document

                            html

                        head    body
                                div  p ul li....

                在html中一切都是节点

                操作DOM的三步

                1.事件源 2.事件 3.事件处理程序


            BOM


            5.使用jquery
              (1)先引入jquery
               (2) 入口函数:
                $(function(){})
               (3)js对象和jquery对象的转化
                 js=》jquery  $(js对象)
                 jquery=>js $('.box')[0]
