CARLA——Sensors in CARLA
Sensors in CARLA.pptx - Google 云端硬盘
笔者对部分自己关注的内容进行了摘抄以及验证
RGB camera upgrade
RGB sensor
几个月前,其中一些交互的发生为该传感器留下了大量新功能。因此,我们更新了RGB相机,以支持一些有用的功能,例如镜头畸变、不同的曝光模式和景深。所有这些都利用了Unreal渲染功能,以确保与引擎的最大集成,从而实现良好的性能。我们正在添加一些新功能,比如一些噪声,比如色差,但是要保持对虚幻相机及其参数的模拟,这样我们就可以随着它发展,将来可能会使用光线投射或他们可以提供的任何新的渲染技术。
New RGB sensor parameters
透镜畸变和色差是传感器的主要噪声功能,它们可以定制并相互组合,与所有其他配置一起工作。现在我们提供了两种接触类型:手动相机,与传统相机一样采用 f 光圈(或光圈的倒数)、ISO和快门速度。自动曝光是一种自动曝光,场景的颜色根据图像的亮度慢慢调整。然后,我们进行颜色校正,以获得不同的颜色效果。这对一些在perception工作的人来说很有用,他们可以在数据中创建一些快速且廉价的可变性,这里我们将使用图像温度、色调、坡度和脚趾。除此之外,我们还展示了一些其他相机属性,它们可以创建景深、运动模糊和刀片数等精细细节。当然,可以从客户端配置所有这些参数。
Instantiating using and configuring sensors
Instancing a camera:
# Get the RGB camera definition
bp = world.get_blueprint_library().find('sensor.camera.rgb')

# Spawn the RGB camera attached at the desired position with respect the vehicle
camera = world.spawn_actor(bp, carla.Transform(), attach_to=parent)
Using the camera:
# Callback that process the image
def on_received_image(image):
  image.save_to_disk('%08d' % image.frame) # save it e.g: “00012345.png”

# Set the function to call every time a new image is received
camera.listen(lambda image: on_received_image(image))
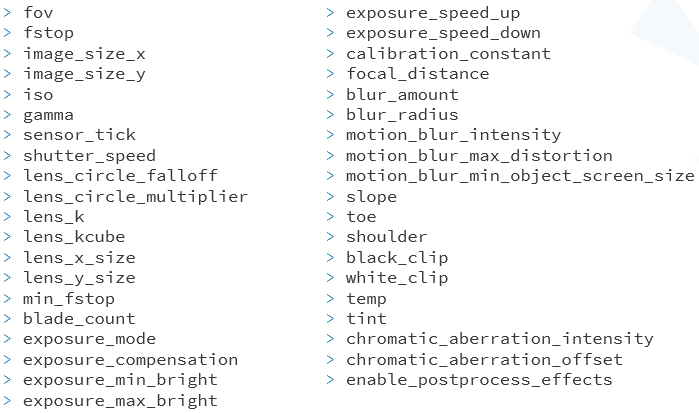
这些都是RGB摄像头的配置参数,其中一些参数(如镜头畸变参数)与其他基于摄像头的传感器(如语义分割)共享。
更深入的解释,可以在下面的链接中找到我们的文档。
Instancing an RGB camera with custom parameters:
# Get the RGB camera definition
bp = world.get_blueprint_library().find('sensor.camera.rgb')

# Field of view
bp.set_attribute('fov', '75.0')
# Camers’s shutter speed
bp.set_attribute('shutter_speed', '60.0')
# And a bit of chormatic aberrarion
bp.set_attribute('chromatic_aberration_intensity', '0.5')

# Spawn the RGB camera attached at the desired position with respect the vehicle
camera = world.spawn_actor(bp, carla.Transform(), attach_to=parent)
这里有一个示例,说明如何使用前面的一些参数实例化RGB相机。在这种情况下,视野为75度,相机的快门速度为60度,还有一点色差,以产生一些不错的噪音效果。获取蓝图并生成它与以前完全一样。
New sensors
IMU (Inertial measurement unit)
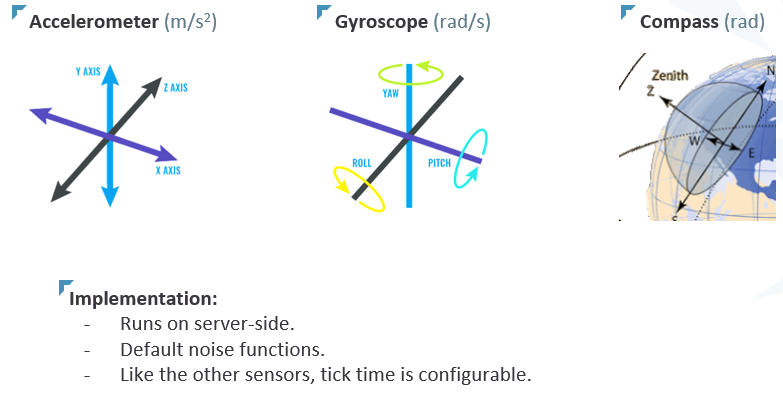
我们添加了一个IMU,它指的是惯性测量单元。它由一个加速计、一个陀螺仪和一个指南针组成。
Instancing the IMU:
# Get the IMU definition
bp = world.get_blueprint_library().find('sensor.other.imu')

# Spawn the IMU attached at the center of mass of the mustang
imu = world.spawn_actor(bp, carla.Transform(), attach_to=parent)
Using the IMU:
# Callback that process the IMU data
def on_received_imu_data(imu_data):
   print(imu_data)

# Set the function to call every time a new IMU data pack is received
imu.listen(lambda imu_data: on_received_imu_data(imu_data))
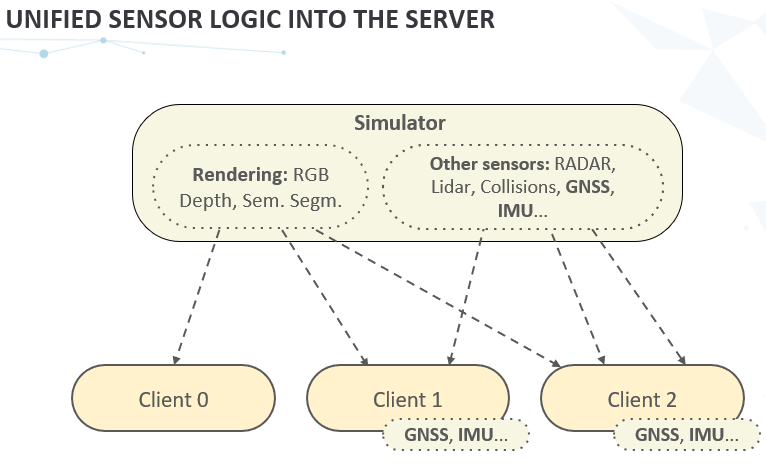
IMU与全球导航卫星系统一起,利用我们在服务器端实现的新通用噪声系统,该系统可用于所有传感器,以备实现,并且传感器拥有它是有意义的。这与之前在摄像机中看到的镜头畸变类似。它是确定性的,在服务器端计算,但可以从客户端参数化,因此这意味着如果有多个客户端连接到服务器,它们都将接收相同的传感器输出。默认情况下,我们使用的是正态分布,但如果需要,任何人都可以更改代码来调整噪声,以获得更精确的模型。
Instancing the IMU with Noise:
# Get the IMU definition
bp = world.get_blueprint_library().find('sensor.other.imu')

# Noise seed value
bp.set_attribute('noise_seed', '10')
# Accelerometer Noise
bp.set_attribute('noise_accel_stddev_x', '0.5')
bp.set_attribute('noise_accel_stddev_y', '0.5')
bp.set_attribute('noise_accel_stddev_z', '0.5')
# Gyroscope Noise
bp.set_attribute('noise_gyro_stddev_x', '0.03')
bp.set_attribute('noise_gyro_stddev_z', '0.03')
bp.set_attribute('noise_gyro_stddev_y', '0.03')

# Spawn the IMU attached at the center of mass of the mustang
imu = world.spawn_actor(bp, carla.Transform(), attach_to=parent)
我们还花了一些时间统一客户端计算的传感器,如GNSS和IMU现在,这些计算在服务器端进行,以从客户端节点释放一些负载。这还可以确保客户接收到的数据是相同的,无论应用的噪声如何。
RADAR (Radio Azimuth Direction And Ranging)
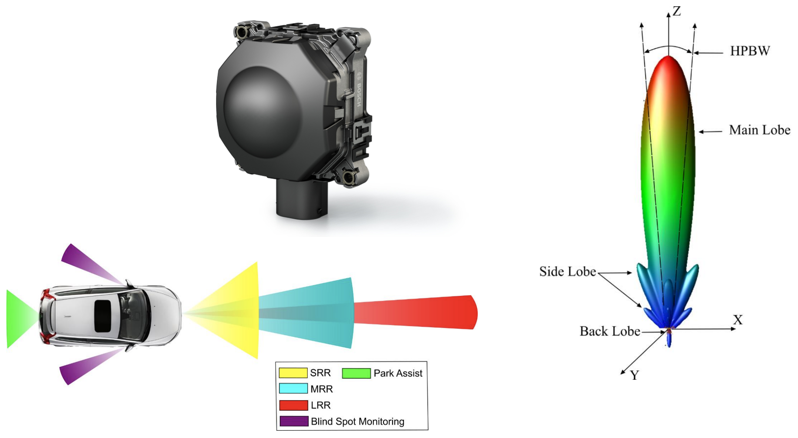
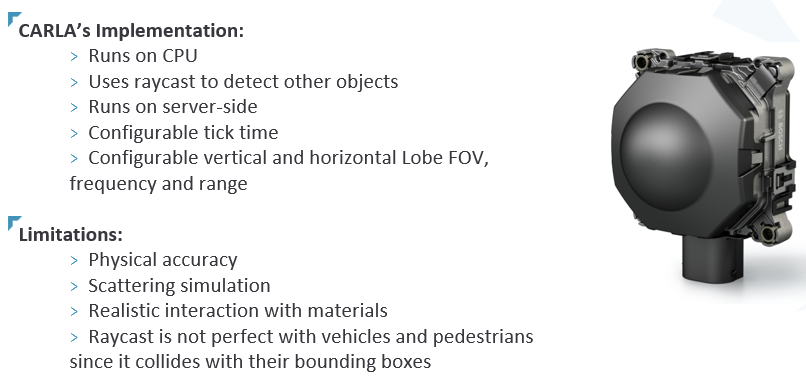
雷达,这是CARLA最近增加的另一个新传感器。雷达是一种探测系统,使用无线电波来确定物体的距离、角度或速度。可以为一辆车设置多个雷达,以提供有价值的周围信息。这个雷达有一个主波瓣(Lobe),你可以在右边看到,这是一个给定雷达的主要探测范围,也是我们要模拟的范围。
Instancing a RADAR:
# Get the RADAR definition
bp = world.get_blueprint_library().find('sensor.other.radar')

# Spawn the RADAR attached at the desired position with respect the vehicle
radar = world.spawn_actor(bp, carla.Transform(), attach_to=parent)
Using the RADAR:
# Callback that process the RADAR data
def on_received_radar_data(radar_data):
   print(radar_data)

# Set the function to call every time a new RADAR data is received
radar.listen(lambda radar_data: on_received_radar_data(radar_data))
我们的雷达在CPU上运行,使用Unreal的Raycast,这意味着它也在服务器端运行。与所有其他传感器一样,它有一个可配置的Tick Time和一些特定的雷达配置,如波瓣形状或频率。
目前的局限性是,与真实雷达相比,它在物理上并不精确,这是因为我们没有计算散射,也没有计算与不同材料的真实相互作用。此外,raycast对于我们的车辆和行人来说并不完美,因为它们使用动画网格,我们仍在寻找改进的方法。
DVS (Dynamic Vision Sensor)
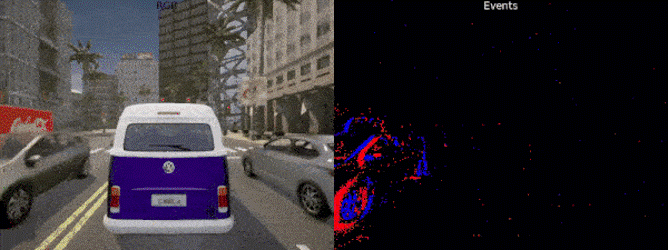
现在,我很高兴向大家介绍最近添加到CARLA中的新DVS方法。这不在我们的路线图中,但因为我们收到了一个与他们合作的人的PR,我们决定与他同步,并调整他们的初始实现,以更好地适应我们的代码。DVS是一种基于事件的传感器,基本上异步测量强度的变化,可用于高速场景和高动态范围环境。
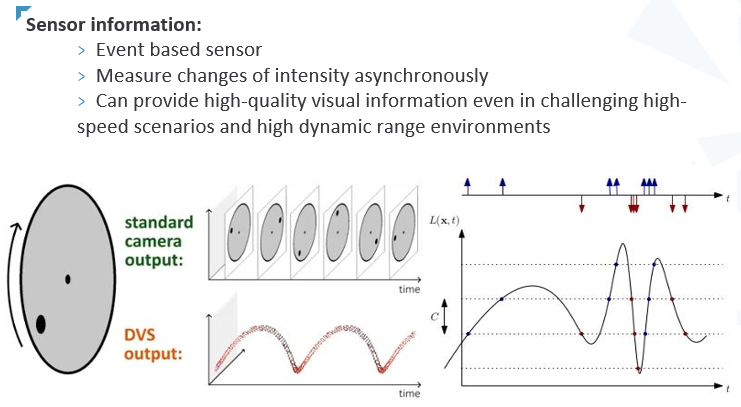
我们的实现在CPU上运行,所有的计算都在服务器端完成。作为未来的工作,为了提高性能,我们可以研究如何将其移植到着色器中,以便它使用GPU。
Instancing the DVS:
# Get the DVS definition
bp = world.get_blueprint_library().find('sensor.camera.dvs')

# Spawn the DVS attached at the desired position with respect the vehicle
dvs = world.spawn_actor(bp, carla.Transform(), attach_to=parent)
Using the DVS:
# Callback that process the DVS event data
def on_received_dvs_event(dvs_data):
   print(dvs_data)

# Set the function to call every time a new DVS event is received
dvs.listen(lambda dvs_data: on_received_dvs_event(dvs_data))
carla.DVSEvent
定义DVS事件的类。一个事件是一个四元组,即4个元素的元组,具有x, y像素坐标位置、时间戳 t 和事件的极性pol。在这里了解更多关于它们的信息。
Instance Variables
Methods
Dunder methods
carla.DVSEventArray
定义carla.DVSEvent中事件流的类。这样的流是一个任意大小的数组,大小取决于事件的数量。此类还存储视野、图像的高度和宽度以及方便使用的时间戳。在这里了解更多关于它们的信息。
Instance Variables
Methods
- to_array(self)
将事件流按以下顺序转换为int值数组[x,y,t,pol]。 - to_array_pol(self)
返回具有流中所有事件极性的数组。 - to_array_t(self)
返回一个数组,其中包含流中所有事件的时间戳。 - to_array_x(self)
返回一个数组,其中包含流中所有事件的X像素坐标。 - to_array_y(self)
返回一个数组,其中包含流中所有事件的Y像素坐标。 - to_image(self)
按照以下模式转换图像:蓝色表示正事件,红色表示负事件。RGB32:R,G,B,A(用作Alpha通道或者不用)。
Dunder methods
- __getitem__(self, pos=int)
- __iter__(self)
Iterate over the carla.DVSEvent retrieved as data. - __len__(self)
- __setitem__(self, pos=int, color=carla.Color)
- __str__(self)
这只是我们到目前为止在传感器模拟方面所做的一个肤浅的更新。现在作为未来的工作,我们真正感兴趣的是Unreal Engine 5能为CARLA提供什么。我们想研究它作为模拟器新的渲染后端的潜力,我们想成为第一个使用它的人。一如既往,与艺术团队一起,我们也将专注于性能改进,同时实现更好的照明,这是实现现实主义的关键。最后,如果你对传感器感兴趣,并且喜欢这个演示,我相信你会喜欢我的同事丹尼尔·桑托斯做的下一个关于外部传感器接口的演示。


