CentOS7系统基本操作
查看网卡命令
[root@localhost ~]# ip addr
1: lo: <LOOPBACK,UP,LOWER_UP> mtu 65536 qdisc noqueue state UNKNOWN qlen 1
    link/loopback 00:00:00:00:00:00 brd 00:00:00:00:00:00
    inet 127.0.0.1/8 scope host lo
       valid_lft forever preferred_lft forever
    inet6 ::1/128 scope host
       valid_lft forever preferred_lft forever
2: ens32: <BROADCAST,MULTICAST,UP,LOWER_UP> mtu 1500 qdisc pfifo_fast state UP qlen 1000
    link/ether 00:0c:29:2c:7b:5f brd ff:ff:ff:ff:ff:ff
    inet 192.168.182.136/24 brd 192.168.182.255 scope global dynamic ens32
       valid_lft 1474sec preferred_lft 1474sec
    inet6 fe80::d323:fa:581f:5e96/64 scope link
       valid_lft forever preferred_lft forever
[root@localhost ~]#
重启网卡命令:
systemctl restart network.service
修改主机名
# 临时生效
hostname centos7
# 编辑配置文件/etc/hostname
# 以下命令可以直接修改配置文件
hostnamectl set-hostname centos7
操作:
[root@localhost ~]# hostnamectl set-hostname centos7
[root@localhost ~]# hostnamectl status
   Static hostname: centos7
         Icon name: computer-vm
           Chassis: vm
        Machine ID: c981bff1414443848dc72e55d6f69e26
           Boot ID: 338c4215248c40598401ca7fa697636e
    Virtualization: vmware
  Operating System: CentOS Linux 7 (Core)
       CPE OS Name: cpe:/o:centos:centos:7
            Kernel: Linux 3.10.0-693.el7.x86_64
      Architecture: x86-64
[root@localhost ~]# hostname
centos7
[root@localhost ~]# cat /etc/hostname
centos7
修改字符集
# 两种方法
localectl set-locale LANG=zh_CN.UTF-8

编辑/etc/locale.conf
操作:
[root@localhost ~]# localectl set-locale LANG=zh_CN.UTF-8
[root@localhost ~]# cat /etc/locale.conf
LANG=zh_CN.UTF-8
[root@localhost ~]# localectl status
   System Locale: LANG=zh_CN.UTF-8
       VC Keymap: us
      X11 Layout: us
[root@centos7 ~]# echo $LANG
zh_CN.UTF-8
更改系统时间
[root@centos7 ~]# date
2017年 11月 02日 星期四 12:02:26 CST
[root@centos7 ~]# timedatectl set-time "2017-11-02 12:01:01"
[root@centos7 ~]# timedatectl status
      Local time: 四 2017-11-02 12:01:12 CST
  Universal time: 四 2017-11-02 04:01:12 UTC
        RTC time: 四 2017-11-02 04:01:12
       Time zone: Asia/Shanghai (CST, +0800)
     NTP enabled: n/a
NTP synchronized: no
 RTC in local TZ: no
      DST active: n/a
[root@centos7 ~]#
更改系统时区
/usr/bin/timedatectl list-timezones # 列出所有时区
/usr/bin/timedatectl set-timezone Asia/Shanghai # 设置系统时区为上海
查看系统版本号
查看系统版本号:
cat /etc/redhat-release
所有支持systemd系统的统一发行版名称和版本号文件:
cat /etc/os-release
操作:
[root@centos7 ~]# cat /etc/redhat-release
CentOS Linux release 7.4.1708 (Core)
[root@centos7 ~]# cat /etc/os-release
NAME="CentOS Linux"
VERSION="7 (Core)"
ID="centos"
ID_LIKE="rhel fedora"
VERSION_ID="7"
PRETTY_NAME="CentOS Linux 7 (Core)"
ANSI_COLOR="0;31"
CPE_NAME="cpe:/o:centos:centos:7"
HOME_URL="https://www.centos.org/"
BUG_REPORT_URL="https://bugs.centos.org/"

CENTOS_MANTISBT_PROJECT="CentOS-7"
CENTOS_MANTISBT_PROJECT_VERSION="7"
REDHAT_SUPPORT_PRODUCT="centos"
REDHAT_SUPPORT_PRODUCT_VERSION="7"
查看系统启动级别
文件查看
cat /etc/inittab
命令查看当前启动级别
systemctl get-default
设置启动级别
# multi-user.target: analogous to runlevel 3
# graphical.target: analogous to runlevel 5

systemctl set-default multi-user.target
操作:
[root@centos7 ~]# cat /etc/inittab
# inittab is no longer used when using systemd.
#
# ADDING CONFIGURATION HERE WILL HAVE NO EFFECT ON YOUR SYSTEM.
#
# Ctrl-Alt-Delete is handled by /usr/lib/systemd/system/ctrl-alt-del.target
#
# systemd uses 'targets' instead of runlevels. By default, there are two main targets:
#
# multi-user.target: analogous to runlevel 3
# graphical.target: analogous to runlevel 5
#
# To view current default target, run:
# systemctl get-default
#
# To set a default target, run:
# systemctl set-default TARGET.target
#
[root@centos7 ~]# systemctl get-default
multi-user.target
[root@centos7 ~]# systemctl set-default multi-user.target
Removed symlink /etc/systemd/system/default.target.
Created symlink from /etc/systemd/system/default.target to /usr/lib/systemd/system/multi-user.target.
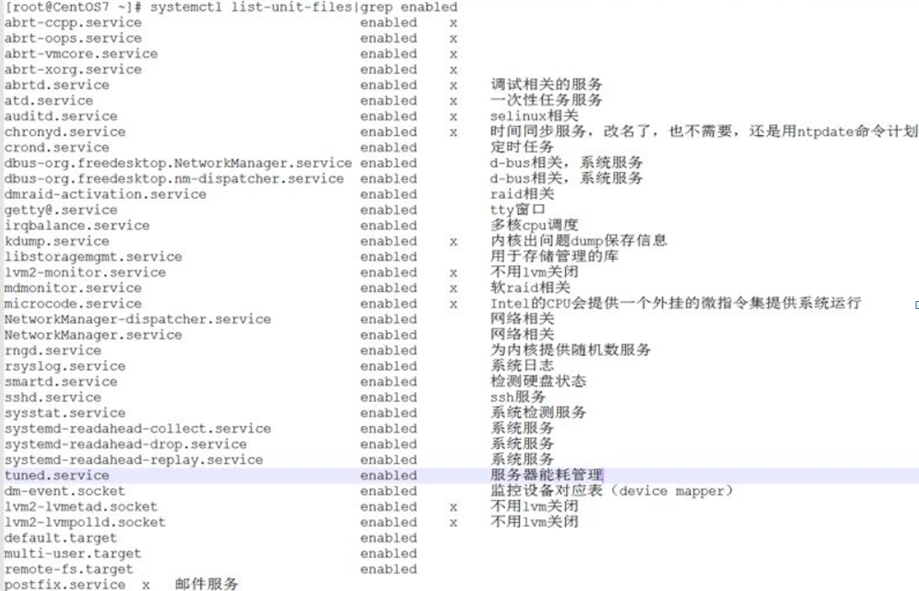
管理服务
systemctl:融合service和chkconfig的功能于一体,兼容sysV和LSB得启动脚本,而且能够在进程启动过程中更有效地引导加载服务。

获取云主机外网IP地址
echo "`curl -s myip.ipip.net | awk -F " " '{print $2}'|awk -F":" '{print $2}'`_`hostname`" > /etc/hostname
设置开机启动
针对svn,nginx每次重启后均要手工启动,好麻烦,所以考虑将其做成开机启动,做成服务好麻烦,考虑像windows 一样,放在某个启动项中完成。
打开启动文件后,发现里面文件内容如下:
#!/bin/bash
# THIS FILE IS ADDED FOR COMPATIBILITY PURPOSES
#
# It is highly advisable to create own systemd services or udev rules
# to run scripts during boot instead of using this file.
#
# In contrast to previous versions due to parallel execution during boot
# this script will NOT be run after all other services.
#
# Please note that you must run 'chmod +x /etc/rc.d/rc.local' to ensure
# that this script will be executed during boot.
意思很简单,需要将此文件权限改为可执行的,这也是为何开机后此文件不能执行的原因
操作步骤:
a. 添加可执行权限:
# chmod +x /etc/rc.d/rc.local

b. 打开文件rc.local:
# vim /etc/rc.d/rc.local

c. 在文件rc.local末添加开机应启动的脚本:
svnserve -d -r /var/svn
/usr/nginx/sbin/nginx

d. 重启机器,验证svn和nginx已经启动成功
# reboot

 浙公网安备 33010602011771号