Spring Boot 集成RabbitMQ
在Spring Boot中整合RabbitMQ是非常容易的,通过在Spring Boot应用中整合RabbitMQ,实现一个简单的发送、接收消息的例子。
首先需要启动RabbitMQ服务,并且add一个账户lg或使用guest账户
1. 创建一个Spring Boot项目,pom如下
<?xml version="1.0" encoding="UTF-8"?>
<project xmlns="http://maven.apache.org/POM/4.0.0"
         xmlns:xsi="http://www.w3.org/2001/XMLSchema-instance"
         xsi:schemaLocation="http://maven.apache.org/POM/4.0.0 http://maven.apache.org/xsd/maven-4.0.0.xsd">

    <groupId>com.luangeng</groupId>
    <artifactId>boot</artifactId>
    <packaging>pom</packaging>
    <version>1.0-SNAPSHOT</version>

    <parent>
        <groupId>org.springframework.boot</groupId>
        <artifactId>spring-boot-starter-parent</artifactId>
        <version>1.5.2.RELEASE</version>
    </parent>

    <properties>
        <java.version>1.8</java.version>
        <project.build.sourceEncoding>UTF-8</project.build.sourceEncoding>
    </properties>

    <dependencies>

        <dependency>
            <groupId>org.springframework.boot</groupId>
            <artifactId>spring-boot-starter-amqp</artifactId>
        </dependency>

        <dependency>
            <groupId>org.springframework.boot</groupId>
            <artifactId>spring-boot-starter-web</artifactId>
        </dependency>

        <!-- TEST -->
        <dependency>
            <groupId>org.springframework.boot</groupId>
            <artifactId>spring-boot-starter-test</artifactId>
            <scope>test</scope>
        </dependency>
    </dependencies>

    <build>
        <plugins>
            <plugin>
                <groupId>org.springframework.boot</groupId>
                <artifactId>spring-boot-maven-plugin</artifactId>
            </plugin>
        </plugins>
    </build>

</project>
2.配置文件
spring.application.name=rabbitmq

spring.rabbitmq.host=localhost
spring.rabbitmq.port=5672
spring.rabbitmq.username=lg
spring.rabbitmq.password=lg
3.新增类Sender, 发送方,使用RabbitTemplate发送消息
@Component
public class Sender {

    @Autowired
    private AmqpTemplate rabbitTemplate;

    private static AtomicInteger count = new AtomicInteger(1);

    public void send() {
        String msg = "msg" + count.getAndIncrement() + " at " + new Date();
        System.out.println("Sender : " + msg);
        this.rabbitTemplate.convertAndSend(RabbitConfig.queueName, msg);
    }
}
4.新增类Receive, 消息接受方,使用@RabbitListener包装一个Queue
import org.springframework.amqp.rabbit.annotation.RabbitHandler;
import org.springframework.amqp.rabbit.annotation.RabbitListener;
import org.springframework.stereotype.Component;

@Component
@RabbitListener(queues = RabbitConfig.queueName)
public class Receiver {

    @RabbitHandler
    public void process(String msg) {
        System.out.println("Receiver : " + msg);
    }

}
5.Rabbit配置类,作用是初始化Queue和Exchange等
import org.springframework.amqp.core.*;
import org.springframework.context.annotation.Bean;
import org.springframework.context.annotation.Configuration;

@Configuration
public class RabbitConfig {

    public final static String queueName = "myQueue";

    //注入queue
    @Bean
    Queue queue() {
        return new Queue(queueName, false);
    }

    //注入exchange
    @Bean
    Exchange exchange() {
        //return new FanoutExchange("fanout-exchange");
        //return new DirectExchange("direct-exchange");
        //return new HeadersExchange("headers-exchange");
        return new TopicExchange("topic-exchange");
    }

    //绑定exchange和queue
    @Bean
    Binding binding(Queue queue, TopicExchange exchange) {
        return BindingBuilder.bind(queue).to(exchange).with(queueName);
    }

}
6.主类
@SpringBootApplication
public class Application {
    public static void main(String[] args) {
        SpringApplication.run(Application.class, args);
    }
}
7.测试类
@RunWith(SpringJUnit4ClassRunner.class)
@SpringBootTest(classes = Application.class)
public class ApplicationTest {

    @Autowired
    private Sender sender;

    @Test
    public void hello() throws Exception {
        while(true) {
            sender.send();
            Thread.sleep(1000);
        }
    }

}
---
运行测试类,控制台输出如下:
Receiver : msg514 at Sun Aug 06 11:21:03 CST 2017
Sender : msg515 at Sun Aug 06 11:21:04 CST 2017
Receiver : msg515 at Sun Aug 06 11:21:04 CST 2017
Sender : msg516 at Sun Aug 06 11:21:05 CST 2017
Receiver : msg516 at Sun Aug 06 11:21:05 CST 2017
Sender : msg517 at Sun Aug 06 11:21:06 CST 2017
Receiver : msg517 at Sun Aug 06 11:21:06 CST 2017
Sender : msg518 at Sun Aug 06 11:21:07 CST 2017
Receiver : msg518 at Sun Aug 06 11:21:07 CST 2017
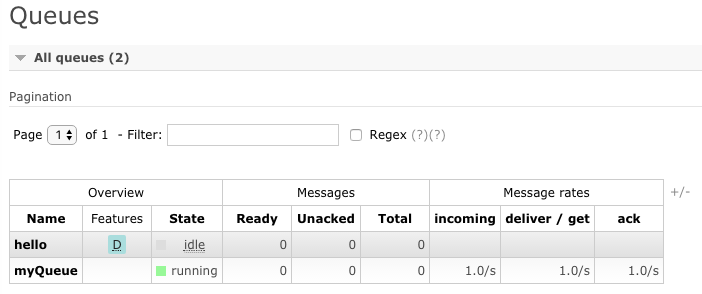
此时Rabbit管理页面显示:


说明消息通过RabbitMQ发送接收成功。
end

