SSH整合:Spring整合Struts2的两种方式,struts.xml管理Action&Bean管理Action
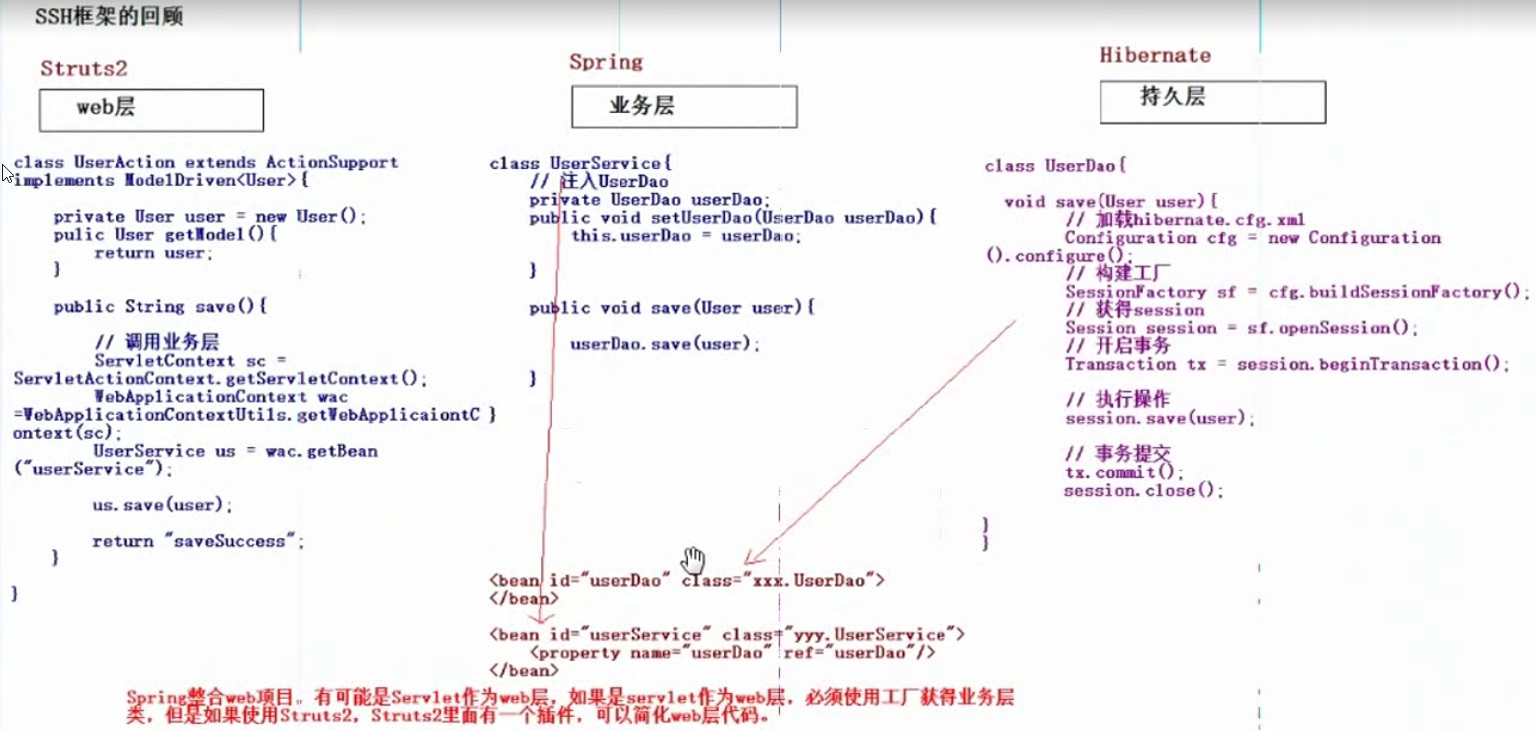
SSH回顾
1 引入jar包
Struts2的jar包
- D:\Struts2\struts-2.3.35\apps\struts2-blank\WEB-INF\lib 开发基本包
- Struts2有一些包是需要了解的:
- struts2-convention-plugin-2.3.35 注解开发包
- struts2-json-plugin-2.3.35.jar 整合ajax
- struts2-spring-plugin-2.3.35.jar 整合Spring
Hibernate的jar包
- D:\Hibernate\hibernate-release-5.0.7.Final\lib\required 开发必须
- mysql-connector-java-5.1.43-bin mysql驱动
- 日志记录

- 注意:Struts2和Hibernate都引入了一个相同的javasistjar包(javasist版本不一样容易冲突),删掉一个版本低的
- 使用C3P0连接池,还需要引:

Spring的jar包
- IOC的开发
- AOP的开发
- JDBC模版的开发
- 整合web项目的开发
- 整合单元测试
- 整合Hibernate的开发
IOC的6个基本包

AOC的包

JDBC开发,事务管理:

整合单元测试:spring-test-4.2.4.RELEASE.jar
整合web项目:

整合Hibernate的开发:

进行Spring和Struts2的整合:
引入整合的插件包
第二步:引入配置文件
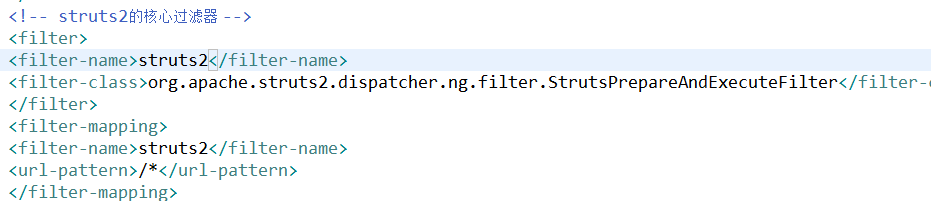
Struts2的配置文件:
- web.xml
- struts.xml
Hibernate的配置文件:
- hibernate.cfg.xml,删掉与线程绑定的session
- 映射文件
- 日志文件
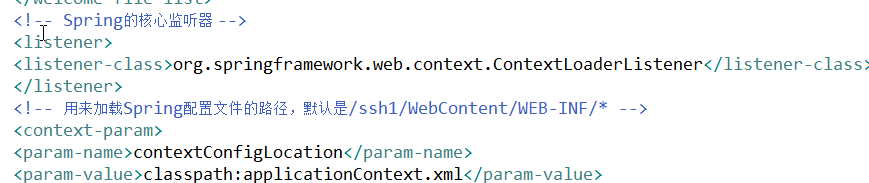
Spring的配置文件:
- web.xml
- applicationContext.xml
- 日志记录(一个就行,如果引过) log4j.properties
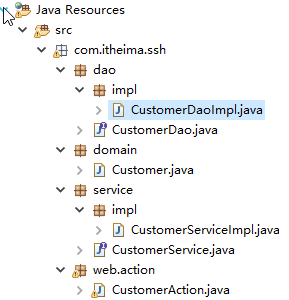
第三步:创建包结构和类
第四步: 引入相关的页面
第五步:修改menu.jsp,修改add.jsp


第六步:编写Action,添加到提交数据到action
第七步:Spring整合Struts2 方式一:Action由Struts2创建(Service由Spring,在Action类中注入Service)
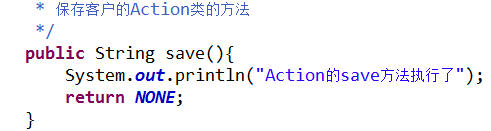
编写Action:

在action中引入Service
传统方式:

进行Spring和Struts2的整合:
引入整合的插件包
在插件包中有如下配置:

开启了一个常量,在Struts2中开启这个常量,就会引发下面常量生效

让action按照名称自动注入service
将service交给Spring管理:

Action中注入Service


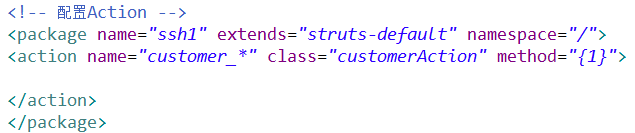
第八步:Spring整合Struts2方式二:Action交给Spring创建(推荐,如果用Struts2创建Action不如用Spring工厂配置,因为可以用AOP增强action)
引入插件包
将Action交给Spring

struts.xml配置Action,使用Spring创建的
注意:
1 原来的Action是多例的,现在是单例的,一个Action只有一个值栈,如果你保存,删除,修改都用一个值栈,在取值的时候就会出现问题。

2 需要手动注入Service

测试:

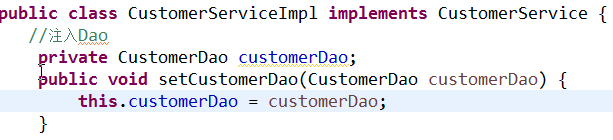
第九步:Service调用Dao
将Dao交给Spring管理

在Service层注入Dao

第十步:Spring整合Hibernate框架
- 创建数据库和表
- 编写实体和映射
Spring和Hibernate整合
在Spring配置文件中引入Hibernate配置信息

在Spring和Hibernate整合后,Spring提供了一个Hibernate的模板类,用来简化Hibernate开发,改写Dao继承HibernateDaoSupport

配置的时候在Dao中直接注入SessionFactory,就会创建Hibernate模版类

在Dao中使用Hibernate的模版实现保存操作

第十步:配置Spring的事务管理
配置事务管理器

开启注解事务

在业务层使用注解

测试:

<?xml version="1.0" encoding="UTF-8"?>
<beans xmlns="http://www.springframework.org/schema/beans"
    xmlns:xsi="http://www.w3.org/2001/XMLSchema-instance" xmlns:context="http://www.springframework.org/schema/context"
    xmlns:aop="http://www.springframework.org/schema/aop" xmlns:tx="http://www.springframework.org/schema/tx"
    xsi:schemaLocation="http://www.springframework.org/schema/beans
    http://www.springframework.org/schema/beans/spring-beans.xsd
    http://www.springframework.org/schema/context
    http://www.springframework.org/schema/context/spring-context.xsd
    http://www.springframework.org/schema/aop
    http://www.springframework.org/schema/aop/spring-aop.xsd
    http://www.springframework.org/schema/tx
    http://www.springframework.org/schema/tx/spring-tx.xsd">


     <!--通过context标签引入jdbc.properties -->
     <context:property-placeholder location="classpath:jdbc.properties"/>

<!--      <context:annotation-config/>     -->

     <!-- 配置C3P0连接池 -->
     <bean id="dataSource" class="com.mchange.v2.c3p0.ComboPooledDataSource">
       <property name="driverClass" value="${jdbc.driverClass}"/>
       <property name="jdbcUrl" value="${jdbc.url}"/>
       <property name="user" value="${jdbc.user}"/>
       <property name="password" value="${jdbc.password}"/>
     </bean>

    <!-- 配置Action -->
    <bean id="customerAction" class="com.ssh.web.action.CustomerAction" scope="prototype">
       <property name="customerService" ref="customerService"/>
    </bean>

    <!-- 注入CustomerService -->
    <bean id="customerService" class="com.ssh.service.impl.CustomerServiceImpl">
    <property name="customerDao" ref="customerDao"/>
    </bean>

    <!-- 注入Dao -->
    <bean id="customerDao" class="com.ssh.dao.impl.CustomerDaoImpl">

    </bean>

</beans>

 浙公网安备 33010602011771号