webpack 单页面配置 hash后缀 热更新 scss解析
关于webpack
Grunt和Gulp以及NPM脚本都是任务执行程序
Webpack是模块打包程序。这两类程序的目标不一样。但webpack简化了 必须“过度使用”Grunt和Gulp和NPM脚本才能实现的Web开发任务也是事实。
什么叫面向过程?如果你知道或者使用过 gulp 这个自动化工具的话,应该会记得 gulp 管道的概念
即从源头那里得到源数据(js/css/html 源码、图片、字体等等),然后数据通过一个又一个组合起来的管道,最后输出成为构建的结果。
配置webpack单页面
安装基本依赖,配置开发模式出入口
npm init -y
yarn add webpack -D
yarn add webpack-cli -D
模式、入口和出口配置:
const path = require('path');
const htmlWebpackPlugin = require('html-webpack-plugin');
module.exports = {

    //开发模式
    mode : "development",
    //入口
    entry:{
        'index':"./src/js/index.js"
    },
    //出口
    output:{
        //不配置默认输出到dist目录
        path:path.resolve(__dirname,'./dev'),
        //这里的哈希值会通过htmlwebpackplugin插件引入到html上
        filename:"index-[hash].js"
    },
}
html-webpack-plugin 将html文件和js文件整合到一块
yarn add html-webpack-plugin -D
引入:const htmlWebpackPlugin = require("html-webpack-plugin")😭"html-webpack-plugin");
配置:
    //插件
    plugins:[
        new htmlWebpackPlugin({
            //这里设置的值可在index页面调用<%= %>
            //<title><%= htmlWebpackPlugin.options.title %></title>
            title:"htmlwebpackplugin set title",
            //配置入口js文件对应的html模板
            template:"./src/views/index.html",
            // 模板名
            filename:'index.html',
            // 防止加载此页面的时候加载其他js
            chunks:['index']
        })
    ]
webpack-dev-server 配置热更新启动服务
安装:yarn add webpack-dev-server -D
导入:无需导入,直接用devServer对象,这个对象是写死的
启动:"dev": "webpack-dev-server --open --config webpack.config.dev.js"
注意这种启动方式不会将文件输出到dev目录,而是在内存里运行
配置:
webpack.config.dev.js
//配置热更新服务webpack-dev-server
devServer:{
    //监听端口
    port:9099,
    //开启服务是否打开页面
    open:true
}
package.json
  "scripts": {
    "dev": "webpack-dev-server --open --config webpack.config.dev.js"
  },
配置sass解析 sass-loader node-sass
使用的时候,js文件直接import sccs文件就好mwebpack里面js可以直接绑定css
安装:
yarn add sass-loader node-sass -D //node-sass是sass-loader的基础
yarn add style-loader css-loader -D //内部样式
配置:
    //配置scss解析并绑定给import它的js文件
    module:{
        rules:[
            {
                //正则筛选
                test:/s[ac]ss$/,
                //指定要用的loader
                use:[
                    //指定内部样式
                    'style-loader',
                    //指定css
                    'css-loader',
                    //把sass转成css
                    'sass-loader'
                ]
            }
        ]
    }
使用:
在js文件里import
import '../style/common.scss';
效果:
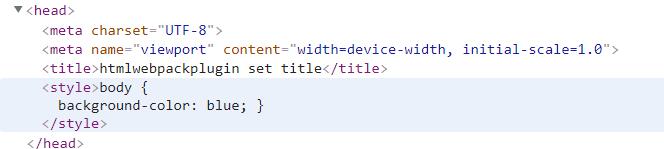
以上是内部样式,要转成外部样式需要另外下载插件 mini-css-extract-plugin
mini-css-extract-plugin
安装:yarn add mini-css-extract-plugin -D
导入:const minicssextractplugin = require(...);
配置:
plugins:绑定css文件
module:用minicssextractplugin.loader代替style.loader
    //插件
    plugins: [
        new htmlWebpackPlugin({
            //这里设置的值可在index页面调用<%= %>
            title: "htmlwebpackplugin set title",
            //配置入口js文件对应的html模板
            template: "./src/views/index.html",
            // 模板名
            filename: 'index.html',
            // 防止加载此页面的时候加载其他js
            chunks: ['index']
        }),
        new miniCssExtractPlugin(
            {
                //此处绑定得是css不是js
                filename: '[name]-[hash].css'
            }
        )
    ],
    //配置scss解析并绑定给import它的js文件
    module: {
        rules: [
            {
                //正则筛选
                test: /s[ac]ss$/,
                //指定要用的loader
                use: [
                    //指定内部样式
                    // 'style-loader',
                    //指定外部样式
                    miniCssExtractPlugin.loader,
                    //指定css
                    'css-loader',
                    //把sass转成css
                    'sass-loader'
                ]
            }
        ]
    }
效果:

package.json:
{
  "name": "webpackDemo",
  "version": "1.0.0",
  "description": "",
  "main": "webpack.config.dev.js",
  "scripts": {
    "test": "echo \"Error: no test specified\" && exit 1",
    "dev": "webpack-dev-server --open --config webpack.config.dev.js"
  },
  "keywords": [],
  "author": "",
  "license": "ISC",
  "devDependencies": {
    "css-loader": "^3.4.2",
    "html-webpack-plugin": "^4.0.0",
    "mini-css-extract-plugin": "^0.9.0",
    "node-sass": "^4.13.1",
    "sass-loader": "^8.0.2",
    "style-loader": "^1.1.3",
    "webpack": "^4.42.0",
    "webpack-cli": "^3.3.11",
    "webpack-dev-server": "^3.10.3"
  }
}
webpack.config.dev.js
/*
    单页面
*/
const path = require('path');
const htmlWebpackPlugin = require('html-webpack-plugin');
//这个不需要引入
// const devServer = require('webpack-dev-server');
const miniCssExtractPlugin = require('mini-css-extract-plugin');
module.exports = {

    //开发模式
    mode: "development",
    //入口
    entry: {
        'index': "./src/js/index.js"
    },
    //出口
    output: {
        //不配置默认输出到dist目录
        path: path.resolve(__dirname, './dev'),
        //这里的哈希值会通过htmlwebpackplugin插件引入到html上
        filename: "index-[hash].js"
    },
    //配置热更新服务webpack-dev-server
    devServer: {
        //监听端口
        port: 9099,
        //开启服务是否打开页面
        open: true
    },
    //插件
    plugins: [
        new htmlWebpackPlugin({
            //这里设置的值可在index页面调用<%= %>
            title: "htmlwebpackplugin set title",
            //配置入口js文件对应的html模板
            template: "./src/views/index.html",
            // 模板名
            filename: 'index.html',
            // 防止加载此页面的时候加载其他js
            chunks: ['index']
        }),
        new miniCssExtractPlugin(
            {
                //此处绑定得是css不是js
                filename: '[name]-[hash].css'
            }
        )
    ],
    //配置scss解析并绑定给import它的js文件
    module: {
        rules: [
            {
                //正则筛选
                test: /s[ac]ss$/,
                //指定要用的loader
                use: [
                    //指定内部样式
                    // 'style-loader',
                    //指定外部样式
                    miniCssExtractPlugin.loader,
                    //指定css
                    'css-loader',
                    //把sass转成css
                    'sass-loader'
                ]
            }
        ]
    }
}
目录


 浙公网安备 33010602011771号