ssm搭建的图书管理小demo(login、CURD)
学完ssm后就可以练手的小项目,图书管理有login、CURD这四个功能。第一次写完整的项目,尽量写的很详细,自己也从新梳理一遍
搭建环境:maven+eclipse+ssm+mysql
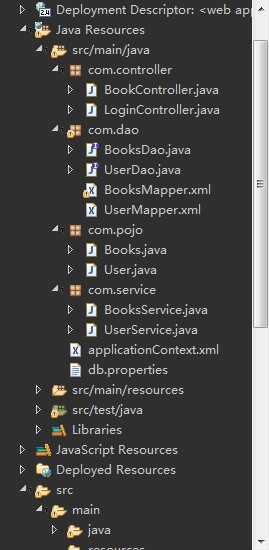
项目结构图:
pom.xml文件内容如下


 1 <project xmlns="http://maven.apache.org/POM/4.0.0" xmlns:xsi="http://www.w3.org/2001/XMLSchema-instance"
 2   xsi:schemaLocation="http://maven.apache.org/POM/4.0.0 http://maven.apache.org/maven-v4_0_0.xsd">
 3   <modelVersion>4.0.0</modelVersion>
 4   <groupId>com.li</groupId>
 5   <artifactId>bookstore</artifactId>
 6   <packaging>war</packaging>
 7   <version>0.0.1-SNAPSHOT</version>
 8   <name>bookstore Maven Webapp</name>
 9   <url>http://maven.apache.org</url>
10
11   <properties>
12       <project.build.sourceEncoding>UTF-8</project.build.sourceEncoding>
13       <spring.version>4.3.0.RELEASE</spring.version>
14   </properties>
15
16   <dependencies>
17         <!--Spring框架核心库 -->
18         <dependency>
19             <groupId>org.springframework</groupId>
20             <artifactId>spring-context</artifactId>
21             <version>${spring.version}</version>
22         </dependency>
23         <!-- aspectJ AOP 织入器 -->
24         <dependency>
25             <groupId>org.aspectj</groupId>
26             <artifactId>aspectjweaver</artifactId>
27             <version>1.8.9</version>
28         </dependency>
29         <!-- Spring Web -->
30         <dependency>
31             <groupId>org.springframework</groupId>
32             <artifactId>spring-web</artifactId>
33             <version>${spring.version}</version>
34         </dependency>
35         <dependency>
36             <groupId>org.springframework</groupId>
37             <artifactId>spring-webmvc</artifactId>
38             <version>${spring.version}</version>
39         </dependency>
40         <!--mybatis-spring适配器 -->
41         <dependency>
42             <groupId>org.mybatis</groupId>
43             <artifactId>mybatis-spring</artifactId>
44             <version>1.3.0</version>
45         </dependency>
46         <!--Spring java数据库访问包,在本例中主要用于提供数据源 -->
47         <dependency>
48             <groupId>org.springframework</groupId>
49             <artifactId>spring-jdbc</artifactId>
50             <version>${spring.version}</version>
51         </dependency>
52         <!--mysql数据库驱动 -->
53         <dependency>
54             <groupId>mysql</groupId>
55             <artifactId>mysql-connector-java</artifactId>
56             <version>5.1.38</version>
57         </dependency>
58         <!--log4j日志包 -->
59         <dependency>
60             <groupId>org.apache.logging.log4j</groupId>
61             <artifactId>log4j-core</artifactId>
62             <version>2.6.1</version>
63         </dependency>
64         <!-- mybatis ORM框架 -->
65         <dependency>
66             <groupId>org.mybatis</groupId>
67             <artifactId>mybatis</artifactId>
68             <version>3.4.1</version>
69         </dependency>
70         <!-- JUnit单元测试工具 -->
71         <dependency>
72             <groupId>junit</groupId>
73             <artifactId>junit</artifactId>
74             <version>4.10</version>
75         </dependency>
76         <!--c3p0 连接池 -->
77         <dependency>
78             <groupId>c3p0</groupId>
79             <artifactId>c3p0</artifactId>
80             <version>0.9.1.2</version>
81         </dependency>
82         <!-- jstl -->
83         <dependency>
84             <groupId>javax.servlet</groupId>
85             <artifactId>jstl</artifactId>
86             <version>1.2</version>
87         </dependency>
88     </dependencies>
89 </project>
数据库内创建两个表,一个用于登录,一个用于对应book,sql脚本如下
 1 USE `my_db`;
 2
 3 /*Table structure for table `books` */
 4
 5 DROP TABLE IF EXISTS `books`;
 6
 7 CREATE TABLE `books` (
 8   `id` int(11) NOT NULL AUTO_INCREMENT COMMENT '编号',
 9   `title` varchar(100) NOT NULL COMMENT '书名',
10   `price` decimal(10,2) DEFAULT NULL COMMENT '价格',
11   `publishDate` timestamp NULL DEFAULT CURRENT_TIMESTAMP COMMENT '出版日期',
12   PRIMARY KEY (`id`),
13   UNIQUE KEY `title` (`title`)
14 ) ENGINE=InnoDB AUTO_INCREMENT=15 DEFAULT CHARSET=utf8;
15
16 /*Data for the table `books` */
17
18 insert  into `books`(`id`,`title`,`price`,`publishDate`) values (14,'HeadFirst Java','56.00','1990-12-12 00:00:00');
19
20 /*Table structure for table `myuser` */
21
22 DROP TABLE IF EXISTS `myuser`;
23
24 CREATE TABLE `myuser` (
25   `id` int(11) NOT NULL,
26   `username` varchar(20) DEFAULT NULL,
27   `age` int(11) DEFAULT NULL,
28   `password` varchar(20) DEFAULT NULL,
29   PRIMARY KEY (`id`)
30 ) ENGINE=InnoDB DEFAULT CHARSET=utf8;
31
32 /*Data for the table `myuser` */
33
34 insert  into `myuser`(`id`,`username`,`age`,`password`) values (1,'aaa',20,'123'),(2,'bbb',23,'234'),(3,'ccc',12,'234'),(5,'poo',23,'876');
然后创建与数据表对应的类,User.java 、Books.java
 1 package com.pojo;
 2
 3 import java.text.ParseException;
 4 import java.text.SimpleDateFormat;
 5 import java.util.Date;
 6
 7 public class Books {
 8
 9     private int id;
10     private String title;
11     private double price;
12     private Date publishDate;
13
14     public Books() {
15         super();
16     }
17
18     public Books(int id, String title, double price, Date publishDate) {
19         super();
20         this.id = id;
21         this.title = title;
22         this.price = price;
23         this.publishDate = publishDate;
24     }
25     @Override
26     public String toString() {
27         return "Books [id=" + id + ", title=" + title + ", price=" + price + ", publishDate=" + publishDate + "]";
28     }
29     public int getId() {
30         return id;
31     }
32     public void setId(int id) {
33         this.id = id;
34     }
35     public String getTitle() {
36         return title;
37     }
38     public void setTitle(String title) {
39         this.title = title;
40     }
41     public double getPrice() {
42         return price;
43     }
44     public void setPrice(double price) {
45         this.price = price;
46     }
47     public Date getPublishDate() {
48         return publishDate;
49     }
50
51     public void setPublishDate(String str) {
52         SimpleDateFormat sdf = new SimpleDateFormat("yyyy-MM-dd");
53         Date publishDate;
54         try {
55             publishDate = sdf.parse(str);
56             this.publishDate = publishDate;
57         } catch (ParseException e) {
58             e.printStackTrace();
59         }
60     }
61
62 }
 1 package com.pojo;
 2
 3 public class User {
 4
 5     private int id;
 6     private String username;
 7     private String password;
 8     private int age;
 9     public int getId() {
10         return id;
11     }
12     public void setId(int id) {
13         this.id = id;
14     }
15     public String getUsername() {
16         return username;
17     }
18     public void setUsername(String username) {
19         this.username = username;
20     }
21     public String getPassword() {
22         return password;
23     }
24     public void setPassword(String password) {
25         this.password = password;
26     }
27     public int getAge() {
28         return age;
29     }
30     public void setAge(int age) {
31         this.age = age;
32     }
33     @Override
34     public String toString() {
35         return "User [id=" + id + ", username=" + username + ", password=" + password + ", age=" + age + "]";
36     }
37
38
39
40 }
根据mybatis的用法需要创建对应的接口,调用数据库来实现相对应的功能。UserDao.java、BooksDao.java
 1 package com.dao;
 2
 3 import java.util.List;
 4
 5 import com.pojo.Books;
 6
 7 public interface BooksDao {
 8
 9     public Books getBooksById(int id);
10
11     public int updateBooks(Books book);
12
13     public int addBooks(Books book);
14
15     public int deleteBooksById(int id);
16
17     public List<Books> getBooksAll();
18
19
20 }
1 package com.dao;
2
3 import com.pojo.User;
4
5 public interface UserDao {
6
7     public User getUser(String username);
8
9 }
然后创建与其对应的mapper文件,每个mapper文件的命名空间需要对应自己的接口类。这样mybatis就会调用数据库来创建相应的对象赋给接口类。BooksMapper.xml、UserMapper.xml。
 1 <?xml version="1.0" encoding="UTF-8"?>
 2 <!DOCTYPE mapper PUBLIC "-//mybatis.org//DTD Mapper 3.0//EN"
 3             "http://mybatis.org/dtd/mybatis-3-mapper.dtd">
 4
 5 <!--命名空间应该是对应接口的包名+接口名 -->
 6 <mapper namespace="com.dao.UserDao">
 7
 8     <select id="getUser" parameterType="string" resultType="User">
 9         select * from myuser where username=#{username}
10     </select>
11
12 </mapper>
 1 <?xml version="1.0" encoding="UTF-8"?>
 2 <!DOCTYPE mapper PUBLIC "-//mybatis.org//DTD Mapper 3.0//EN"
 3             "http://mybatis.org/dtd/mybatis-3-mapper.dtd">
 4
 5 <!--命名空间应该是对应接口的包名+接口名 -->
 6 <mapper namespace="com.dao.BooksDao">
 7
 8     <insert id="addBooks">
 9         insert into books (title,price,publishDate) values(#{title},#{price},#{publishDate})
10     </insert>
11
12     <update id="updateBooks">
13         update books set title=#{title},price=#{price},publishDate=#{publishDate} where id=#{id}
14     </update>
15
16     <delete id="deleteBooksById">
17         delete from books where id=#{id}
18     </delete>
19
20     <select id="getBooksById" parameterType="int" resultType="Books">
21         select * from books where id=#{id}
22     </select>
23
24     <select id="getBooksAll" resultType="Books">
25         select * from books
26     </select>
27
28 </mapper>
接着创建service层,也是分别创建UserService.java、BooksService.java。
 1 package com.service;
 2
 3 import java.util.List;
 4
 5 import javax.annotation.Resource;
 6
 7 import org.springframework.stereotype.Service;
 8
 9 import com.dao.BooksDao;
10 import com.pojo.Books;
11
12 @Service
13 public class BooksService {
14
15     @Resource
16     private BooksDao booksDao;
17
18     public int deleteBooksById(int id) {
19         return booksDao.deleteBooksById(id);
20     }
21
22     public int addBooks(Books book) {
23         return booksDao.addBooks(book);
24     }
25
26     public int updateBooks(Books book) {
27         return booksDao.updateBooks(book);
28     }
29
30     public Books getBooksById(int id) {
31         Books books = booksDao.getBooksById(id);
32         return books;
33     }
34
35     public List<Books> getBooksAll(){
36         List<Books> list = booksDao.getBooksAll();
37         return list;
38     }
39
40 }
 1 package com.service;
 2
 3 import javax.annotation.Resource;
 4
 5 import org.springframework.stereotype.Service;
 6
 7 import com.dao.UserDao;
 8 import com.pojo.User;
 9
10 @Service
11 public class UserService {
12
13     @Resource
14     private UserDao userDao;
15
16     public User getUser(String username) {
17
18         User user = userDao.getUser(username);
19         return user;
20
21     }
22
23 }
添加spring-mybatis整合的文件,文件名还是叫applicationContext.xml
 1 <?xml version="1.0" encoding="UTF-8"?>
 2 <beans xmlns="http://www.springframework.org/schema/beans"
 3     xmlns:xsi="http://www.w3.org/2001/XMLSchema-instance"
 4     xmlns:p="http://www.springframework.org/schema/p"
 5     xmlns:aop="http://www.springframework.org/schema/aop"
 6     xmlns:context="http://www.springframework.org/schema/context"
 7     xmlns:tx="http://www.springframework.org/schema/tx"
 8     xsi:schemaLocation="http://www.springframework.org/schema/beans
 9         http://www.springframework.org/schema/beans/spring-beans.xsd
10         http://www.springframework.org/schema/context
11         http://www.springframework.org/schema/context/spring-context-4.3.xsd
12         http://www.springframework.org/schema/aop
13         http://www.springframework.org/schema/aop/spring-aop-4.3.xsd
14         http://www.springframework.org/schema/tx
15         http://www.springframework.org/schema/tx/spring-tx-4.3.xsd">
16
17     <!--1 引入属性文件,在配置中占位使用 -->
18     <context:property-placeholder location="classpath*:db.properties" />
19
20     <!--2 配置C3P0数据源 -->
21     <bean id="datasource" class="com.mchange.v2.c3p0.ComboPooledDataSource" destroy-method="close">
22         <!--驱动类名 -->
23         <property name="driverClass" value="${jdbc.driver}" />
24         <!-- url -->
25         <property name="jdbcUrl" value="${jdbc.url}" />
26         <!-- 用户名 -->
27         <property name="user" value="${jdbc.uid}" />
28         <!-- 密码 -->
29         <property name="password" value="${jdbc.pwd}" />
30
31         <!-- 当连接池中的连接耗尽的时候c3p0一次同时获取的连接数  -->
32         <property name="acquireIncrement" value="5"></property>
33         <!-- 初始连接池大小 -->
34         <property name="initialPoolSize" value="10"></property>
35         <!-- 连接池中连接最小个数 -->
36         <property name="minPoolSize" value="5"></property>
37         <!-- 连接池中连接最大个数 -->
38         <property name="maxPoolSize" value="20"></property>
39     </bean>
40
41     <!--3 会话工厂bean sqlSessionFactoryBean -->
42     <bean id="sqlSessionFactory" class="org.mybatis.spring.SqlSessionFactoryBean">
43         <!-- 数据源 -->
44         <property name="dataSource" ref="datasource"></property>
45         <!-- 别名 -->
46         <property name="typeAliasesPackage" value="com.pojo"></property>
47         <!-- sql映射文件路径 -->
48         <property name="mapperLocations" value="classpath*:com/dao/*Mapper.xml"></property>
49     </bean>
50
51     <!--4 自动扫描对象关系映射 -->
52     <bean class="org.mybatis.spring.mapper.MapperScannerConfigurer">
53         <!--指定会话工厂,如果当前上下文中只定义了一个则该属性可省去 -->
54         <property name="sqlSessionFactoryBeanName" value="sqlSessionFactory"></property>
55         <!-- 指定要自动扫描接口的基础包,实现接口 -->
56         <property name="basePackage" value="com.dao"></property>
57     </bean>
58
59     <!--5 声明式事务管理 -->
60     <!--定义事物管理器,由spring管理事务 -->
61     <bean id="transactionManager" class="org.springframework.jdbc.datasource.DataSourceTransactionManager">
62         <property name="dataSource" ref="datasource"></property>
63     </bean>
64     <!--支持注解驱动的事务管理,指定事务管理器 -->
65     <tx:annotation-driven transaction-manager="transactionManager"/>
66
67     <!--6 容器自动扫描IOC组件  -->
68     <context:component-scan base-package="com"></context:component-scan>
69
70     <!--7 aspectj支持自动代理实现AOP功能 -->
71     <aop:aspectj-autoproxy proxy-target-class="true"></aop:aspectj-autoproxy>
72 </beans>
添加db.properties
1 #mysql jdbc
2 jdbc.driver=com.mysql.jdbc.Driver
3 jdbc.url=jdbc:mysql://localhost:3306/my_db?useUnicode=true&characterEncoding=UTF-8
4 jdbc.uid=root
5 jdbc.pwd=123456
创建单元测试类来测试是否能够调用数据库。UserServiceTest.java、BooksServiceTest.java
 1 package com.service;
 2
 3 import org.junit.BeforeClass;
 4 import org.junit.Test;
 5 import org.springframework.context.ApplicationContext;
 6 import org.springframework.context.support.ClassPathXmlApplicationContext;
 7
 8 import com.pojo.User;
 9
10 public class UserServiceTest {
11
12     private static UserService service;
13
14     //测试前需加载的方法
15     @BeforeClass
16     public static void before(){
17         ApplicationContext context = new ClassPathXmlApplicationContext("applicationContext.xml");
18         service = context.getBean(UserService.class);
19     }
20
21     @Test
22     public void testGetUser() {
23
24         User user = service.getUser("aaa");
25
26         System.out.println(user.toString());
27
28     }
29
30 }
 1 package com.service;
 2
 3 import static org.junit.Assert.*;
 4
 5 import java.util.List;
 6
 7 import org.junit.BeforeClass;
 8 import org.junit.Test;
 9 import org.springframework.context.ApplicationContext;
10 import org.springframework.context.support.ClassPathXmlApplicationContext;
11
12 import com.dao.BooksDao;
13 import com.pojo.Books;
14
15 public class BooksServiceTest {
16
17     private static BooksDao booksDao;
18
19     @BeforeClass
20     public static void before(){
21         ApplicationContext context = new ClassPathXmlApplicationContext("applicationContext.xml");
22         booksDao = context.getBean(BooksDao.class);
23     }
24
25     @Test
26     public void testDeleteBooksById() {
27         fail("Not yet implemented");
28     }
29
30     @Test
31     public void testAddBooks() {
32         fail("Not yet implemented");
33     }
34
35     @Test
36     public void testUpdateBooks() {
37         fail("Not yet implemented");
38     }
39
40     @Test
41     public void testGetBooksById() {
42         fail("Not yet implemented");
43     }
44
45     @Test
46     public void testGetBooksAll() {
47         List<Books> list = booksDao.getBooksAll();
48         for(Books book : list) {
49             System.out.println(book.toString());
50         }
51     }
52
53 }
如果测试发现没有问题,则就可以开始实现前端了。先实现登录功能。用用户输入的用户名作为查询条件,得到数据表内与其对应的密码,该密码若与用户输入的密码不同则提示“用户名或密码错误”再重新输入,若相同则转发到信息展示页面。
此时需要配置DispatcherServlet,在web.xml中进行配置。
 1 <?xml version="1.0" encoding="UTF-8"?>
 2 <web-app xmlns:xsi="http://www.w3.org/2001/XMLSchema-instance"
 3     xmlns="http://java.sun.com/xml/ns/javaee"
 4     xsi:schemaLocation="http://java.sun.com/xml/ns/javaee http://java.sun.com/xml/ns/javaee/web-app_3_0.xsd"
 5     id="WebApp_ID" version="3.0" >
 6
 7     <servlet>
 8         <servlet-name>controller</servlet-name>
 9         <servlet-class>org.springframework.web.servlet.DispatcherServlet</servlet-class>
10         <load-on-startup>1</load-on-startup>
11     </servlet>
12     <servlet-mapping>
13         <servlet-name>controller</servlet-name>
14         <url-pattern>/</url-pattern>
15     </servlet-mapping>
16
17     <listener>
18         <description>contextLoaderListener</description>
19         <listener-class>org.springframework.web.context.ContextLoaderListener</listener-class>
20     </listener>
21     <context-param>
22         <description>ContextLoaderListener</description>
23         <param-name>contextConfigLocation</param-name>
24         <param-value>classpath*:applicationContext.xml</param-value>
25     </context-param>
26 </web-app>
默认需要配置DispatcherServlet的<name>-servlet.xml作为视图解析器的配置文件,controller-servlet.xml。放在WEB-INF下。
 1 <?xml version="1.0" encoding="UTF-8"?>
 2 <beans xmlns="http://www.springframework.org/schema/beans"
 3     xmlns:xsi="http://www.w3.org/2001/XMLSchema-instance"
 4     xmlns:aop="http://www.springframework.org/schema/aop"
 5     xmlns:c="http://www.springframework.org/schema/c"
 6     xmlns:cache="http://www.springframework.org/schema/cache"
 7     xmlns:context="http://www.springframework.org/schema/context"
 8     xmlns:jdbc="http://www.springframework.org/schema/jdbc"
 9     xmlns:jee="http://www.springframework.org/schema/jee"
10     xmlns:lang="http://www.springframework.org/schema/lang"
11     xmlns:mvc="http://www.springframework.org/schema/mvc"
12     xmlns:p="http://www.springframework.org/schema/p"
13     xmlns:task="http://www.springframework.org/schema/task"
14     xmlns:tx="http://www.springframework.org/schema/tx"
15     xmlns:util="http://www.springframework.org/schema/util"
16     xsi:schemaLocation="http://www.springframework.org/schema/jee http://www.springframework.org/schema/jee/spring-jee-4.3.xsd
17         http://www.springframework.org/schema/mvc http://www.springframework.org/schema/mvc/spring-mvc-4.3.xsd
18         http://www.springframework.org/schema/context http://www.springframework.org/schema/context/spring-context-4.3.xsd
19         http://www.springframework.org/schema/aop http://www.springframework.org/schema/aop/spring-aop-4.3.xsd
20         http://www.springframework.org/schema/util http://www.springframework.org/schema/util/spring-util-4.3.xsd
21         http://www.springframework.org/schema/jdbc http://www.springframework.org/schema/jdbc/spring-jdbc-4.3.xsd
22         http://www.springframework.org/schema/cache http://www.springframework.org/schema/cache/spring-cache-4.3.xsd
23         http://www.springframework.org/schema/task http://www.springframework.org/schema/task/spring-task-4.3.xsd
24         http://www.springframework.org/schema/beans http://www.springframework.org/schema/beans/spring-beans.xsd
25         http://www.springframework.org/schema/lang http://www.springframework.org/schema/lang/spring-lang-4.3.xsd
26         http://www.springframework.org/schema/tx http://www.springframework.org/schema/tx/spring-tx-4.3.xsd ">
27
28      <bean class="org.springframework.web.servlet.view.InternalResourceViewResolver"
29          p:prefix="/"
30          p:suffix=".jsp"
31      />
32
33      <context:component-scan base-package="com.controller"></context:component-scan>
34
35
36 </beans>
配置登录用的controller,LoginController.java。使用springmvc的参数绑定标签获取jsp表单中的数据
 1 package com.controller;
 2
 3 import java.util.List;
 4
 5 import org.springframework.beans.factory.annotation.Autowired;
 6 import org.springframework.stereotype.Controller;
 7 import org.springframework.web.bind.annotation.RequestMapping;
 8 import org.springframework.web.bind.annotation.RequestMethod;
 9 import org.springframework.web.bind.annotation.RequestParam;
10 import org.springframework.web.servlet.ModelAndView;
11
12 import com.pojo.Books;
13 import com.pojo.User;
14 import com.service.BooksService;
15 import com.service.UserService;
16
17 @Controller
18 @RequestMapping("/bookstore")
19 public class LoginController {
20
21     @Autowired
22     private UserService userService;
23
24     @Autowired
25     private BooksService booksService;
26
27     @RequestMapping(path = "/login" ,method = RequestMethod.POST)
28     public ModelAndView userLogin(@RequestParam("username")String username,@RequestParam("password")String password) {
29
30         ModelAndView modelAndView = new ModelAndView();
31
32         User user = userService.getUser(username);
33
34         List<Books> books = booksService.getBooksAll();
35
36         if(password.equals(user.getPassword())){
37             modelAndView.setViewName("ListBook");
38             modelAndView.addObject("books", books);
39         }
40         else {
41             modelAndView.setViewName("login");
42             modelAndView.addObject("user", user);
43             modelAndView.addObject("message", "用户名或密码错误");
44         }
45
46         return modelAndView;
47
48     }
49
50 }
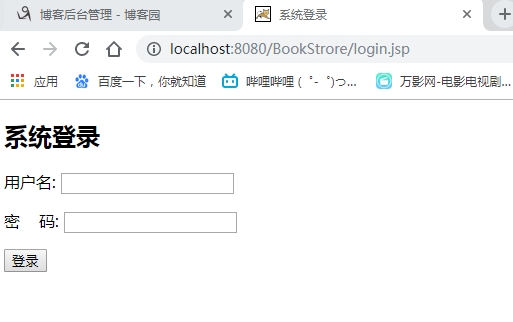
再添加登录页面login.jsp,里面使用jstl标签获取ModelAndView内的信息
1 <%@ page language="java" contentType="text/html; charset=UTF-8" 2 pageEncoding="UTF-8"%> 3 <%@taglib uri="http://java.sun.com/jsp/jstl/core" prefix="c" %> 4 <!DOCTYPE html> 5 <html> 6 <head> 7 <meta http-equiv="Content-Type" content="text/html; charset=UTF-8"> 8 <link href="styles/main.css" type="text/css" rel="stylesheet" /> 9 <title>系统登录</title> 10 </head> 11 <body> 12 13 <div class="main"> 14 <h2 class="title"><span>系统登录</span></h2> 15 <form action="<c:url value="/bookstore/login" />" method="post"> 16 <p>用户名: <input type="text" name="username" value="${user.getUsername()}" /></p> 17 <p>密 码: <input type="password" name="password" value="${user.getPassword() }" /></p> 18 <input type = "submit" name="login" value ="登录"/> 19 </form> 20 <p style="color: red">${message}</p> 21 </div> 22 23 </body> 24 </html>
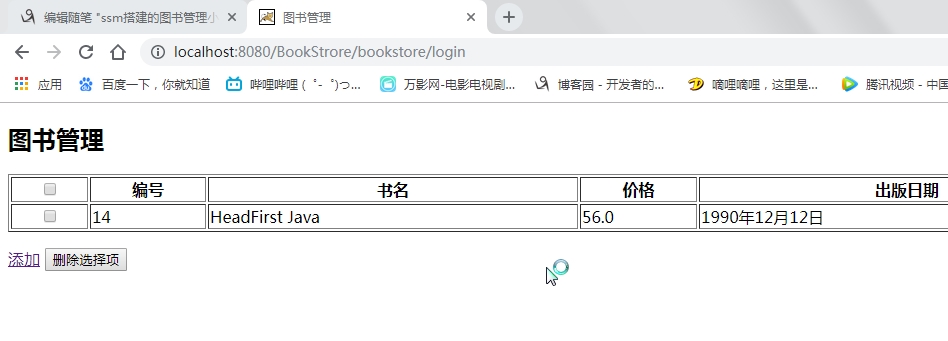
登录实现后就开始实现CURD功能。先是ListBook.jsp,获取数据库内的所有数据,从login.jsp转发到该页面。
 1 <%@ page language="java" contentType="text/html; charset=UTF-8"
 2     pageEncoding="UTF-8"%>
 3 <%@taglib prefix="c" uri="http://java.sun.com/jsp/jstl/core"%>
 4 <%@taglib prefix="fmt" uri="http://java.sun.com/jsp/jstl/fmt" %>
 5 <!DOCTYPE html>
 6 <html>
 7 <head>
 8 <meta http-equiv="Content-Type" content="text/html; charset=UTF-8">
 9 <link href="styles/main.css" type="text/css" rel="stylesheet" />
10 <title>图书管理</title>
11 </head>
12 <body>
13     <div class="main">
14         <h2 class="title"><span>图书管理</span></h2>
15         <form action="<c:url value="/bookstore/deletes" />" method="post">
16         <table border="1" width="100%" class="tab">
17             <tr>
18                 <th><input type="checkbox" id="chbAll"></th>
19                 <th>编号</th>
20                 <th>书名</th>
21                 <th>价格</th>
22                 <th>出版日期</th>
23                 <th>操作</th>
24             </tr>
25             <c:forEach var="book" items="${books}">
26                 <tr>
27                     <th><input type="checkbox" name="ids" value="${book.id}"></th>
28                     <td>${book.id}</td>
29                     <td>${book.title}</td>
30                     <td>${book.price}</td>
31                     <td><fmt:formatDate value="${book.publishDate}" pattern="yyyy年MM月dd日"/></td>
32                     <td>
33                     <a href="<c:url value="/bookstore/delete" />?id=${book.id}" class="abtn">删除</a>
34                     <a href="<c:url value="/bookstore/update" />?id=${book.id}" class="abtn">编辑</a>
35                     </td>
36                 </tr>
37             </c:forEach>
38         </table>
39         <p style="color: red">${message}</p>
40         <p>
41             <a href="<c:url value="/bookstore/add" />" class="abtn">添加</a>
42             <input type="submit"  value="删除选择项" class="btn"/>
43         </p>
44     </form>
45     </div>
46 </body>
47 </html>
接着实现ListBook.jsp内的所有按钮功能。先说删除和多项删除。删除的话就是直接拿到id调用数据库进行删除,多项删除拿到要被删除的所有id一个一个的删除,实现思路都是用springmvc的参数绑定标签获取jsp表单中的数据,也就是封装servlet的request、response。其实也没有啥思路好说的(2333),修改和添加页面都是如此,EditBook.jsp、AddBook.jsp。
 1 <%@ page language="java" contentType="text/html; charset=UTF-8"
 2     pageEncoding="UTF-8"%>
 3 <%@taglib prefix="c" uri="http://java.sun.com/jsp/jstl/core"%>
 4 <%@taglib prefix="fmt" uri="http://java.sun.com/jsp/jstl/fmt"%>
 5 <!DOCTYPE html>
 6 <html>
 7 <head>
 8 <meta http-equiv="Content-Type" content="text/html; charset=UTF-8">
 9 <link href="styles/main.css" type="text/css" rel="stylesheet" />
10 <title>编辑图书</title>
11 </head>
12 <body>
13     <div class="main">
14         <h2 class="title"><span>编辑图书</span></h2>
15         <form action="<c:url value="/bookstore/updatePost" />" method="post">
16         <fieldset>
17             <legend>图书</legend>
18             <p>
19                 <label for="title">图书名称:</label>
20                 <input type="text" id="title" name="title"  value="${book.title}"/>
21             </p>
22             <p>
23                 <label for="title">图书价格:</label>
24                 <input type="text" id="price" name="price" value="${book.price}"/>
25             </p>
26             <p>
27                 <label for="title">出版日期:</label>
28                 <input type="text" id="publishDate" name="publishDate"  value="<fmt:formatDate value="${book.publishDate}" pattern="yyyy-MM-dd"/>"/>
29             </p>
30             <p>
31                <input type="hidden" id="id" name="id" value="${book.id}"/>
32               <input type="submit" value="保存" class="btn">
33             </p>
34         </fieldset>
35         </form>
36         <p style="color: red">${message}</p>
37         <p>
38             <a href="<c:url value="/bookstore/list" />" class="abtn">返回列表</a>
39         </p>
40     </div>
41 </body>
42 </html>
 1 <%@ page language="java" contentType="text/html; charset=UTF-8"
 2     pageEncoding="UTF-8"%>
 3 <%@taglib prefix="c" uri="http://java.sun.com/jsp/jstl/core"%>
 4 <!DOCTYPE html>
 5 <html>
 6 <head>
 7 <meta http-equiv="Content-Type" content="text/html; charset=UTF-8">
 8 <link href="styles/main.css" type="text/css" rel="stylesheet" />
 9 <title>新增图书</title>
10 </head>
11 <body>
12     <div class="main">
13         <h2 class="title"><span>新增图书</span></h2>
14         <form action="<c:url value="/bookstore/addPost" />" method="post">
15         <fieldset>
16             <legend>图书</legend>
17             <p>
18                 <label for="title">图书名称:</label>
19                 <input type="text" id="title" name="title"/>
20             </p>
21             <p>
22                 <label for="title">图书价格:</label>
23                 <input type="text" id="price" name="price" />
24             </p>
25             <p>
26                 <label for="title">出版日期:</label>
27                 <input type="text" id="publishDate" name="publishDate" />
28             </p>
29             <p>
30               <input type="submit" value="保存" class="btn">
31             </p>
32         </fieldset>
33         </form>
34         <p style="color: red">${message}</p>
35         <p>
36             <a href="<c:url value="/bookstore/list" />" class="abtn">返回列表</a>
37         </p>
38     </div>
39 </body>
40 </html>
到这里所有功能都已经完善,说说其中碰到的问题:
1:页面404问题
(一)、未加载controller包,无法加载controller,但我在Spring-mybatis里已经配置过扫描所有包了,目前还没查具体原因(2333,急着做项目准备找工作,哪位要是知道也可以在底下评论告诉我下),无奈只能在springmvc文件里又重新扫描controller包,解决了该问题。
(二)、我一开始在jsp页面中所有请求都是直接写路径,一直都是404就很烦,突然看到浏览器地址栏的路径,在提交之后会直接变成jsp页面内表单的action路径,地址栏路径里的项目名没有了,用了jstl里的<c:url >标签解决。
2:表单内容无法封装到springmvc内
springmvc会自动得到表单内容封装到相对应对象属性中,发现无法封装,百度后知道问题是出在数据表的publishDate字段,看别人博客里说的是在set方法中,传入字符串再强转为日期类型,因为springmvc只能封装string类型。
3:乱码问题
就是在添加和修改页面所提交的汉字会乱码,debug发现是springmvc封装里的内容乱码,从springMVC获取内容再转码调用数据库。