Springboot项目Websocket
第一步:pom文件依赖
<!--websocket-->
<dependency>
    <groupId>org.springframework.boot</groupId>
    <artifactId>spring-boot-starter-websocket</artifactId>
</dependency>
第二步:配置websocket
import org.springframework.context.annotation.Bean;
import org.springframework.context.annotation.Configuration;
import org.springframework.web.socket.server.standard.ServerEndpointExporter;

/**
 * @author lrx
 * @create 2020-08-14 19:33
 * websocket配置类
 */
@Configuration
public class WebSocketConfig {

    @Bean
    public ServerEndpointExporter serverEndpointExporter() {
        return new ServerEndpointExporter();
    }

}
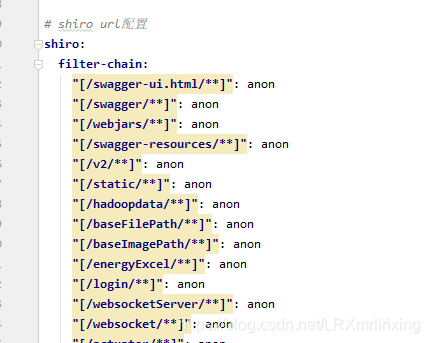
第三步:去除验证
第四步,编写websocket
package com.mp.core.websocket;

import com.alibaba.fastjson.JSONObject;
import com.mp.core.model.dto.pressure.RealDataDTO;
import com.mp.core.service.pressure.realdata.RealDataService;
import lombok.extern.slf4j.Slf4j;
import org.springframework.beans.factory.annotation.Autowired;
import org.springframework.stereotype.Component;

import javax.annotation.PostConstruct;
import javax.websocket.*;
import javax.websocket.server.ServerEndpoint;
import java.io.IOException;
import java.util.Map;
import java.util.concurrent.CopyOnWriteArraySet;
import java.util.concurrent.atomic.AtomicInteger;

/**
 * @author lrx
 * @description: TODO  app站点实时数据
 * @date 2021/3/29 15:43
 */
@Slf4j
@ServerEndpoint(value = "/websocketServer/appRealData/{userId}")
@Component
public class AppRealDataSocketServer {
    @PostConstruct
    public void init() {
        System.out.println("websocket 加载");
    }

    @Autowired
    private RealDataService realDataService;

    private static final AtomicInteger OnlineCount = new AtomicInteger(0);

    // concurrent包的线程安全Set,用来存放每个客户端对应的Session对象。
    private static CopyOnWriteArraySet<Session> sessionSet = new CopyOnWriteArraySet<Session>();


    /**
     * 连接建立成功调用的方法
     */
    @OnOpen
    public void onOpen(Session session) {
        sessionSet.add(session);
        int cnt = OnlineCount.incrementAndGet(); // 在线数加1
        log.info("有连接加入,当前连接数为:{}", cnt);
    }

    /**
     * 连接关闭调用的方法
     */
    @OnClose
    public void onClose(Session session) {
        sessionSet.remove(session);
        int cnt = OnlineCount.decrementAndGet();
        log.info("有连接关闭,当前连接数为:{}", cnt);
    }

    /**
     * 收到客户端消息后调用的方法
     *
     * @param message 客户端发送过来的消息
     */
    @OnMessage
    public void onMessage(String message, Session session) {
        log.info("来自客户端的消息:{}", message);
    }

    /**
     * 出现错误
     *
     * @param session
     * @param error
     */
    @OnError
    public void onError(Session session, Throwable error) {
        log.error("发生错误:{},Session ID: {}", error.getMessage(), session.getId());
        error.printStackTrace();
    }

    /**
     * 发送消息,实践表明,每次浏览器刷新,session会发生变化。
     *
     * @param session
     */
    public void sendMessage(Session session) {
        try {
            // 获取参数
            Map<String, String> pathParameters = session.getPathParameters();
            //获取用户id
            Long userId = Long.valueOf(pathParameters.get("userId"));
            Map<String, Map<String, RealDataDTO>> appRealDataDTOMap = realDataService.appRealDataDTOList(userId);
            log.info("会话 " + session.getId() + " 推送消息:" + JSONObject.toJSONString(appRealDataDTOMap));
            session.getBasicRemote().sendText(JSONObject.toJSONString(appRealDataDTOMap));
        } catch (IOException e) {
            log.error("发送消息出错:{}", e.getMessage());
            e.printStackTrace();
        } catch (Exception e) {
            e.printStackTrace();
        }
    }

    /**
     * 群发消息
     *
     * @throws IOException
     */
    public void broadCastInfo() throws IOException {
        log.info("=============开始群发消息===============");
        for (Session session : sessionSet) {
            if (session.isOpen()) {
                sendMessage(session);
            }
        }
    }
}

 浙公网安备 33010602011771号