SpringBoot 2.x 整合ElasticSearch的demo
SpringBoot 2.x 整合ElasticSearch的demo
1.配置文件application.yml信息
# Tomcat
server:
    tomcat:
        uri-encoding: UTF-8
        max-threads: 1000
        min-spare-threads: 30
    port: 8088
    context-path: /lion-admin
# DataSource
spring:
  data:
    elasticsearch:
      cluster-name: elasticsearch
      cluster-nodes: 127.0.0.1:9300
      repositories:
        enabled: true
2.实体类User.java
package com.louis.lion.admin.model;

import org.springframework.data.elasticsearch.annotations.Document;

/**
 * @ClassName: Search
 * @Description: TODO(这里用一句话描述这个类的作用)
 * @author lr
 * @date 2018年12月5日 下午4:58:50
 *
 */
@Document(indexName = "userindex", type = "user")
public class User {

    /** 编号 */
    private Long id;
    /** 姓名 */
    private String name;

    /** 年龄 */
    private Integer age;

    /** 描述 */
    private String description;

    /** 创建时间 */
    private String createtm;


    public User(){
    }


   public User(Long id, String name, Integer age, String description, String createtm) {
           super();
           this.id = id;
           this.name = name;
           this.age = age;
           this.description = description;
           this.createtm = createtm;
   }

   /**
    * 获取编号
    * @return  id
    */
   public Long getId() {
           return id;
   }

   /**
    * 设置编号
    * @param Long id
    */
   public void setId(Long id) {
           this.id = id;
   }

   /**
    * 获取姓名
    * @return  name
    */
   public String getName() {
           return name;
   }

   /**
    * 设置姓名
    * @param String name
    */
   public void setName(String name) {
           this.name = name;
   }

   /**
    * 获取年龄
    * @return  age
    */
   public Integer getAge() {
           return age;
   }

   /**
    * 设置年龄
    * @param Integer age
    */
   public void setAge(Integer age) {
           this.age = age;
   }

   /**
    * 获取描述
    * @return  description
    */
   public String getDescription() {
           return description;
   }

   /**
    * 设置描述
    * @param String description
    */
   public void setDescription(String description) {
           this.description = description;
   }

   /**
    * 获取创建时间
    * @return  createtm
    */
   public String getCreatetm() {
           return createtm;
   }
   /**
    * 设置创建时间
    * @param String createtm
    */
   public void setCreatetm(String createtm) {
           this.createtm = createtm;
   }

   @Override
   public String toString() {
           return "User [id=" + id + ", name=" + name + ", age=" + age + ", description=" + description + ", createtm="
                           + createtm + "]";
   }


}
3.service类
package com.louis.lion.admin.service;

import java.util.List;

import com.louis.lion.admin.model.User;

/**
 * @ClassName: SearchService
 * @Description: TODO(这里用一句话描述这个类的作用)
 * @author lr
 * @date 2018年12月5日 下午5:05:12
 *
 */
public interface SearchService{
    boolean insert(User entity);
    List<User> search(String searchContent);
}
4.serviceImpl实现类
package com.louis.lion.admin.service.impl;

import java.util.ArrayList;
import java.util.Iterator;
import java.util.List;

import org.elasticsearch.index.query.QueryStringQueryBuilder;
import org.springframework.beans.factory.annotation.Autowired;
import org.springframework.stereotype.Service;

import com.louis.lion.admin.dao.SearchMapper;
import com.louis.lion.admin.model.User;
import com.louis.lion.admin.service.SearchService;

/**
 * @ClassName: SearchServiceImpl
 * @Description: TODO(这里用一句话描述这个类的作用)
 * @author lr
 * @date 2018年12月5日 下午5:06:03
 *
 */
@Service
public class SearchServiceImpl implements SearchService{

    @Autowired
    private SearchMapper searchMapper;

    @Override
    public boolean insert(User entity) {
            boolean falg=false;
            try{
                searchMapper.save(entity);
                    falg=true;
            }catch(Exception e){
                    e.printStackTrace();
            }
            return falg;
    }

    @Override
    public List<User> search(String searchContent){
        QueryStringQueryBuilder builder = new QueryStringQueryBuilder(searchContent);
        System.out.println("查询的语句:"+builder);
        Iterable<User> searchResult = searchMapper.search(builder);
        Iterator<User> iterator = searchResult.iterator();
        List<User> list=new ArrayList<User>();
        while (iterator.hasNext()) {
          list.add(iterator.next());
        }
     return list;
    }
}
5.dao类
/**
 * @Title: SearchMapper.java
 * @Package com.louis.lion.admin.dao
 * @Description: TODO(用一句话描述该文件做什么)
 * @author lr
 * @date 2018年12月5日 下午5:03:17
 * @version V1.0.0
 */
package com.louis.lion.admin.dao;

import org.springframework.data.elasticsearch.repository.ElasticsearchRepository;

import com.louis.lion.admin.model.User;

/**
 * @ClassName: SearchMapper
 * @Description: TODO(这里用一句话描述这个类的作用)
 * @author lr
 * @date 2018年12月5日 下午5:03:17
 *
 */
public interface SearchMapper extends ElasticsearchRepository<User, Long>{

}
6.SearchController.java
/**
 * @Title: SearchController.java
 * @Package com.louis.lion.admin.controller
 * @Description: TODO(用一句话描述该文件做什么)
 * @author lr
 * @date 2018年12月5日 下午4:56:18
 * @version V1.0.0
 */
package com.louis.lion.admin.controller;

import java.util.List;

import org.springframework.beans.factory.annotation.Autowired;
import org.springframework.web.bind.annotation.GetMapping;
import org.springframework.web.bind.annotation.PostMapping;
import org.springframework.web.bind.annotation.RequestBody;
import org.springframework.web.bind.annotation.RequestMapping;
import org.springframework.web.bind.annotation.RequestParam;
import org.springframework.web.bind.annotation.RestController;

import com.louis.lion.admin.model.User;
import com.louis.lion.admin.service.SearchService;

/**
 * @ClassName: SearchController
 * @Description: TODO(这里用一句话描述这个类的作用)
 * @author lr
 * @date 2018年12月5日 下午4:56:18
 *
 */
@RestController
@RequestMapping(value = "search")
public class SearchController {

    @Autowired
    private SearchService searchService;

    @PostMapping("/save")
    public boolean createUser(@RequestBody User user) {
        return searchService.insert(user);
    }

//    @GetMapping(value = "/{name}")
//    public Object search(@PathVariable("name") String name) {
//        return this.searchService.search(name);
//    }
    @GetMapping("/searchContent")
    public List<User> search(@RequestParam(value = "searchContent") String searchContent) {
                return searchService.search(searchContent);
    }
}
windows 上安装Elasticsearch服务
文件准备
下载地址:
https://www.elastic.co/downloads
选择ElasticSearch相关版本, 然后选择后缀名为ZIP文件进行下载,下载之后进行解压
修改解压后的配置文件,进入到elasticsearch-6.5.1\config 下修改elasticsearch.yml
# ======================== Elasticsearch Configuration =========================
#
# NOTE: Elasticsearch comes with reasonable defaults for most settings.
#       Before you set out to tweak and tune the configuration, make sure you
#       understand what are you trying to accomplish and the consequences.
#
# The primary way of configuring a node is via this file. This template lists
# the most important settings you may want to configure for a production cluster.
#
# Please consult the documentation for further information on configuration options:
# https://www.elastic.co/guide/en/elasticsearch/reference/index.html
#
# ---------------------------------- Cluster -----------------------------------
#
# Use a descriptive name for your cluster:
#
cluster.name: elasticsearch
#
# ------------------------------------ Node ------------------------------------
#
# Use a descriptive name for the node:
#
node.name: node-1
#
# Add custom attributes to the node:
#
#node.attr.rack: r1
#
# ----------------------------------- Paths ------------------------------------
#
# Path to directory where to store the data (separate multiple locations by comma):
#
#path.data: /path/to/data
#
# Path to log files:
#
#path.logs: /path/to/logs
#
# ----------------------------------- Memory -----------------------------------
#
# Lock the memory on startup:
#
#bootstrap.memory_lock: true
#
# Make sure that the heap size is set to about half the memory available
# on the system and that the owner of the process is allowed to use this
# limit.
#
# Elasticsearch performs poorly when the system is swapping the memory.
#
# ---------------------------------- Network -----------------------------------
#
# Set the bind address to a specific IP (IPv4 or IPv6):
#
network.host: 0.0.0.0
#
# Set a custom port for HTTP:
#
http.port: 9200
#
# For more information, consult the network module documentation.
#
# --------------------------------- Discovery ----------------------------------
#
# Pass an initial list of hosts to perform discovery when new node is started:
# The default list of hosts is ["127.0.0.1", "[::1]"]
#
#discovery.zen.ping.unicast.hosts: ["host1", "host2"]
#
# Prevent the "split brain" by configuring the majority of nodes (total number of master-eligible nodes / 2 + 1):
#
#discovery.zen.minimum_master_nodes:
#
# For more information, consult the zen discovery module documentation.
#
# ---------------------------------- Gateway -----------------------------------
#
# Block initial recovery after a full cluster restart until N nodes are started:
#
#gateway.recover_after_nodes: 3
#
# For more information, consult the gateway module documentation.
#
# ---------------------------------- Various -----------------------------------
#
# Require explicit names when deleting indices:
#
#action.destructive_requires_name: true
http.cors.enabled: true
http.cors.allow-origin: "*"
node.master: true
node.data: true
启动Elasticsearch
进入bin目录下,运行 elasticsearch.bat
然后在浏览上输入: localhost:9200
成功显示一下界面表示成功!
{
  "name" : "node-1",
  "cluster_name" : "elasticsearch",
  "cluster_uuid" : "Qt1HMowsQDqKUgBMVtwLAg",
  "version" : {
    "number" : "6.5.1",
    "build_flavor" : "default",
    "build_type" : "zip",
    "build_hash" : "8c58350",
    "build_date" : "2018-11-16T02:22:42.182257Z",
    "build_snapshot" : false,
    "lucene_version" : "7.5.0",
    "minimum_wire_compatibility_version" : "5.6.0",
    "minimum_index_compatibility_version" : "5.0.0"
  },
  "tagline" : "You Know, for Search"
}
web管理界面head 安装
Windows10搭建ElasticSearch 并配置head
中文分词使用
然后根据对应的版本下载,我下载的是V6.5.1,下载完成后,解压到elasticsearch-6.5.1的plugins目录下。把解压后的文件放到IK【自己新建】文件夹中,然后重新启动就可以了
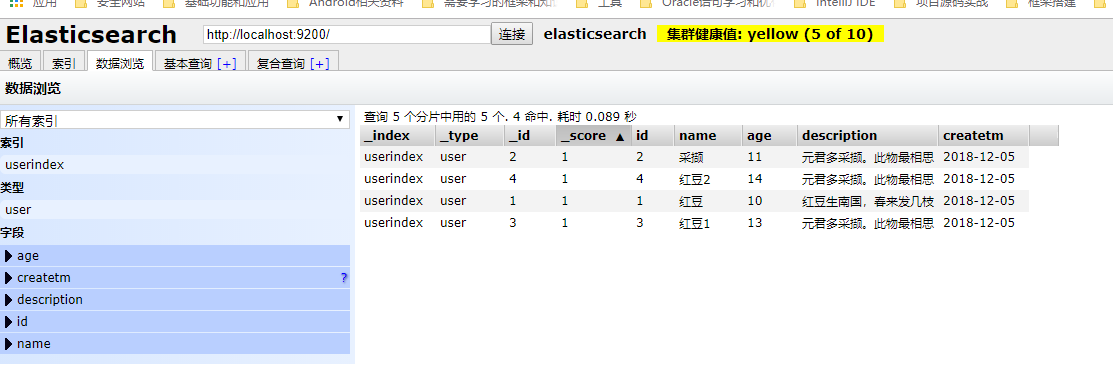
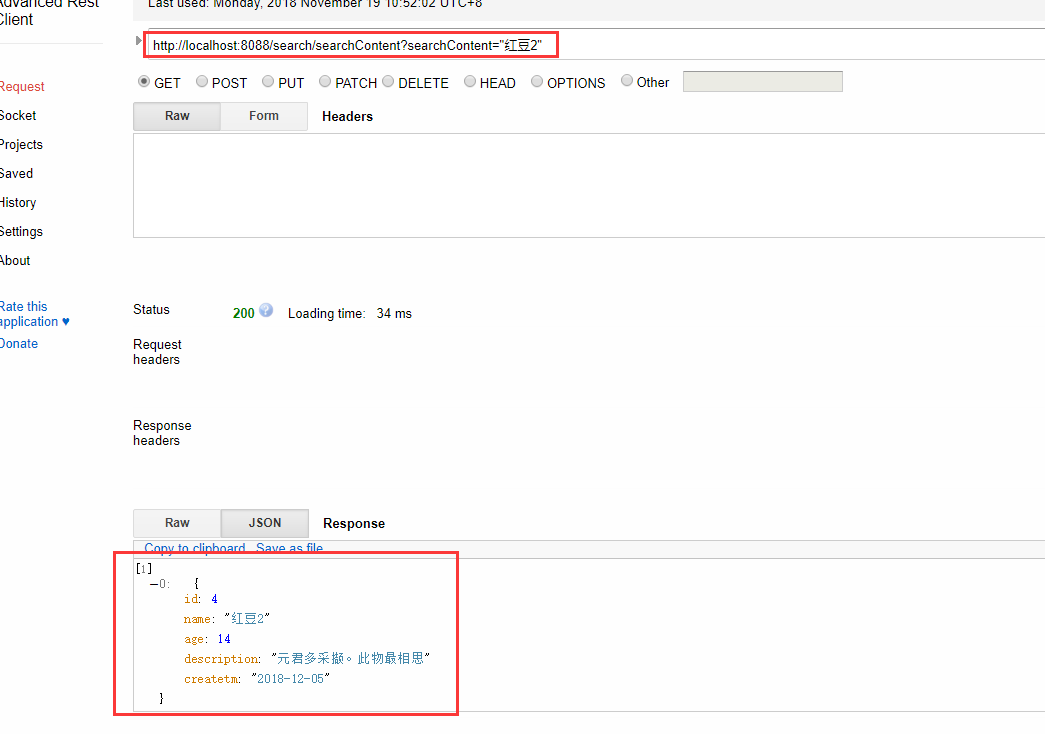
API调用效果如下,首先需要向分词器中添加数据


 不定期会发布一些实用的Java开发文章


