Git简单介绍以及使用入门
Git
Git:分布式版本控制系统, 此外还有 SVN (集中式版本控制系统)
下载地址(阿里云镜像) :CNPM Binaries Mirror (npmmirror.com)
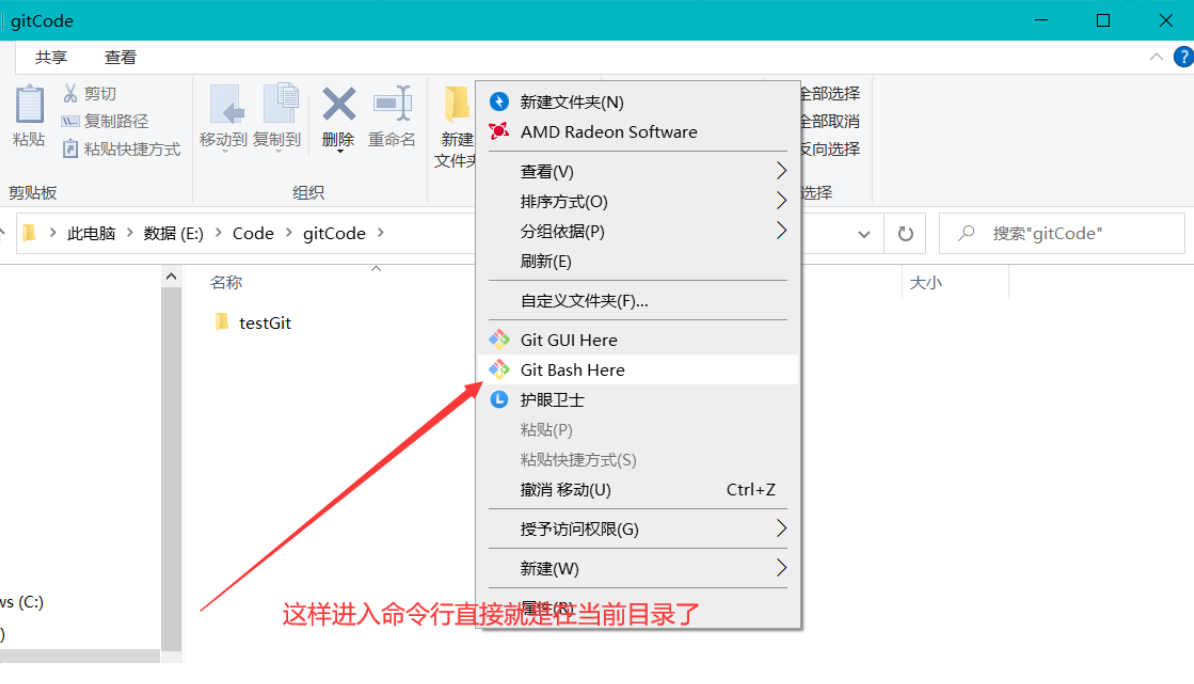
Git Bash : Linux命令行风格 (推荐使用)
Git CMD: window命令行风格
Git UID : 图形界面
提示: 下面都是在Linux风格命令行下演示, 在Linux命令行中下,#号后面代表的是注释,用于解释说明
工具使用技巧: 命令行切换目录麻烦,可以在直接打开该目录,再鼠标右击进入Git Bash
配置
使用Git必须配置用户名和邮箱(不需要是真实的邮箱)
git config --global --list   # 查看全局配置,即用户配置
git config --system --list   # 查看系统配置
git config --global user.name "名字"
git config --global user.email 318482536@qq.com
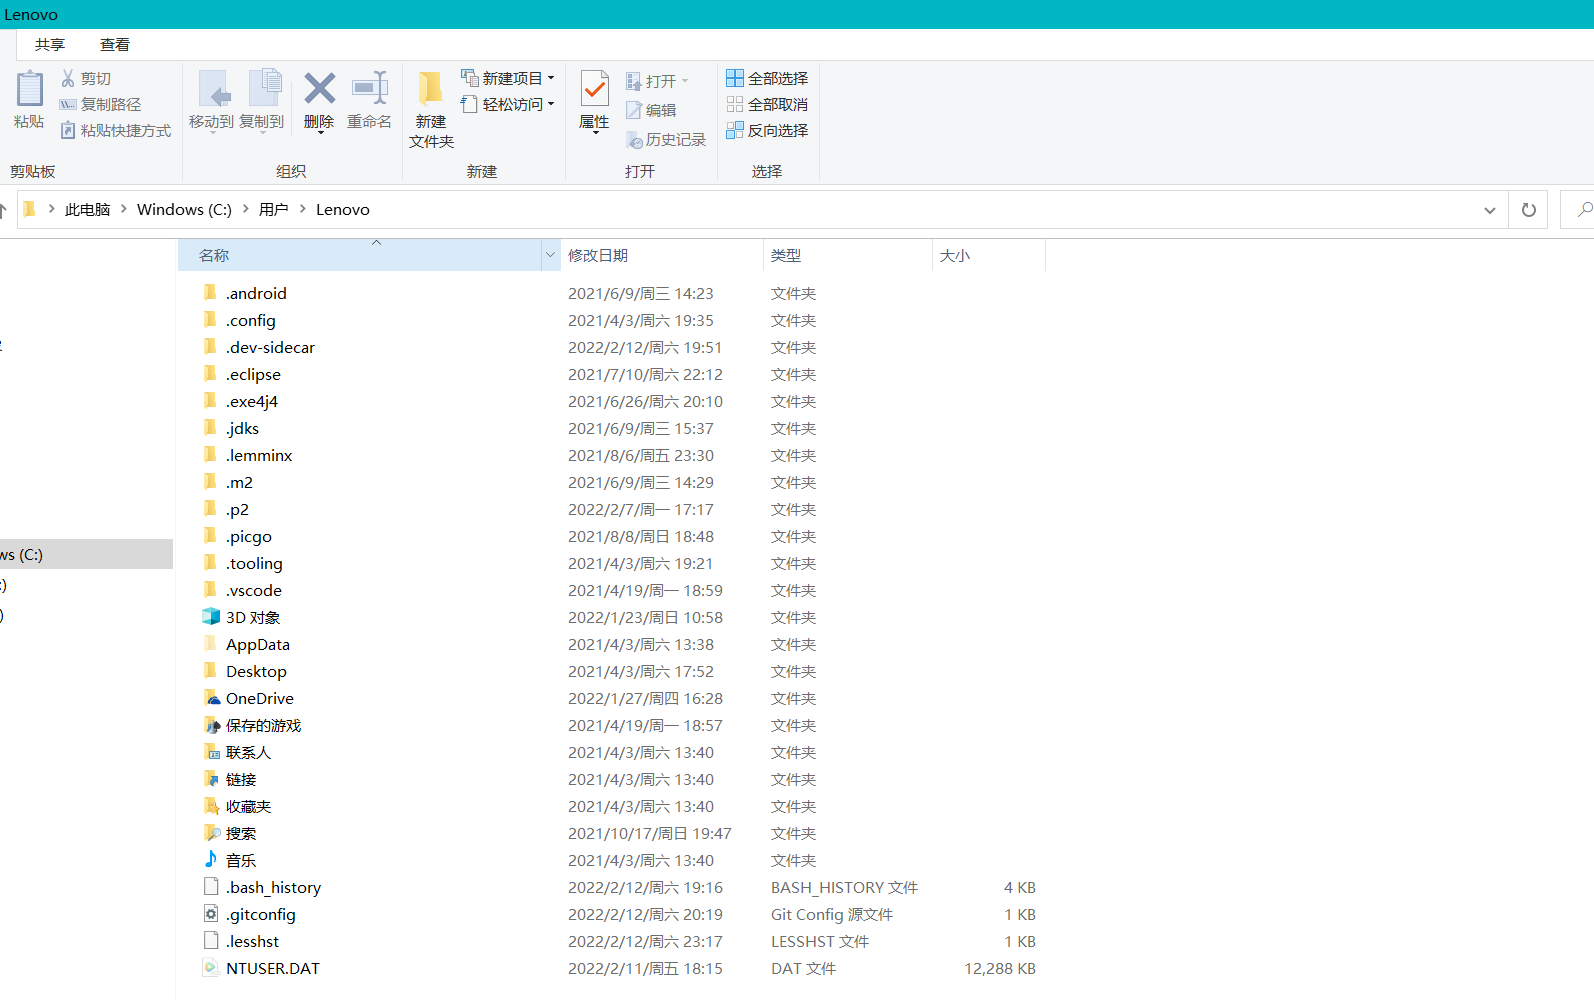
Git配置文件
系统配置文件在: 安装路径\Git\etc\gitconfig
用户配置文件 C:\Users\当前用户名.gitconfig
Git基本原理(理论)
工作区域
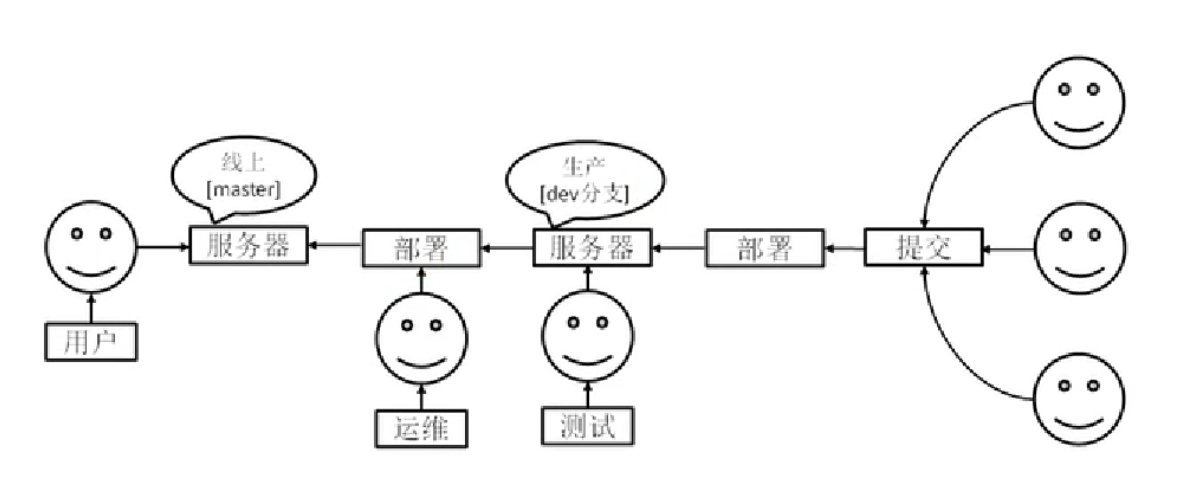
Git 在本地有三个工作区域:, 工作目录(Working Directory) , 暂存区(Stage/index) , 资源库(Git Directory或Repsoitory), 远程的Git仓库如GItHub或Gitee码云(Remole Directory)共四个工作区域,转换关系如下:
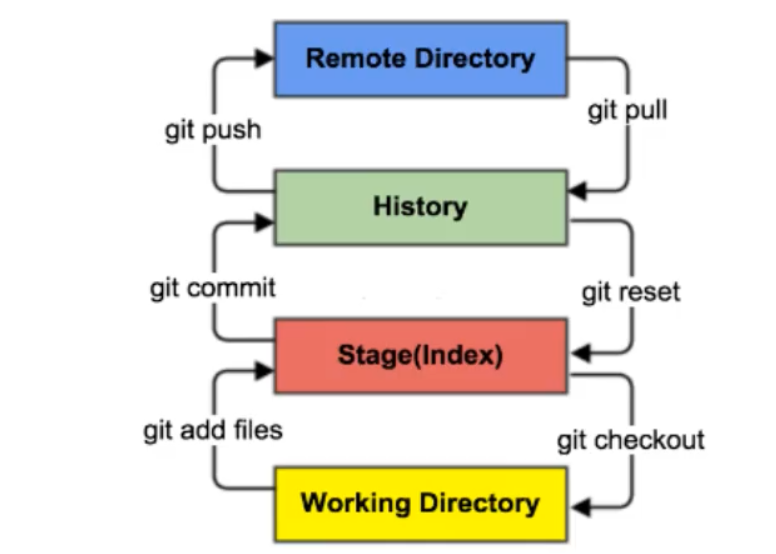
(图片来自狂神说)
工作目录 add => 添加到暂存区 , commit => 提交到本地仓库 ,push => 推送到远程仓库
-
工作区: 平时项目代码存放的地方,是真实的目录
-
暂存区: 用于临时存代码的改动,实际上只是一个文件,记录了即将提交到文件列表的信息,并不是真实目录
-
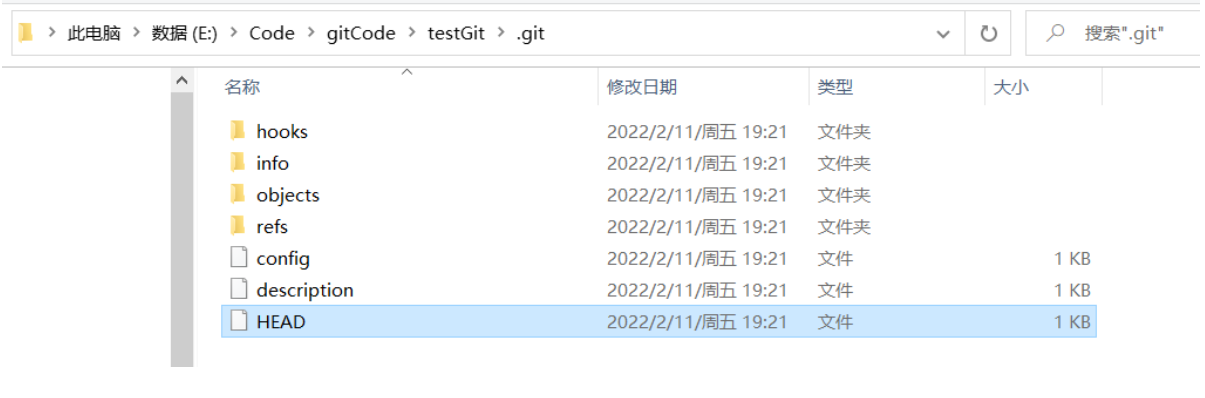
本地仓库: 安全存放数据的位置(实际上存在于.git目录中),存有所有版本的数据,其中HEAD文件指向最新放入仓库的版本
-
远程仓库:相当于网盘
注: HEAD文件在仓库目录的隐藏文件.git文件中,此文件记录了分支数以及分支指向,
基本流程
- 在工作目录添加,修改文件; 相当于我们日常Coding的项目文件目录
- 将需要进行版本管理的文件放入暂存区 对应命令 git add
- 将暂存区的文件提交到本地仓库 对应命令 git commit
- (可选) 提交到远程仓库 对应命令 git add push
git管理的文件状态:
是否跟踪(untrack,track):
文件在工作目录且未被git管理就是属于未跟踪,并且是属于未暂存的,
是否暂存 (unstage,stage):
当文件已经被添加到暂存区后,就属于暂存状态了,但是git管理的文件被修改后,又会变成未暂存状态
已修改(modfiied):
顾名思义,也就是当暂存区的文件被修改后,文件会变成已经修改状态,并且属于未状态,不过请注意,未跟踪的文件由于是未被git管理,故未跟踪的文件即使被修改也还是未跟踪状态
已提交(commited):
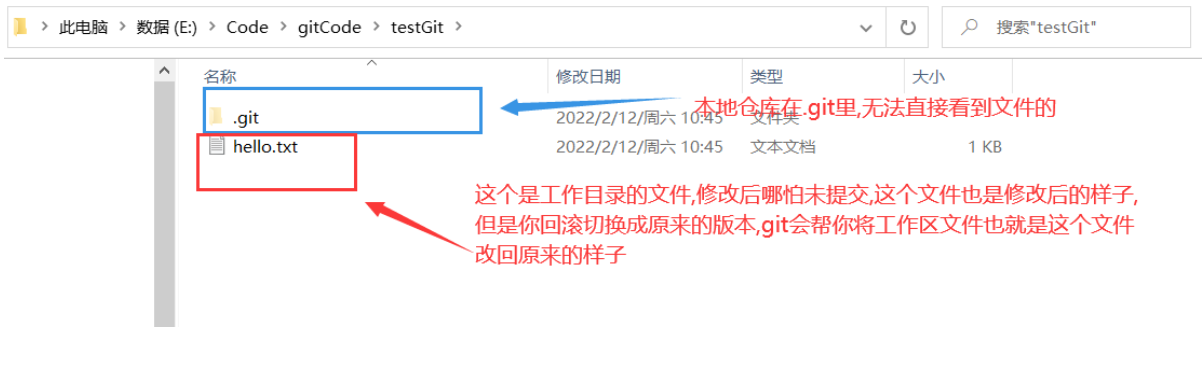
顾名思义,也就是被提交到本地仓库的文件,此外,请注意本地仓库在隐藏目录.git中,并且只保存一些修改记录信息,所以并不能在本地仓库中真实的查看到代码或文件内容 ,咱们能正常查看到的文件是属于工作区的(这也就意味着我们修改文件后,并不能直接查看到原来的文件内容)
命令(速查)
git init  # 在当前目录初始化git项目
git clone url  #克隆一个远程仓库项目到本地,url是项目链接; 克隆会初始化本地库,拉去代码,起一个默认别名
git status [文件名]# 查看仓库(文件)状态
git add 文件名 # 添加文件到暂存区
git rm --cached 文件名  # 将文件从暂存区移除,相当于标记为未跟踪,不删除本地文件
git commit -m "日志信息" 文件名  # 提交到本地仓库
git reflog # 查看历代版本信息
git log # 查看详细版本
git reset --hard 版本号  # 切换版本
git push 远程库的别名或url 分支名  #将本地库推送到远程库
git pull 远程库的别名或url 分支名  #将本地库拉取到远程库
# 以下不常用
git git restore 文件名 #恢复,这个命令针对已修改但还未添加到暂存区的文件,撤销本次修改操作,文件将恢复成未修改之前的样子
git restore --staged 文件名 #恢复暂存的文件,这个命令针对已修改并且已经添加到暂存区的文件,相当于撤销本次添加到暂存区操作
# 分支管理命令
git branch 分支名  # 创建分支
git branch -v  # 查看分支
git checkout # 切换分支
git merge 分支名 # 把指定的分支合并到当前分支下
# 别名管理命令
git remote -v  #查看所有远程链接别名
git remote add 别名 远程地址url   #添加别名
git remote remove 别名 #删除别名
分支
为了提高开发效率,开建立多个分支进行协同开发,分支可简单理解为一个单独的副本(底层是指针的引用),
基本开发流程
( 图片来自尚硅谷 )
分支协同开发
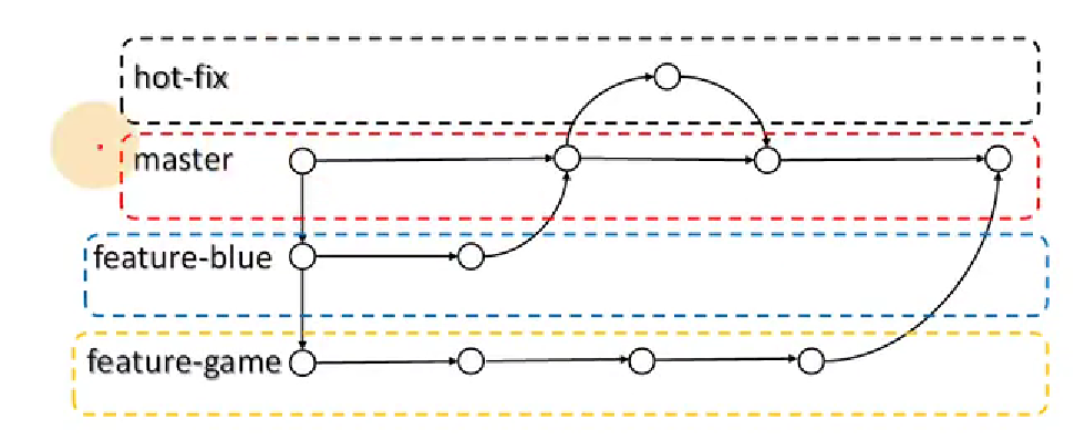
( 图片来自尚硅谷 )
master分支:代表项目上线正式版本
hot-fix 分支: 项目热维护分支,不需要将部署的项目停止运行
feature-bule: 开发分支
feature-game: 开发分支
分支操作(命令)
git branch 分支名  # 创建分支
git branch -v  # 查看分支
git checkout # 切换分支
git merge 分支名 # 把指定的分支合并到当前分支下
团队协作
团队内协作
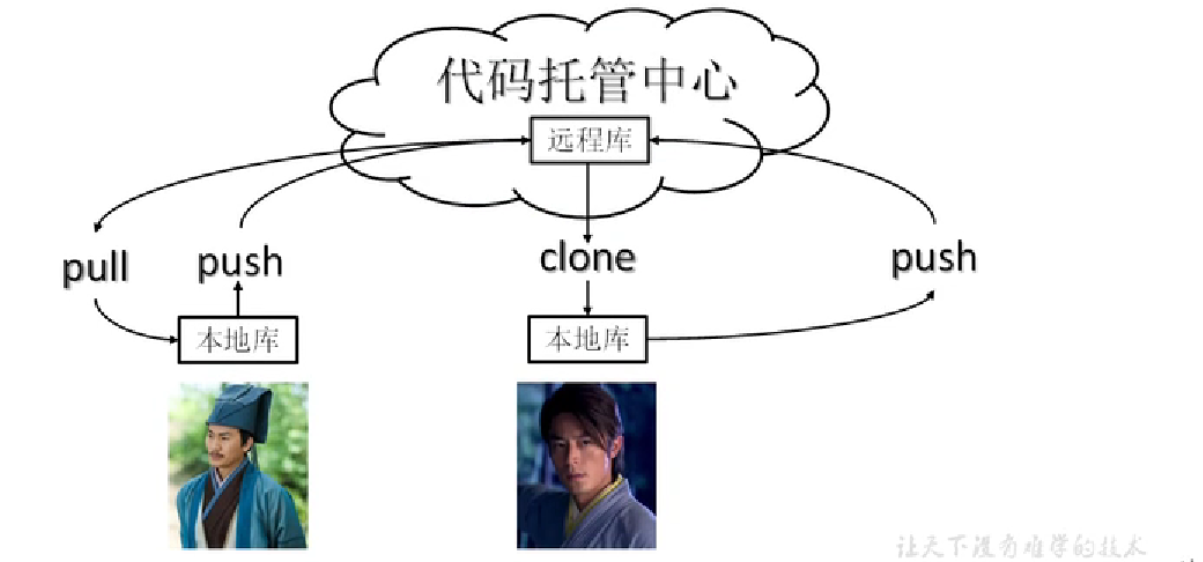
(图片来自尚硅谷)
跨团队协作
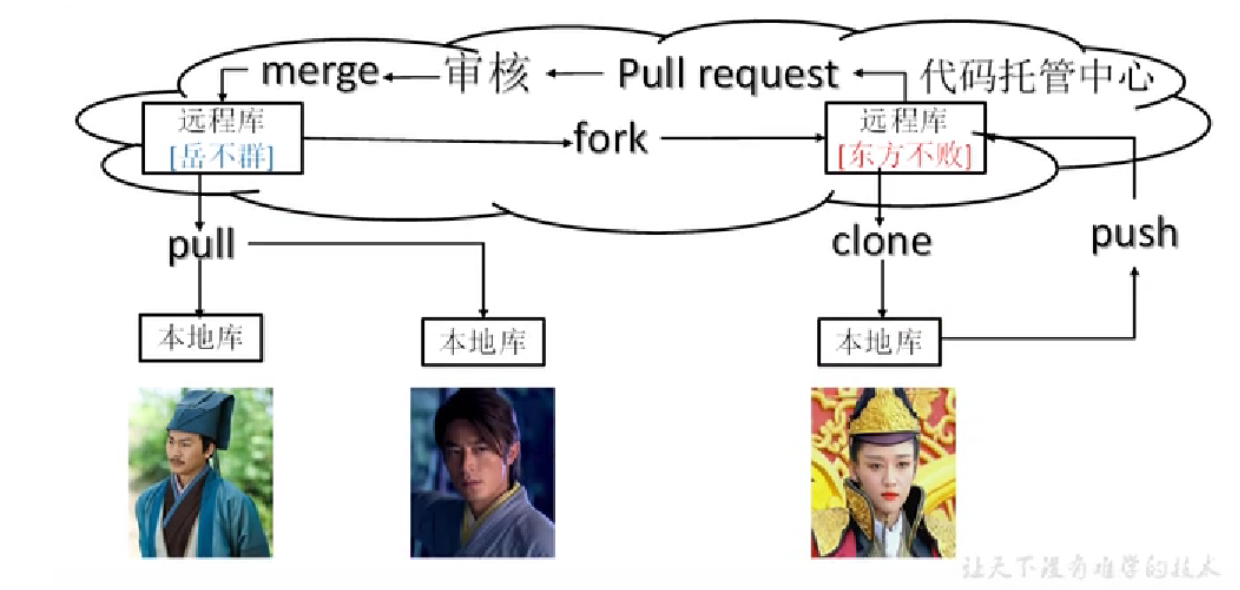
(图片来自尚硅谷)
远程仓库
相关命令
git remote -v  #查看所有远程链接别名
git remote add 别名 远程地址url   #添加别名
git push 远程库别名或url # 将本地框推送至远程库
git pull 远程库别名或url # 将远程库拉取到本地
git remote remove 别名 #删除别名
样例:
以下所有案例都是连续的操作
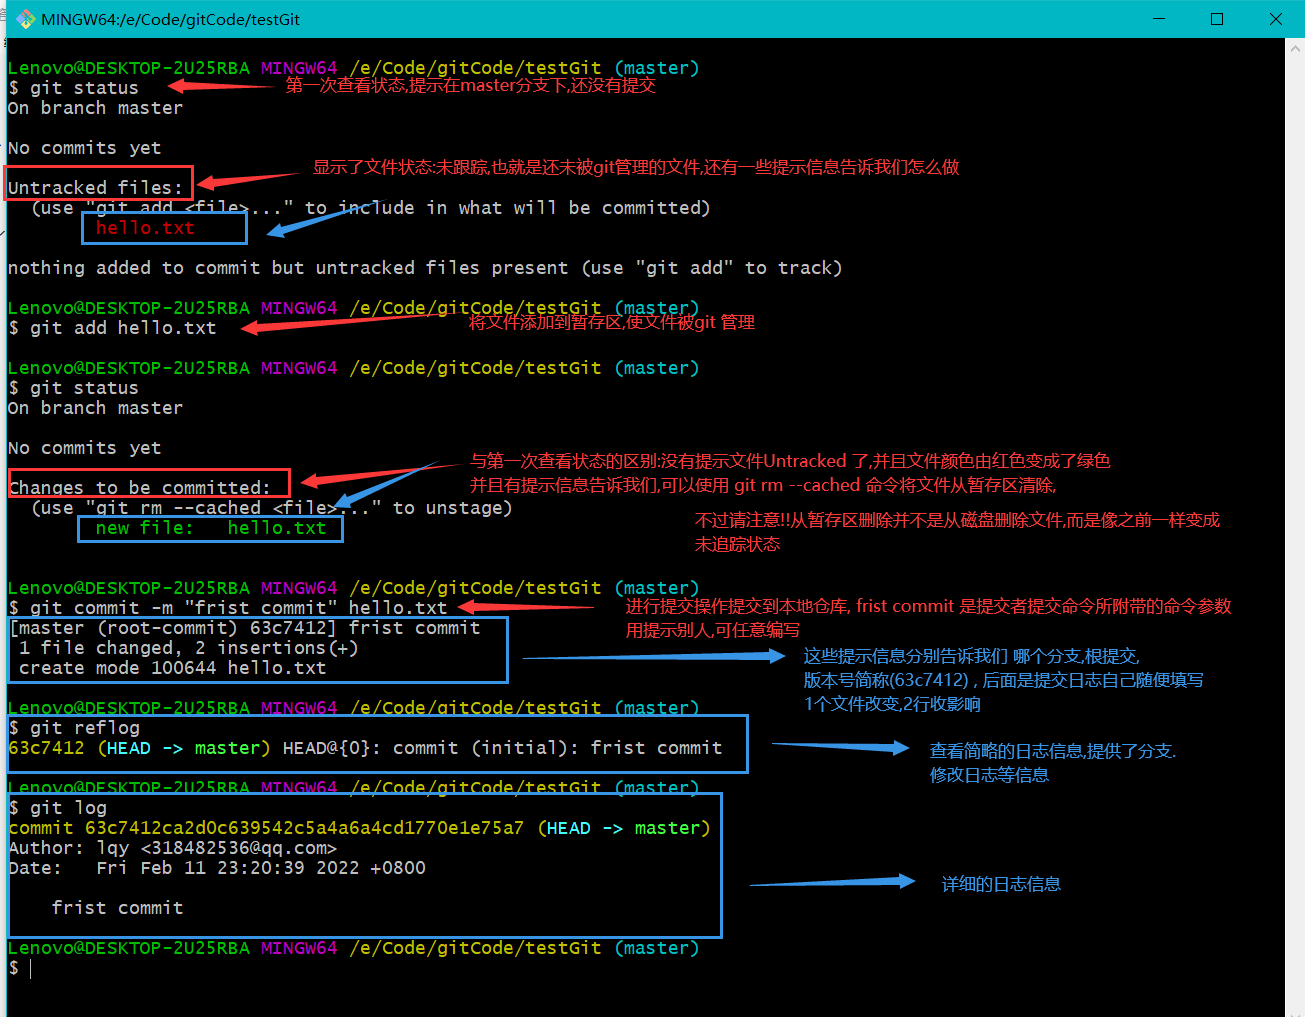
初次提交
有如下案例,在testGit项目中存在一个hello.txt文件,从未追踪到提交到本地库生成版本信息如下:
后续修改
如下代码赋值终端信息为了方便观看,接上面的案例
Lenovo@DESKTOP-2U25RBA MINGW64 /e/Code/gitCode/testGit (master)
$ ls -lh     # 查看当前所有文件信息
total 1.0K
-rw-r--r-- 1 Lenovo 197609 12 Feb 11 22:55 hello.txt    # 当前目录存在一个hello.txt文件

Lenovo@DESKTOP-2U25RBA MINGW64 /e/Code/gitCode/testGit (master)
$ cat hello.txt    # 查看文件内容,内容为: \n hello java

hello java
Lenovo@DESKTOP-2U25RBA MINGW64 /e/Code/gitCode/testGit (master)
$ echo "hello javaweb!!!" >> hello.txt     # Linux命令(通过管道)向hello.txt文件追加内容,模拟修改代码
echo "hello javawebcat hello.txt !" >> hello.txt

Lenovo@DESKTOP-2U25RBA MINGW64 /e/Code/gitCode/testGit (master)
$ cat hello.txt   # 再次查看文件内容 文件内容为: \n hello javahello javawebcat hello.txt !

hello javahello javawebcat hello.txt !

Lenovo@DESKTOP-2U25RBA MINGW64 /e/Code/gitCode/testGit (master)
$ git status  # 查看状态,可发现文件被修改后又变成了未暂存状态
On branch master
Changes not staged for commit:
  (use "git add <file>..." to update what will be committed)
  (use "git restore <file>..." to discard changes in working directory)
        modified:   hello.txt

no changes added to commit (use "git add" and/or "git commit -a")

Lenovo@DESKTOP-2U25RBA MINGW64 /e/Code/gitCode/testGit (master)
$ git add hello.txt   # 添加文件到暂存区
warning: LF will be replaced by CRLF in hello.txt.
The file will have its original line endings in your working directory

Lenovo@DESKTOP-2U25RBA MINGW64 /e/Code/gitCode/testGit (master)
$ git status    # 再次查看状态,和第一提交差不多,文件已经在暂存区中,但还未提交
On branch master
Changes to be committed:
  (use "git restore --staged <file>..." to unstage)
        modified:   hello.txt


Lenovo@DESKTOP-2U25RBA MINGW64 /e/Code/gitCode/testGit (master)
$ git commit -m "second commit" hello.txt  # 将修改后的文件提交到本地仓库
warning: LF will be replaced by CRLF in hello.txt.  # 这里的警告是说window和linux换行符不同的原因,不用在意
The file will have its original line endings in your working directory
[master 1db21ac] second commit  # 提交成功后,又有一个版本号,以及提交者编写的信息
 1 file changed, 1 insertion(+), 1 deletion(-)

Lenovo@DESKTOP-2U25RBA MINGW64 /e/Code/gitCode/testGit (master)
$ git reflog  # 查看日志
1db21ac (HEAD -> master) HEAD@{0}: commit: second commit
63c7412 HEAD@{1}: commit (initial): frist commit
  #(HEAD -> master)所在的版本号表示master分支的当前版本(指向)

Lenovo@DESKTOP-2U25RBA MINGW64 /e/Code/gitCode/testGit (master)
$ git log   # 查看详细日志
commit 1db21ac75f97fdd8bc9dfed2e57eb430c3153b5b (HEAD -> master)
Author: lqy <318482536@qq.com>
Date:   Sat Feb 12 00:00:04 2022 +0800

    second commit

commit 63c7412ca2d0c639542c5a4a6a4cd1770e1e75a7
Author: lqy <318482536@qq.com>
Date:   Fri Feb 11 23:20:39 2022 +0800

    frist commit

Lenovo@DESKTOP-2U25RBA MINGW64 /e/Code/gitCode/testGit (master)
$
版本穿梭,代码回滚
接上面两个案例,将版本切换为初代版本
版本切换会将造成本地工作区的文件内容修改,但本质是git在操作HEAD指针
Lenovo@DESKTOP-2U25RBA MINGW64 /e/Code/gitCode/testGit (master)
$ git reflog # 查看历代版本
1db21ac (HEAD -> master) HEAD@{0}: commit: second commit
63c7412 HEAD@{1}: commit (initial): frist commit

Lenovo@DESKTOP-2U25RBA MINGW64 /e/Code/gitCode/testGit (master)
$ git reset --hard 63c7412  # 切换版本
HEAD is now at 63c7412 frist commit  # 提示HEAD指针现在指向第一个版本

Lenovo@DESKTOP-2U25RBA MINGW64 /e/Code/gitCode/testGit (master)
$
查看创建分支,多分支提交
Lenovo@DESKTOP-2U25RBA MINGW64 /e/Code/gitCode/testGit (master)
$ git branch -v   # 查看分支,目录名后面的括号代表了当前所处分支.即现在在master分支下
* master 1db21ac second commit

Lenovo@DESKTOP-2U25RBA MINGW64 /e/Code/gitCode/testGit (master)
$ git branch hot-fix  #创建分支

Lenovo@DESKTOP-2U25RBA MINGW64 /e/Code/gitCode/testGit (master)
$ git branch -v   # 查看分支
  hot-fix 1db21ac second commit
* master  1db21ac second commit

Lenovo@DESKTOP-2U25RBA MINGW64 /e/Code/gitCode/testGit (master)
$ git checkout hot-fix   # 切换到hot-fix分支,模拟热维护
Switched to branch 'hot-fix'

Lenovo@DESKTOP-2U25RBA MINGW64 /e/Code/gitCode/testGit (hot-fix)  #切换后,目录后面的括号内容发生改变
$ ls -lh
total 1.0K
-rw-r--r-- 1 Lenovo 197609 42 Feb 12 10:45 hello.txt

Lenovo@DESKTOP-2U25RBA MINGW64 /e/Code/gitCode/testGit (hot-fix)
$ cat hello.txt   # 查看文件内容

hello javahello javawebcat hello.txt !

Lenovo@DESKTOP-2U25RBA MINGW64 /e/Code/gitCode/testGit (hot-fix)
$ echo "\n hello Git! and Java yyds" >> hello.txt  # 追加文件内容

Lenovo@DESKTOP-2U25RBA MINGW64 /e/Code/gitCode/testGit (hot-fix)
$ cat hello.txt  # 再次查看文件内容,检查是添加成功,发现已经添加

hello javahello javawebcat hello.txt !
\n hello Git! and Java yyds

Lenovo@DESKTOP-2U25RBA MINGW64 /e/Code/gitCode/testGit (hot-fix)
$ git status .
On branch hot-fix
Changes not staged for commit:
  (use "git add <file>..." to update what will be committed)
  (use "git restore <file>..." to discard changes in working directory)
        modified:   hello.txt

no changes added to commit (use "git add" and/or "git commit -a")

Lenovo@DESKTOP-2U25RBA MINGW64 /e/Code/gitCode/testGit (hot-fix)
$ git add .
warning: LF will be replaced by CRLF in hello.txt.
The file will have its original line endings in your working directory

Lenovo@DESKTOP-2U25RBA MINGW64 /e/Code/gitCode/testGit (hot-fix)
$ git status
On branch hot-fix
Changes to be committed:
  (use "git restore --staged <file>..." to unstage)
        modified:   hello.txt


Lenovo@DESKTOP-2U25RBA MINGW64 /e/Code/gitCode/testGit (hot-fix)
$ git commit -m "hot-fix frist commit" . # hot-fix分支,添加,提交到本地仓库成功
warning: LF will be replaced by CRLF in hello.txt.
The file will have its original line endings in your working directory
[hot-fix f804008] hot-fix frist commit
 1 file changed, 1 insertion(+)

Lenovo@DESKTOP-2U25RBA MINGW64 /e/Code/gitCode/testGit (hot-fix)
$ git checkout master  # 切换回 master分支
Switched to branch 'master'

Lenovo@DESKTOP-2U25RBA MINGW64 /e/Code/gitCode/testGit (master)
$ cat hello.txt   # 查看 master 分支下的文件内容(查看在别的分支下修改文件是否会受到影响)
 #发现和切换到 hot-fix分支之前的文件内容一样,说明每个分支修改都是独立的
hello javahello javawebcat hello.txt !

Lenovo@DESKTOP-2U25RBA MINGW64 /e/Code/gitCode/testGit (master)
$ git reflog  # 下面都是查看历史版本和日志
1db21ac (HEAD -> master, checkout) HEAD@{0}: checkout: moving from hot-fix to master
f804008 (hot-fix) HEAD@{1}: commit: hot-fix frist commit
1db21ac (HEAD -> master, checkout) HEAD@{2}: checkout: moving from master to hot-fix
1db21ac (HEAD -> master, checkout) HEAD@{3}: reset: moving to 1db21ac
63c7412 HEAD@{4}: reset: moving to 63c7412
1db21ac (HEAD -> master, checkout) HEAD@{5}: commit: second commit
63c7412 HEAD@{6}: commit (initial): frist commit

Lenovo@DESKTOP-2U25RBA MINGW64 /e/Code/gitCode/testGit (master)
$ git log
commit 1db21ac75f97fdd8bc9dfed2e57eb430c3153b5b (HEAD -> master, checkout)
Author: lqy <318482536@qq.com>
Date:   Sat Feb 12 00:00:04 2022 +0800

    second commit

commit 63c7412ca2d0c639542c5a4a6a4cd1770e1e75a7
Author: lqy <318482536@qq.com>
Date:   Fri Feb 11 23:20:39 2022 +0800

    frist commit

Lenovo@DESKTOP-2U25RBA MINGW64 /e/Code/gitCode/testGit (master)
$ git checkout hot-fix  # 再次切换回 hot-fix分支
Switched to branch 'hot-fix'

Lenovo@DESKTOP-2U25RBA MINGW64 /e/Code/gitCode/testGit (hot-fix)
$ cat hello.txt  # 查看文件还是 之前自己(hot-fix分支)修改提交后的样子

hello javahello javawebcat hello.txt !
\n hello Git! and Java yyds
分支合并(无冲突)
接上面的例子,将hot-fix修改的内容合并到master分支上,并且两者是没有修改到重复的地方(也就是无冲突)
Lenovo@DESKTOP-2U25RBA MINGW64 /e/Code/gitCode/testGit (hot-fix)
$ git checkout master  # 切换回master分支,因为我们要将 hot-fix 合并到当前的分支(也就是master)下
Switched to branch 'master'

Lenovo@DESKTOP-2U25RBA MINGW64 /e/Code/gitCode/testGit (master)
$ git merge hot-fix  # 合并
Updating 1db21ac..f804008
Fast-forward
 hello.txt | 1 +  #共一行受到影响,添加了内容(之前hot-fix分支添加了\n hello Git! and Java yyds)
 1 file changed, 1 insertion(+)

Lenovo@DESKTOP-2U25RBA MINGW64 /e/Code/gitCode/testGit (master)
$ cat hello.txt # 查看文件,注意:此时在master分支下,查看的是master的文件,发现已经合并了

hello javahello javawebcat hello.txt !
\n hello Git! and Java yyds

Lenovo@DESKTOP-2U25RBA MINGW64 /e/Code/gitCode/testGit (master)
$
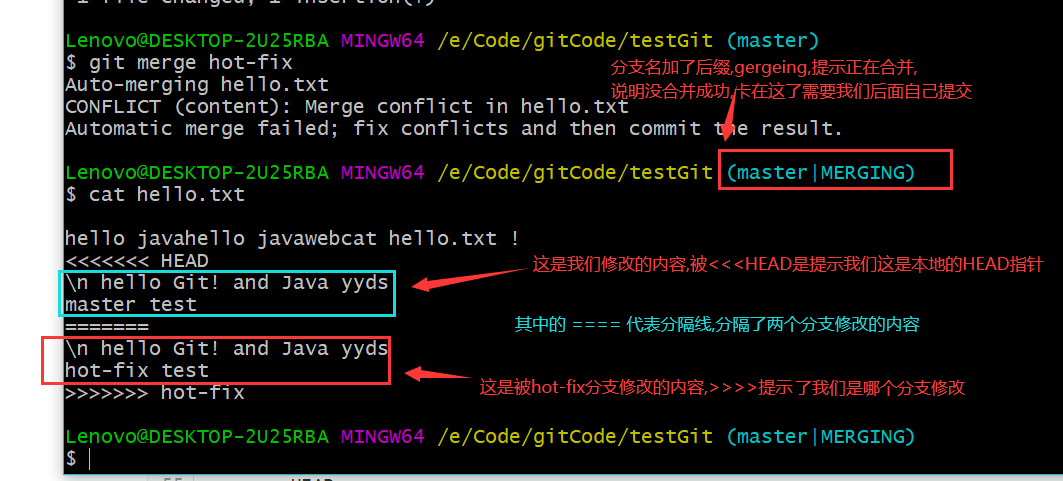
合并冲突
出现的原因: 多个分支同时修改了同一个文件的同一个位置,这时git不会自动处理(仅仅把冲突标记),需要人为修改
下面例子演示了hot-fex分支和master同时在hello.txt最后一行添加数据合并的情况
Lenovo@DESKTOP-2U25RBA MINGW64 /e/Code/gitCode/testGit (hot-fix)
$ cat hello.txt  # 查看原来的文件,请注意最后一行

hello javahello javawebcat hello.txt !
\n hello Git! and Java yyds

Lenovo@DESKTOP-2U25RBA MINGW64 /e/Code/gitCode/testGit (hot-fix)
$ cat hello.txt  #在最后一行添加内容,修改过程已省略,需要注意的是修改后需要commit

hello javahello javawebcat hello.txt !
\n hello Git! and Java yyds
hot-fix test
Lenovo@DESKTOP-2U25RBA MINGW64 /e/Code/gitCode/testGit (hot-fix)
$ git add .

Lenovo@DESKTOP-2U25RBA MINGW64 /e/Code/gitCode/testGit (hot-fix)
$ git commit -m "2" .  # 需要提交,不提交合并的还是之前的版本
[hot-fix 2d3540a] 2
 1 file changed, 1 insertion(+)

Lenovo@DESKTOP-2U25RBA MINGW64 /e/Code/gitCode/testGit (hot-fix)
$ git checkout master  # 切换回 master 分支,除了合并,其他操作与 hot-fix分支一致,文件修改内容不一样罢了
Switched to branch 'master'

Lenovo@DESKTOP-2U25RBA MINGW64 /e/Code/gitCode/testGit (master)
$ cat hello.txt

hello javahello javawebcat hello.txt !
\n hello Git! and Java yyds

Lenovo@DESKTOP-2U25RBA MINGW64 /e/Code/gitCode/testGit (master)
$ cat hello.txt

hello javahello javawebcat hello.txt !
\n hello Git! and Java yyds
master test
Lenovo@DESKTOP-2U25RBA MINGW64 /e/Code/gitCode/testGit (master)
$ git add .

Lenovo@DESKTOP-2U25RBA MINGW64 /e/Code/gitCode/testGit (master)
$ git commit -m "2" .
[master 73cb316] 2
 1 file changed, 1 insertion(+)

Lenovo@DESKTOP-2U25RBA MINGW64 /e/Code/gitCode/testGit (master)
$ git merge hot-fix  # 进行合并
Auto-merging hello.txt
CONFLICT (content): Merge conflict in hello.txt #提示我们发现了(内容)冲突,发生在hello.txt文件
Automatic merge failed; fix conflicts and then commit the result.
# 自动合并失败,让我们修复冲突然后进行提交, 注意,之后的提交命令接文件名

Lenovo@DESKTOP-2U25RBA MINGW64 /e/Code/gitCode/testGit (master|MERGING)
$ git status  # 查看状态
On branch master
You have unmerged paths.
  (fix conflicts and run "git commit")
  (use "git merge --abort" to abort the merge)

Unmerged paths:
  (use "git add <file>..." to mark resolution)
        both modified:   hello.txt   # 提示都修改

no changes added to commit (use "git add" and/or "git commit -a")
然后我们打开文件观看发现
注意!!!我们修改后的提交命令也不能带文件名了,因为如果携带文件名他就不知道该提交哪个
Lenovo@DESKTOP-2U25RBA MINGW64 /e/Code/gitCode/testGit (master|MERGING)
$ git add hello.txt

Lenovo@DESKTOP-2U25RBA MINGW64 /e/Code/gitCode/testGit (master|MERGING)
$ git commit -m "merge test" hello.txt
fatal: cannot do a partial commit during a merge. # 提交失败,致命(错误),合并过程中不能部分提交

Lenovo@DESKTOP-2U25RBA MINGW64 /e/Code/gitCode/testGit (master|MERGING)
$ git commit -m "merge test"   # 提交成功,又生成了一个新的版本号
[master d74e6d6] merge test
不过,合并只会改变被合并的分支,不会改变拿来合并的分支,如下所示,切换到hot-fix分支文件内容依然没变
Lenovo@DESKTOP-2U25RBA MINGW64 /e/Code/gitCode/testGit (master)
$ cat hello.txt

hello javahello javawebcat hello.txt !
\n hello Git! and Java yyds
master test

Lenovo@DESKTOP-2U25RBA MINGW64 /e/Code/gitCode/testGit (master)
$ git checkout hot-fix
Switched to branch 'hot-fix'

Lenovo@DESKTOP-2U25RBA MINGW64 /e/Code/gitCode/testGit (hot-fix)
$ cat hello.txt

hello javahello javawebcat hello.txt !
\n hello Git! and Java yyds
hot-fix test
Lenovo@DESKTOP-2U25RBA MINGW64 /e/Code/gitCode/testGit (hot-fix)
$
创建别名
远程库链接太长,为了方便管理,我们通常会给远程库起一个别名替代远程库链接
如下演示:我们在码云创建一个仓库,并且起一个别名,在上面的本地仓库进行
Lenovo@DESKTOP-2U25RBA MINGW64 /e/Code/gitCode/testGit (master)
$ git remote -v  # 查看别名,发现没有

Lenovo@DESKTOP-2U25RBA MINGW64 /e/Code/gitCode/testGit (master)
$ git remote add testGit https://gitee.com/LQY679/test-git.git   #从gitee获得链接,并且起一个别名testGit

Lenovo@DESKTOP-2U25RBA MINGW64 /e/Code/gitCode/testGit (master)
$ git remote -v  # 发现有两个,因为需要拉去和推送,实际上是同一个仓库
testGit https://gitee.com/LQY679/test-git.git (fetch)
testGit https://gitee.com/LQY679/test-git.git (push)

Lenovo@DESKTOP-2U25RBA MINGW64 /e/Code/gitCode/testGit (master)
$
推送和拉取远程库
请注意:无论是push 远程库还是pull 远程库时,都需要指定分支,
并且在push可能因为远程库被修改过了(如远程库比本地库多了些本地库没有的文件),会导致push失败,所以在push失败时可以先尝试pull在push
Lenovo@DESKTOP-2U25RBA MINGW64 /e/Code/gitCode/testGit (master)
$ git push testGit master  #将本地仓库推送至远程库的master分支,出现下面信息代表成功
Enumerating objects: 37, done.
Counting objects: 100% (37/37), done.
Delta compression using up to 12 threads
Compressing objects: 100% (24/24), done.
Writing objects: 100% (37/37), 3.10 KiB | 528.00 KiB/s, done.
Total 37 (delta 7), reused 0 (delta 0), pack-reused 0
remote: Powered by GITEE.COM [GNK-6.2]
To https://gitee.com/LQY679/test-git.git
 * [new branch]      master -> master

Lenovo@DESKTOP-2U25RBA MINGW64 /e/Code/gitCode/testGit (master)
$ git pull testGit master  # 将远程库拉取到本地库的master,出现下面信息代表成功
From https://gitee.com/LQY679/test-git
 * branch            master     -> FETCH_HEAD
Updating d74e6d6..d9ec34f
Fast-forward
 hello.txt | 1 +
 1 file changed, 1 insertion(+)

Lenovo@DESKTOP-2U25RBA MINGW64 /e/Code/gitCode/testGit (master)
$ cat hello.txt  # 查看文件发现发现了在gitee上的修改

hello javahello javawebcat hello.txt !
\n hello Git! and Java yyds
master test
 在gitee上做的修改

Lenovo@DESKTOP-2U25RBA MINGW64 /e/Code/gitCode/testGit (master)
$
SSH公钥免密登陆
gitee和gitHub都支持使用ssh公钥免密登陆,我们在自己电脑绑定公钥后以后进行Git操作就不需要频繁输入密码了
生成公钥命令
ssh-keygen -t rsa -C 自己的邮箱 # 使用真实邮箱,rsa是一种加密算法, 注意 -C选项的C 是大小
生成并且查看公钥
生成的公钥在用户目录中,用户目录即 C:\Users\自己电脑的登陆名,由于我还未生生成,故是没有的,
在此目录下右击鼠标打开Git命令行工具,随后输入命令

随后进入.ssh目录,会有两个文件 id_rsa ,这个文件内容是私钥, id_rsa.pub 文件的内容是公钥,
复制公钥在平台(Gitee或GitHub)里绑定
登陆Gitee或租GitHub,在个人信息找到相关设置将id_rsa.pub 文件的内容复制后.粘贴到对应平台所需要填写的公钥即可


【推荐】国内首个AI IDE,深度理解中文开发场景,立即下载体验Trae
【推荐】编程新体验,更懂你的AI,立即体验豆包MarsCode编程助手
【推荐】抖音旗下AI助手豆包,你的智能百科全书,全免费不限次数
【推荐】轻量又高性能的 SSH 工具 IShell:AI 加持,快人一步
· DeepSeek 开源周回顾「GitHub 热点速览」
· 物流快递公司核心技术能力-地址解析分单基础技术分享
· .NET 10首个预览版发布:重大改进与新特性概览!
· AI与.NET技术实操系列(二):开始使用ML.NET
· 单线程的Redis速度为什么快?