Spring Boot 简介
1. 什么是 SpringBoot
1.1 使用spring boot可以非常方便、快速搭建项目,不用考虑框架的兼容性或版本问题,集中式的配置,仅仅添加一个配置就可以了,所以使用sping boot非常适合构建微服务。
1.2 Spring Boot可以以jar包的形式进行独立的运行,使用:java -jar xx.jar 就可以成功的运行项目,或者在应用项目的主程序中运行main函数即可。
2. SpringCloud
2.1 Spring Cloud是一个基于Spring Boot实现的云应用开发工具,微服务架构里面这些服务都是独立部署的,这些服务都有自己的数据,这是微服务架构
3. SpringBoot 优点
3.1 去除了大量的xml配置文件
3.2 简化复杂的依赖管理
3.3 配合各种starter使用,基本上可以做到自动化配置
3.4 快速启动容器,创建独立Spring应用程序,嵌入式Tomcat,Jetty容器,无需部署WAR包,简化Maven及Gradle配置(spring boot项目的入口是一个main方法,运行该方法即可)(如需打包,可直接打成 jar 包,java -jar ***.jar 即可运行)
总结
使编码变得简单:
spring boot采用java config的方式,对spring进行配置,并且提供了大量的注解,极大地提高了工作效率。
使配置变得简单:
spring boot提供许多默认配置,当然也提供自定义配置。但是所有spring boot的项目都只有一个配置文件:application.properties/application.yml。用了spring boot,再也不用担心配置出错找不到问题所在了。
使部署变得简单:
spring boot内置了三种servlet容器:tomcat,jetty,undertow。
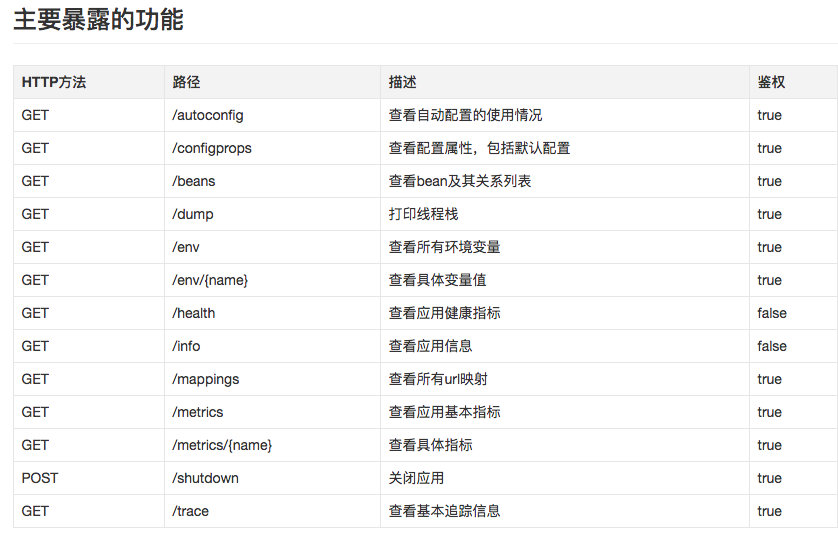
使监控变得简单:
常用注解的使用
@WebServlet(name="servlet", urlPatterns="/helloServlet") 声明该类是Servlet类(类需继承HttpServlet)
@WebFilter(filterName="helloFilter", urlPatterns="/helloServlet") 声明filter过滤器(类需实现servlet的Filter),urlPatterns执行需要拦截的方法名
@WebListener 声明监听器类(类需实现ServletContextListener)
以上三个注解都可通过@ServletComponentScan扫描到,也可以用下面手动注册Bean的方式实现:
// 注册Servlet程序
@Bean
public ServletRegistrationBean getServlet(){
    ServletRegistrationBean bean = new ServletRegistrationBean(new HelloServlet());
    // 设置访问路径
    bean.addUrlMappings("/*");
    return bean;
}
// 注册Filter程序
@Bean
public FilterRegistrationBean getFilter(){
    FilterRegistrationBean bean = new FilterRegistrationBean(new HelloFilter());
    bean.addUrlPatterns("/*");
    return bean;
}
// 注册Listener程序
@Bean
public ServletListenerRegistrationBean<HelloListener> getListener(){
    ServletListenerRegistrationBean<HelloListener> bean = new ServletListenerRegistrationBean<HelloListener>(new HelloListener());
    return bean;
}
@SpringBootApplication(exclude={DataSourceAutoConfiguration.class,HibernateJpaAutoConfiguration.class}) //移除自动注入数据源
@Bean(name="sysMenu",initMethod="start",destroyMethod="cleanUp") 可指定初始化及销毁方法
@Scope("prototype"):默认是singleton,可设置为原型作用域
@ComponentScan(basePackages = "com.dxz.model.configuration") 可指定扫描路径
@MapperScan("com.individual.mapper")必须指定mapper包路径
@SpringBootApplication:程序启动的注解 @Configuration + @EnableAutoConfiguration + @ComponentScan
@Configuration:标注在类上,相当于把该类作为spring的xml配置文件中的<beans>,作用为:配置spring容器(应用上下文)
@EnableAutoConfiguration:能够自动配置spring的上下文,试图猜测和配置你想要的bean类,通常会自动根据你的类路径和你的bean定义自动配置
@ComponentScan:会自动扫描指定包下的全部标有@Component的类,并注册成bean,当然包括@Component下的子注解@Service,@Repository,@Controller
@RestController:这是一个组合注解,相当于@ResponseBody + @Controller
@Component:添加注册bean的注解
@interface:可自定义注解,是jdk1.5之后加入的,java没有给它新的关键字,所以就用@interface这么个东西表示了
@Retention(RetentionPolicy.RUNTIME) // 注解将会由虚拟机保留,以便它可以在运行时通过反射读取
@Documented:注解表明这个注解应该被 javadoc工具记录. 默认情况下,javadoc是不包括注解的. 但如果声明注解时指定了 @Documented,则它会被 javadoc 之类的工具处理, 所以注解类型信息也会被包括在生成的文档中
@Target 注解的作用目标
@Target:(ElementType.TYPE)    接口、类、枚举、注解
@Target:(ElementType.FIELD)    字段、枚举的常量
@Target:(ElementType.METHOD)    方法
@Target:(ElementType.PARAMETER)    方法参数
@Target:(ElementType.CONSTRUCTOR)    构造函数
@Target:(ElementType.LOCAL_VARIABLE)    局部变量
@Target:(ElementType.ANNOTATION_TYPE)    注解
@Target:(ElementType.PACKAGE)    包
Spring Boot 搭建
我们都知道,在一般的项目中是需要引入很多包和很多配置文件的,最坑的是在以前的项目中可不是仅仅引入包就可以的,还要避免版本冲突等问题,总体来说还是比较头疼的。那么在SpringBoot中就不需要再担心包版本或者缺包的问题了,只需一段配置 SpringBoot就会帮我们全部搞定。我们来看一下,只引入了一个核心依赖与web支持 SpringBoot 会帮我们导入哪些包吧!(以下就是本demo引入的所有依赖了)
1. pom.xml配置
<!-- SpringBoot 核心依赖 -->
<parent>
    <groupId>org.springframework.boot</groupId>
    <artifactId>spring-boot-starter-parent</artifactId>
    <version>2.0.2.RELEASE</version>
</parent>

<!-- web 支持 -->
<dependencies>
    <dependency>
        <groupId>org.springframework.boot</groupId>
        <artifactId>spring-boot-starter-web</artifactId>
        <version>1.5.9.RELEASE</version>
    </dependency>
</dependencies>

2. 程序启动入口(直接运行main方法即可)
@SpringBootApplication
public class Application {

    public static void main(String[] args) {
        SpringApplication.run(Application.class, args);
    }
}
为了方便测试,我们在这里添加一个Controller、Entity
import org.springframework.http.MediaType;
import org.springframework.web.bind.annotation.PathVariable;
import org.springframework.web.bind.annotation.RequestMapping;
import org.springframework.web.bind.annotation.RequestMethod;
import org.springframework.web.bind.annotation.RestController;

import com.firstboot.lpx.entity.Person;

@RestController
public class MyController {

    @RequestMapping(value="/getPerson/{age}", method=RequestMethod.GET, produces=MediaType.APPLICATION_JSON_VALUE)
    public Person getPerson(@PathVariable int age){
        Person p = new Person();
        p.setName("小李");
        p.setAge(age);
        return p;
    }

}
public class Person {

    private String name;
    private int age;

    public String getName() {
        return name;
    }
    public void setName(String name) {
        this.name = name;
    }
    public int getAge() {
        return age;
    }
    public void setAge(int age) {
        this.age = age;
    }

}
3. 启动SpringBoot程序 并 访问getPerson接口
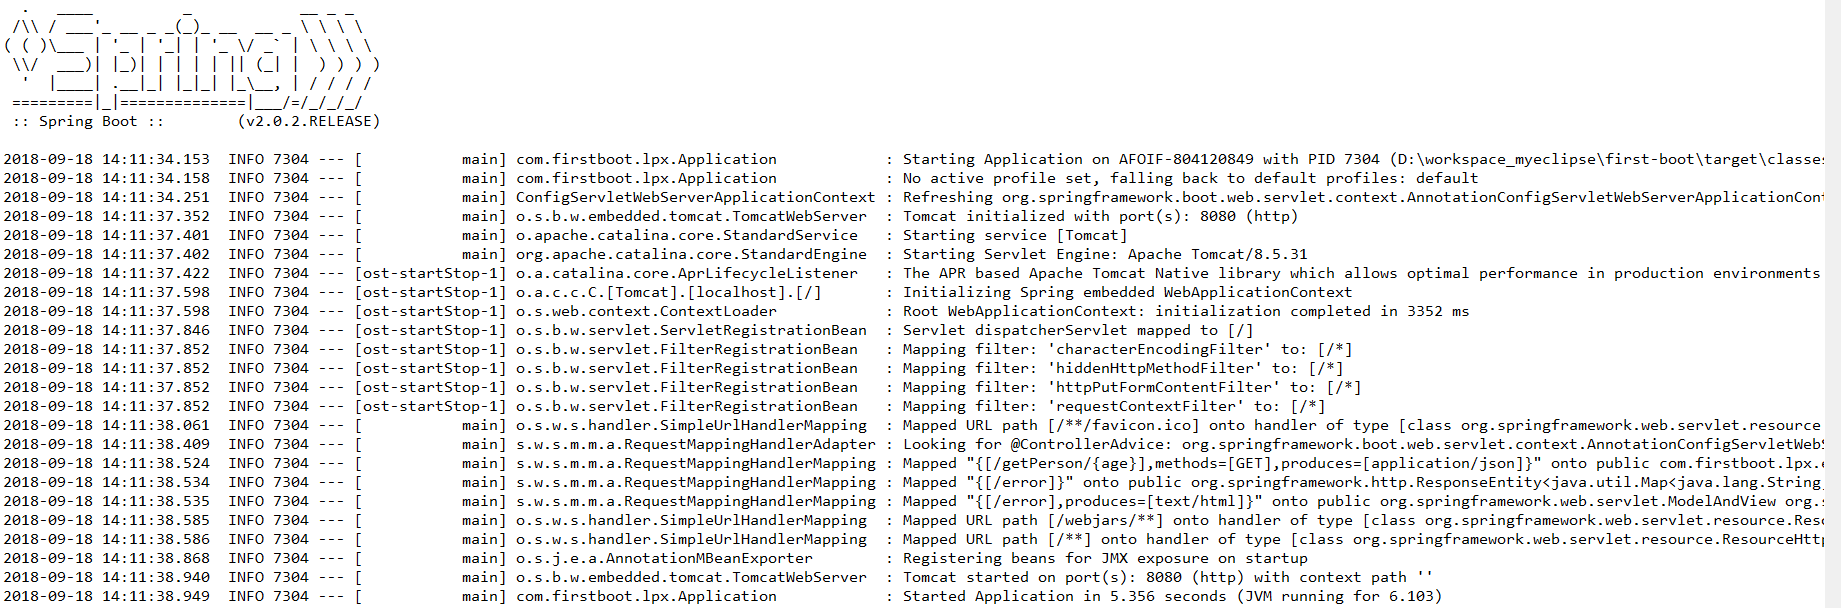

OK,以上就是 SpringBoot 的小 demo。

 浙公网安备 33010602011771号