Spring Cloud 微服务简介
1. 单体应用优化
1.1 可使用SOA面向服务架构(将每个模块分开,某个模块出问题了,不会影响其他模块)
1.2 如果某个服务于其他服务有调用关系,那么就需用到ESB(企业服务总线)
2. 微服务架构
2.1 将单体应用切分为小服务单元
3. Spring Cloud
3.1 是一个工具箱
3.2 基于SpringBoot,封装了Netflix的框架
3.3 将Netflix与Spring容器进行整合
4. Spring Cloud整合的Netflix框架
4.1 Eureka:基于REST服务的分布式中间件,主要用于服务管理
4.2 Hystrix:容错框架,通过添加延迟阀值以及容错的逻辑,来帮助我们控制分布式系统间组件的交互。
4.3 Feign:一个REST客户端,目的是为了简化WebService客户端的开发
4.4 Ribbon:负载均衡框架 Zuul:为微服务集群提供过代理,过滤,路由等功能
5. 微服务的优点
5.1 易于开发和维护:由于微服务单个模块就相当于一个项目,开发这个模块我们就只需关心这个模块的逻辑即可,代码量和逻辑复杂度都会降低,从而易于开发和维护。
5.2 启动较快:这是相对单个微服务来讲的,相比于启动单体架构的整个项目,启动某个模块的服务速度明显是要快很多的。
5.3 局部修改容易部署:在开发中发现了一个问题,如果是单体架构的话,我们就需要重新发布并启动整个项目,非常耗时间,但是微服务则不同,哪个模块出现了bug我们只需要解决那个模块的bug就可以了,解决完bug之后,我们只需要重启这个模块的服务即可,部署相对简单,不必重启整个项目从而大大节约时间。
5.4 技术栈不受限:比如订单微服务和电影微服务原来都是用java写的,现在我们想把电影微服务改成nodeJs技术,这是完全可以的,而且由于所关注的只是电影的逻辑而已,因此技术更换的成本也就会少很多。
小白必看,大神略过,下面这段介绍 会帮助你更快的理解 SpringCloud 微服务
在搭建 SpringCloud 微服务之前呢,先大概的说一下微服务结构,SpringCloud 微服务是由三个部分组成:
1. 服务器:将服务器当作是平时查电话的114平台
2. 服务提供者:将服务提供者当作是警察局,将警察局的电话放到了114平台上面
3. 服务调用者:服务调用者肯定是我们啦,我们就可以通过114平台查到警察局的电话了
上面简单的介绍了一下什么Spring Cloud微服务,那么下面直接上代码,为的就是能让初学者快速上手,自己搭建起Spring Cloud微服务框架。
搭建 Eureka 服务器(114平台)
什么是Eureka:Eureka是Netflix开发的服务发现组件,本身是一个基于REST的服务。Spring Cloud将它集成在其子项目spring-cloud-netflix中,以实现Spring Cloud的服务发现功能。
Eureka的配置可以说是非常简单的,配置如下:
pom.xml
<parent>
    <groupId>org.springframework.boot</groupId>
    <artifactId>spring-boot-starter-parent</artifactId>
    <version>2.0.1.RELEASE</version>
</parent>

<dependencyManagement>
    <dependencies>
        <dependency>
            <groupId>org.springframework.cloud</groupId>
            <artifactId>spring-cloud-dependencies</artifactId>
            <version>Finchley.SR1</version>
            <type>pom</type>
            <scope>import</scope>
        </dependency>
    </dependencies>
</dependencyManagement>

<dependencies>
    <dependency>
        <groupId>org.springframework.cloud</groupId>
        <artifactId>spring-cloud-starter-config</artifactId>
        <version>1.3.4.RELEASE</version>
    </dependency>
    <dependency>
        <groupId>org.springframework.cloud</groupId>
        <artifactId>spring-cloud-starter-eureka-server</artifactId>
        <version>1.3.6.RELEASE</version>
    </dependency>
</dependencies>
application.yml
server:
  port: 8761
eureka:
  client:
    register-with-eureka: false  不将自己注册到服务器,因为自己本身就是服务器
    fetchRegistry: false  不抓取服务列表
Application.java
@SpringBootApplication
@EnableEurekaServer
public class Application {

    public static void main(String[] args) {
        new SpringApplicationBuilder(Application.class).web(true).run(args);
    }
}
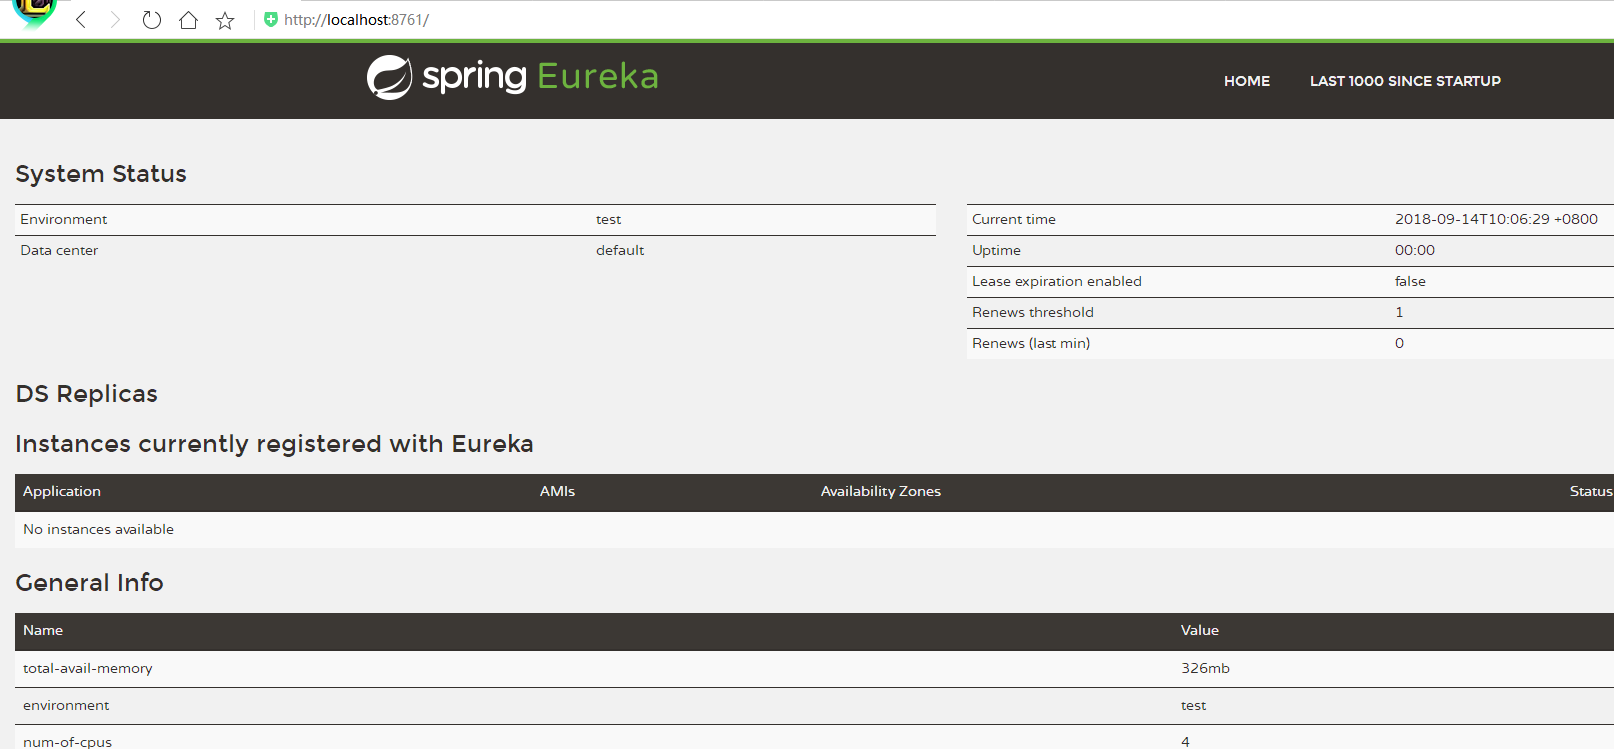
启动后,如果能够正常访问到这个页面的朋友们,恭喜你们 成功了 !!!
想要做集群的话,也是很简单的,只需在服务端改一下配置就可以了,废话不多说,请继续往下看:
需要修改系统文件:C:/Windows/System32/drivers/etc/hosts
增加映射:127.0.0.1 slave1 slave2(无论是slave1还是slave2,都会映射到127.0.0.1)(这个映射一定要加,否则映射时会出问题)
因加入了集群,那么就需要对每个服务进行单独启动(这里进行手动启动服务)区别如下:
Application.java
@SpringBootApplication
@EnableEurekaServer
public class Application {

    public static void main(String[] args) {
        Scanner scan = new Scanner(System.in);// 需手动输入:刚刚配置过映射的 slave1、slave2
        String pro = scan.nextLine();
        new SpringApplicationBuilder(Application.class).profiles(pro).run(args);
    }
}
注:
在这里有一点需要注意的是:在application.yml配置中的书写的规范,换行后 需加两个空格(一定不可以使用Tab缩进,会报错的)
两个配置中间的横杠:---(这里的“-”,一定要是三个,多一个 少一个都不行)
name: spring-cloud-server(Eureka程序的项目名)
profiles: slave1(刚刚配置映射时的名称)
application.yml
server:
port: 8761
spring:
application:
name: cluster-114
profiles: slave1
eureka:
instance:
hostname: slave1
client:
serviceUrl:
defaultZone: http://slave2:8762/eureka/
---
server:
port: 8762
spring:
application:
name: cluster-114
profiles: slave2
eureka:
instance:
hostname: slave2
client:
serviceUrl
defaultZone: http://slave1:8761/eureka/
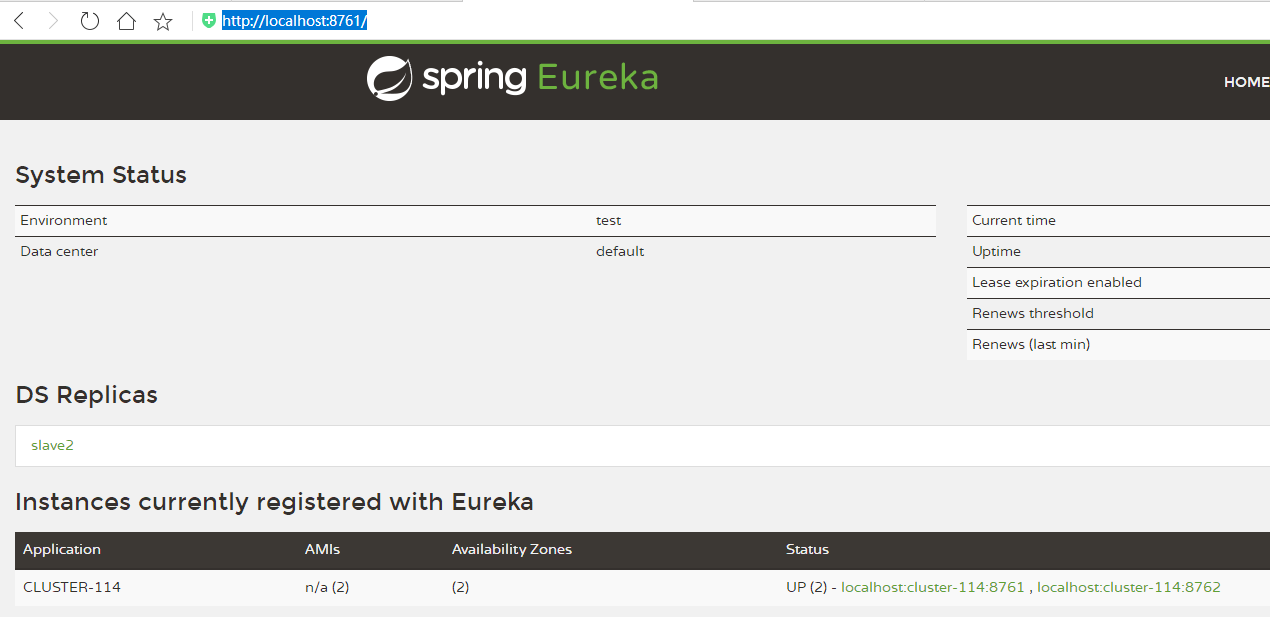
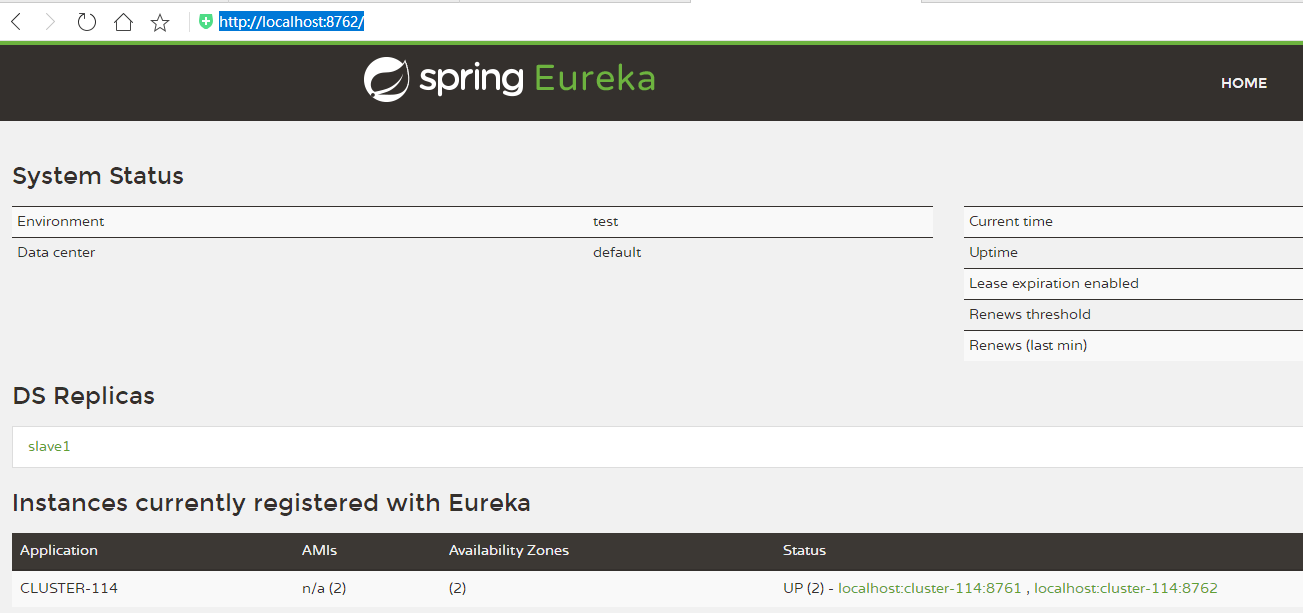
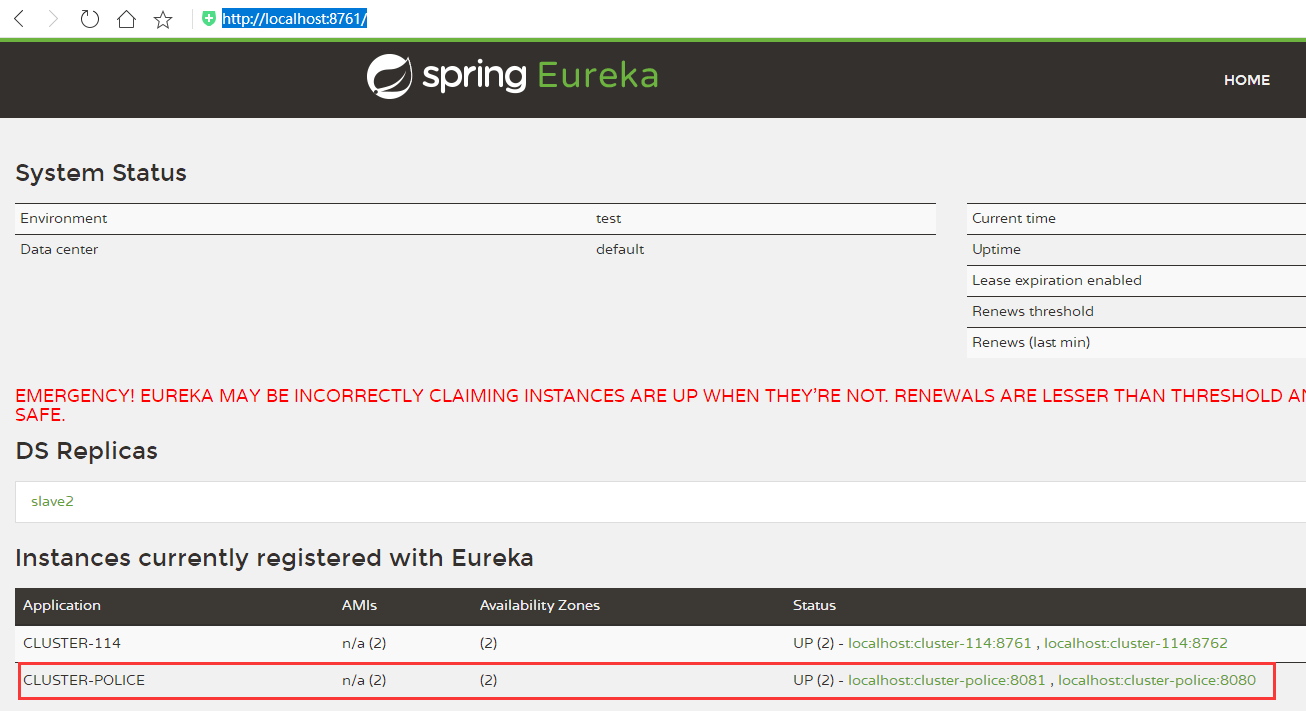
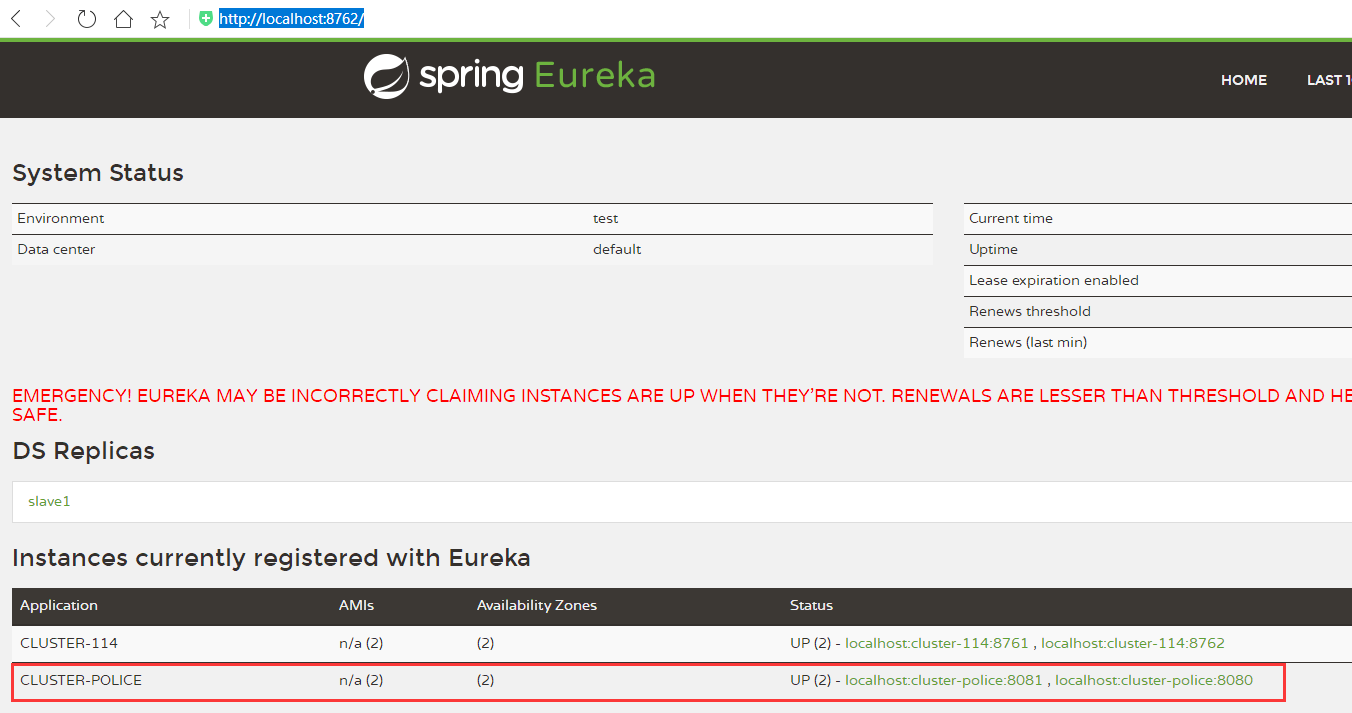
分别启动后的截图:http://localhost:8761/ http://localhost:8762/
到这里 Eureka 服务器的搭建已经结束了,那么下面说一下 如何搭建 服务提供者 也就是在上面提到的 “警察局”
搭建 Eureka 客户端_服务提供者(警察局)
pom.xml
<parent>
    <groupId>org.springframework.boot</groupId>
    <artifactId>spring-boot-starter-parent</artifactId>
    <version>1.5.13.RELEASE</version>
</parent>
<dependencyManagement>
    <dependencies>
        <dependency>
            <groupId>org.springframework.cloud</groupId>
            <artifactId>spring-cloud-dependencies</artifactId>
            <version>Dalston.SR5</version>
            <type>pom</type>
            <scope>import</scope>
        </dependency>
    </dependencies>
</dependencyManagement>
<dependencies>
    <dependency>
        <groupId>org.springframework.cloud</groupId>
        <artifactId>spring-cloud-starter-config</artifactId>
    </dependency>
    <dependency>
        <groupId>org.springframework.cloud</groupId>
        <artifactId>spring-cloud-starter-eureka</artifactId>  不用翻到上面去找不同啦~  区别就在这里,客户端是 eureka,而服务器端是 eureka-server
    </dependency>
</dependencies>
application.yml
server:
  port: 8080  为了避免端口被占用,这里自定义端口号
spring:
  application:
    name: first-police  最好起个有意义的,该name是要显示在服务列表中的
eureka:
  client:
    serviceUrl:
      defaultZone: http://localhost:8761/eureka/  这里需要将自己注册到服务器
为了测试,创建一个简单的Controller,以便调用
@RestController
public class MyController {

    @RequestMapping(value = "/call/{no}", method = RequestMethod.GET, produces = MediaType.APPLICATION_JSON_VALUE)
    public String call(@PathVariable String no){
        return "自定义编号:"+no+"   成功获取警局电话号码!";
    }

}
PoliceApplication.java
@SpringBootApplication
@EnableEurekaClient
public class PoliceApplication {

    public static void main(String[] args) {
        new SpringApplicationBuilder(PoliceApplication.class).web(true).run(args);
    }

}
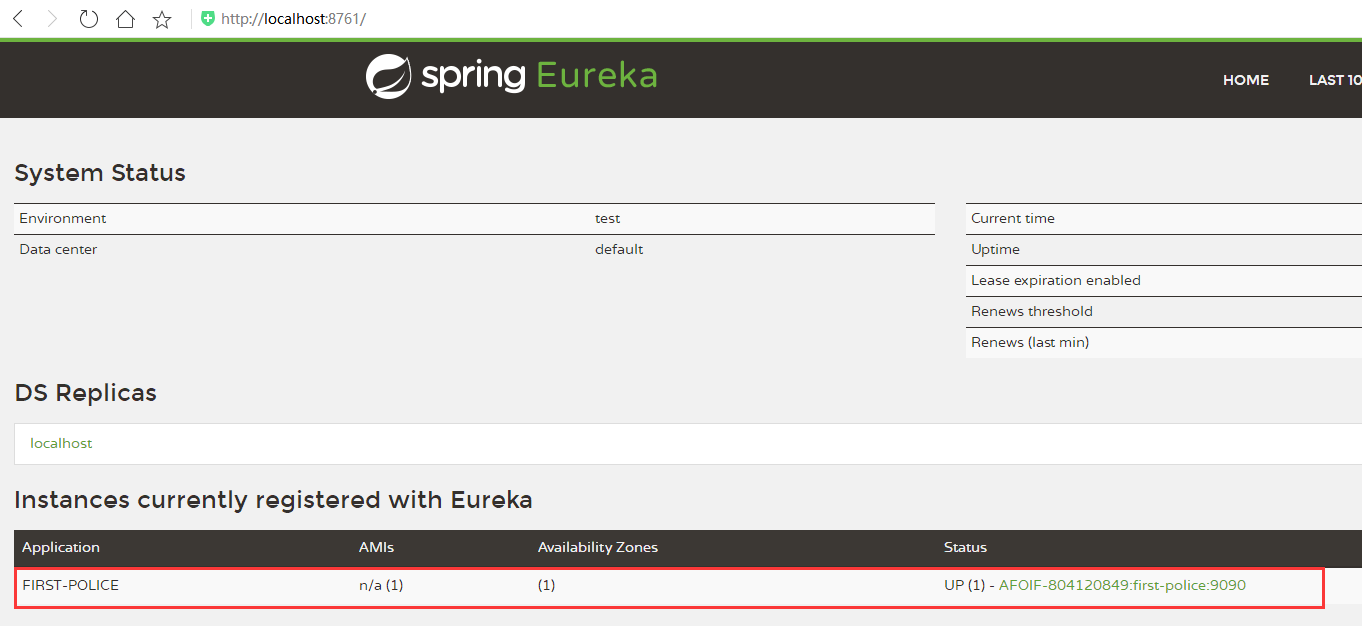
以上就是 服务提供者 的全部代码,启动后可在服务列表中看到该服务,见下图:
上面服务提供者的配置已经说完了,那么下面说一说 服务提供者应该如何向服务器注册服务(本次在Eureka服务器做了集群之后,加入服务提供者)
pom.xml:与上面的配置相同
application.yml:既然想要开启多个服务实例,那么就需要启动不同的端口来实现,将server.port配置删除,在启动时进行手动输入端口号来启动。。。
spring:
  application:
    name: cluster-police
eureka:
  client:
    serviceUrl:
      defaultZone: http://localhost:8761/eureka/, http://localhost:8762/eureka/  因为我们启动了两个eureka服务,所以要将自己同时注册到两个服务器上
MyController.java 在这里我们对之前的方法进行修改,为的就是让大家更直观的看出,负载均衡是否起了作用
@RestController
public class MyController {

    @RequestMapping(value = "/call/{no}", method = RequestMethod.GET, produces = MediaType.APPLICATION_JSON_VALUE)
    public String call(@PathVariable String no, HttpServletRequest request){
        return "请求地址:"+request.getRequestURL()+"   自定义编号:"+no+"   成功获取警局电话号码!";// 在这里打印出请求地址
    }

}
PoliceApplication.java
@SpringBootApplication
@EnableEurekaClient
public class PoliceApplication {

    public static void main(String[] args) {
        Scanner scan = new Scanner(System.in);
        String port = scan.nextLine();
        new SpringApplicationBuilder(PoliceApplication.class).properties("server.port="+port).run(args);// 在启动时,手动输入端口号  在这里我们分别用8080、8081两个端口来启动下
    }

}
分别启动后的截图:http://localhost:8761/ http://localhost:8762/
搭建 Eureka 客户端_服务调用者(我们就是服务调用者)
pom.xml
<parent>
    <groupId>org.springframework.boot</groupId>
    <artifactId>spring-boot-starter-parent</artifactId>
    <version>1.5.13.RELEASE</version>
</parent>
<dependencyManagement>
    <dependencies>
        <dependency>
            <groupId>org.springframework.cloud</groupId>
            <artifactId>spring-cloud-dependencies</artifactId>
            <version>Dalston.SR5</version>
            <type>pom</type>
            <scope>import</scope>
        </dependency>
    </dependencies>
</dependencyManagement>
<dependencies>
    <dependency>
        <groupId>org.springframework.cloud</groupId>
        <artifactId>spring-cloud-starter-config</artifactId>
    </dependency>
    <dependency>
        <groupId>org.springframework.cloud</groupId>
        <artifactId>spring-cloud-starter-eureka</artifactId>  因为服务调用者也属于Eureka客户端,所以在这里引入eureka
    </dependency>
    <dependency>
        <groupId>org.springframework.cloud</groupId>
        <artifactId>spring-cloud-starter-ribbon</artifactId>  引入ribbon负载均衡依赖,在后面会介绍到负载均衡,ribbon是使用在客户端的框架
    </dependency>
</dependencies>
application.yml
server:
  port: 9091
spring:
  application:
    name: first-person
eureka:
  client:
    serviceUrl:
      defaultZone: http://localhost:8761/eureka/  服务调用者也是一样,需要将自己注册到服务器
创建一个Controller,在接口中去调用我们刚刚注册好的服务提供者(警察局)
@RestController
@Configuration
public class MyController {

    /**
     * RestTemplate 是由 Spring Web 模块提供的工具类,与 SpringCloud 无关,是独立存在的
     * 因 SpringCloud 对 RestTemplate 进行了一定的扩展,所以 RestTemplate 具备了负载均衡的功能
     * @return RestTemplate
     */
    @Bean
    @LoadBalanced
    public RestTemplate getRestTemplate(){
        return new RestTemplate();
    }

    @RequestMapping("/call/{no}")
    public String call(@PathVariable String no){
        RestTemplate rtl = getRestTemplate();
        return rtl.getForObject("http://first-police/call/"+no, String.class); // http://提供者服务实例名称/接口...
    }

}
PersonApplication.java
@SpringBootApplication
@EnableEurekaClient
public class PersonApplication {

    public static void main(String[] args) {
        new SpringApplicationBuilder(PersonApplication.class).web(true).run(args);
    }
}
启动后访问,会发现服务列表中有两个服务:

服务调用者需调用服务提供者,所以访问:http://localhost:9091/call/1

前面给大家讲解了如何搭建“Eureka服务器”和“服务提供者”的集群。 想要知道上面配置的集群有没有起作用呢?那么接下来我们就要测试一下。。。
pom.xml:上面已经贴了配置,在这里就不再重复贴了
application.yml:
server:
  port: 9999  自定义端口
spring:
  application:
    name: cluster-person
eureka:
  client:
    serviceUrl:
      defaultZone: http://localhost:8761/eureka/  这里也需要向服务器注册服务
Controller在上面也有贴,call方法没有做任何改变,在这里就不再重复贴了
至于启动类,没有特殊化,和之前的启动方法相同
@SpringBootApplication
@EnableEurekaClient
public class PersonApplication {

    public static void main(String[] args) {
        new SpringApplicationBuilder(PersonApplication.class).web(true).run(args);
    }
}
接下来,启动 看效果 浏览器访问:http://localhost:9999/call/123


由此可见,交叉访问,我们所配置的负载均衡起作用了,负载均衡也可自定义,在本文中暂不讲述。

 浙公网安备 33010602011771号