UI基础-UI基础控件(一)
一.UIView
1.简单说明
曾经有人这么说过,在iphone里你看到的,摸到的,都是UIView,所以UIView在iphone开发里具有非常重要的作用。
2.常见属性
1.frame 位置和尺寸(以父控件的左上角为原点(0, 0))
2.center 中点
3.bounds 位置和尺寸(以自己的左上角为原点(0, 0))
4.transform 形变属性(缩放, 旋转)
5.background 背景颜色
6.tag 标识(父控件可以根据这个标识找到对应的子控件,同一个父控件中的子控件不要一样)
7.hidden 设置是否隐藏
8.alpha 透明度(0~1);
9.opaque 不透明度(0~1);
10.userInteractionEnabled 能否跟用户进行交互 (BOOL型 YES能交互)
11.superView 父控件
12.subView 子控件
13.contentMode 内容显示的模式 拉伸自适应
3.常见方法
1.addSubview;
添加子控件,子控件在父控件的上层
2.removeFromSuperview
从父控件中移除
3.viewWithTag;
父控件通过Tag找到对应的控件
4.insertSubview:atIndex:
通过指定位置添加子控件
4.代码示例
    CGRect rect1 = CGRectMake(10, 10, 100, 100);
    //  创建矩形区域
    UIView *view1 = [[UIView alloc] initWithFrame:rect1];
    //对矩形区域初始化
    [self.window addSubview:view1];
    //添加进入window
    [view1 setBackgroundColor:[UIColor blueColor]];
    //设置背景颜色
二.UILable
UIView 标签:是显示文本的控件。是App中出现频率最高的控件。
UILable是UIView的子类,作为子类一般是为了扩充父类的功能,UILable扩展了文字显示的功能,UILable是能显示文字的视图。
所谓文本,就是我们的文字,文本显示,就是在视图上显示文字,主要有文本内容,文本字体,文本颜色,文本对齐方式,文本换行模式,文本行数,文本阴影等
1.使用UILable的步骤:
开辟空间并且初始化
设置文本控制相关属性
添加到父视图
释放等几个步骤
示例:
    UILabel *userNameLabel = [[UILabel alloc]initWithFrame:CGRectMake(30, 100, 100, 30)];
    userNameLabel.text = @"⽤用户名";
    [containerView addSubview:userNameLabel];
    [userNameLabel release];
2.文本控件属性
1.text 要显⽰的文本内容
label.text = @“用户名”;
2.textColor 文本内容的颜色
label.textColor = [UIColor redColor];
3.textAlignment 文本对齐方式(水平方向)
label.textAlignment = NSTextAlignmentLeft;
4.font 文本字体
label.font = [UIFont fontWithName:@“Helvetica-Bold” size:20;//黑体加粗,20号字。
5.numberOfLines 行数
label.numberOfLines = 3;//显示3行,注意label的高度要能容纳3行。如果3⾏没能显示完信息,没显示的信息以
省略号代替。
6.lineBreakMode 断行模式
label.lineBreakMode = NSLineBreakByWordWrapping;//以单词为单位换⾏
7.shadowColor 阴影颜色
label.shadowColor = [UIColor yellowColor];阴影黄色
8.shadowOffset 阴影大小
label.shadowOffset = CGSizeMake(2, 1);//阴影想X正方向偏移2,向Y正方向偏移1
3.小结
UIView是所有可视化控件的基类。
UILabel是具有特定外观特定功能的视图。
UILabel侧重于⽂文本的呈现。
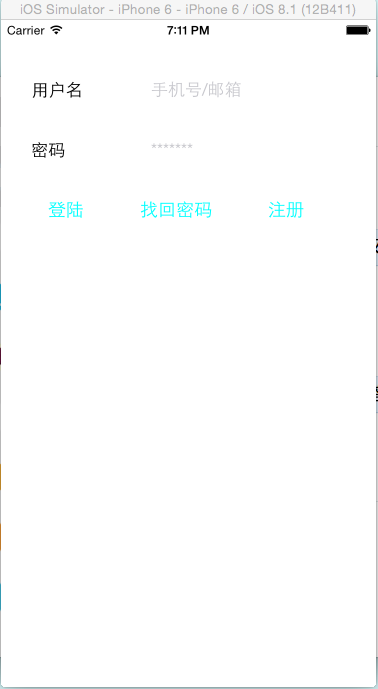
现在我们创建一个类似于用户登陆界面的视图;
代码示例:
 1     self.window = [[UIWindow alloc] initWithFrame:[[UIScreen mainScreen] bounds]];
 2     [self.window makeKeyAndVisible];
 3
 4     UIView *containerView = [[[UIView alloc] initWithFrame:self.window.bounds]autorelease];
 5     [containerView setBackgroundColor:[UIColor whiteColor]];
 6     [self.window addSubview:containerView];
 7
 8
 9     CGRect rect1 = CGRectMake(30, 50, 100, 40);
10     CGRect rect2 = CGRectMake(150, 50, 150, 40);
11     CGRect rect3 = CGRectMake(30, 110, 100, 40);
12     CGRect rect4 = CGRectMake(150, 110, 150, 40);
13     CGRect rect5 = CGRectMake(30, 170, 70, 40);
14     CGRect rect6 = CGRectMake(130, 170, 90, 40);
15     CGRect rect7 = CGRectMake(250, 170, 70, 40);
16
17     UILabel *lable1 = [[[UILabel alloc] initWithFrame:rect1] autorelease];
18     UITextField *textfield1 = [[[UITextField alloc] initWithFrame:rect2]autorelease];
19     UILabel *lable2 = [[[UILabel alloc] initWithFrame:rect3] autorelease];
20     UITextField *textfield2 = [[[UITextField alloc] initWithFrame:rect4] autorelease];
21     UIButton *button1= [[[UIButton alloc] initWithFrame:rect5] autorelease];
22     UIButton *button2 = [[[UIButton alloc] initWithFrame:rect6] autorelease];
23     UIButton *button3 = [[[UIButton alloc] initWithFrame:rect7] autorelease];
24
25     [lable1 setText:@"用户名"];
26     textfield1.placeholder = @"手机号/邮箱";
27     [lable2 setText:@"密码"];
28     textfield2.placeholder = @"*******";
29     textfield2.secureTextEntry = YES;
30     [button1 setTitle:@"登陆" forState:UIControlStateNormal];
31     [button1 setTitleColor:[UIColor cyanColor] forState:UIControlStateNormal];
32     [button2 setTitle:@"找回密码" forState:UIControlStateNormal];
33     [button2 setTitleColor:[UIColor cyanColor] forState:UIControlStateNormal];
34     [button3 setTitle:@"注册" forState:UIControlStateNormal];
35     [button3 setTitleColor:[UIColor cyanColor] forState:UIControlStateNormal];
36
37
38
39
40
41     [self.window addSubview:lable1];
42     [self.window addSubview:textfield1];
43     [self.window addSubview:lable2];
44     [self.window addSubview:textfield2];
45     [self.window addSubview:button1];
46     [self.window addSubview:button2];
47     [self.window addSubview:button3];
实现效果:


