vue与element ui的el-checkbox的坑
一,场景
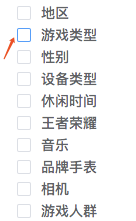
通过使用checkbox,实现如图的场景, 点击某个tag,实现选中和非选中状态。

二, 官网的例子
通过切换checked值为true或者false来实现,一个checkbox的状态切换
1 2 3 4 5 6 7 8 9 10 11 12 13 | <template> <!-- `checked` 为 true 或 false --> <el-checkbox v-model="checked">备选项</el-checkbox></template><script> export default { data() { return { checked: true }; } };</script> |
效果如下:

三, 思考。
通过循环li, 给数据添加checked属性,并绑定到v-model上,来实现 一的场景。模板代码如下:
1 2 3 4 5 6 7 8 9 10 11 | <template> <div class="demo"> <ul> <li v-for="(item, index) in list" :key="index"> //循环li <el-checkbox v-model="item.checked"> //v-model绑定到每个item的checked属性 {{ item.name }} </el-checkbox> </li> </ul> </div></template> |
后台返回数据格式(已精简),如下(没有checked属性)
1 2 3 4 5 6 7 8 9 10 11 12 | [ { id: 1, pid: 1, name: '地区' }, { id: 2, pid: 2, name: '游戏类型' }, { id: 3, pid: 4, name: '性别' }, { id: 4, pid: 5, name: '设备类型' }, { id: 5, pid: 6, name: '休闲时间' }, { id: 6, pid: 7, name: '王者荣耀' }, { id: 7, pid: 8, name: '音乐' }, { id: 8, pid: 9, name: '品牌手表' }, { id: 9, pid: 10, name: '相机' }, { id: 10, pid: 12, name: '游戏人群' }, ] |
我要做的, mounted方法获取后台数据,再给每条数据循环添加checked属性,初始值为false。
1 2 3 4 5 6 7 8 9 10 11 12 13 14 15 16 17 18 19 20 21 22 23 24 25 26 27 28 29 30 31 32 33 34 35 36 37 | <script> export default { name: 'demo', data() { return { list: [], allTags: [], } }, methods: { getList() {<br> //获取数据用settimeout模拟 setTimeout(() => { this.allTags = [ { id: 1, pid: 1, name: '地区' }, { id: 2, pid: 2, name: '游戏类型' }, { id: 3, pid: 4, name: '性别' }, { id: 4, pid: 5, name: '设备类型' }, { id: 5, pid: 6, name: '休闲时间' }, { id: 6, pid: 7, name: '王者荣耀' }, { id: 7, pid: 8, name: '音乐' }, { id: 8, pid: 9, name: '品牌手表' }, { id: 9, pid: 10, name: '相机' }, { id: 10, pid: 12, name: '游戏人群' }, ] this.allTags.map(item => { item.checked = false return item }) this.list = this.allTags }, 1500) }, }, mounted() { this.getList() }, }</script> |
到这以为实现了功能,看效果发现问题: 点击时候,没有勾上,只有框变了颜色。
排查问题.....
(脑补痛苦过程......)
猜测:
1,element不支持这种方法绑定,只能按官网例子中,循环el-checkbox来实现。
2,vue绑定问题
针对问题1: 换成了循环el-checkbox,发现结果是一样的不行。 否定!
剩下的就是猜测二:
人为把返回数据默认加上checked属性, 即data格式为:
1 2 3 4 5 6 7 8 9 10 11 12 | [ { id: 1, pid: 1, name: '地区', checked: false}, { id: 2, pid: 2, name: '游戏类型' , checked: false}, { id: 3, pid: 4, name: '性别' , checked: false}, { id: 4, pid: 5, name: '设备类型' , checked: false}, { id: 5, pid: 6, name: '休闲时间' , checked: false}, { id: 6, pid: 7, name: '王者荣耀', checked: false }, { id: 7, pid: 8, name: '音乐', checked: false }, { id: 8, pid: 9, name: '品牌手表' , checked: false}, { id: 9, pid: 10, name: '相机' , checked: false}, { id: 10, pid: 12, name: '游戏人群' , checked: false}, ] |
测试发现,这样可以。
迷茫。。。
然后在控制台打印数据,对比了一下结果。
前端添加checked属性的情况 和 后台返回数据本来就有checked属性情况 打印出来分别如 1 和 图2
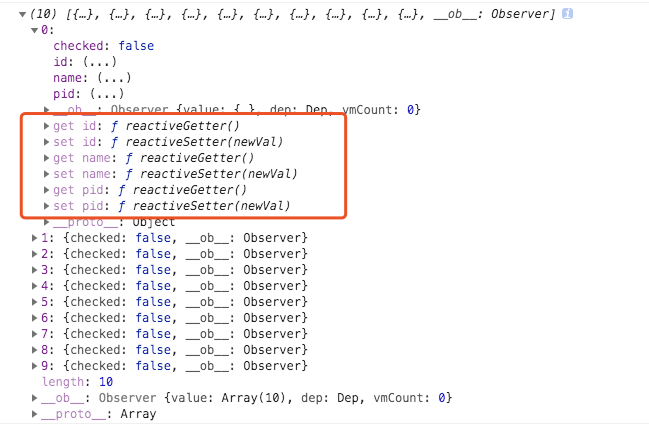
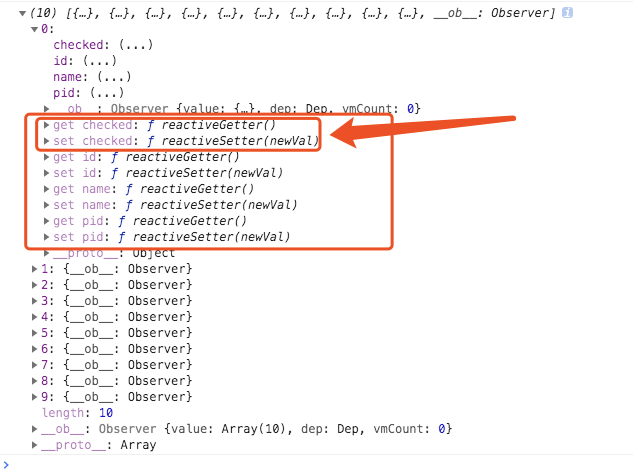
图1 图2
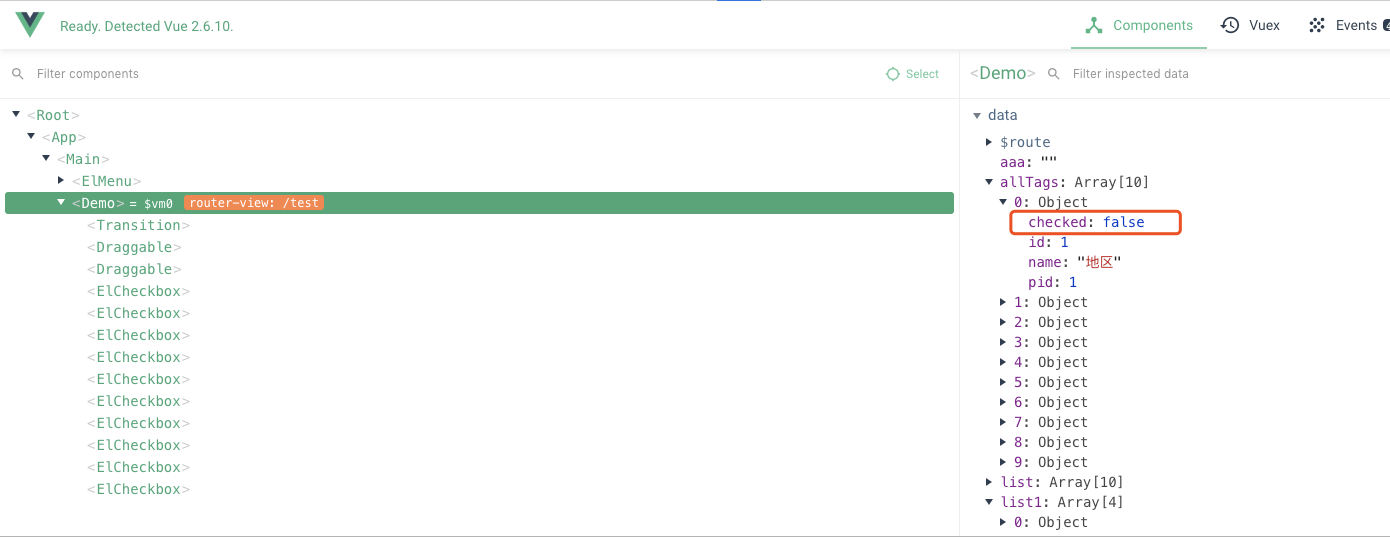
对比一下发现,前端添加checked属性, vue并没有添加get set方法,因此,监听不到checked值变化,进而不能更新view。这点,可以在浏览器vue调试中看到,点击时候 数据的checked属性 true和false是在交替变化,但是view上没同步更新。截了个图
四,解决方法
两种方法,
1, 拿到值不赋值给data属性的allTags,而是定义临时变量let, 操作完之后,赋值给list,即:
1 2 3 4 5 6 7 8 9 10 11 12 13 14 15 16 17 18 19 20 21 22 23 24 25 26 27 28 29 30 31 32 33 34 35 36 37 | <script> export default { name: 'demo', data() { return { list: [], } }, methods: { getList() { //获取数据用settimeout模拟 setTimeout(() => { let allTags = [ //这里let定义allTags { id: 1, pid: 1, name: '地区' }, { id: 2, pid: 2, name: '游戏类型' }, { id: 3, pid: 4, name: '性别' }, { id: 4, pid: 5, name: '设备类型' }, { id: 5, pid: 6, name: '休闲时间' }, { id: 6, pid: 7, name: '王者荣耀' }, { id: 7, pid: 8, name: '音乐' }, { id: 8, pid: 9, name: '品牌手表' }, { id: 9, pid: 10, name: '相机' }, { id: 10, pid: 12, name: '游戏人群' }, ] allTags.map(item => { item.checked = false return item }) this.list = allTags }, 1500) }, }, mounted() { this.getList() }, }</script> |
2(推荐),用vue.$set方法,强制vue监听checked属性
1 2 3 4 5 6 7 8 9 10 11 12 13 14 15 16 17 18 19 20 21 22 23 24 25 26 27 28 29 30 31 32 33 34 35 36 37 38 | <script> export default { name: 'demo', data() { return { list: [], } }, methods: { getList() { //获取数据用settimeout模拟 setTimeout(() => { this.allTags = [ //这里let定义allTags { id: 1, pid: 1, name: '地区' }, { id: 2, pid: 2, name: '游戏类型' }, { id: 3, pid: 4, name: '性别' }, { id: 4, pid: 5, name: '设备类型' }, { id: 5, pid: 6, name: '休闲时间' }, { id: 6, pid: 7, name: '王者荣耀' }, { id: 7, pid: 8, name: '音乐' }, { id: 8, pid: 9, name: '品牌手表' }, { id: 9, pid: 10, name: '相机' }, { id: 10, pid: 12, name: '游戏人群' }, ] this.allTags.map(item => { //item.checked = false this.$set(item, 'checked', false) // 这里,给对象添加属性,用$set方法。 return item }) this.list = this.allTags }, 1500) }, }, mounted() { this.getList() }, }</script> |
done!!
五,总结。
这个问题是我在项目中遇到的问题,通过一步一步锁定问题之后,抽出来做了最精简版本,故做此总结,也给其他遇到坑的童鞋一点点帮助。
ps,每次用element ui 都会有一些感触,苦笑。


【推荐】国内首个AI IDE,深度理解中文开发场景,立即下载体验Trae
【推荐】编程新体验,更懂你的AI,立即体验豆包MarsCode编程助手
【推荐】抖音旗下AI助手豆包,你的智能百科全书,全免费不限次数
【推荐】轻量又高性能的 SSH 工具 IShell:AI 加持,快人一步
· Linux系列:如何用heaptrack跟踪.NET程序的非托管内存泄露
· 开发者必知的日志记录最佳实践
· SQL Server 2025 AI相关能力初探
· Linux系列:如何用 C#调用 C方法造成内存泄露
· AI与.NET技术实操系列(二):开始使用ML.NET
· 被坑几百块钱后,我竟然真的恢复了删除的微信聊天记录!
· 没有Manus邀请码?试试免邀请码的MGX或者开源的OpenManus吧
· 【自荐】一款简洁、开源的在线白板工具 Drawnix
· 园子的第一款AI主题卫衣上架——"HELLO! HOW CAN I ASSIST YOU TODAY
· Docker 太简单,K8s 太复杂?w7panel 让容器管理更轻松!