D 源码、知识点 2 vue中的slot与slot-scope 补充: 见了 slot-scope="scope" scope.row 和 slot-scope="{row}" 别不认识怎么用!!!
2019.10.21 直接显示常用的方式
<el-table-column width="120px" align="center" label="Author">
        <template slot-scope="scope">
            <span>{{ scope.row.author }}</span>
        </template>
    </el-table-column>
<template slot-scope="item">
            <span>{{item.row.id}}</span>
        </template>
<template slot-scope="{row}">
        <el-tag :type="row.status | statusFilter">
            {{ row.status }}
        </el-tag>
        </template>
//
slot-scope="scope" 和 slot-scope="{row}" 写法, {{ scope.row.author }}和 {{ row.author }}的结果是一样的,可以理解成不同的写法!!
上面是常用的几个方式,做下说明
scope(或者item,这个可以自定义啦)返回的值是slot标签上返回的所有属性值,并且是一个对象的形式保存起来
该对象有两个属性,一个是row,另一个是$index, 因此返回 {"row": item, "$index": "index索引"}; 其中item就是data里面的一个个对象。
scope.row 就表示某一条数据了 ,slot-scope="{row}"的方式 效果和前面一样 ,可以理解为简写。
原文如下
插槽,也就是slot,是组件的一块HTML模板
插槽模板是slot,它是一个空壳子,因为它显示与隐藏以及最后用什么样的html模板显示由父组件控制。
插槽显示的位置确由子组件自身决定,slot写在组件template的哪块,父组件传过来的模板将来就显示在哪块。
大体分三个部分 深入理解
一:单个插槽 or 默认插槽 or 匿名插槽
单个插槽是vue的官方叫法,可以叫它默认插槽,匿名插槽。因为它不用设置name属性。
单个插槽可以放置在组件的任意位置
一个组件中只能有一个该类插槽
案例说明:
// 父组件
<template>
    <div class="father">
        <h3>这里是父组件</h3>
        <child>
            <div class="tmpl">
              <span>菜单1</span>
              <span>菜单2</span>
              <span>菜单3</span>
              <span>菜单4</span>
              <span>菜单5</span>
              <span>菜单6</span>
            </div>
        </child>
    </div>
</template>

//子组件
<template>
    <div class="child">
        <h3>这里是子组件</h3>
        <slot></slot>
    </div>
</template>

//解析 父组件在<child></child>里面写了html模板,那么子组件的匿名插槽处就引入父组件的html模版内容。

//即:<slot></slot> 代指
            <div class="tmpl">
              <span>菜单1</span>
              <span>菜单2</span>
              <span>菜单3</span>
              <span>菜单4</span>
              <span>菜单5</span>
              <span>菜单6</span>
            </div>内容
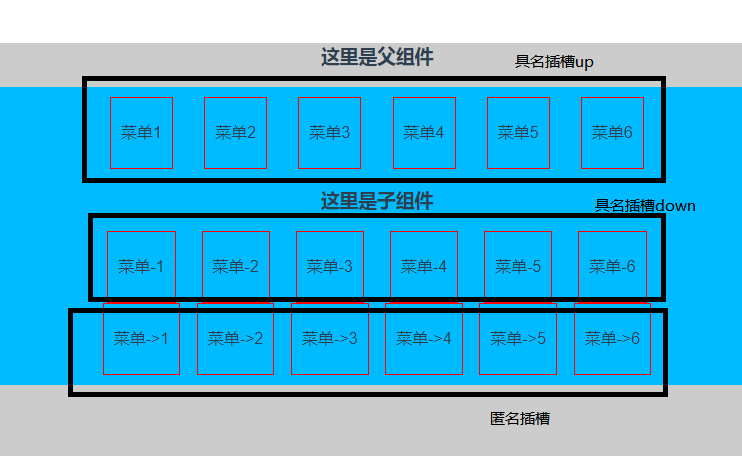
二:具名插槽
插槽加了name属性,就变成了具名插槽。具名插槽可以在一个组件中出现N次。出现在不同的位置
//父组件
<template>
  <div class="father">
    <h3>这里是父组件</h3>
    <child>
      <div class="tmpl" slot="up">
        <span>菜单1</span>
        <span>菜单2</span>
        <span>菜单3</span>
        <span>菜单4</span>
        <span>菜单5</span>
        <span>菜单6</span>
      </div>
      <div class="tmpl" slot="down">
        <span>菜单-1</span>
        <span>菜单-2</span>
        <span>菜单-3</span>
        <span>菜单-4</span>
        <span>菜单-5</span>
        <span>菜单-6</span>
      </div>
      <div class="tmpl">
        <span>菜单->1</span>
        <span>菜单->2</span>
        <span>菜单->3</span>
        <span>菜单->4</span>
        <span>菜单->5</span>
        <span>菜单->6</span>
      </div>
    </child>
  </div>
</template>

// 子组件

<template>
  <div class="child">
    // 具名插槽
    <slot name="up"></slot>
    <h3>这里是子组件</h3>
    // 具名插槽
    <slot name="down"></slot>
    // 匿名插槽
    <slot></slot>
  </div>
</template>

//父组件通过html模板上的slot属性关联具名插槽。没有slot属性的html模板默认关联匿名插槽
效果图:
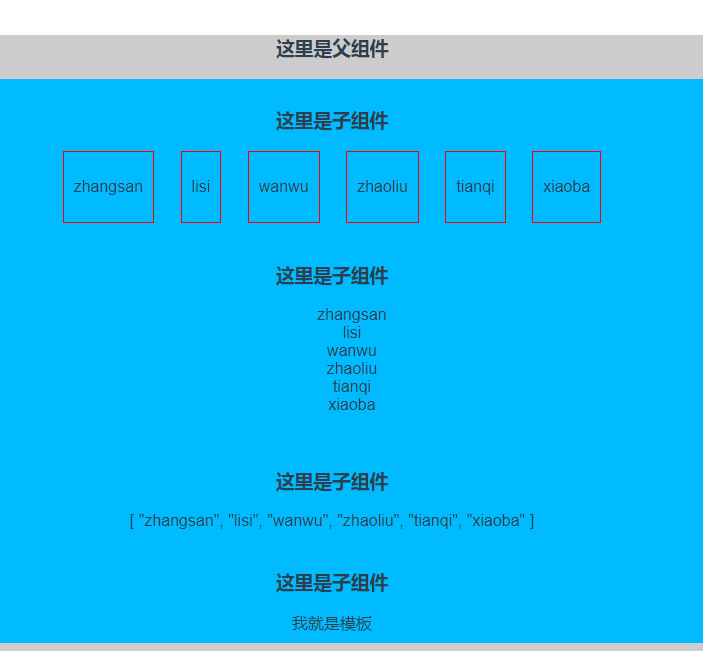
三:作用域插槽 | 带数据的插槽
作用域插槽要求,在slot上面绑定数据,先简单的理解为需要绑定数据,(实现一种由子组件向父组件传递信息的方式)
//父组件
<template>
  <div class="father">
    <h3>这里是父组件</h3>
    <!--第一次使用:用flex展示数据-->
    <child>
      <template slot-scope="user">
        <div class="tmpl">
          <span v-for="item in user.data">{{item}}</span>
        </div>
      </template>

    </child>

    <!--第二次使用:用列表展示数据-->
    <child>
      <template slot-scope="user">
        <ul>
          <li v-for="item in user.data">{{item}}</li>
        </ul>
      </template>

    </child>
   // 用法有所区别

    <!--第三次使用:直接显示数据-->
    <child>
      <template slot-scope="user">
       {{user.data}}
      </template>

    </child>

    <!--第四次使用:不使用其提供的数据, 作用域插槽退变成匿名插槽-->
    <child>
      我就是模板
    </child>
  </div>
</template>

// 子组件
<template>
  <div class="child">

    <h3>这里是子组件</h3>
    // 作用域插槽
    <slot  :data="data"></slot>
  </div>
</template>

 export default {
    data: function(){
      return {
        data: ['zhangsan','lisi','wanwu','zhaoliu','tianqi','xiaoba']
      }
    }
}
注:
1.父组件中的 user 是自己定义的,
2.带参数的插槽 用法有一点区别
效果
关于slot 的知识点,仅参考了一篇文章,从头敲下来,感觉不错,做了个记录!!以后随时补充》
文中的 用法是引入组件的方式,自己通过vue插件的方式,一样可以实现效果!!!,
参考 https://segmentfault.com/a/1190000012996217
666

 浙公网安备 33010602011771号