
Spring从熟悉到陌生
BeanFactory与ApplicationContext的区别与联系
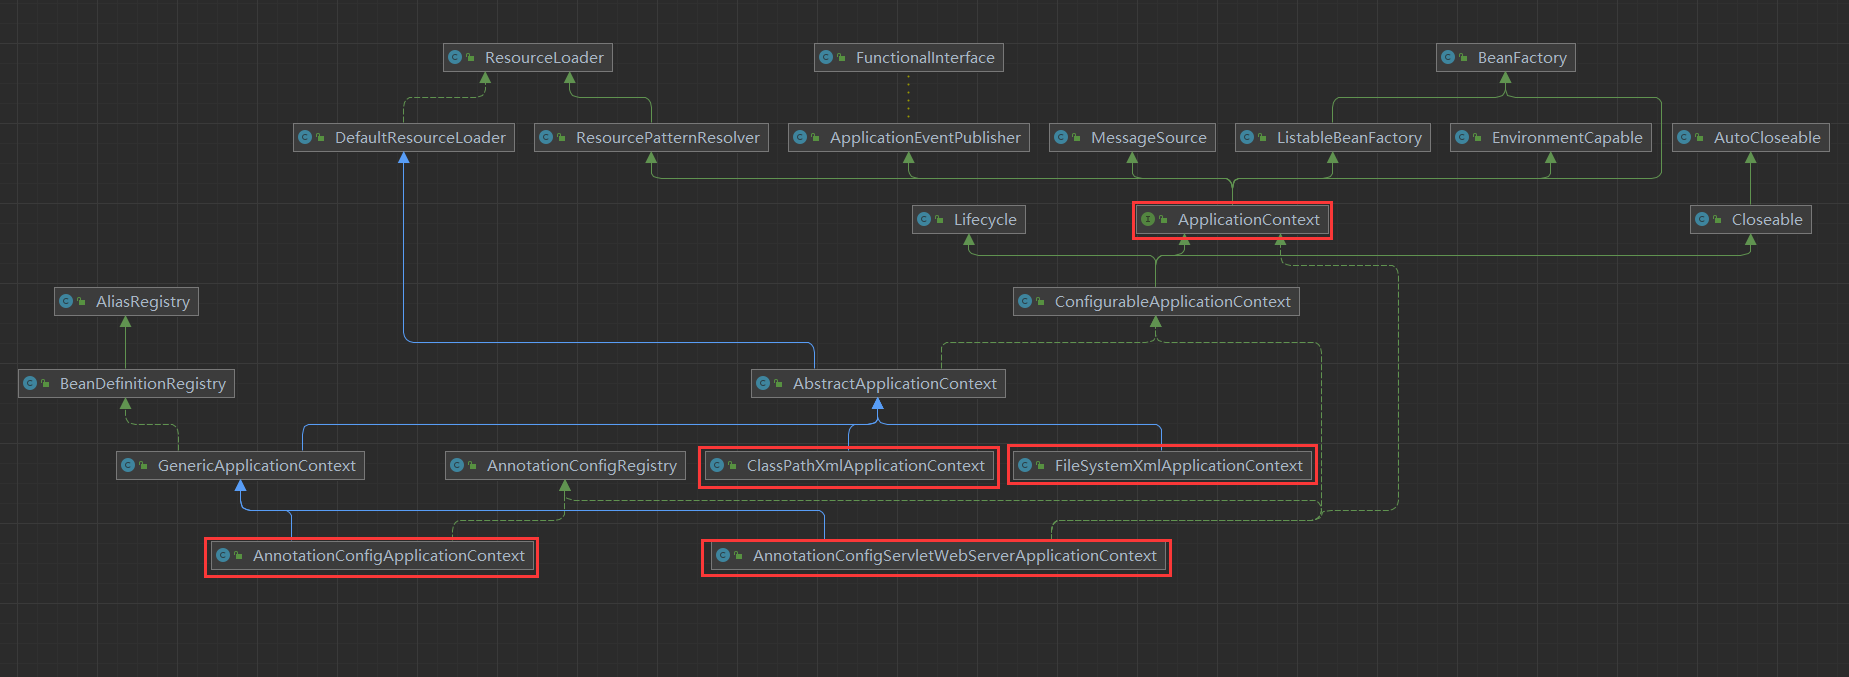
在SpringBoot项目中我们通过SpringApplication.run(SpringLearnApplication.class, args);来启动项目,实际上这个方法有一个返回值,类型为 ConfigurableApplicationContext,类图关系如下。
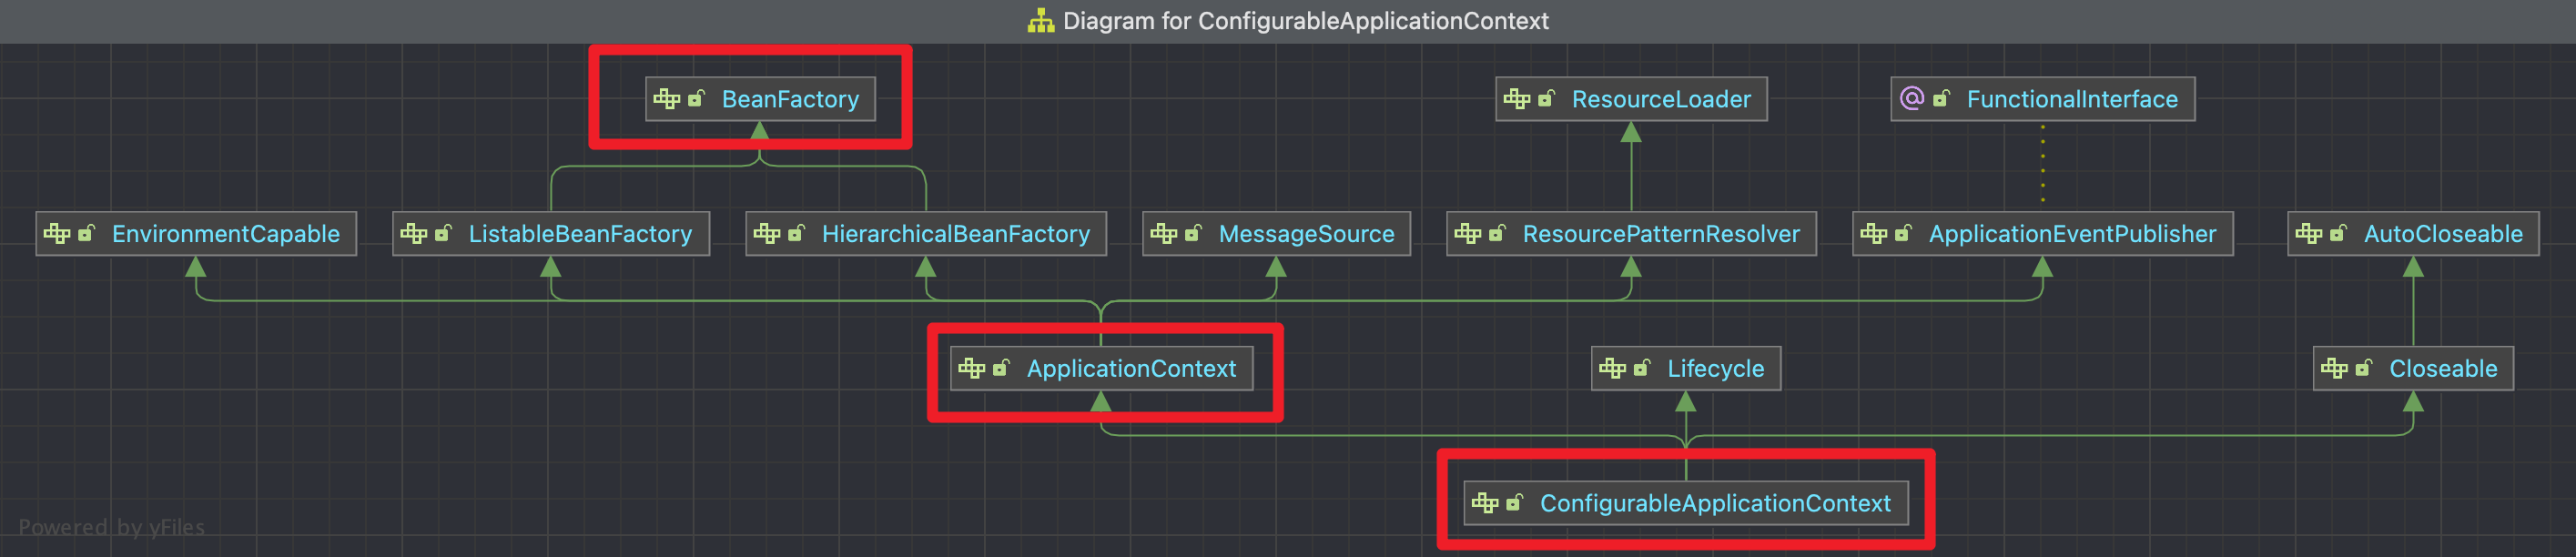
可以看到它实现了ApplicationContext接口,而ApplicationContext又间接的实现了BeanFactory接口。
到底什么是BeanFactory?
- 它是Application的父接口
- 它才是Spring的核心容器,主要的ApplicationContext实现都组合了它的功能。
BeanFactory接口中方法如下:
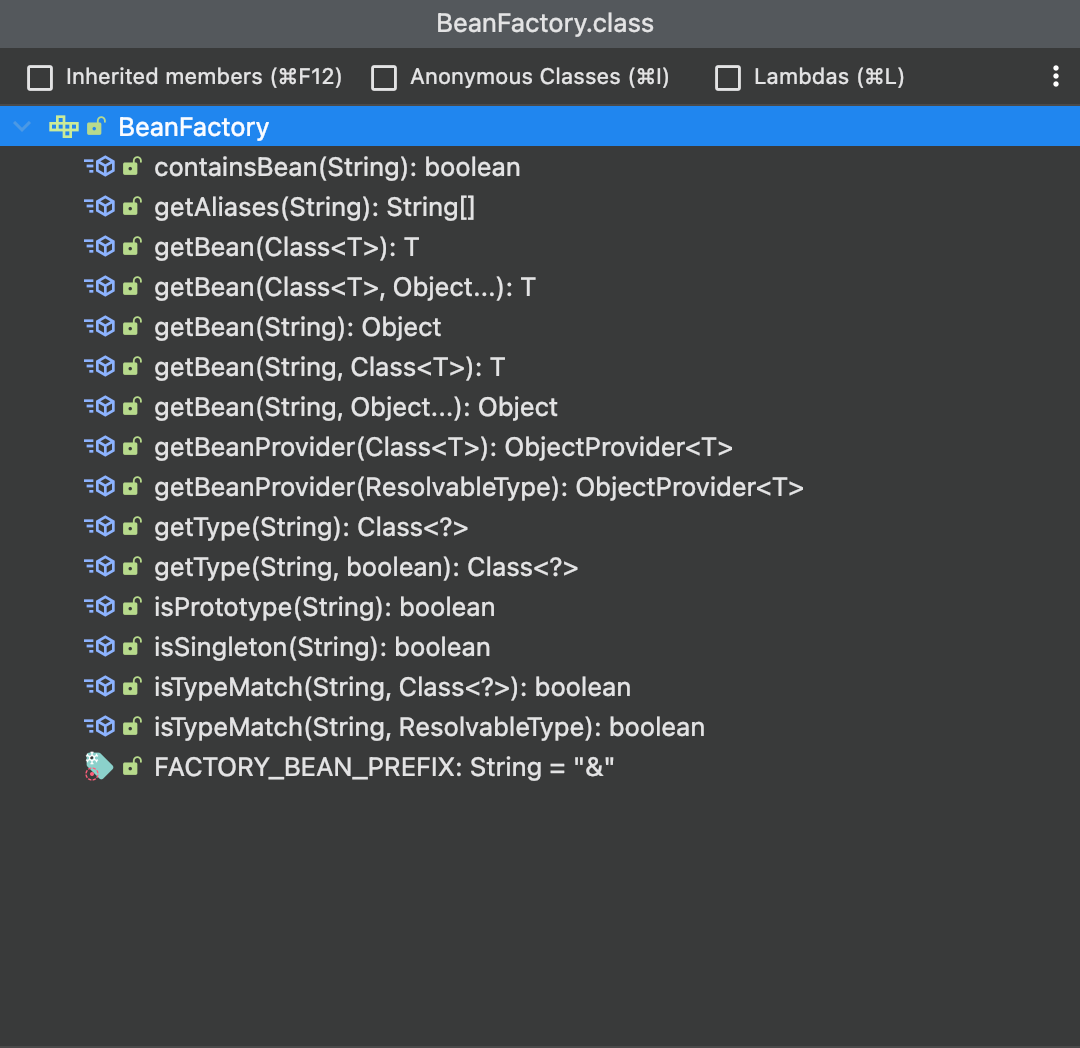
表面上看起来只有getBean对我来来说有用,实际上控制反转、基本的依赖注入、直至Bean的生命周期的各种功能都由他的实现类提供。
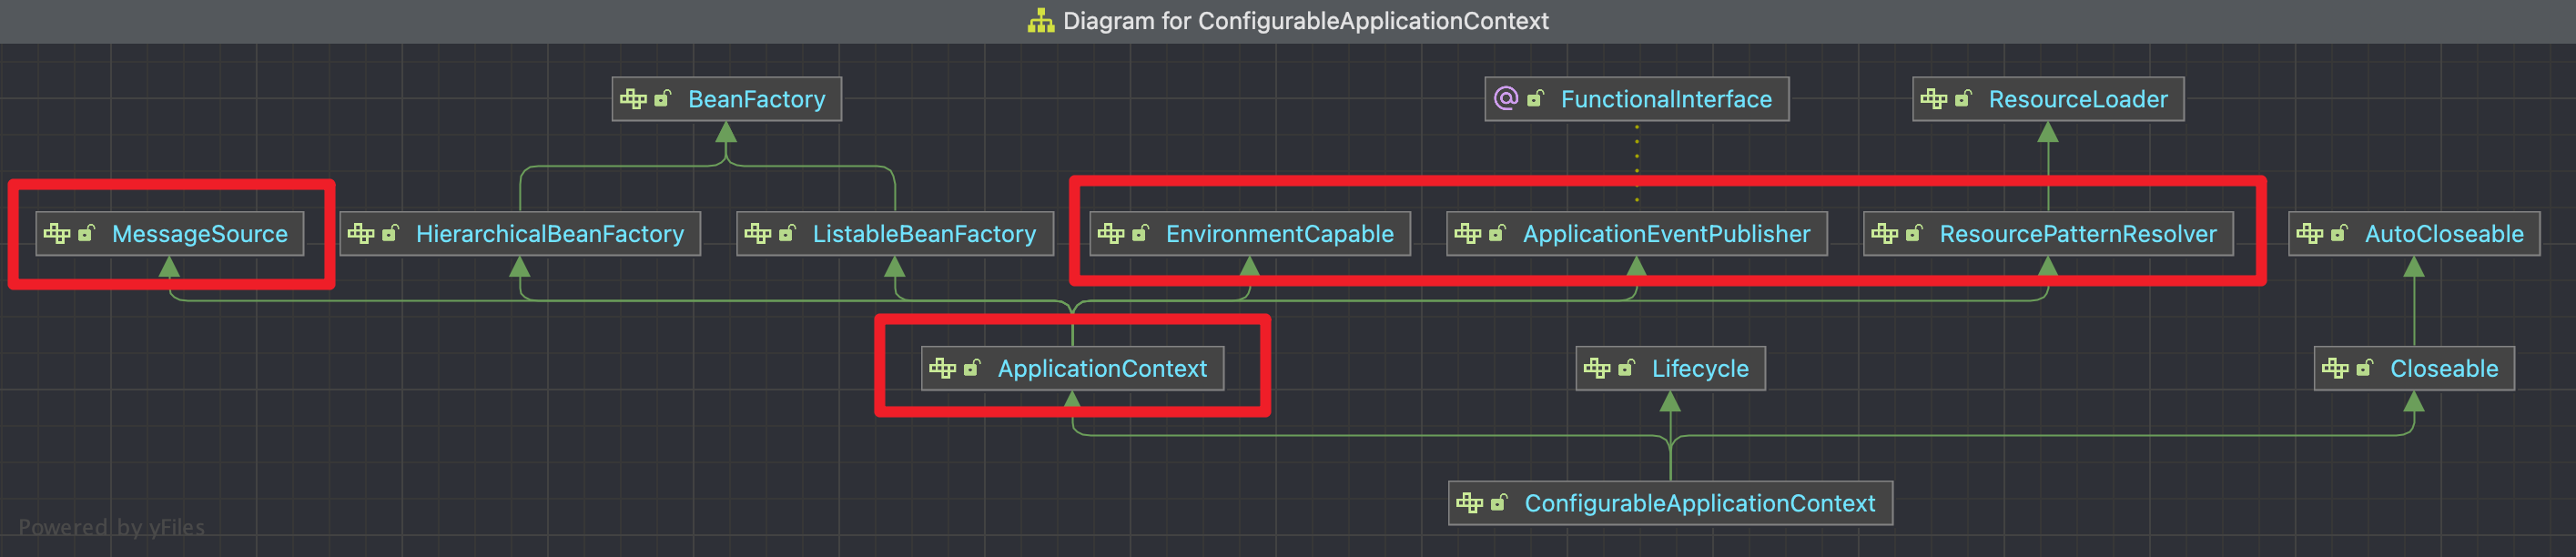
ApplicationContext相较于BeanFactory多了哪些功能
-
MessageSource:国际化功能
-
EnvironmentCapable:获取环境变量
-
ApplicationEventPublisher:发布事件
-
ResourcePatternResolver:通配符匹配资源路径
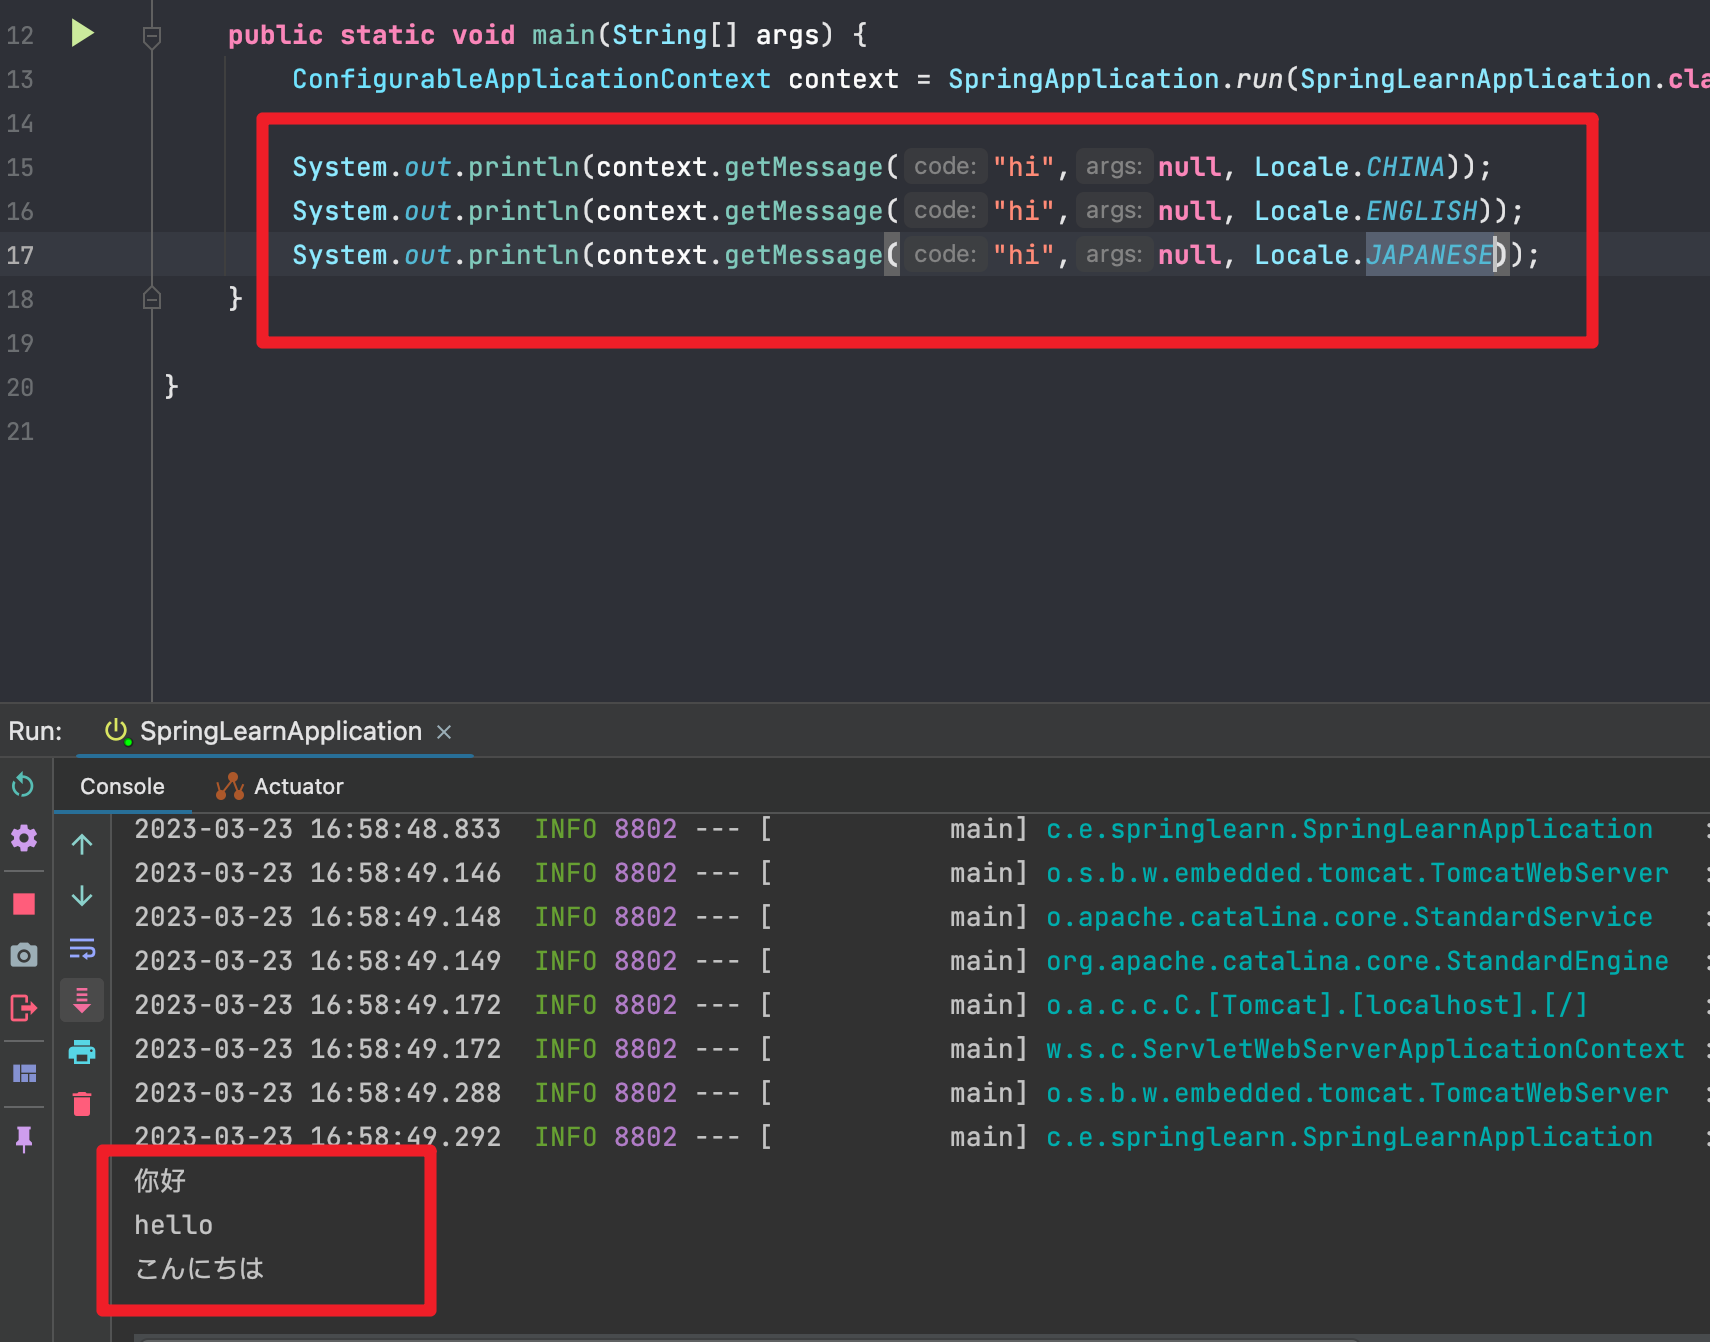
MessageSource
在resources目录下创建四个文件messages.properties、messages_en.properties、messages_ja.properties、messages_zh.properties,然后分别在四个文件里面定义同名的key,比如在message_en.properties中定义hi=hello,在messages_ja.propertes中定义hi=こんにちは,在messages_zh中定义hi=你好,这样在代码中就可以根据这个key hi和不同的语言类型获取不同的value了。
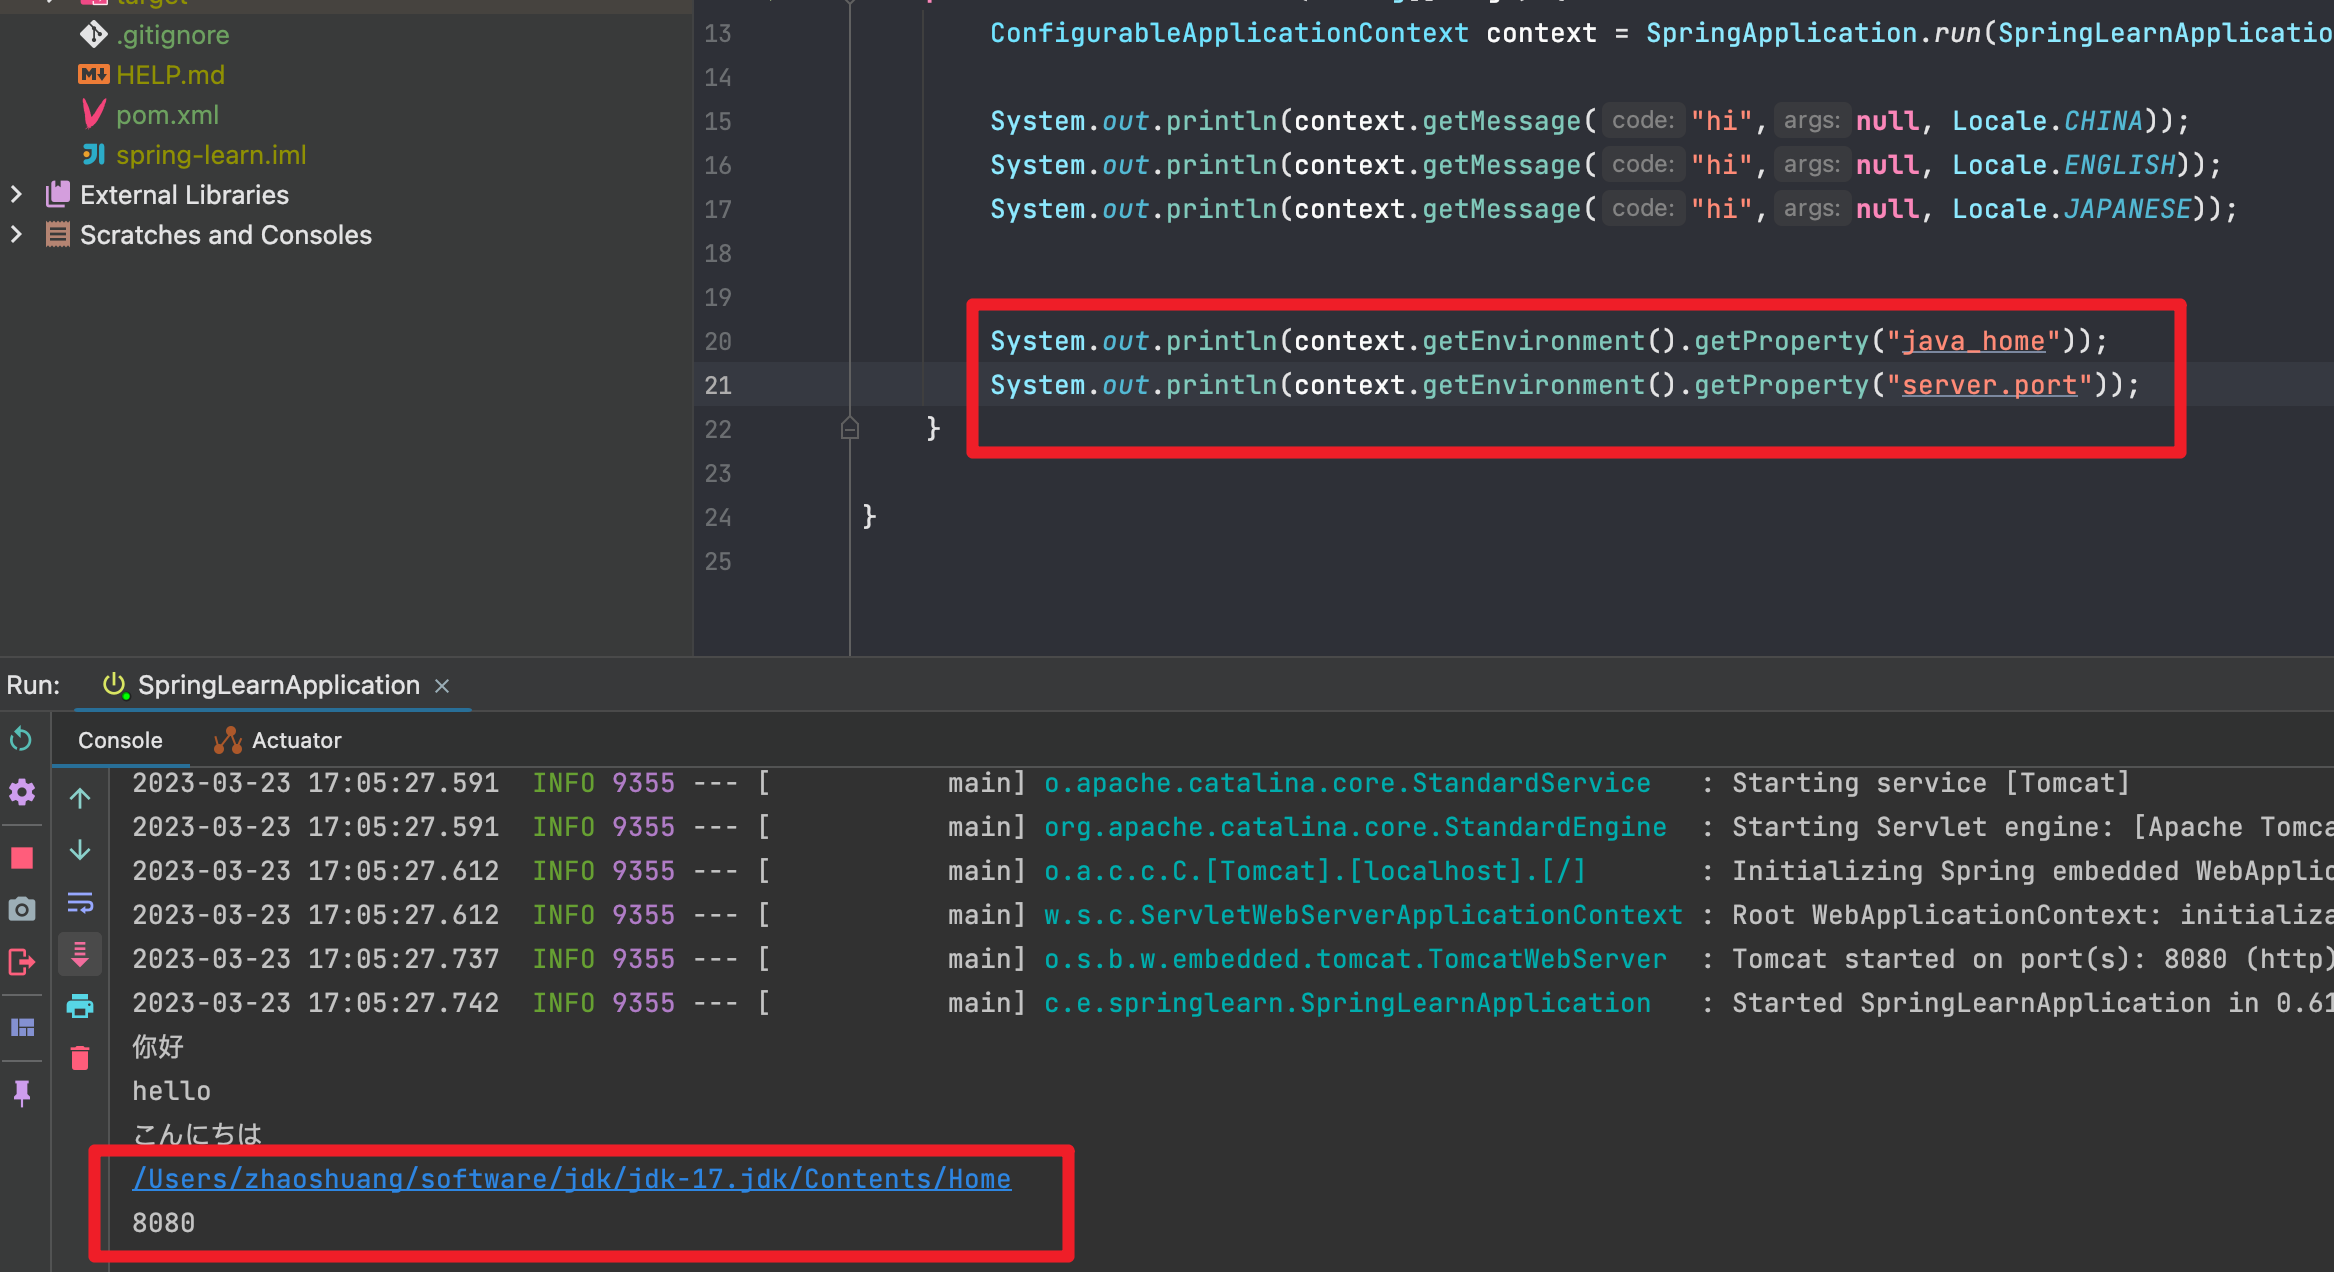
EnvironmentCapable
获取系统环境变量中的java_home和项目的application.yml中的server.port属性
ApplicationEventPublisher
首先我先需要定义一个事件类,继承于ApplicationEvent
public class UserEvent extends ApplicationEvent {
    public UserEvent(Object source) {
        super(source);
    }
}
再定义一个监听器类,用于监听用户自定义的事件,在Spring中所有的bean对象都可以用来作为监听器类,只需要添加一个方法用来接受事件,方法的参数类型即为我们需要监听的事件的类型,并且在方法上用@EventListener来标注。
@Component
public class UserListener {

    @EventListener
    public void onMessage(UserEvent event){
        System.out.println("收到userEvent: "+event.getSource());
    }
}
最后我们再通过context发布事件即可,在需要发布事件的位置,注入ApplicationContext然后调用publishEvent方法

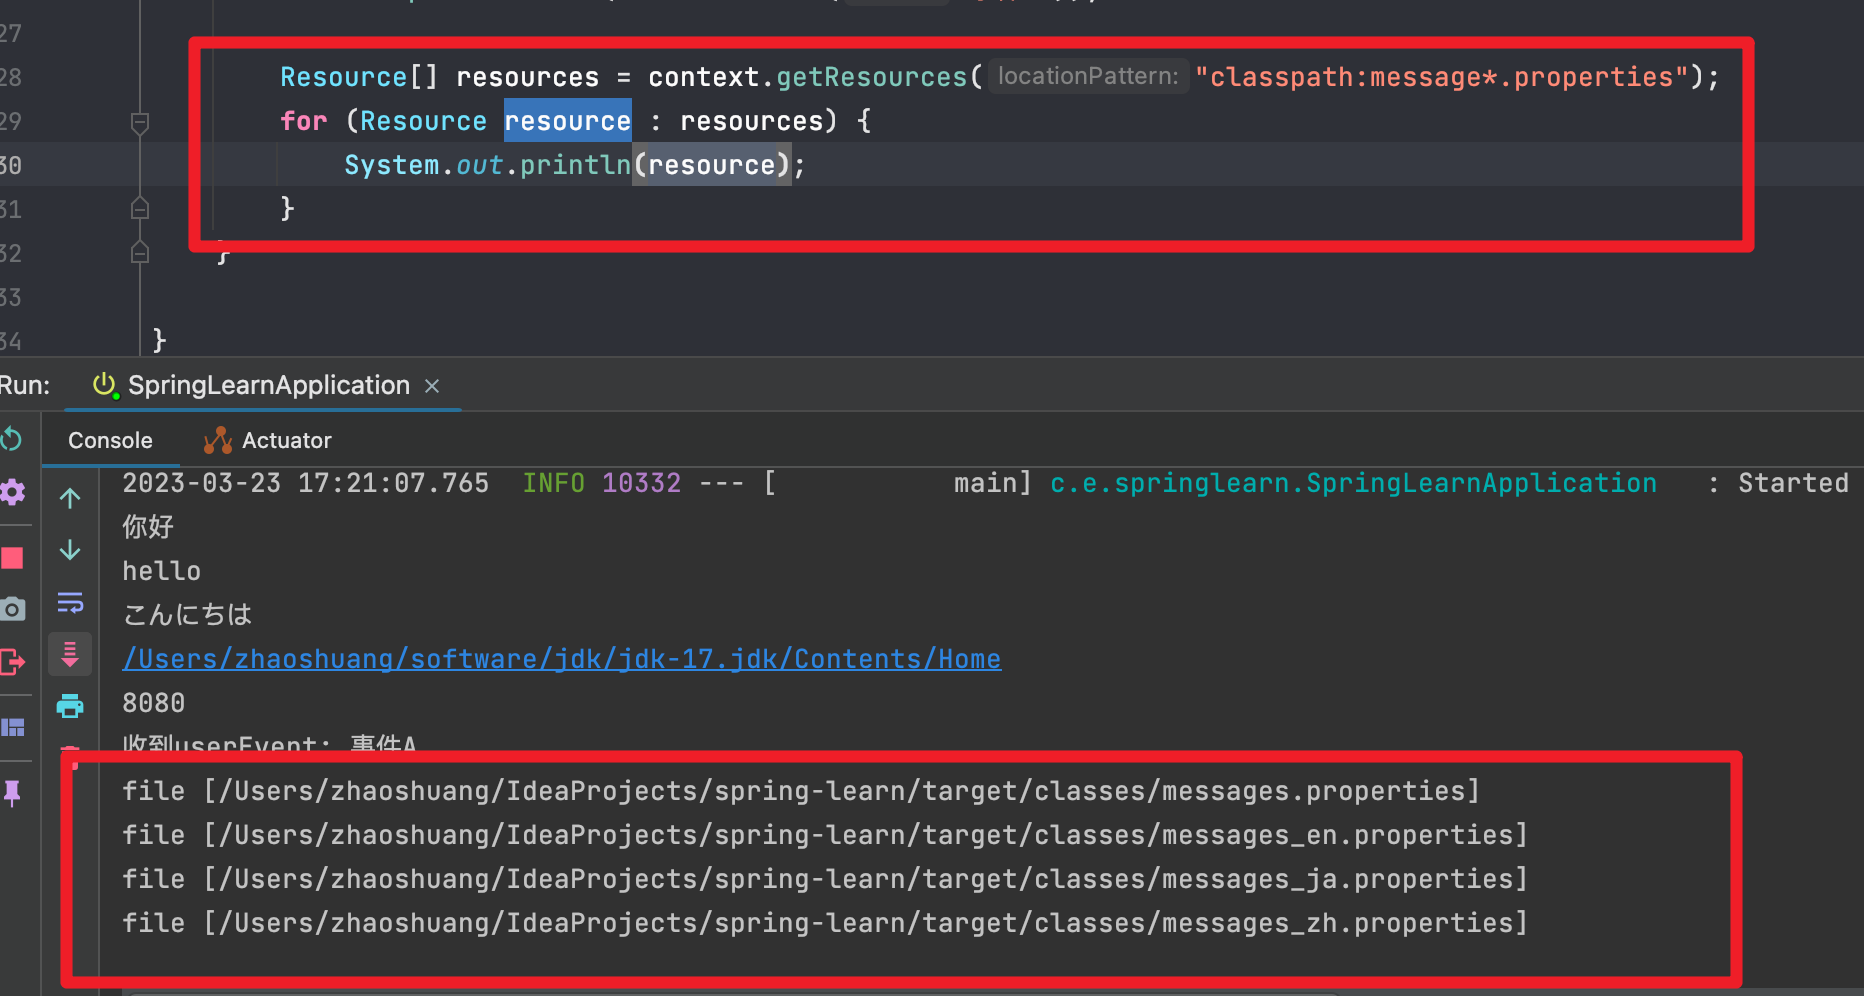
ResourcePatternResolver 可以通过通配符的方式获取配置文件
例1:获取类路径下的message开头的配置
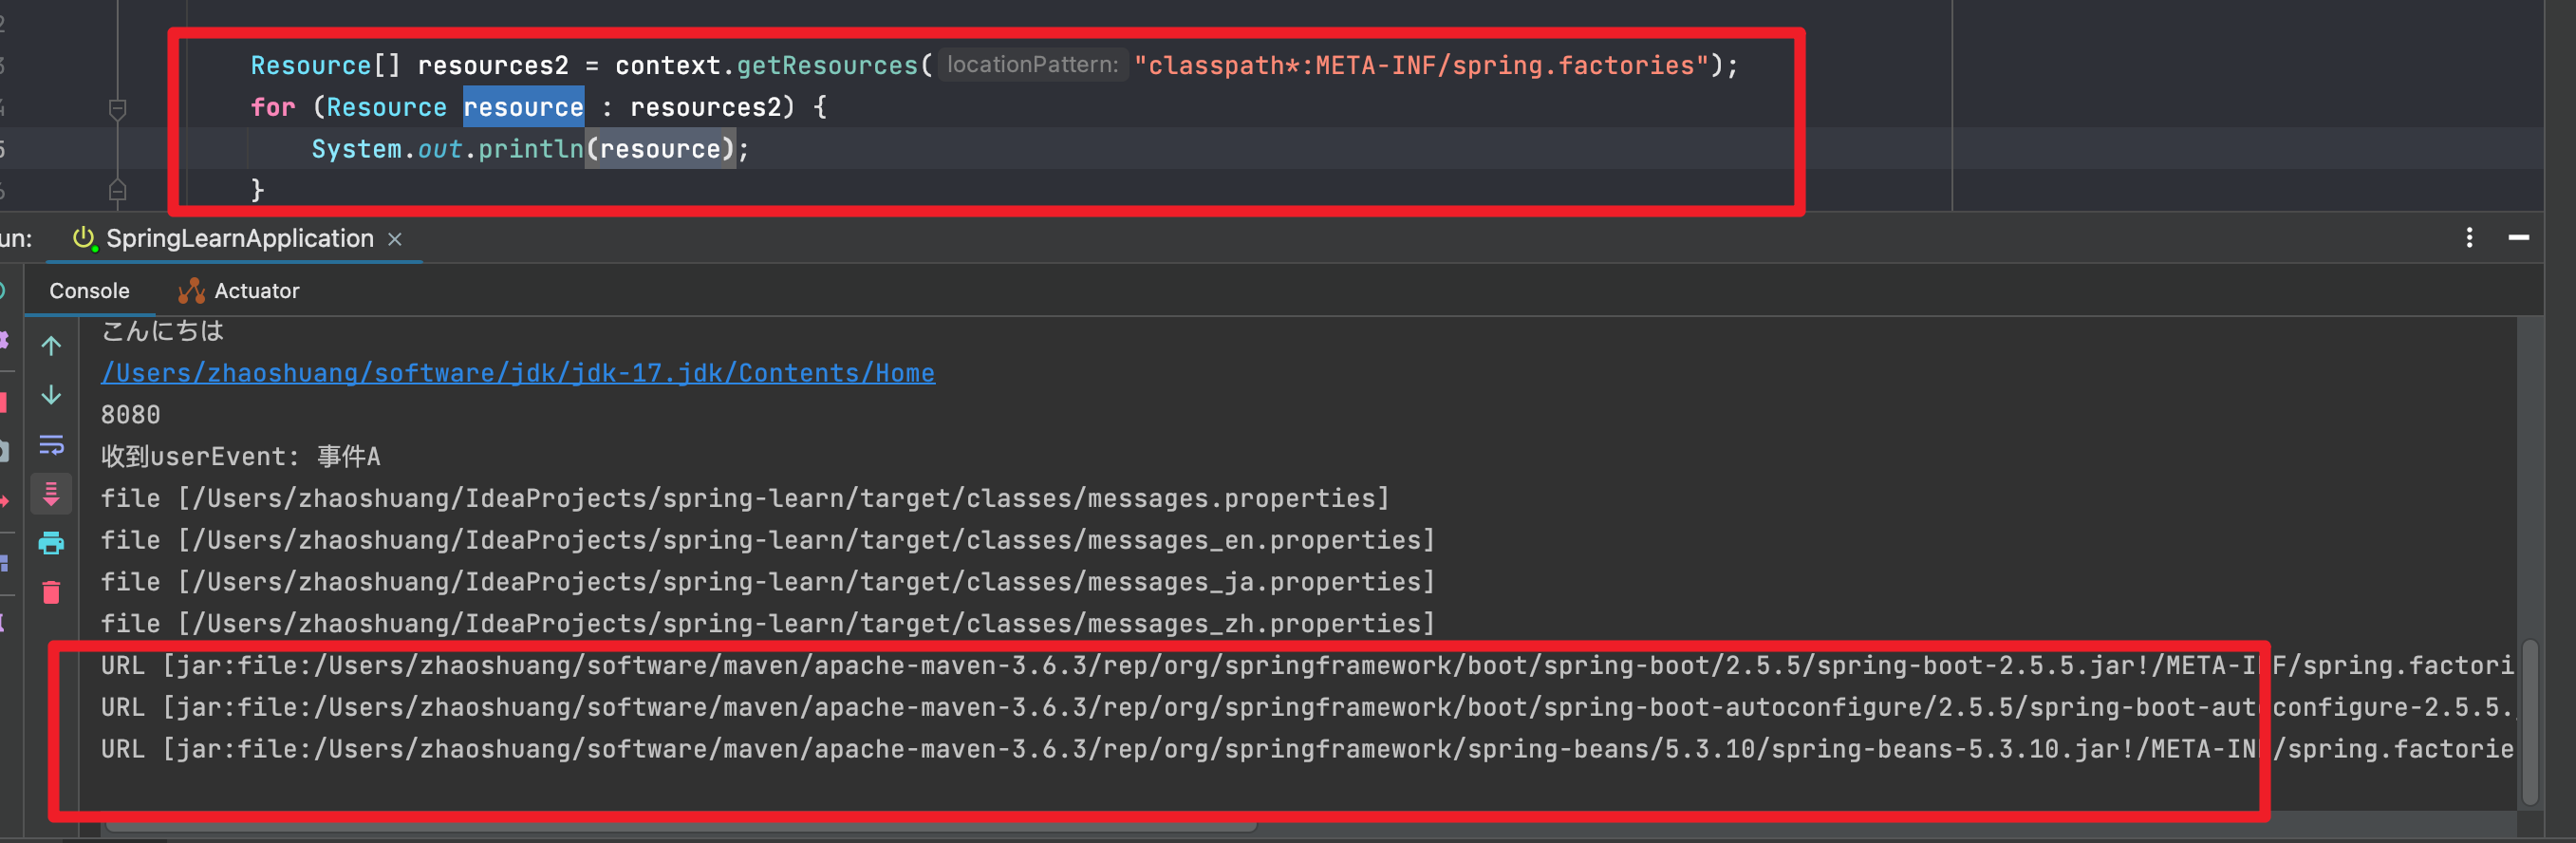
例2:获取Spring相关jar包中的spring.factories配置文件,需要在classpath后面加一个*
BeanFactory和ApplicationContext的重要实现类
DefaultListableBeanFactory
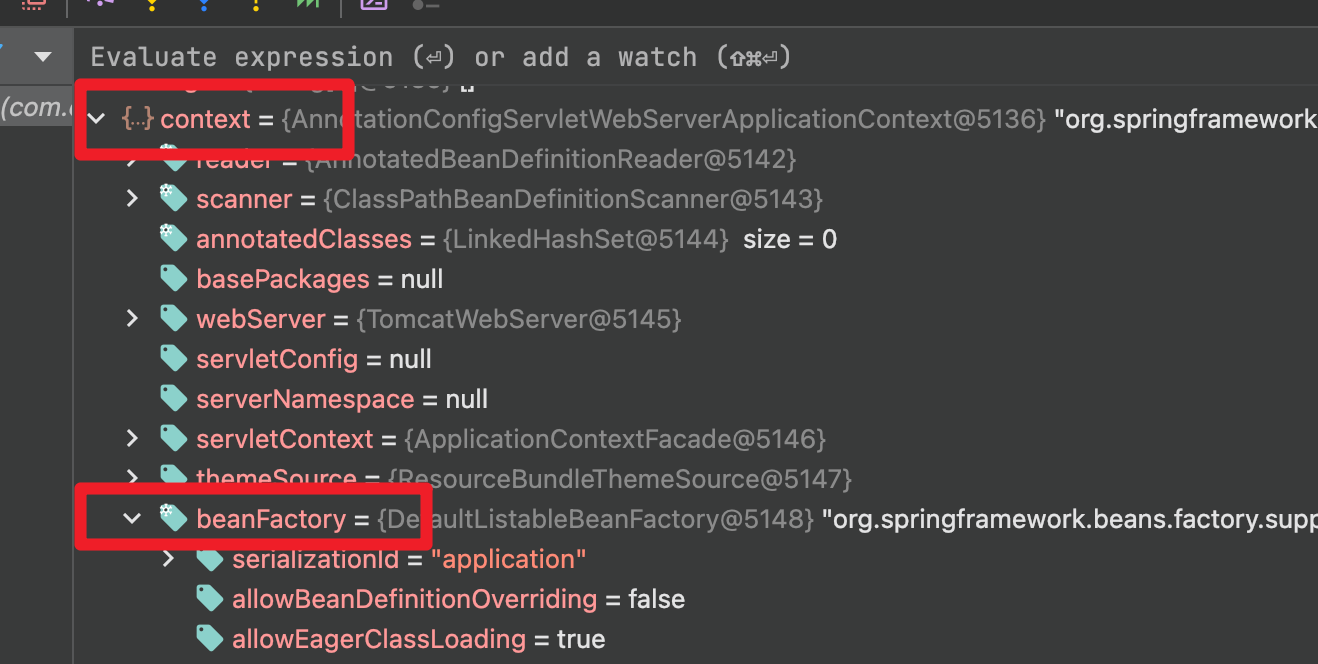
        ConfigurableApplicationContext context = SpringApplication.run(SpringLearnApplication.class, args);
        System.out.println(context.getBeanFactory().getClass());
// class org.springframework.beans.factory.support.DefaultListableBeanFactory
从上面的内容中我们可以了解到ConfigurableApplicationContext内部组合的BeanFactory的实际类型为DefaultListableBeanFactory,它是BeanFactory的一个重要的实现类,我们尝试使用这个类来模拟Spring容器启动。
我们先定义了一个Config的配置类,在其中申明了2个Bean,我们先创建了一个DefaultListableBeanFactory对象 然后通过BeanDefinitionBuilder来构造了了Config类的Bean定义对象,最后在工厂中注册了这个定义对象。
public class TestBeanFactory {
    public static void main(String[] args) {
        DefaultListableBeanFactory beanFactory = new DefaultListableBeanFactory();

        // bean的定义(class、scope、初始化、销毁)
        AbstractBeanDefinition beanDefinition = BeanDefinitionBuilder.genericBeanDefinition(Config.class).setScope("singleton").getBeanDefinition();

        beanFactory.registerBeanDefinition("config",beanDefinition);


        System.out.println("-------------------------------");
        // 可以看到工厂内只有一个config
        for (String definitionName : beanFactory.getBeanDefinitionNames()) {
            System.out.println(definitionName);
        }
    }

  @Configuration
    static class Config{
        @Bean
        public Bean1 bean1(){return new Bean1();}

        @Bean
        public Bean2 bean2(){return new Bean2();}
    }


    static class Bean1{
        private static final Logger log = LoggerFactory.getLogger(Bean1.class);
        @Autowired
        private Bean2 bean2;

        public Bean2 getBean2() {
            return bean2;
        }

        public Bean1(){
            log.debug("构造Bean1()");
        }
    }

    static class Bean2{
        private static final Logger log = LoggerFactory.getLogger(Bean2.class);

        public Bean2(){
            log.debug("构造Bean2()");
        }
    }
}
按照我们预期的应该来我们在Config类中配置了2个其他的Bean对象那么工厂中至少应该存在这几个,但是我们执行打印输出发现只有一个config
我们的BeanFactory的功能并不完整,解析@Configuration跟@Bean功能并不是由我们的BeanFactory提供的,所以我们需要调用AnnotationConfigUtils.registerAnnotationConfigProcessors(beanFactory)往容器中添加一些常用后处理器。

再次的打印输入可以看到已经多了一些Bean,比方说ConfigurationAnnotationProcessor用来解析@Configuration以及里面的@Bean注解的
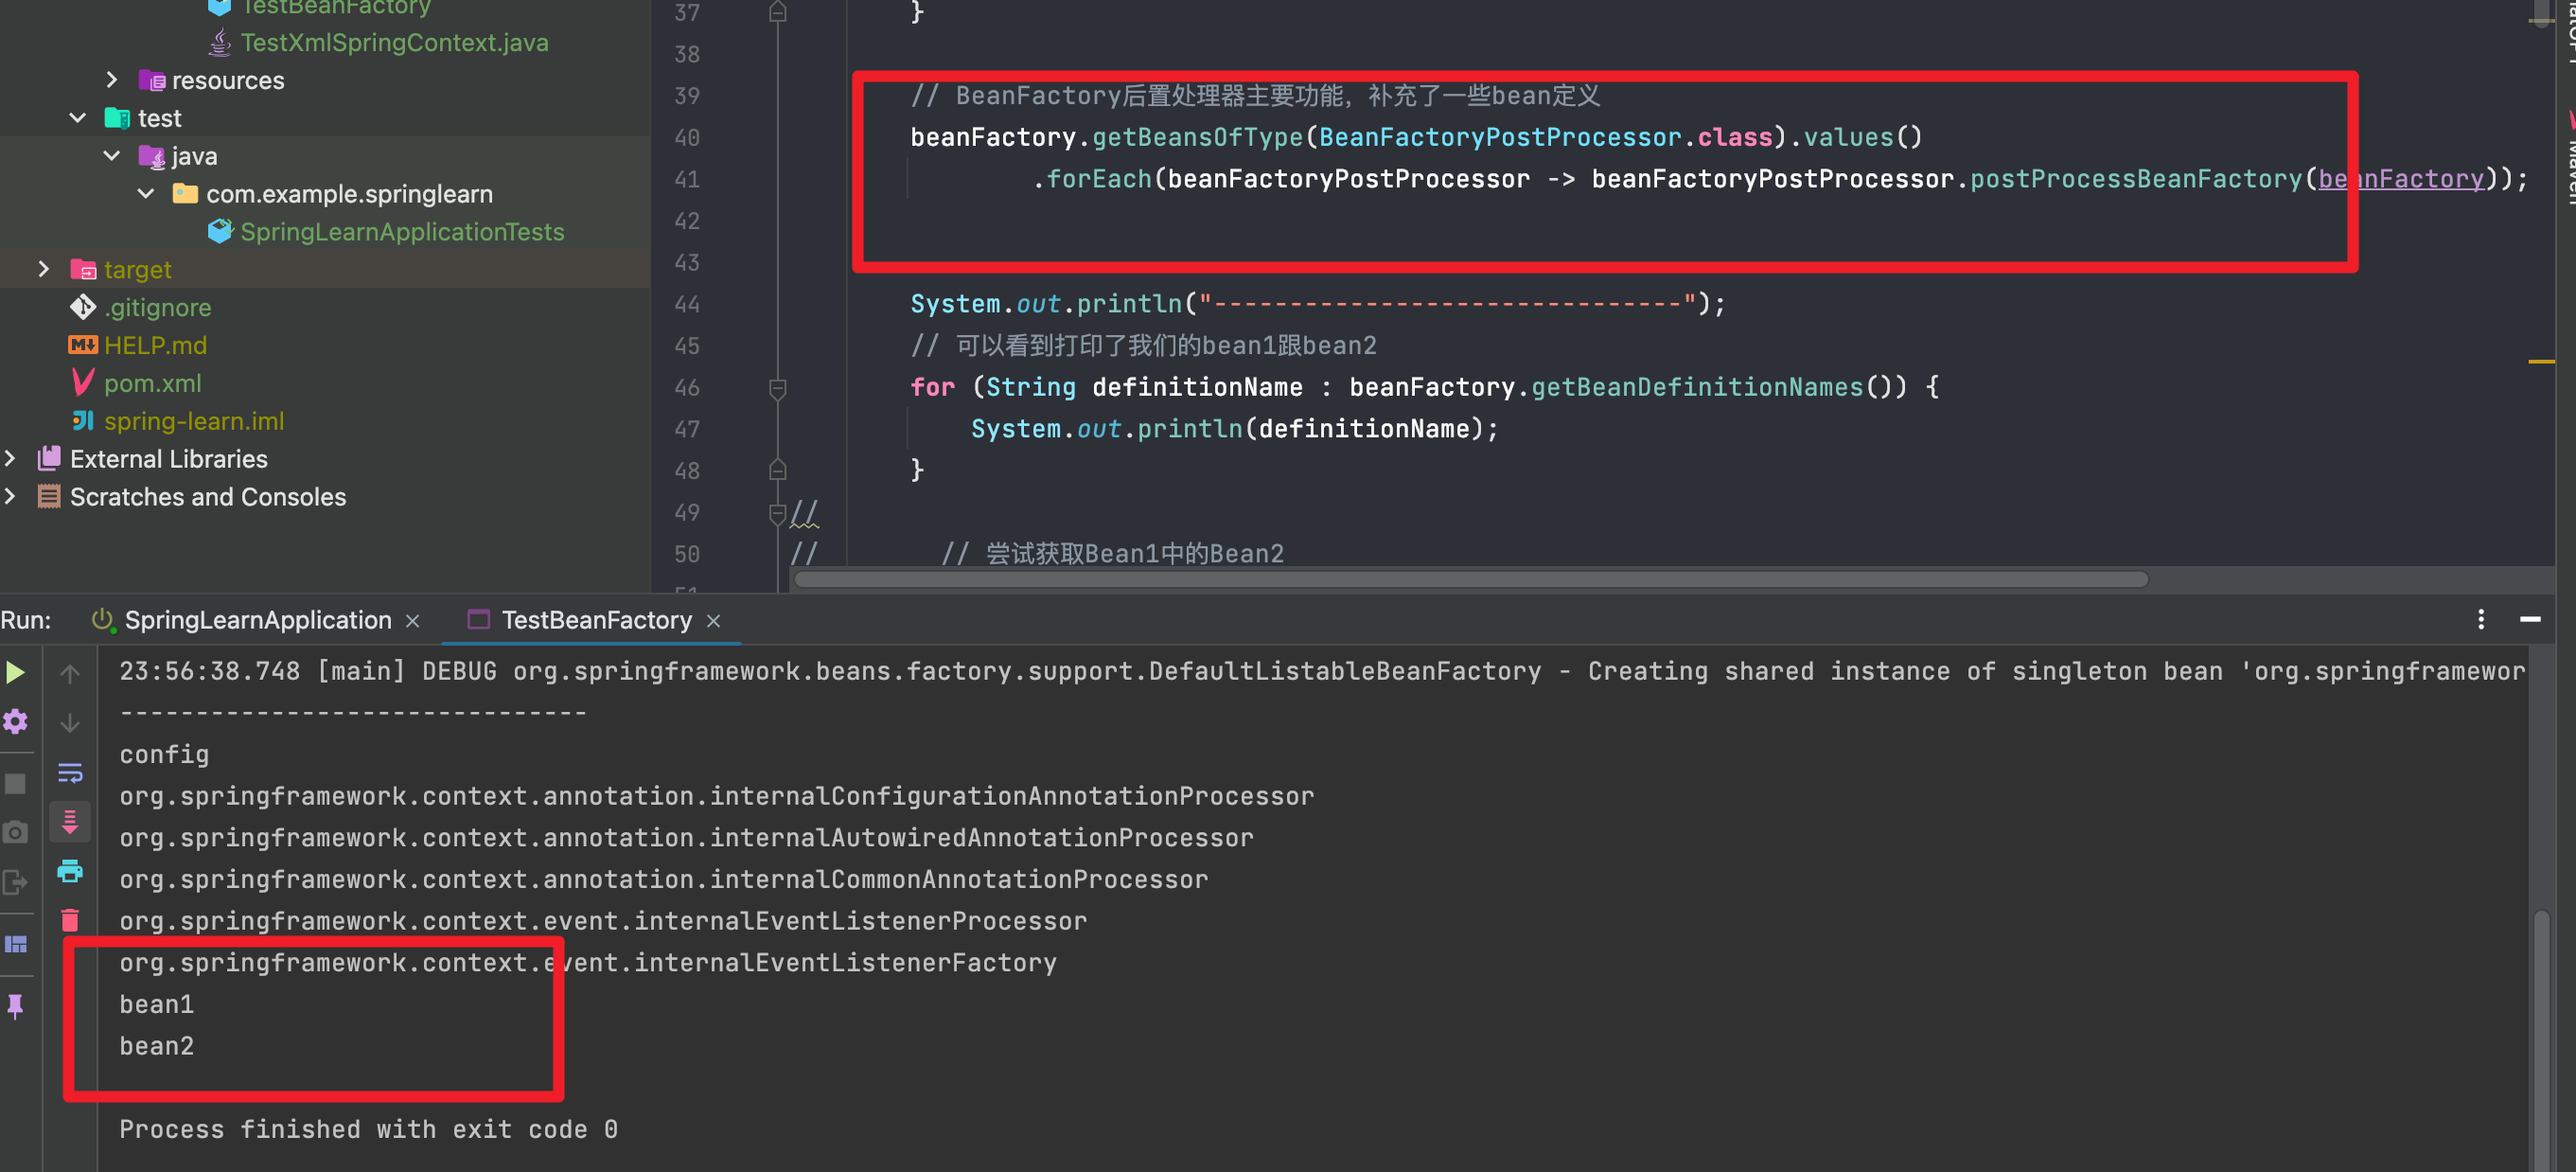
然后我们再调用后置处理器来解析,解析这些注解的后置处理器的类型都为BeanFactoryPostProcessor,所以我们可以通过以下的方式拿到并处理。
        // BeanFactory后置处理器主要功能,补充了一些bean定义
        beanFactory.getBeansOfType(BeanFactoryPostProcessor.class).values()
                .forEach(beanFactoryPostProcessor -> beanFactoryPostProcessor.postProcessBeanFactory(beanFactory));


        System.out.println("-------------------------------");
        // 可以看到打印了我们的bean1跟bean2
        for (String definitionName : beanFactory.getBeanDefinitionNames()) {
            System.out.println(definitionName);
这下可以看到我们定义的bean1跟bean2了
   // 尝试获取Bean1中的Bean2
        System.out.println(beanFactory.getBean(Bean1.class).getBean2());//null
我们尝试从Bean1获取注入的Bean2对象,发现获取的结果为null,说明我们在Bean1中通过@Autowired注入的Bean2没有成功。
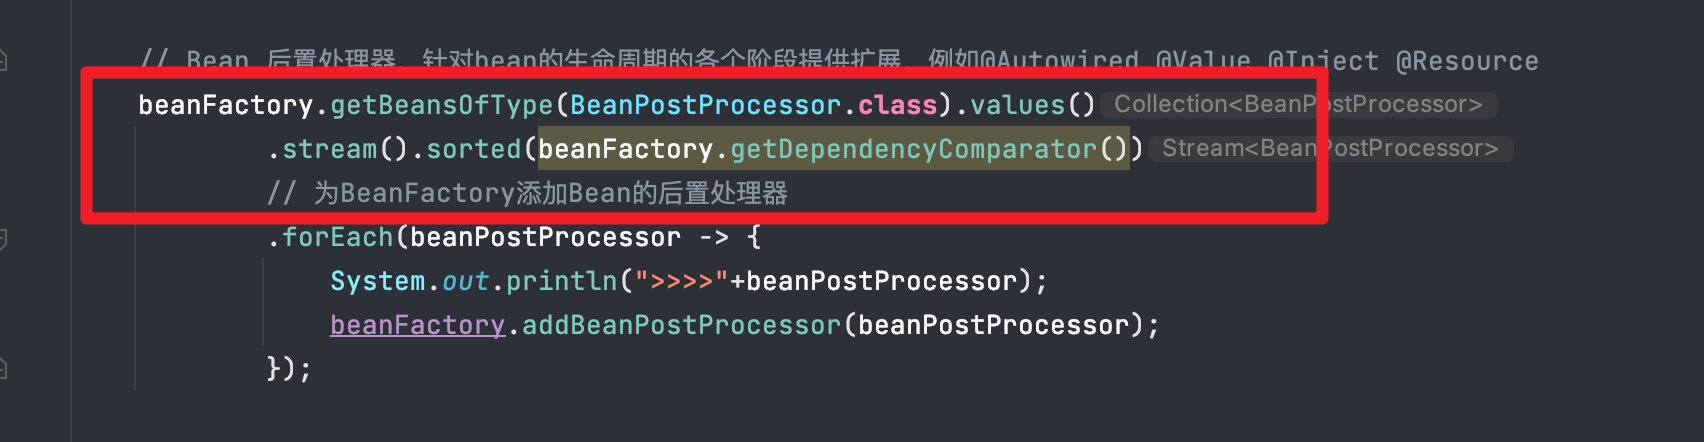
实际上@Autowired这个依赖注入功能也是通过一些后置处理器来完成的,类型为BeanPostProcessor的后置处理器。就是我们上面看到的AutowiredAnnotationBeanPostProcessor它是用来解析@@Autowired、@Value、@Inject等等注解。
// Bean 后置处理器,针对bean的生命周期的各个阶段提供扩展,例如@Autowired @Value @Inject @Resource
beanFactory.getBeansOfType(BeanPostProcessor.class).values()
// 为BeanFactory添加Bean的后置处理器
.forEach(beanFactory::addBeanPostProcessor);
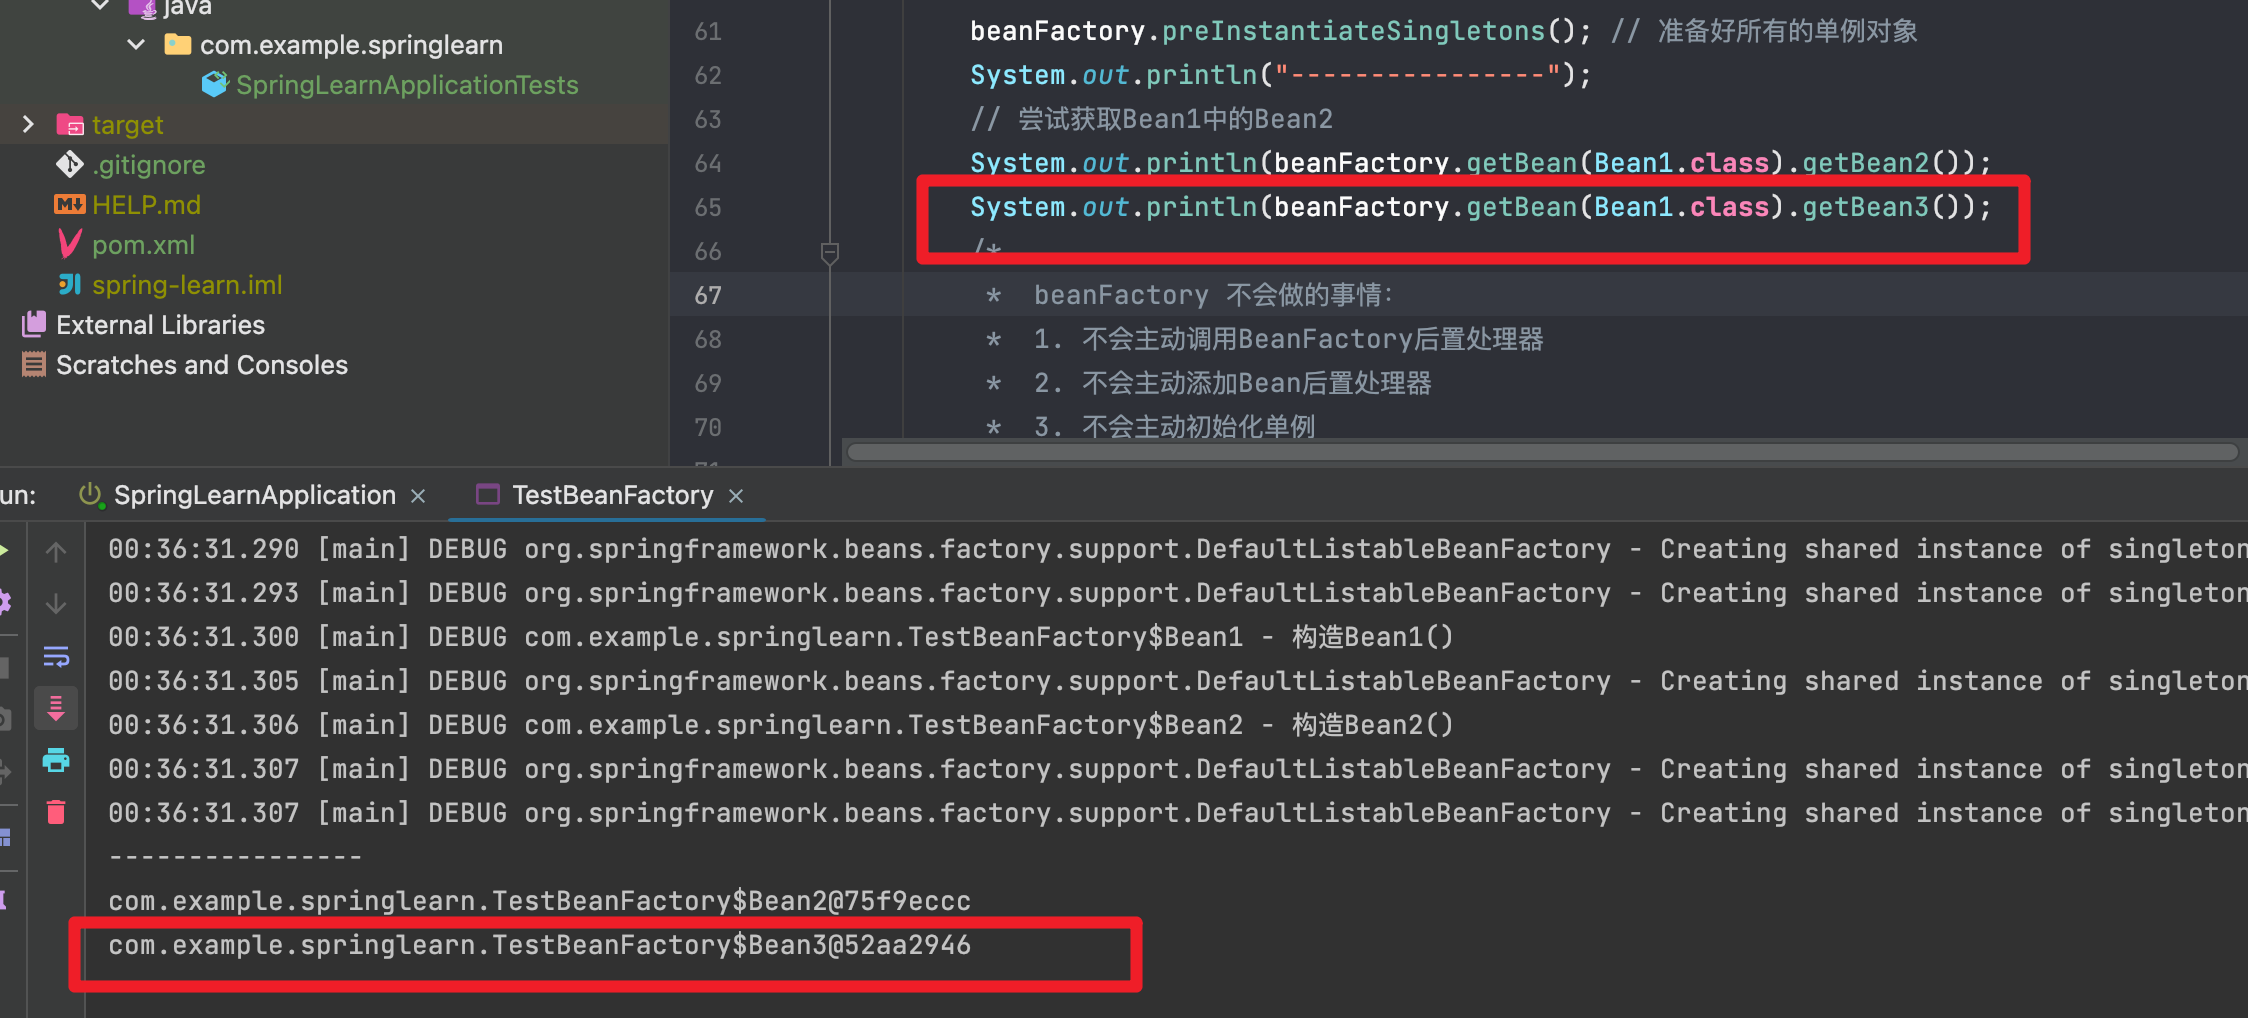
beanFactory.preInstantiateSingletons(); // 准备好所有的单例对象
System.out.println("----------------");
// 尝试获取Bean1中的Bean2
System.out.println(beanFactory.getBean(Bean1.class).getBean2());
beanFactory.preInstantiateSingletons()可以直接初始化我们的单例bean,而不是在第一次getBean的时候再初始化。
我们可以知道不仅可以通过@Autowired注入也可以通过@Resource注入,而@Resource就是通过CommonAnnotationBeanPostProcessor来解析的。如果对一个字段同时添加这两个注解那么哪种会生效呢?
 interface Inter{}

    static class Bean3 implements Inter{

    }

    static class Bean4 implements Inter{

    }

  	    @Configuration
    static class Config{
        @Bean
        public Bean1 bean1(){return new Bean1();}

        @Bean
        public Bean2 bean2(){return new Bean2();}

        @Bean
        public Bean3 bean3(){
            return new Bean3();
        }

        @Bean
        public Bean4 bean4(){
            return new Bean4();
        }
    }

 static class Bean1{
        private static final Logger log = LoggerFactory.getLogger(Bean1.class);
        @Autowired
        private Bean2 bean2;

        public Bean2 getBean2() {
            return bean2;
        }

        @Autowired
        @Resource(name = "bean4")
        private Inter bean3;

        public Inter getBean3() {
            return bean3;
        }
我们定义了一个Inter接口,然后Bean3,Bean4都实现了这个接口,我们在Bean1中通过@Autowired注入,默认是通过类型去容器中查找,如果找不到合适的再通过方法名去查找,因为我们容器中有两个Inter类型的bean也就是说它注入的应该是Bean3这个;@Resource通过我们指定的名称查找,也就是Bean4。
因为在我们这里是AutowiredAnnotationBeanPostProcessor在前所以先生效的是@Autowired
我们也可以通过一些比较器来排序
添加这个比较器后我们Common就在前面了,所以也就注入的Bean4
那么这比较器对象从哪里来的呢,实际上我们在调用AnnotationConfigUtils.registerAnnotationConfigProcessors(beanFactory);这个方法时,会给beanFactory中设置一个比较器对象。
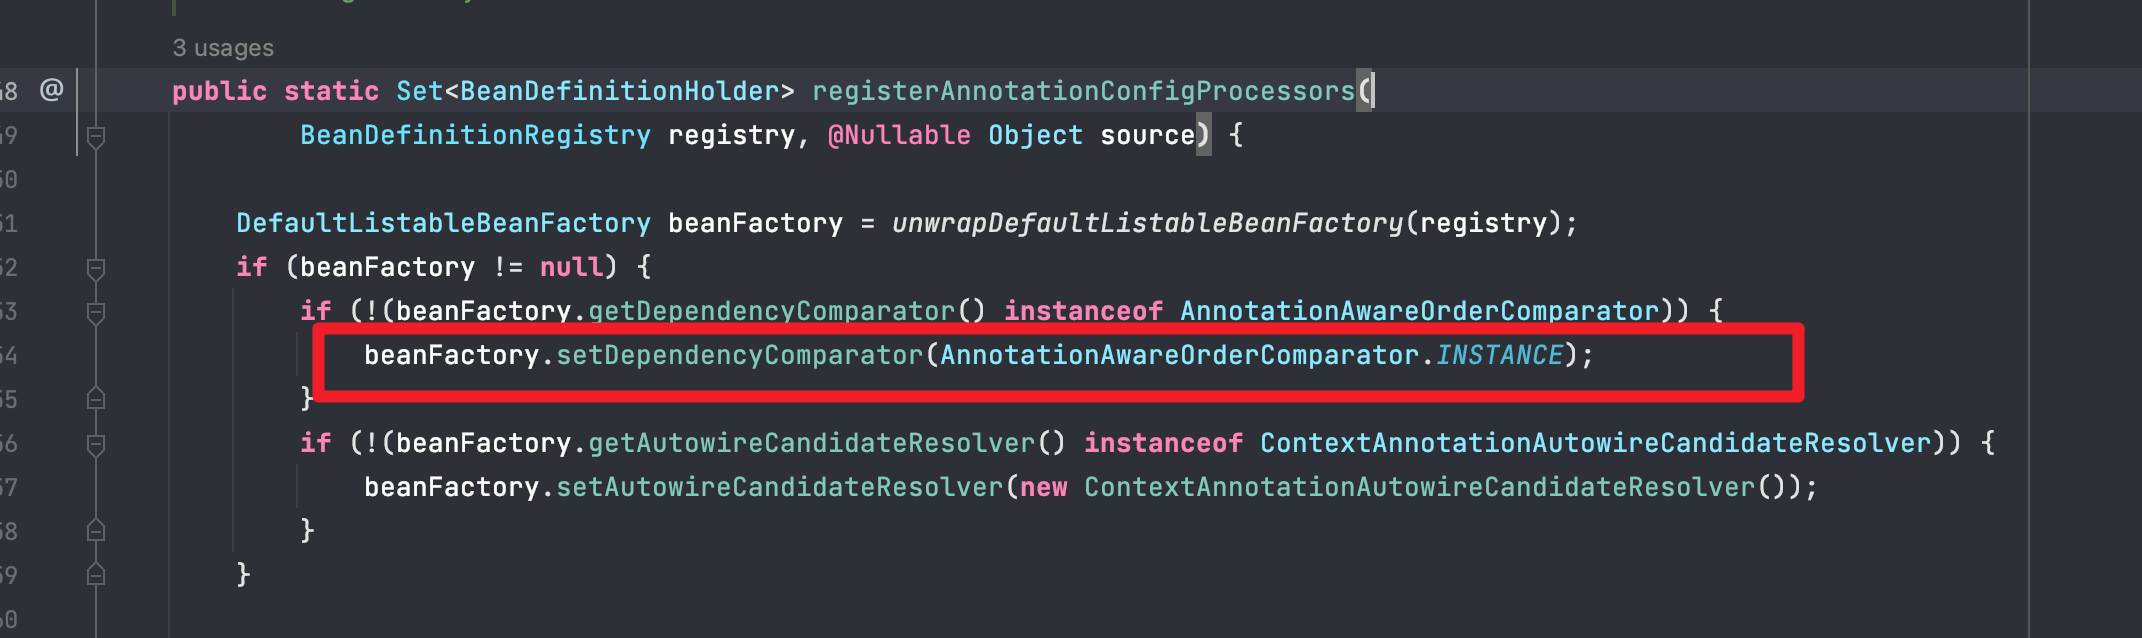
这两后置处理器都实现了Order接口,通过调用处理器的的getOrder方法进行排序的,order越大的排在后面
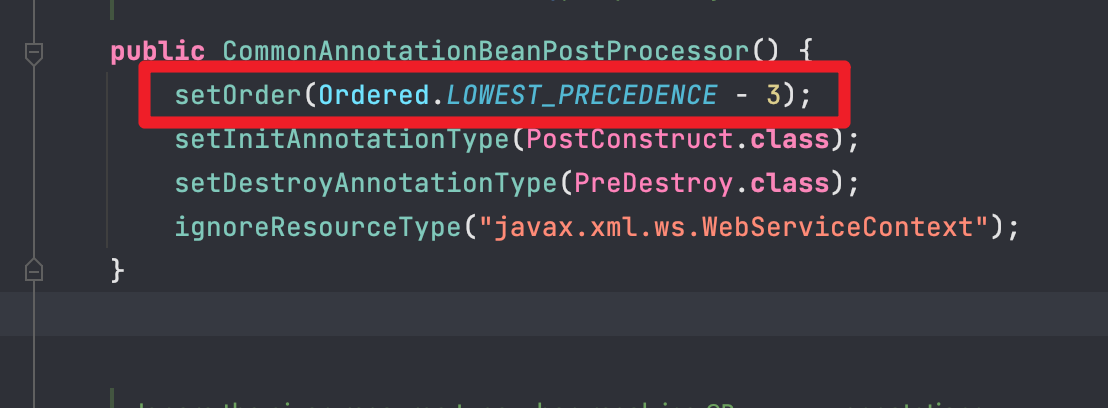
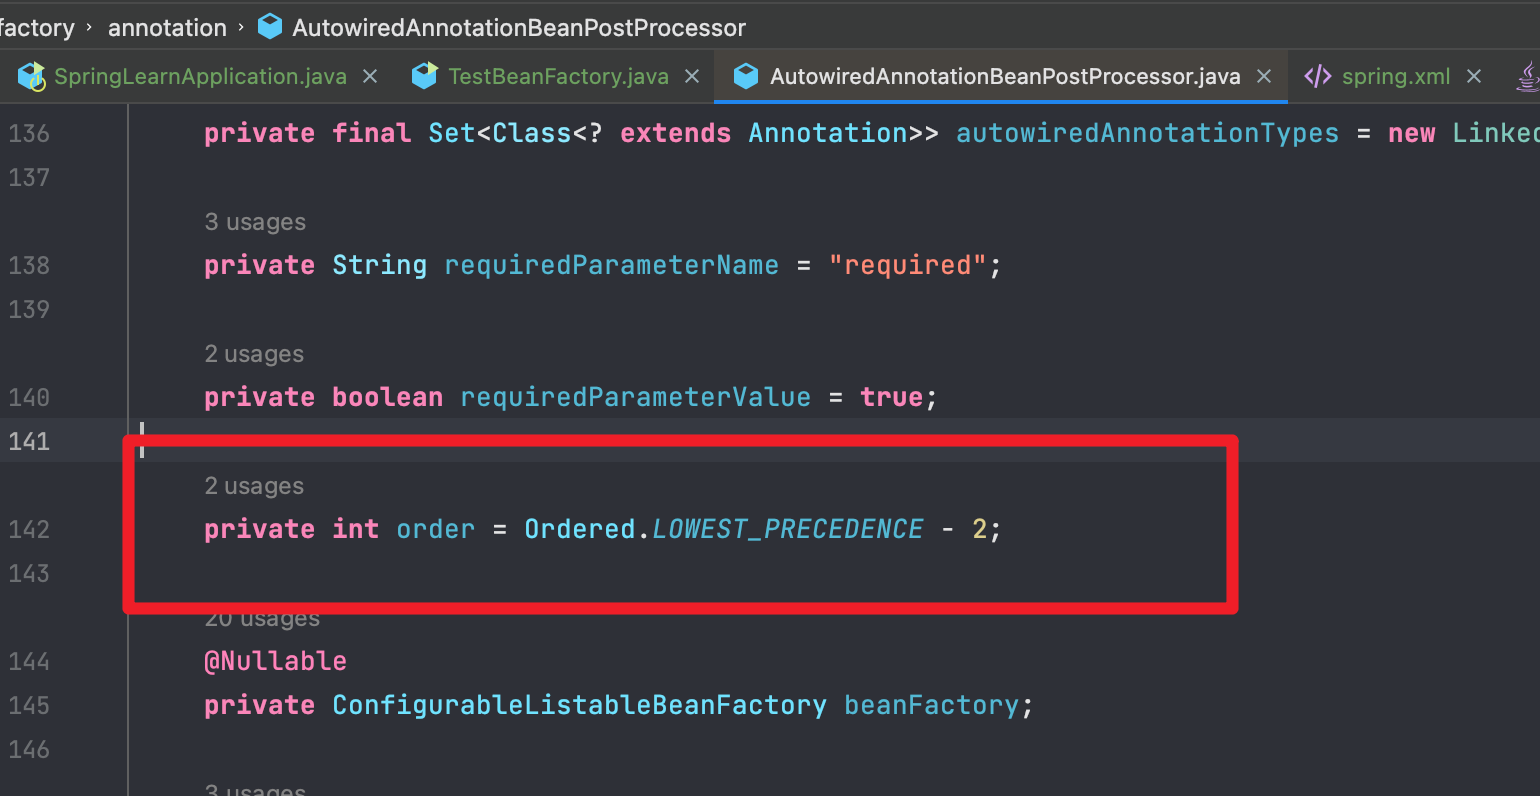
由此我们可以得知:
beanFactory不会为我们做的事情:
- 不会主动调用BeanFactory的后置处理器
- 不会主动添加Bean的后置处理器
- 不会主动初始化单例Bean
Bean后置处理器会有排序的逻辑
ApplicationContext的实现
四个重要的ApplicationContext接口的实现类
-
ClassPathXmlApplicationContext
-
FileSystemXmlApplicationContext
-
AnnotationConfigApplicationContext
-
AnnotationConfigServletWebServerApplication
ClassPathXmlApplicationContext
基于classpath 下 xml 格式的配置文件来创建
public class TestSpringContext {

    public static void main(String[] args) {
      testClassPathXmlApplicationContext()
    }
   private static void testClassPathXmlApplicationContext(){
        // 较为经典的容器,基于classpath下的xml格式的配置文件来创建
        ClassPathXmlApplicationContext context = new ClassPathXmlApplicationContext("spring.xml");
        for (String name : context.getBeanDefinitionNames()) {
            System.out.println(name);
        }

        System.out.println(context.getBean(Bean2.class).getBean1());
    }

  @Configuration
    static class Config{
        @Bean
        public Bean1 bean1(){
            return new Bean1();
        }
        @Bean
        public Bean2 bean2(Bean1 bean1){
            Bean2 bean2 = new Bean2();
            bean2.setBean1(bean1);
            return bean2;
        }
    }
    static class Bean1{

    }

    static class Bean2{
        private Bean1 bean1;

        public Bean1 getBean1() {
            return bean1;
        }

        public void setBean1(Bean1 bean1) {
            this.bean1 = bean1;
        }
    }
}
spring.xml
<?xml version="1.0" encoding="UTF-8"?>
<beans xmlns="http://www.springframework.org/schema/beans"
       xmlns:xsi="http://www.w3.org/2001/XMLSchema-instance"
       xsi:schemaLocation="http://www.springframework.org/schema/beans http://www.springframework.org/schema/beans/spring-beans.xsd">

    <bean id="bean1" class="com.example.springlearn.TestSpringContext.Bean1">

    </bean>
    <bean id="bean2" class="com.example.springlearn.TestSpringContext.Bean2">
        <property name="bean1" ref="bean1"/>

    </bean>
</beans>
FileSystemXmlApplicationContext
基于磁盘路径下 xml 格式的配置文件来创建
public class TestSpringContext {

    public static void main(String[] args) (){
      testFileSystemXmlApplicationContext();
    }
  private static void testFileSystemXmlApplicationContext(){

        FileSystemXmlApplicationContext context = new FileSystemXmlApplicationContext("/Users/zhaoshuang/IdeaProjects/spring-learn/src/main/resources/spring.xml");
        for (String name : context.getBeanDefinitionNames()) {
            System.out.println(name);
        }

        System.out.println(context.getBean(Bean2.class).getBean1());
    }
}
AnnotationConfigApplicationContext
基于java配置类来创建
public class TestSpringContext {

    public static void main(String[] args) (){
      testAnnotationConfigApplicationContext();
    }

  private static void testAnnotationConfigApplicationContext(){
        AnnotationConfigApplicationContext context = new AnnotationConfigApplicationContext(Config.class);

        for (String name : context.getBeanDefinitionNames()) {
            System.out.println(name);
        }

    }

     @Configuration
    static class Config{
        @Bean
        public Bean1 bean1(){
            return new Bean1();
        }
        @Bean
        public Bean2 bean2(Bean1 bean1){
            Bean2 bean2 = new Bean2();
            bean2.setBean1(bean1);
            return bean2;
        }
    }

      static class Bean1{

    }

    static class Bean2{
        private Bean1 bean1;

        public Bean1 getBean1() {
            return bean1;
        }

        public void setBean1(Bean1 bean1) {
            this.bean1 = bean1;
        }
    }
}
AnnotationConfigServletWebServerApplication
基于java配置类来创建web环境
public class TestSpringContext {

    public static void main(String[] args) (){
      testAnnotationConfigServletWebServerApplicationContext();
    }
  // 模拟Springboot web项目内嵌Tomcat
  private static void testAnnotationConfigServletWebServerApplicationContext(){
        AnnotationConfigServletWebServerApplicationContext context = new AnnotationConfigServletWebServerApplicationContext(WebConfig.class);
    }

      @Configuration
    static class WebConfig{
      // 1. WebServer工厂
        @Bean
        public ServletWebServerFactory servletWebServerFactory(){
            return new TomcatServletWebServerFactory();
        }
      //2. 准备DispatcherServlet
        @Bean
        public DispatcherServlet dispatcherServlet(){
            return new DispatcherServlet();
        }
      //3.DispatcherServlet注册到WebServer上,并且所有以/开头的bean都会被DispatcherServlet处理
        @Bean
        public DispatcherServletRegistrationBean registrationBean(DispatcherServlet dispatcherServlet){
            return new DispatcherServletRegistrationBean(dispatcherServlet, "/");
        }

        @Bean("/hello")
        public Controller controller1(){
            return (request, response) -> {
                response.getWriter().print("hello");
                return null;
            };
        }
    }
}
常见Bean的后置处理器
我们先举个例子:
public class D02Application {
    public static void main(String[] args) {
        // GenericApplicationContext是一个干净的容器,不会添加后置处理器
        GenericApplicationContext context = new GenericApplicationContext();
        // 手动注入四个bean
        context.registerBean("bean1",Bean1.class);
        context.registerBean("bean2",Bean2.class);
        context.registerBean("bean3",Bean3.class);
        context.registerBean("bean4",Bean4.class);

        // 初始化容器
        context.refresh();

        System.out.println(context.getBean("bean4"));

        // 销毁容器
        context.close();
    }

    static class Bean1{
        private static final Logger log = LoggerFactory.getLogger(Bean1.class);
        private Bean2 bean2;

        @Autowired
        public void setBean2(Bean2 bean2) {
            log.debug("@Autowired生效:{}",bean2);
            this.bean2 = bean2;
        }
        private Bean3 bean3;

        @Resource
        public void setBean3(Bean3 bean3) {
            log.debug("@Resource:{}",bean3);
            this.bean3 = bean3;
        }

        private String home;

        @Autowired
        public void setHome(@Value("${JAVA_HOME}") String home) {
            log.debug("@Value生效:{}",home);
            this.home = home;
        }

        @PostConstruct
        public void init(){
            log.debug("@PostConstruct生效");
        }

        @PreDestroy
        public void destroy(){
            log.debug("@PreDestroy");
        }
    }
    static class Bean2{

    }
    static class Bean3{

    }

    @ConfigurationProperties(prefix = "java")
    static class Bean4{
        private String home;
        private String version;

        public String getHome() {
            return home;
        }

        public void setHome(String home) {
            this.home = home;
        }

        public String getVersion() {
            return version;
        }

        public void setVersion(String version) {
            this.version = version;
        }

        @Override
        public String toString() {
            return "Bean4{" +
                    "home='" + home + '\'' +
                    ", version='" + version + '\'' +
                    '}';
        }
    }
}
我们通过GenericApplicationContext来创建了一个干净的Spring容器,它不会为容器中添加Bean的后置处理器,接着我们定义了4个Bean并且手动注入容器中。其中Bean2、Bean3都是普通的类,Bean中我们分别通过@Autowried、@Resource、@Value、@PostConstruct、@PreDestroy,注入了一些属性添加了一个初始化方法跟销毁方法。在Bean4中我们通过@ConfigurationProperties来注入2个属性。
运行结果,可以看到我们的通过注解注入的属性跟方法并没有生效。
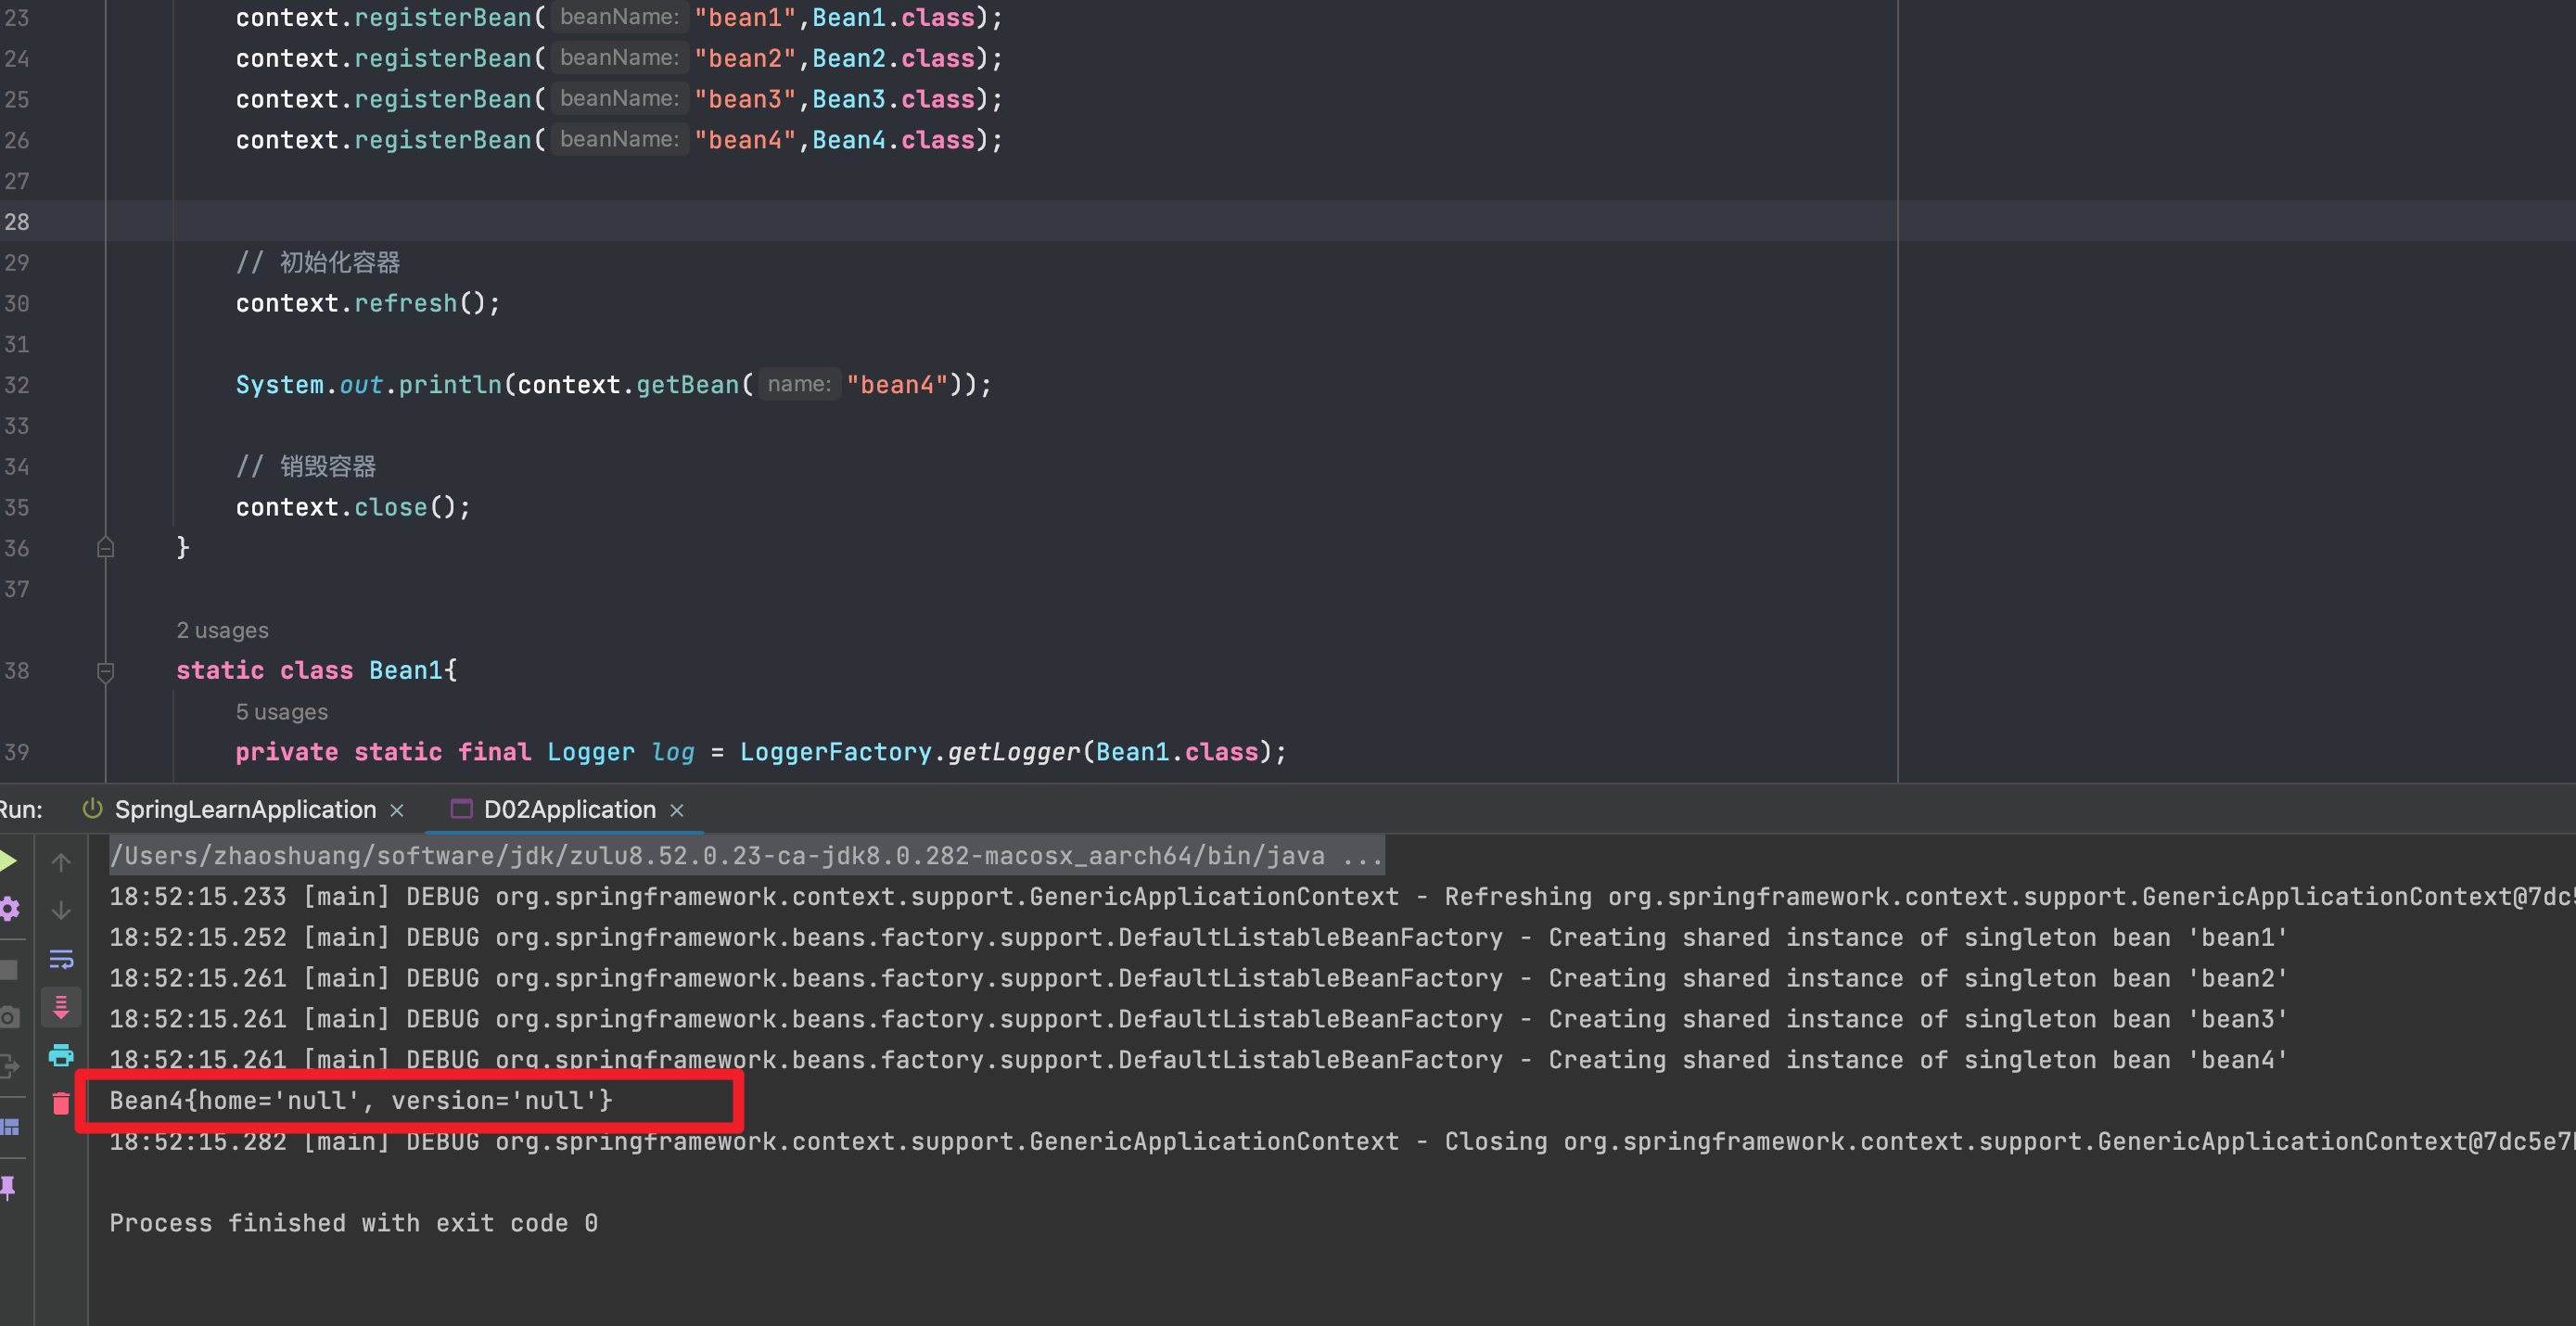
是因为这些注解的处理实际上是通过一些列的Bean的后置处理器来执行的,而我们创建的是一个干净的容器,不会添加后置处理器。
AutowiredAnnotationBeanPostProcessor
我们在给容器中添加一个AutowiredAnnotationBeanPostProcessor处理器。
context.registerBean(AutowiredAnnotationBeanPostProcessor.class);
运行结果报错,Caused by: org.springframework.beans.factory.NoSuchBeanDefinitionException: No qualifying bean of type 'java.lang.String' available: expected at least 1 bean which qualifies as autowire candidate. Dependency annotations: {@org.springframework.beans.factory.annotation.Value(value=${JAVA_HOME})}
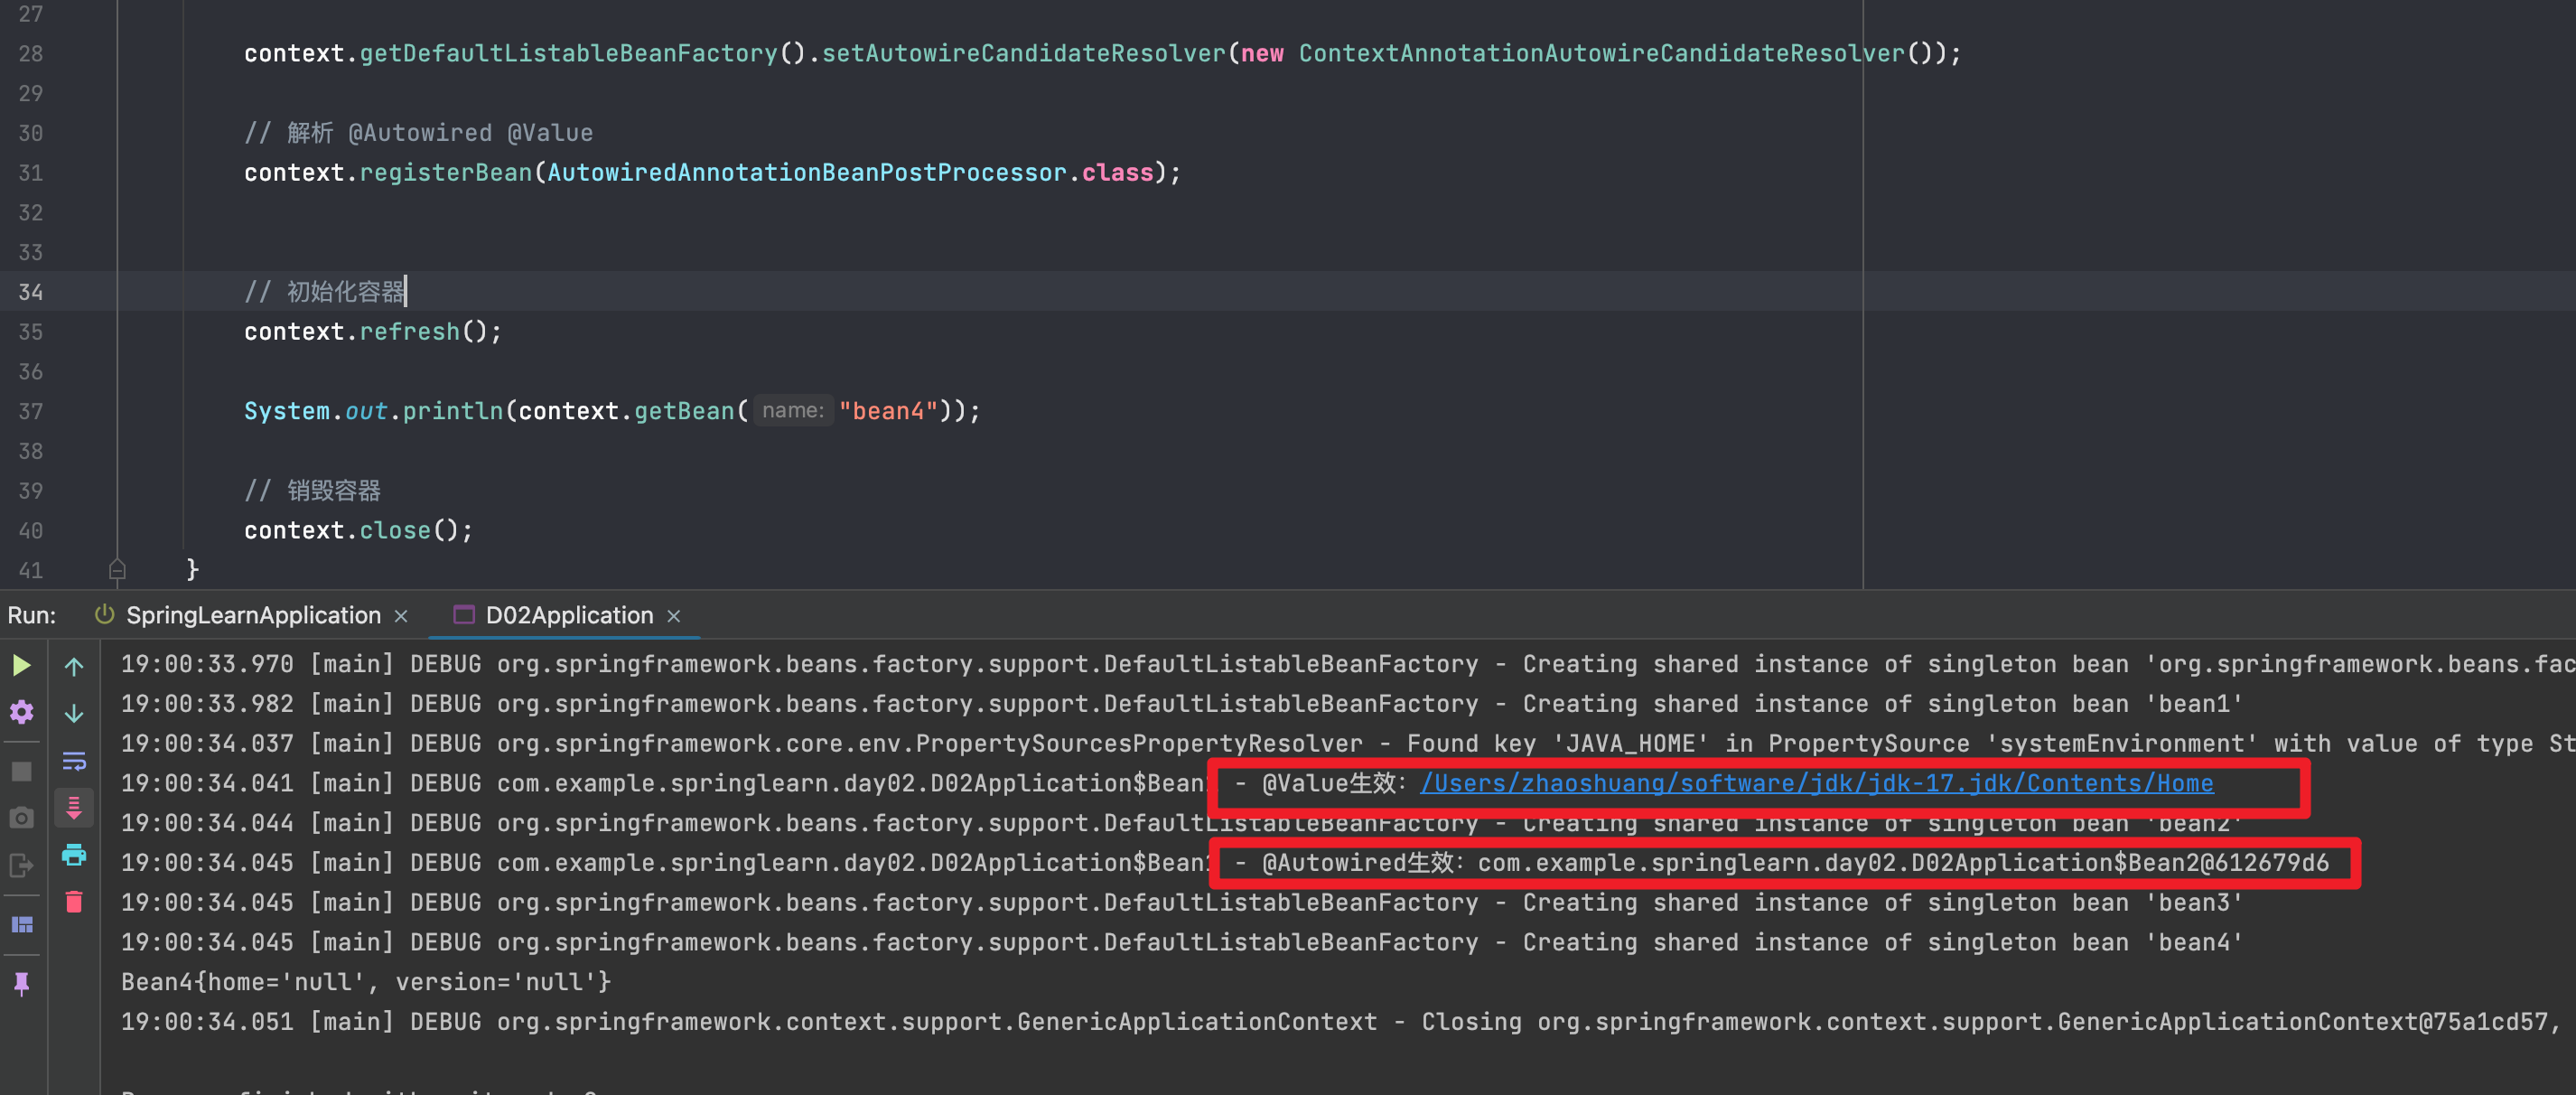
是因为我们@Value在处理字符串类型的时候还需要添加一个ContextAnnotationAutowireCandidateResolver
        context.getDefaultListableBeanFactory().setAutowireCandidateResolver(new ContextAnnotationAutowireCandidateResolver());

        // 解析 @Autowired @Value
        context.registerBean(AutowiredAnnotationBeanPostProcessor.class);
CommonAnnotationBeanPostProcessor
对于@Resource、@PostConstruct、@PreDestroy这类注解的解析需要用到CommonAnnotationBeanPostProcessor这个注解。
// 用于解析@Resource、@PostConstruct、@PreDestroy
context.registerBean(CommonAnnotationBeanPostProcessor.class);

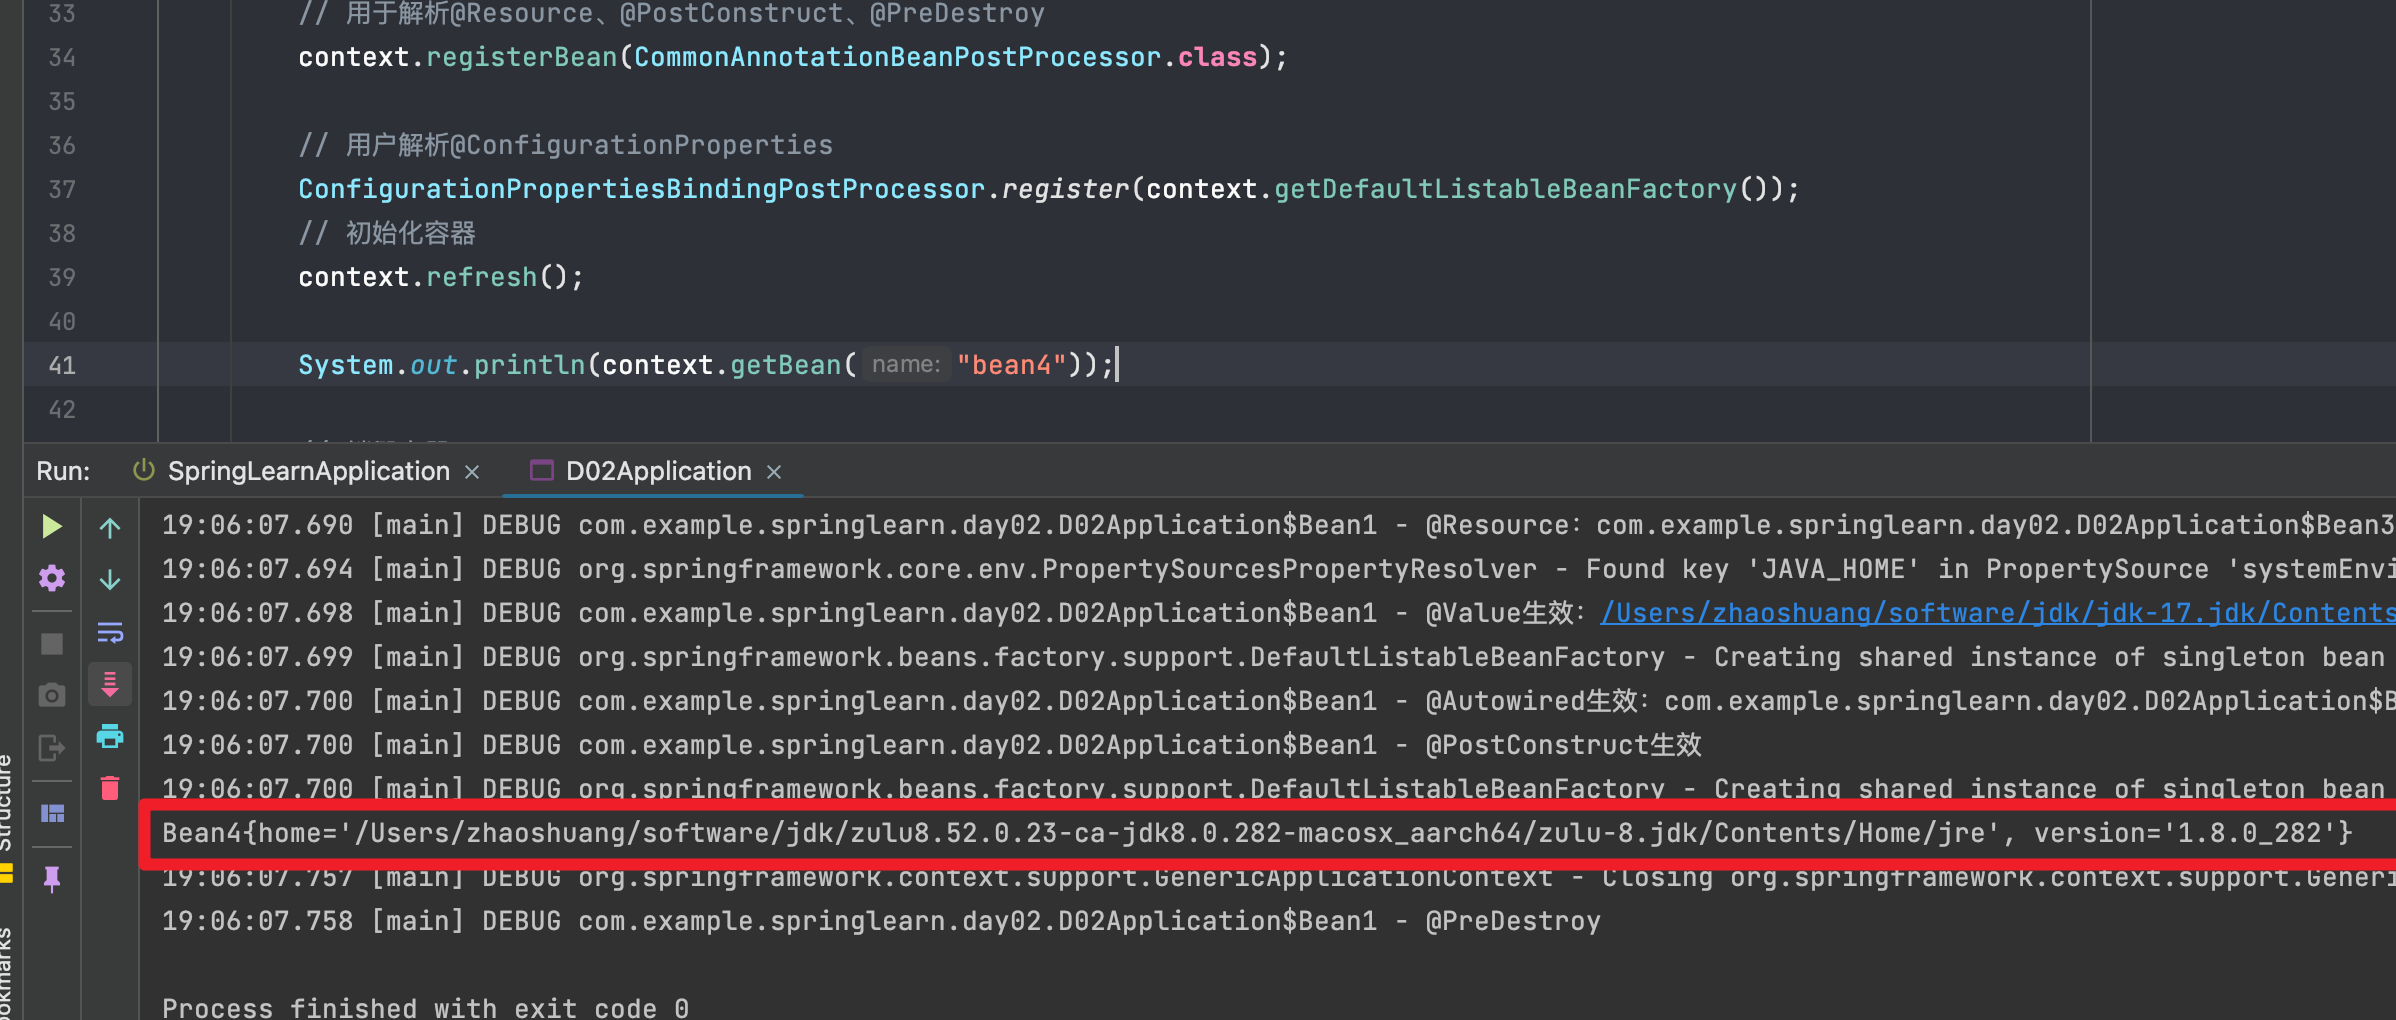
ConfigurationPropertiesBindingPostProcessor
通常被框架添加到容器,用于解析bean组件上的注解@ConfigurationProperties,将属性源中的属性设置到bean组件
// 用户解析@ConfigurationProperties
ConfigurationPropertiesBindingPostProcessor.register(context.getDefaultListableBeanFactory());
@Autowired解析过程
接着上一个列子:我们创建一个beanFactory并且在容器中注入两个Bean,这里我们使用beanFactory.registerSingleton方法来注入,相较于前面的beanFactory.registerBeanDefinition来说创建过程更简单,但是创建的Bean对象不会再走创建过程(依赖注入、初始化),并且添加了一个解析器来处理@Value注解中的值
public class D02Application {
    public static void main(String[] args) {
        DefaultListableBeanFactory beanFactory = new DefaultListableBeanFactory();
        beanFactory.registerSingleton("bean2",new Bean2());
        beanFactory.registerSingleton("bean3",new Bean3());
        beanFactory.setAutowireCandidateResolver(new ContextAnnotationAutowireCandidateResolver());


    }
我们在之前已经知道了@Autowired注解解析用到的后处理器是AutowiredAnnotationBeanPostProcessor,这个后处理器就是通过调用postProcessProperties(PropertyValues pvs, Object bean, String beanName)完成注解的解析和注入的功能。
所以我们可以手动的来调用这个方法来给我们创建的Bean1对象进行依赖注入。
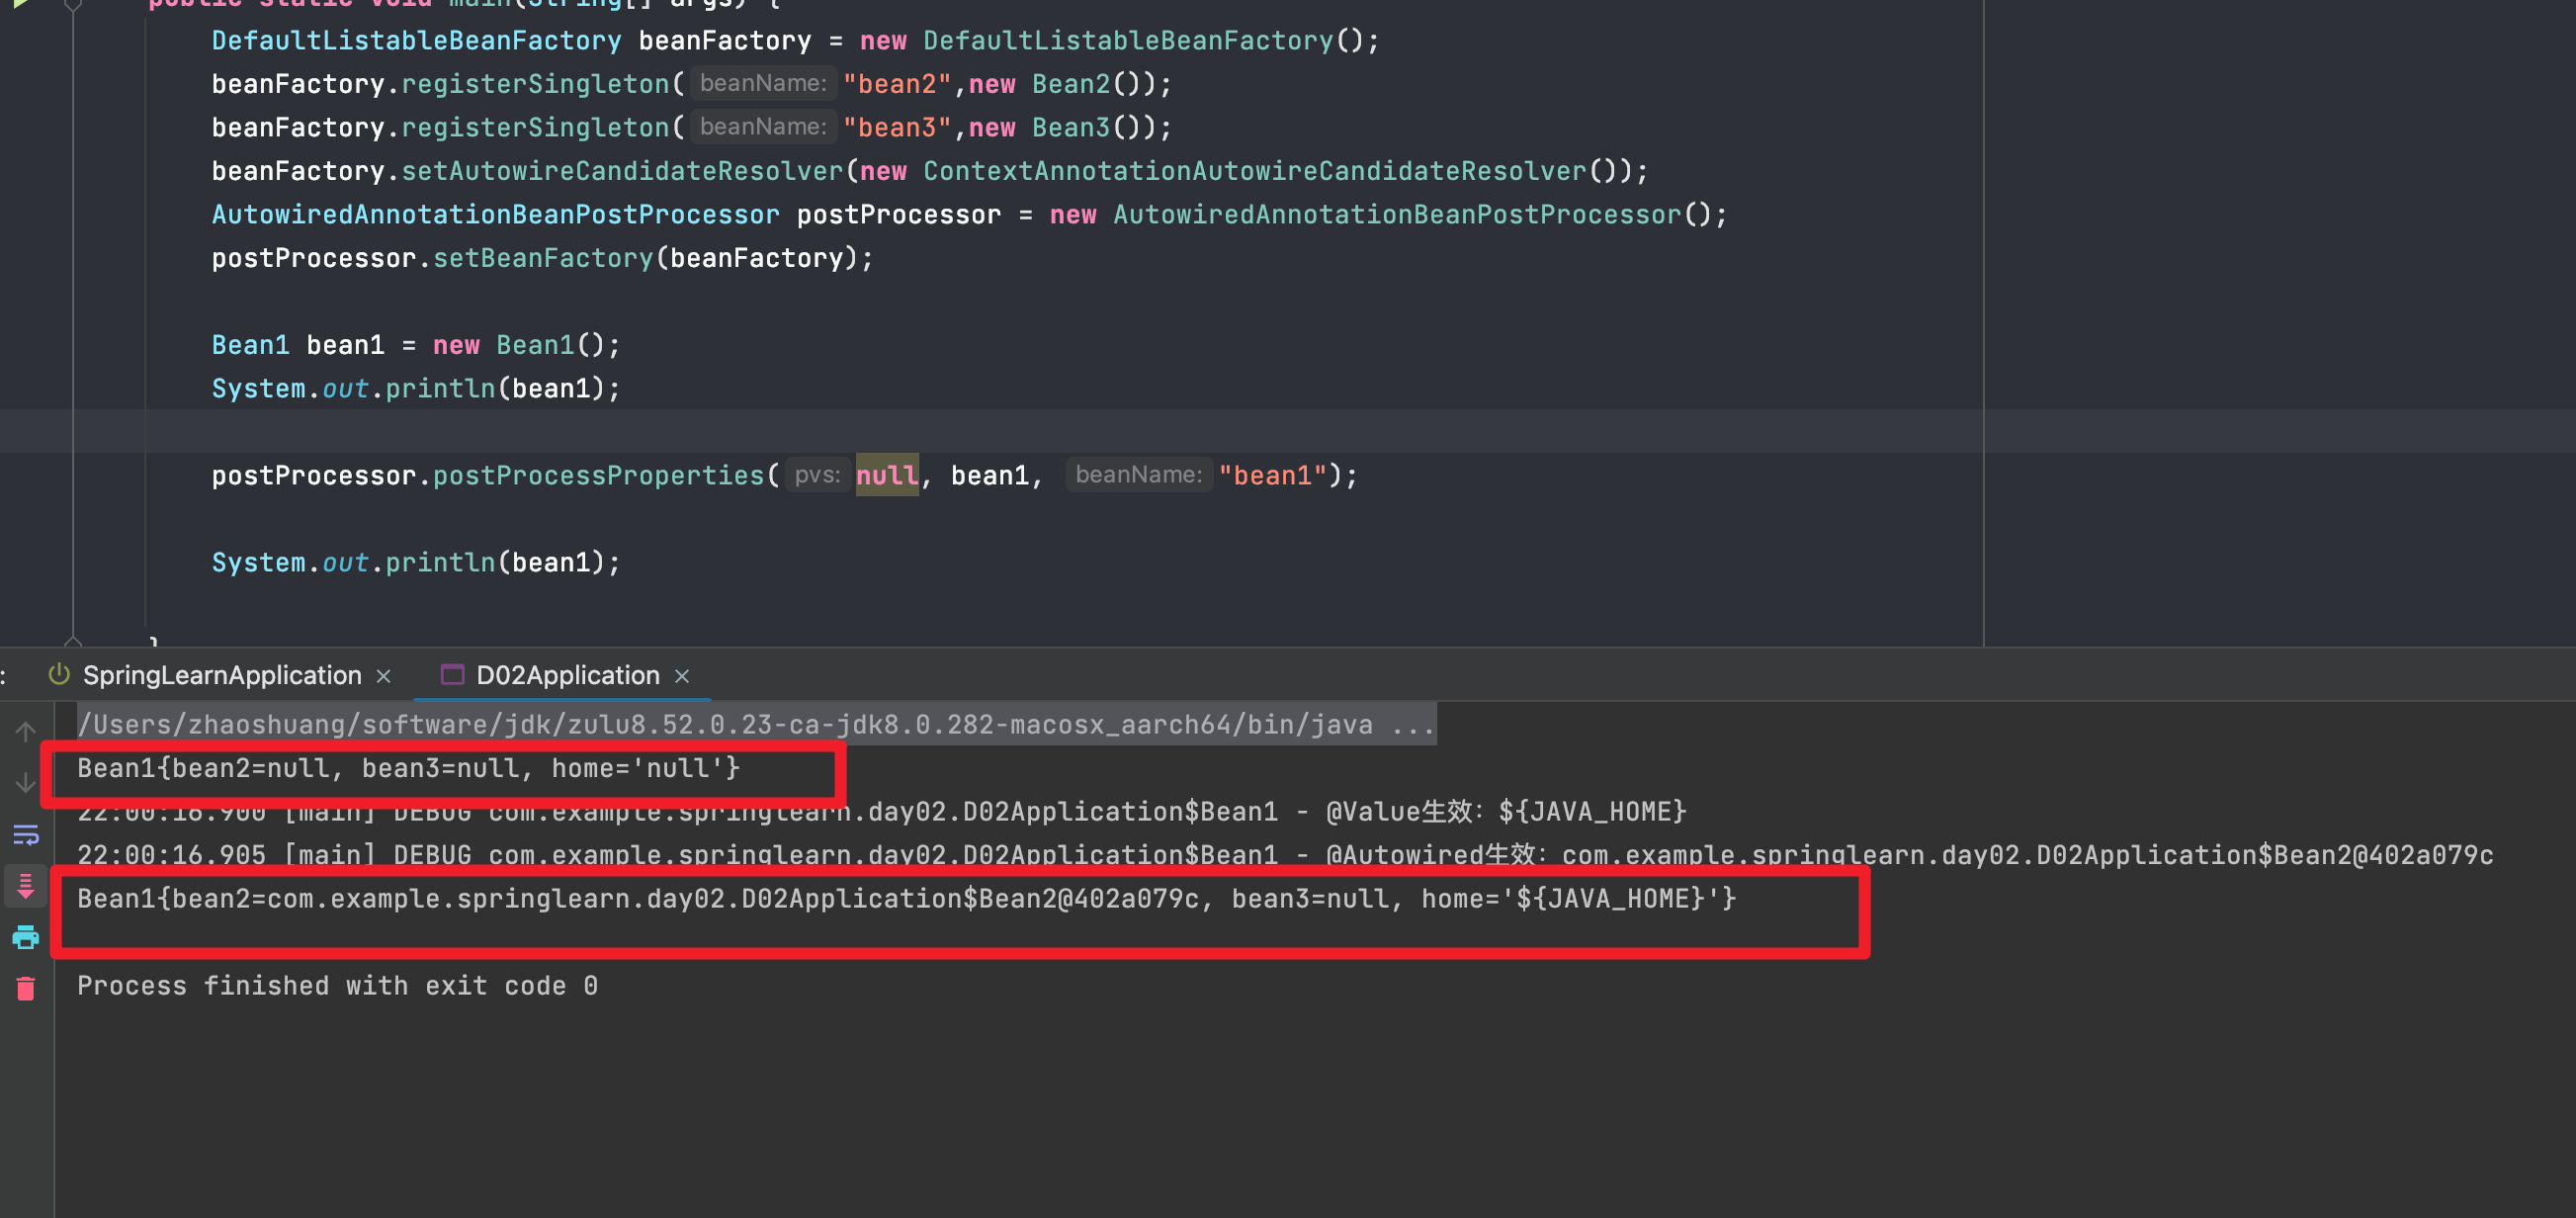
可以看到我们之间new出来的Bean1对象中属性都为空,然后我们创建一个AutowiredAnnotationBeanPostProcessor并且设置好BeanFactory,接着我们调用它的postProcessProperties方法,传入需要解析的Bean1对象。再次打印bean1,可以看到已经成功注入了我们属性(bean3属性是通过CommonAnnotationBeanPostProcessor注入的,所以暂时还为null)。
点进这个方法可以知道,它首先是调用private InjectionMetadata findAutowiringMetadata(String beanName, Class<?> clazz, @Nullable PropertyValues pvs) 这个方法获取到InjectionMetadata,然后调用它的inject方法来注入的。

findAutowiringMetadata主要是用来查找哪些方法或者成员变量上加了@Autowired注解。这个find方法是私有的我们不能直接调用,所以我们可以通过反射来调用它。
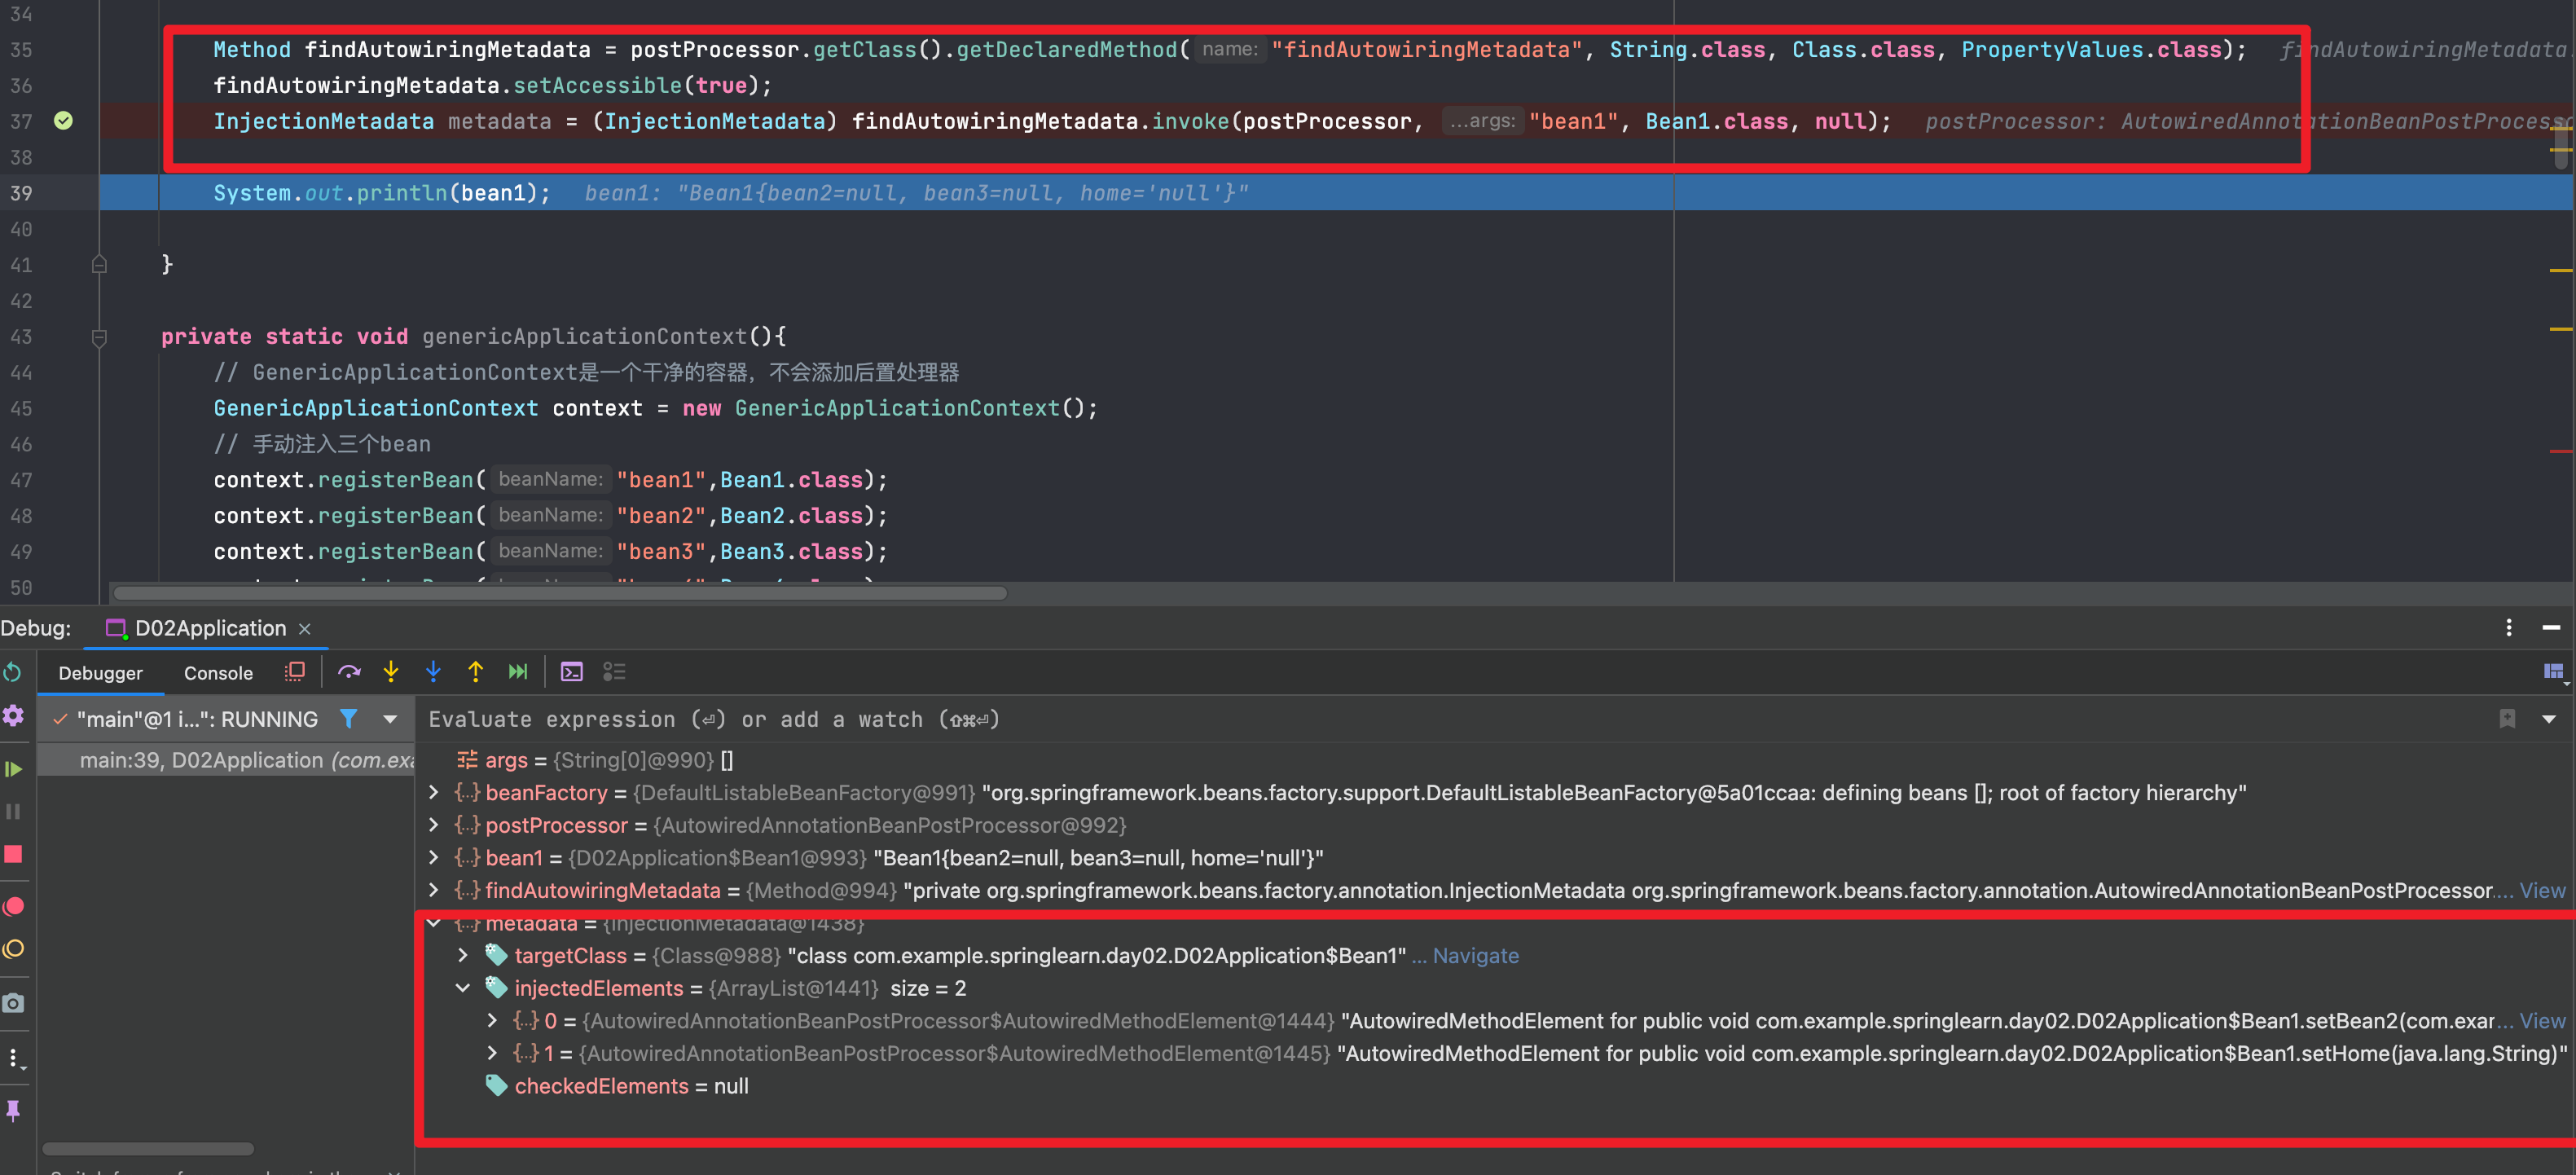
可以看到它找到了2个方法一个是setBean2一个是setHome
我们再调用metadata的inject方法。

可以看到同意,注入成功了,但是这里因为我们少了${}的解析器,所以没有里面没有值,我们可以在前面给它添加上这个解析器就可以了。
beanFactory.addEmbeddedValueResolver(new StandardEnvironment()::resolvePlaceholders);//${}解析器
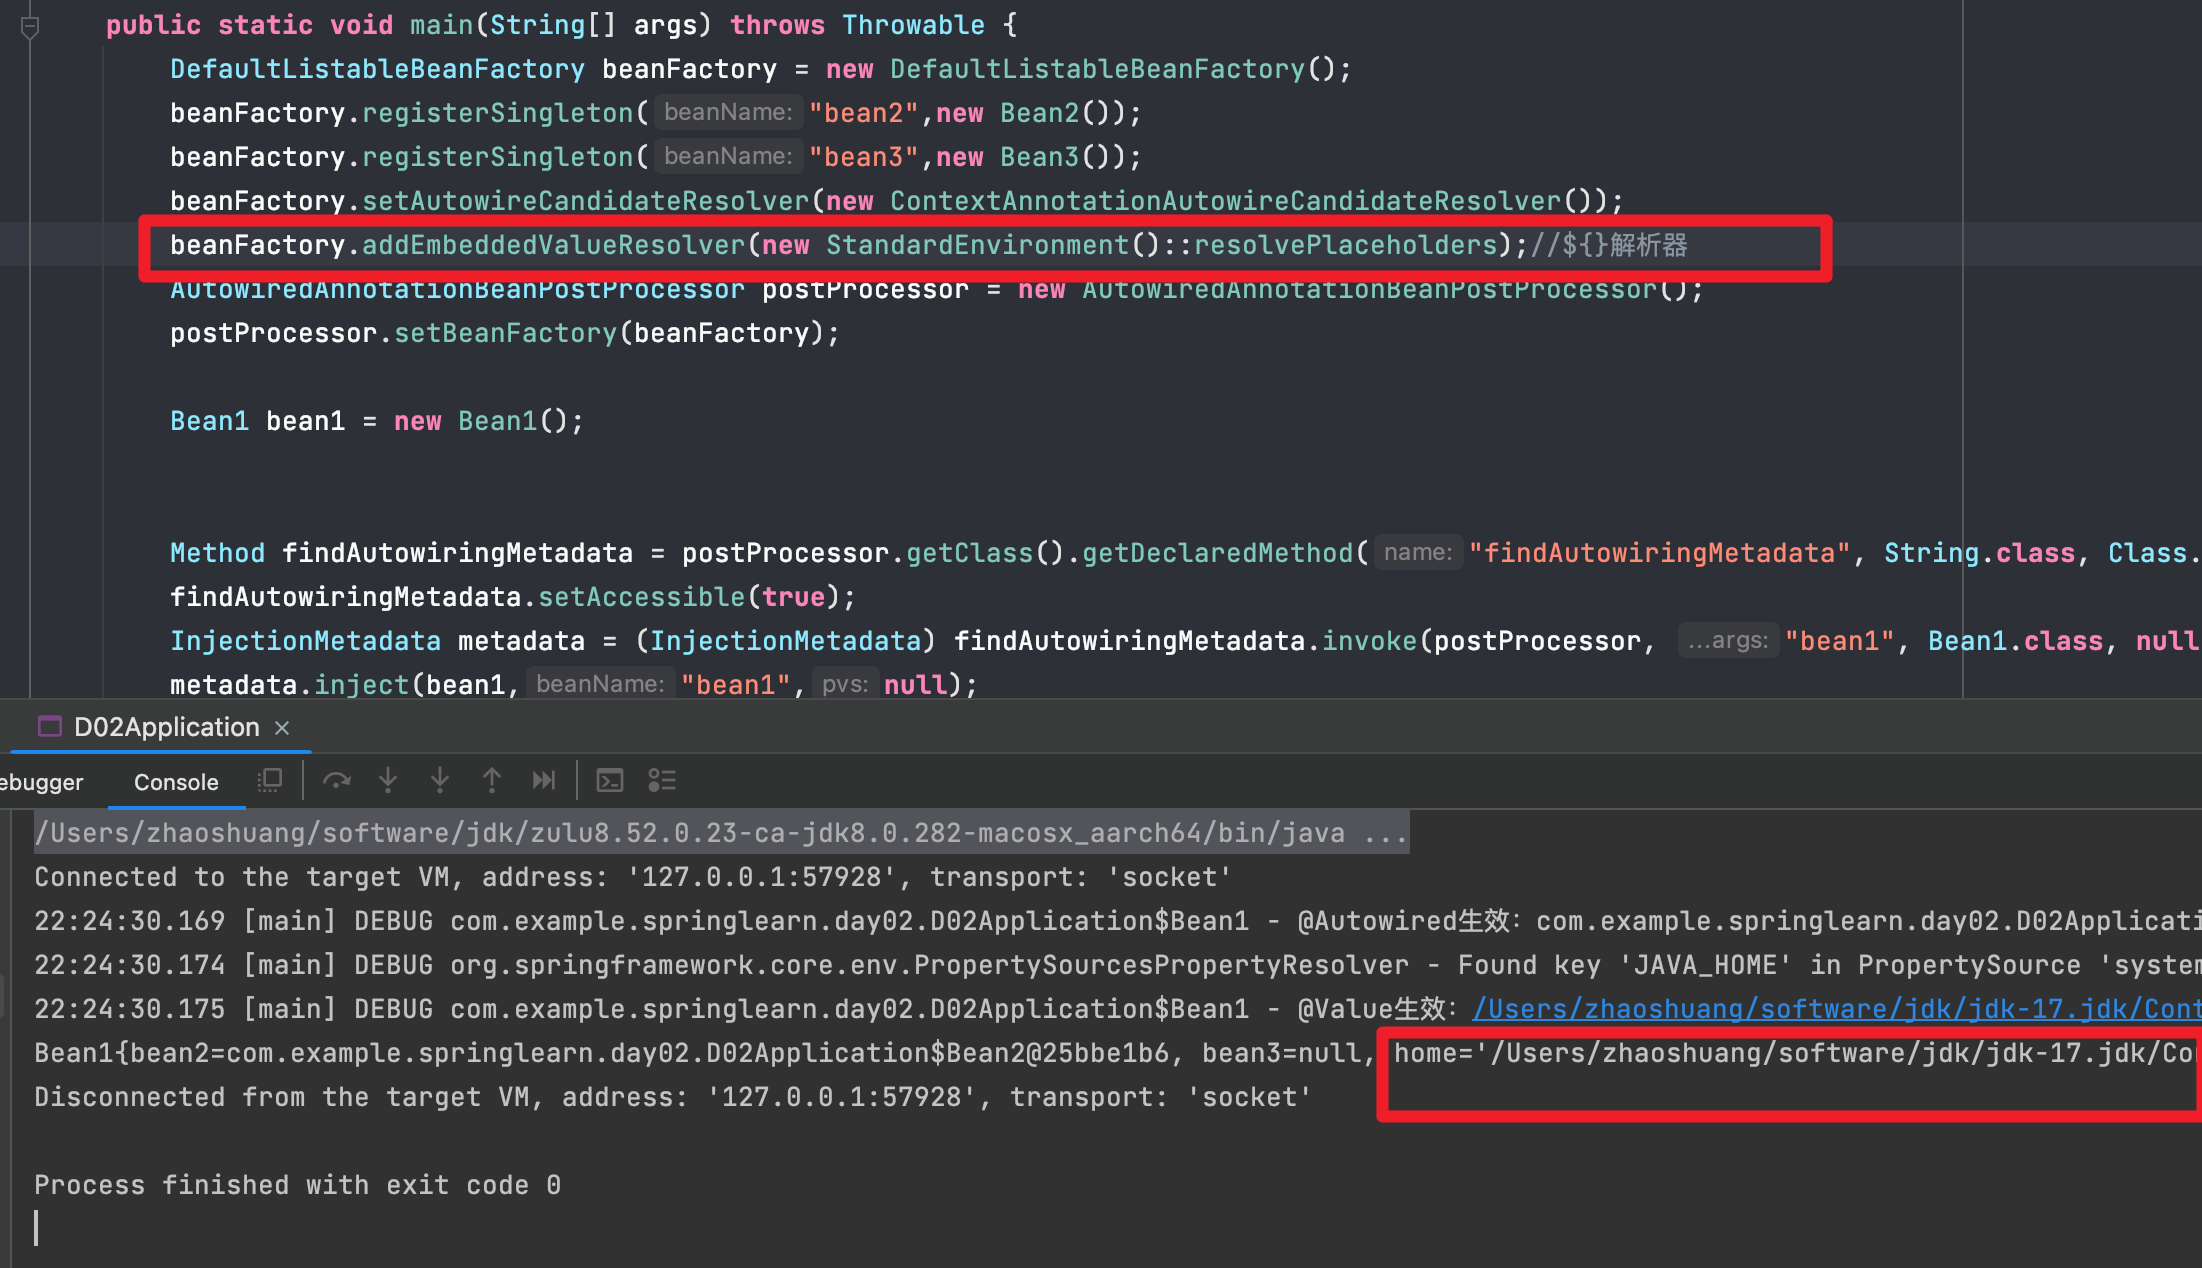
所以我们可以知道AutowiredAnnotationBeanPostProcessor解析@Autowire主要分为两步,第一步通过findAutowiringMetadata来找到所有标记了@Autowire的属性跟方法封装成InjectionMetadata对象,第二步调用InjectionMetadata的inject方法来完成依赖注入。
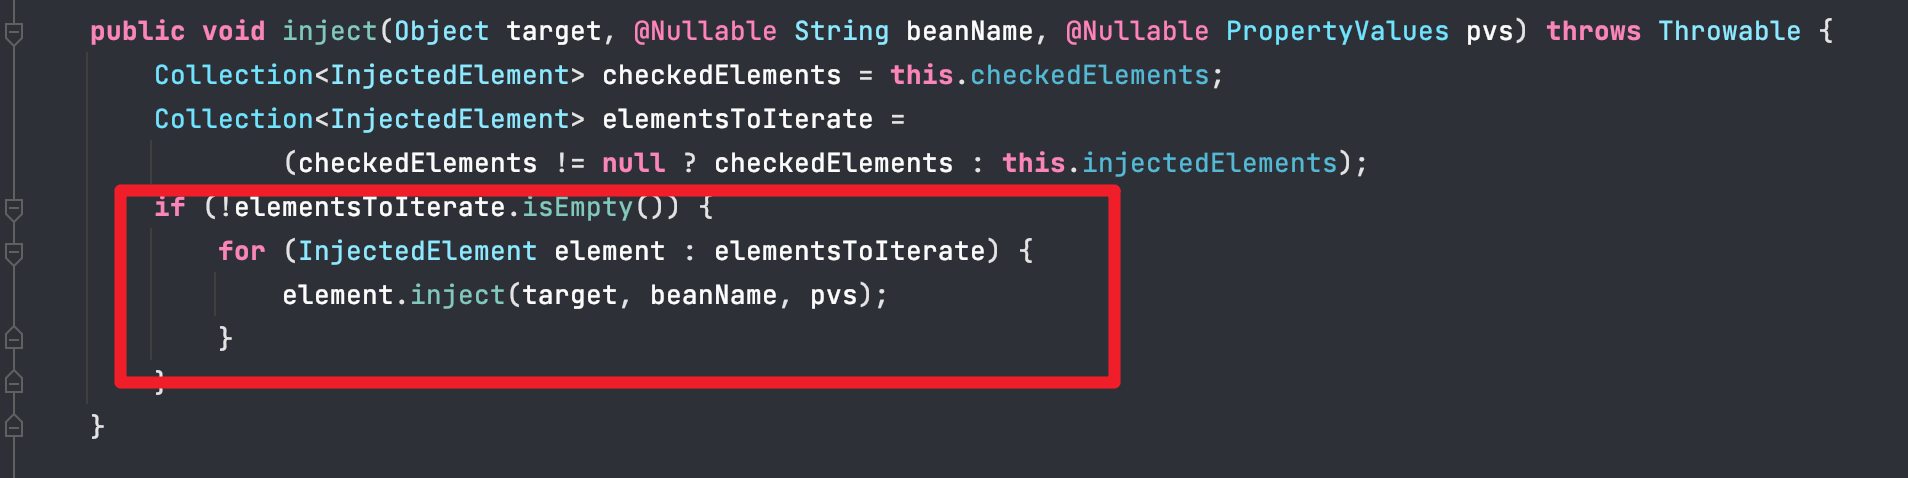
InjectionMetadata的inject方法会循环调用内部封装的InjectedElement对象(我们之前看到的被@Autowired标记的成员变量或者方法封装而来的)的inject
protected void inject(Object target, @Nullable String requestingBeanName, @Nullable PropertyValues pvs)
				throws Throwable {

			if (this.isField) {
				Field field = (Field) this.member;
				ReflectionUtils.makeAccessible(field);
				field.set(target, getResourceToInject(target, requestingBeanName));
			}
			else {
				if (checkPropertySkipping(pvs)) {
					return;
				}
				try {
					Method method = (Method) this.member;
					ReflectionUtils.makeAccessible(method);
					method.invoke(target, getResourceToInject(target, requestingBeanName));
				}
				catch (InvocationTargetException ex) {
					throw ex.getTargetException();
				}
			}
		}
这段代码是 Spring 框架中用于注入依赖对象的核心代码。它通过反射调用目标对象中的方法或设置目标对象中的字段,将依赖对象注入到目标对象中。
具体来说,这段代码包含一个名为 inject 的方法,它接受三个参数:目标对象 target,请求 bean 的名称 requestingBeanName 和属性值 pvs。其中,target 表示要注入依赖对象的目标对象,requestingBeanName 表示当前 bean 的名称(如果有的话),pvs 表示要注入的属性值。
在方法中,首先会判断要注入的是一个字段还是一个方法,通过 isField 标记进行判断。如果要注入的是一个字段,那么就使用反射工具类 ReflectionUtils 将该字段设置为可访问,并通过 field.set 方法将依赖对象注入到目标对象中。如果要注入的是一个方法,那么就先通过 checkPropertySkipping 方法检查是否需要跳过该属性,然后使用反射工具类 ReflectionUtils 将该方法设置为可访问,并通过 method.invoke 方法将依赖对象注入到目标对象中。
如果在注入过程中出现了异常,会通过 InvocationTargetException 获取目标异常,并将其抛出。
常见的BeanFactory后置处理器
BeanFactory后置处理器的作用为BeanFactory提供扩展。
我们还是先用代码来演示一次。
我们先创建一个Bean2的类用@Component标记。
@Component
public class Bean2 {
    private static final Logger log = LoggerFactory.getLogger(Bean2.class);
    public Bean2(){
        log.debug("我被Spring管理了{}",Bean2.class);
    }
}
接着再来创建一个Bean1的类。
public class Bean1 {
    private static final Logger log = LoggerFactory.getLogger(Bean1.class);

    public Bean1() {
        log.debug("我被Spring管理了{}",Bean1.class);
    }
}
创建一个Config类并且添加上@Configuration,用@ComponentScan来找到Bean2,用@Bean来注入了3个Bean对象
@Configuration
@ComponentScan("com.example.springlearn.a05.component")
public class Config {
    @Bean
    public Bean1 bean1(){
        return new Bean1();
    }
    @Bean
    public SqlSessionFactoryBean sqlSessionFactoryBean(DataSource dataSource){
        SqlSessionFactoryBean sqlSessionFactoryBean = new SqlSessionFactoryBean();
        sqlSessionFactoryBean.setDataSource(dataSource);
        return sqlSessionFactoryBean;
    }

    @Bean(initMethod = "init")
    public DruidDataSource dataSource(){
        DruidDataSource dataSource = new DruidDataSource();
        dataSource.setUrl("jdbc:mysql://192.168.31.134:3306/db1");
        dataSource.setUsername("root");
        dataSource.setPassword("123456");
        return dataSource;
    }

}
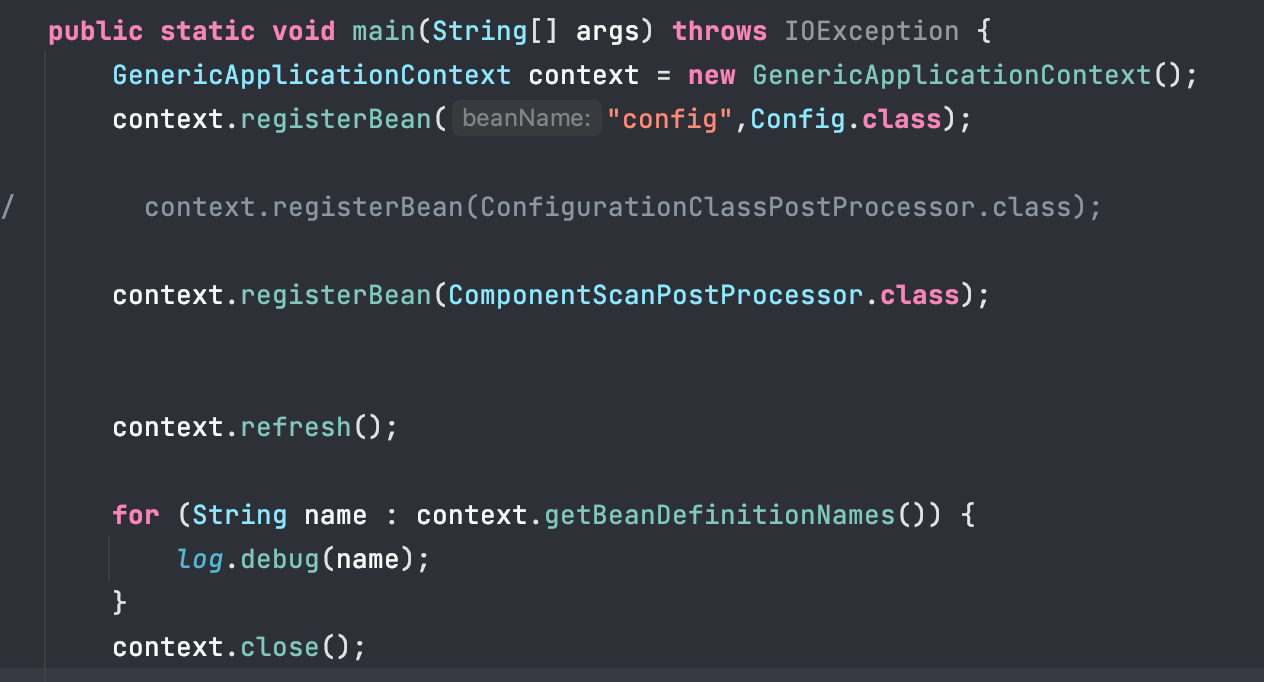
我们同样GenericApplicationContext来创建一个干净的容器,并且注册我们的配置类,再打印输出我们容器中的Bean对象,正常来说会有5个。
public class A05Application {
    private static final Logger log = LoggerFactory.getLogger(A05Application.class);

    public static void main(String[] args) {
        GenericApplicationContext context = new GenericApplicationContext();
        context.registerBean("config",Config.class);


        context.refresh();

        for (String name : context.getBeanDefinitionNames()) {
            log.debug(name);
        }
        context.close();

    }
}
但是实际上只有一个config的Bean对象。
这是因为我们的容器中缺少了解析@Bean、@ComponentScan的处理器,我们需要向容器中添加一个context.registerBean(ConfigurationClassPostProcessor.class); 这样我们就能够解析成功了。
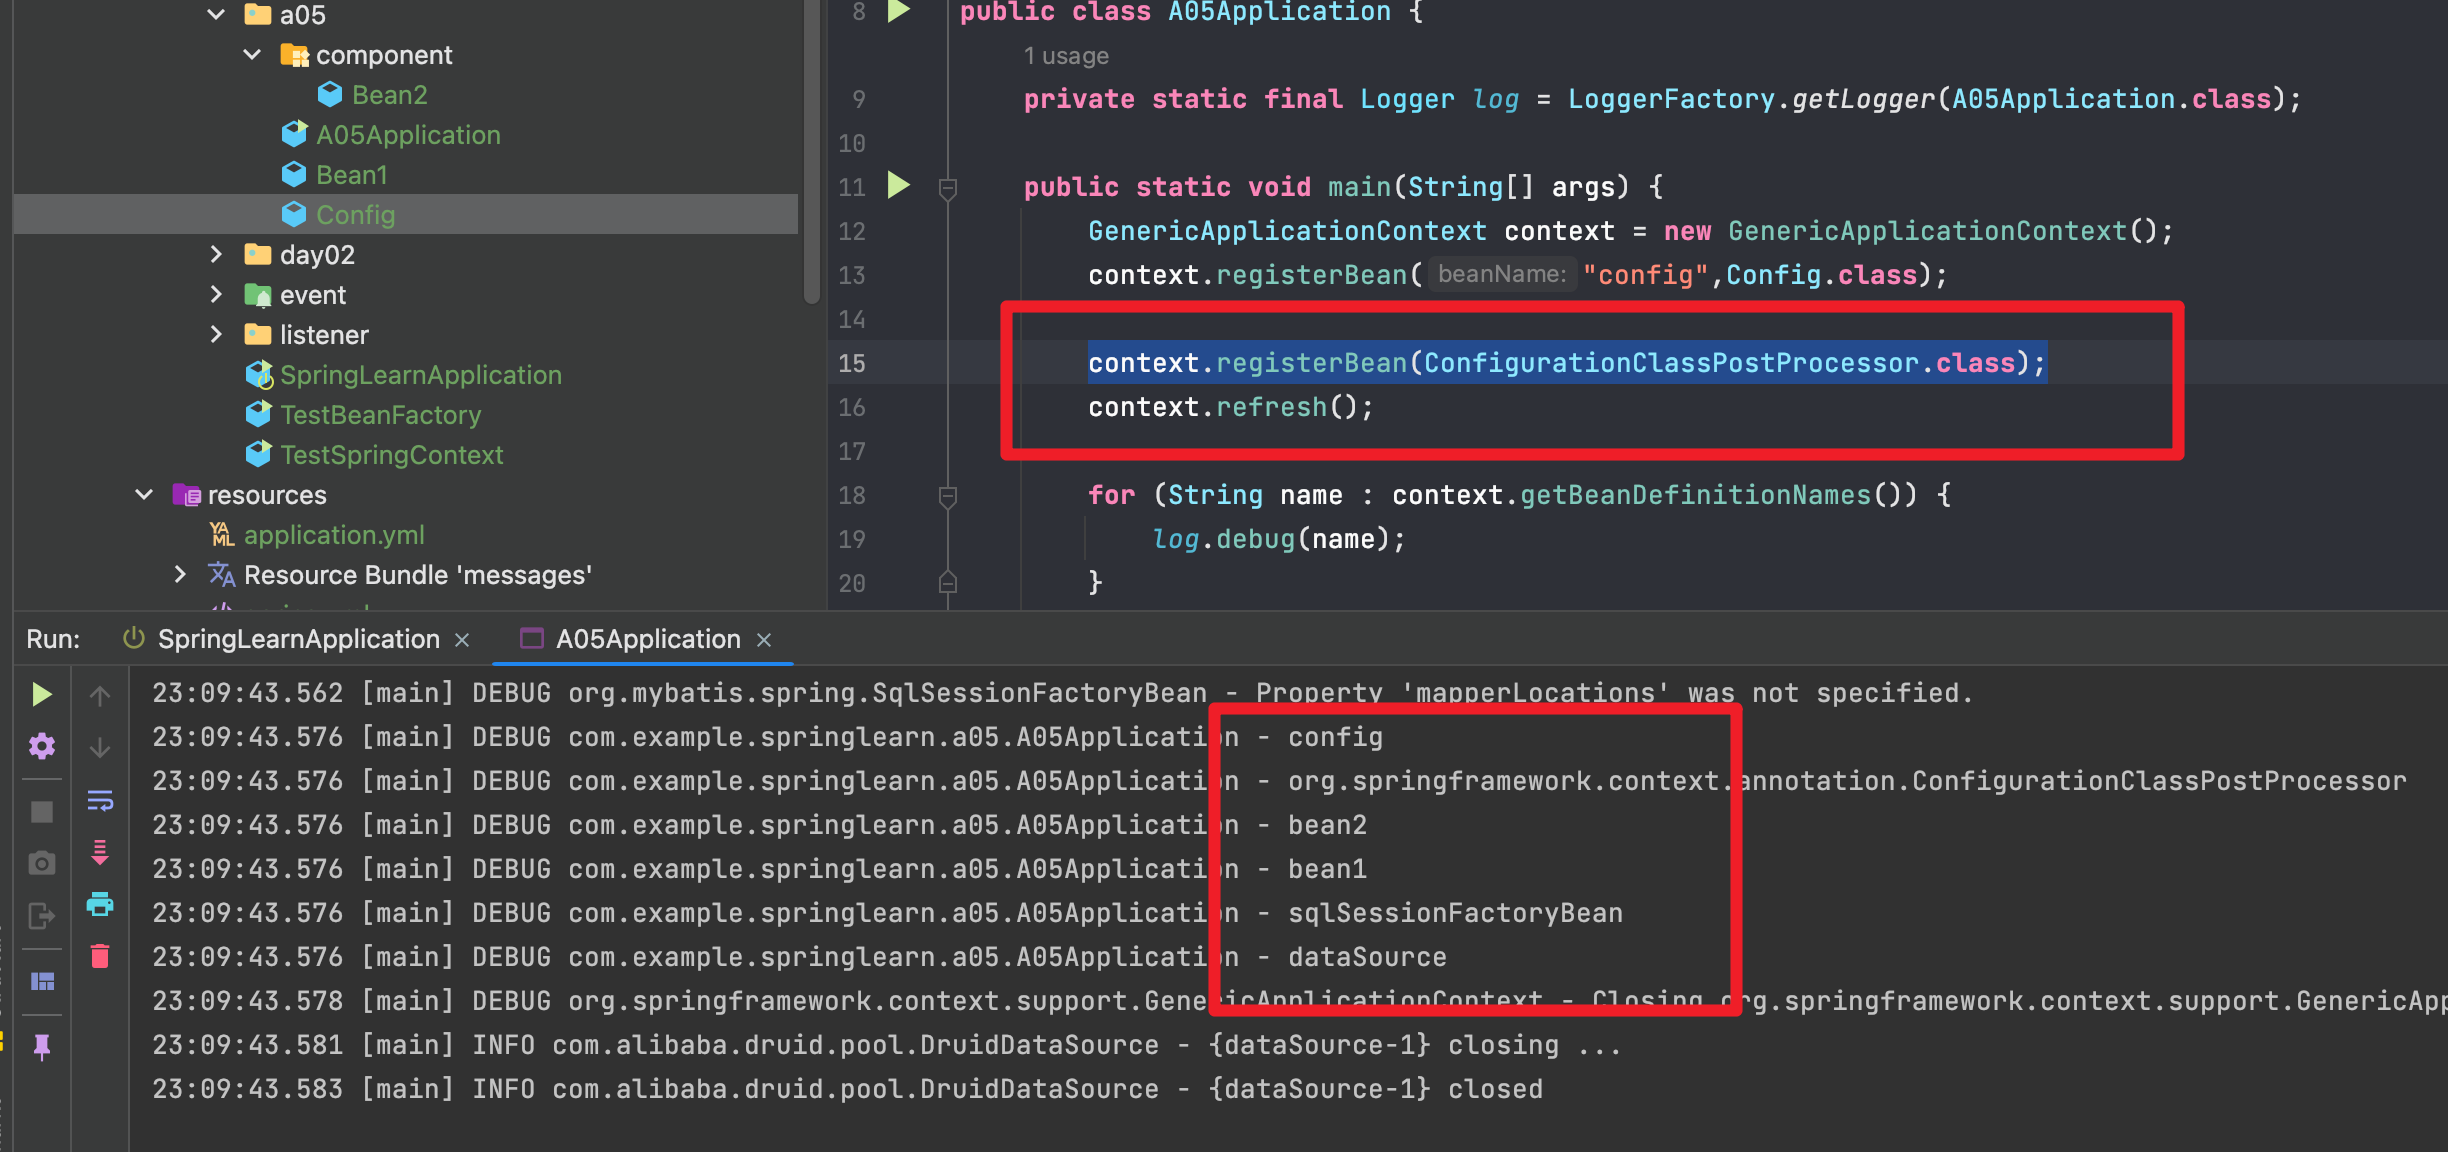
ConfigurationClassPostProcessor就是一个BeanFactory的后置处理器。
自定义BeanFactoryPostProcessor
我们可以尝试自己写一个BeanFactoryPostProcessor来实现解析@Component注解
- 我们定义的
ComponentScanPostProcessor需要实现BeanFactoryPostProcessor接口然后重写postProcessBeanFactory方法。 - 我们通过
AnnotationUtils.findAnnotation(Config.class, ComponentScan.class);来找到需要包扫描的路径。 - 根据获取到的路径指定我们需要扫描的所有文件位置
String path = "classpath*:"+p.replace(".","/")+"/**/*.class";。 - 通过
Resource[] resources = new PathMatchingResourcePatternResolver().getResources(path);将文件转换为Resource数组。 - 遍历
resources,再通过CachingMetadataReaderFactory将resource转换为MetadataReader。 AnnotationMetadata annotationMetadata = reader.getAnnotationMetadata();可以获取类上的所以注解。annotationMetadata.hasAnnotation(Component.class.getName())||annotationMetadata.hasMetaAnnotation(Component.class.getName()用来判断这个类上面是否直接加了@Component或者间接加了@ComponentBeanDefinitionBuilder.genericBeanDefinition(reader.getClassMetadata().getClassName()).getBeanDefinition();将类转换为BeanDefinition。AnnotationBeanNameGenerator generator = new AnnotationBeanNameGenerator();String beanName = generator.generateBeanName(beanDefinition, beanFactory);根据BeanDefinition生成beanNamebeanFactory.registerBeanDefinition(beanName,beanDefinition);最后像容器中注入符合条件的Bean
public class ComponentScanPostProcessor implements BeanFactoryPostProcessor {
@Override
public void postProcessBeanFactory(ConfigurableListableBeanFactory configurableListableBeanFactory) throws BeansException {
// 判断扫描的哪个包
ComponentScan componentScan = AnnotationUtils.findAnnotation(Config.class, ComponentScan.class);
if (componentScan!=null){
try {
for (String p : componentScan.basePackages()) {
String path = "classpath*:"+p.replace(".","/")+"/**/*.class";
// bean工厂
CachingMetadataReaderFactory factory = new CachingMetadataReaderFactory();
// 根据路径获取资源
Resource[] resources = new PathMatchingResourcePatternResolver().getResources(path);
// 根据注解生成bean的名字工具类
AnnotationBeanNameGenerator generator = new AnnotationBeanNameGenerator();
for (Resource resource : resources) {
MetadataReader reader = factory.getMetadataReader(resource);
AnnotationMetadata annotationMetadata = reader.getAnnotationMetadata();
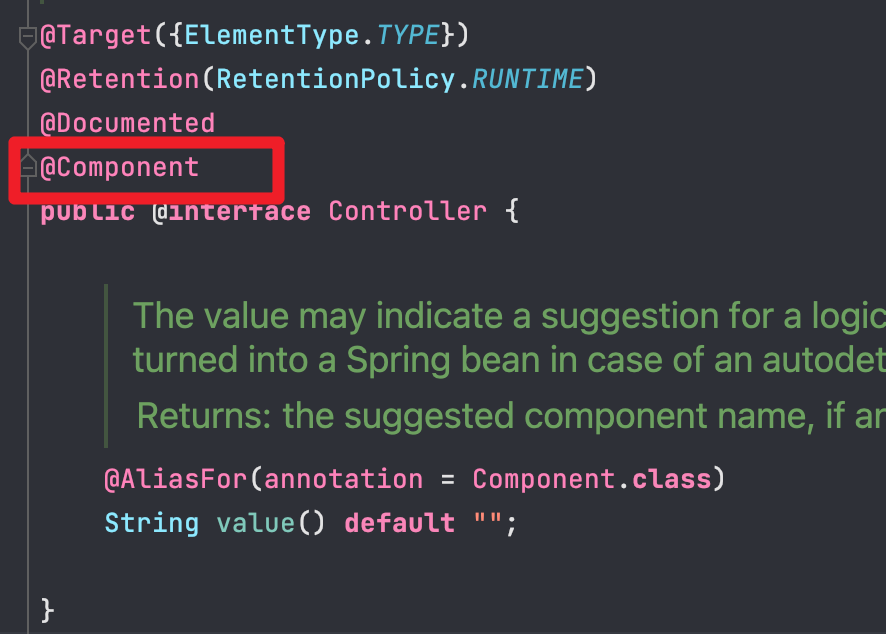
// hasMetaAnnotation 是否间接的加了@Component
// hasAnnotation 判断是否直接或者间接的加了@Component注解
if (annotationMetadata.hasAnnotation(Component.class.getName())
|| annotationMetadata.hasMetaAnnotation(Component.class.getName())
){
AbstractBeanDefinition beanDefinition = BeanDefinitionBuilder.genericBeanDefinition(reader.getClassMetadata().getClassName()).getBeanDefinition();
if (configurableListableBeanFactory instanceof DefaultListableBeanFactory ){
DefaultListableBeanFactory beanFactory = (DefaultListableBeanFactory) configurableListableBeanFactory;
String beanName = generator.generateBeanName(beanDefinition, beanFactory);
beanFactory.registerBeanDefinition(beanName,beanDefinition);
}
}
}
}
}catch (Exception e){
}
}
}
}
我们注入我们的ComponentScanPostProcessor
我们在这个路径下com.example.springlearn.a05.component有三个类。
@Component
public class Bean2 {
    private static final Logger log = LoggerFactory.getLogger(Bean2.class);
    public Bean2(){
        log.debug("我被Spring管理了{}",Bean2.class);
    }
}

@Controller
public class Bean3 {
    private static final Logger log = LoggerFactory.getLogger(Bean3.class);
    public Bean3(){
        log.debug("我被Spring管理了{}", Bean3.class);
    }
}
public class Bean4 {
    private static final Logger log = LoggerFactory.getLogger(Bean4.class);
    public Bean4(){
        log.debug("我被Spring管理了{}", Bean4.class);
    }
}

可以看到被@Component跟@Controller标记的 bean2跟bean3已经成功注入到容器中。
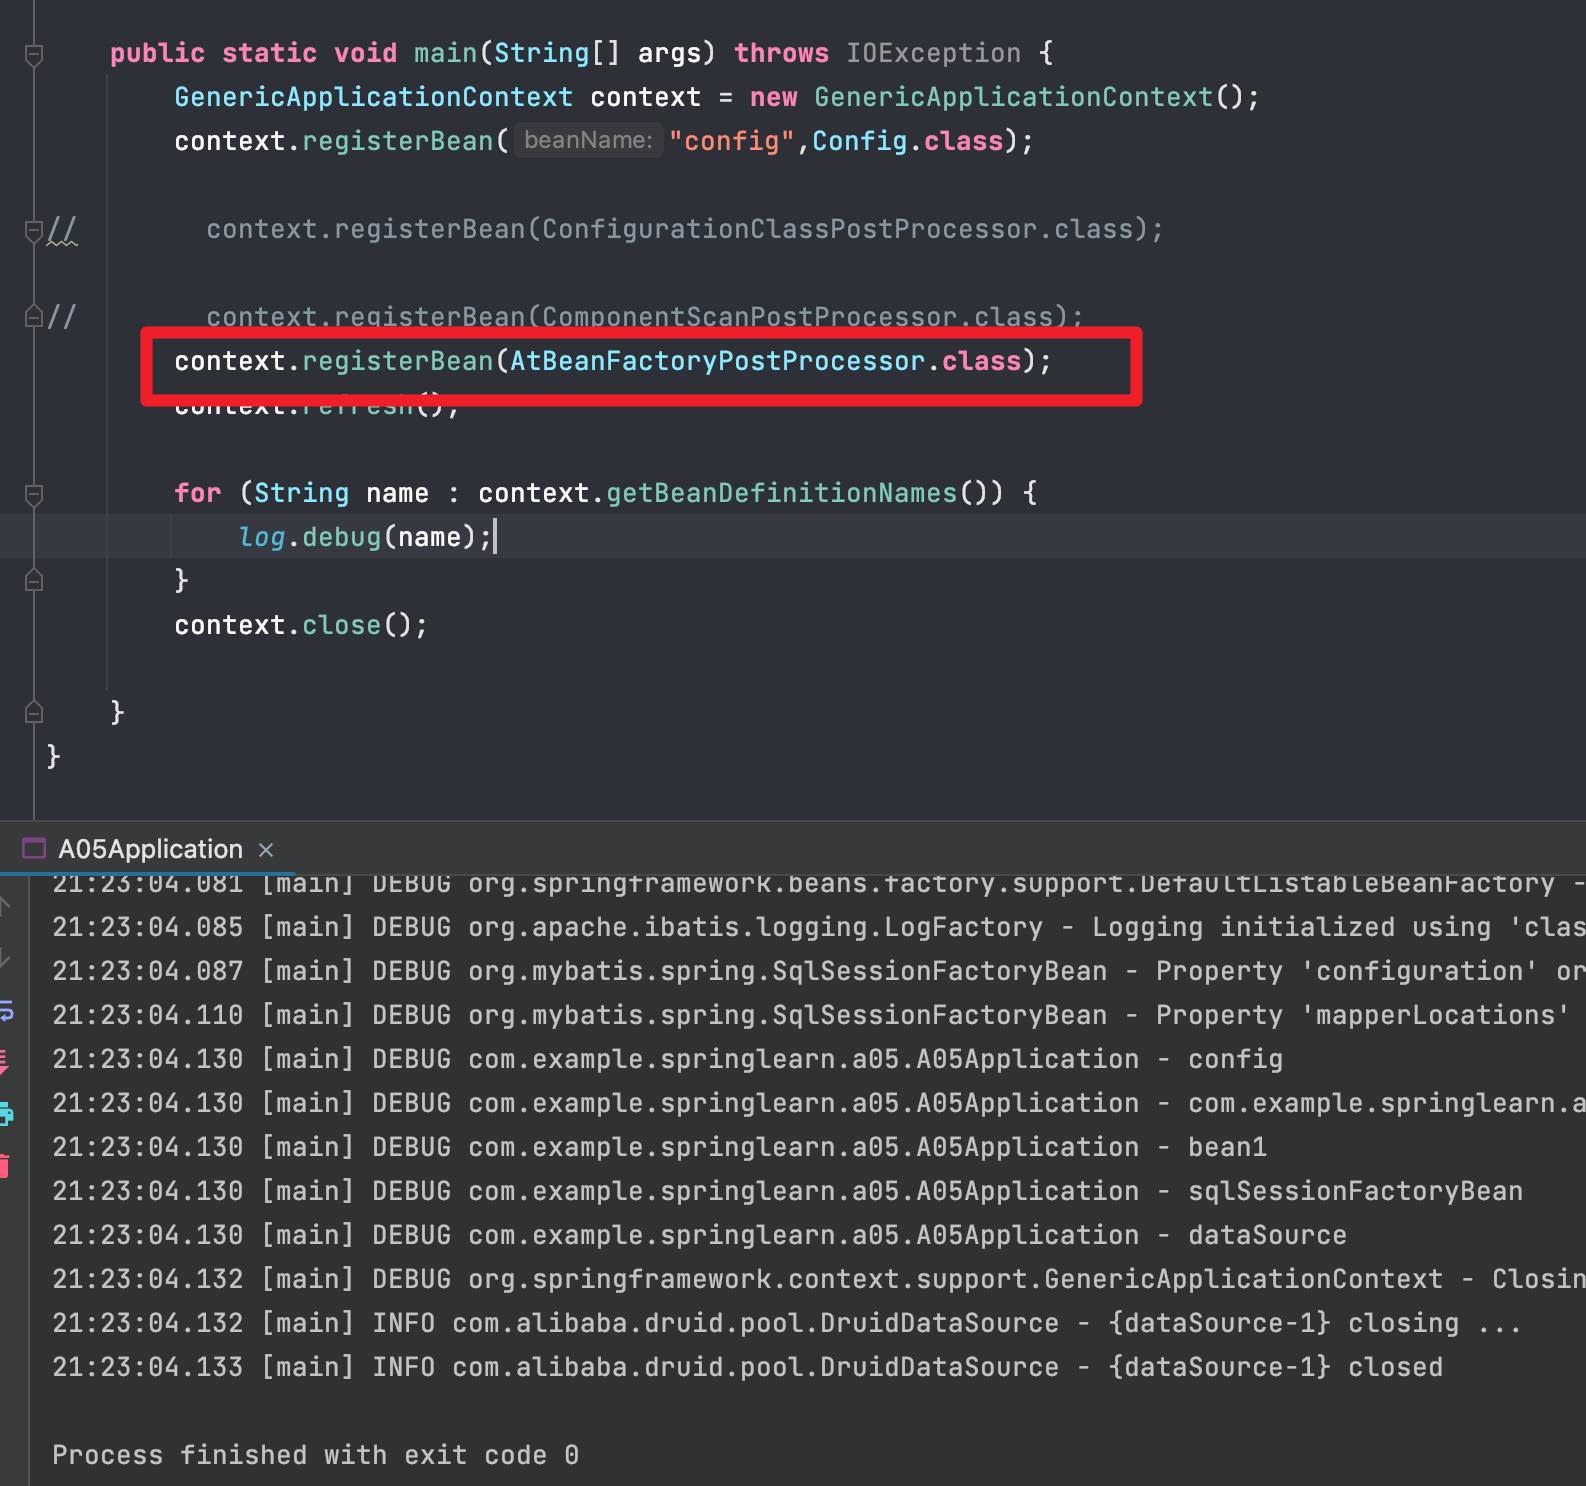
自定义AtBeanFactoryPostProcessor
对于@Bean注解的解析我们也可以通过自定义一个BeanFactoryPostProcessor来处理
- 我们定义的
AtBeanFactoryPostProcessor需要实现BeanFactoryPostProcessor接口然后重写postProcessBeanFactory方法。 - 我们去扫描
Config类并且封装成一个MetadataReader。 Set<MethodMetadata> methods = reader.getAnnotationMetadata().getAnnotatedMethods(Bean.class.getName());获取这个类中所有被@Bean注解标记过的方法。- 通过
BeanDefinitionBuilder将方法封装成一个工厂方法并且注入到BeanFactory中,对于设置了initMethod的String initMethod = method.getAnnotationAttributes(Bean.class.getName()).get("initMethod").toString(); if (initMethod.length()>0){ builder.setInitMethodName(initMethod); }设置值。 - 对于Config类中的
sqlSessionFactoryBean(DataSource dataSource)方法,他有一个入参数,实际上是通过构造器注入的,所以我们要设置builder.setAutowireMode(AbstractBeanDefinition.AUTOWIRE_CONSTRUCTOR);它的自动装配模式为构造器。
public class AtBeanFactoryPostProcessor implements BeanFactoryPostProcessor {
    @Override
    public void postProcessBeanFactory(ConfigurableListableBeanFactory beanFactory) throws BeansException {
        try {
            CachingMetadataReaderFactory factory = new CachingMetadataReaderFactory();
            // 应该去扫描读取 我这里直接写死了
            MetadataReader reader = factory.getMetadataReader(new ClassPathResource("com/example/springlearn/a05/Config.class"));
            // 获取所有被@Bean标记的方法
            Set<MethodMetadata> methods = reader.getAnnotationMetadata().getAnnotatedMethods(Bean.class.getName());
            for (MethodMetadata method : methods) {
                System.out.println(method.getMethodName());

                // 定义了Config的工厂方法 每一个被@Bean标记的方法都将被定义为一个工厂方法
                BeanDefinitionBuilder builder = BeanDefinitionBuilder.genericBeanDefinition();

                String initMethod = method.getAnnotationAttributes(Bean.class.getName()).get("initMethod").toString();
                if (initMethod.length()>0){
                    builder.setInitMethodName(initMethod);
                }
                builder.setFactoryMethodOnBean(method.getMethodName(), "config");
                // 设置装配模式,因为我们有一个需要,dataSource方法中需要一个构筑器注入
                builder.setAutowireMode(AbstractBeanDefinition.AUTOWIRE_CONSTRUCTOR);
                AbstractBeanDefinition bd = builder.getBeanDefinition();
                ((DefaultListableBeanFactory)beanFactory).registerBeanDefinition(method.getMethodName() ,bd);

            }
        }catch (Exception e){

        }
    }
}
启动运行,可以看到已经成功解析@Bean注解
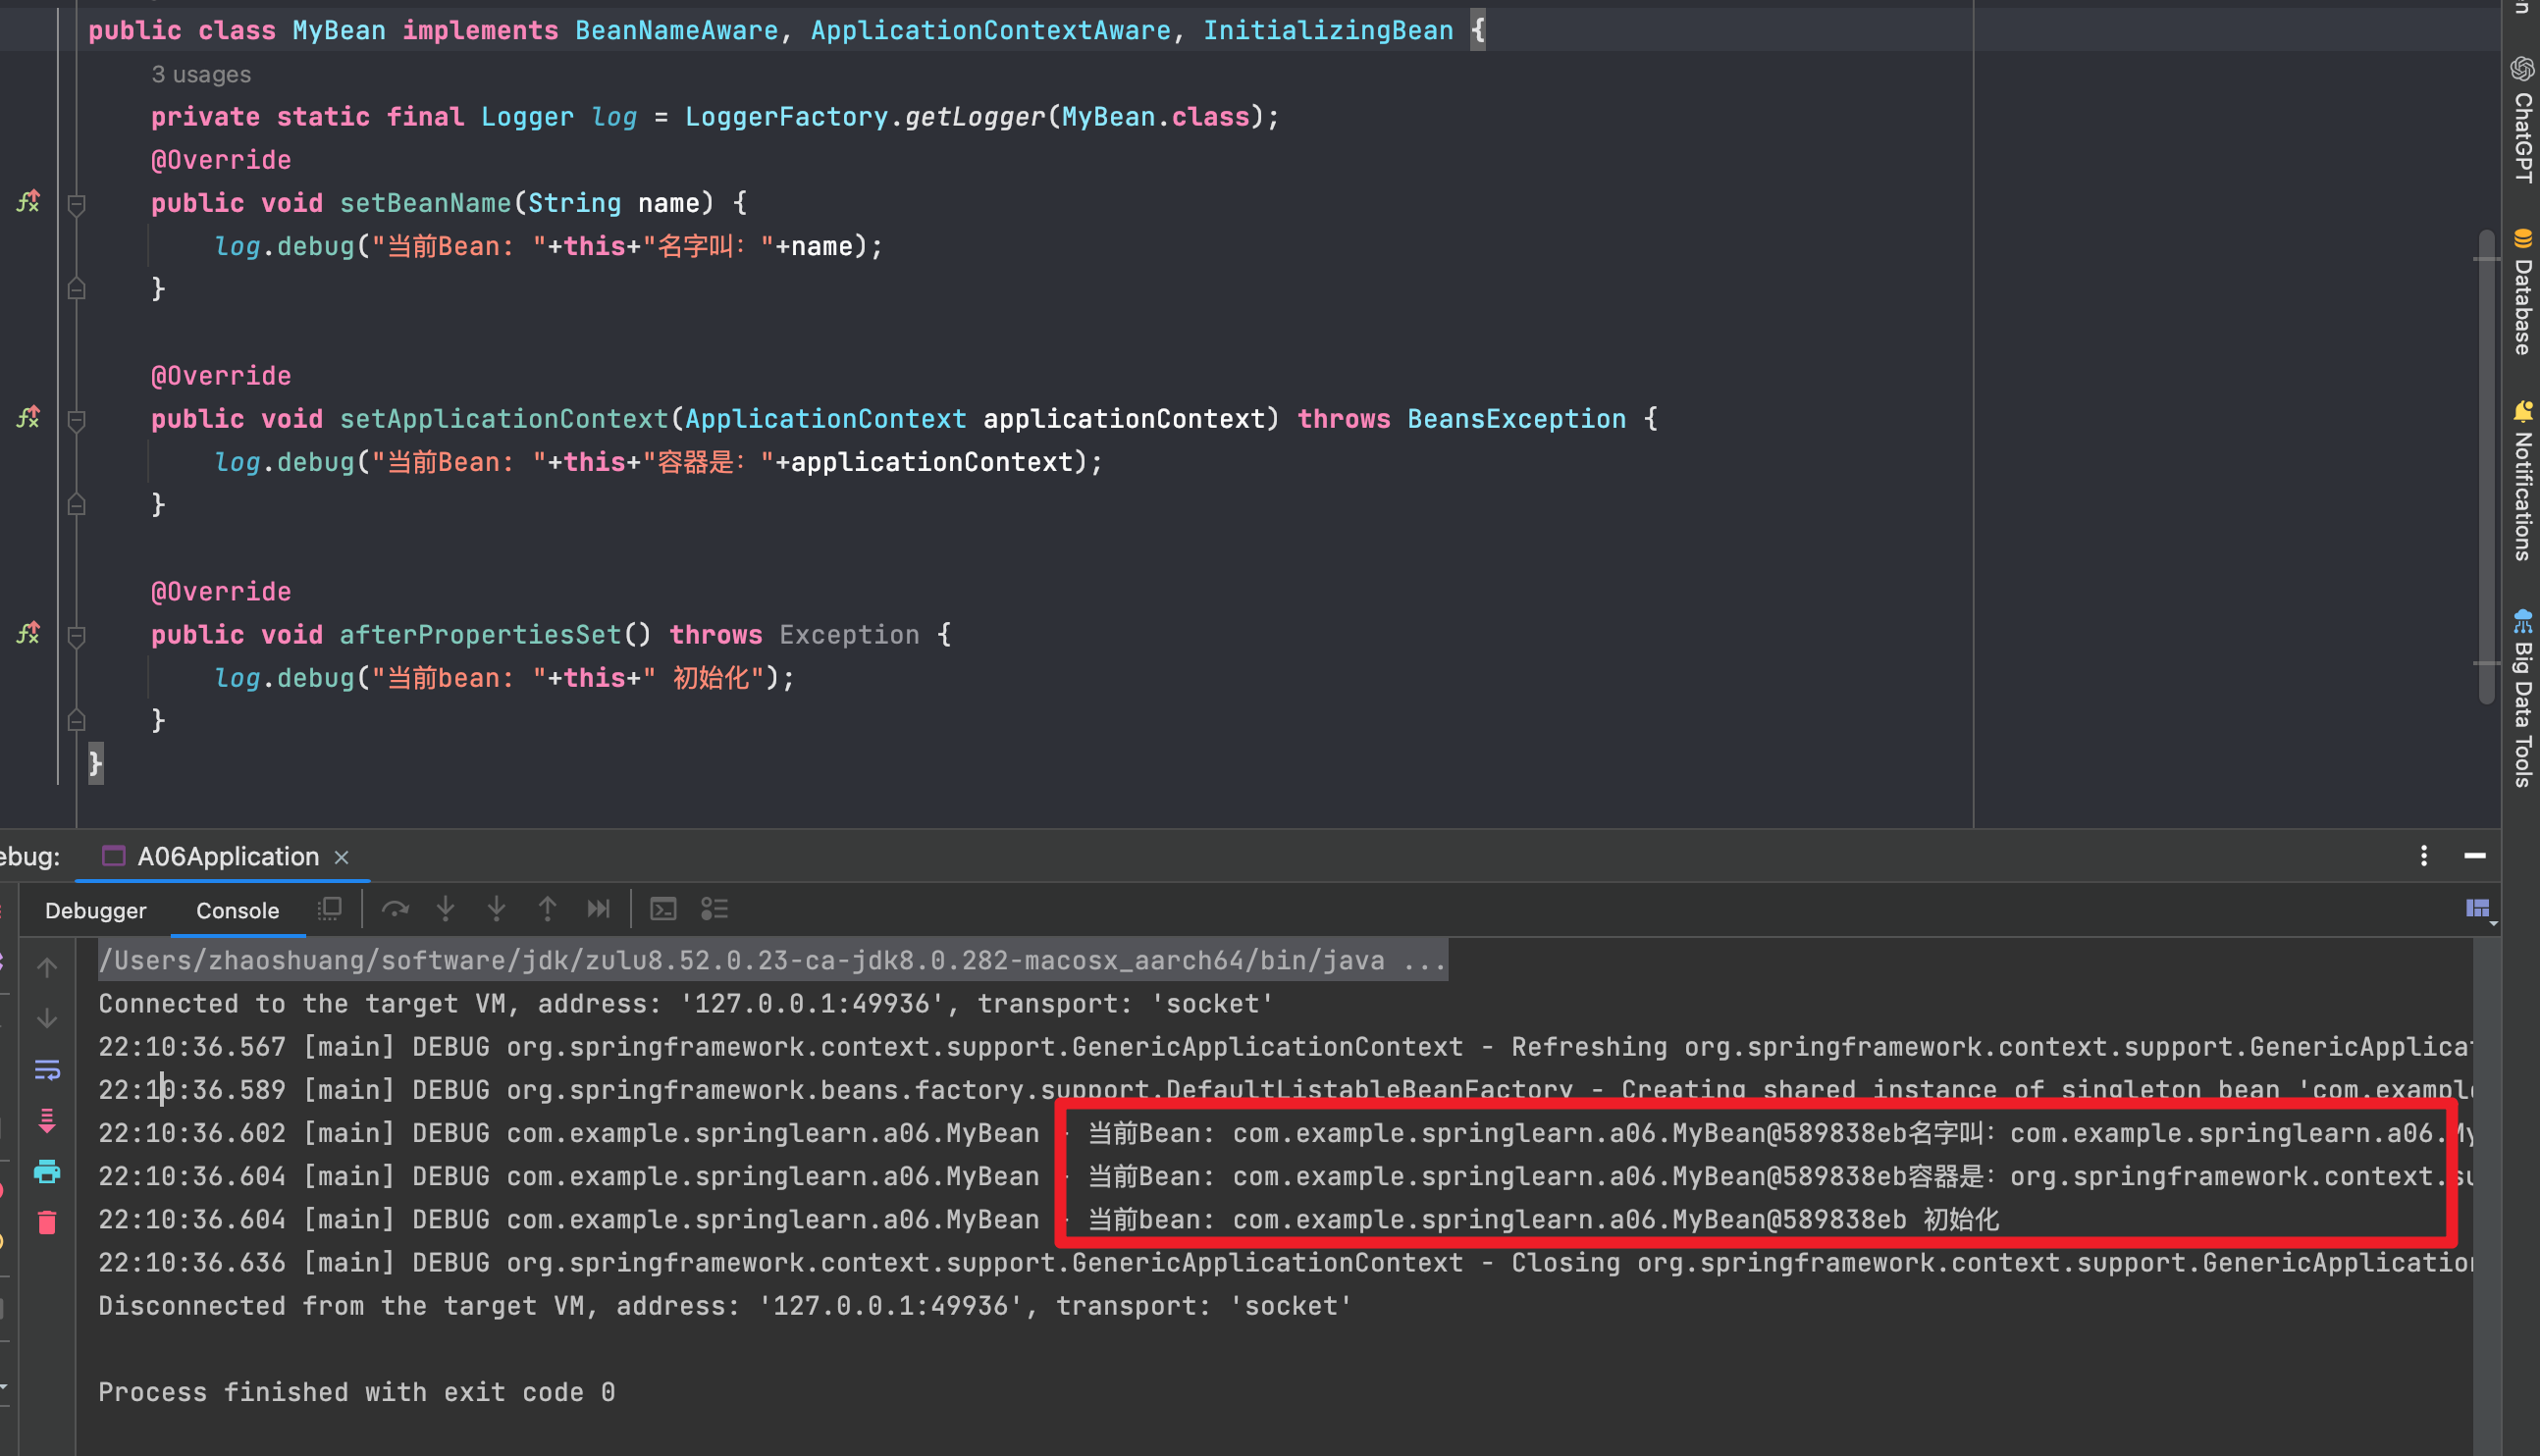
Aware接口及InitializingBean接口
Aware
Aware接口用于注入一些与容器相关的信息
-
BeanNameAware注入Bean的名字 -
BeanFactoryAware注入BeanFactory -
ApplicationContextAware注入ApplicationContext -
EmbeddedValueResolverAware注入一个解析器可以解析${}
对于BeanFactoryAware、ApplicationContextAware、EmbeddedValueResolverAware的功能使用@Autowired就能实现,为什么还需要Aware接口呢?
简单的来说,@Autowired的解析需要用到Bean的后置处理器,属于扩展功能,而Aware接口属于内置功能,不需要加任何扩展,Spring就能解析。某些情况下扩展功能会失效,而内置功能不会。
可以看到如果不加后置处理器(AutowiredAnnotationBeanPostProcessor、CommonAnnotationBeanPostProcessor)这两个不会成效。
Autowired失效
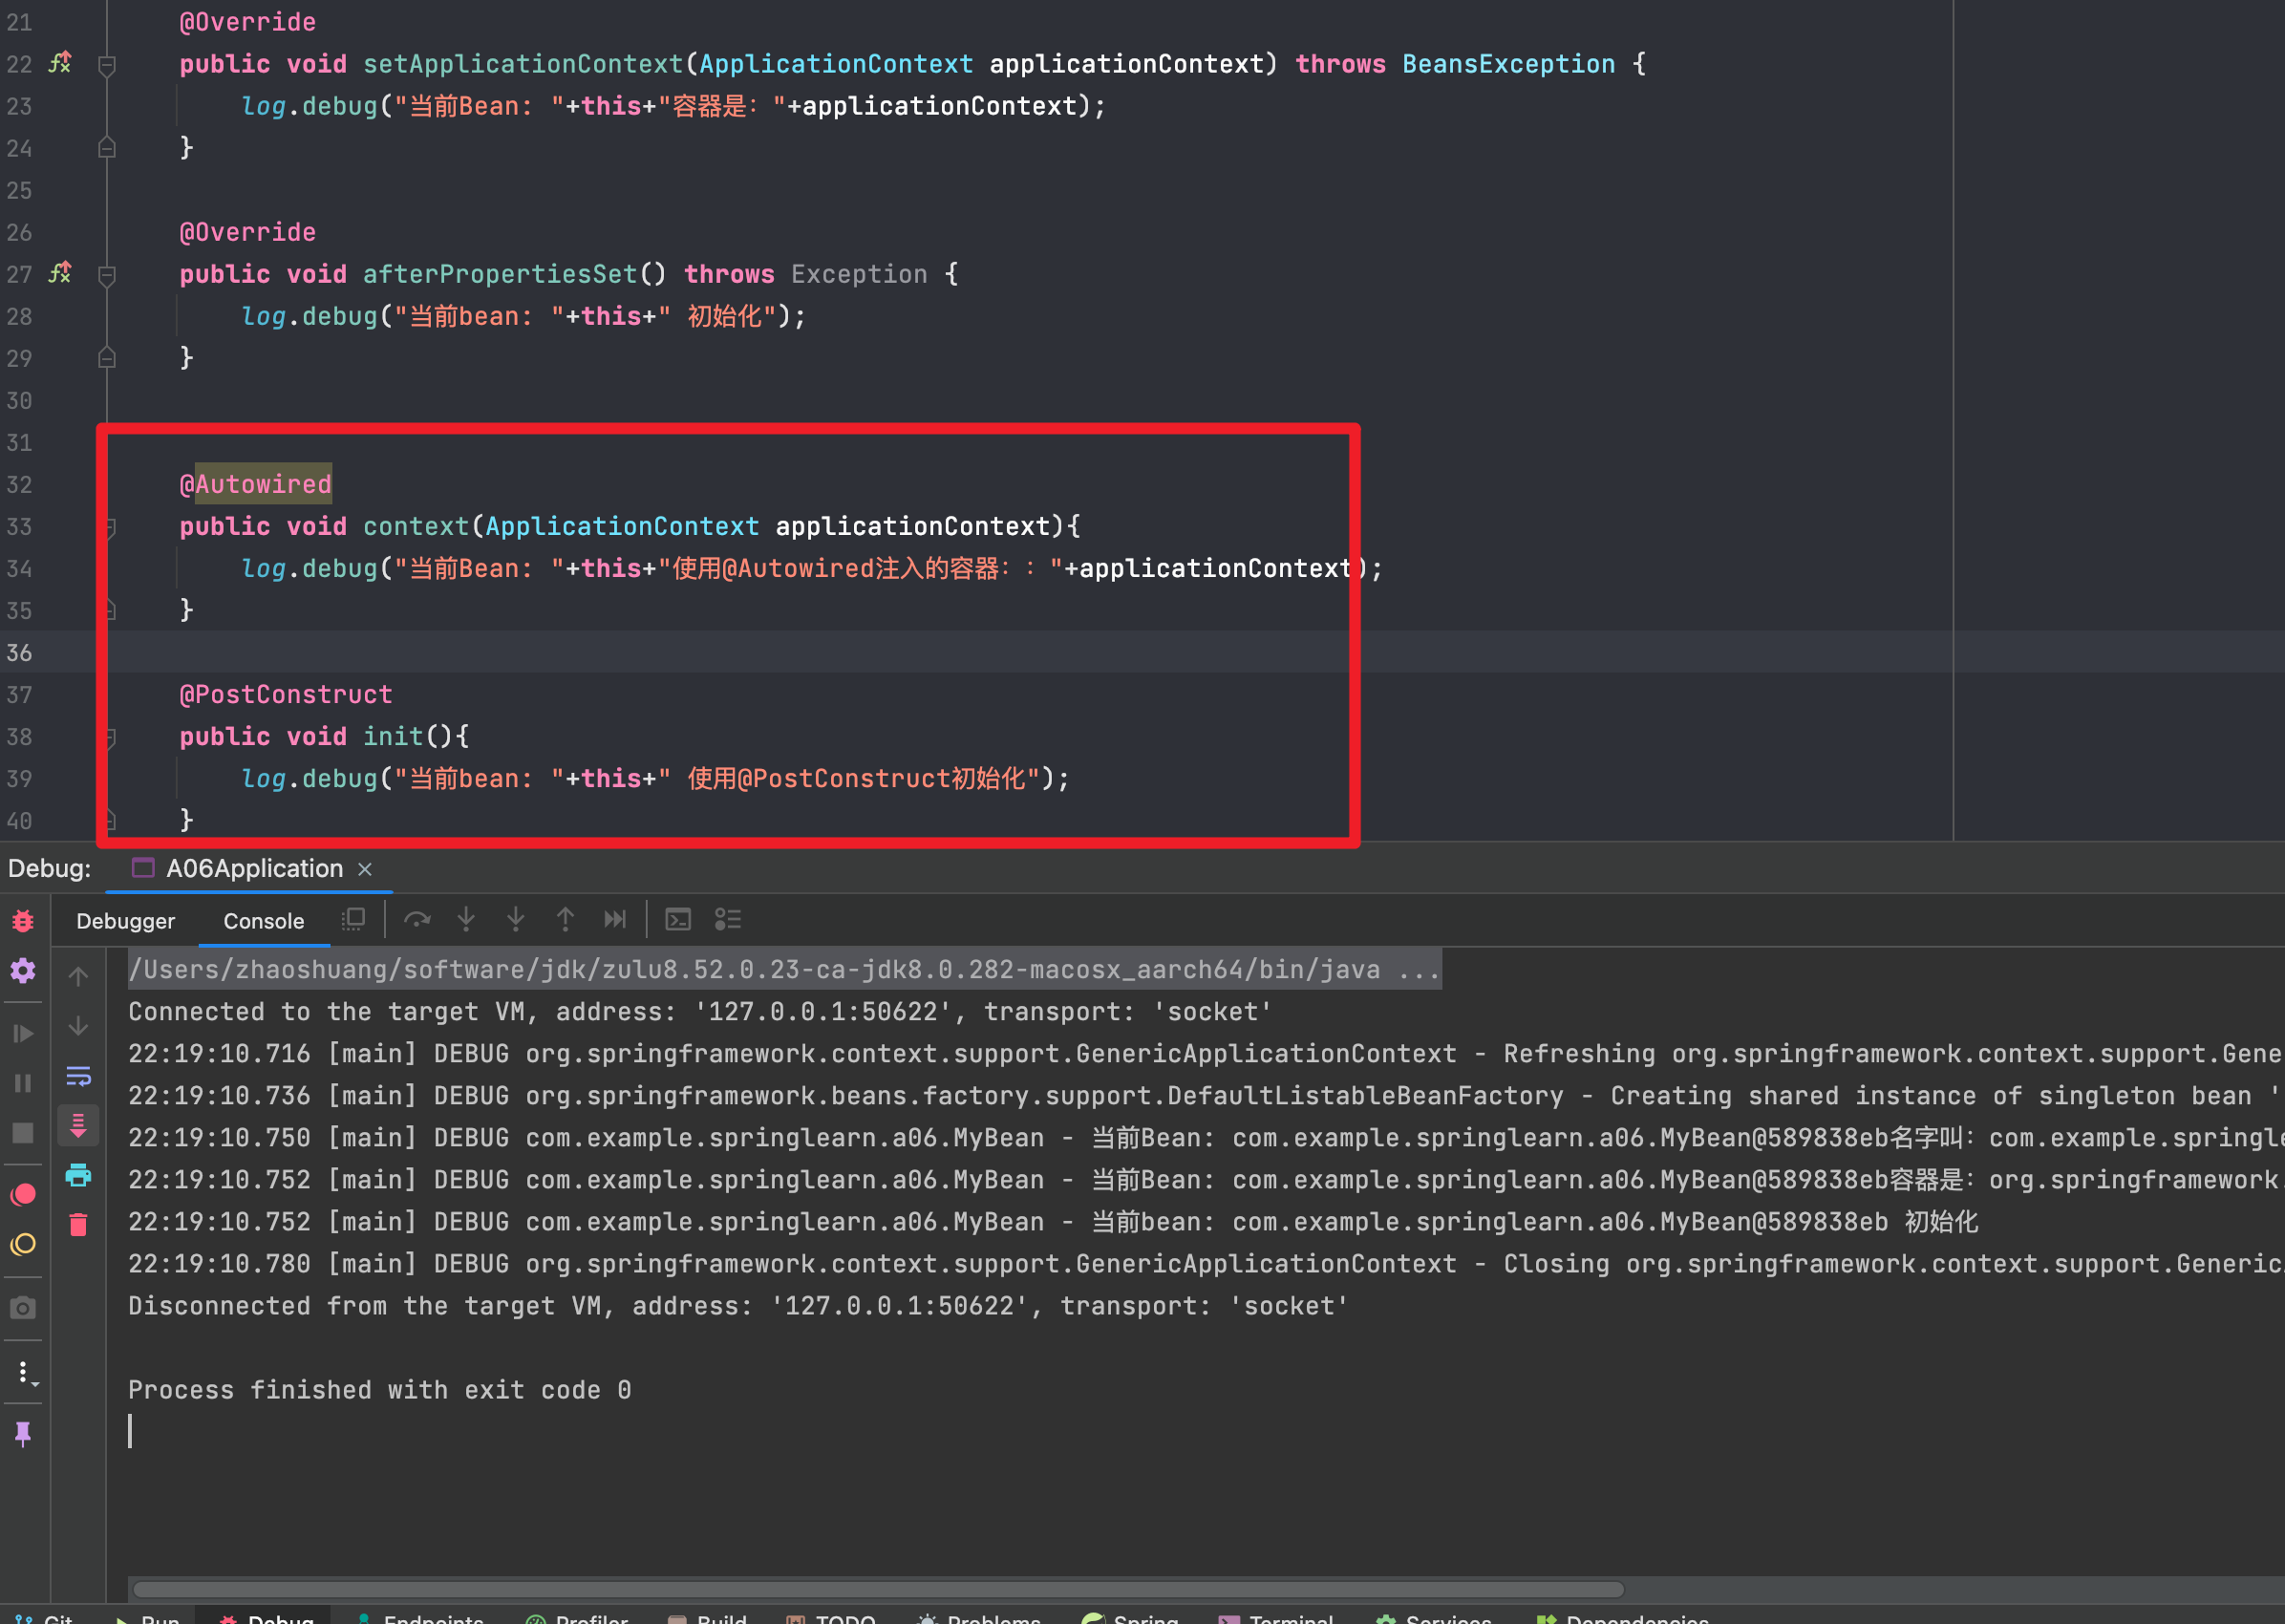
我们来定义一个配置类,通过@Autowired注入一个属性,@PostConstruct添加一个初始化方法
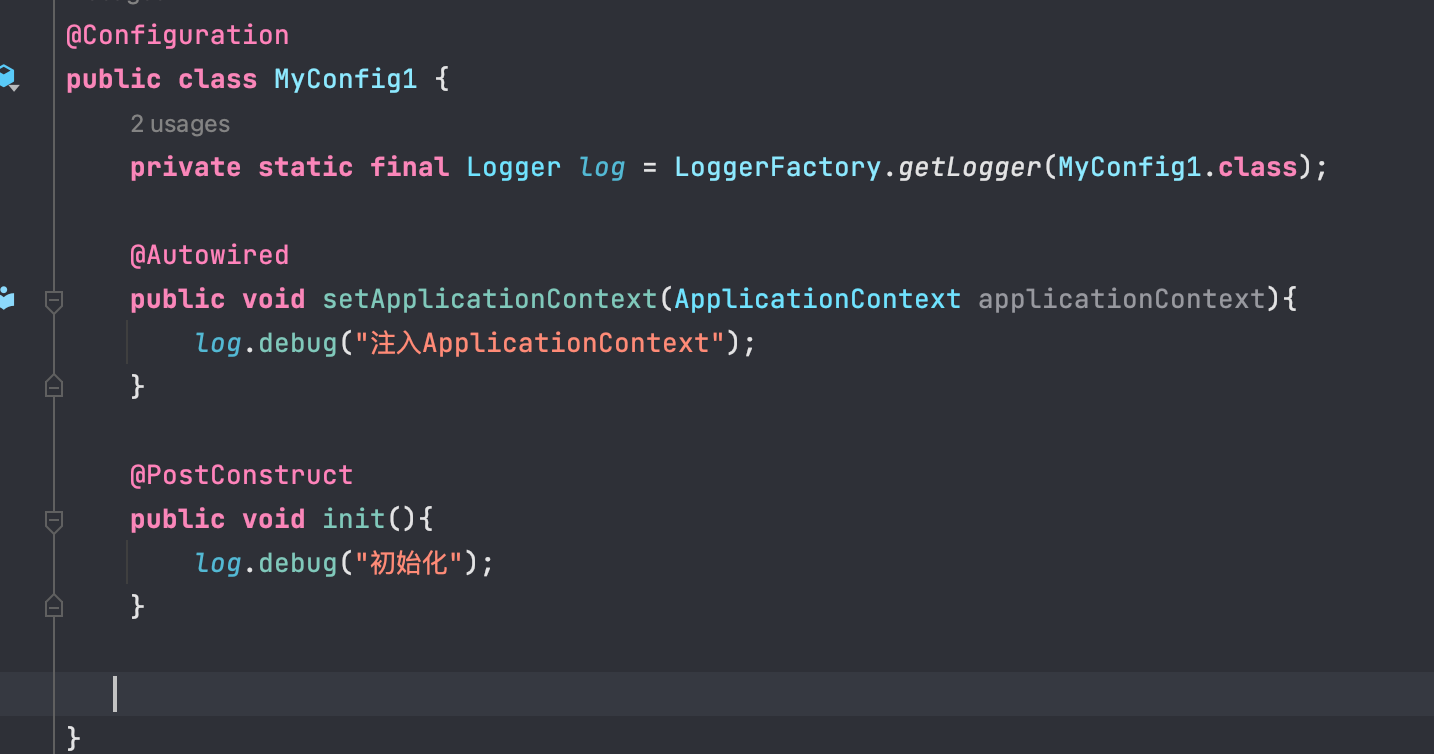
然后我们再给容器中添加一些用于处理这些注解的后置处理器,可以看到我们的注入跟初始化方法生效了。
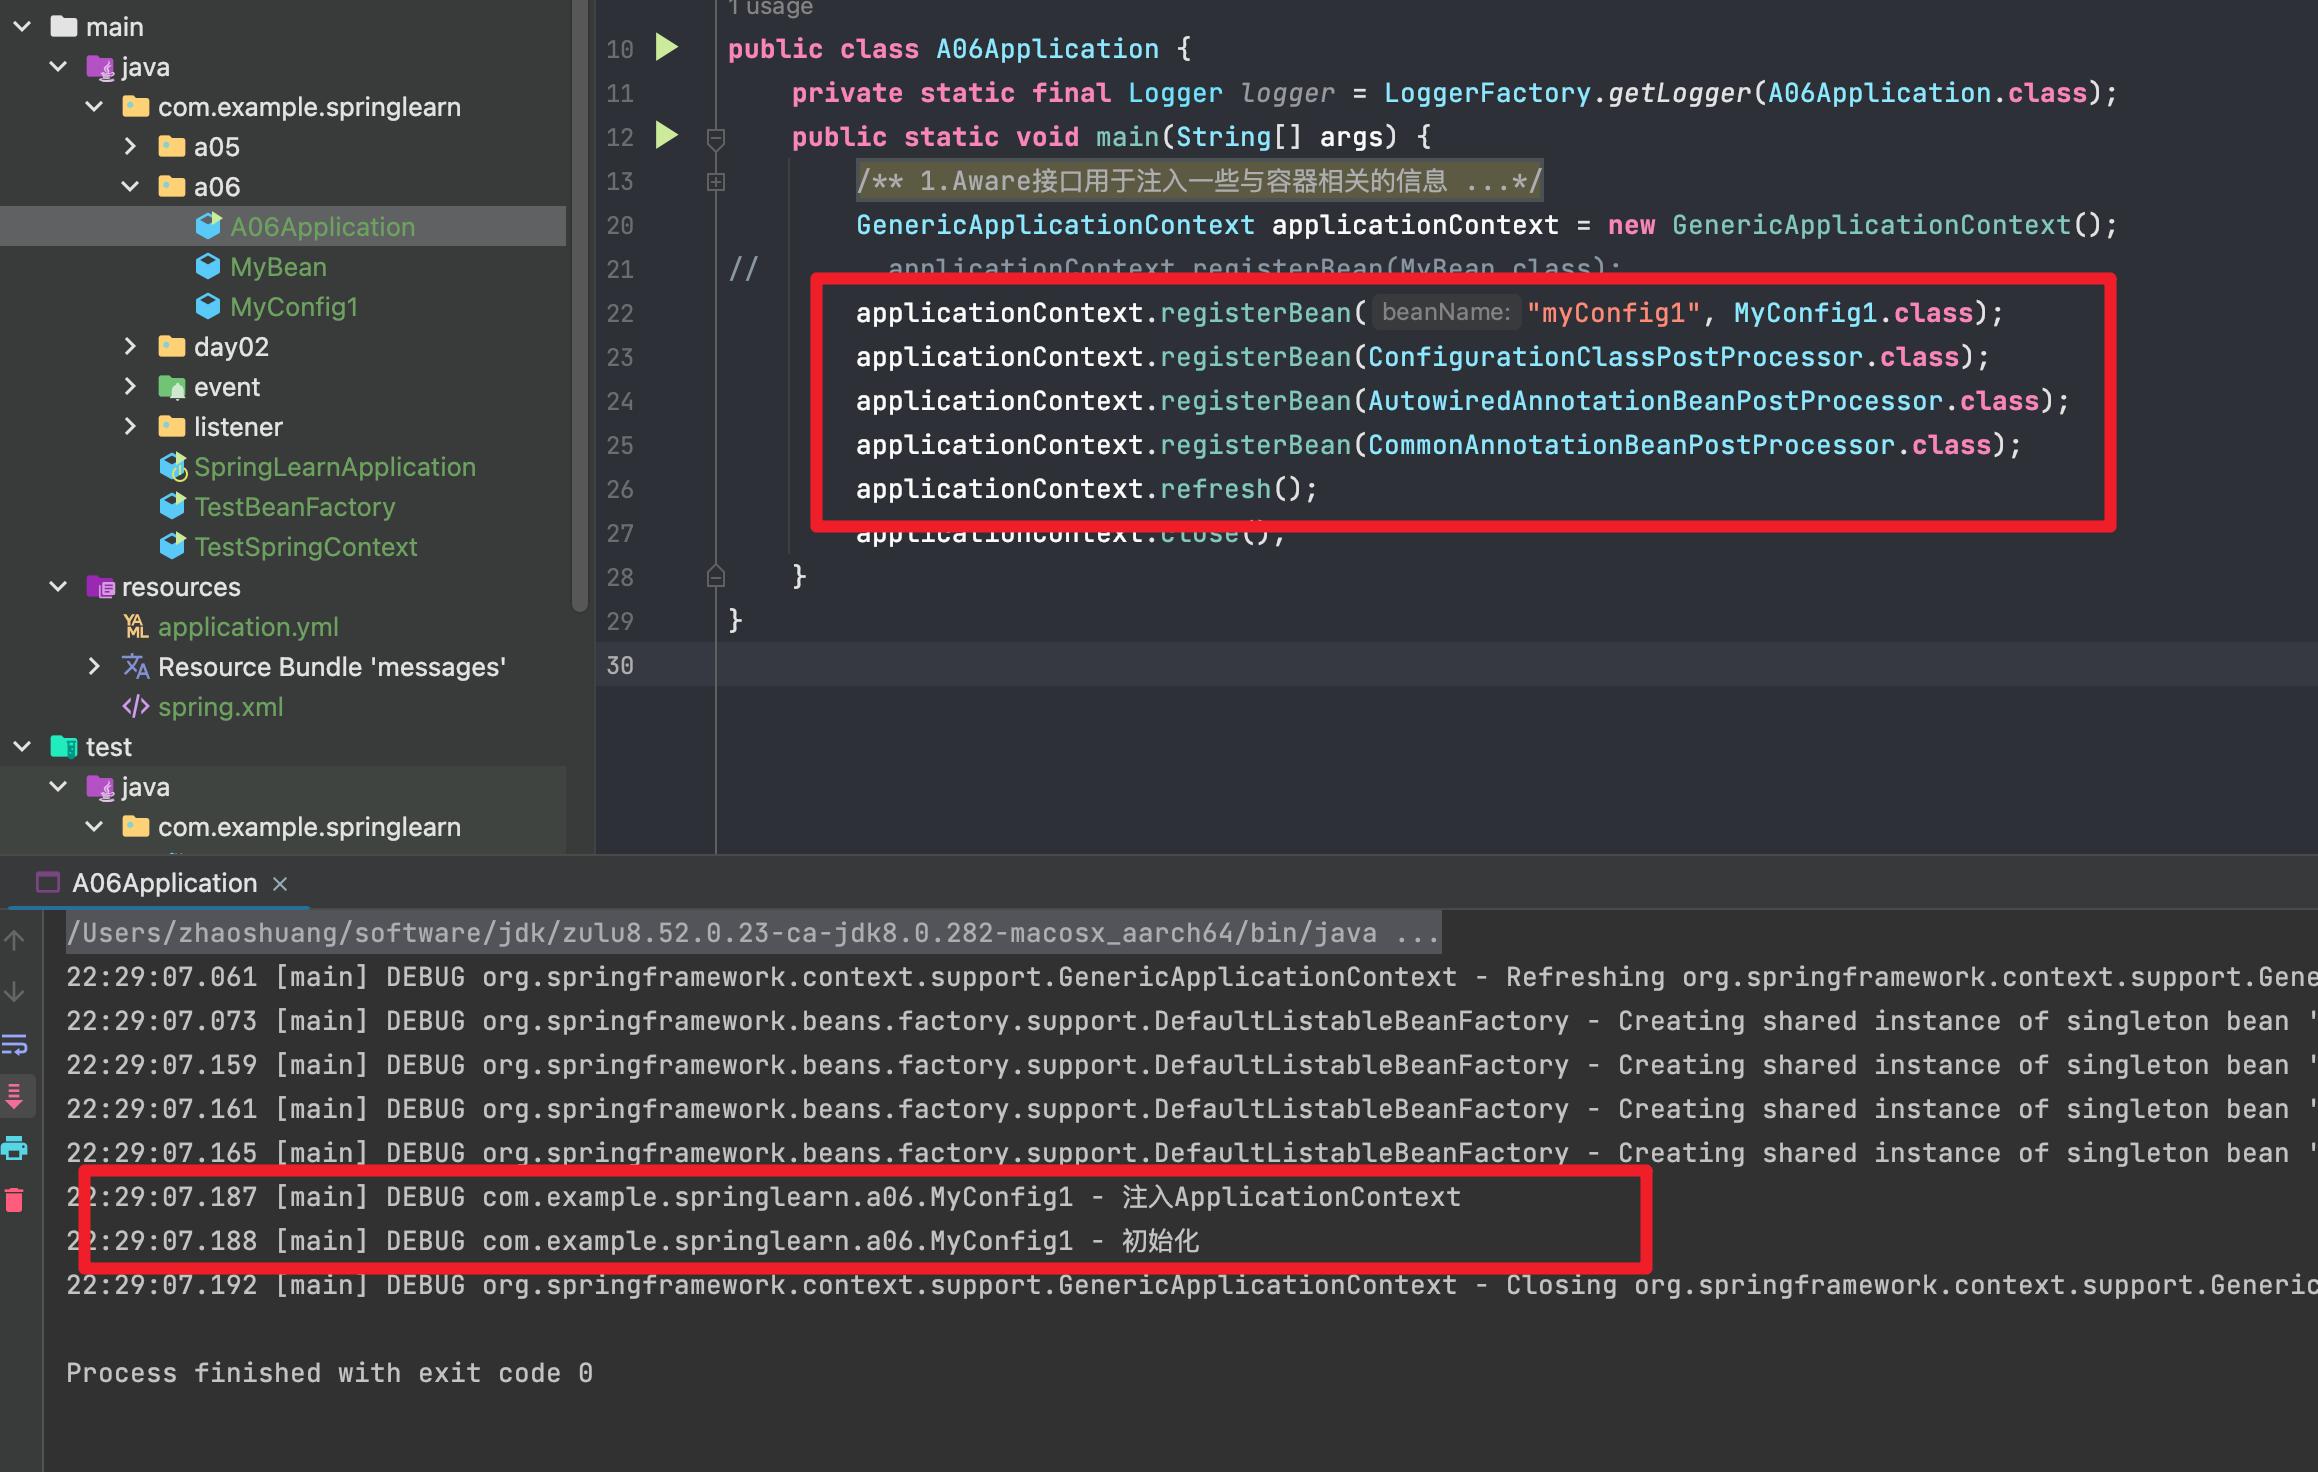
如果我们给容器中注入一个BeanFactoryPostProcessor,那么可以看到@Autowired失效了
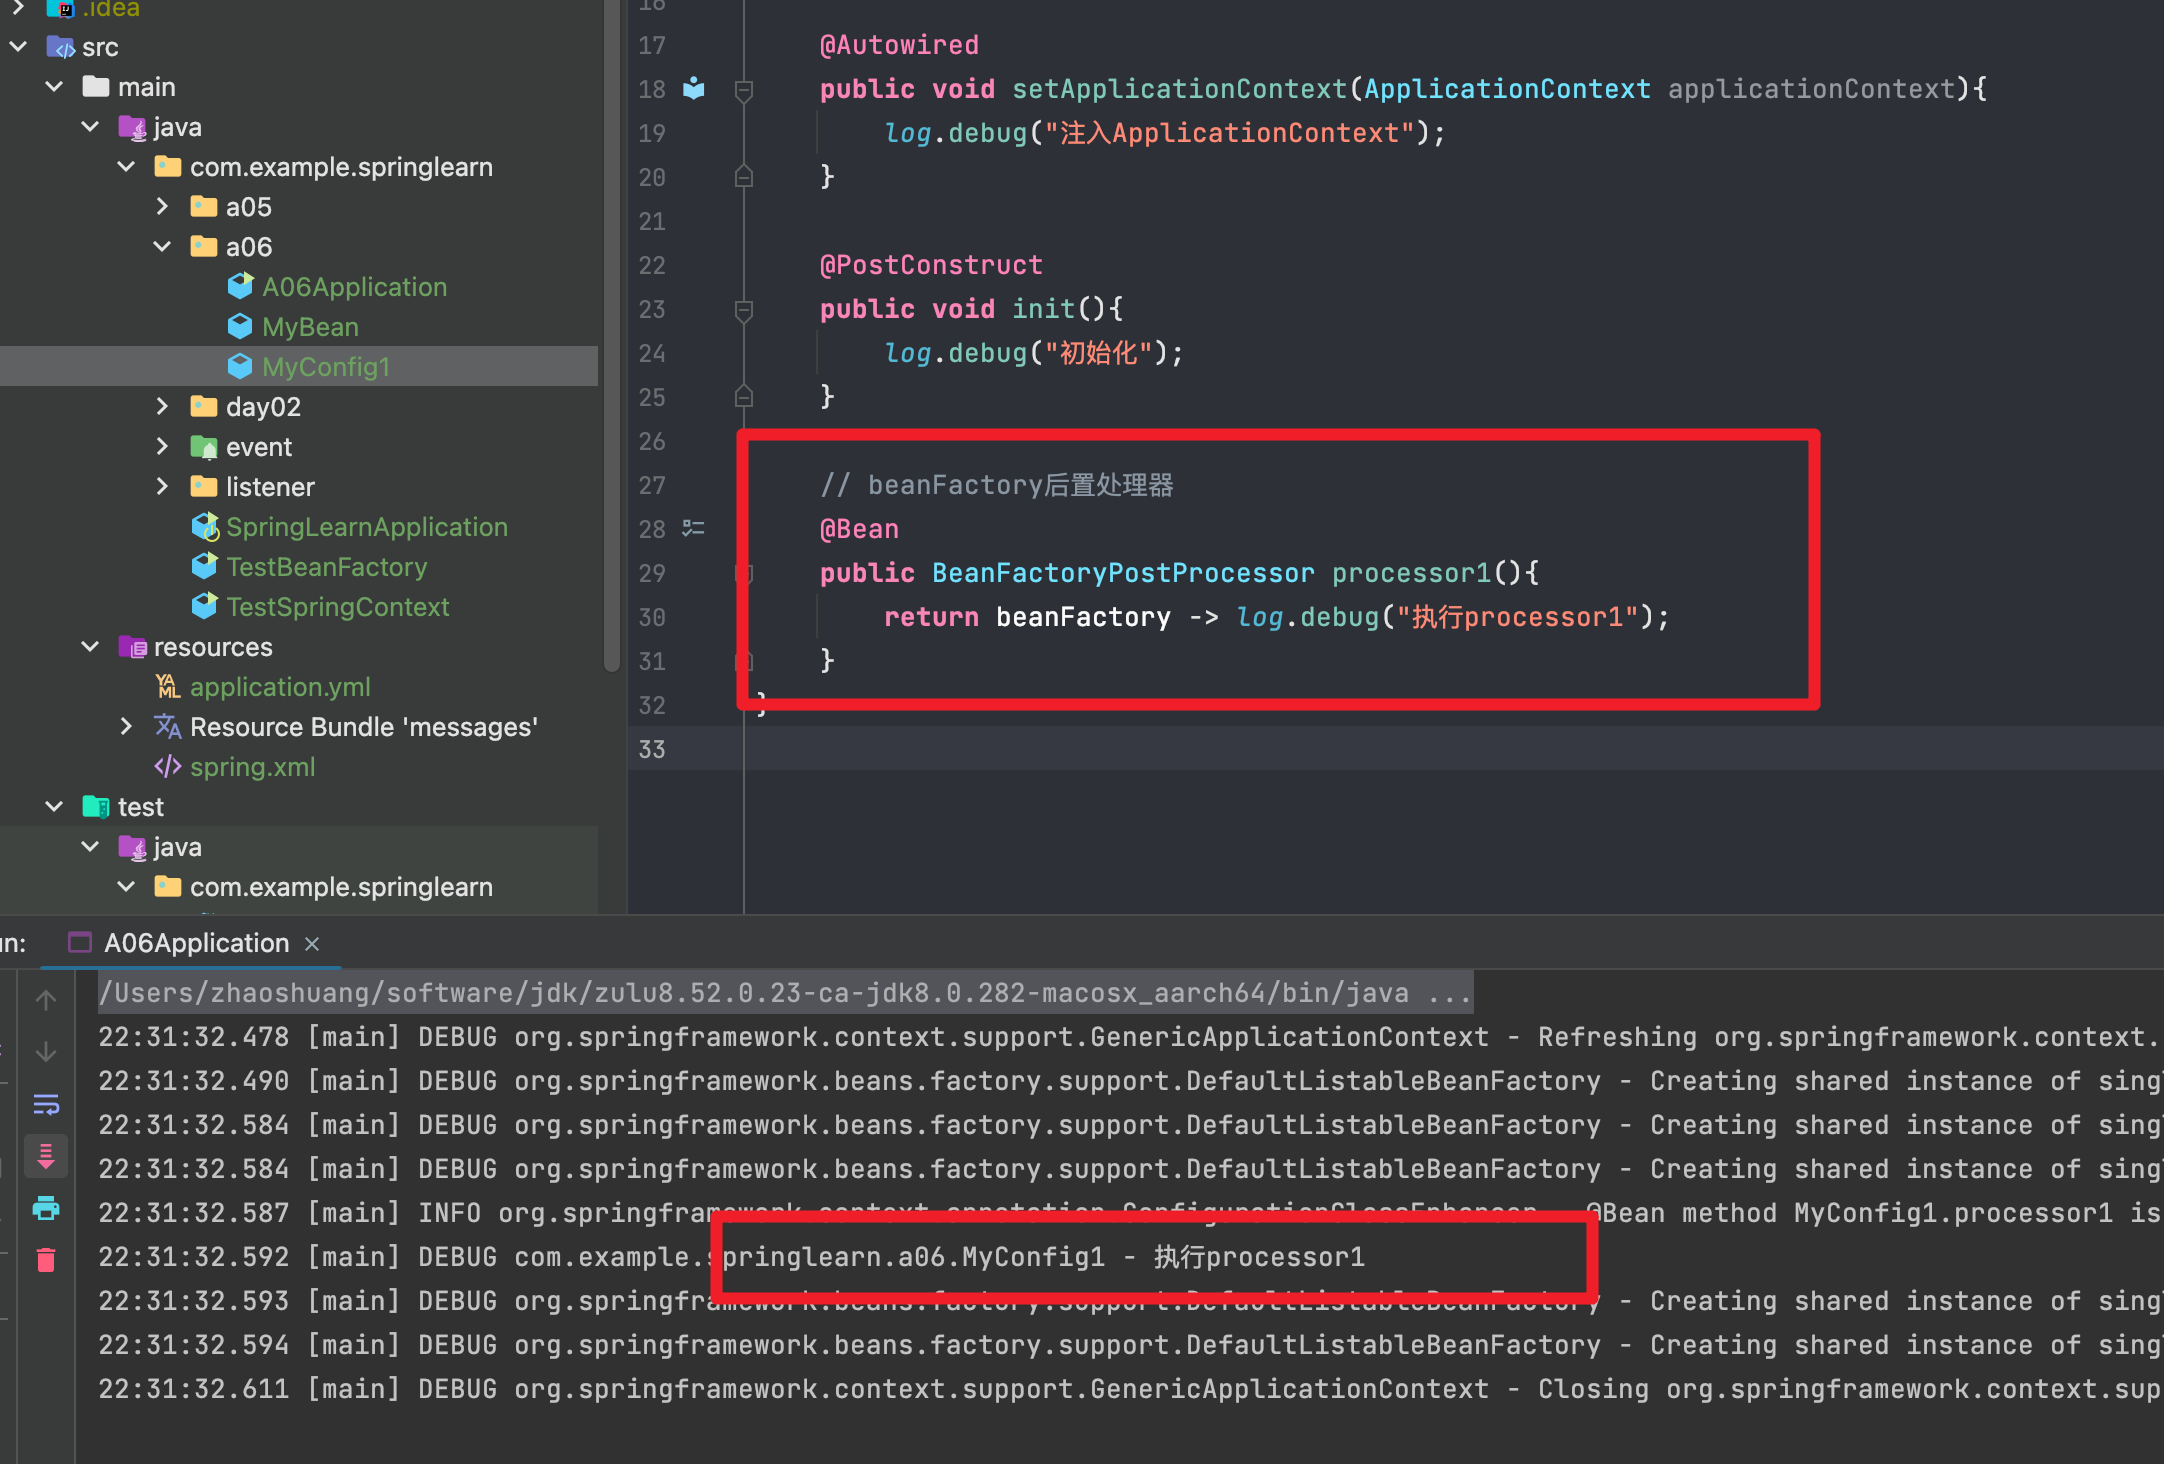
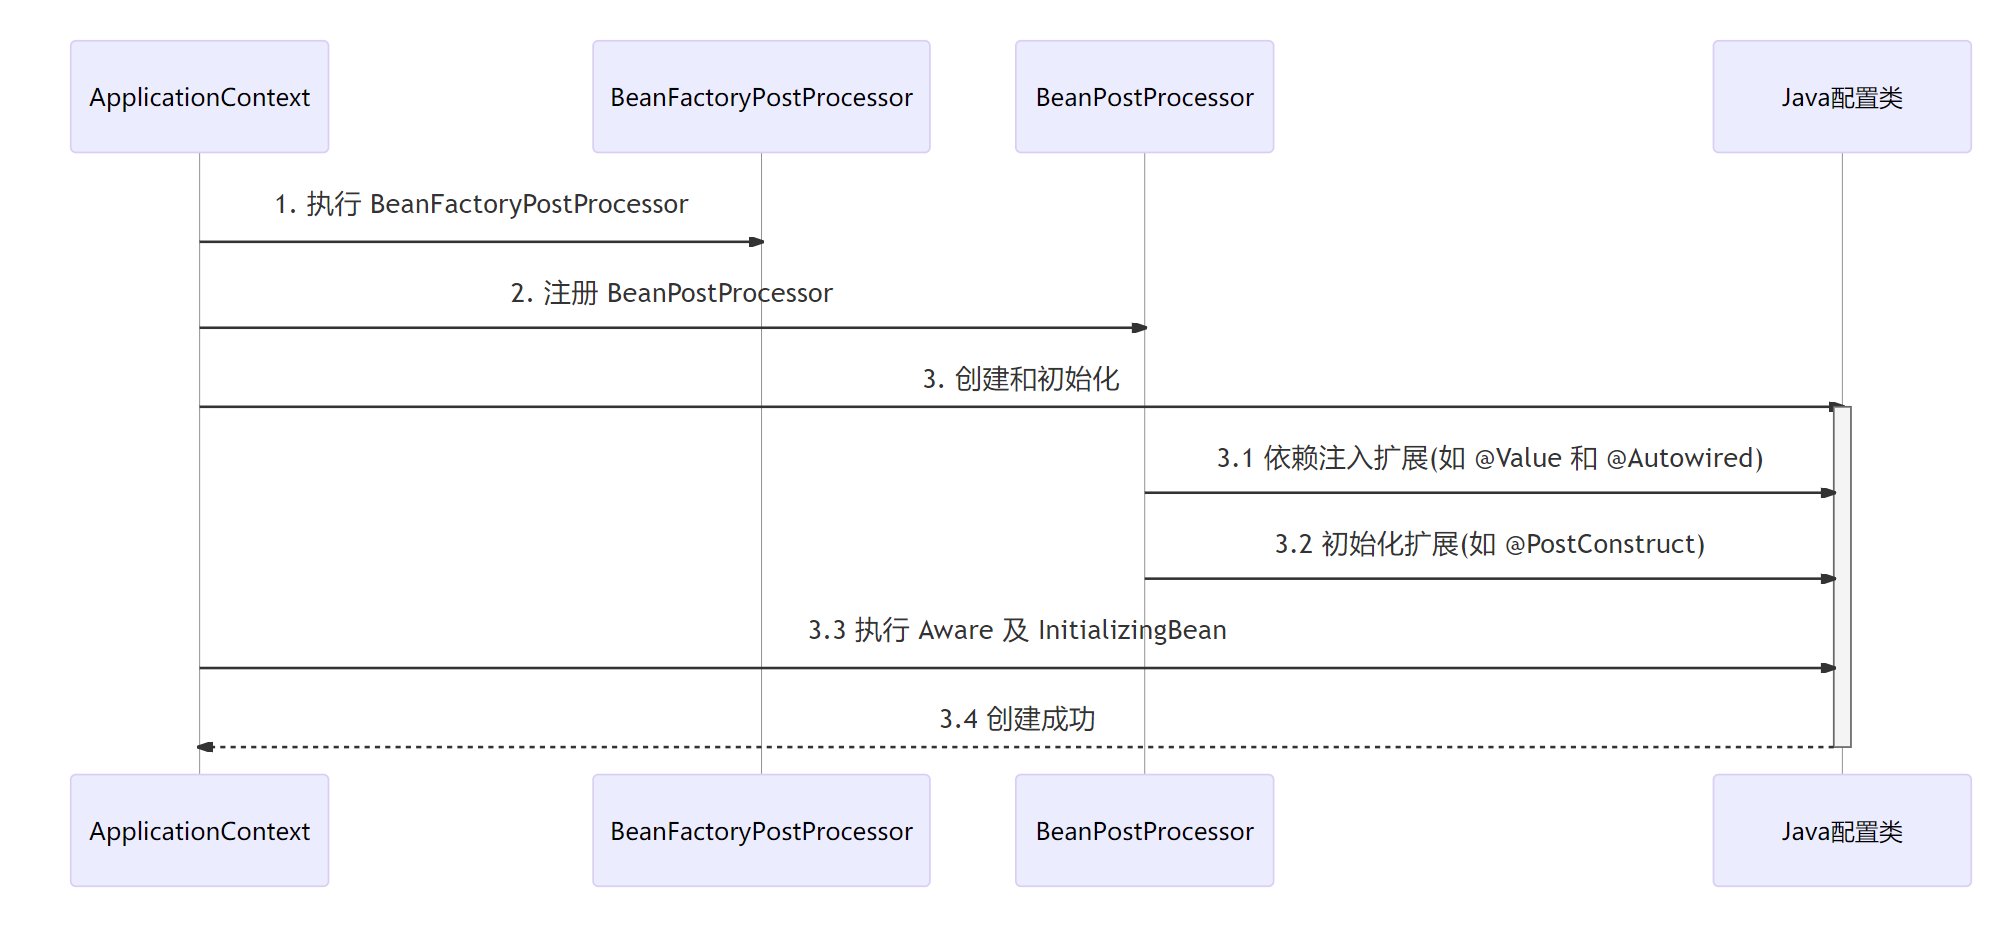
如果我们的配置类中不包含BeanFactoryPostProcessor,那么我们的执行顺序将会是如下图所示,先执行BeanFactoryPostProcessor,然后注册BeanPostProcessor,再创建和初始化我们的配置类。
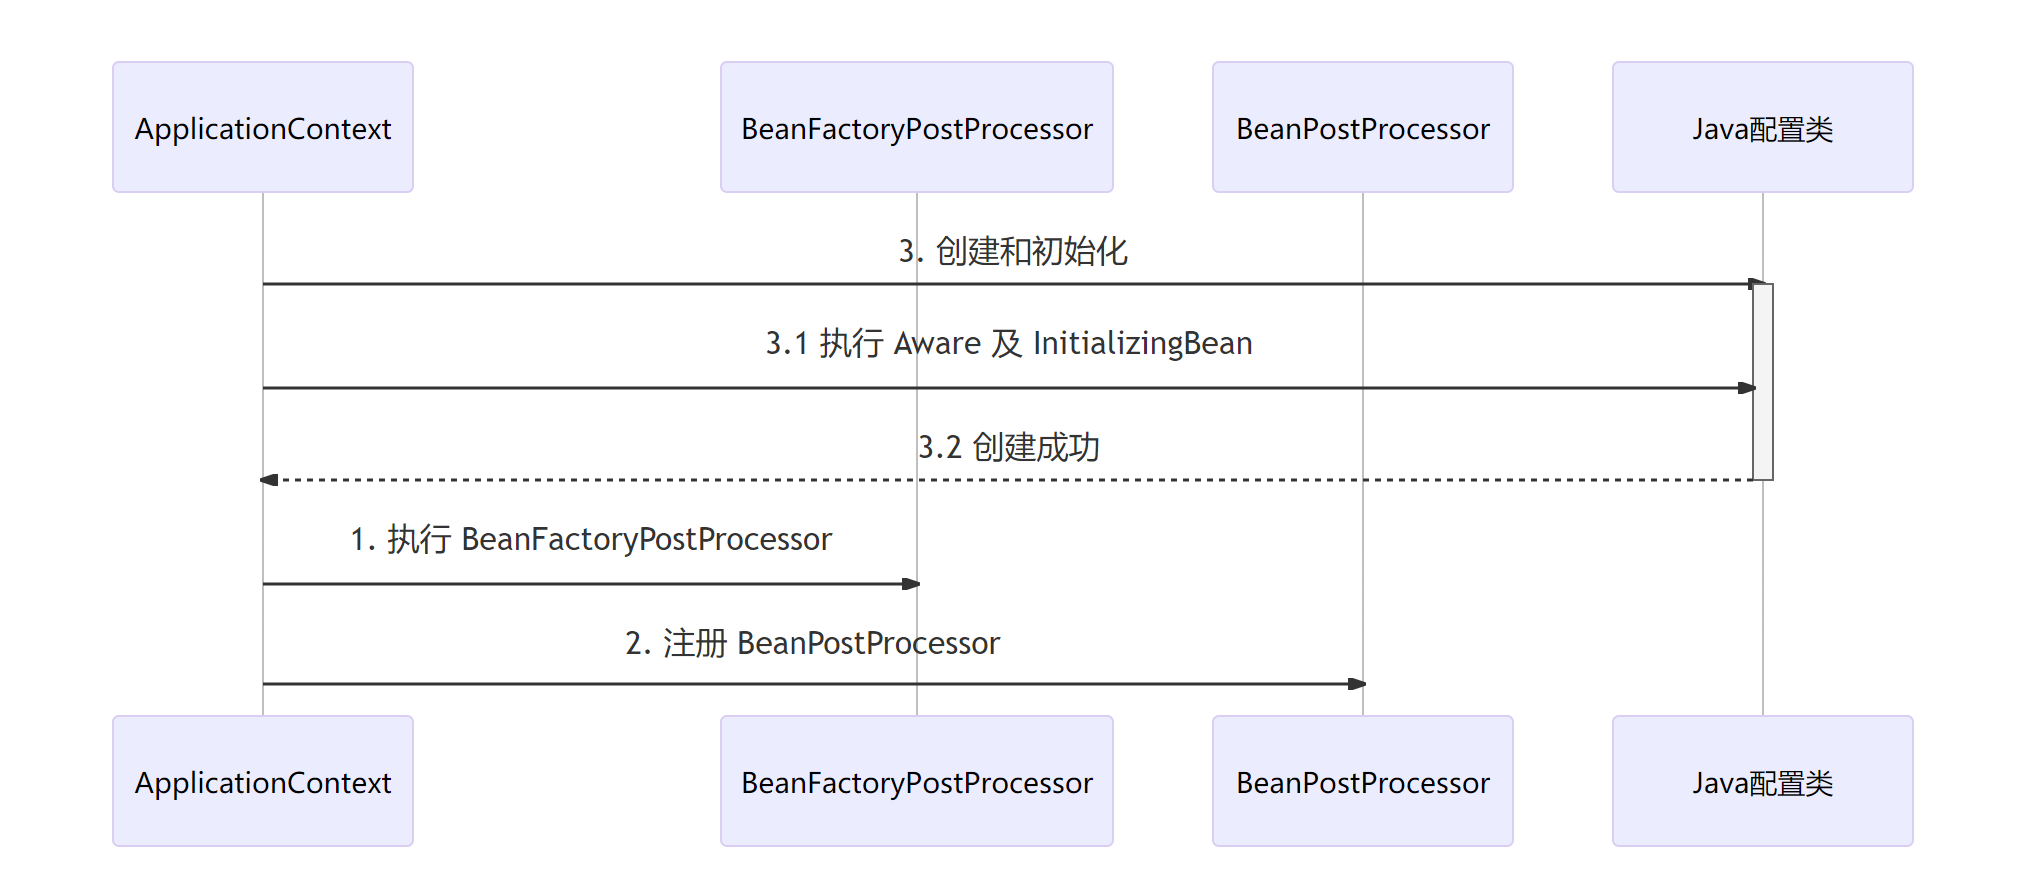
如果我们的配置类中包含BeanFactoryPostProcessor,如果想要调用这个工厂方法,前提是需要将这个方法所在的对象创建好,也就是我们的配置类。所以它的顺序就变成了先去创建我们的单例对象,然后再去执行BeanFactoryPostProcessor,但是这个时候它还未添加那些BeanPostProcessor,我们的配置类相当于被提前创建,导致那些扩展功能失效了,所以也就无法解析@Autowired相关的注入,只能执行Aware跟InitializingBean。
要解决这个问题也很简单
- 我们可以通过
Aware跟InitializingBean来注入属性跟初始化方法。 - 或者是我们给
BeanFactoryPostProcessor这个注入方法标识为static方法,这样调用它的时候可以不需要先初始化我们的Config类。
初始化与销毁
初始化方法
Spring提供了三种初始化方法
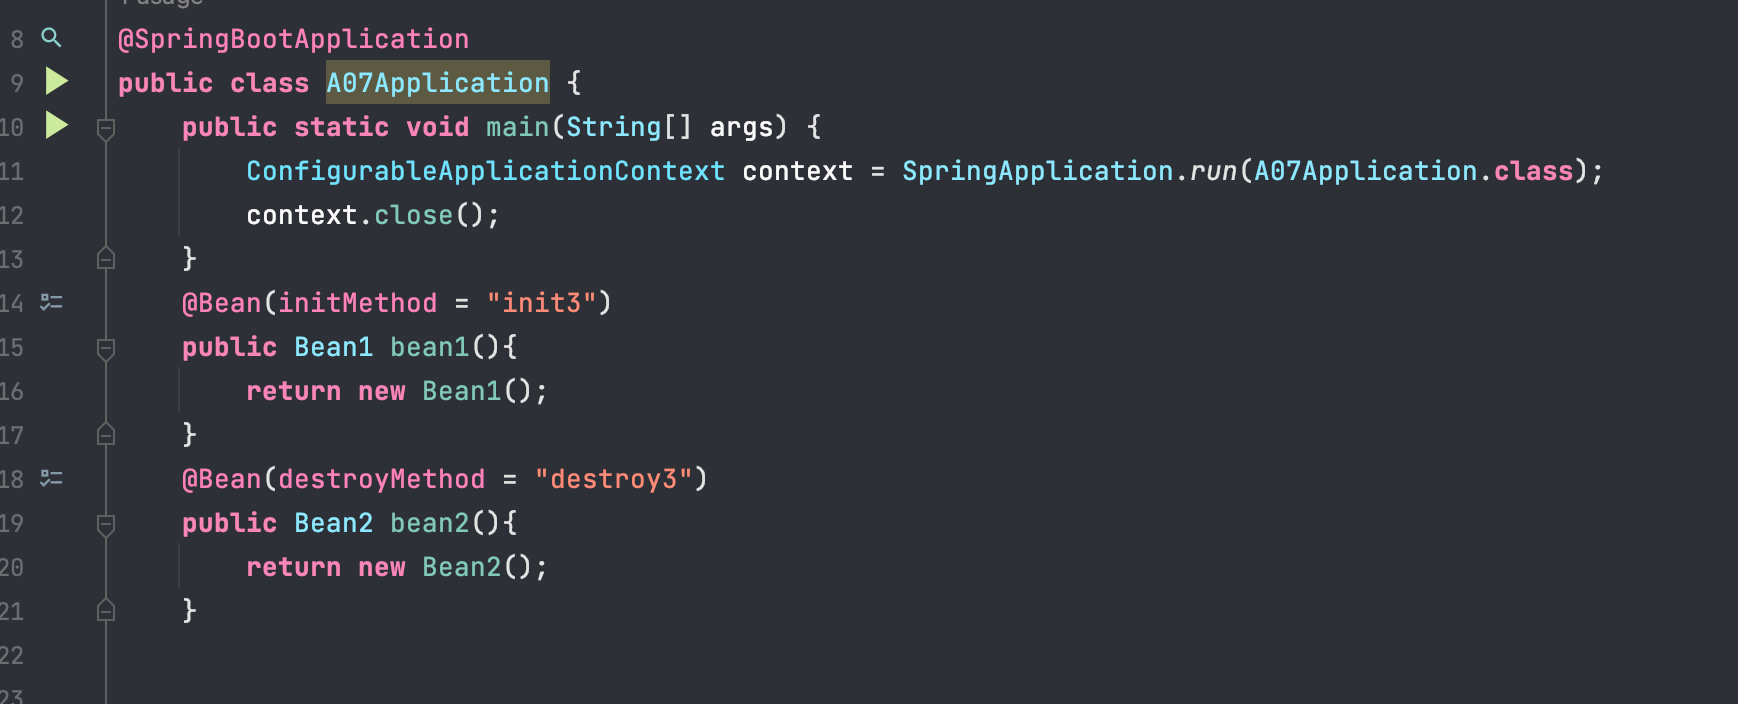
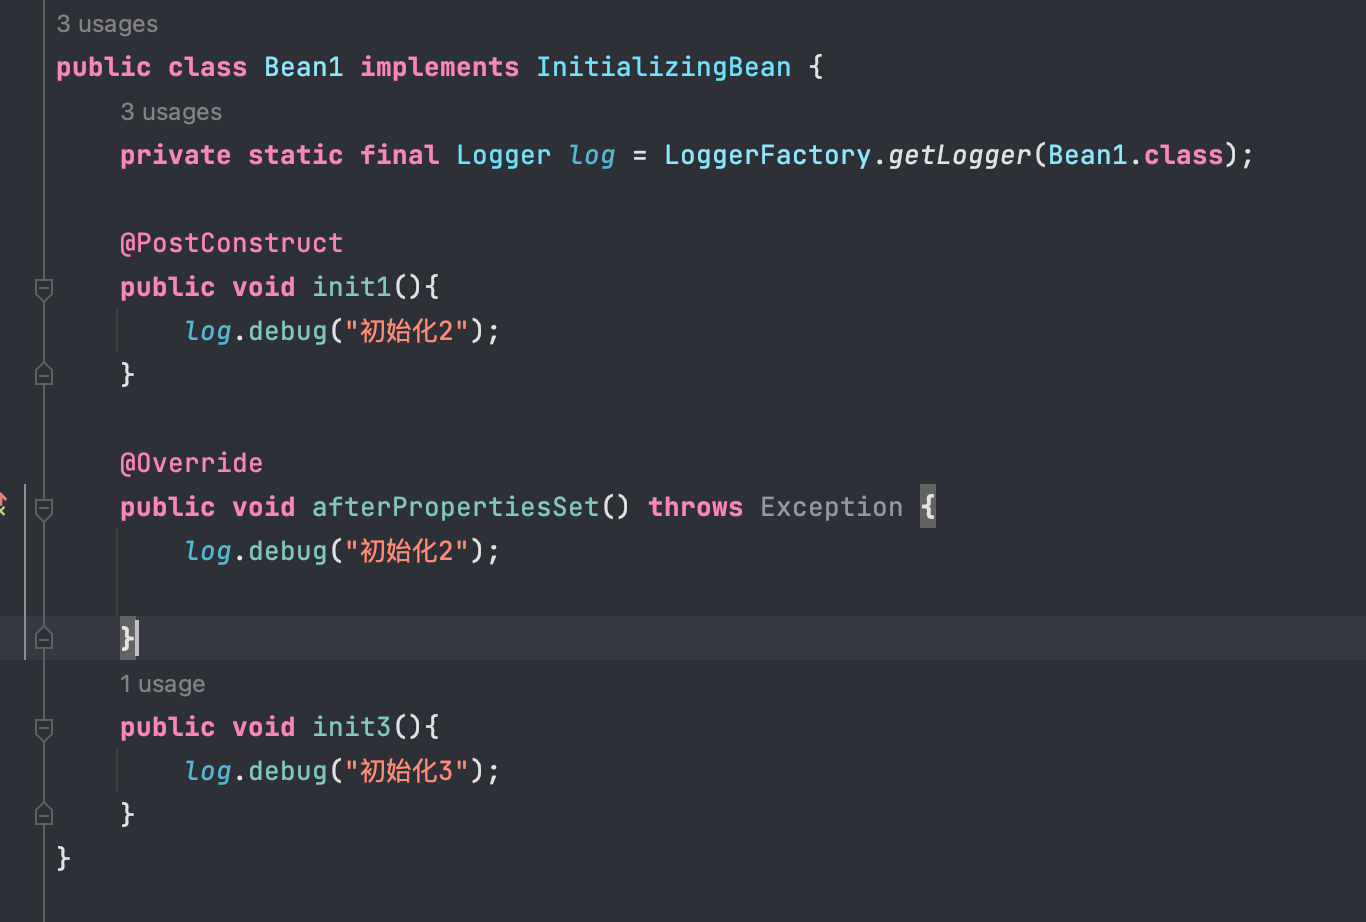
- 通过
@PostConstruct标识 - 通过实现
InitializingBean的afterPropertiesSet()方法 @Bean(initMethod = "methodName")
他们三个执行的顺序首先执行@PostConstruct通过Bean的后置处理器来执行,然后执行InitializingBean,最后执行@Bean(initMethod = "methodName")它是把bean的初始化方法加在了BeanDefinition中。
销毁方法
Spring提供了三种销毁方法
- 通过
@PreDestory - 实现
DisposableBean接口的destroy()方法 - 通过
@Bean(destroyMethod = "destroyMethod")来指定

执行顺序跟初始化的类似,先执行@PreDestory,再执行DisposableBean,最后执行@Bean的
Scope
Scope类型有哪些
- Singleton:单例模式,每个 Spring 容器中只会存在一个共享的 Bean 实例。
- Prototype:原型模式,每次请求 Bean 时都会创建一个新的实例。
- Request:每个 HTTP 请求都会创建一个新的 Bean 实例,该 Bean 实例仅在当前 HTTP 请求中可用。
- Session:每个 HTTP Session 都会创建一个新的 Bean 实例,该 Bean 实例仅在当前 HTTP Session 中可用。
- Application:每个 ServletContext 中只会创建一个共享的 Bean 实例。
举个简单的例子说明一下:
定义三个Bean对象,给他们配置不同的Scope
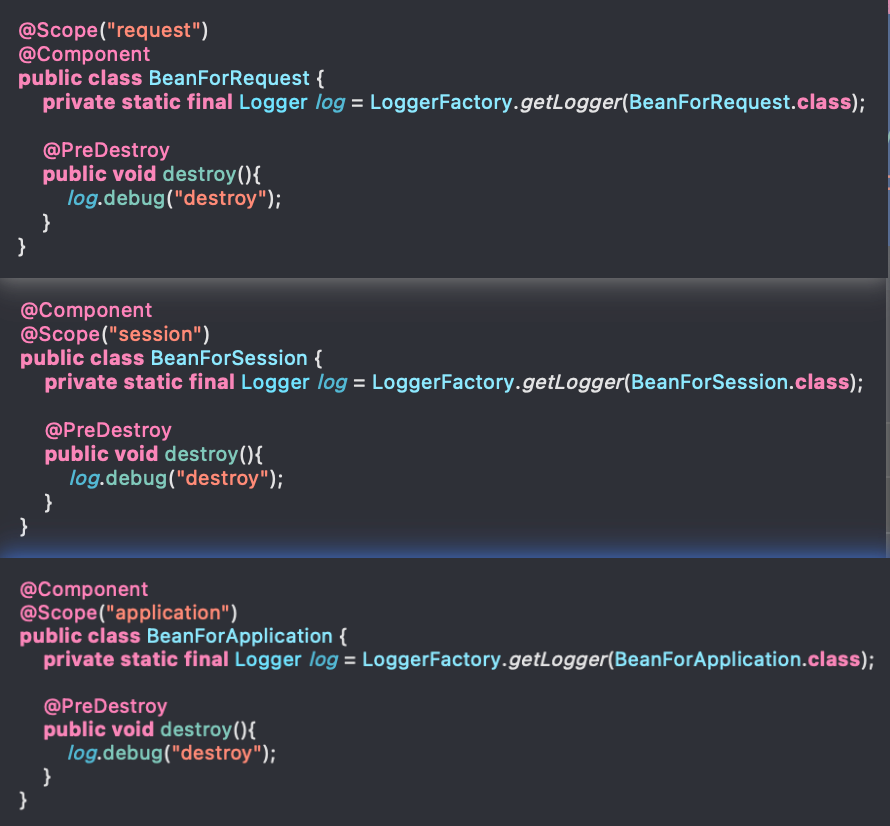
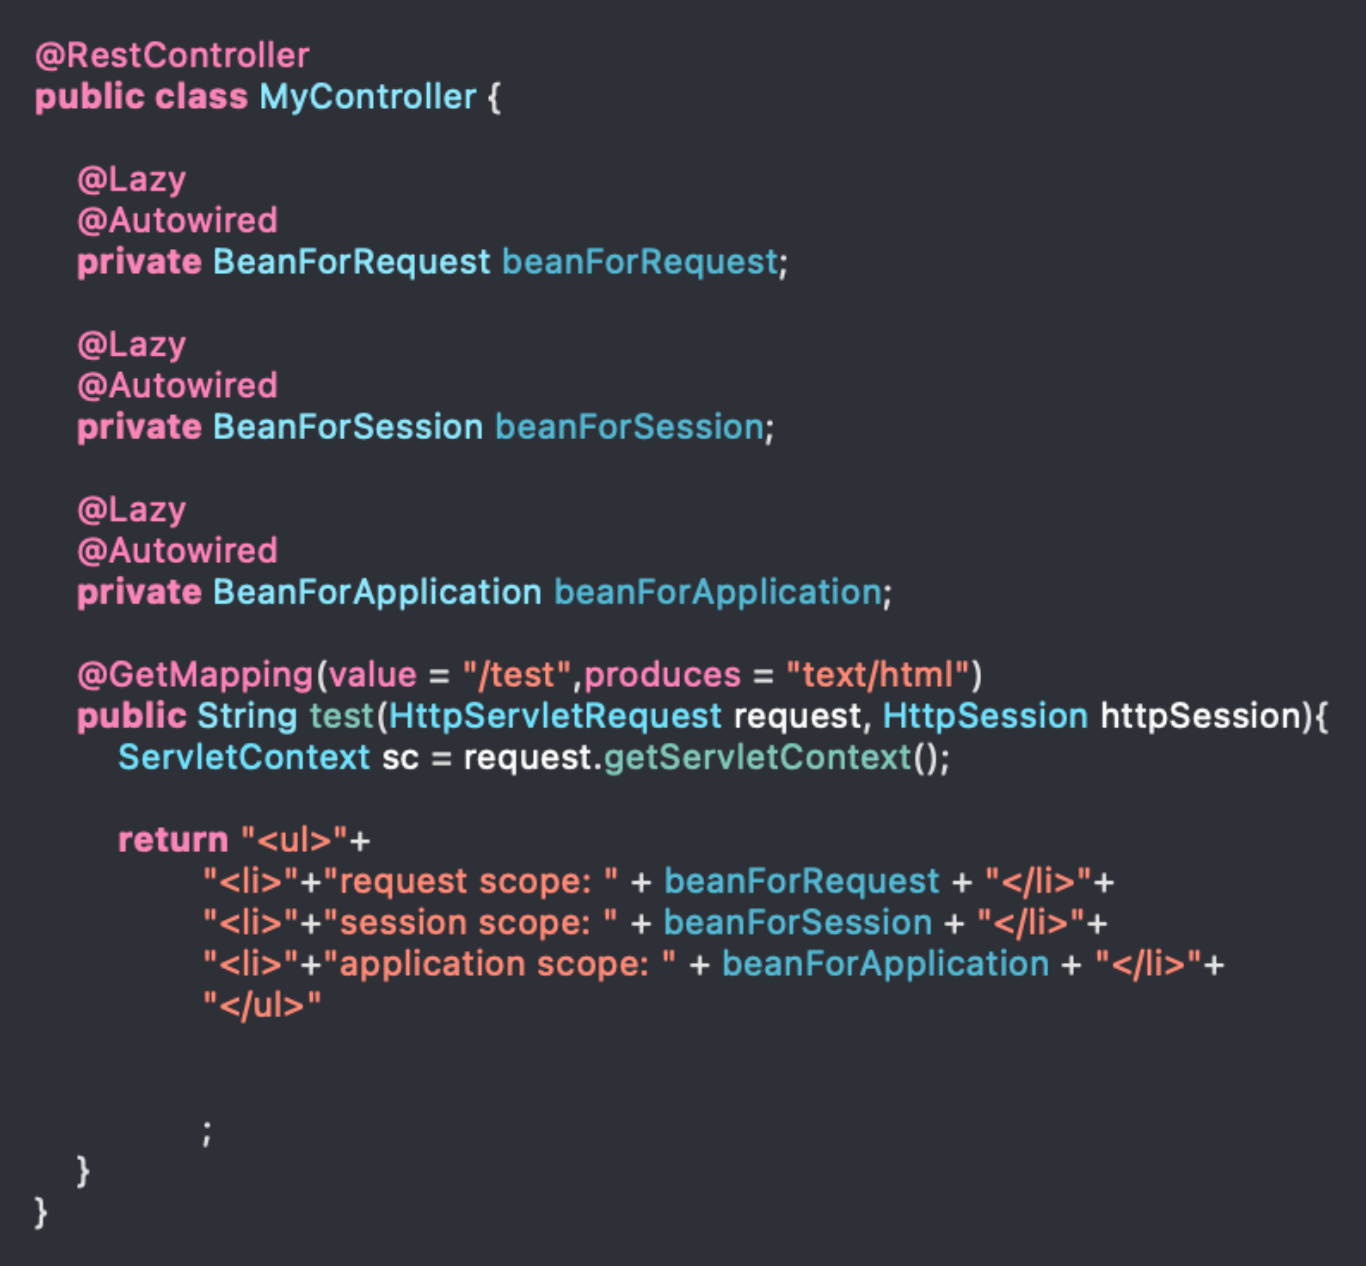
再定义一个controller注入这三个bean对象
启动应用程序
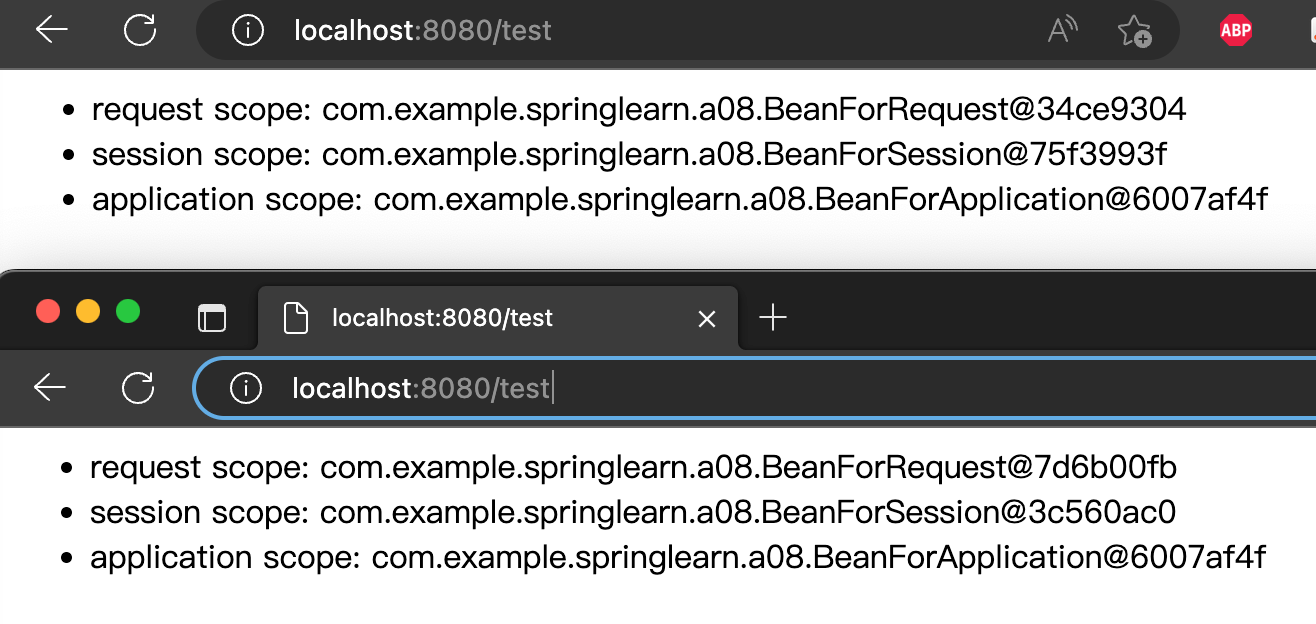
访问test接口可以看到如下:
每次访问request对象不同,而session跟application scope的对象是同一个

再开一个浏览器访问,会发现session的也不同了。
Scope的销毁
查看控制台的输出,可以看到在我们每次浏览器刷新的时候request作用域的bean调用了销毁方法,再session过期的时候session作用域的对象调用了销毁方法。

在singleton中使用其它几种scope的注意事项
我们这里定义一个单例的Bean E,然后在其中注入了一个多例的F1
@Component
public class E {

    @Autowired
    private F1 f1;

    public F1 getF1() {
        return f1;
    }
}
@Scope("prototype")
@Component
public class F1 {
}
我们两次调用e.getF1()发现注入的是同一个对象。
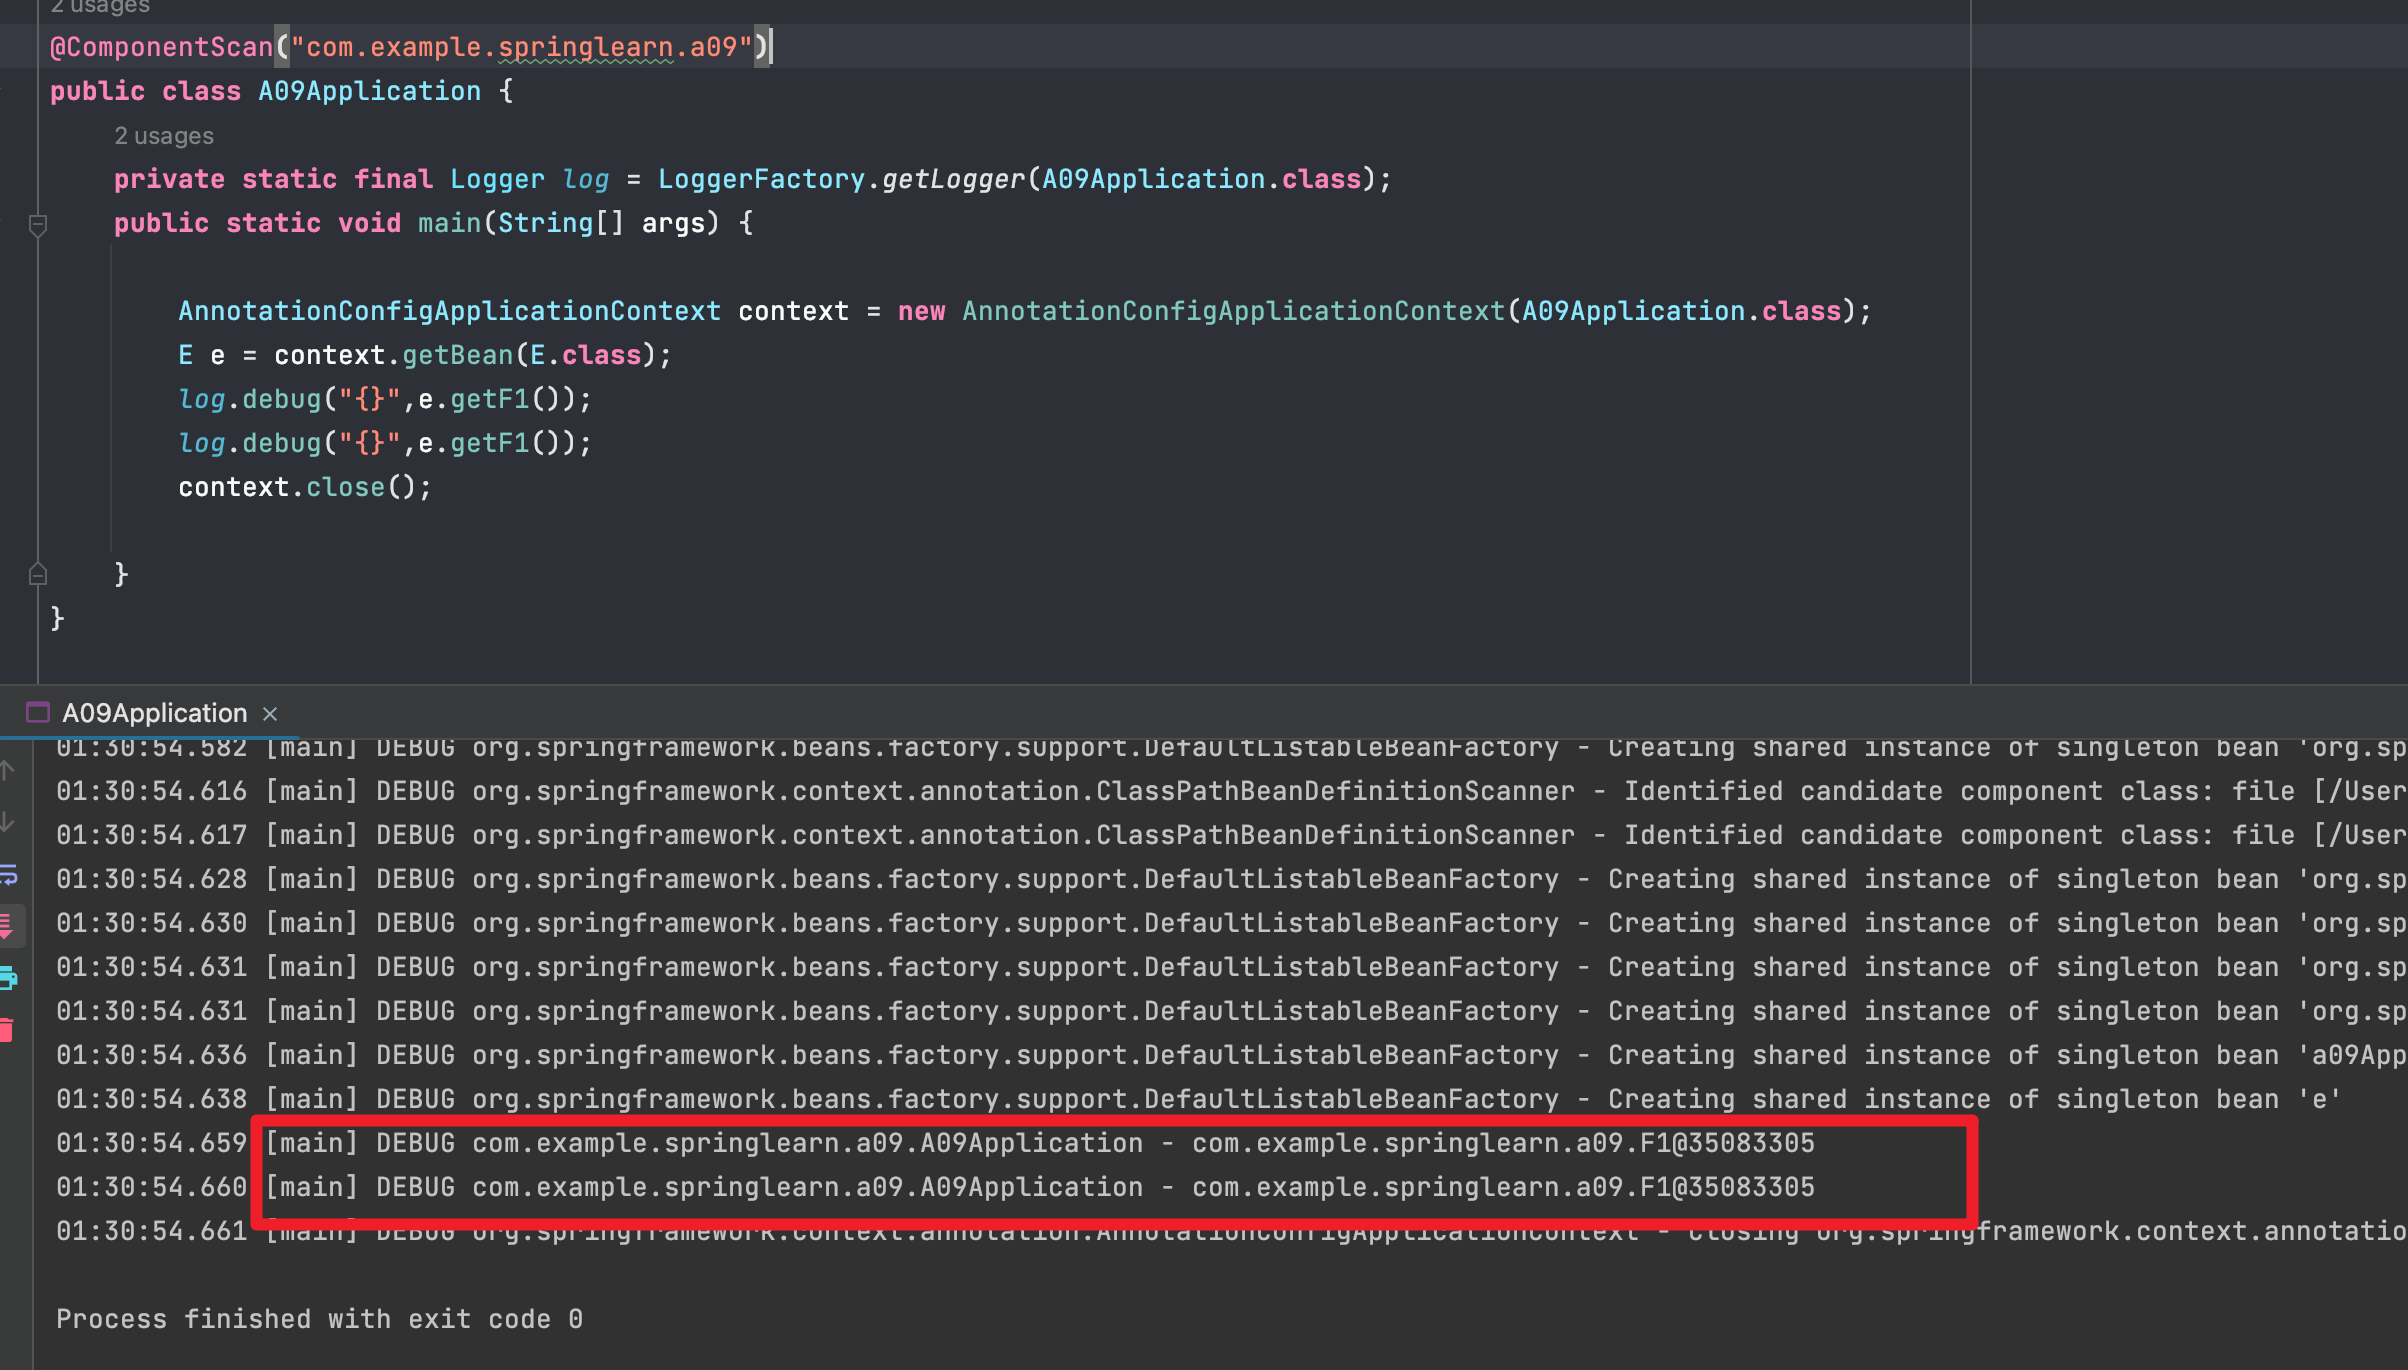
我们发现在单例中注入多例的时候失效了,为什么会失效呢?
因为对于单例对象来讲,依赖注入仅发生了一次,后续再没有用到多列的F,因此E用的始终是第一次依赖注入的F。
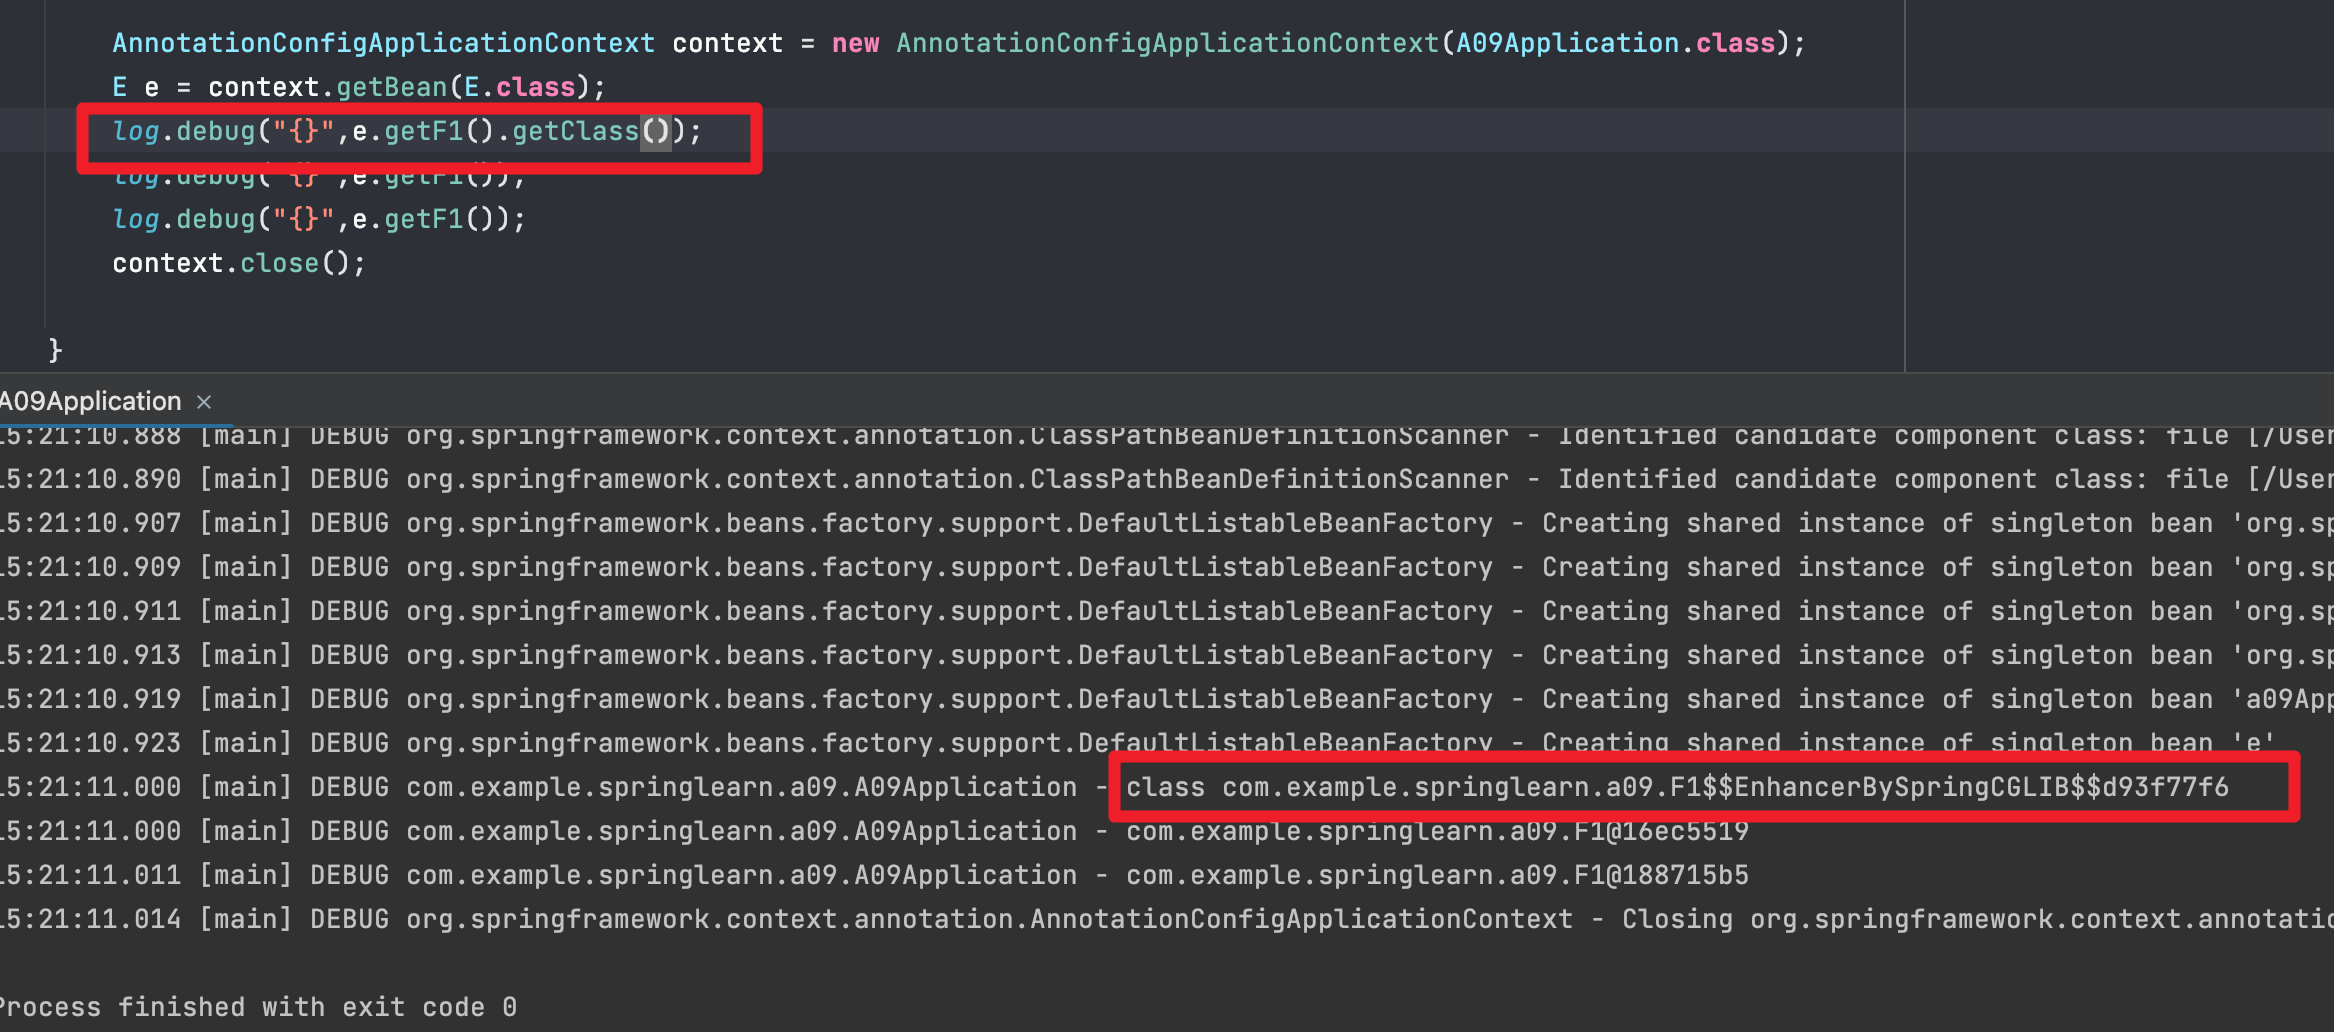
解决办法:
- 使用
@Lazy生成代理,代理的对象虽然还是同一个,但当每次使用代理对象的任意方法时,由代理创建新的f对象。

它的真实类型也变成了被CGLIB增强的代理类
-
在Score中添加一个proxyMode属性
ScopedProxyMode.TARGET_CLASS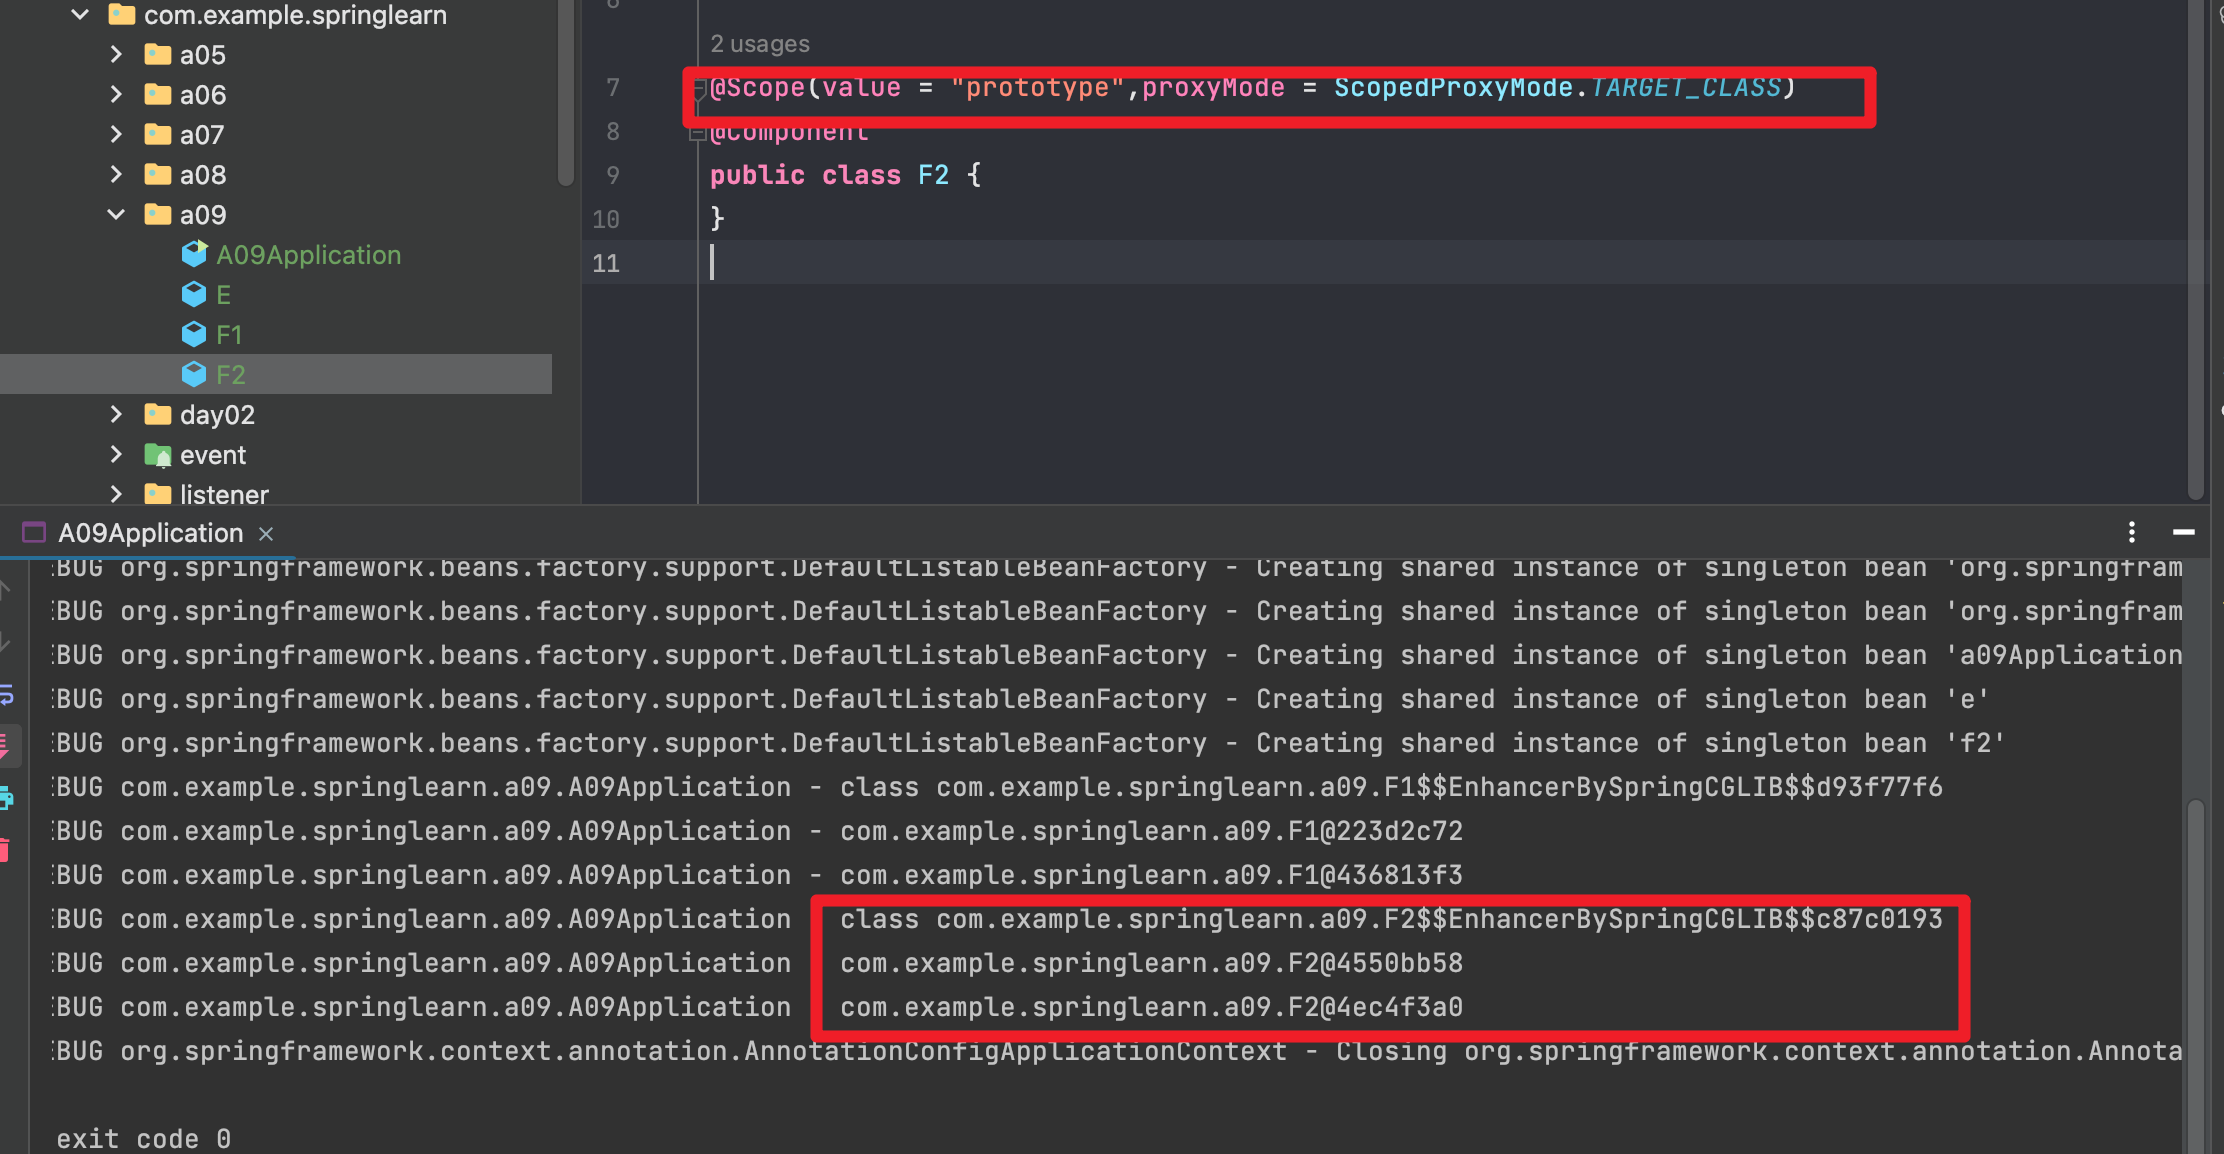
-
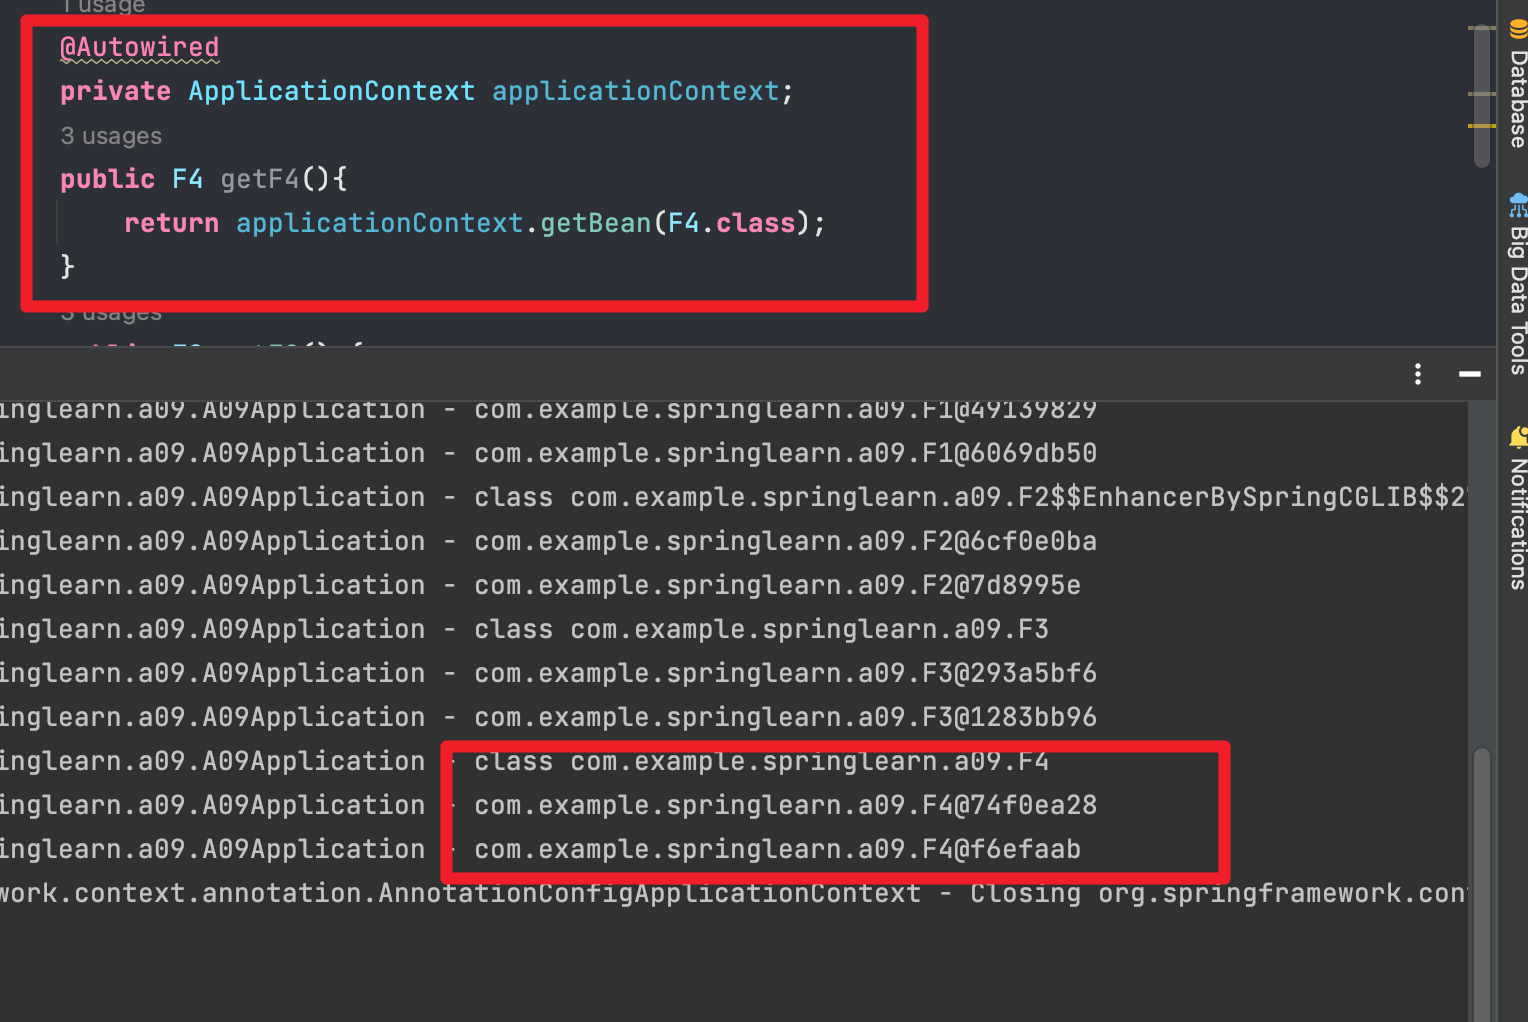
通过ObjectFactory方法注入,然后调用
getObject方法,用的是工厂而非代理模式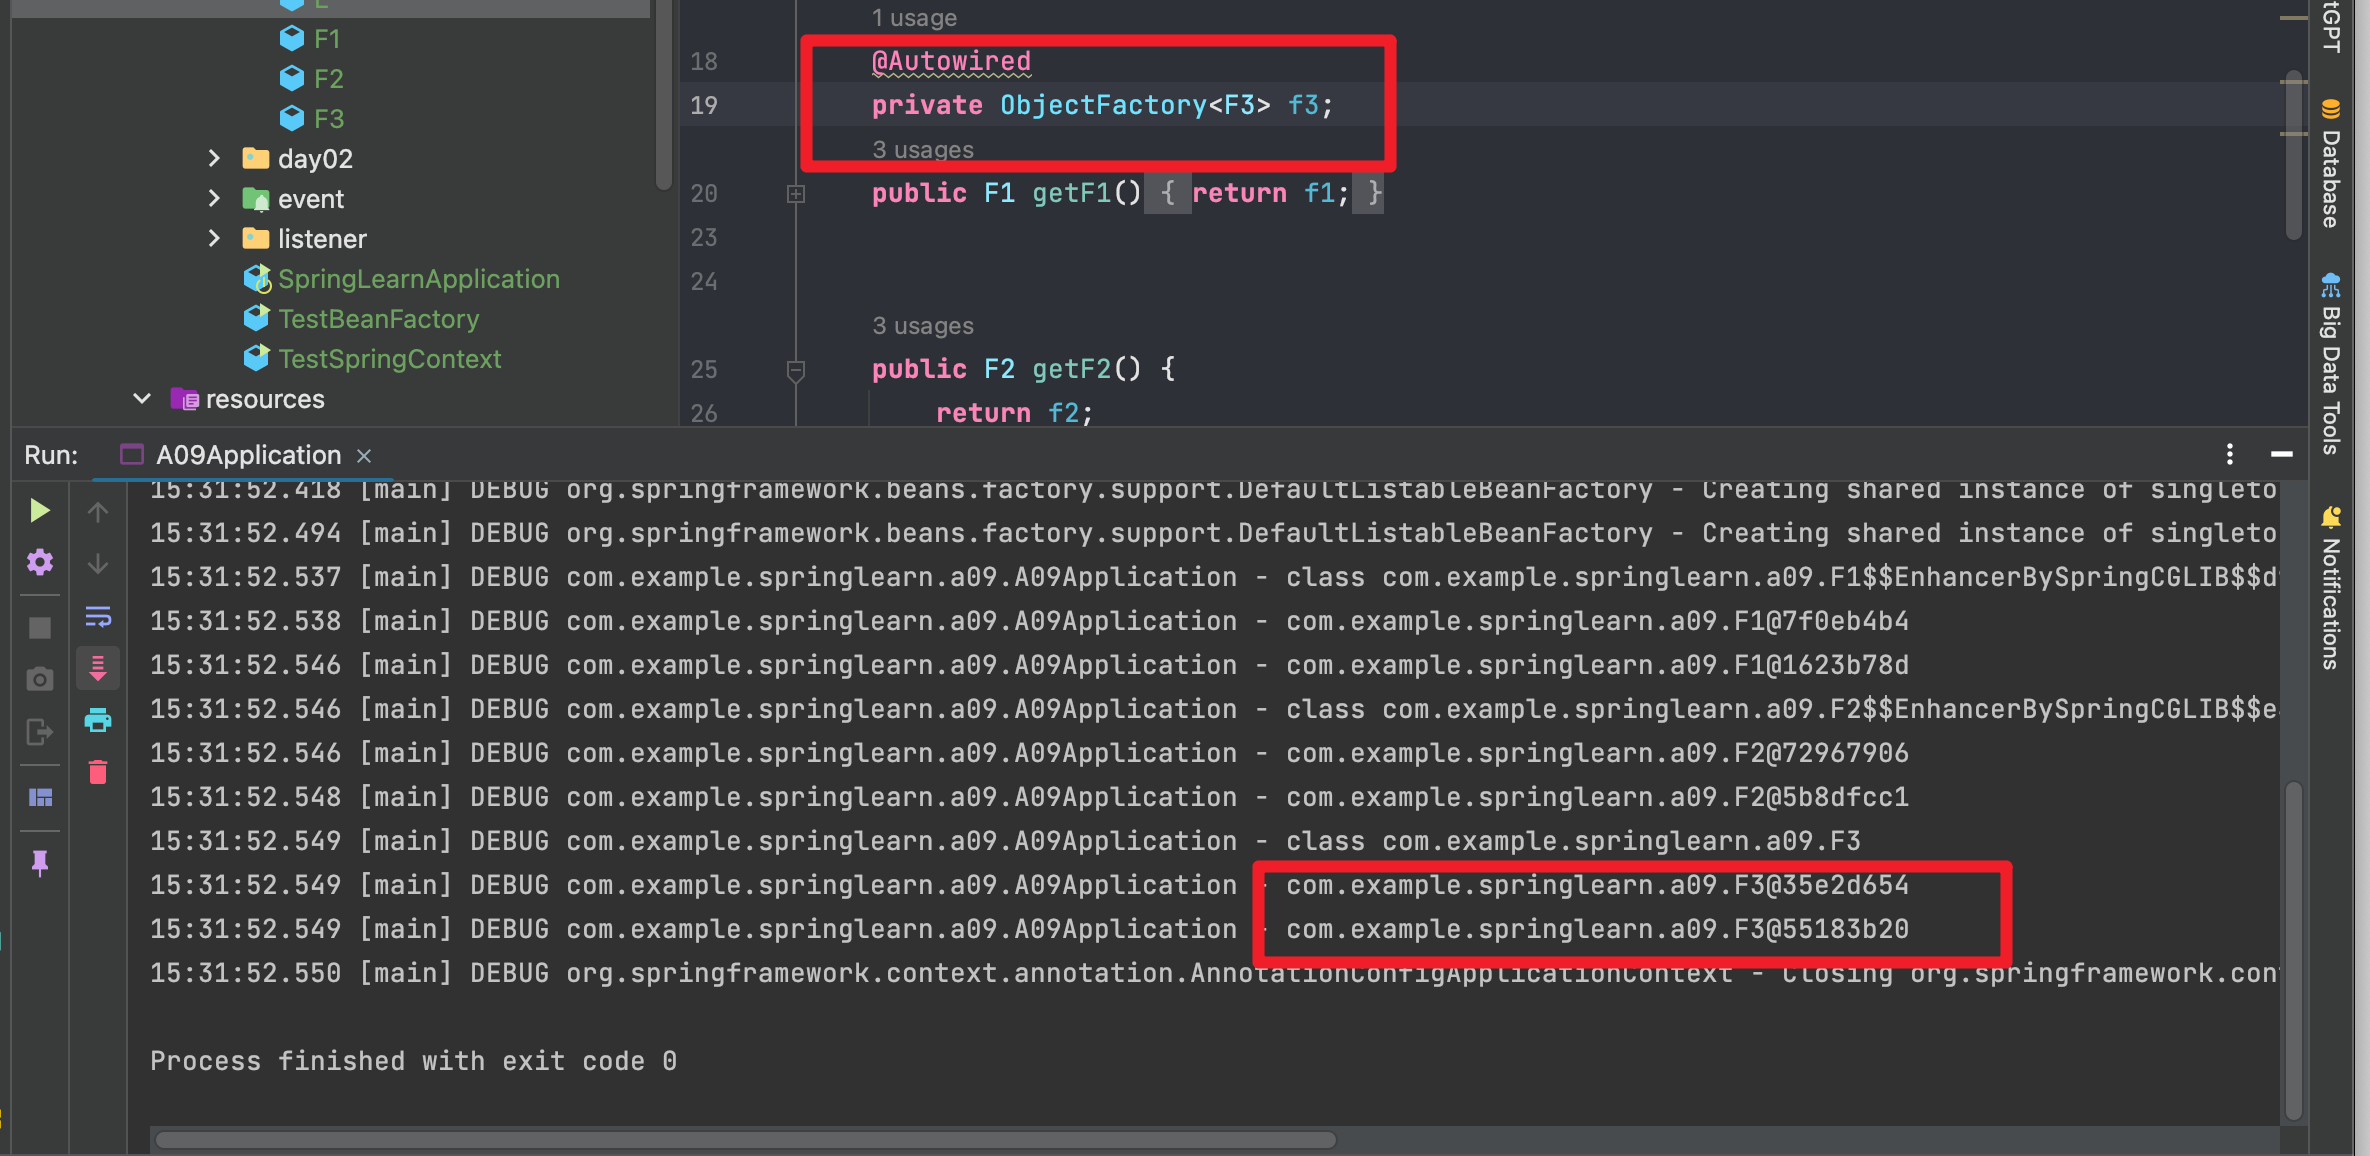
-
通过ApplicationContext直接获取。

 浙公网安备 33010602011771号