
网页伪静态、视图层、模板层
网页伪静态、视图层、模板层
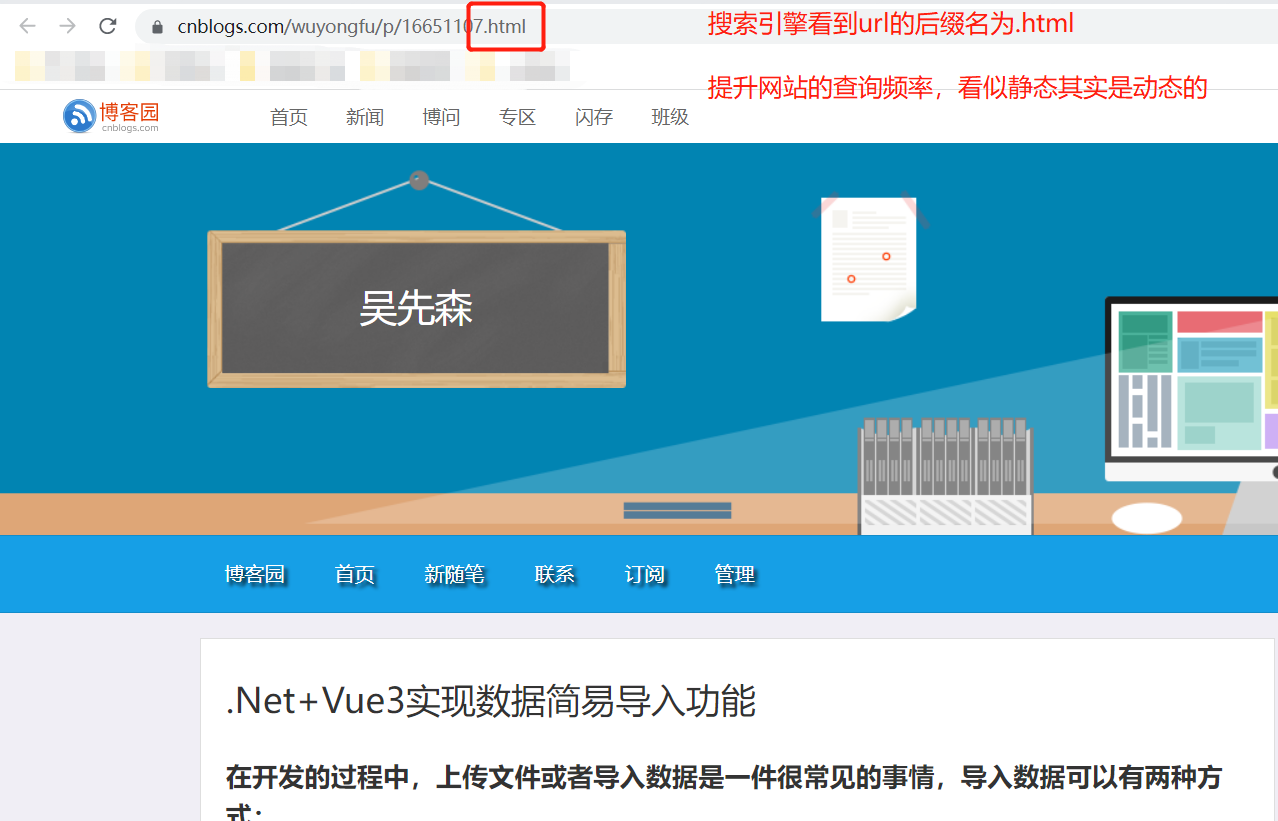
一、网页伪静态
将动态网页伪装成静态网页,从而提升网页被搜索引擎收录的概率
表现形式:网址看着像一个具体的文件路径


def index(request):
    from django.shortcuts import HttpResponse
    return HttpResponse('哈哈哈,我不困')
urlpatterns = [
    path('index.html', view.index)
]
二、视图层
1、视图函数返回值
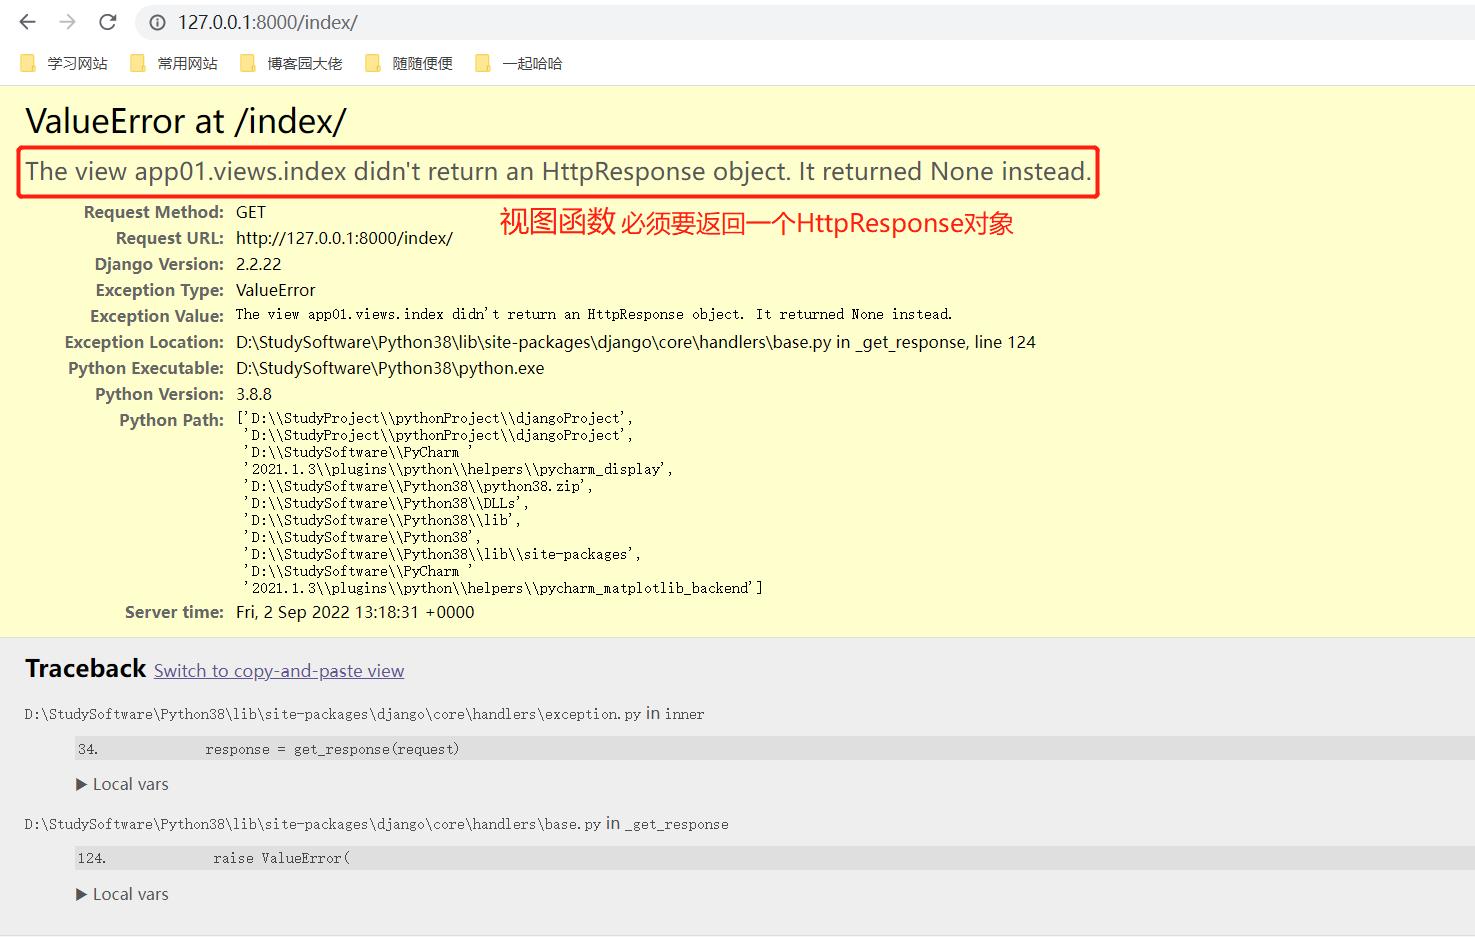
'''视图函数必须要返回一个HttpResponse对象'''
def index(request):
    # class HttpResponse(HttpResponseBase):
    #     pass
    # return HttpResponse('下雨了,凉快!')  # 类名加括号实例化产生一个对象

    # def render():
    #     return HttpResponse(content, content_type, status)
    # return render()  # 函数名加括号执行优先级最高,执行上面render函数,然后返回一个HttpResponse对象

    # def redirect():
    #                      HttpResponsePermanentRedirect是HttpResponse的子类
    #     redirect_class = HttpResponsePermanentRedirect if permanent else HttpResponseRedirect
    #     return redirect_class()
    # >>>
    # class HttpResponsePermanentRedirect(HttpResponseRedirectBase):
    #     pass
    return redirect()  # 通过继承HttpResponse子类
2、JsonResponse方法
对于JSON模块:
user_dict = {'name': 'jason老师', 'pwd': 123, 'hobby': ['sleep', 'eat', 'drink']}
json_str = json.dumps(user_dict, ensure_ascii=False) # 防止编码问题
return HttpResponse(json_str) # {"name": "jason老师", "pwd": 123, "hobby": ["sleep", "eat", "drink"]}
对于JsonResponse模块(django中使用):
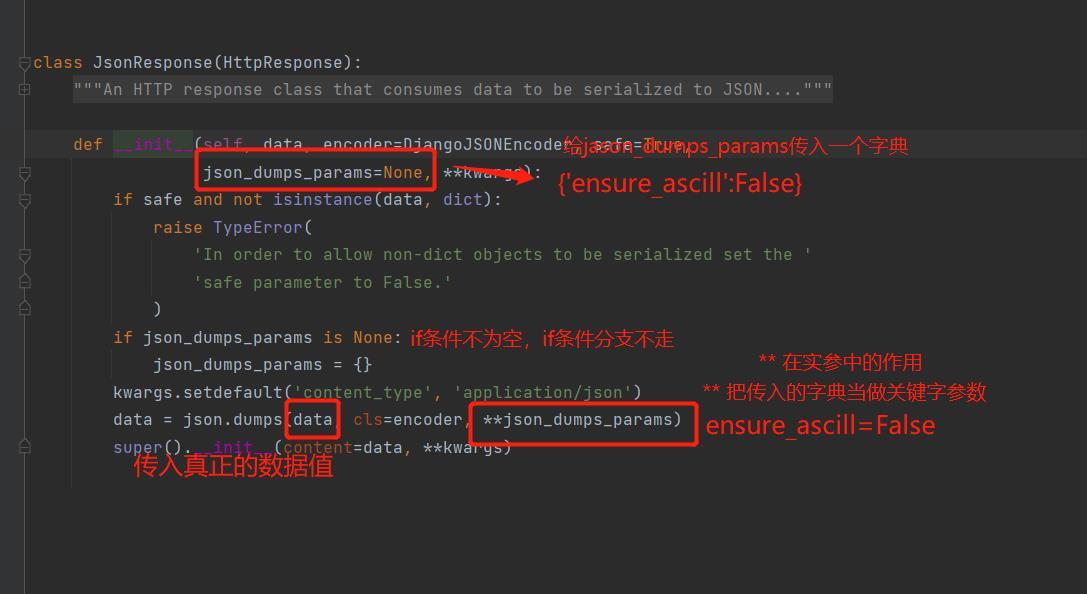
主要源码(删除了部分):
class JsonResponse(HttpResponse):
def __init__(self, data, encoder=DjangoJSONEncoder, safe=True,
json_dumps_params=None, **kwargs):
if json_dumps_params is None:
json_dumps_params = {}
kwargs.setdefault('content_type', 'application/json')
data = json.dumps(data, cls=encoder, **json_dumps_params)
super().__init__(content=data, **kwargs)
1)字典使用:返回值的JsonResponse加入参数:json_dumps_params={'ensure_ascii': False}
from django.http import JsonResponse
user_dict = {'name': 'jason老师', 'pwd': 123, 'hobby': ['sleep', 'eat', 'drink']}
return JsonResponse(user_dict, json_dumps_params={'ensure_ascii': False}) # {"name": "jason老师", "pwd": 123, "hobby": ["sleep", "eat", "drink"]}
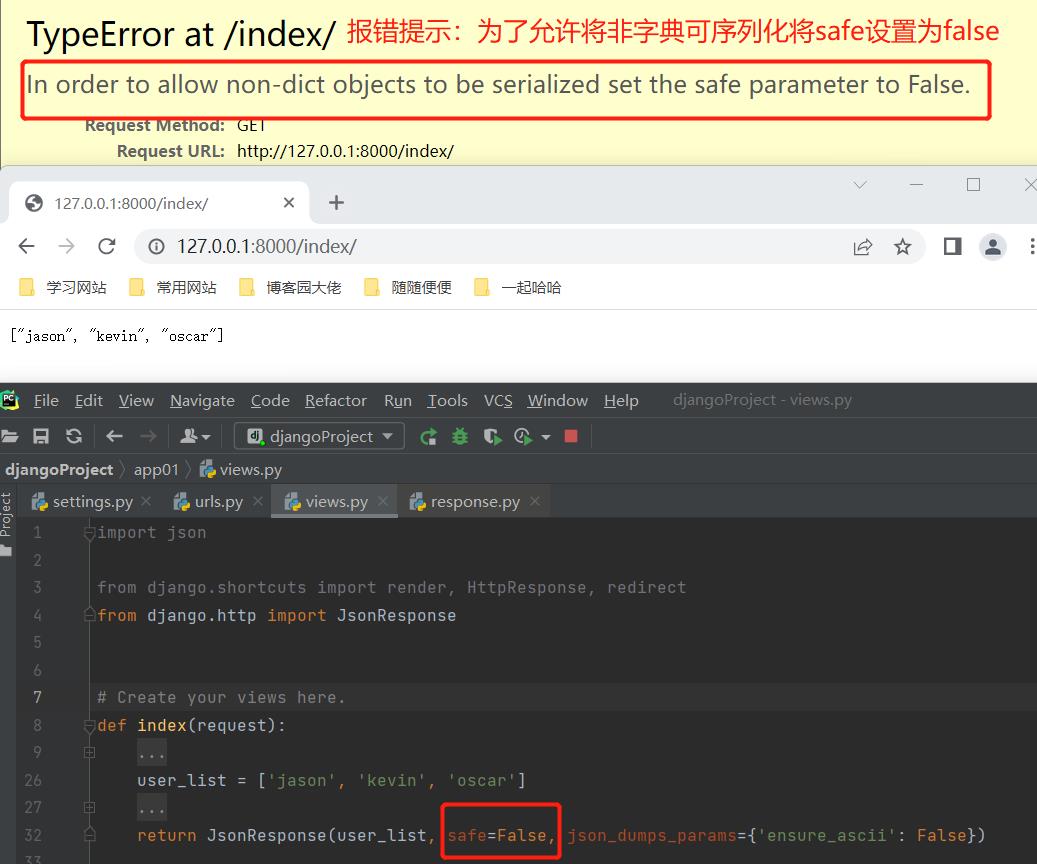
2)列表使用
user_list = ['jason', 'kevin', 'oscar']
return JsonResponse(user_list, json_dumps_params={'ensure_ascii': False})
# 报错:In order to allow non-dict objects to be serialized set the safe parameter to False.
# 报错已经提示:为了能够允许非字典的对象可以被序列化让 safe字段为False
return JsonResponse(user_list, safe=False, json_dumps_params={'ensure_ascii': False}) # ["jason", "kevin", "oscar"]
源码分析:
列表报错:
3、form表单携带文件数据
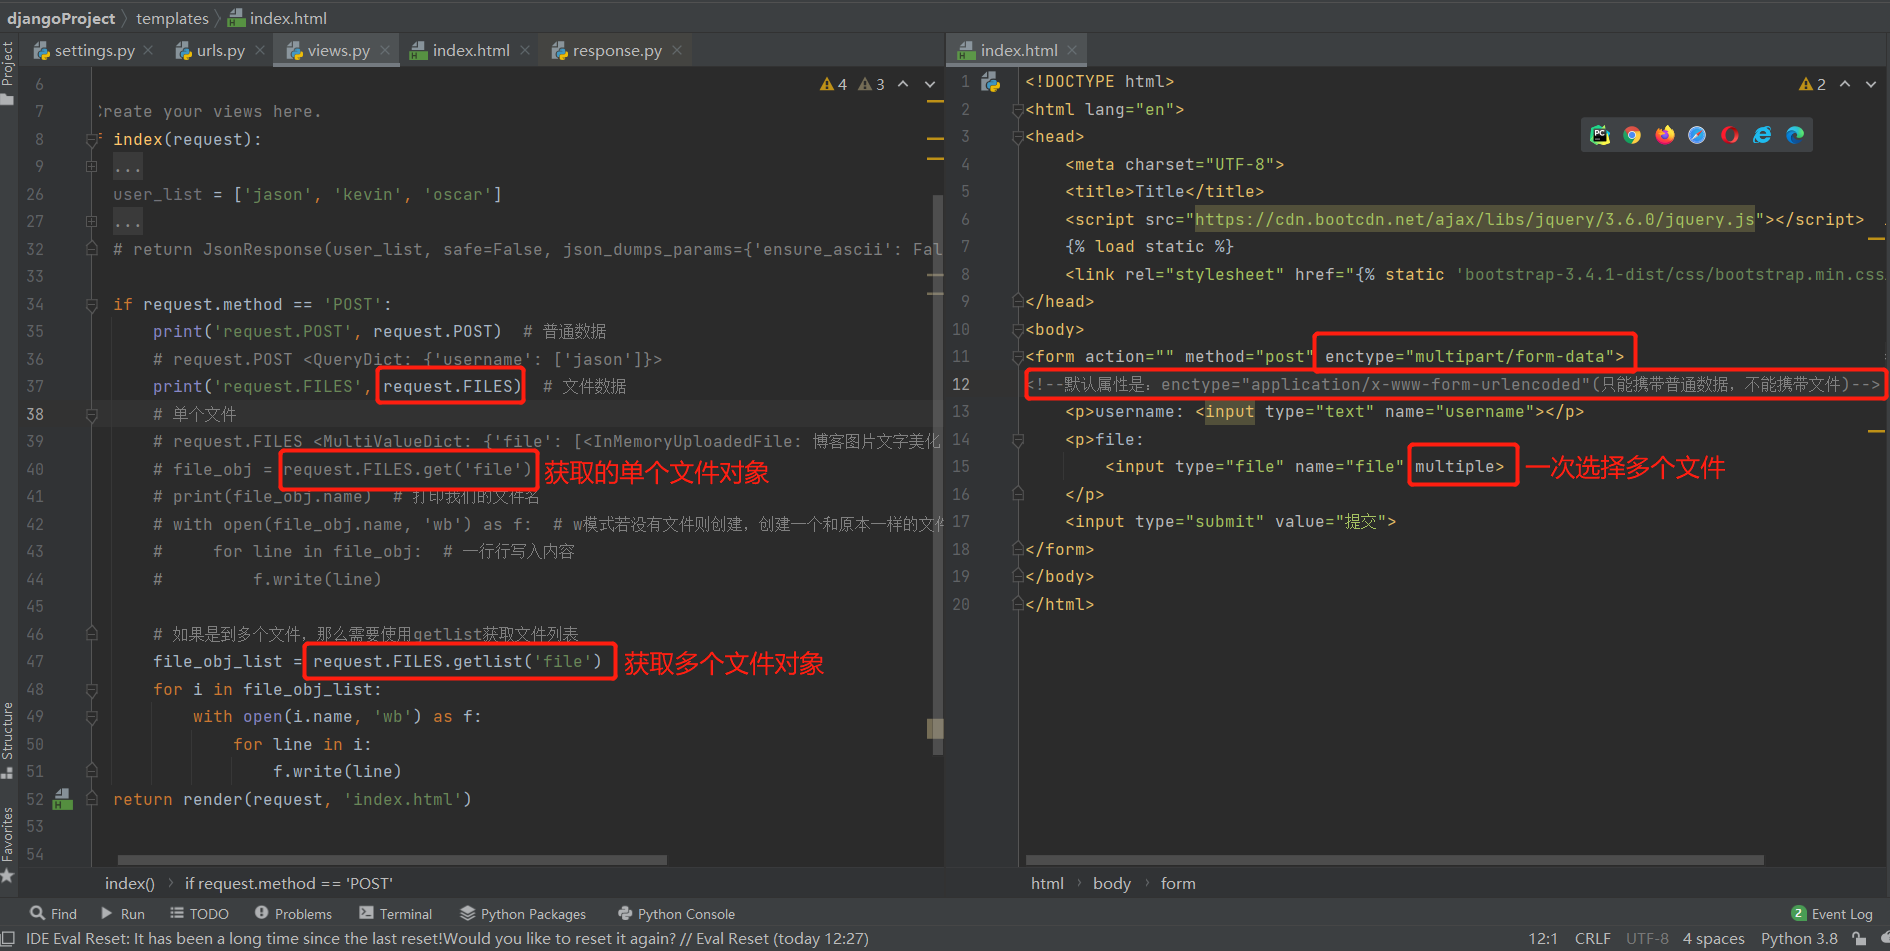
form表单需要具备的条件:
1)method属性值必须是:post
2)enctype属性值必须是:enctype="multipart/form-data"
3)后端获取文件数据的操作:request.FILES
单个文件:
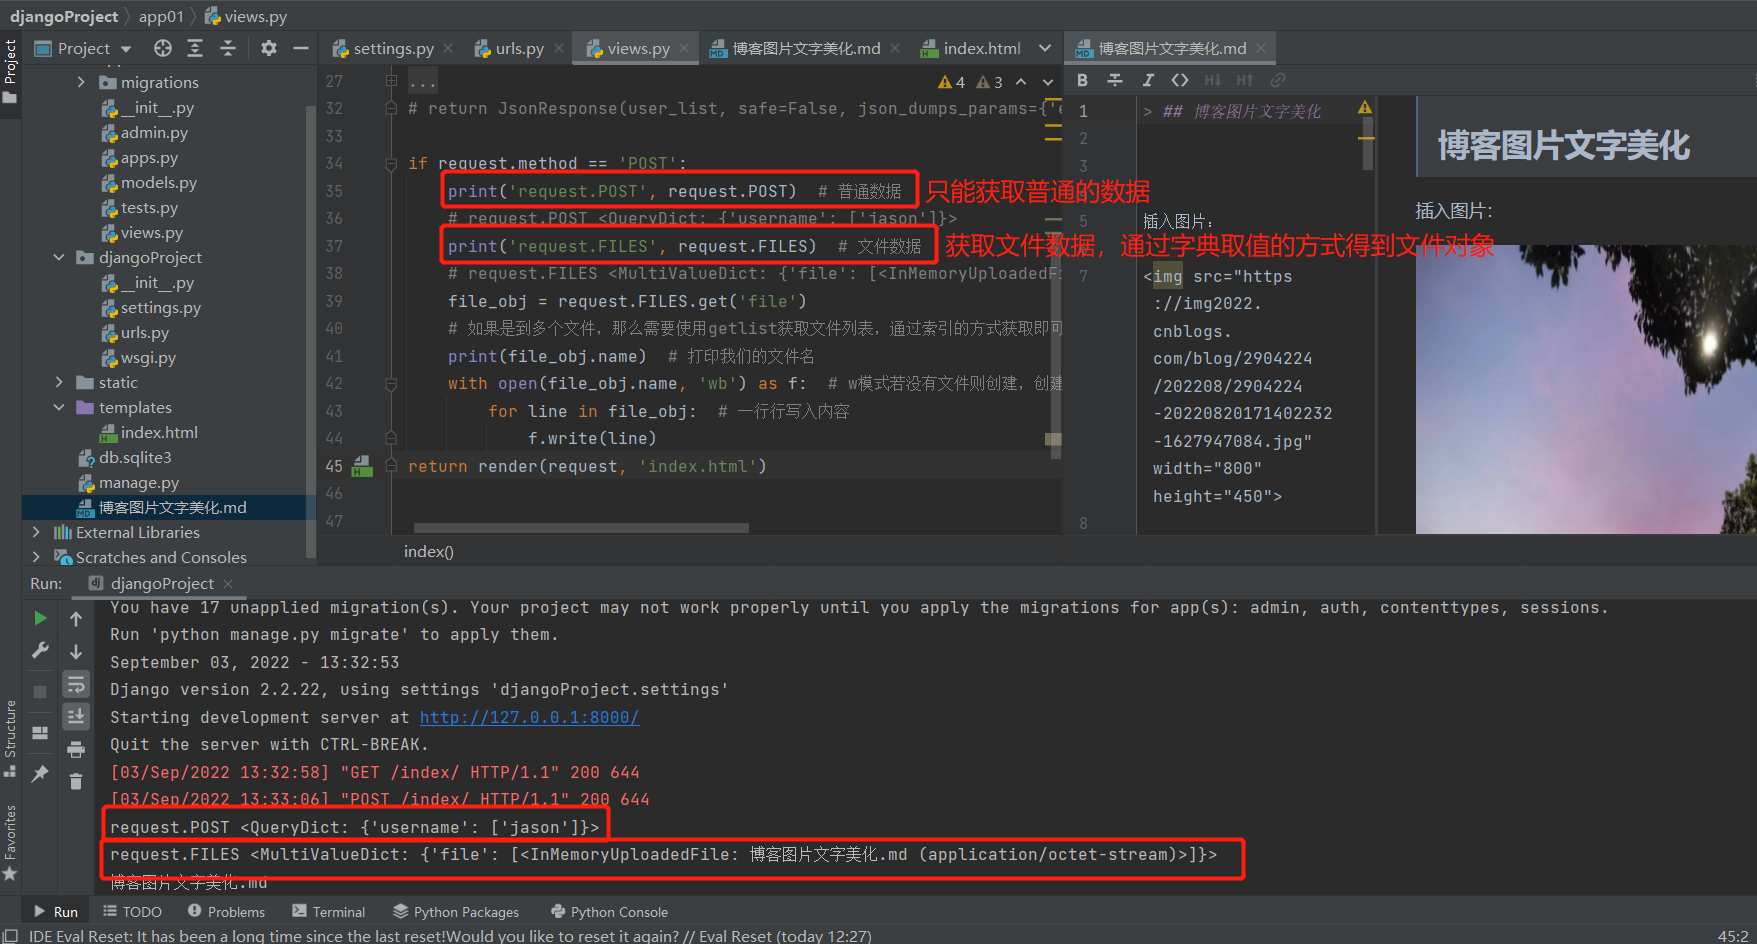
def index(request):
if request.method == 'POST':
print('request.POST', request.POST) # 普通数据
# request.POST <QueryDict: {'username': ['jason']}>
print('request.FILES', request.FILES) # 文件数据
# request.FILES <MultiValueDict: {'file': [<InMemoryUploadedFile: 博客图片文字美化.md (application/octet-stream)>]}>
file_obj = request.FILES.get('file')
# 如果是到多个文件,那么需要使用getlist获取文件列表,通过索引的方式获取即可
print(file_obj.name) # 打印我们的文件名
with open(file_obj.name, 'wb') as f: # w模式若没有文件则创建,创建一个和原本一样的文件
for line in file_obj: # 一行行写入内容
f.write(line)
return render(request, 'index.html')
html:<input type="file" name="file">
多个文件:
def index(request):
if request.method == 'POST':
print('request.POST', request.POST) # 普通数据
# request.POST <QueryDict: {'username': ['jason']}>
print('request.FILES', request.FILES) # 文件数据
# request.FILES <MultiValueDict: {'file': [<InMemoryUploadedFile: 复习.md (application/octet-stream)>, <InMemoryUploadedFile: 今日考题.md (application/octet-stream)>]}>
file_obj_list = request.FILES.getlist('file')
for i in file_obj_list:
with open(i.name, 'wb') as f:
for line in i:
f.write(line)
return render(request, 'index.html')
html:<input type="file" name="file" multiple>
单个文件:
多个文件:
4、FBV与CBV
FBV:基于函数的视图
def index(request):
    return HttpResponse()
路由:path('index/',views.index)

CBV:基于类的视图
from django import views
# 定义类
class MyView(views.View):
    def get(self, request):
        return HttpResponse('我是CBV里面的get方法')  # 当朝浏览器发送一个get请求自动触发

    def post(self, request):
        return HttpResponse('我是CBV里面的post方法')  # 当朝浏览器发送一个post请求自动触发
路由:path('func/', views.MyView.as_view())  # CBV路由匹配 类名点方法名
'''
不需要通过rquest.method方法来判断当前是什么请求,CBV会自动判断,如果是get请求方式自动触发get方法,如果是post请求方式自动触发post方法。
'''
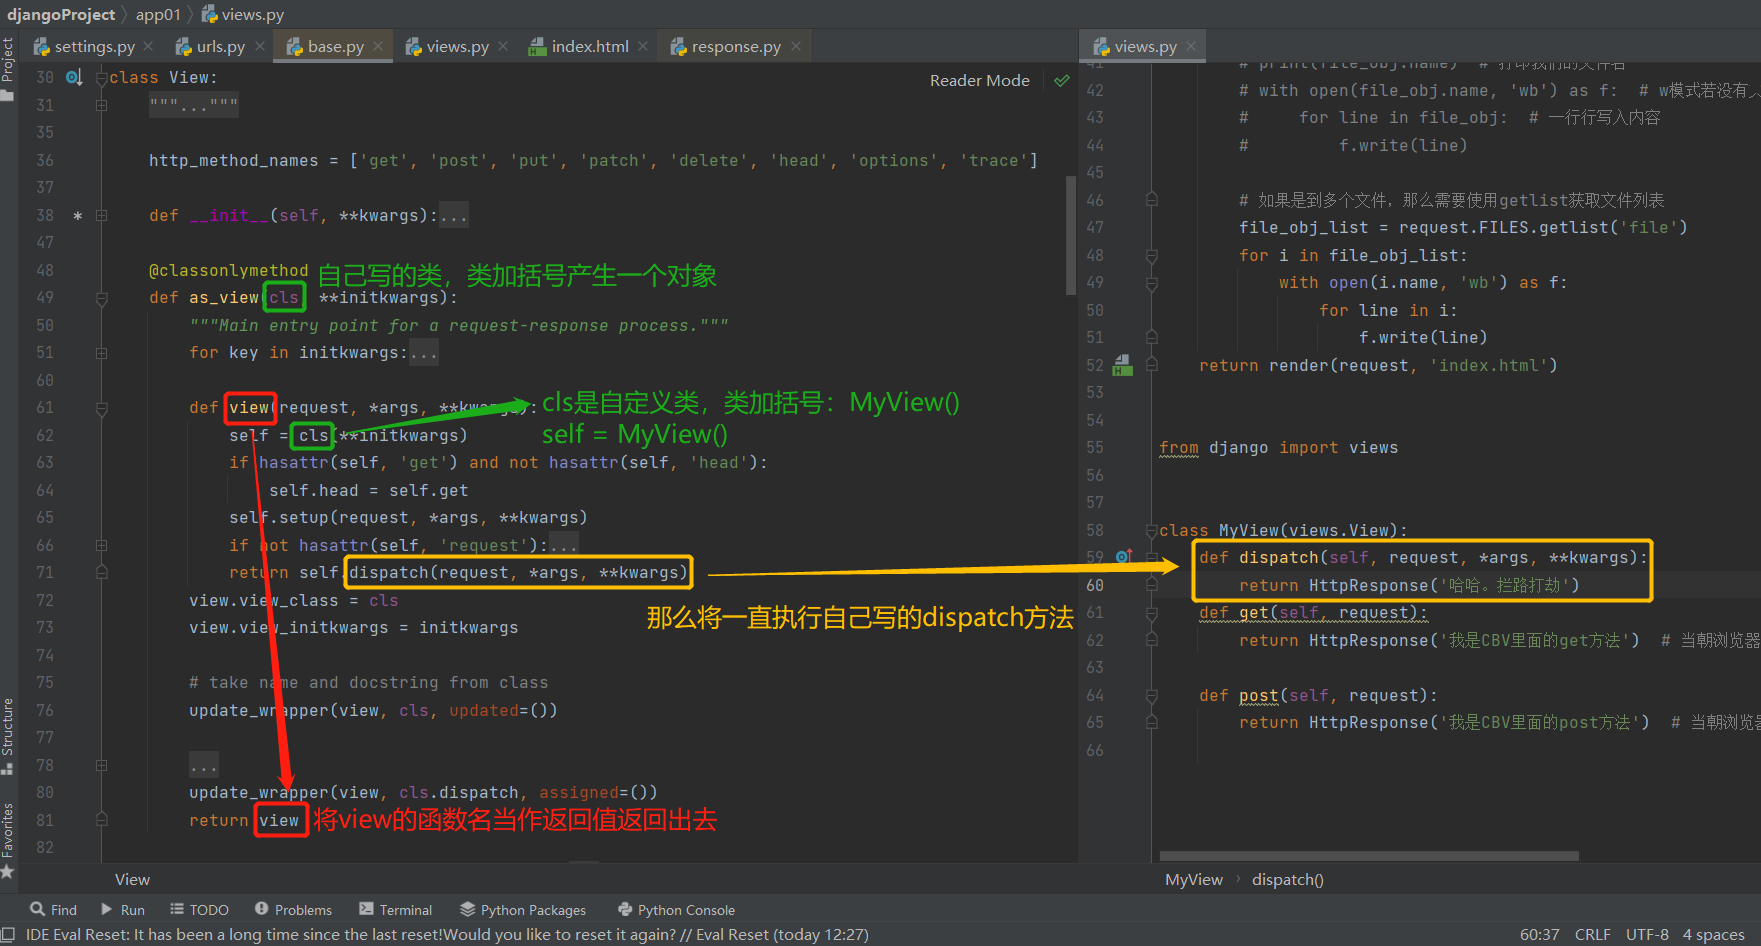
5、CBV源码分析(重要)
源码分析入口:
path('func/', views.MyView.as_view()) # 自己写的类没有as_view这个方法,找父类View | as_view()函数名加括号执行优先级最高
# CBV路由匹配 类名点方法名(类点名字加括号可以看成对象点名字加括号,那么对象后面点的是方法)
# 要么是普通的函数,要么是绑定给类的方法,类来调,自动将类当做参数传进去
# '''
# 类里面定义的方法默认是绑定给对象使用的
# @classmethod 绑定给类的方法 类来调将类当做第一个参数传入
# @staticmethod 静态方法 无论谁来调用都必须按照普普通通的函数传参方式
# 类/对象点属性查找顺序是:先找自己,再找产生对象/这个类的父类
# '''
1)绑定给类的as_view方法
def as_view(...):
def view(...):
pass
return view
2)CBV路由匹配的本质:跟FBV是一致的
>>>变形
path('func/', views.view) # 当路由匹配到视图函数则执行view函数
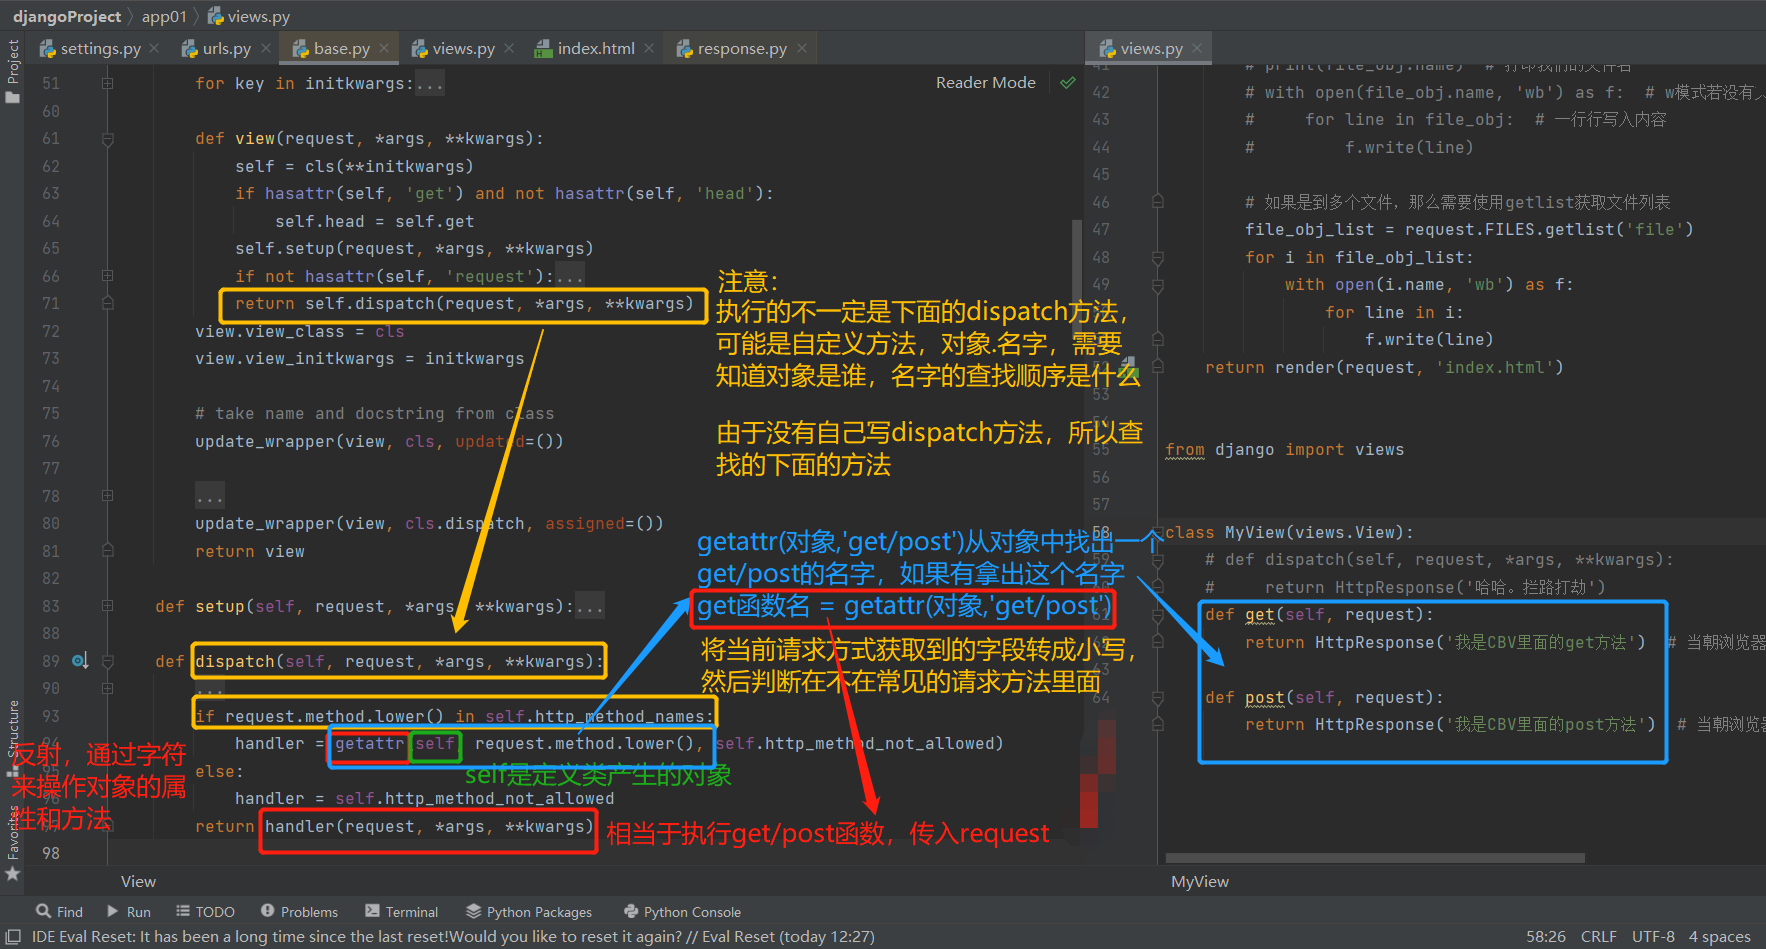
3)访问func触发视图函数view执行
def view(...):
self = cls(...)
return self.dispatch(...)
'''涉及到对象点名字一定要确定对象是谁,再确定查找顺序'''
4)研究dispatch方法
def dispatch(...):
handler = getattr(self, request.method.lower(), self.http_method_not_allowed)
return handler(...) # return handler()
三、模板层
1、模板语法传值
1.模板语法传值
方式一:指名道姓 # 指名道姓传参,不浪费资源
return render(request, 'modal.html', {'name': name, 'age': age, 'gender': gender})
方式二:关键字:locals()
'''locals()将函数体里面所有的局部名称空间的名字传给前面的页面'''
return render(request,'modal.html',locals())
views.py:
def modal(request):
name = 'jason'
age = 18
gender = 'male'
# return render(request, 'modal.html', {'name': name, 'age': age, 'gender': gender}) # 优点指名道姓传的很精确,缺点就是如果传入的值太多那么很麻烦
return render(request,'modal.html',locals()) # locals()将函数体里面所有的局部名称空间的名字传给modal.html页面
# 缺点:若用到的名字很少造成浪费
modal.html:
{{ request }}
{{ name }}
2.模板语法传值的范围
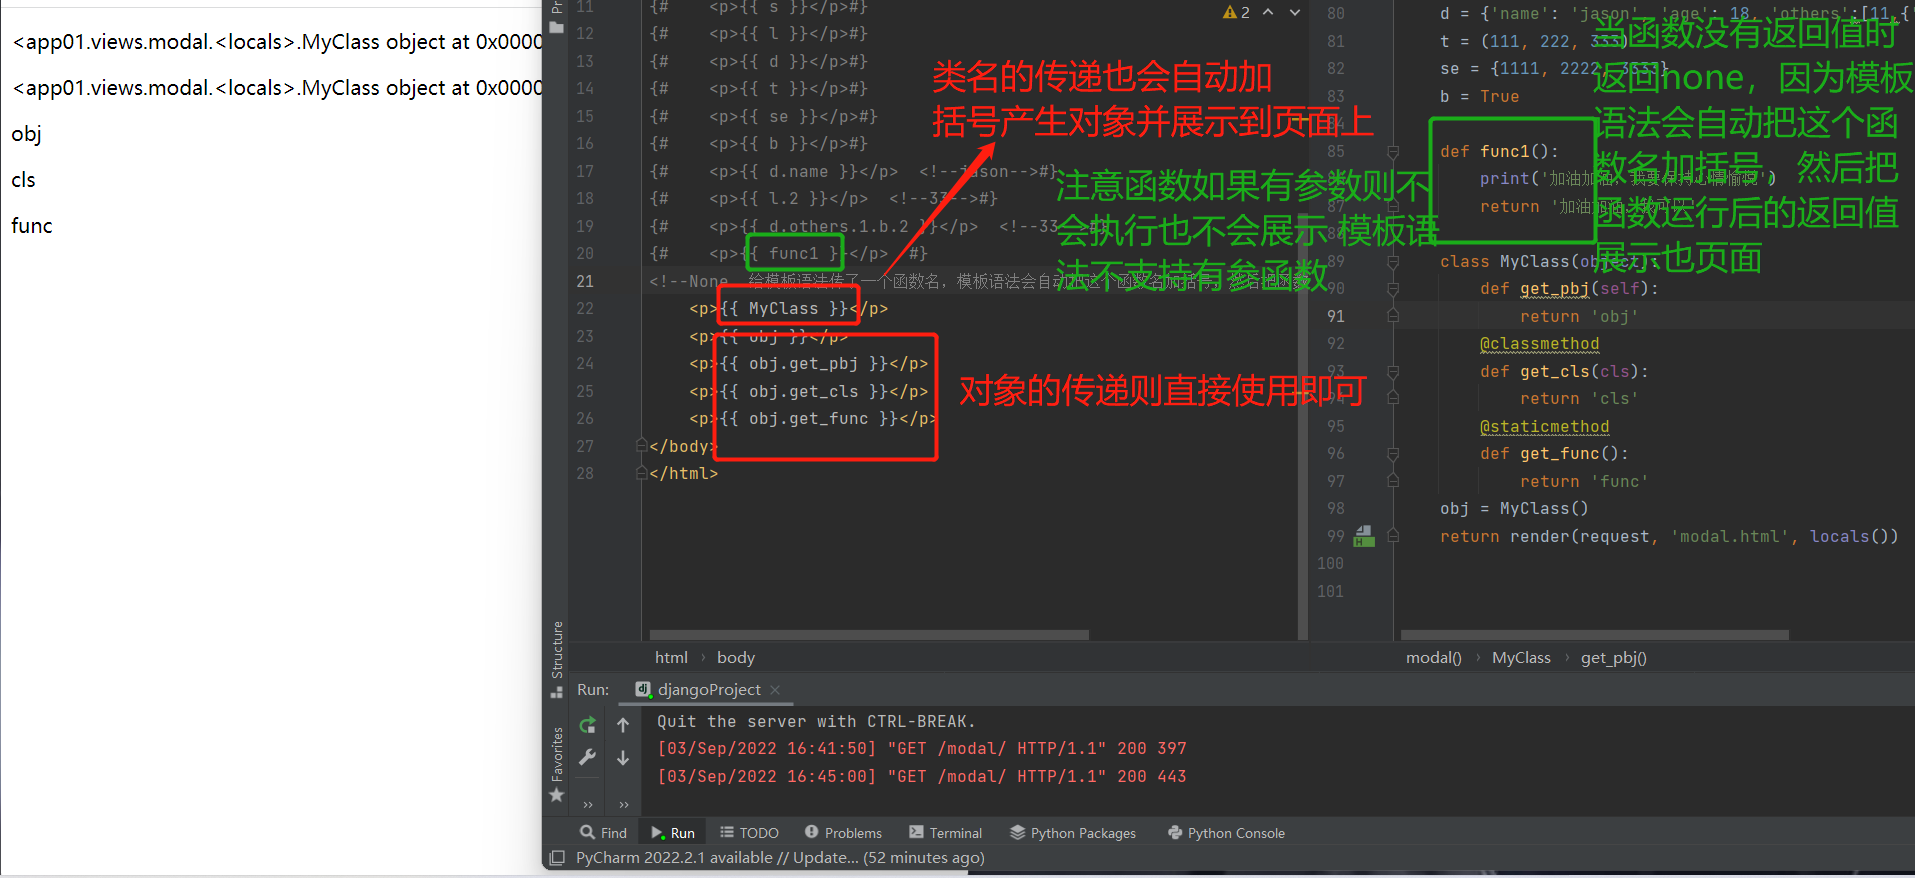
1)基本数据类型直接传递使用
2)函数名的传递使用:模板语法会自动把这个函数名加括号,然后把函数运行后的返回值展示也页面
注意:函数如果有参数则不会执行也不会展示,模板语法不支持有参函数
3)类名的传递使用:模板语法会自动把这个类名加括号,然后把函数运行后的返回值展示也页面
4)象的传递则直接使用
PS:模板语法会判断每个名字是否可以调用,如果可以则调用
'''Django的模板语法在操作容器类型的时候值允许使用句点符'''
2、模板语法之过滤器(类似于python内置函数)
'''
语法结构
	{{ 数据对象|过滤器名称:参数 }}  过滤器最多只能额外传输一个参数

过滤器会自动把 | 前面的数据当做方法的第一个参数传入,若想传入第二个参数需要 :
'''

PS:有时候html页面上的数据不一定非要在html页面上编写,也可以后端写好传入

html:
<p>统计长度:{{ s|length }}</p>
<p>加法运算:{{ i|add:123 }}、加法运算:{{ s|add:'hahaha' }}</p>
<p>日期转换(不要加百分号):{{ res|date:'Y-m-d H:i:s' }}</p>
<p>文件大小(将数字格式化成表示文件大小的单位):{{ file_size|filesizeformat }}</p>
<p>数据切片:{{ l|slice:'0:10' }}</p>
<p>字符截取(三个点算一个字符):{{ s1|truncatechars:6 }}</p>
<p>单词截取(按空格截取):{{ s1|truncatewords:6 }}</p>
# 重点:语法转义
<p>语法转义:{{ script_tag|safe }}</p>  <!--默认情况下不转,否则在脚本里写了死循环则页面绷了-->
<p>语法转义:{{ script_tag1|safe }}</p>
<p>后端转义:{{ res }}</p>

views.py:
    i = 123
    f = 11.11
    s = '加油加油'
    l = [11, 22, 33]
    d = {'name': 'jason', 'age': 18, 'others':[11,{'a':123,'b':[11,22,33]},22]}
    t = (111, 222, 333)
    se = {1111, 2222, 3333}
    b = True

    # import os
    # os.path.getsize()
    file_size = 2333334567

    s1 = 'my name is jason,my age is 18.my favorite fruit is apple.this is just so so'

    script_tag = '<h1>心静自然就能够干好了</h1>'
    script_tag1 = '<script>alert("心静")</script>'
    # 后端取消转义
    from django.utils.safestring import mark_safe
    script_tag2 = '<script>alert("可以从后端直接转义")</script>'
    res = mark_safe(script_tag2)
3、模板语法之标签(类似于python流程控制)
1.for
基本格式:
{% for 变量 in 值 %}
{{循环体}}
{% endfor %}
2.if
基本格式:
{% if判断语句 %}
if表达式为真执行的代码块
{% elif 条件 %}
if表达式为真执行的代码块
{% else %}
所有条件都不满足执行的代码块
{% endif %}
3.with起别名
{% with 变量 as a %} <!--给变量起了别名为a-->
代码块
{% endwith %}
eg:
{% if s %}
<p>哈哈哈</p>
{% elif l %}
<p>嘿嘿嘿</p>
{% else %}
<p>哦哦哦</p>
{% endif %}
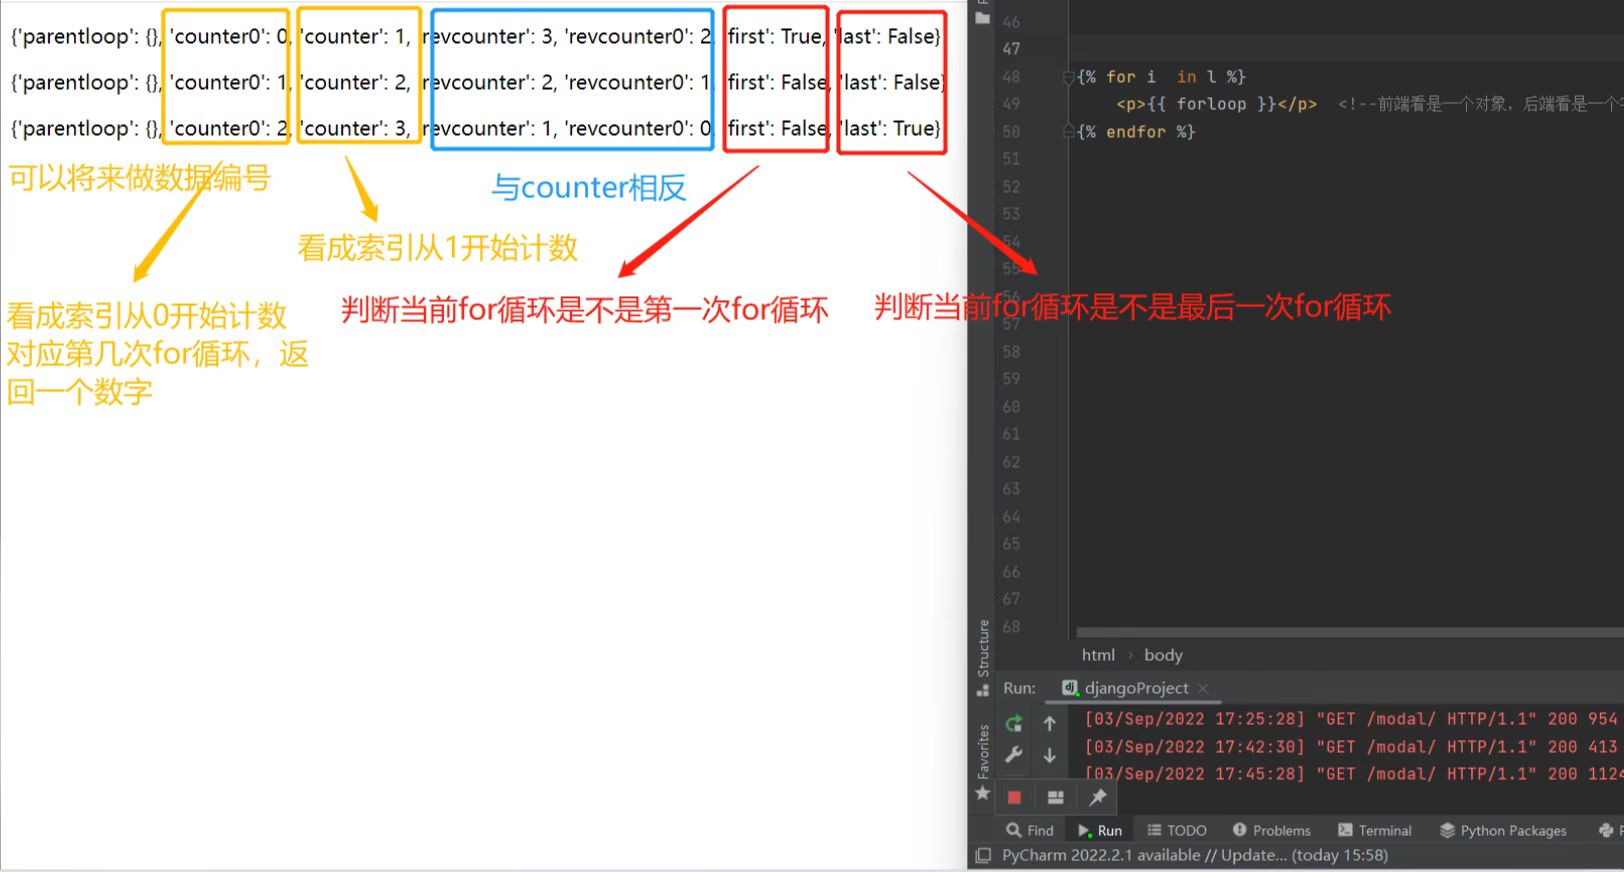
{% for i in l %}
<p>{{ forloop }}</p> <!--前端看是一个对象,后端看是一个字典-->
{% if forloop.first %}
<p>这是第一次</p>
{% elif forloop.last %}
<p>只是最后一次</p>
{% else %}
<p>{{ i }}</p>
{% endif %}
{% empty %} # 判断in后面是不是为空
<p>是个空,不能for循环</p>
{% endfor %}
{% with d.others.1.b.2 as a %} <!--给d.others.1.b.2起了别名为a-->
<p>{{ a }}</p>
{% endwith %}
4、自定义相关功能(了解)
'''
必须步骤:
1.在app应用下创建一个名字叫templatetags文件夹。
2.在该文件夹内创建一个任意名称的.py文件
3.在该py文件内必须写下两个语句
	from django import template
	register = template.Library()
4. 前端先使用{% load 自动模板语法文件的名字 %}
5. {{ 变量名|name指定名字(过滤器名字) }} 中 使用
'''

1.自定义过滤器
from django.template import Library
register = Library()
# 自定义过滤器(过滤器最多只有两个参数)
@register.filter(name='myfilter')
def my_add(a, b):
    return a + b

html页面中:
{% load mytag %}
{{ i|myfilter:1 }}  # 自定义过滤器:只能接收两个参数


2.自定义标签函数
from django.template import Library
register = Library()
# 自定义标签函数(可以接收任意的参数)
@register.simple_tag(name='mt')
def func(a,b,c,d):
    return a + b + c + d

html页面中:
{% load mytag %}
{% mt 1 2 3 4 %}  # 想传入几个参数就传入几个参数


3.自定义inclusion_tag
from django.template import Library
register = Library()
# 自定义inclusion_tag
@register.inclusion_tag(filename='it.html')
def index(n):
    html = []
    for i in range(n):
        html.append('第%s页' % i)
    return locals()  # locals()把html列表传给 it 这个页面,在页面上可以通过it用到html列表内的数据

html页面(完整页面):
{% load mytag %}
{% index 10 %}

it页面(不完整页面):
<ul>
    {% for i in html %}
        <li>{{ i }}</li>
    {% endfor %}
</ul>

解释:在完整的页面上调用一个inclusion_tag,执行一个函数会有返回值给到一个不完整的html页面(inclusion_tag作用于一个不是完整的html页面(局部的页面)),不是完整的html页面生成之后再放回完整的页面上
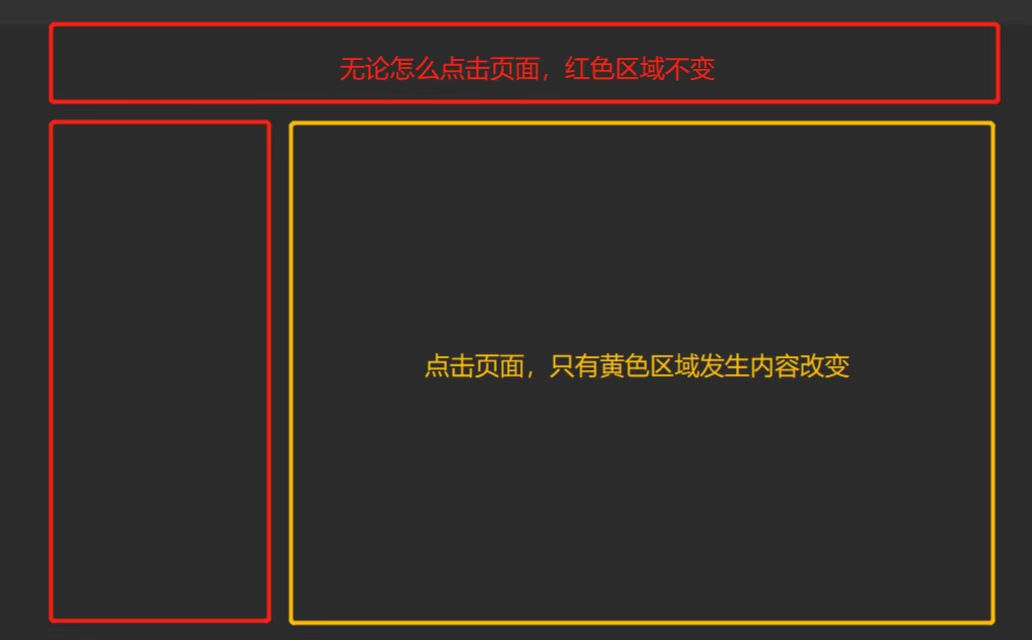
5、模板的继承与导入
模板继承
模板页面 models.html
先在模板中通过block划定将来可以被修改的区域
{% block 名字 %}
	可能需要替换的区域
{% endblock %}

子页面 xxx.html
{% extends 'models.html' %}  继承模板页面
{% block 名字 %}        引用
 	写新的代码替换
{% endblock %}

子页面可以重复父页面的内容:{{ block.super }}
"""
模板上最少应该有三个区域
	css区域、内容区域、js区域
子页面就可以有自己独立的css、js、内容
"""
{% block css %}
	被替换的区域
{% endblock %}

{% block content %}
	被替换的区域
{% endblock %}

{% block js %}
	被替换的区域
{% endblock %}


1)母板:
<!DOCTYPE html>
<html lang="en">
<head>
  <meta charset="UTF-8">
  <meta http-equiv="x-ua-compatible" content="IE=edge">
  <meta name="viewport" content="width=device-width, initial-scale=1">
  <title>Title</title>
  {% block page-css %}

  {% endblock %}
</head>
<body>

<h1>这是母板的标题</h1>

{% block page-main %}

{% endblock %}
<h1>母板底部内容</h1>
{% block page-js %}

{% endblock %}
</body>
</html>
'''我们通常会在母板中定义页面专用的CSS块和JS块,方便子页面替换。'''

2)继承母板:在子页面中在页面最上方使用下面的语法来继承母板
{% extends 'layouts.html' %}


3)块(block):
通过在母板中使用{% block  xxx %}来定义"块"。在子页面中通过定义母板中的block名来对应替换母板中相应的内容。
# 先在模板中通过block划定将来可以被修改的区域
{% block page-main %}
	可能需要替换的区域
{% endblock %}

4)组件:可以将常用的页面内容如导航条,页尾信息等组件保存在单独的文件中,然后在需要使用的地方按如下语法导入即可。
{% include 'navbar.html' %}
模板导入
类似于将html页面上的局部页面做成模块的形式 哪个地方想要直接导入即可展示

eg:有一个非常好看的获取用户数据的页面 需要在网站的多个页面上使用
    策略1:拷贝多份即可
    策略2:模板的导入

使用方式
	{% include 'menu.html' %}


【推荐】国内首个AI IDE,深度理解中文开发场景,立即下载体验Trae
【推荐】编程新体验,更懂你的AI,立即体验豆包MarsCode编程助手
【推荐】抖音旗下AI助手豆包,你的智能百科全书,全免费不限次数
【推荐】轻量又高性能的 SSH 工具 IShell:AI 加持,快人一步
· 震惊!C++程序真的从main开始吗?99%的程序员都答错了
· 别再用vector<bool>了!Google高级工程师:这可能是STL最大的设计失误
· 单元测试从入门到精通
· 【硬核科普】Trae如何「偷看」你的代码?零基础破解AI编程运行原理
· 上周热点回顾(3.3-3.9)