
mongodb分片部署
Mongodb 分片部署
配置mongodb集群,比如 在3个server上配置 3 shard的Mongodb集群:
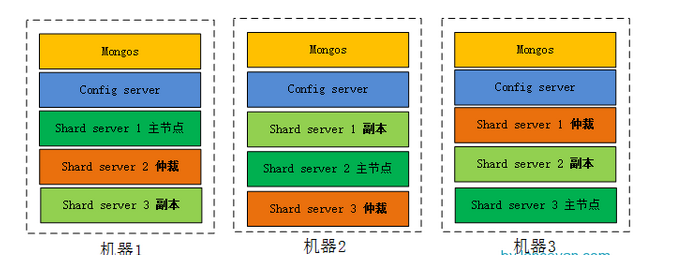
架构:
1.每片数据需要3个mongod server,2个为主从数据节点;1个为仲裁节点(arbiter),不存数据。 一共三片,可以做成:
   20.220-mongo1:   20001(sh1主),20002(sh2从),20003(sh3仲裁)
   20.221-mongo2:   20002(sh2主),20003(sh3从),20001(sh1仲裁)
   20.222-mongo3:   20003(sh3主),20001(sh1从),20002(sh2仲裁)
2. 需要3个mongod config server,登录3台机器执行如下
 20.220-mongo1: 19999
    echo 'export PATH=$PATH:/usr/local/mongodb/bin' >> /etc/profile
tar zxvf mongodb-linux-x86_64-2.6.0.tgz
mv mongodb-linux-x86_64-2.6.0 /usr/local/mongodb
mkdir -p /usr/local/mongodb/{etc,date,log}
cd /usr/local/mongodb/date
mkdir sh1
mkdir sh2
mkdir sh3
mkdir cf1
mkdir cf2
mkdir cf3
20.221-mongo2: 19998
    echo 'export PATH=$PATH:/usr/local/mongodb/bin' >> /etc/profile
tar zxvf mongodb-linux-x86_64-2.6.0.tgz
mv mongodb-linux-x86_64-2.6.0 /usr/local/mongodb
mkdir -p /usr/local/mongodb/{etc,date,log}
cd /usr/local/mongodb/date
mkdir sh1
mkdir sh2
mkdir sh3
mkdir cf1
mkdir cf2
mkdir cf3
20.222-mongo3: 19997
    echo 'export PATH=$PATH:/usr/local/mongodb/bin' >> /etc/profile
tar zxvf mongodb-linux-x86_64-2.6.0.tgz
mv mongodb-linux-x86_64-2.6.0 /usr/local/mongodb
mkdir -p /usr/local/mongodb/{etc,date,log}
cd /usr/local/mongodb/date
mkdir sh1
mkdir sh2
mkdir sh3
mkdir cf1
mkdir cf2
mkdir cf3
3. mongos server 作为入口
192.168.20.220: 20000
1.启动mongod datanode service
/usr/local/mongodb/bin/mongod --fork --rest --replSet sh1 --shardsvr --oplogSize 40000 --dbpath /usr/local/mongodb/date/sh1 --logpath /usr/local/mongodb/log/sh1.log --port 20001
/usr/local/mongodb/bin/mongod --fork --rest --replSet sh2 --shardsvr --oplogSize 40000 --dbpath /usr/local/mongodb/date/sh2 --logpath /usr/local/mongodb/log/sh2.log --port 20002
/usr/local/mongodb/bin/mongod --fork --rest --replSet sh3 --shardsvr --oplogSize 40000 --dbpath /usr/local/mongodb/date/sh3 --logpath /usr/local/mongodb/log/sh3.log --port 20003
2.配置每片的 replica set,即每3台配成一个replica set互备
20.220-mongo1:主机
mongo 192.168.20.220:20001/admin
use admin;
config = {_id: 'sh1', members:[
{_id:0, host: '192.168.20.220:20001'},
{_id:1, host: '192.168.20.221:20001'},
{_id:2, host: '192.168.20.222:20001', arbiterOnly: true}
]}
rs.initiate(config) //初始化repl set

rs.status() //看结果是否成功建成repl set


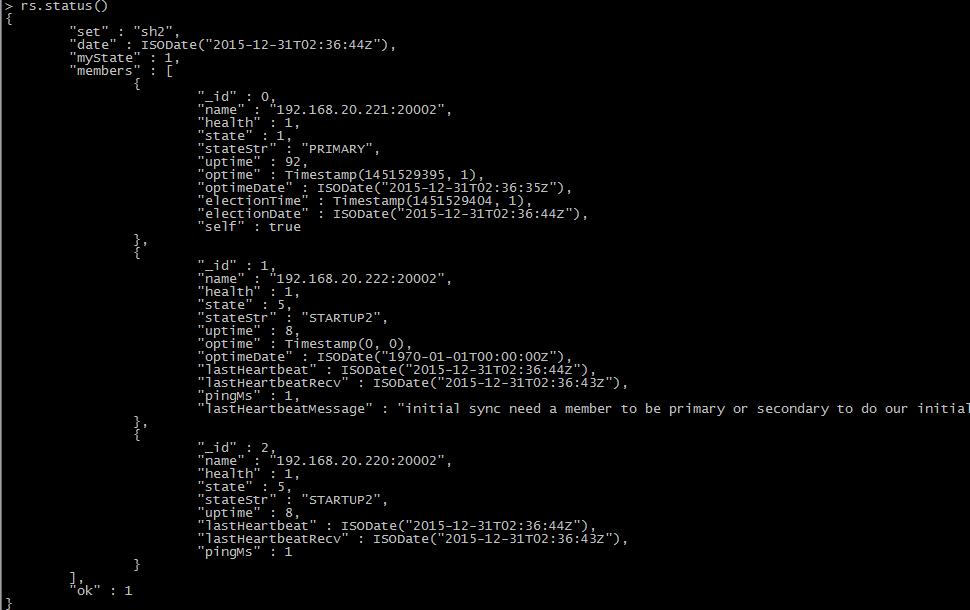
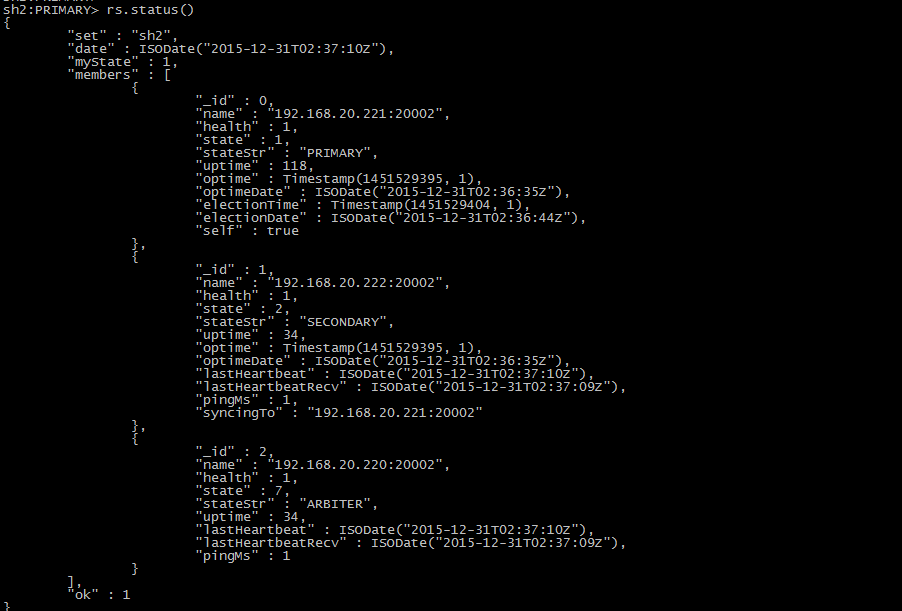
20.221-mongo2:主机
mongo 192.168.20.221:20002/admin
use admin;
config = {_id: 'sh2', members:[
{_id:0, host: '192.168.20.221:20002'},
{_id:1, host: '192.168.20.222:20002'},
{_id:2, host: '192.168.20.220:20002', arbiterOnly: true}
]}
rs.initiate(config) //初始化repl set

rs.status() //看结果是否成功建成repl set
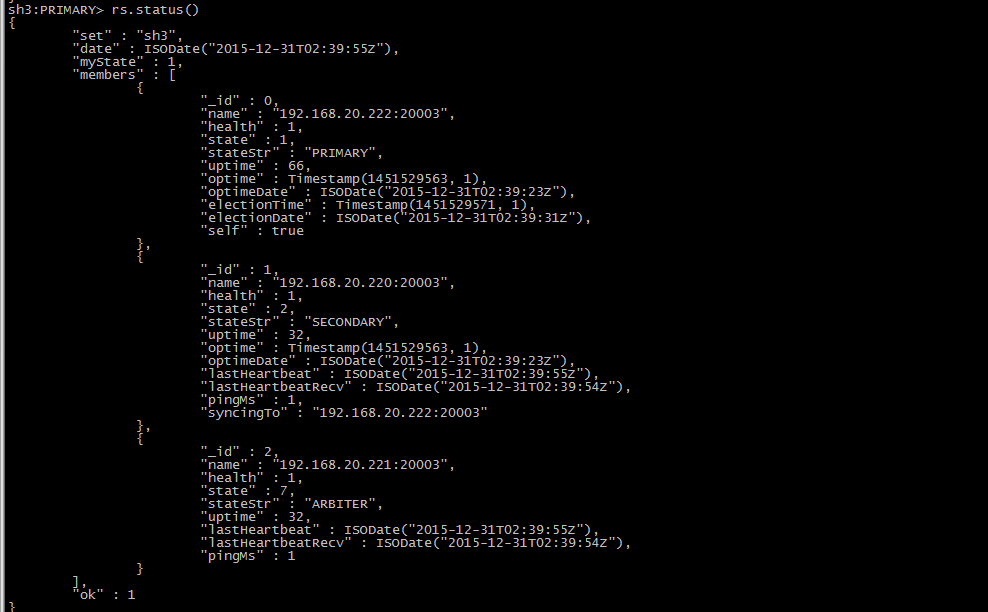
20.222-mongo3:主机
mongo 192.168.20.222:20003/admin
use admin;
config = {_id: 'sh3', members:[
{_id:0, host: '192.168.20.222:20003'},
{_id:1, host: '192.168.20.220:20003'},
{_id:2, host: '192.168.20.221:20003', arbiterOnly: true}
]}
rs.initiate(config) //初始化repl set

rs.status() //看结果是否成功建成repl set
3.执行启动 config server:
/usr/local/mongodb/bin/mongod --fork --rest --configsvr --port 19999 --dbpath /usr/local/mongodb/date/cf1/ --logpath /usr/local/mongodb/log/cf1.log
20.221-mongo2
/usr/local/mongodb/bin/mongod --fork --rest --configsvr --port 19998 --dbpath /usr/local/mongodb/date/cf2/ --logpath /usr/local/mongodb/log/cf2.log
20.222-mongo3
/usr/local/mongodb/bin/mongod --fork --rest --configsvr --port 19997 --dbpath /usr/local/mongodb/date/cf3/ --logpath /usr/local/mongodb/log/cf3.log
4.启动 mongos server
/usr/local/mongodb/bin/mongos --configdb 192.168.20.220:19999,192.168.20.221:19998,192.168.20.222:19997 --logpath /usr/local/mongodb/log/mongos.log --logappend --fork --port 20000

5. 配置mongo 分片集群
mongo 192.168.20.220:20000/admin
mongos> db.runCommand({addshard:"sh1/192.168.20.220:20001,192.168.20.221:20001",name:"sh1"});

mongos> db.runCommand({addshard:"sh2/192.168.20.221:20002,192.168.20.222:20002",name:"sh2"});

mongos> db.runCommand({addshard:"sh3/192.168.20.222:20003,192.168.20.220:20003",name:"sh3"});

mongos> db.runCommand({listshards:1})

6. 激活数据库分片
登录mongos:
>use admin;
>db.runCommand( { enablesharding : "dbname" } );

>db.runCommand( { shardcollection : "dbname.collectionname", key :{ "keyfield" :1 }});
注意分片使用的keyfield需要是表索引。
sh.enableSharding("dbname")

