几种不同方式将用户照片导入到AD
修改 AD架构为了使头像能够显示在GAL中,需要让其在全局编录(GC)中进行复制 ,
默认情况下,对象 的“thumbnailphoto”属性 值不会在GC中进行复制 ,通过修改 AD架构可以是实现 这一个功能。
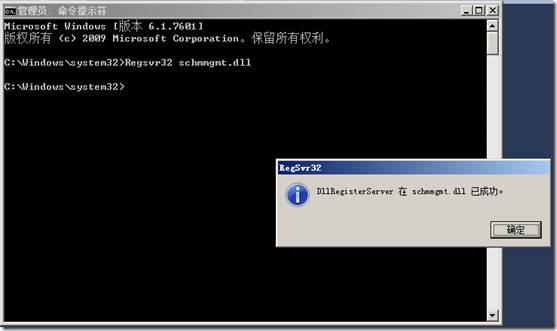
1. 在以管理 员身份打开cmd,并执行 Regsvr32 schmmgmt.dll注册AD架构管理单元,如下图所示:
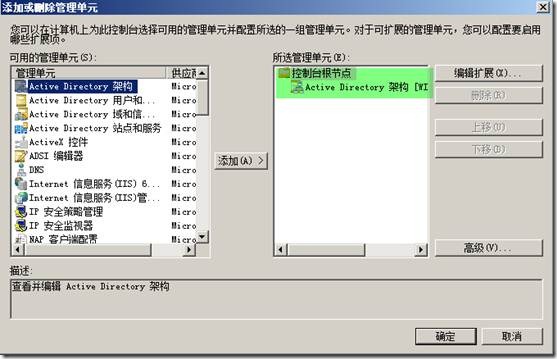
2. 打开MMC控制 台,添加AD架构管理 单元
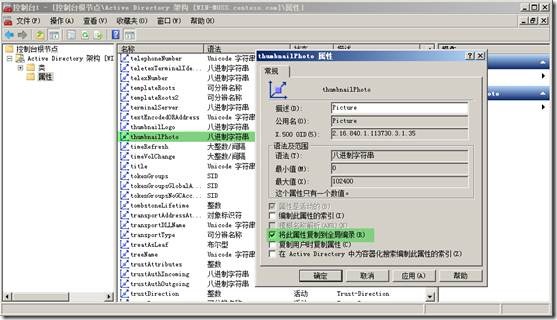
3. 在活动 目录 架构管理 单元中展开“属性 ”节点,定位到“thumbnailPhoto”。
4. 打开“thumbnailPhoto”的属性 对话框,在“常规”选项 卡上勾选“将此属性 复制 到全局编录”。
修改完毕后保存。以下几种方式进行修改。
提示:
我们要实现准备好一些照片,照片不要超过大小不要超过30KB,所以尺寸也要控制好,一般就96X96就差不多了,太大了没有意义,因为这些照片是存在AD内的,所以如果太大的话,会导致AD的数据库增大,从而影响复制
1、powershell脚本修改
脚本1:
$SAMName=Read-Host "Enter a username" $root = [ADSI]'GC://dc=uc,dc=local'$searcher = new-object System.DirectoryServices.DirectorySearcher($root)
$searcher.filter = "(&(objectClass=user)(sAMAccountName=$SAMName))"
$user = $searcher.findall()
$userdn = $user[0].path
$userdn = $userdn.trim("GC")$userdn = "LDAP" + $userdnfunction Select-FileDialog{param([string]$Title,[string]$Directory,[string]$Filter="All Files (*.*)|*.*")
[System.Reflection.Assembly]::LoadWithPartialName("System.Windows.Forms") | Out-Null$objForm = New-Object System.Windows.Forms.OpenFileDialog
$objForm.InitialDirectory = $Directory
$objForm.Filter = $Filter
$objForm.Title = $Title
$objForm.ShowHelp = $true
$Show = $objForm.ShowDialog()
If ($Show -eq "OK")
{Return $objForm.FileName
}
Else
{ Write-Error "Operation cancelled by user."}
}
$photo = Select-FileDialog -Title "Select a photo" -Directory "%userprofile%" -Filter "JPG Images (*.jpg)|*.jpg"
$user = [ADSI]($userdn)
[byte[]]$file = Get-Content $photo -Encoding Byte
# clear previous image if exist $user.Properties["thumbnailPhoto"].Clear()# write the image to the user's thumbnailPhoto attribute by converting the byte[] to Base64String $user.Properties["thumbnailPhoto"].Add([System.Convert]::ToBase64String($file))# commit the changes to AD $user.CommitChanges()
脚本2:
#Add-ADPhoto Powershell v1 compatibile script for updating#user thumbnailphoto attribute. Resizes input photo to recommended#dimensions and size. Only updates for the currently logged in user.#This is a script for user self service.#Author: Nathan Linley#Site: http://myitpath.blogspot.com$infile = $args[0]
$aspect = $args[1]
function usage { write-host "Usage: Add-ADPhoto filename [aspect]" write-host " Provide the name of an image file in your current directory." write-host " If you wish to preserve the aspect ratio of the image, type" write-host " 1 after your file name. Images are resized to the recommended" write-host " 96x96, converted to JPG and set to 70% quality to limit size."exit
}
$imagefile = (pwd).path + "\" + $infile$imagefileout = (pwd).path + "\adout.jpg"##############################################################################
#Check to see if the argument for filename was provided, and that it exists###
##############################################################################
if ([string]::isnullorempty($infile) -or -not (test-path $imagefile)) {&usage
}
###############################
#Remove any old converted file#
###############################
if (test-path $imagefileout) { del -path $imagefileout -ErrorAction "silentlycontinue"}
$Image = New-Object -ComObject Wia.ImageFile
$ImageProcessor = New-Object -ComObject Wia.ImageProcess
##########################################################
#Try loading the file, if its not an image this will fail#
##########################################################
$Image.LoadFile($ImageFile)
if (-not $?) { &usage }#############################################################
#Create filters, set aspect ratio setting, change dimensions#
#to max 96pixels, convert to JPG and set quality #
#############################################################
$Scale = $ImageProcessor.FilterInfos.Item("Scale").FilterId$ImageProcessor.Filters.Add($Scale)
$Qual = $ImageProcessor.FilterInfos.Item("Convert").FilterID$ImageProcessor.Filters.Add($qual)
if ([string]::isnullorempty($aspect) -or [string]$aspect -ne "1") { $ImageProcessor.Filters.Item(1).Properties.Item("PreserveAspectRatio") = $false} else { $ImageProcessor.Filters.Item(1).Properties.Item("PreserveAspectRatio") = $true}
$ImageProcessor.Filters.Item(1).Properties.Item("MaximumHeight") = 96$ImageProcessor.Filters.Item(1).Properties.Item("MaximumWidth") = 96$ImageProcessor.Filters.Item(2).Properties.Item("FormatID") = "{B96B3CAE-0728-11D3-9D7B-0000F81EF32E}"####################################################################
#Drop image quality until it meets the size recommendation of 10kb #
####################################################################
$quality = 80
do { Remove-Item -path $imagefileout -ErrorAction "silentlycontinue" $ImageProcessor.Filters.Item(2).Properties.Item("Quality") = $quality$Image = $ImageProcessor.Apply($Image)
$Image.SaveFile($ImageFileOut)
[byte[]]$imagedata = get-content $imagefileout -encoding byte
$quality -= 10
} while ($imagedata.length -gt 10kb)
#####################################################################
#Find domain, and Account distinguished name. Open user object, add#
#thumbnailphoto data and save.
#####################################################################
$de = new-object directoryservices.directoryentry("LDAP://" + $env:logonserver.substring(2))$ds = new-object directoryservices.directorysearcher($de)
$ds.filter = "(&(objectclass=user)(samaccountname=" + $env:username + "))"
$myaccount = $ds.findone()
$de = new-object directoryservices.directoryentry($myaccount.path)
$de.properties["Thumbnailphoto"].clear()$de.properties["Thumbnailphoto"].add($imagedata) |out-null$de.setinfo()
Write-Host "Photo has been uploaded"
2、vbscript脚本修改
我AD里面的用户名字是张三,那么照片也是张三。
AD里面用户的名称为张三,而AD属性里面对应名称字段的值为name,要以这个为准。因为我们一会脚本搜索的属性也是这个name属性。
照片就非常简单了,用户的名字为文件名。
Const ForReading = 1'图片存的目录 InDir = "C:\photo" Set fso = CreateObject("Scripting.FileSystemObject")
set oIADS = GetObject("LDAP://RootDSE")
strDefaultNC = oIADS.Get("defaultnamingcontext")
Set theConn = CreateObject("ADODB.Connection")
theConn.Provider = "ADsDSOObject" theConn.Open "ADs Provider" Set theCmd = CreateObject("ADODB.Command")
theCmd.ActiveConnection = theConn
Set objRecordSet = CreateObject("ADODB.Recordset")
For Each tFile In fso.GetFolder(InDir).Files
tName = tFile.Name
tName = Left(tName, InStrRev(tName,".")-1) strQuery = "<LDAP://" & strDefaultNC & ">;" & "(&(objectClass=person)(name=" & tName & "));name,adspath;subtree"
theCmd.CommandText = strQuery
Set objRS = theCmd.Execute If objRS.RecordCount = 0 Then
MsgBox "Can't find account for " & tName Else Set objUser = GetObject(objRS("adspath"))
ObjUser.Put "thumbnailPhoto", ReadByteArray(tFile.Path) ObjUser.SetInfo
End If
Next Function ReadByteArray(strFileName) Const adTypeBinary = 1 Dim bin Set bin = CreateObject("ADODB.Stream")
bin.Type = adTypeBinary
bin.Open
bin.LoadFromFile strFileName
ReadByteArray = bin.Read
End Function
3、C#代码修改
DirectoryEntry container = new DirectoryEntry(LDAP_URI + USERS_DIR);DirectoryEntry user = container.Children.Add("cn=" + username, "user");
// Set other property's of the user object://// user.Properties ["xxx"].Value = "yyy";//// ...byte [] buffer;FileStream fileStream = new FileStream(@"c:\photo.jpg", FileMode.Open, FileAccess.Read);
try {int length = (int) fileStream.Length; // get file length
buffer = new byte [length]; // create buffer
int count; // actual number of bytes read
int sum = 0; // total number of bytes read
// read until Read method returns 0 (end of the stream has been reached) while ((count = fileStream.Read(buffer, sum, length - sum)) > 0) sum += count; // sum is a buffer offset for next reading}
finally {fileStream.Close();
}
user.Properties ["thumbnailPhoto"].Value = buffer;user.CommitChanges();


