1-4时间序列数据建模流程范例
0.配置
import torch

print('torch.__version__ = ', torch.__version__)

"""
torch.__version__ =  2.1.0+cpu
"""

import os

#mac系统上pytorch和matplotlib在jupyter中同时跑需要更改环境变量
# os.environ["KMP_DUPLICATE_LIB_OK"]="TRUE"
1.准备数据
import requests

data = requests.get('https://c.m.163.com/ug/api/wuhan/app/data/list-total',
                   headers={'User-Agent': 'PostmanRuntime/7.36.0'})

df = pd.DataFrame([{
    'date': x.get('date'),
    'confirm': x.get('total').get('confirm'),
    'heal': x.get('total').get('heal'),
    'dead': x.get('total').get('dead'),
} for x in data.json().get('data').get('chinaDayList')])

df.head()

"""
date	confirm	heal	dead
0	2020-01-20	291	25	6
1	2020-01-21	440	25	9
2	2020-01-22	571	28	17
3	2020-01-23	830	34	25
4	2020-01-24	1287	38	41
"""
df = df[(df['date'] >= '2020-01-24') & (df['date'] <= '2020-03-09')]
import numpy as np
import pandas as pd
import matplotlib.pyplot as plt

%matplotlib inline
%config InlineBackend.figure_format = 'svg'

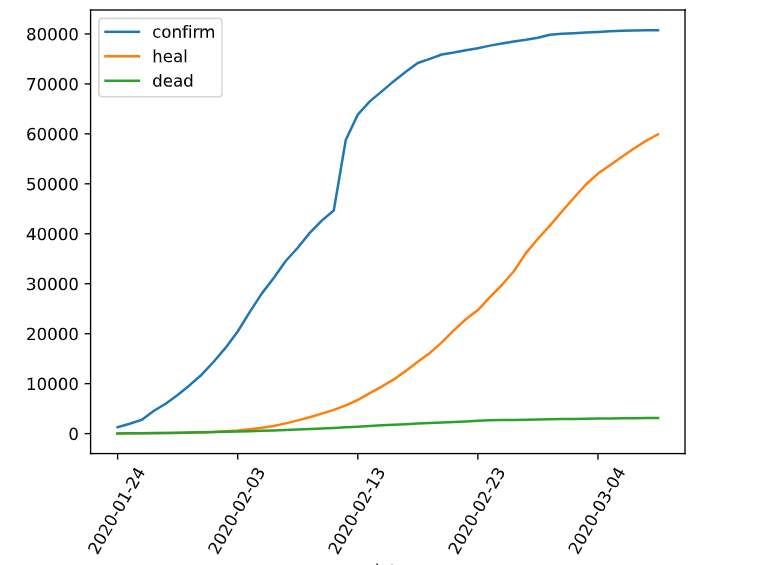
df.plot(x='date', y=['confirm', 'heal', 'dead'])
plt.xticks(rotation=60)
dfdata = df.set_index('date')
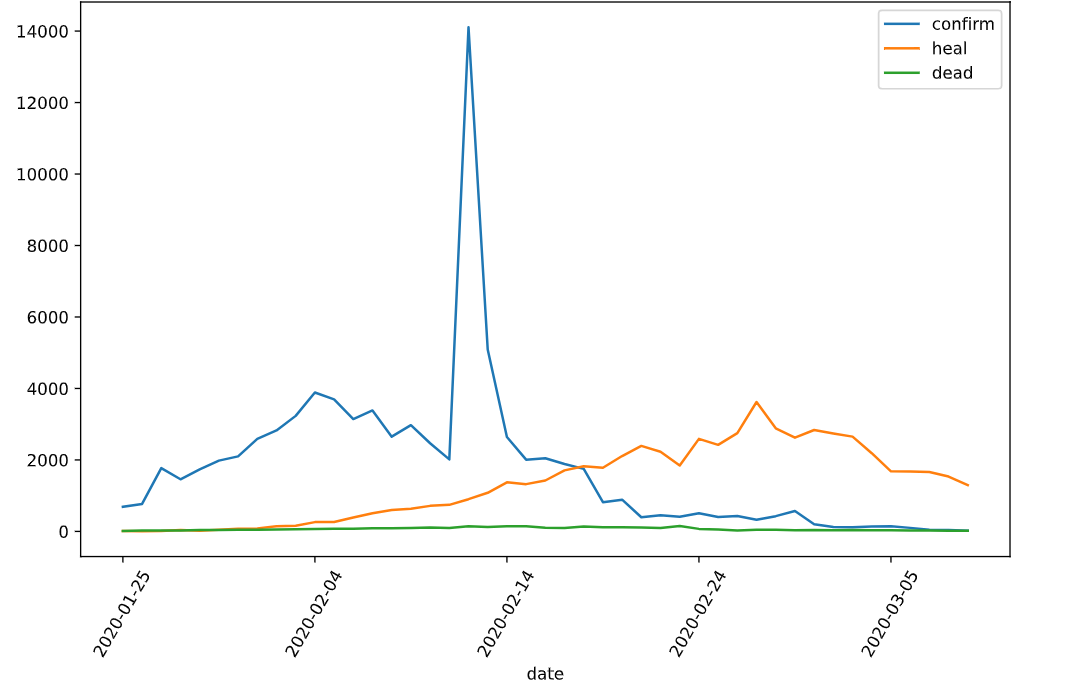
dfdiff = dfdata.diff(periods=1).dropna()
dfdiff = dfdiff.reset_index('date')

dfdata = df.set_index('date')
dfdiff = dfdata.diff(periods=1).dropna()
dfdiff = dfdiff.reset_index('date')
dfdiff.tail()

"""
confirm	heal	dead
40	143.0	1681.0	30.0
41	99.0	1678.0	28.0
42	44.0	1661.0	27.0
43	40.0	1535.0	22.0
44	19.0	1297.0	17.0
"""
下面我们通过继承torch.utils.data.Dataset实现自定义时间序列数据集
torch.utils.data.Dataset是一个抽象类,用户想要加载自定义的数据集只需要继承这个类,并且覆写其中的 两个方法即可:
- len:实现len(dataset)返回整个数据集的大小
- getitem:用来获取一些索引的数据,使
dataset[i]返回数据集中的第i个样本
import torch
from torch import nn

# 用某日前8天窗口数据作为输入预测该日数据
WINDOW_SIZE = 8

class Covid19Dataset(torch.utils.data.Dataset):
    def __len__(self):
        return len(dfdiff) - WINDOW_SIZE

    def __getitem__(self, i):
        x = dfdiff.loc[i: i+WINDOW_SIZE-1, :]
        feature = torch.tensor(x.values)
        y = dfdiff.loc[i+WINDOW_SIZE, :]
        label = torch.tensor(y.values)
        return feature, label

ds_train = Covid19Dataset()

# 数据较小,可以将全部训练数据放入到一个batch中,提升性能
dl_train = torch.utils.data.DataLoader(ds_train, batch_size=38)

for features, labels in dl_train:
    break

# dl_train同时作为验证集
dl_val = dl_train
2.定义模型
使用Pytorch通常有三种方式构建模型:使用nn.Sequential按层顺序构建模型,继承nn.Module基类构建自定义模型,继承nn.Module基类构建模型并辅助应用模型容器进行封装。
此处选择第二种方式构建模型
import torch
import torchkeras

torch.random.seed()

class Block(torch.nn.Module):
    def __init__(self):
        super().__init__()

    def forward(self, x, x_input):
        x_out = torch.max((1+x)*x_input[:, -1, :], torch.tensor(0.0))
        return x_out

class Net(torch.nn.Module):
    def __init__(self):
        super().__init__()
        self.lstm = torch.nn.LSTM(input_size=3, hidden_size=3, num_layers=5, batch_first=True)
        self.linear = torch.nn.Linear(3, 3)
        self.block = Block()

    def forward(self, x_input):
        x = self.lstm(x_input)[0][:, -1, :]  # 取预测的时间步的最后一个值
        x = self.linear(x)
        y = self.block(x, x_input)
        return y

net = Net()
print(net)

"""
Net(
  (lstm): LSTM(3, 3, num_layers=5, batch_first=True)
  (linear): Linear(in_features=3, out_features=3, bias=True)
  (block): Block()
)
"""

from torchkeras import summary

print(summary(net, input_data=features))

"""
--------------------------------------------------------------------------
Layer (type)                            Output Shape              Param #
==========================================================================
LSTM-1                                    [-1, 8, 3]                  480
Linear-2                                     [-1, 3]                   12
Block-3                                      [-1, 3]                    0
==========================================================================
Total params: 492
Trainable params: 492
Non-trainable params: 0
--------------------------------------------------------------------------
Input size (MB): 0.000076
Forward/backward pass size (MB): 0.000229
Params size (MB): 0.001877
Estimated Total Size (MB): 0.002182
--------------------------------------------------------------------------
"""
3.训练模型
训练Pytorch通常需要用户编写自定义训练循环,训练循环的代码风格因人而异。
有3类典型的训练循环代码风格:脚本形式训练循环,函数形式训练循环,类形式训练循环。
此处我们通过引入torchkeras库中的KerasModel工具来训练模型,无需编写自定义循环
from torchmetrics.regression import MeanAbsolutePercentageError
y_1 = None
y_2 = None
def mspe(y_pred, y_true):
    global y_1, y_2
    y_1 = y_pred
    y_2 = y_true
    err_percent = (y_true - y_pred)**2 / (torch.max(y_true**2,torch.tensor(1e-7)))
    return torch.mean(err_percent)

net = Net()
loss_fn = mspe
metric_dict = {"mape": MeanAbsolutePercentageError()}

optimizer = torch.optim.Adam(net.parameters(), lr=0.03)
lr_scheduler = torch.optim.lr_scheduler.StepLR(optimizer, step_size=10, gamma=0.0001)

from torchkeras import KerasModel
model = KerasModel(net,
                   loss_fn=loss_fn,
                   metrics_dict=metric_dict,
                   optimizer=optimizer,
                   lr_scheduler=lr_scheduler)

dfhistory = model.fit(train_data=dl_train,
                      val_data=dl_val,
                      epochs=100,
                      ckpt_path='checkpoint',
                      patience=10,
                      monitor='val_loss',
                      mode='min',
                      callbacks=None,
                      plot=True,
                      cpu=True)
4.评估模型
评估模型一般要设置验证集或者测试集,由于此例数据较少,我们仅仅可视化损失函数在训练集上的迭代。
model.evaluate(dl_val)

"""
{'val_loss': 0.09135004132986069, 'val_mape': 0.2397426813840866}
"""
5.使用模型
此处我们使用模型预测疫情结束时间,即新增确诊病例为0的时间
# 使用dfresult记录现有数据以及此后预测的疫情数据
dfresult = dfdiff[['confirm', 'heal', 'dead']].copy()
dfresult.tail()

"""
confirm	heal	dead
40	143.0	1681.0	30.0
41	99.0	1678.0	28.0
42	44.0	1661.0	27.0
43	40.0	1535.0	22.0
44	19.0	1297.0	17.0
"""

# 预测此后1000天的新增走势,将其结果添加到dfresult中
for i in range(1000):
    arr_input = torch.unsqueeze(torch.from_numpy(dfresult.values[-38:, :]), axis=0)
    arr_predict = model.forward(arr_input)
    dfpredict = pd.DataFrame(torch.floor(arr_predict).data.numpy(), columns=dfresult.columns)
    dfresult = pd.concat([dfresult, dfpredict], ignore_index=True)

"""
第50天开始新增确诊为0,第45天对应3月10日,也就是5天后,即预计3月15日新增确诊降为0
"""
dfresult.query('confirm==0').head()

"""
confirm	heal	dead
50	0.0	1436.0	5.0
51	0.0	1461.0	4.0
52	0.0	1486.0	3.0
53	0.0	1511.0	2.0
54	0.0	1537.0	1.0
"""

dfresult.query('heal==2').head()

"""
	confirm	heal	dead
1	769.0	2.0	24.0
"""
6.保存模型
模型权重保存在model.ckpt_path路径
print(model.ckpt_path)

"""
checkpoint
"""

model.load_ckpt('checkpoint')
作者:lotuslaw
出处:https://www.cnblogs.com/lotuslaw/p/17921631.html
版权:本作品采用「署名-非商业性使用-相同方式共享 4.0 国际」许可协议进行许可。


【推荐】国内首个AI IDE,深度理解中文开发场景,立即下载体验Trae
【推荐】编程新体验,更懂你的AI,立即体验豆包MarsCode编程助手
【推荐】抖音旗下AI助手豆包,你的智能百科全书,全免费不限次数
【推荐】轻量又高性能的 SSH 工具 IShell:AI 加持,快人一步
· 阿里最新开源QwQ-32B,效果媲美deepseek-r1满血版,部署成本又又又降低了!
· 开源Multi-agent AI智能体框架aevatar.ai,欢迎大家贡献代码
· Manus重磅发布:全球首款通用AI代理技术深度解析与实战指南
· 被坑几百块钱后,我竟然真的恢复了删除的微信聊天记录!
· 没有Manus邀请码?试试免邀请码的MGX或者开源的OpenManus吧