uniCloud笔记
uniCloud笔记
结合:uni-admin实现后台的云管理,schema2code辅助自动生成代码(只需要定义好表结构)
云函数
云函数,是将本地写好的函数上传到云端,在云端的node.js的环境中运行。
可以在本地的页面中在生命周期函数(钩子函数)中调用云函数
如下:
//在组件/页面加载时,调用云函数的回调函数
onLoad() {
	uniCloud.callFunction({
		name: "hello-test",  //云函数叫做"hello-test"
		success: (e) => {     //e是云函数return的对象
			this.title = e
		}
	})
}
为什么这里用callFunction而不用网络请求request呢?
为了安全,因为callFunction不会暴露请求的URL,不会被爬虫黑客攻击,而request是需要URL才能访问的,如果只做APP和小程序,本来就可以不用域名,可以省点钱
但是域名可以不用买,因为云开发自动生成了云函数的URL,在云平台-》云函数-》云函数管理,最下面就有自动生成的URL

schema2code
只要配置好云端的schema表结构,就可以用schema2code一键生成增删改查的代码!!!
页面之间的参数传递
//A页面item是一条记录,一个对象
update(item) {
		//代码触发字符unavigateto
		uni.navigateTo({
			url: '../update/update?abc=' + JSON.stringify(item),
            //将对象转换成json格式作为url参数abc的值
            //在这里用item作为参数名更好
			success: res => {},
			fail: () => {},
			complete: () => {}
		});
}
//在B页面的onLoad钩子函数中,获取url中的参数abc
//在这里用item作为参数名更好
onLoad({abc}) {
	this.item = JSON.parse(abc);
    //将json格式转换成对象,赋给B页面的对象item
}
指定id-doc
collection.doc('指定id').remove()
collection.doc('02').update({
		name: 'update test'
	})
简易获取数据的例子
获取数据的前提:表结构中必须设置成允许读取(read)
1、在云平台的云空间创建数据表
2、本地关联云空间
3、在uiCloud下的database文件夹中需要有对应 数据表名.schema.json文件,可以本地自己创建修改,也可以在云端配置表结构后右键从云端下载配置
4、在本地文件中输入必要的获取数据代码,注:contacts为数据表名
代码快捷键 直接输入 udb即可
<unicloud-db v-slot:default="{data, loading, error, options}" collection="contacts">
  <!--data, loading, error, options为客户端向云数据库的数据表请求的信息,也是将会返回的字段-->
		<view v-if="error">{{error.message}}</view>
		<view v-else>
			{{data}}
		</view>
</unicloud-db>
简易删除数据的例子
删除数据的前提:表结构中必须设置成允许删除(delete)
<unicloud-db ref="udb" v-slot:default="{data, loading, error, options}" collection="contacts">
		<view v-if="error">{{error.message}}</view>
		<view v-else>
			<uni-list>
				<uni-list-item v-for="item in data" @longpress.native="confirmDelete(item._id)" :key="item._id" :title="item.name" :note="item.iphone" link></uni-list-item>
			</uni-list>
		</view>
</unicloud-db>

<script>

	// 通过id删除数据,在表结构中必须允许删除
	confirmDelete(id) {
			 this.$refs.udb.remove(id)//refs见uni-app笔记
        //collection.doc('指定id').remove()
	}

</script>
简易添加数据例子
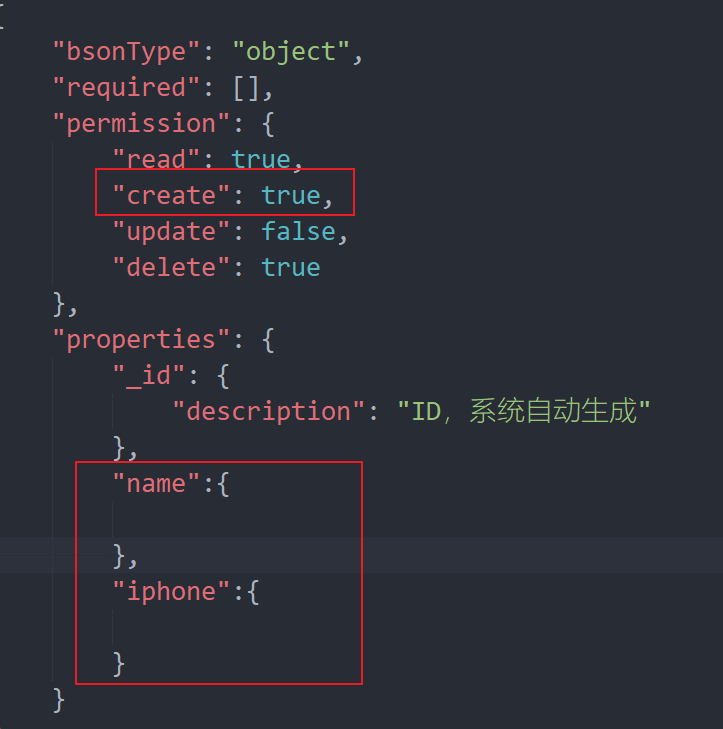
添加数据前提:表结构中必须设置允许添加(create)
还有可能因为表结构不完整而报错,此时只需要填写完整即可!

<template>
	<view>
		<uni-easyinput  v-model="item.name" placeholder="" />
		<uni-easyinput  v-model="item.iphone" placeholder="" />
		<button type="default" @click="submit">提交</button>
	</view>
</template>

<script>
	export default {
		data() {
			return {
				item:{
					"name":"",
					"iphone":""
				}
			}
		},
		methods: {
			submit(){
				const db = uniCloud.database();//代码快捷键cdb
				db.collection('contacts').add(this.item).then(e=>{
					console.log(e);
				})
			}
		}
	}vue
</script>
简易更新数据例子
更新数据前提:表结构中必须设置允许更新(update)
onLoad({abc}) {   //见前面的页面传递参数
	this.item = JSON.parse(abc);
    //将json格式转换成对象,赋给本页面的对象data中的item
},
methods:{
    submit() {
		//带this的item都是data中的item并不是let(局部)的item
		const db = uniCloud.database();
		let item = {...this.item};//将data中的item展开作为更新内容
		delete item._id //这个是let的item,用于更新的内容不需要带'_id'这列
							db.collection('contacts').doc(this.item._id).update(item).then(e => {
		console.log(e);
	})
   // .then(e => {console.log(e);})执行完之后返回更新的结果
	}
}
对mysql操作的核心用法
try {
    //连接数据库
    connection.connect()

    // 新增记录
    let addRes = await query('insert into users set ?', {
        name: '丁元英',
        age: 40
    })
    console.log("新增记录:", addRes)

    // 删除记录
    let delRes = await query('delete from users where name=? ', ['韩楚风'])
    console.log("删除记录:", delRes)

    //修改记录
    let updateRes = await query('update users set age=? where name=? ', [50, '丁元英'])
    console.log("修改记录:", updateRes)

    //查询记录
    let queryRes = await query('select * from users where name=? ', ['丁元英'])
    console.log("查询记录:", queryRes)

    //关闭连接
    connection.end();
} catch (e) {
    console.log('操作失败,失败信息 ', e);
}
表结构即云函数
经常要上传使得云端和本地同步,本地和云端同步
{
	"bsonType": "object",//固定
	"permission": {              //表的权限
		"read": true,
		"create": true,
		"update": true,
		"delete": true
	},
	"required": ["username", "mobile"],//必填字段
	"properties": {
		"_id": {
			"description": "存储文档 ID(用户 ID),系统自动生成"
		},
		"username": {
			"bsonType": "string",
			"title": "姓名",
			"description": "姓名", //等价于placeholder
			"order": 1,          //展示顺序,渲染顺序,越大越后
			"trim": "both"       //修剪输入的左右空格
		},
		"gender": {
			"bsonType": "int",
			"title": "性别",
			"description": "用户性别:0 未知 1 男性 2 女性",
			"order": 2,
			"defaultValue": 0,
			"enum": [{
				"text": "未知",
				"value": 0
			}, {
				"text": "男",
				"value": 1
			}, {
				"text": "女",
				"value": 2
			}],
            //下面这个属性就是了解一下,毕竟性别不用多选
            //若是复选框,则这个字段的类型应该定义为数组 array
            "componentForEdit":{     //可选
            //设置性别所在的uni-data-checkbox标签,加入multiple属性,变成复选框
				"name":"uni-data-checkbox",
				"props":{
					"multiple":true
				}
			}

		},
        "nation_china":{
			"bsonType":"string",
			"title":"民族",
		    "enum":{
				"collection":"opendb-nation-china",
				"field":"name as text, _id as value"
			},
			"foreignKey":"opendb-nation-china._id",//外键
			"componentForEdit":{
				"name":"uni-data-picker"
			}
		},
		"address":{
			"bsonType":"string",
			"title":"城市",
			"enum":{
				"collection":"opendb-city-china",
				"field":"code as value,name as text"
			},
			"foreignKey":"opendb-city-china.code",
			"enumType":"tree"  //必须在枚举enum之后定义,树形结构
		},
		"mobile": {
			"bsonType": "string",
			"title": "电话",
			"order": 3,
			"description": "电话",
			"pattern": "^\\+?[0-9-]{3,20}$",
			"trim": "both"
		},
		"email": {
			"bsonType": "string",
			"format": "email",
			"title": "邮箱",
			"order": 4,
			"description": "邮箱地址",
			"trim": "both"
		},
		"comment": {
			"bsonType": "string",
			"title": "备注",
			"order": 5,
			"description": "备注",
			"trim": "both",
			"component": {
				"name": "textarea"
			}
		},
		"create_date": {
			"bsonType": "timestamp",
			"description": "创建时间",
			"forceDefaultValue": {
				"$env": "now"
			}
		}
	}
}


 浙公网安备 33010602011771号