

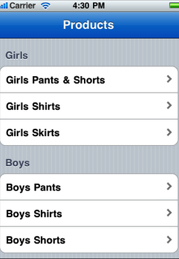
表用于显示数据列表,数据列表中的每一项都由行表示。IOS没有行的限制,行数仅受可用才存储空间的限制,IOS的表只有一列。
     表视图是显示表数据的试图对象,是UITableView类的一个实例,表中的每个可建行都有UITableViewCell类实现。即一个UITableView实例由若干UITableViewCell组成。
   表视图不负责存储表中的所有数据,只存储足够绘制当前可见行的数据。每次只加载一屏幕的数据。表视图从遵循UITableViewDelegate协议的对象中获取配置数据,从遵循UITableViewDataSource协议的对象中获得行数据。

(1)- (NSInteger)numberOfSectionsInTableView:(UITableView *)tableView;
         这个方法返回 tableview 有多少个section
//返回有多少个Sections
- (NSInteger)numberOfSectionsInTableView:(UITableView *)tableView
{
    return array.Count;  //默认值为1
}
(2)- (NSInteger)tableView:(UITableView *)table numberOfRowsInSection:(NSInteger)section;
        这个方法返回对应的section有多少个元素,也就是多少行。
- (NSInteger)tableView:(UITableView *)tableView numberOfRowsInSection:(NSInteger)section
{
    return 10;  //默认也是1 ,分区中的行的个数
}

(3)-(UITableViewCell *)tableView:(UITableView*)tableView cellForRowAtIndexPath:(NSIndexPath *)indexPath;
返回指定的row 的cell。这个地方是比较关键的地方,一般在这个地方来定制各种个性化的 cell元素。这里只是使用最简单最基本的cell 类型。
其中有一个主标题cell.textLabel 还有一个副标题cell.detailTextLabel,  还有一个 image在最叫cell.imageView.  还可以设置右边的图标,通过cell.accessoryType 可以设置是饱满的向右的蓝色箭头,还是单薄的向右箭头,还是勾勾标记。
//设置每行调用的cell
-(UITableViewCell *)tableView:(UITableView *)tableView cellForRowAtIndexPath:(NSIndexPath *)indexPath {
static NSString *SimpleTableIdentifier = @"SimpleTableIdentifier";//自定义的标识符

    UITableViewCell *cell = [tableView dequeueReusableCellWithIdentifier:
                             SimpleTableIdentifier];
    if (cell == nil) {
        cell = [[[UITableViewCell alloc] initWithStyle:UITableViewCellStyleDefault
                                       reuseIdentifier: SimpleTableIdentifier] autorelease];
 }
 cell.imageView.image=image;//未选cell时的图片
 cell.imageView.highlightedImage=highlightImage;//选中cell后的图片
 cell.text=@”测试文本”;
 return cell;
}

   表中的每一行都代表一个UITableViewCell。可以使用图像、文本还有辅助的图标等来自定义你自己的UITableViewCell。你可以自定义你自己的cell如下模型或者像appstore那样的。


(4)- (NSString *)tableView:(UITableView *)tableView titleForHeaderInSection:(NSInteger)section
返回指定的section的 header的title,如果这个sectionheader  有返回view,那么title就不起作用了。

- (NSString *)tableView:(UITableView *)tableView titleForHeaderInSection:(NSInteger)section
{
    if (tableView == tableView_)
    {
        if (section == 0)
        {
         return @"Girls";
        }
        else
        {
            return @"Boys";
        }
    }
}


(5)设置让UITableView行缩进


// 把每一行的缩进级别设置为其行号,第一行为1,第二行为2
-(NSInteger)tableView:(UITableView *)tableView indentationLevelForRowAtIndexPath:(NSIndexPath *)indexPath{
 NSUInteger row = [indexPath row];
 return row;
}

(6)设置cell每行间隔的高度
- (CGFloat)tableView:(UITableView *)tableView eightForRowAtIndexPath:(NSIndexPath *)indexPath{
    return 40;
}
(7)设置选中Cell的响应事件

- (void)tableView:(UITableView *)tableView didSelectRowAtIndexPath:(NSIndexPath *)indexPath{
 [tableView deselectRowAtIndexPath:indexPath animated:YES];//选中后的反显颜色即刻消失
}
该方法是选中之后执行。另一个方法willSelectRowAtIndexPath是在一行选择前调用,通常用来阻止某行的能否被选中
-(NSIndexPath *)tableView:(UITableView *)tableView willSelectRowAtIndexPath:(NSIndexPath *)indexPath
{
  if(row == 0)
     return nil;//设置第一个可见行不能被选中
     return indexPath;
}


图片说明:此图片是从其他网站上戒掉的部分图。和上述代码运行效果不大相同。
UITableViewController是IOS开发中一个比较重要的试图控制器,是集成了UITableView视图的控制器,在实际开发中经常用到,功能非常强大,可定制性也很高,下面从简单的使用和自定义Cell以及事件响应等方面来使用。

1.首先创建一个Single View Project,命名为UITableViewControllerTest。打开ViewController.xib并拖入一个UITableView,选中该视图,并点击Connections inspector,分别将delegate和dataSource连线到File's owner
2.在AppDelegate.h中添加属性
@property (strong, nonatomic) IBOutlet UITabBarController * rootViewController;
并在.m文件中添加合成器
@synthesize rootViewController;
然后在- (BOOL)application:(UIApplication *)application didFinishLaunchingWithOptions:(NSDictionary *)launchOptions方法中添加该TableView为subView
3.在ViewController.h文件中添加协议UITableViewDelegate,UITableViewDataSource,然后在.m文件中实现协议中的方法
#pragma mark -
#pragma mark Table View Data Source Methods
-(NSInteger)tableView:(UITableView *)tableView numberOfRowsInSection:(NSInteger)section
{
return [self.listDatas count];
}
上面的方法是返回Table中的行数
-(UITableViewCell *)tableView:(UITableView *)tableView cellForRowAtIndexPath:(NSIndexPath *)indexPath
{
static NSString * SimpleTableViewIdentifier =@"SimpleTableViewIdentifier";
UITableViewCell * cell = [tableView dequeueReusableCellWithIdentifier:SimpleTableViewIdentifier];
if (cell == nil) {
cell = [[UITableViewCell alloc]initWithStyle:UITableViewCellStyleDefault reuseIdentifier:SimpleTableViewIdentifier];
}
UIImage * img = [UIImage imageNamed:@"singleicon"];
cell.imageView.image = img;
NSUInteger row = [indexPath row];
cell.textLabel.text = [listDatas objectAtIndex:row];
return cell;
}
上面的方法是构造每一个cell,也就是每一行,SimpleTableViewIdentifier是标记,dequeueReusableCellWithIdentifier方法是当有可重用的cell时,根据标记直接取,而不用重新生成,可以提高效率。
NSIndexPath封装了有关行和分区的信息
UIImage * img = [UIImage imageNamed:@"singleicon"];
cell.imageView.image = img;
NSUInteger row = [indexPath row];
cell.textLabel.text = [listDatas objectAtIndex:row];
这段代码分别设置了行的图片和文字,另外,通过accessoryType属性可以设置行的附属属性,有几种样式可以提供选择。也可以自定义附属视图:cell.accessoryView = [[myView alloc] init];
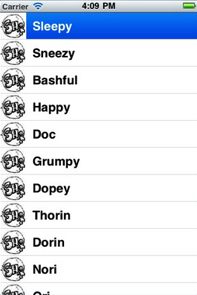
4.在viewDidLoad方法中添加NSArray后,填入数据,然后run,可以看打运行结果

在这里我使用了TabBarController来承载三种类型的tableview,分别是Plain、Group以及Custom自定义的
5.下面看第二种样式,分组的形式
使用分组的话还要添加一个方法,返回一共有多少组
-(NSInteger)numberOfSectionsInTableView:(UITableView *)tableView
另外可以设置分组标题
//返回组的名称
-(NSString *)tableView:(UITableView *)tableView titleForHeaderInSection:(NSInteger)section
{
if ([keys count] == 0) {
returnnil;
}
NSString * key = [keys objectAtIndex:section];
return key;
}
//设置行的高度
-(CGFloat)tableView:(UITableView *)tableView heightForRowAtIndexPath:(NSIndexPath *)indexPath
{
return60;
}
#pragma mark Table Delegate Methods
-(void)tableView:(UITableView *)tableView didSelectRowAtIndexPath:(NSIndexPath *)indexPath
{
NSUInteger row = [indexPath row];
NSString * message = [[NSString alloc]initWithFormat:@"You selected is %@!",[listDatas objectAtIndex:row]];
UIAlertView * alert = [[UIAlertView alloc]initWithTitle:@"Information" message:message delegate:nilcancelButtonTitle:@"Confirm" otherButtonTitles:nil,nil];
[alert show];
}
上面这个方法是单击行的方法,点击一行后弹出一个对话框UIAlertView

6.最后是自定义cell

首先拖一个UITableViewCell到.xib文件中,并拖入一些视图
然后在.h文件中声明属性
@property(nonatomic,retain)IBOutlet UITableViewCell * tableCell;
@property(nonatomic,retain)IBOutlet UILabel * name;
@property(nonatomic,retain)IBOutlet UILabel * color;
@property(nonatomic,retain)IBOutlet UIImageView * imageView;
7.在.m文件中添加合成器并实现如下方法:
#pragma mark Table Data Source Methods
-(NSInteger)tableView:(UITableView *)tableView numberOfRowsInSection:(NSInteger)section
{
return [computers count];
}
/*
自定义表格单元格
*/
-(UITableViewCell *)tableView:(UITableView *)tableView cellForRowAtIndexPath:(NSIndexPath *)indexPath
{
static NSString * CustomTableViewIdentifier =@"CustomTableViewIdentifier";
UITableViewCell * cell = [tableView dequeueReusableCellWithIdentifier:CustomTableViewIdentifier];
if (cell == nil) {
//加载自定义表格单元格nib文件
NSArray *nib = [[NSBundle mainBundle]loadNibNamed:@"CustomCell" owner:self options:nil];
if ([nib count] > 0) {
//tableCell已与自定义cell相关联
cell = self.tableCell;
}
}
NSUInteger row = [indexPath row];
NSDictionary * rowData = [computers objectAtIndex:row];
self.name.text = [rowData objectForKey:@"Name"];
self.color.text = [rowData objectForKey:@"Color"];
UIImage * img = [UIImage imageNamed:@"doubleicon"];
imageView.image = img;
//cell.imageView.image = img;
return cell;
}
8.最后编译运行,结果如下图:

以上就是简单的UITableViewController的使用,过程可能讲的不是很清楚,有问题可以一起交流,希望和同为IOS开发路上的人一同学习一同进步

 浙公网安备 33010602011771号