SpringBoot起飞系列-数据访问(九)
一、前言
前边我们已经学些了开发的基本流程,最重要的一步来了,怎么样和数据库交互才是最重要的,毕竟没有数据那就相当于什么也没做,本文我们来学习使用springboot整合jdbc、mybatis、jpa等我们常用的数据库持久化技术。
二、整合jdbc
2.1 引入maven依赖
整合jdbc我们需要两个依赖,一个是starter依赖,一个是mysql驱动(访问数据库驱动肯定是比不可少的),starter中我们指定了要使用的数据源。
 1  <dependency>
 2      <groupId>org.springframework.boot</groupId>
 3      <artifactId>spring-boot-starter-jdbc</artifactId>
 4  </dependency>
 5
 6  <dependency>
 7      <groupId>mysql</groupId>
 8      <artifactId>mysql-connector-java</artifactId>
 9      <scope>runtime</scope>
10  </dependency>
在application.yml或者application.properties中添加配置信息:
1 spring:
2   datasource:
3     username: root
4     password: root
5     url: jdbc:mysql://localhost:3306/jdbctest?serverTimezone=UTC
6     driver-class-name: com.mysql.cj.jdbc.Driver
2.2 测试数据库连接
在test中添加测试代码,来测试我们的数据库是否链接成功。
 1 @Autowired
 2 DataSource dataSource;
 3
 4 //....
 5 @Test
 6 public void jdbcTest() {
 7     System.out.println(dataSource.getClass());
 8     try {
 9         System.out.println(dataSource.getConnection());
10     } catch (SQLException e) {
11         e.printStackTrace();
12     }
13 }
springboot整个jdbc,默认使用的是org.apache.tomcat.jdbc.pool.DataSource作为数据源,据源的相关配置都在DataSourceProperties里面。jdbc的自动配置原理在org.springframework.boot.autoconfigure.jdbc下。
2.3 使用数据
添加一个aciton,使用JdbcTemplate来查询数据:
1 @Autowired
2 private JdbcTemplate jdbcTemplate;
3
4 @RequestMapping("/query")
5  public List<Map<String, Object>> query() {
6      List<Map<String, Object>> list = jdbcTemplate.queryForList("select * from `user`");
7      return list;
8  }
三、整合Druid数据源
这里我们整合Druid数据源,这是阿里巴巴的一个数据,整合之后我们可以跟踪sql日志,查询我们sql的执行情况。
3.1 添加pom依赖
1 <!--引入druid数据源-->
2 <!-- https://mvnrepository.com/artifact/com.alibaba/druid -->
3 <dependency>
4     <groupId>com.alibaba</groupId>
5     <artifactId>druid</artifactId>
6     <version>1.1.8</version>
7 </dependency>
在config下添加一个配置项DruidConfig.java:
 1 package com.example.demo.config;
 2
 3 import com.alibaba.druid.pool.DruidDataSource;
 4 import com.alibaba.druid.support.http.StatViewServlet;
 5 import com.alibaba.druid.support.http.WebStatFilter;
 6 import org.springframework.boot.context.properties.ConfigurationProperties;
 7 import org.springframework.boot.web.servlet.FilterRegistrationBean;
 8 import org.springframework.boot.web.servlet.ServletRegistrationBean;
 9 import org.springframework.context.annotation.Bean;
10 import org.springframework.context.annotation.Configuration;
11
12 import javax.sql.DataSource;
13 import java.util.Arrays;
14 import java.util.HashMap;
15 import java.util.Map;
16
17 @Configuration
18 public class DruidConfig {
19
20     @ConfigurationProperties(prefix = "spring.datasource")
21     @Bean
22     public DataSource druid(){
23        return  new DruidDataSource();
24     }
25
26     //配置Druid的监控
27     //1、配置一个管理后台的Servlet
28     @Bean
29     public ServletRegistrationBean statViewServlet(){
30         ServletRegistrationBean bean = new ServletRegistrationBean(new StatViewServlet(), "/druid/*");
31         Map<String,String> initParams = new HashMap<>();
32
33         initParams.put("loginUsername","admin");
34         initParams.put("loginPassword","123456");
35         initParams.put("allow","");//默认就是允许所有访问
36         initParams.put("deny","192.168.15.21");
37
38         bean.setInitParameters(initParams);
39         return bean;
40     }
41
42
43     //2、配置一个web监控的filter
44     @Bean
45     public FilterRegistrationBean webStatFilter(){
46         FilterRegistrationBean bean = new FilterRegistrationBean();
47         bean.setFilter(new WebStatFilter());
48
49         Map<String,String> initParams = new HashMap<>();
50         initParams.put("exclusions","*.js,*.css,/druid/*");
51
52         bean.setInitParameters(initParams);
53
54         bean.setUrlPatterns(Arrays.asList("/*"));
55
56         return  bean;
57     }
58 }
其中statViewServlet是数据库管理后台,便于我们查看数据sql监控,webStatFilter添加一个过滤来使Druid知道哪些请求(附带sql查询的请求)需要捕获到,以便于记录sql日志。
但是Druid后台默认使用的日志框架是log4j,和当前版本你的springboot的日志框架不一样,直接启动会报错,需要再添加一个依赖。参考:https://blog.csdn.net/lyn_kk/article/details/89086476
1  <dependency>
2      <groupId>org.slf4j</groupId>
3      <artifactId>slf4j-log4j12</artifactId>
4  </dependency>
3.2 数据源配置参数
在yml添加Druid数据源额外的参数:
 1 spring:
 2   datasource:
 3     username: root
 4     password: root
 5     url: jdbc:mysql://localhost:3306/jdbctest?serverTimezone=UTC&useSSL=false
 6     driver-class-name: com.mysql.cj.jdbc.Driver
 7
 8     #Druid数据源特有的配置
 9     initialSize: 5
10     minIdle: 5
11     maxActive: 20
12     maxWait: 60000
13     timeBetweenEvictionRunsMillis: 60000
14     minEvictableIdleTimeMillis: 300000
15     validationQuery: SELECT 1 FROM DUAL
16     testWhileIdle: true
17     testOnBorrow: false
18     testOnReturn: false
19     poolPreparedStatements: true
20     #   配置监控统计拦截的filters,去掉后监控界面sql无法统计,'wall'用于防火墙
21     filters: stat,wall,log4j
22     maxPoolPreparedStatementPerConnectionSize: 20
23     useGlobalDataSourceStat: true
24     connectionProperties: druid.stat.mergeSql=true;druid.stat.slowSqlMillis=500
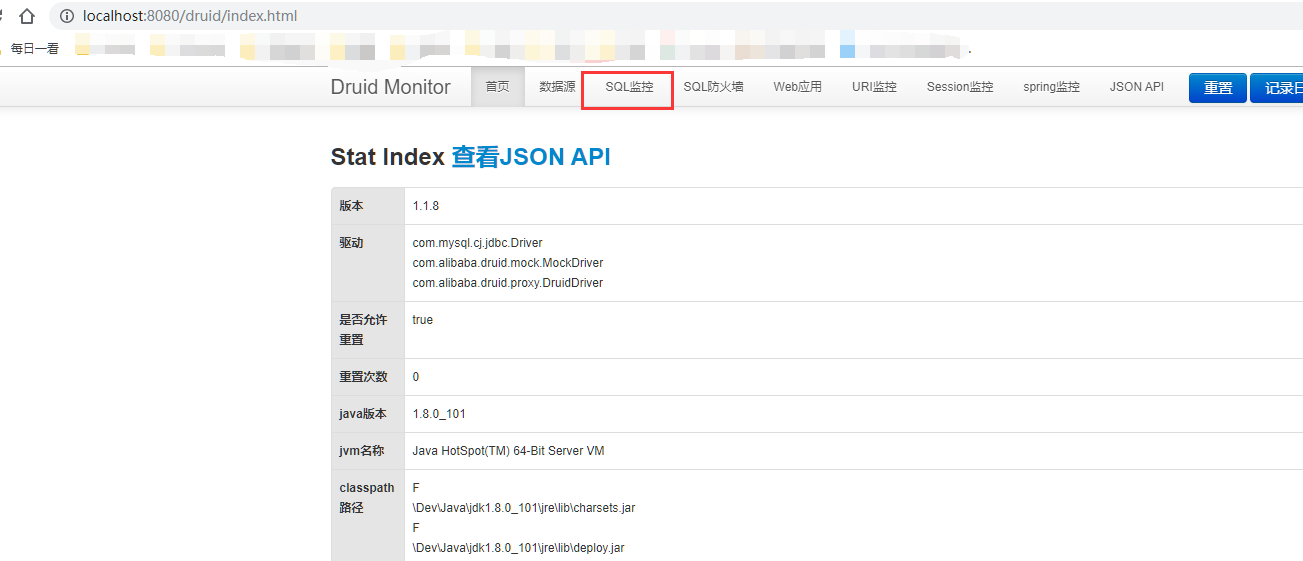
启动访问 http://localhost:8080/druid/index.html可以登录sql管理后台来查看监控,当我们访问一次数据库就会有一次监控。

四、整合Mybatis
前边我们已经整个了jdbc和druid数据源,下面我们就来使用一个操作数据库的框架,我们之前所熟悉的mybatis也整合进来。
4.1 添加依赖
接上边的依赖配置,我们添加mybatis的依赖:
1 <!--引入mybatis-->
2 <dependency>
3     <groupId>org.mybatis.spring.boot</groupId>
4     <artifactId>mybatis-spring-boot-starter</artifactId>
5     <version>1.3.1</version>
6 </dependency>
4.2 添加Mapper(注解版)
 1 package com.example.demo.mapper;
 2
 3 import com.example.demo.domain.Department;
 4 import org.apache.ibatis.annotations.Mapper;
 5 import org.apache.ibatis.annotations.Select;
 6
 7 import java.util.List;
 8
 9
10 @Mapper
11 public interface DepartmentMapper {
12
13     @Select("select * from department")
14     List<Department> getAll();
15
16     @Select("select * from department where id=#{id}")
17     Department getById(Integer id);
18
19 }
添加对应的实体:
 1 public class Department {
 2     private Integer id;
 3     private  String name;
 4
 5     public Integer getId() {
 6         return id;
 7     }
 8
 9     public void setId(Integer id) {
10         this.id = id;
11     }
12
13     public String getName() {
14         return name;
15     }
16
17     public void setName(String name) {
18         this.name = name;
19     }
20
21     public Department() {
22
23     }
24
25     public Department(Integer id, String name) {
26         this.id = id;
27         this.name = name;
28     }
29
30     @Override
31     public String toString() {
32         return "Department{" +
33                 "id=" + id +
34                 ", name='" + name + '\'' +
35                 '}';
36     }
37 }
4.3 添加控制器访问
@RestController
@RequestMapping("/dept")
public class DepartmentController {

    @Autowired
    DepartmentMapper departmentMapper;


    @GetMapping("list")
    public Object getAll(){
        return departmentMapper.getAll();
    }

    @GetMapping("{id}")
    public Object getById(@PathVariable("id") Integer id){
        return departmentMapper.getById(id);
    }
}
访问地址:http://localhost:8080/dept/1

使用@MapperScan注解指定包名,可以把该包下边的所有类注册为Mapper,使我们不用再每个类型写注解@Mapper。
 1 //使用MapperScan批量扫描所有的Mapper接口;
 2 @MapperScan(value = "com.example.demo.mapper")
 3 @SpringBootApplication
 4 public class DemoApplication {
 5
 6     public static void main(String[] args) {
 7         SpringApplication.run(DemoApplication.class, args);
 8     }
 9
10 }
4.4 Xml配置版
我们可以在类路径下添加传统的mybatis配置文件,并在application.yml添加如下配置就可以实现配置文件方式的mybatis。
mybatis:
  config-location: classpath:mybatis/mybatis-config.xml 指定全局配置文件的位置
  mapper-locations: classpath:mybatis/mapper/*.xml  指定sql映射文件的位置
五、整合SpringData JPA
5.1 什么是SpringData JPA
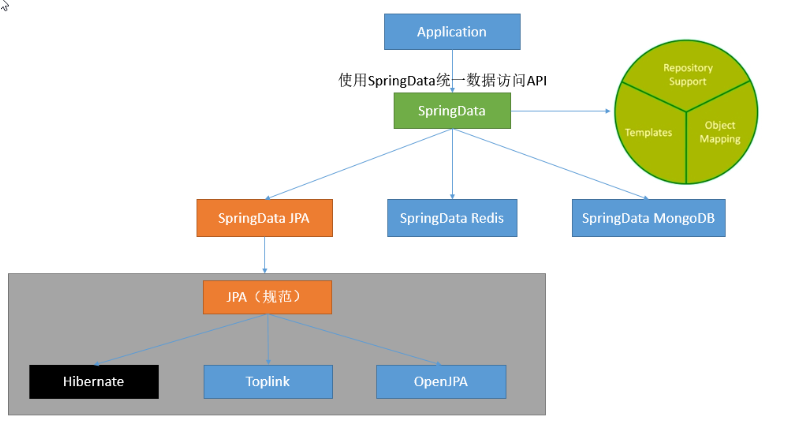
JPA(Java Persistence API)是Sun官方提出的Java持久化规范. 为Java开发人员提供了一种对象/关联映射工具来管理Java应用中的关系数据. 它的出现是为了简化现有的持久化开发工作和整合ORM技术. 结束各个ORM框架各自为营的局面。
JPA仅仅是一套规范,不是一套产品, 也就是说Hibernate, TopLink等是实现了JPA规范的一套产品。
Spring Data JPA是Spring基于ORM框架、JPA规范的基础上封装的一套JPA应用框架,是基于Hibernate之上构建的JPA使用解决方案,用极简的代码实现了对数据库的访问和操作,包括了增、删、改、查等在内的常用功能。
除此之外还有SpringData Redis、SpringData MongoDb。

5.2 引入依赖
 1  <!--整合jdbc-->
 2  <dependency>
 3      <groupId>org.springframework.boot</groupId>
 4      <artifactId>spring-boot-starter-jdbc</artifactId>
 5  </dependency>
 6  <dependency>
 7      <groupId>mysql</groupId>
 8      <artifactId>mysql-connector-java</artifactId>
 9      <scope>runtime</scope>
10  </dependency>
11
12
13  <!--引入springdata jpa-->
14  <dependency>
15      <groupId>org.springframework.boot</groupId>
16      <artifactId>spring-boot-starter-data-jpa</artifactId>
17  </dependency>
其中前两个都是访问数据库不可缺少的依赖,在整合mybatis的时候也有。
5.3 添加实体类
添加一个User类,添加相应注解,SpringData JPA会自动生成到数据库表。
 1 package com.example.demo.domain;
 2
 3 import javax.persistence.*;
 4
 5 @Entity
 6 public class User {
 7
 8     @Id //表名这是一个主键
 9     @Column() //是数据库中的列,默认不写把属性名自动作为列,使用注解可以指定列明
10     @GeneratedValue(strategy = GenerationType.IDENTITY) //主键自增
11     private  Integer id;
12
13     @Column(name = "user_name",length = 50) //这是和数据表对应的一个列
14     private  String name;
15
16     private  String  email;
17
18     public String getEmail() {
19         return email;
20     }
21
22     public void setEmail(String email) {
23         this.email = email;
24     }
25
26     public Integer getId() {
27         return id;
28     }
29
30     public void setId(Integer id) {
31         this.id = id;
32     }
33
34     public String getName() {
35         return name;
36     }
37
38     public void setName(String name) {
39         this.name = name;
40     }
41 }
5.4 添加一个仓储
1 package com.example.demo.repository;
2
3 import com.example.demo.domain.User;
4 import org.springframework.data.jpa.repository.JpaRepository;
5
6 public interface UserRepository extends JpaRepository<User,Integer> {
7
8 }
只要继承了JpaRepository<User,Integer>就行了,里边有封装好自带的访问数据库的方法。
5.5 添加一个控制器
 1 @RestController
 2 public class UserController {
 3
 4     @Autowired
 5     UserRepository userRepository;
 6
 7     @GetMapping("/user/{id}")
 8     public User getUser(@PathVariable("id") Integer id){
 9         Optional<User> optional = userRepository.findById(id);
10         return optional.get();
11     }
12
13     @GetMapping("/user")
14     public  User insertUser(User user){
15         User save = userRepository.save(user);
16         return save;
17     }
18 }
里边有一个插入的方法和一个获取的方法,我们可以先插入在访问获取方法。
访问:http://localhost:8080/user?name=dsff&email=526457385@qq.com来插入数据,访问:http://localhost:8080/user/1来获取数据。
六、总结
以上就是springboot对数据库访问的整合了,基本上学到这里就可以完全的使用springboot进行开发了,其他的一些细节问题会开发过程中遇见的时候再进行学习就行了。


