Scrapy选择器和持久化
介绍
Scrapy是一个为了爬取网站数据,提取结构性数据而编写的应用框架。 其可以应用在数据挖掘,信息处理或存储历史数据等一系列的程序中。理解scrapy可以参考django,django框架是用帮助我们快速开发web程序的,而scrapy框架就是用来帮助我们快速抓取网页信息的。
安装
#Windows平台
    1、pip3 install wheel #  pip默认只是去网络去找包,要想pip支持本地wheel文件安装,需要安装wheel包。安装后,便支持通过wheel文件安装软件,wheel文件官网:https://www.lfd.uci.edu/~gohlke/pythonlibs
    3、pip3 install lxml
    4、pip3 install pyopenssl
    5、下载并安装pywin32:https://sourceforge.net/projects/pywin32/files/pywin32/
    6、下载twisted的wheel文件:http://www.lfd.uci.edu/~gohlke/pythonlibs/#twisted
    7、执行pip3 install 下载目录\Twisted-17.9.0-cp36-cp36m-win_amd64.whl
    8、pip3 install scrapy

#Linux平台
    1、pip3 install scrapy
整体架构

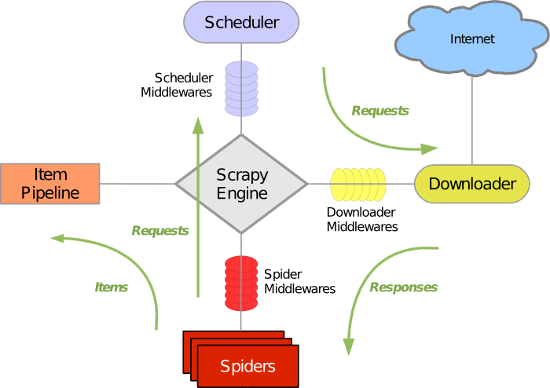
在Scrapy的数据流是由执行引擎控制,具体流程如下:
- spiders产生request请求,将请求交给引擎
- 引擎把请求交给调度器,调度器具有url去重功能(因为request对象里有url),调度器会对需要执行的请求按照优先级排列放到一个地方
- 调取器把请求给引擎,引擎把调度好的请求发送给download,通过中间件发送(这个中间件至少有 两个方法,一个请求的,一个返回的)
- 一旦完成下载就返回一个response,通过下载器中间件,返回给引擎,引擎把response 对象传给下载器中间件,最后到达引擎
- 引擎从下载器中收到response对象,经过爬虫中间件传给了spiders(spiders里面做两件事,1、产生request请求,2、为request请求绑定一个回调函数),spiders只负责解析爬取的任务。不做存储(可以做,但是不建议做,一来是为了分工明确,二来是为了解决重复打开文件的尴尬)
- 解析完成之后返回一个解析之后的结果items对象及(跟进的)新的Request给引擎
- 引擎将(Spider返回的)爬取到的Item给Item Pipeline,存入数据库,持久化。如果yield的是一个request对象,就传给调度器再次去下载
- 重复上述过程
Scrapy主要包括了以下组件:
- 引擎(Scrapy)
用来处理整个系统的数据流处理, 触发事务(框架核心) - 调度器(Scheduler)
用来接受引擎发过来的请求, 压入队列中, 并在引擎再次请求的时候返回. 可以想像成一个URL(抓取网页的网址或者说是链接)的优先队列, 由它来决定下一个要抓取的网址是什么, 同时去除重复的网址 - 下载器(Downloader)
用于下载网页内容, 并将网页内容返回给蜘蛛(Scrapy下载器是建立在twisted这个高效的异步模型上的) - 爬虫(Spiders)
爬虫是主要干活的, 用于从特定的网页中提取自己需要的信息, 即所谓的实体(Item)。用户也可以从中提取出链接,让Scrapy继续抓取下一个页面 - 项目管道(Pipeline)
负责处理爬虫从网页中抽取的实体,主要的功能是持久化实体、验证实体的有效性、清除不需要的信息。当页面被爬虫解析后,将被发送到项目管道,并经过几个特定的次序处理数据。 - 下载器中间件(Downloader Middlewares)
位于Scrapy引擎和下载器之间的框架,主要是处理Scrapy引擎与下载器之间的请求及响应。 - 爬虫中间件(Spider Middlewares)
介于Scrapy引擎和爬虫之间的框架,主要工作是处理蜘蛛的响应输入和请求输出。 - 调度中间件(Scheduler Middewares)
介于Scrapy引擎和调度之间的中间件,从Scrapy引擎发送到调度的请求和响应。
创建项目
scrapy创建项目也是和django创建项目类似
1. scrapy startproject 项目名称
   - 在当前目录中创建中创建一个项目文件(类似于Django)

2. scrapy genspider [-t template] <name> <domain>
   - 创建爬虫应用,需要cd到项目目录
   如:
      scrapy gensipider -t basic oldboy oldboy.com
      scrapy gensipider -t xmlfeed autohome autohome.com.cn
   PS:
      查看所有命令:scrapy gensipider -l
      查看模板命令:scrapy gensipider -d 模板名称

3. scrapy list
   - 展示爬虫应用列表

4. scrapy crawl 爬虫应用名称
   - 运行单独爬虫应用,加上--nolog参数就不会打印提示信息
目录结构
 myproject/
   scrapy.cfg    # 项目部署的配置文件
    myproject/
       __init__.py
       items.py          # 用于结构化数据,类似于django中的model
       pipelines.py    # 数据处理,一般做数据持久化
       middlewares.py   # 中间件
       settings.py    # 爬虫程序使用的配置文件
       spiders/
           __init__.py
           jd.py       # 文件名一般和爬虫名一样,但是不一样也没关系,因为scrapy crawl jd,使用的是爬虫的name属性
如果在windows中国之行爬虫出现编码问题,在爬虫程序的最上面加上如下代码
import sys,os
sys.stdout=io.TextIOWrapper(sys.stdout.buffer,encoding='gb18030')
起步
# -*- coding: utf-8 -*-
import scrapy
from scrapy.http import Request

class ChoutiSpider(scrapy.Spider):
    # 爬虫名称,不能更改
    name = "chouti"
    # 爬去过程可能遇到一些a标签,这个选项用来控制爬虫只爬取chouti.com这个网站的连接,不往外爬
    allowed_domains = ["chouti.com"]

    # 初始url
    start_urls = ['http://chouti.com/']

    def start_requests(self):
        # 爬虫刚开启会执行这个,这个函数要么是一个生成器,要么返回一个可迭代对象,因为源码是把生成器或者可迭代对象通过
        # iter() 方法转化为迭代器,然后next取值
        # for url in self.start_urls:
        #     # 默认callback调用的是parse
        #     yield Request(url)
        url_list = []
        for url in self.start_urls:
            url_list.append(Request(url))
        return url_list

    def parse(self, response):
        # response 是爬取得到的对象HtmlResponse,里面不仅封装了响应头,也封装了响应体response.body
        items = response.xpath('//*[@id="content-list"]/div[@class="item"]')
        # 每次
        f = open('chouti.txt', 'a+')
        for i in items:
            """
            extract 得到列表, extract_first 得到单个值,extract 或 extract_first 得到的里面的内容都是字符串
            而不是可以使用xpath方法的selector对象
            """
            link = i.xpath('.//a/@href').extract_first()
            f.write(link + '\n')
        f.close()

        page_links = response.xpath('//*[@id="dig_lcpage"]//a/@href').extract()
        for i in page_links:
            # 发送下一个请求
            yield Request(url='https://dig.chouti.com' + i, callback=self.parse)
选择器
在scrapy中可以使用beautifulsoup,但是如果你在scrapy里面使用beautifulsoup就有点非主流了,因为scrapy可以使用xpath语法,关键是在浏览器有一个copy xpath的功能以及xpath组件(crtl + shift + x)可以快速帮我们寻找的我们想要寻找的内容
#!/usr/bin/env python
# -*- coding:utf-8 -*-

from scrapy.http import HtmlResponse, Response
from scrapy.selector import Selector
html = """<!DOCTYPE html>
<html>
    <head lang="en">
        <meta charset="UTF-8">
        <title></title>
    </head>
    <body>
        <ul>
            <li class="item-"><a id='i1' href="link.html">first item</a></li>
            <li class="item-0"><a id='i2' href="llink.html">first item</a></li>
            <li class="item-1"><a href="llink2.html">second item<span>vv</span></a></li>
        </ul>
        <div><a href="llink2.html">second item</a></div>
    </body>
</html>
"""
response = HtmlResponse(url='http://xxx.com', body=html, encoding='utf8')
# // 表示子子孙孙, / 表示儿子
hxs = response.xpath('//a')
print(hxs)
hxs = response.xpath('//a[2]')
print(hxs)
hxs = response.xpath('//a[@id]')
print(hxs)
hxs = response.xpath('//a[@id="i1"]')
print(hxs)
# 并且的条件
hxs = response.xpath('//a[@href="link.html"][@id="i1"]')
print(hxs)
# 包含,比较常用
hxs = response.xpath('//a[contains(@href, "link")]')
print(hxs)
# 没有end-with
hxs = response.xpath('//a[starts-with(@href, "link")]')
print(hxs)
# 正则表达式,其中re:test 是固定写法
hxs = response.xpath('//a[re:test(@id, "i\d+")]')
print(hxs)
hxs = response.xpath('//a[re:test(@id, "i\d+")]/text()').extract()
print(hxs)
hxs = response.xpath('//a[re:test(@id, "i\d+")]/@href').extract()
print(hxs)
# 抽取li标签下的所有a的href属性组成一个列表,列表里放着字符串
hxs = response.xpath('/html/body/ul/li/a/@href').extract()
print(hxs)
# 抽取li标签下的第一个a的href属性组成一个列表,列表里放着字符串
hxs = response.xpath('//body/ul/li/a/@href').extract_first()
print(hxs)

ul_list = response.xpath('//body/ul/li')
for item in ul_list:
    # 如果这里用item.xpath('/a/span'),那么寻找范围是response,而不是item
    v = item.xpath('./a/span')
    # 或
    # v = item.xpath('a/span')
    # 或
    # v = item.xpath('*/a/span')
    print(v)
cookie的处理
cookie的处理有两种方式,第一种是自己在程序中获取cookie并每次显示地带上cookie
from scrapy.http.cookies import CookieJar
        cookie_jar = CookieJar()
        cookie_jar.extract_cookies(response, response.request)
        # 去对象中将cookie解析到字典
        for k, v in cookie_jar._cookies.items():
            for i, j in v.items():
                for m, n in j.items():
                    self.cookie_dict[m] = n.value
发送请求时携带cookies,需要注意的一点是body传入的值是‘’k1=1&k2=2‘’这样的格式
yield Request(
            url='https://xxx',
            method='post',
            body='xxoo',
            cookies=self.cookie_dict,
            headers = {'Content-Type': 'application/x-www-form-urlencoded; charset=UTF-8'},
            callback = self.check_login
        )

from urllib.parse import urlencode

dic = {
    'k1':1,
    'k2':2
}
print(urlencode(dic))
第二种方式是在每个请求加上这样一句meta={'cookiejar': True},这样发请求的时候会自动解析cookie并携带cookie
pipeline
我们在parse爬取的内容,可以直接在里面打开文件写入文件并关闭文件。但是这样会存在两个问题:
- 程序的耦合性较高,因为爬虫代码和存储数据的代码放到一起,这样一旦程序大了就会很乱,我们希望的是爬虫代码就仅仅是爬虫代码,数据持久化代码就只写数据保存相关的逻辑
- 一旦在程序设计到翻页,想要再次发请求并且回调函数还是parse的时候,就会重复打开文件,这肯定会浪费资源
那么我们能否做到在爬虫启动到结束只打开一次文件呢?答案是肯定的,借助item和pipeline就能完成。
cnblogs.py
from nj.items import NjItem

class CnblogSpider(scrapy.Spider):
    # 爬虫名称,不能更改
    name = "cnblog"
    allowed_domains = ["cnblogs.com"]

    # 初始url
    start_urls = ['https://www.cnblogs.com/longyunfeigu/']
    def parse(self, response):
        links = response.xpath("//a[@class='postTitle2']/@href").extract()
        for link in links:
            yield NjItem(href=link)
items.py 相当于django的model
import scrapy

class NjItem(scrapy.Item):
    # define the fields for your item here like:
    # name = scrapy.Field()
    href = scrapy.Field()
pipelines.py
# -*- coding: utf-8 -*-

# Define your item pipelines here
#
# Don't forget to add your pipeline to the ITEM_PIPELINES setting
# See: http://doc.scrapy.org/en/latest/topics/item-pipeline.html
from scrapy.exceptions import DropItem

"""
源码内容:
    1. 判断当前FilePipeline类中是否有from_crawler
        有:
            obj = FilePipeline.from_crawler(....)
        否:
            obj = FilePipeline()
    2. obj.open_spider()

    3. obj.process_item()/obj.process_item()/obj.process_item()/obj.process_item()/obj.process_item()

    4. obj.close_spider()
"""

"""
这里的两个Pipeline不管parse函数是否yield,都会实例化相应的对象并调用open_spider方法,
然后这两个对象就坐在这抽烟等着了,等待着parse返回item对象,然后一层层调用process_item处理,最终爬虫结束的时候接关闭close_spider

raise 一个DropItem() 对象的结果

File.from_crawler
DB.from_crawler
File.open_spider
Db.open_spider
File
Db.close_spider
File.close_spider
"""

class FilePipeline(object):
    def __init__(self, path):
        # 把这个类的对象后续方法可能会用到的属性定义在__init__里面,这样看代码的人一眼就能看到这个对象具有的属性
        # 否则调用open方法self才有f属性,别人可能有疑惑,明明__init__没有f,现在怎么就有了呢,还得一个个去方法找哪一个给self绑定f属性,这也是编程规范
        self.f = None
        self.path = path

    @classmethod
    def from_crawler(cls, crawler):
        """
        初始化时候,用于创建pipeline对象,我们在这里取settings的配置,注意我们写的settings不是爬虫所有的配置
        类似django的settings也不是项目的完整配置
        :param crawler:
        :return:
        """
        print('File.from_crawler')
        path = crawler.settings.get('FILE_PATH')
        return cls(path)

    def open_spider(self, spider):
        """
        爬虫开始执行时,调用
        :param spider:
        :return:
        """
        # if spider.name == 'chouti':
        print('File.open_spider')
        self.f = open(self.path, 'a+')

    def process_item(self, item, spider):
        # f = open('xx.log','a+')
        # f.write(item['href']+'\n')
        # f.close()
        print('File')
        self.f.write(item.get('href','') + '\n')
        # 返回item或者返回None, 写一个pipeline都的process_item都会被调用,调用传入的参数就是在这返回的值
        # 如果返回None,那么下一个pipeline都的process_item的item参数就是None
        # 要想pipeline都的process_item不再执行,可以使用raise DropItem() 异常实例
        return item
        # raise DropItem()

    def close_spider(self, spider):
        """
        爬虫关闭时,被调用
        :param spider:
        :return:
        """
        print('File.close_spider')
        self.f.close()

class DbPipeline(object):
    def __init__(self,path):
        self.f = None
        self.path = path

    @classmethod
    def from_crawler(cls, crawler):
        """
        初始化时候,用于创建pipeline对象
        :param crawler:
        :return:
        """
        print('DB.from_crawler')
        path = crawler.settings.get('DB_PATH')
        return cls(path)

    def open_spider(self,spider):
        """
        爬虫开始执行时,调用
        :param spider:
        :return:
        """
        print('Db.open_spider')
        self.f = open(self.path,'a+')

    def process_item(self, item, spider):
        # f = open('xx.log','a+')
        # f.write(item['href']+'\n')
        # f.close()
        print('Db',item)
        # self.f.write(item['href']+'\n')
        return item

    def close_spider(self,spider):
        """
        爬虫关闭时,被调用
        :param spider:
        :return:
        """
        print('Db.close_spider')
        self.f.close()
settings.py
ITEM_PIPELINES = {
   'nj.pipelines.FilePipeline': 300,
   'nj.pipelines.DbPipeline': 400,
}
