
Git的基本使用
Git的基本使用
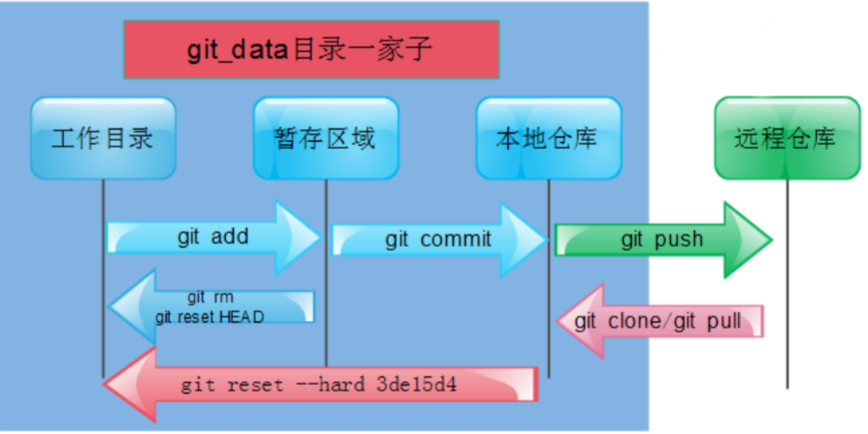
1、git的四个工作区域
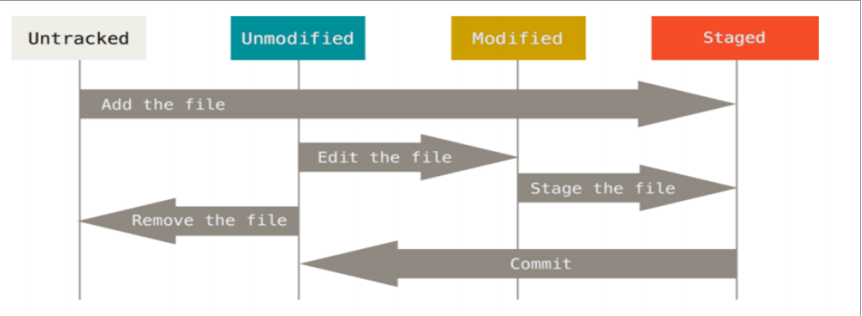
2、git四种状态
3、git基础命令
1、查看工作区状态
[root@git git_data]# git status
# 位于分支 master
# 初始提交
无文件要提交(创建/拷贝文件并使用 "git add" 建立跟踪)
[root@git git_data]# touch a b c
[root@gitlab git_test]# git status
# On branch master
#
# Initial commit
#
# Untracked files:
#   (use "git add <file>..." to include in what will be committed)
#
#       a
#       b
#       c
nothing added to commit but untracked files present (use "git add" to track)
2.git add 将改动过的目录或文件 提交到暂存区
[root@git git_data]# git add a
[root@gitlab git_test]# git status
# On branch master
#
# Initial commit
#
# Changes to be committed:
#   (use "git rm --cached <file>..." to unstage)
#
#       new file:   a
#
# Untracked files:
#   (use "git add <file>..." to include in what will be committed)
#
#       b
#       c
3.使用git add .添加目录中所有改动过的文件
[root@gitlab git_test]# git add .
[root@gitlab git_test]# git status
# On branch master
#
# Initial commit
#
# Changes to be committed:
#   (use "git rm --cached <file>..." to unstage)
#
#       new file:   a
#       new file:   b
#       new file:   c
#
4.将暂存区中的文件撤回到工作区
[root@gitlab git_test]# git rm --cached c
rm 'c'
[root@gitlab git_test]# git status
# On branch master
#
# Initial commit
#
# Changes to be committed:
#   (use "git rm --cached <file>..." to unstage)
#
#       new file:   a
#       new file:   b
#
# Untracked files:
#   (use "git add <file>..." to include in what will be committed)
#
#       c
5.删除文件
1.先从暂存区撤回到工作区、然后直接删除文件
git rm ‐‐cached c
rm ‐f c

2.直接从暂存区域同工作区域一同删除文件命令
git rm ‐f b
6.提交到本地仓库
[root@gitlab git_test]# git commit -m "commit a b c"
[master (root-commit) 9152daa] commit a b c
 3 files changed, 0 insertions(+), 0 deletions(-)
 create mode 100644 a
 create mode 100644 b
 create mode 100644 c
4、git分支
1.查看当前分支
[root@gitlab git_data]# git  log  --oneline  --decorate
75cb253 (HEAD, master) modifled a.txt a         # 默认分支指向你最后一次的提交 HEAD头、指针
a23372f rename a  a.txt
68a450e new file b c
6ea0eb3 new file a

###  HEAD 指针指向哪个分支、说明你当前在哪个分支下工作

[root@gitlab git_data]# git branch
* master
*
2.创建分支
## git branch 分支名称              ---创建分支
## git checkout -b 分支名称         ---创建并进入分支
[root@gitlab git_data]# git branch  testing   ## 新建testing分支
[root@gitlab git_data]# git log --oneline --decorate
75cb253 (HEAD, testing, master) modifled a.txt a
a23372f rename a  a.txt
68a450e new file b c
6ea0eb3 new file a
3.切换分支
[root@gitlab git_data]# git checkout testing
Switched to branch 'testing'
[root@gitlab git_data]# git branch
  master
* testing
4.删除分支
[root@gitlab git_data]# git branch -d testing
Deleted branch testing (was 636dcdc).
5.合并分支
[root@gitlab git_data]# git merge testing
Merge made by the 'recursive' strategy.
 testing | 0
 1 file changed, 0 insertions(+), 0 deletions(-)
 create mode 100644 testing

[root@gitlab git_data]# git log  --oneline --decorate
05ed989 (HEAD, master) Merge branch 'testing'
636dcdc add new file master on master
d9dbeec (testing) add testing on testing fenzhi
a57f5c2 add new file bbb
6.标签
标签也是指向了一次commit提交,是一个里程碑式的标签,回滚打标签直接加标签号,不需要加唯一字符串不好记
[root@git git_data]# git tag ‐a v1.0 ‐m "aaa bbb master tesing version v1.0"
# ‐a指定标签名字 ‐m 指定说明文字
[root@git git_data]# git tag
v1.0
[root@git git_data]# git tag ‐a v2.0 dbead4c ‐m "add bbb version v2.0"
# 指定某一次的提交为标签
# dbead4c  唯一值  通过git reflog查看
[root@git git_data]# git show v1.0
# 查看v1.0的信息 git show 加标签查看
[root@git git_data]# git reset ‐‐hard v2.0
# 直接还原数据到v2.0
HEAD 现在位于 dbead4c add bbb
[root@git git_data]# ll
总用量 4
‐rw‐r‐‐r‐‐ 1 root root 8 8月 23 11:26 a
‐rw‐r‐‐r‐‐ 1 root root 0 8月 23 11:25 b
[root@git git_data]# git tag ‐d v2.0
# 删除标签 ‐d参数

 浙公网安备 33010602011771号