shell
一、shell概述
shell是操作系统的最外层,可以合并编程语言一控制进程和文件,以及启动和控制其他程序。shell通过提示输入,向操作系统解释该输入。shell是一个命令行解释器,它接收应用程序/用户命令,然后调用操作系统内核。


Shell还是一个功能相当强大的编程语言,易编写、易调试、灵活性强。
Linux提供的shell解析器
root@zhangkun:~# cat /etc/shells
/bin/sh
/bin/bash
/usr/bin/bash
/bin/dash
/usr/bin/dash
root@zhangkun:~# echo $SHELL
/bin/bash
二、第一个shell脚本
先新建一个sh脚本文件
root@zhangkun:~# mkdir study
root@zhangkun:~/study# touch hello.sh
root@zhangkun:~/study# vi hello.sh
在helloworld.sh中输入如下内容
#!/bin/bash
echo "Hello,world"
脚本常用的执行方式
Linux shell种类非常多,常见的有:Bourne Shell(/usr/bin/sh或/bin/sh)、Bourne Again Shell(/bin/bash)、C Shell(/usr/bin/csh)、K shell(/usr/bin/ksh)、Shell for Root(/sbin/sh)等。不同的Shell语言的语法有所不同,所以不能交换使用。
最常用的shell是Bash,也就是Bourne Again Shell,是大多是Linux系统默认的Shell。
1、第一种采用bash或sh+脚本的相对路径或者绝对路径(不用赋予脚本+x权限)
sh+脚本的相对路径
root@zhangkun:~/study# sh hello.sh
Hello,world
sh+脚本的绝对路径
root@zhangkun:~/study# sh /root/study/hello.sh
Hello,world
bash+脚本的相对路径
root@ zhangkun:~/study# bash hello.sh
Hello,world
bash+脚本的绝对路径
root@ zhangkun:~/study# bash /root/study/hello.sh
Hello,world
2、第二种:采用输入脚本的绝对路径和相对路径执行脚本(必须具有可执行权限+x)
1、首先赋予helloworld.sh脚本+x权限
root@zhangkun:~/study# chmod +x hello.sh
2、./+脚本名
root@zhangkun:~/study# ./hello.sh
Hello,world
3、/+绝对路径
root@ zhangkun:~/study# /root/study/hello.sh
Hello,world
第三种:在脚本的路径前加上”. ”或者source命令
root@zhangkun:~/study# source hello.sh
Hello,world
root@zhangkun:~/study# source /root/study/hello.sh
Hello,world
root@zhangkun:~/study# . hello.sh
Hello,world
source是shell的内嵌
root@zhangkun:~/study# type source

source is a shell builtin
前两种都是在当前shell中打开一个子shell来执行脚本内容,当脚本内容结束,则子shell关闭,回到父shell中。
第三种,也就是使用在脚本路径前加”.”或者source的方式,可以使脚本内容在当前shell里执行,而无需打开子shell,也就是为什么我们每次修改完/etc/profile文件以后,需要source一下的原因。
三、父子shell
查看bash进程
root@zhangkun:~/study# ps -f

UID          PID    PPID  C STIME TTY          TIME CMD
root     1623611 1623417  0 Jul16 pts/4    00:00:00 -bash
root     2973460 1623611  0 16:18 pts/4    00:00:00 ps -f
在敲一下bash,生成一个bash的子进程
root@ zhangkun:~/study# bash

root@ zhangkun:~/study# ps -f
UID          PID    PPID  C STIME TTY          TIME CMD
root     1623611 1623417  0 Jul16 pts/4    00:00:00 -bash
root     2975205 1623611  0 16:19 pts/4    00:00:00 bash
root     2975216 2975205  0 16:19 pts/4    00:00:00 ps -f
后面进行的操作是在子shell中进行。
然后执行exit退出子shell
root@zhangkun:~/study# exit
exit
root@zhangkun:~/study# ps -f
UID          PID    PPID  C STIME TTY          TIME CMD
root     1623611 1623417  0 Jul16 pts/4    00:00:00 -bash
root     2979056 1623611  0 16:21 pts/4    00:00:00 ps -f
开子shell和不开子shell的区别在于,环境变量的继承关系,如在子shell中设置的当前变量,父shell中是不可见的。
四、变量
shell编程语言是非典型的解释型语言,不像C++/Java语言编程时需要事先声明变量,SHELL给一个变量赋值,实际上就是定义了变量,在Linux支持的所有shell中,都可以使用赋值符号(=)为变量赋值。
SHELL变量可分为两类:局部变量和环境变量,局部变量只在创建它们的shell脚本中使用,而环境变量则可以再创建它们的shell以及其派生出来的任意子进程中使用,有些变量使用户创建的,其他的则是专用shell变量。
4.1 系统预定义变量
(1)常用系统变量
$HOME、$PWD、$SHELL、$USER等。
$0 当前程序的名称
$n 当前程序的第n个参数,n=1,2,....9
$* 当前程序的所有参数(不包括程序本身)
$? 命令或程序执行完后的状态,一般返回0表示执行成功。
$UID 当前用户的ID
$PWD 当前所在的目录
$#:表示执行脚本传入参数的个数
(2) 案例实操
查看系统变量的值
root@zhangkun:~/study# env
root@zhangkun:~/study# echo $HOME
/root
root@zhangkun:~/study# echo $PWD
/root/study
root@zhangkun:~/study# printenv
root@zhangkun:~/study# echo $USER
root
root@zhangkun:~/study# printenv | less

![]()
![]()

![]()
查看所有的变量
root@zhangkun:~/study# set
输出所有参数、执行结果和参数个数

#!/bin/bash
# author print variables
echo -e '\033[32m----------------------\033[0m'
echo "This is $0 param !"
echo "This is \$1 is $1 param !"
echo "This is \$2 is $2 param !"
echo -e '\033[32m----------------------\033[0m'
echo "This is \$# is $# param !"
echo "This is \$* is $* param !"
echo "This is \$? is $? param !"
运行结果如下:

(3)LAMP导航菜单编写
#!/bin/bash
#by authors zk

echo -e "\033[32mPlease select Menu follow:\033[1m"

echo "1)install apache server"
echo "2)install Mysql server"
echo "3)install PHP server"
echo "4)install LAMP WEB "

echo "--------------------------------------------"
输出结果如下:

4.2 用户自定义变量
(1)基本语法
1、定义变量:变量名=变量值,注意,=号前后不能有空格
root@zhangkun:/# a=2
root@ zhangkun:/# echo $a
2
root@ zhangkun:/# echo $my_var

root@ zhangkun:/# my_var=hello
root@ zhangkun:/# echo $my_var
hello
root@ zhangkun:/# my_var='Hello,world'
root@ zhangkun:/# echo $my_var
Hello,world
root@ zhangkun:/# my_var="Hello,world"
root@ zhangkun:/# echo $my_var
Hello,world
#自定义变量是一个局部变量
root@ zhangkun:/# env | grep $my_var
root@ zhangkun:/# set | grep $my_var
_=Hello,world
my_var=Hello,world
#定义一个全局变量,变量升级
root@ zhangkun:/# export my_var
root@ zhangkun:/# echo $my_var
Hello,world
#切换进入子shell
root@ zhangkun:/# bash
root@ zhangkun:/# echo $my_var
Hello,world
#如果在子shell中更改变量的值只会在子shell中有效
root@ zhangkun:/# echo $my_var
Hello,world
root@ zhangkun:/# bash
root@ zhangkun:/# my_var='Hello'
root@ zhangkun:/# echo $my_var
Hello
root@ zhangkun:/# exit
exit
root@ zhangkun:/# echo $my_var
Hello,world
用户自定义变量

五、IF条件控制语句
在Linux Shell编程中,if、for、while、case等条件流程控制语句用的非常多。
IF (表达式) #if(Variable in Array)
语句1
else
语句2
fi
例一:判断数字大小
#!/bin/bash

NUM1=100
NUM2=200

if (($NUM2 > $NUM1));then
    echo "$NUM2 greater $NUM1!"
fi
运行结果如下:

逻辑运算符解析:
-f 判断文件是否存在 eg: if [ -f file name ]

-d 判断目录是否存在 eg: if [ -d dir ]

-eq 等于 应用于:整型比较

-ne 不等于 应用于:整型比较

-lt 小于 应用于:整型比较

-gt 大于 应用于:整型比较

-le 小于或等于 应用于:整型比较

-ge 大于或等于 应用于:整型比较

-a 双方都成立(and)逻辑表达式 -a 逻辑表达式

-o 单方成立(or)逻辑表达式 -o 逻辑表达式

-z 空字符串
例二:判断目录是否存在,如果目录不存在则创建
#!/bin/bash
# judge dir exists

dir=~/Desktop/test
if [ -d  $dir ];then
	echo "test exist"
else
	mkdir -p $dir
	echo "$dir mkdir success"
fi
运行结果如下:

![]()
例三:判断文件是否存在,如果存在,打印输出,如果不存在创建文件
#!/bin/bash

filename="file.txt"

if [ ! -f $filename ];then
	echo "OK">> $filename
else
	echo "file is exists"
	cat $filename
fi
运行结果如下:


例四:根据分数判断成绩等级
#!/bin/bash

score=$1
if [ -z $score ];then
        echo "Usage:{60|80}"
        exit
fi

if [[ $score -gt 85 ]];then
        echo "very good"
elif [[ $score -gt 75 ]];then
        echo "good"
elif [[ $score -gt 60 ]];then
        echo "pass"
else
        echo "no pass"
fi
运行结果如下:

例五:使用if条件语句编写Mysql备份脚本
#!/bin/bash
# auto backup mysql db
# by author zk

DATE=$(date +%F-%H-%M-%S)
echo $DATE
MYSQLDB=school
BAK_DIR=/root/data/backup/${MYSQLDB}_${DATE}
echo $BAK_DIR
MYSQLUSR=root
MYSQLPW=123456
MYSQLCMD=/usr/bin/mysqldump

if [ $UID -ne 0 ];then
    echo "Must to be use root for exec shell."
fi

if [ ! -d $BAK_DIR ];then
    mkdir -p $BAK_DIR
    echo -e "\033[32mThe $BAK_DIR Create Successfully!"
else
    echo "This $BAK_DIR is exists..."
fi

$MYSQLCMD -u$MYSQLUSR -p$MYSQLPW -d $MYSQLDB >$BAK_DIR/$MYSQLDB.sql

if [ $? -eq 0 ];then
    echo -e "\033[32mThe Mysql Backup $MYSQLDB Successfully!"
else
    echo -e "\033[32mThe Mysql Backup $MYSQLDB Failed,Please check!"
fi
先使用sh -n检查脚本是否存在问题
![]()
然后执行脚本

执行成功
可以看到备份sql

看一下备份sql的内容

指定每日备份计划
![]()
输入如下代码
0 0 * * * /bin/bash /home/zk/Desktop/shelltext/mysql_bak.sh >> /tmp/mysql_bak.log 2>&1
指定每日0点0分执行mysql_bak.sh备份数据库
例六:if条件综合LAMP一键安装脚本
一键源码安装LAMP脚本,先分解任务:
打印菜单
(1)安装apache WEB服务器
(2)安装Mysql DB服务器
(3)安装PHP服务器
(4)整合LAMP架构并启动服务
(1)安装apache WEB服务器
下载httpd-2.4.62.tar.bz2版本,下载URL,解压,进入安装目录,configure;make ; make install
遇到过如下错误
错误一:
checking for APR... no configure: error: APR not found. Please read the documentation.
这个错误需要先安装APR,在脚本里实现
错误二:
error: no acceptable C compiler found in $PATH
这个错误需要安装GCC
zk@zk-None:~/Desktop/shelltext$ sudo apt install gcc
错误三:
LAMP.sh: line 37: make: command not found
一般出现这个-bash: make: command not found提示,系统没有安装make等常用命令,直接sudo apt-get install安装下即可。
解决方法:
sudo apt-get update
sudo apt-get install  gcc automake autoconf libtool make
错误四:
xml/apr_xml.c:35:10: fatal error: expat.h: No such file or directory
解决方法:
sudo apt-get update
sudo apt-get install libexpat1-dev
错误五:安装pcre时
configure: error: Invalid C++ compiler or C++ compiler flags
解决方法:
sudo apt-update
sudo apt-get install g++
安装apache web服务器LAMP.sh
错误六:启动apache报错
AH00558: httpd: Could not reliably determine the server's fully qualified domain name, using 127.0.1.1. Set the 'ServerName' directive globally to suppress this message
到httpd目录下配置httpd.conf中Servername

ServerName localhost:80
设置代理服务器
echo 'Acquire::http::Proxy "http://your-proxy-address:port/";' | sudo tee
(1)安装apache服务器的脚本LAMP.sh
#!/bin/bash
# auto make install LAMP
# by authors zk

# HTTP define path variable
H_PREFIX_APACHE=/usr/local/apache

H_FILES_HTTPD=httpd-2.4.62.tar.bz2
H_FILES_HTTPD_DIR=httpd-2.4.62
H_HTTPD_URL=https://mirrors.tuna.tsinghua.edu.cn/apache/httpd/
H_PREFIX_HTTPD=/usr/local/apache/httpd/

H_FILES_APR=apr-1.6.5.tar.bz2
H_FILES_APR_DIR=apr-1.6.5
H_APR_URL=http://mirrors.tuna.tsinghua.edu.cn/apache/apr/
H_PREFIX_APR=/usr/local/apache/apr/

H_FILES_APR_UTIL=apr-util-1.6.3.tar.bz2
H_FILES_APR_UTIL_DIR=apr-util-1.6.3
H_APR_UTIL_URL=http://mirrors.tuna.tsinghua.edu.cn/apache/apr/
H_PREFIX_APR_UTIL=/usr/local/apache/apr-util/

H_FILES_PCRE=pcre-8.45.tar.gz
H_FILES_PCRE_DIR=pcre-8.45
H_PCRE_URL=https://sourceforge.net/projects/pcre/files/pcre/8.45/
H_PREFIX_PCRE=/usr/local/apache/pcre/

H_FILES_PCRE2=pcre2-10.37.tar.gz
H_FILES_PCRE2_DIR=pcre2-10.37
H_PCRE2_URL=https://sourceforge.net/projects/pcre/files/pcre2/10.37/
H_PREFIX_PCRE2=/usr/local/apache/pcre2/

if [ -z "$1" ];then
	echo -e "\033[36mPlease Select Install Menu follow:\033[0m"
	echo -e "\033[32m1)install apache server\033[1m"
	echo -e "\033[32m2)install Mysql server\033[1m"
	echo -e "\033[32m3)install PHP server\033[1m"
	echo -e "\033[31mUsage:{ /bin/sh $0 1|2|3|help}\033[0m"
	exit
fi

if [[ "$1" -eq "help" ]];then
	echo -e "\033[36mPlease Select Install Menu follow:\033[0m"
	echo -e "\033[32m1)install apache server\033[1m"
	echo -e "\033[32m2)install Mysql server\033[1m"
	echo -e "\033[32m3)install PHP server\033[1m"
	echo -e "\033[31mUsage:{ /bin/sh $0 1|2|3|help}\033[0m"
	exit
fi
if [[ "$1" -eq "1" ]];then
	wget -c $H_APR_URL/$H_FILES_APR &&tar -jxvf $H_FILES_APR &&cd $H_FILES_APR_DIR ;./configure --prefix=$H_PREFIX_APR
	if [ $? -eq 0 ];then
		make && make install
		echo -e "\033[32mThe $H_FILES_APR_DIR Server Install Successfully!\033[0m"
	else
		echo -e "\033[32mThe $H_FILES_APR_DIR Server Install Failed,Please check...!\033[0m"
		exit
	fi
	wget -c $H_APR_UTIL_URL/$H_FILES_APR_UTIL &&tar -jxvf $H_FILES_APR_UTIL &&cd $H_FILES_APR_UTIL_DIR ;./configure --prefix=$H_PREFIX_APR_UTIL --with-apr=$H_PREFIX_APR
	if [ $? -eq 0 ];then
		make && make install
		echo -e "\033[32mThe $H_FILES_APR_UTIL_DIR Server Install Successfully!\033[0m"
	else
		echo -e "\033[32mThe $H_FILES_APR_UTIL_DIR Server Install Failed,Please check...!\033[0m"
		exit
	fi
	wget -c $H_PCRE_URL/$H_FILES_PCRE &&tar -zxvf $H_FILES_PCRE &&cd $H_FILES_PCRE_DIR ;./configure --prefix=$H_PREFIX_PCRE --with-apr=$H_PREFIX_APR
	if [ $? -eq 0 ];then
		make && make install
		echo -e "\033[32mThe $H_FILES_PCRE_DIR Server Install Successfully!\033[0m"
	else
		echo -e "\033[32mThe $H_FILES_PCRE_DIR Server Install Failed,Please check...!\033[0m"
		exit
	fi
	wget -c $H_PCRE2_URL/$H_FILES_PCRE2 &&tar -zxvf $H_FILES_PCRE2 &&cd $H_FILES_PCRE2_DIR ;./configure --prefix=$H_PREFIX_PCRE2 --with-apr=$H_PREFIX_APR
	if [ $? -eq 0 ];then
		make && make install
		echo -e "\033[32mThe $H_FILES_PCRE2_DIR Server Install Successfully!\033[0m"
	else
		echo -e "\033[32mThe $H_FILES_PCRE2_DIR Server Install Failed,Please check...!\033[0m"
		exit
	fi
	export PATH=$PATH:$H_PREFIX_PCRE
	echo $PATH
	wget -c $H_HTTPD_URL/$H_FILES_HTTPD &&tar -jxvf $H_FILES_HTTPD &&cd $H_FILES_HTTPD_DIR ;./configure --prefix=$H_PREFIX_HTTPD --with-apr=$H_PREFIX_APR --with-apr-util=$H_PREFIX_APR_UTIL --enable-so --enable-mods-shared=most --with-pcre=$H_PREFIX_PCRE --with-pcre2=$H_PREFIX_PCRE2
	if [ $? -eq 0 ];then
		make && make install
		echo -e "\033[32mThe $H_FILES_HTTPD_DIR Server Install Successfully!\033[0m"
	else
		echo -e "\033[32mThe $H_FILES_HTTPD_DIR Server Install Failed,Please check...!\033[0m"
		exit
	fi
fi
执行完以上脚本后,启动apache服务器
root@zk-None:/usr/local/apache/httpd/bin# /usr/local/apache/httpd/bin/apachectl -k start
httpd (pid 351155) already running
root@zk-None:/usr/local/apache/httpd/bin# /usr/local/apache/httpd/bin/apachectl -k stop
root@zk-None:/usr/local/apache/httpd/bin# /usr/local/apache/httpd/bin/apachectl -k start
查看到80端口正在监听
root@zk-None:/usr/local/apache/httpd/bin# netstat -lnt
Active Internet connections (only servers)
Proto Recv-Q Send-Q Local Address           Foreign Address         State
tcp        0      0 127.0.0.1:3306          0.0.0.0:*               LISTEN
tcp        0      0 127.0.0.53:53           0.0.0.0:*               LISTEN
tcp        0      0 127.0.0.1:631           0.0.0.0:*               LISTEN
tcp        0      0 127.0.0.1:33060         0.0.0.0:*               LISTEN
tcp        0      0 127.0.0.54:53           0.0.0.0:*               LISTEN
tcp6       0      0 ::1:631                 :::*                    LISTEN
tcp6       0      0 :::80                   :::*                    LISTEN
访问localhost:80

apache服务器安装成功。
(2)安装Mysql DB服务器
安装mysql服务器脚本LAMP.sh
#!/bin/bash
# auto make install LAMP
# by authors zk

# HTTP define path variable
H_PREFIX_APACHE=/usr/local/apache

H_FILES_HTTPD=httpd-2.4.62.tar.bz2
H_FILES_HTTPD_DIR=httpd-2.4.62
H_HTTPD_URL=https://mirrors.tuna.tsinghua.edu.cn/apache/httpd/
H_PREFIX_HTTPD=/usr/local/apache/httpd/

H_FILES_APR=apr-1.6.5.tar.bz2
H_FILES_APR_DIR=apr-1.6.5
H_APR_URL=http://mirrors.tuna.tsinghua.edu.cn/apache/apr/
H_PREFIX_APR=/usr/local/apache/apr/

H_FILES_APR_UTIL=apr-util-1.6.3.tar.bz2
H_FILES_APR_UTIL_DIR=apr-util-1.6.3
H_APR_UTIL_URL=http://mirrors.tuna.tsinghua.edu.cn/apache/apr/
H_PREFIX_APR_UTIL=/usr/local/apache/apr-util/

H_FILES_PCRE=pcre-8.45.tar.gz
H_FILES_PCRE_DIR=pcre-8.45
H_PCRE_URL=https://sourceforge.net/projects/pcre/files/pcre/8.45/
H_PREFIX_PCRE=/usr/local/apache/pcre/

H_FILES_PCRE2=pcre2-10.37.tar.gz
H_FILES_PCRE2_DIR=pcre2-10.37
H_PCRE2_URL=https://sourceforge.net/projects/pcre/files/pcre2/10.37/
H_PREFIX_PCRE2=/usr/local/apache/pcre2/

if [ -z "$1" ];then
        echo -e "\033[36mPlease Select Install Menu follow:\033[0m"
        echo -e "\033[32m1)install apache server\033[1m"
        echo -e "\033[32m2)install Mysql server\033[1m"
        echo -e "\033[32m3)install PHP server\033[1m"
        echo -e "\033[31mUsage:{ /bin/sh $0 1|2|3|help}\033[0m"
        exit
fi

if [[ "$1" -eq "help" ]];then
        echo -e "\033[36mPlease Select Install Menu follow:\033[0m"
        echo -e "\033[32m1)install apache server\033[1m"
        echo -e "\033[32m2)install Mysql server\033[1m"
        echo -e "\033[32m3)install PHP server\033[1m"
        echo -e "\033[31mUsage:{ /bin/sh $0 1|2|3|help}\033[0m"
        exit
fi

if [[ "$1" -eq "1" ]];then
        wget -c $H_APR_URL/$H_FILES_APR &&tar -jxvf $H_FILES_APR &&cd $H_FILES_APR_DIR ;./configure --prefix=$H_PREFIX_APR
        if [ $? -eq 0 ];then
                make && make install
                echo -e "\033[32mThe $H_FILES_APR_DIR Server Install Successfully!\033[0m"
        else
                echo -e "\033[32mThe $H_FILES_APR_DIR Server Install Failed,Please check...!\033[0m"
                exit
        fi
        wget -c $H_APR_UTIL_URL/$H_FILES_APR_UTIL &&tar -jxvf $H_FILES_APR_UTIL &&cd $H_FILES_APR_UTIL_DIR ;./configure --prefix=$H_PREFIX_APR_UTIL --with-apr=$H_PREFIX_APR
        if [ $? -eq 0 ];then
                make && make install
                echo -e "\033[32mThe $H_FILES_APR_UTIL_DIR Server Install Successfully!\033[0m"
        else
                echo -e "\033[32mThe $H_FILES_APR_UTIL_DIR Server Install Failed,Please check...!\033[0m"
                exit
        fi
        wget -c $H_PCRE_URL/$H_FILES_PCRE &&tar -zxvf $H_FILES_PCRE &&cd $H_FILES_PCRE_DIR ;./configure --prefix=$H_PREFIX_PCRE --with-apr=$H_PREFIX_APR
        if [ $? -eq 0 ];then
                make && make install
                echo -e "\033[32mThe $H_FILES_PCRE_DIR Server Install Successfully!\033[0m"
        else
                echo -e "\033[32mThe $H_FILES_PCRE_DIR Server Install Failed,Please check...!\033[0m"
                exit
        fi
        wget -c $H_PCRE2_URL/$H_FILES_PCRE2 &&tar -zxvf $H_FILES_PCRE2 &&cd $H_FILES_PCRE2_DIR ;./configure --prefix=$H_PREFIX_PCRE2 --with-apr=$H_PREFIX_APR
        if [ $? -eq 0 ];then
                make && make install
                echo -e "\033[32mThe $H_FILES_PCRE2_DIR Server Install Successfully!\033[0m"
        else
                echo -e "\033[32mThe $H_FILES_PCRE2_DIR Server Install Failed,Please check...!\033[0m"
                exit
        fi
        export PATH=$PATH:$H_PREFIX_PCRE
        echo $PATH
        wget -c $H_HTTPD_URL/$H_FILES_HTTPD &&tar -jxvf $H_FILES_HTTPD &&cd $H_FILES_HTTPD_DIR ;./configure --prefix=$H_PREFIX_HTTPD --with-apr=$H_PREFIX_APR --with-apr-util=$H_PREFIX_APR_UTIL --enable-so --enable-mods-shared=most --with-pcre=$H_PREFIX_PCRE --with-pcre2=$H_PREFIX_PCRE2
        if [ $? -eq 0 ];then
                make && make install
                echo -e "\033[32mThe $H_FILES_HTTPD_DIR Server Install Successfully!\033[0m"
        else
                echo -e "\033[32mThe $H_FILES_HTTPD_DIR Server Install Failed,Please check...!\033[0m"
                exit
        fi
fi
if [[ "$1" -eq "2" ]];then
        sudo systemctl stop mysql
        sudo apt-get remove --purge mysql-server mysql-client mysql-common
        sudo rm -rf /etc/mysql /var/lib/mysql
        sudo apt-get autoremove
        sudo apt-get autoclean
        sudo apt-get remove --purge mysql-*
        sudo apt update
        sudo apt install mysql-server mysql-client
        if [ $? -eq 0 ];then
                echo -e "\033[32mThe $H_FILES_MYSQL_DIR Server Install Successfully!\033[0m"
        else
                echo -e "\033[32mThe $H_FILES_MYSQL_DIR Server Install Failed,Please check...!\033[0m"
                exit
        fi
fi
运行脚本LAMP.sh后,输入mysql登录数据库
root@zk-None:~# mysql -uroot -p123456
mysql: [Warning] Using a password on the command line interface can be insecure. Welcome to the MySQL monitor. Commands end with ; or \g. Your MySQL connection id is 4 Server version: 5.7.33-0ubuntu0.16.04.1 (Ubuntu) Copyright (c) 2000, 2021, Oracle and/or its affiliates. Oracle is a registered trademark of Oracle Corporation and/or its affiliates. Other names may be trademarks of their respective owners. Type 'help;' or '\h' for help. Type '\c' to clear the current input statement.
mysql>
(3)安装PHP服务器
在LAMP.sh中配置安装PHP服务器功能
六、for循环语句
For 变量 in 字符串
    do
    语句1
    done
例一:打印seq数字循环
#!/bin/bash
for i in $(seq 1 15);
do
	echo -e "\033[32mThe Num is $i\033[32m"
done
运行结果如下:

例二:求和1-100的值
#!/bin/bash
# auto sum 1 100
j=0
for ((i=1;i<=100;i++));
do
	j=$(($i+$j))
done
echo $j
#!/bin/bash
# auto sum 1 100
j=0
for ((i=1;i<=100;i++));
do
	#j=$(($i+$j))
	j=$(expr $j + $i)
done
echo $j
运行结果如下:

例三:批量打包sh文件
#!/bin/bash

for i in `find * . -maxdepth 1 -name "*.sh"`
do
    tar -czvf $i.tgz $i
done
运行结果如下:

例四:批量解压文件
#!/bin/bash

for i in `find * . -maxdepth 1 -name "*.tgz"`
do
    tar -xzvf $i -C /home/zk/Desktop/shelltext
done
执行前

执行后

例五:服务器远程批量传输文件
首先需要开放虚拟机中的22端口号
Linux 中 22 端口是 ssh 应用端口用以进行远程访问,正常情况下 Linux 服务器要打开 22 端口。
如下命令检查服务器是否启用 22 端口:
netstat -tln | grep 22
如果结果出现 xxx:22 等结果则说明,22 端口已开启,否则需要手动开启。
开启 22 端口
首先,检查是否安装 SSH 服务器,执行如下命令
sudo apt-get update
sudo apt-get install openssh-server
然后,开启服务器上的 22 端口。需要修改 SSH 服务器配置文件/etc/ssh/sshd_config。执行如下命令:
sudo vi /etc/ssh/sshd_config
找到“#Port 22”一行,然后将其改为“Port 22”。
最后,需要重启SSH服务以使配置更改生效,执行如下命令:
sudo service ssh restart
再次执行
netstat -tln | grep 22
检查 22 端口状态。如果开启,则可以通过 ssh 链接该服务器。
![]()
开启ssh服务
systemctl enable ssh.service

service sshd start
查看ssh服务状态
service ssh status

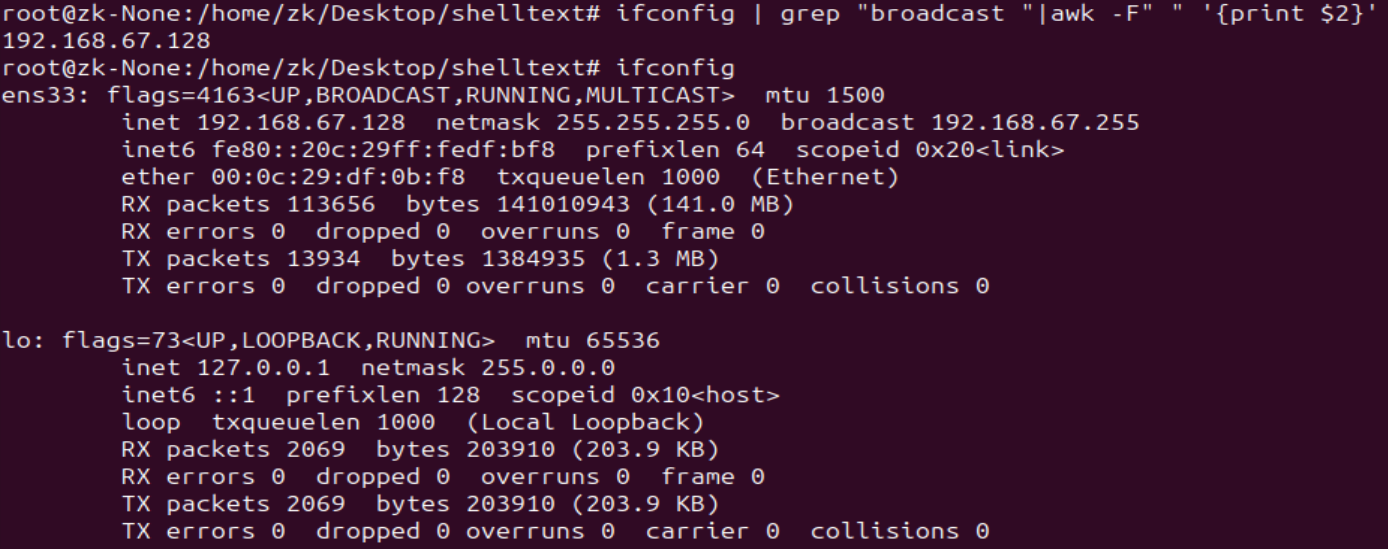
Linux的ip地址是192.168.67.128

#!/bin/bash
#auto ssh ls /tmp
#by authors zk 2024
for i in `echo 192.168.67.128 127.0.0.1`
do
        scp  /tmp/test.txt root@$i:/root/
done
在执行脚本的时候我遇到如下问题:

更改了/etc/ssh/sshd_config文件下的配置不好用
root@zk-None:/home/zk/Desktop/shelltext# cat /etc/ssh/sshd_config | grep 'PermitRootLogin yes\|PasswordAuthentication yes'
PermitRootLogin yes
PasswordAuthentication yes
最后更改了/etc/ssh/sshd_config下UsePAM解决问题
root@zk-None:/var/log# cat /etc/ssh/sshd_config | grep 'UsePAM'
UsePAM no

可以看到文件已经从/tmp目录传输到/root目录下了


生成免密钥登陆
root@zk-None:/home/zk/Desktop/shelltext# ssh-keygen
先生成一个公钥,然后将生成的公钥拷贝过去

后续copy就不需要密码了
例六:远程主机批量执行命令
#!/bin/bash
#auto ssh ls /tmp
#by authors zk 2024
for i in `seq 100 200`
do
        ssh -l root 192.168.1.$i 'ls /tmp'
done
七、While循环语句
打印0-9
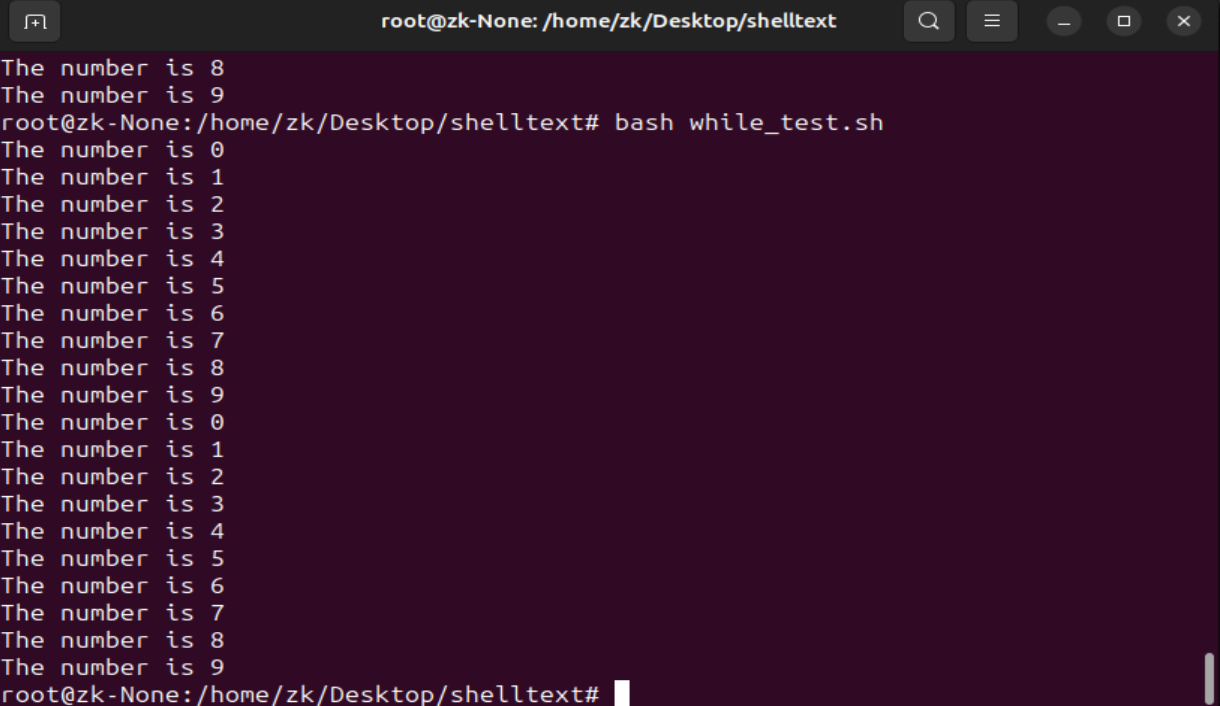
#!/bin/bash
i=0

while [[ $i -lt 10 ]]
do
	echo "The number is $i"
	((i++))
done

j=0
while (( $j < 10 ))
do
	echo "The number is $j"
	((j++))
done
打印结果如下:
八、提示输入read功能
read -p "please input number:" input

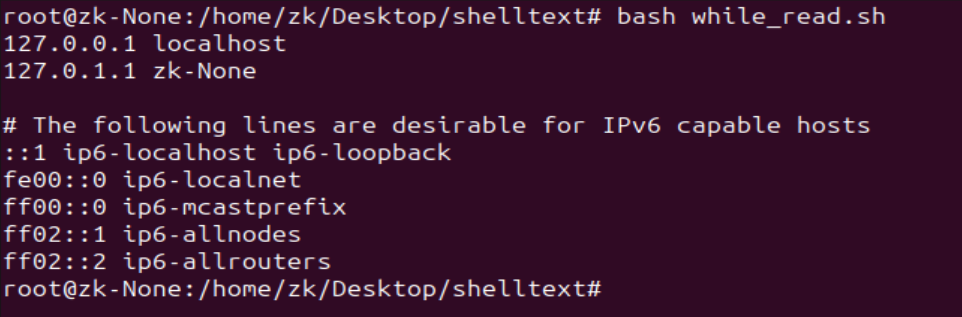
循环读出文件中的值
#!/bin/bash

while read line
do
	echo $line
done </etc/hosts
输出结果为
新建一个带有ip list的文件list.txt
192.168.1.1
192.168.1.2
192.168.1.3
192.168.1.4
192.168.1.5
192.168.1.6
192.168.1.7
192.168.1.8
192.168.1.9
192.168.1.10

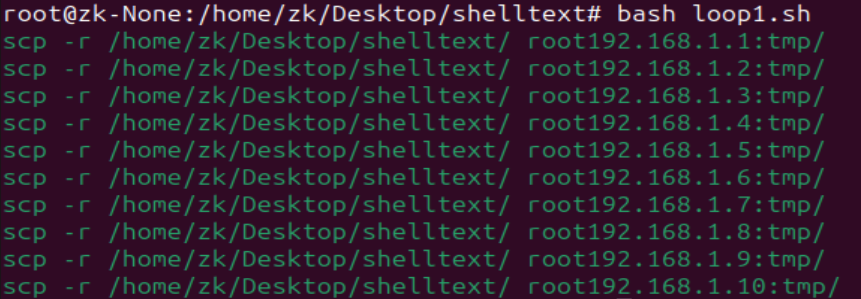
向列表中的ip去同步内容
#!/bin/bash

while read line
do
  echo -e "\033[32mscp -r /home/zk/Desktop/shelltext/ root$line:tmp/ \033[0m"
done < list.txt

类似for循环的实现
#!/bin/bash

for line in `cat list.txt`
do
    echo -e "\033[32mscp -r /home/zk/Desktop/shelltext/ root$line:tmp/ \033[0m"
done
更改list.txt文件如下
1 192.168.1.1 /src1 /des1
2 192.168.1.2 /src2 /des2
3 192.168.1.3 /src3 /des3
4 192.168.1.4 /src4 /des4
5 192.168.1.5 /src5 /des5
6 192.168.1.6 /src6 /des6
7 192.168.1.7 /src7 /des7
8 192.168.1.8 /src8 /des8
9 192.168.1.9 /src9 /des19
10 192.168.1.10 /src10 /des10
使用awk命令循环取出第二列
#!/bin/bash

while read line
do
	IP=`echo $line |awk '{print $2}'`
	echo -e "\033[32mscp -r /home/zk/Desktop/shelltext/ root@$IP:tmp/ \033[0m"
done < list.txt
执行结果如下:

九、Until循环语句
until 提交
do
    action
done
直到满足条件,才退出,否则执行action
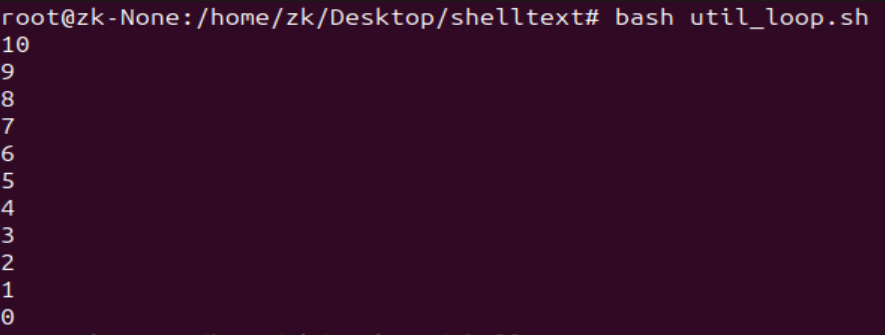
条件判断数字
#!/bin/bash
a=10;

until [[ $a -lt 0 ]];do
echo $a;
((a--));
done;
执行结果
十、Case选择语句
case $arg in
    pattern1)
    语句1
    ;;
    pattern2)
    语句2
    ;;
    *)
    语句3
    ;;
easc
case.sh
#!/bin/bash
#auto install LAMP
#by authors zk 2025

case $1 in
	apache )
	echo "wait install apache server......"
	;;
	mysql )
	echo "wait install mysql server......"
	;;
	PHP )
	echo "wait install PHP server......"
	;;
	*	)
	echo "Usage: {$0 Apache|MYsql|PHP|help}"
	;;
esac
执行脚本

十一、选择select语句
#!/bin/bash
#auto install LAMP
#by authors zk 2025

PS3="select you will exec Menu:"
select i in "apache" "mysql" "PHP"
do
case $i in
	apache )
	echo "wait install apache server......"
	;;
	mysql )
	echo "wait install mysql server......"
	;;
	PHP )
	echo "wait install PHP server......"
	;;
	*	)
	echo "Usage: {$0 Apache|MYsql|PHP|help}"
	;;
esac
done
执行结果如下:

#!/bin/bash

select system in "centos" "Rehat" "ubuntu";
do
	echo "select your system:$system"
done
执行结果如下:

十二、Shell数组
数组,就是相同数据类型的元素按照一定顺序排列的集合,就是把有限个类型相同的变量用一个名字命名,然后用编号区分他们的变量的集合,这个名字称为数组名,编号成为下标
定义一个一维数组,定义数组一般以括号的方式来定义,数组的值可以随机定义
A=(test1 test2 test3)
输出数组中的值
#!/bin/bash

array1=( test1 test2 test3)
echo ${array1[0]}
{$A[0]}代表第一个数组变量,结果显示test1,数组引用从0开始,代表第一个数组,以此类推。

显示数组中所有的参数,echo ${A[@]}将显示所有参数test1 test2 test3
#!/bin/bash

array1=( test1 test2 test3)
echo ${array1[@]}

显示数组中的参数个数
打印Linux网络接口的硬件地址、ip、掩码、网关地址
#!/bin/bash
#Auto Make KVM Virtualization
#Auto config bond scripts

NETWORK=(
	HWADDR=`ifconfig ens33 |egrep "ether" |tr "\n" " "|awk '{print $2}'`
	IPADDR=`ifconfig ens33 |egrep "inet" |tr "\n" " "|awk '{print $2}'`
	NETMASK=`ifconfig ens33 |egrep "netmask" |tr "\n" " "|awk '{print $4}'`
	GATEWAY=`route -n|grep "UG"|awk '{print $2}'`
)
echo ${NETWORK[0]}
echo ${NETWORK[1]}
echo ${NETWORK[2]}
echo ${NETWORK[3]}
执行结果如下:

十三、Linux函数详解
Linux函数,什么是函数呢,其实函数就相当于一个简单的命令所包括的很多命令的集合,基本的格式:
function command()
{
Xxx.xx
xxxx.xx
}
command
函数安装apache服务器
#!/bin/bash
# auto make install LAMP
# by authors zk

# HTTP define path variable
function install_apache()
{
	H_PREFIX_APACHE=/usr/local/apache

	H_FILES_HTTPD=httpd-2.4.62.tar.bz2
	H_FILES_HTTPD_DIR=httpd-2.4.62
	H_HTTPD_URL=https://mirrors.tuna.tsinghua.edu.cn/apache/httpd/
	H_PREFIX_HTTPD=/usr/local/apache/httpd/

	H_FILES_APR=apr-1.6.5.tar.bz2
	H_FILES_APR_DIR=apr-1.6.5
	H_APR_URL=http://mirrors.tuna.tsinghua.edu.cn/apache/apr/
	H_PREFIX_APR=/usr/local/apache/apr/

	H_FILES_APR_UTIL=apr-util-1.6.3.tar.bz2
	H_FILES_APR_UTIL_DIR=apr-util-1.6.3
	H_APR_UTIL_URL=http://mirrors.tuna.tsinghua.edu.cn/apache/apr/
	H_PREFIX_APR_UTIL=/usr/local/apache/apr-util/

	H_FILES_PCRE=pcre-8.45.tar.gz
	H_FILES_PCRE_DIR=pcre-8.45
	H_PCRE_URL=https://sourceforge.net/projects/pcre/files/pcre/8.45/
	H_PREFIX_PCRE=/usr/local/apache/pcre/

	H_FILES_PCRE2=pcre2-10.37.tar.gz
	H_FILES_PCRE2_DIR=pcre2-10.37
	H_PCRE2_URL=https://sourceforge.net/projects/pcre/files/pcre2/10.37/
	H_PREFIX_PCRE2=/usr/local/apache/pcre2/
	wget -c $H_APR_URL/$H_FILES_APR &&tar -jxvf $H_FILES_APR &&cd $H_FILES_APR_DIR ;./configure --prefix=$H_PREFIX_APR
        if [ $? -eq 0 ];then
                make && make install
                echo -e "\033[32mThe $H_FILES_APR_DIR Server Install Successfully!\033[0m"
        else
                echo -e "\033[32mThe $H_FILES_APR_DIR Server Install Failed,Please check...!\033[0m"
                exit
        fi
        wget -c $H_APR_UTIL_URL/$H_FILES_APR_UTIL &&tar -jxvf $H_FILES_APR_UTIL &&cd $H_FILES_APR_UTIL_DIR ;./configure --prefix=$H_PREFIX_APR_UTIL --with-apr=$H_PREFIX_APR
        if [ $? -eq 0 ];then
                make && make install
                echo -e "\033[32mThe $H_FILES_APR_UTIL_DIR Server Install Successfully!\033[0m"
        else
                echo -e "\033[32mThe $H_FILES_APR_UTIL_DIR Server Install Failed,Please check...!\033[0m"
                exit
        fi
        wget -c $H_PCRE_URL/$H_FILES_PCRE &&tar -zxvf $H_FILES_PCRE &&cd $H_FILES_PCRE_DIR ;./configure --prefix=$H_PREFIX_PCRE --with-apr=$H_PREFIX_APR
        if [ $? -eq 0 ];then
                make && make install
                echo -e "\033[32mThe $H_FILES_PCRE_DIR Server Install Successfully!\033[0m"
        else
                echo -e "\033[32mThe $H_FILES_PCRE_DIR Server Install Failed,Please check...!\033[0m"
                exit
        fi
        wget -c $H_PCRE2_URL/$H_FILES_PCRE2 &&tar -zxvf $H_FILES_PCRE2 &&cd $H_FILES_PCRE2_DIR ;./configure --prefix=$H_PREFIX_PCRE2 --with-apr=$H_PREFIX_APR
        if [ $? -eq 0 ];then
                make && make install
                echo -e "\033[32mThe $H_FILES_PCRE2_DIR Server Install Successfully!\033[0m"
        else
                echo -e "\033[32mThe $H_FILES_PCRE2_DIR Server Install Failed,Please check...!\033[0m"
                exit
        fi
        export PATH=$PATH:$H_PREFIX_PCRE
        echo $PATH
        wget -c $H_HTTPD_URL/$H_FILES_HTTPD &&tar -jxvf $H_FILES_HTTPD &&cd $H_FILES_HTTPD_DIR ;./configure --prefix=$H_PREFIX_HTTPD --with-apr=$H_PREFIX_APR --with-apr-util=$H_PREFIX_APR_UTIL --enable-so --enable-mods-shared=most --with-pcre=$H_PREFIX_PCRE --with-pcre2=$H_PREFIX_PCRE2
        if [ $? -eq 0 ];then
                make && make install
                echo -e "\033[32mThe $H_FILES_HTTPD_DIR Server Install Successfully!\033[0m"
        else
                echo -e "\033[32mThe $H_FILES_HTTPD_DIR Server Install Failed,Please check...!\033[0m"
                exit
        fi
}

install_apache
十四、awk、sed、grep、find命令
sed
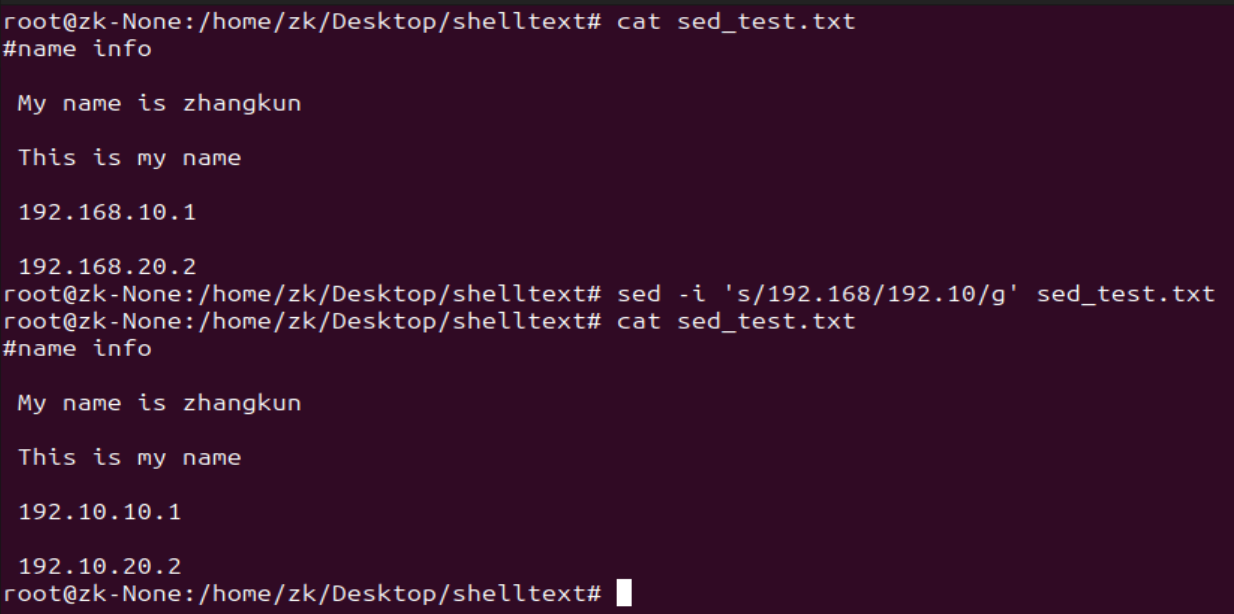
当sed不加参数的时候,原文件不会更改
sed 's/[源文件内容]/[替换内容]/g' sed_test.txt

当加入参数-i时,会更改原始文件
在文件中内容的每行前增加一个空格
sed -i 's/^/& /g' sed_test.txt
在文件中内容的每行前增加一个id
sed -i 's/^/&id /g' sed_test.txt

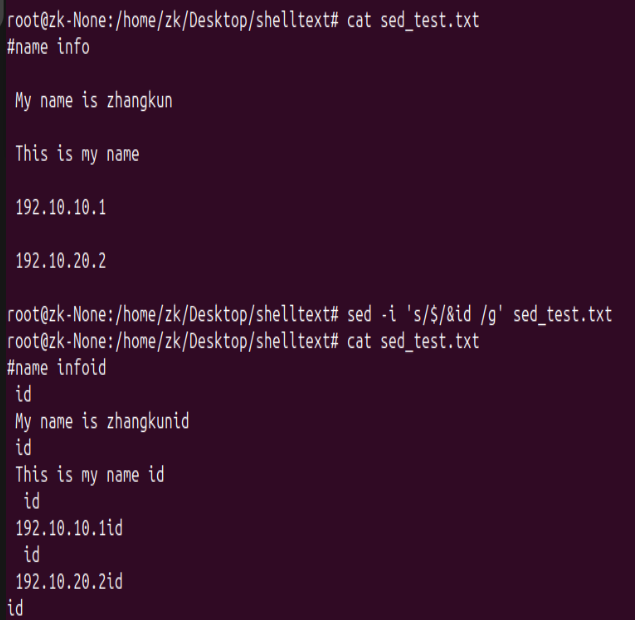
在文件中内容的每行最后增加一个id
sed -i 's/$/&id /g' sed_test.txt
在某字符串行后加入另一字符串
sed '/[字符串1]/a [字符串2]' sed_test.txt

在某字符串行前加入另一字符串
sed '/zhangkun/i wuguangke' sed_test.txt

打印包含某字符串的行
sed -n '/zhangkun/p' sed_test.txt

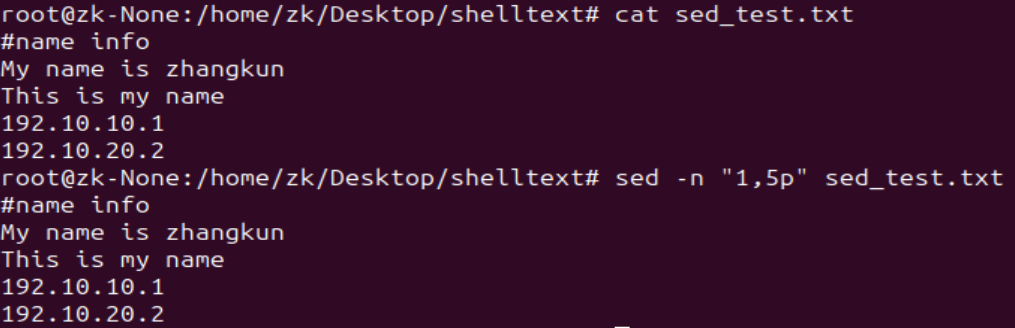
打印文件中1-5行
sed -n "1,5p" sed_test.txt
在sed_number.txt中查找最大的数
sed_number.txt
232
2323 322 21 12
323
3222323
445
12308
23 212 432 5323 232321313
打印sed_number.txt中最大值和最小值
cat sed_number.txt |sed 's/ /\n/g'|grep -v "^$"|sort -nr|sed -nr '1p;$p'

grep
grep可过滤匹配字符串
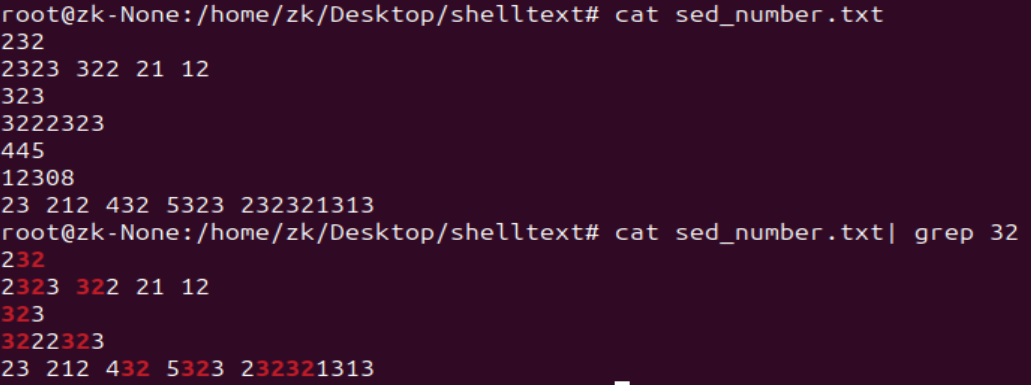
过滤含有32字符串的字符行
cat sed_number.txt| grep 32
过滤不含有32字符串的字符行
cat sed_number.txt| grep -v 32

grep正则匹配
匹配19开头的行
cat list.txt| grep "^19"

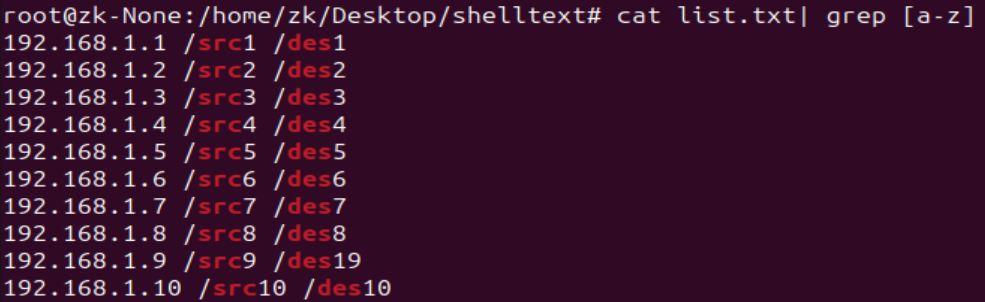
匹配含有字符串a-z的行
cat list.txt| grep [a-z]
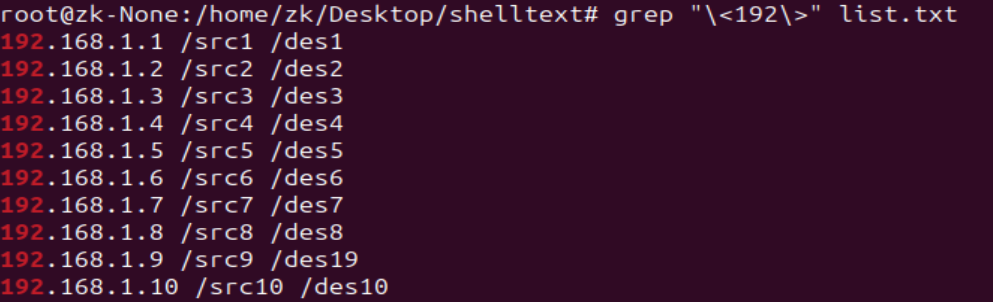
匹配含192的行
grep "\<192\>" list.txt
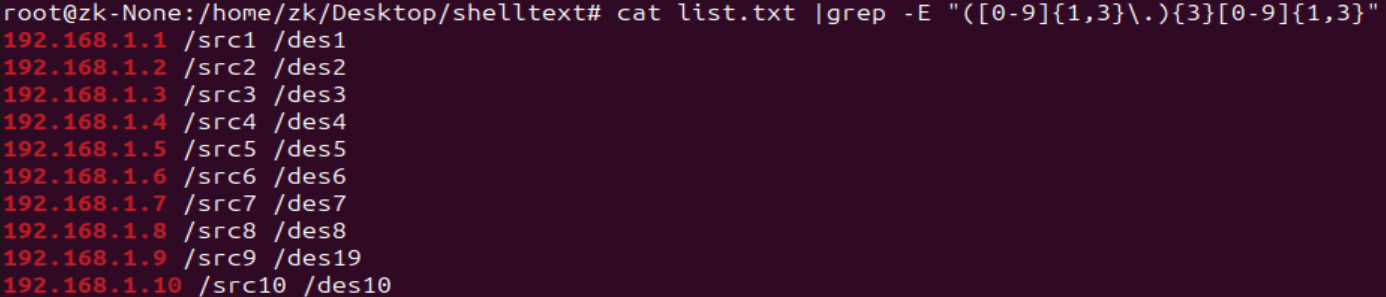
匹配行Ip地址
cat list.txt |grep -E "([0-9]{1,3}\.){3}[0-9]{1,3}"
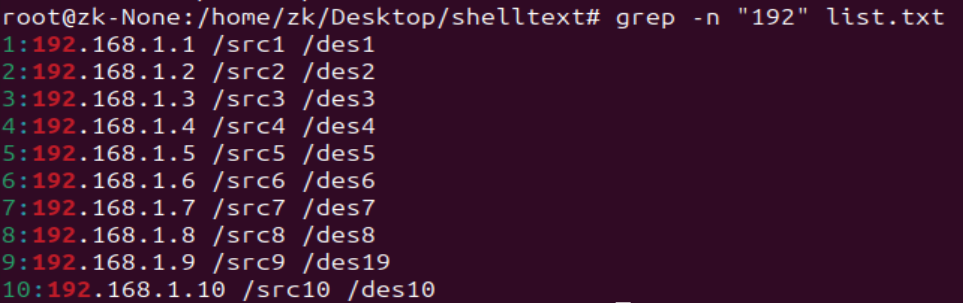
匹配按行打印出行号
grep -n "192" list.txt
awk
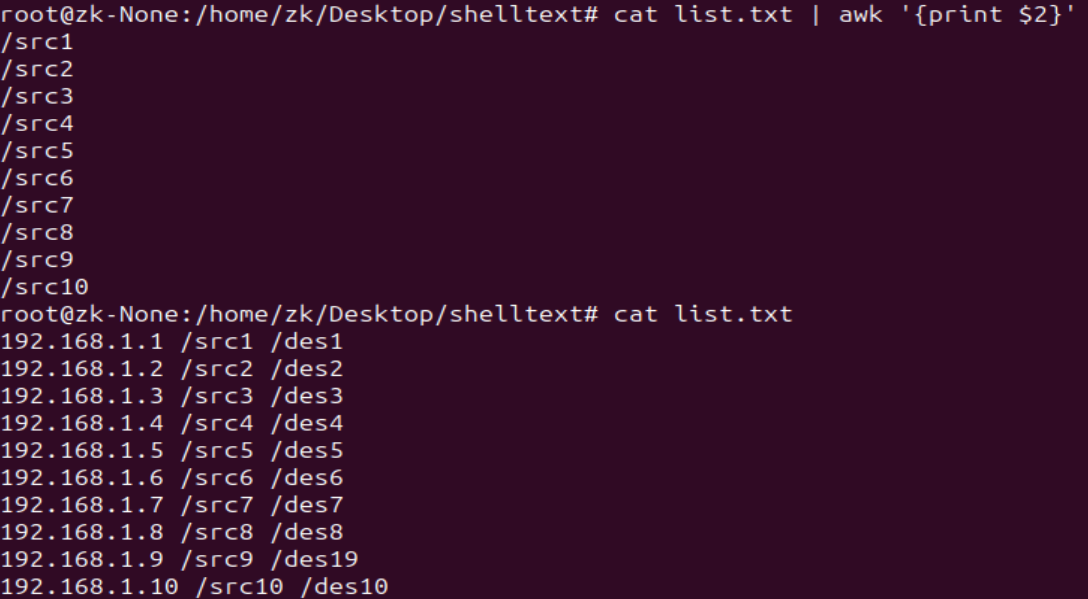
匹配列打印,打印第2列
cat list.txt | awk '{print $2}'
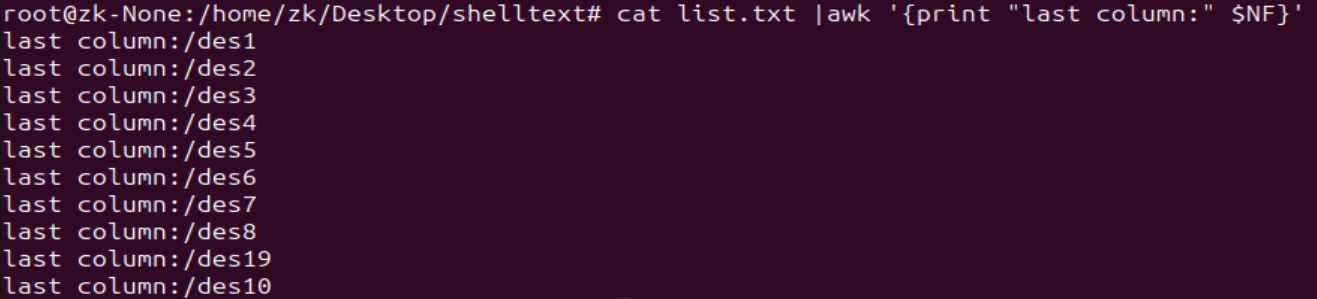
打印最后一列,最后一个域
cat list.txt | awk '{print $NF}'

cat list.txt |awk '{print "last column:" $NF}'
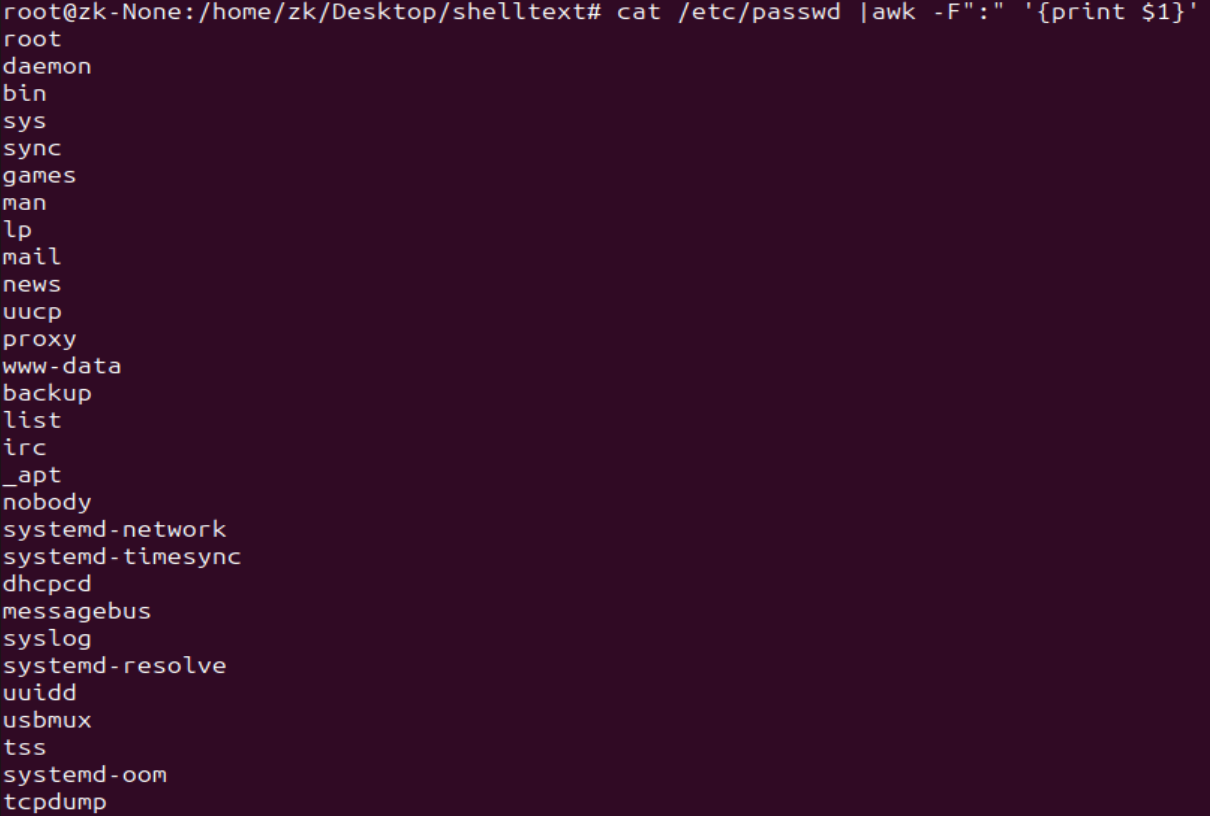
按列打印passwd中的用户名
cat /etc/passwd |sed 's/:/ /g'|awk '{print $1}'

按符号切割
awk -F"[符号]"
cat /etc/passwd |awk -F":" '{print $1}'
获取ip地址
ifconfig | grep "broadcast "|awk -F" " '{print $2}'
find
find的主要作用查找文件
在当前目录下查找文件
find -name "uguangke"

在一级目录下查找类型为文件文件名包含txt的文件
find . -maxdepth 1 -type f -name "*.txt"

在二级目录下查找类型为文件文件名包含txt的文件
find . -maxdepth 2 -type f -name "*.txt"

过滤修改时间在60天以前的文件
find -maxdepth 1 -name "*.sh" -mtime +60

过滤修改时间在1天以内的文件并删除文件
新建三个文件
touch a.txt b.txt c.txt
查找修改时间在1天以内的文件
find . -maxdepth 1 -type f -name "*.txt" -mtime -1
查找修改时间在1天以内的文件并删除
find . -maxdepth 1 -type f -name "*.txt" -mtime -1 -exec rm -rf {} \;

查找修改时间为5天的txt文件并copy到tmp目录下
find . -maxdepth 1 -type f -name "*.txt" -mtime -5 -exec cp {} /tmp/ \;

使用xargs删除文件,xargs只能用于删除文件,不同于exec
find . -maxdepth 1 -type f -name "*.txt" -mtime -5|xargs rm -rf {} \;

查询文件大小大于1k的文件
find . -size +1k -type f

查询文件大小大于1k的文件剪切移动到tmp目录下
find . -size +1k -type f -exec mv {} /tmp/ \;

十五、全量备份和增量备份Linux系统脚本
全量备份sh脚本
tar -g /tmp/snapshot -czvf /tmp/2025_02_08_full_systembak.tar.gz /home/zk/Desktop/shelltext/*.sh
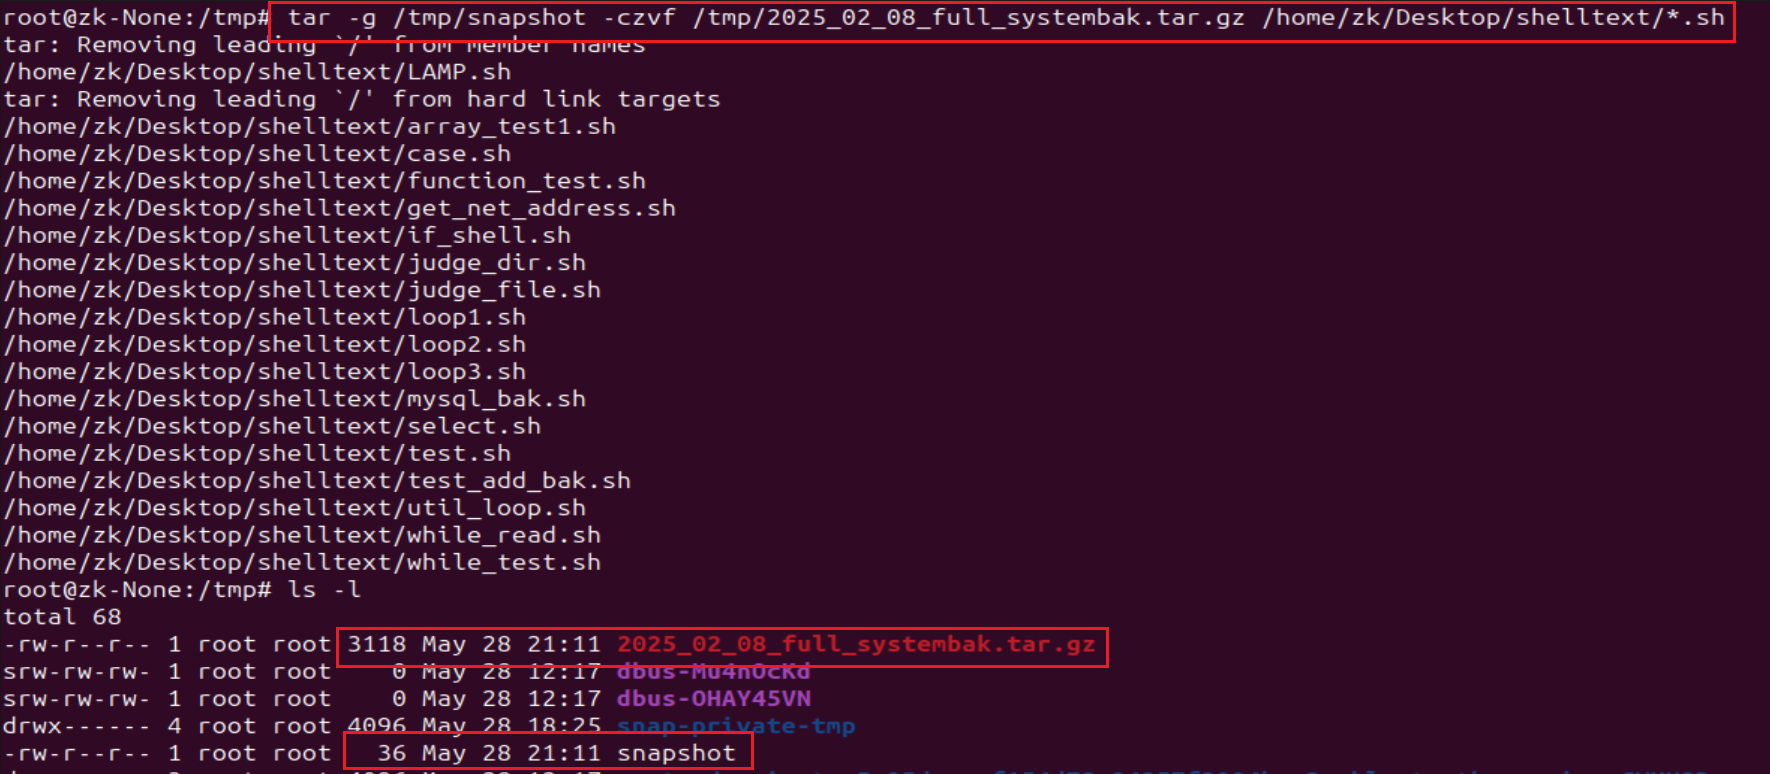
在shelltext目录下新建一个sh文件
touch test_add_bak.sh
![]()
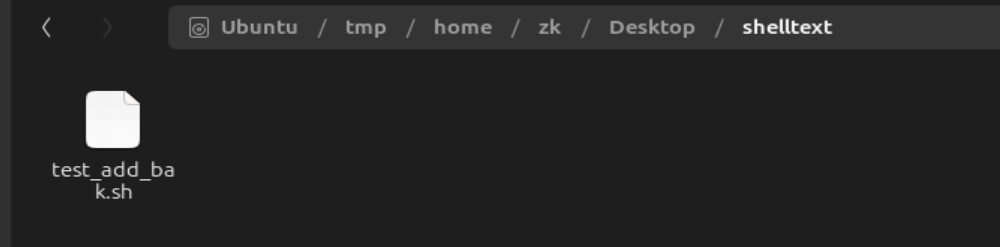
再次增量备份,他只会备份新增的文件
tar -g /tmp/snapshot -czvf /tmp/2025_02_08_add_systembak.tar.gz /home/zk/Desktop/shelltext/*.sh

解压增量备份压缩文件后,文件夹下只包含一个sh文件
全量以及增量备份脚本
#!/bin/sh
#Automatic Backup Linux System Files
#Author zk 2025-05-29
#Define Variable
SOURCE_DIR=/home/zk/Desktop/shelltext
TARGET_DIR=/home/zk/data/backup
YEAR=`date +%Y`
MONTH=`date +%m`
DAY=`date +%d`
WEEK=`date +%u`
A_NAME=`date +%Y-%m-%d-%H%M`
FILES=system_backup.tgz
CODE=$?
if [ ! -d $TARGET_DIR/$YEAR/$MONTH/$DAY ];then
mkdir -p $TARGET_DIR/$YEAR/$MONTH/$DAY
echo -e "\033[32mThe $TARGET_DIR Created Successfully !\033[0m"
fi
#EXEC Full_Backup Function Command
Full_Backup()
{
	if [ "$WEEK" -eq "3" ];then
		rm -rf $TARGET_DIR/snapshot
		cd $TARGET_DIR/$YEAR/$MONTH/$DAY;tar -g $TARGET_DIR/snapshot -czvf $A_NAME$FILES ${SOURCE_DIR[@]}
		[ "$CODE" == "0" ]&&echo -e "--------------------------------------------\nThese Full_Backup System Files Backup Successfully !"
	fi
}
#Perform incremental BACKUP Function Command
Add_Backup()
{
	if [ $WEEK -ne "3" ];then
		cd $TARGET_DIR/$YEAR/$MONTH/$DAY ;tar -g $TARGET_DIR/snapshot -czvf $A_NAME$FILES ${SOURCE_DIR[@]}
		[ "$CODE" == "0" ]&&echo -e "These Add_Backup System Files $TARGET_DIR/$YEAR/$MONTH/$DAY/${YEAR}_$A_NAME$FILES Backup Successfully !"
	fi
}
sleep 3
Full_Backup;Add_Backup
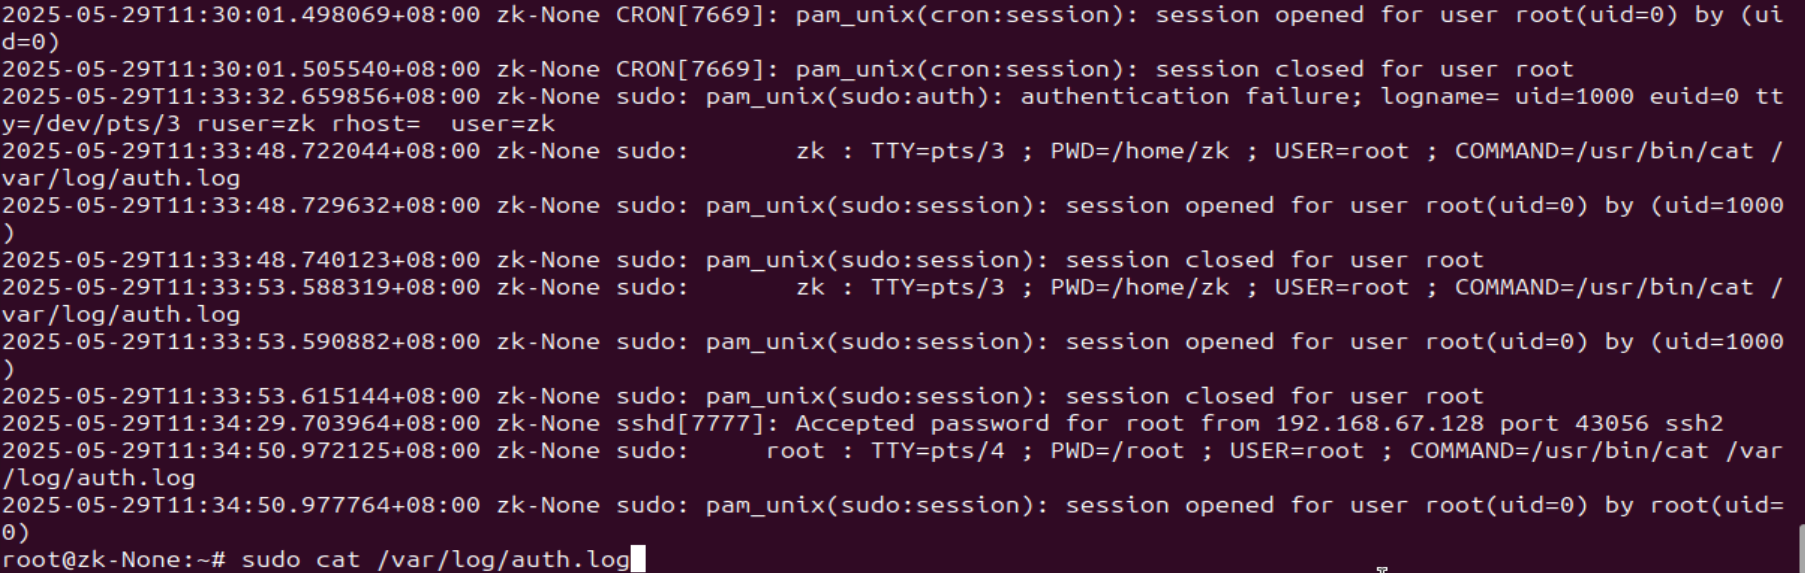
十六、查看系统登录日志
Ubuntu / Debian:sudo cat /var/log/auth.log | grep "Failed"

CentOS / RHEL:sudo cat /var/log/secure | grep "Failed"
若需要更详细的信息,可以将上述命令与grep结合使用,并添加关键字进行过滤。比如,要查看特定IP地址的登录失败情况,可以使用类似于以下命令:
sudo cat /var/log/auth.log | grep "Failed" | grep "ip_address"
如果想要持续监控新的登录失败事件,可以使用tail命令配合-f参数,实时显示最新的日志内容。例如:
sudo tail -f /var/log/secure

tail -f /var/log/auth.log
十七、设置虚拟机共享
在虚拟机共享设置中设置虚拟机共享目录
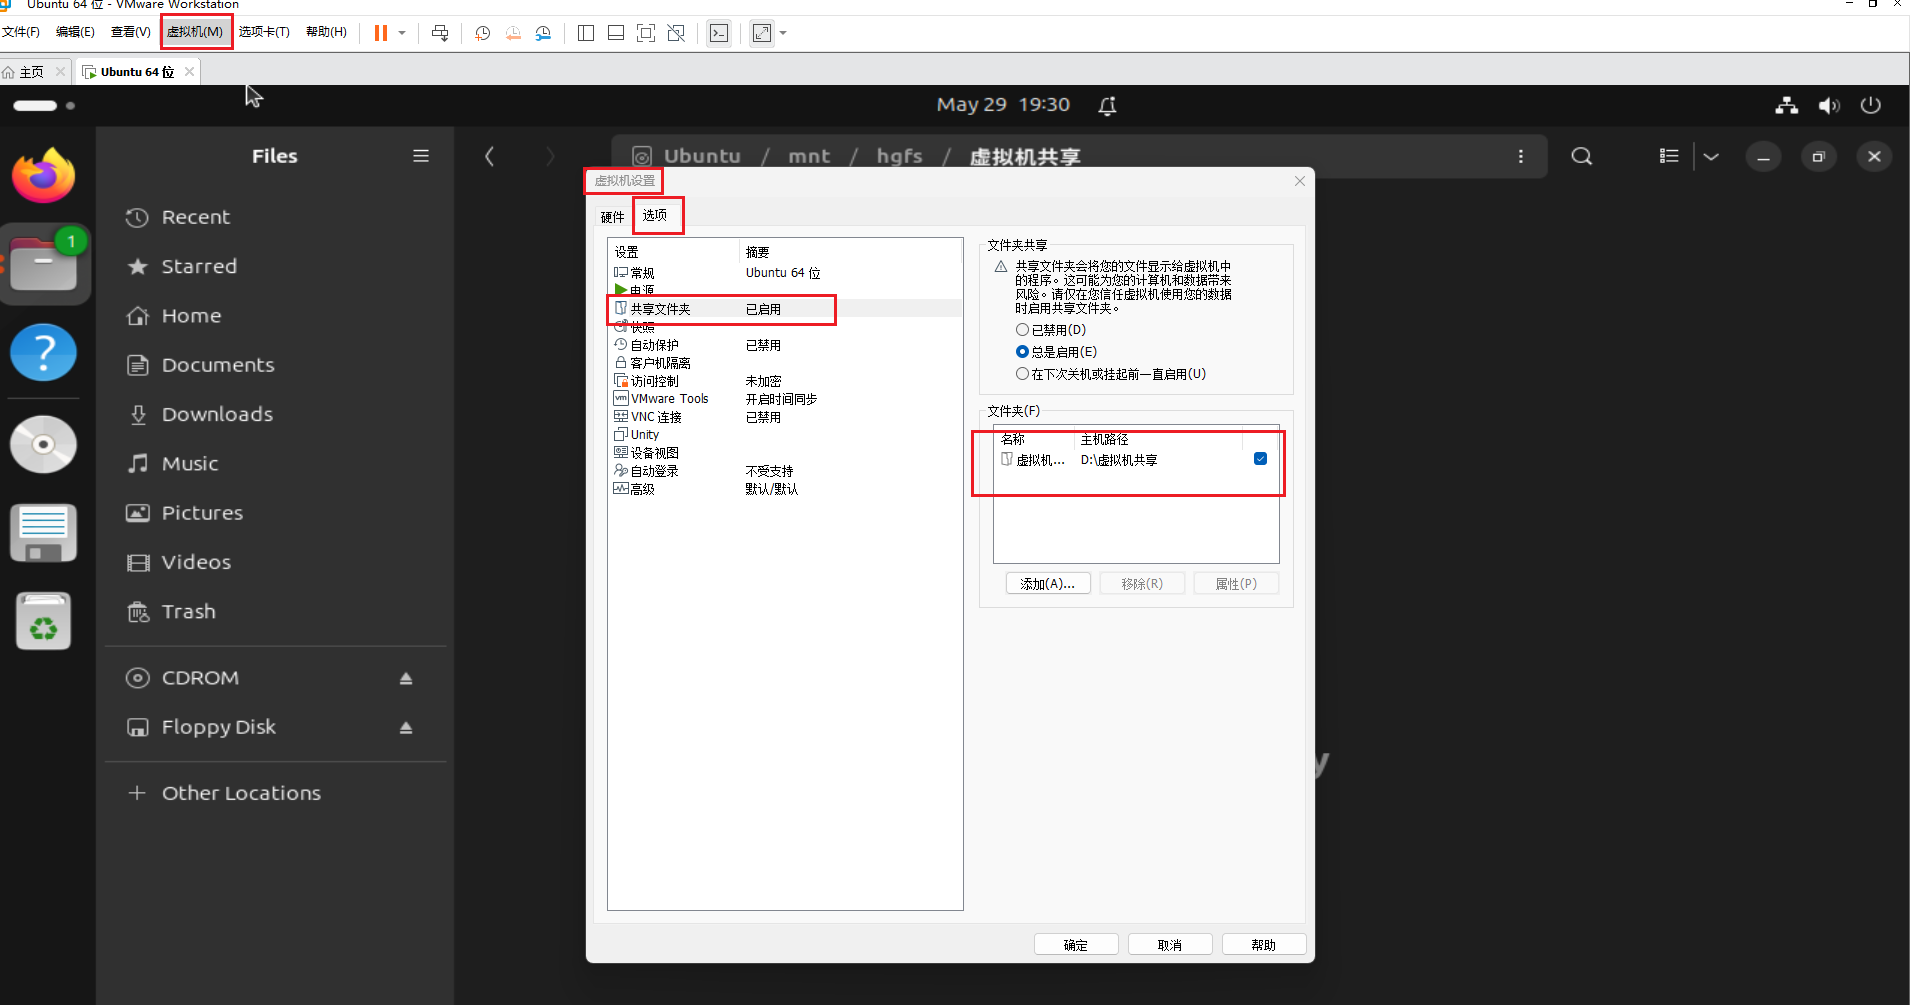
就会实现在/mnt/hgfs下目录地挂载

十八、mobaXterm连接虚拟机Linux系统
首先服务器开放22端口号
root@zk-None:/home/zk# sudo ufw allow 22
其次获取ip地址
root@zk-None:/home/zk# ifconfig

使用22端口号登录

登录成功

需要先行安装ssh服务
sudo apt update
sudo apt install openssh-server
检查ssh服务状态
sudo systemctl status ssh
ssh服务开启
sudo systemctl start sshd
ufw allow in to any port 22 from any proto tcp
ufw allow in to any from any port 22 proto tcp
十九、Linux安装防火墙
ufw
sudo apt install ufw
启动防火墙
sudo ufw enable
查看防火墙状态
sudo ufw status
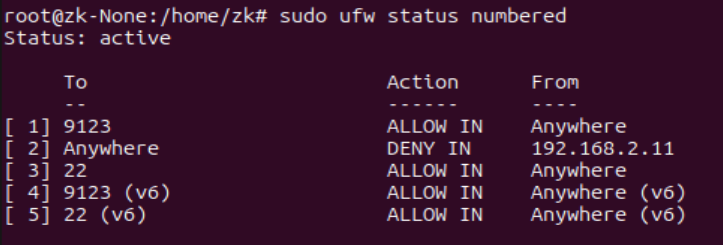
查看防火墙策略
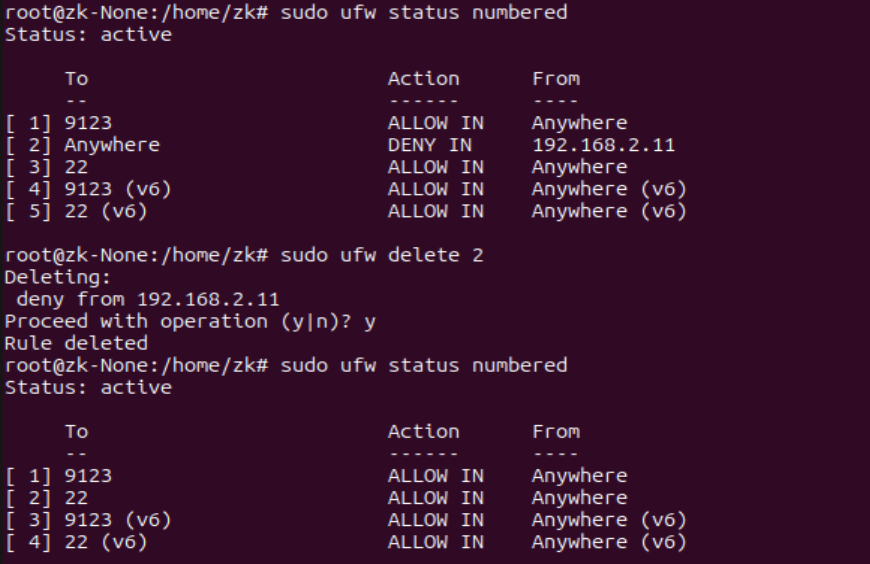
sudo ufw status numbered
删除某条策略
sudo ufw delete 2
当192.168.67.128设置ufw阻止22端口号的tcp报文时
sudo ufw deny in to any from any port 22 proto tcp

会让另一台主机无法登录到此台设备上
设置允许22端口登录策略
sudo ufw allow in to any from any port 22 proto tcp

可以登录

iptable
使用iptable禁止icmp报文通过
iptables -A OUTPUT --proto icmp -j DROP

删除禁用
iptables -D OUTPUT --proto icmp -j DROP

防火墙过滤登录失败大于4次的IP地址
#!/bin/bash
#auto drop ssh failed IP address
#zhangk 2025-05-31
#define variables
SEC_FILE=/var/log/

IP_ADDR=`tail -n 1000 /var/log/auth.log | grep "Failed password"| egrep -o "([0-9]{1,3}\.){3}[0-9]{1,3}" | sort -nr | uniq -c |awk '$1>=4{print $2}'`
echo
cat <<EOF
++++++++++++++++++++++welcome to use ssh login drop failed ip++++++++++++++
EOF

for i in `echo $IP_ADDR`
do
	sudo iptables -L -v | grep $IP_ADDR
if [ $? -ne 0 ];then
	iptables -A INPUT -s $i -m state --state NEW -m tcp -p tcp --dport 22 -j DROP
	sudo iptables -L -v | grep $IP_ADDR
	echo "This is $i is add in iptables,please exit ......"
else
	echo "This is $i is exist in iptables,please exit ......"
fi
done
运行脚本后查看过滤规则
iptables -L -n

如果发现无法ping通自己,执行如下命令
# 默认策略设置为ACCEPT,否则后续操作会导致连接断开,无法再次连接
iptables -P INPUT ACCEPT
iptables -P FORWARD ACCEPT
iptables -P OUTPUT ACCEPT
iptables -t nat -P PREROUTING ACCEPT
iptables -t nat -P POSTROUTING ACCEPT
iptables -t nat -P OUTPUT ACCEPT
# 清空所有规则
iptables -F
iptables -t nat -F
# 删除所有非系统默认的链
iptables -X
iptables -t nat -X
# 保存一下
iptables-save

 浙公网安备 33010602011771号