Winform跑马灯——Graphics运用
Winform跑马灯——Graphics运用
本文将建立一个winform项目中运用graphics绘制跑马灯效果的简单实例,以下是详细步骤:
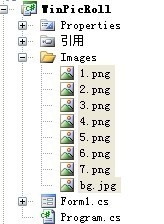
新建一个winform项目WinPicRoll,本例采用框架.net 2.0,如果采用.net 4.0某些属性的使用会略有不同,并放入一些演示用图片,滚动用图片采用png格式,一张背景图片采用jpg格式,设置所有图片素材的属性为"如果较新则复制",这样就可以在程序中使用相对路径来获取图片。


在Form1中,添加布局代码,本例采用一个picturebox用来演示。
        public Form1()
        {
            InitializeComponent();
            this.FormLayout();
        }

        PictureBox pb_PicRoll;  //显示区域

        /// <summary>
        /// 窗体布局
        /// </summary>
        void FormLayout()
        {
            this.DoubleBuffered = true;
            this.StartPosition = FormStartPosition.CenterScreen;
            this.Size = new Size(300, 400);
            this.BackColor = Color.LightBlue;

            pb_PicRoll = new PictureBox();
            pb_PicRoll.Location = new Point(50, 50);
            pb_PicRoll.Size = new Size(200, 200);
            this.Controls.Add(pb_PicRoll);
        }

        private void Form1_Load(object sender, EventArgs e)
        {
            this.InitPicRoll();
        }
下面完成跑马灯的初始化方法InitPicRoll,获取Images文件夹下的所有png图片作为滚动用,设置滚动的区域为picturebox的显示区域,为picturebox设置一个画笔graphics,画笔可以在指定的区域绘制图片、文字、线条等等。
        List<Image> ls_images = new List<Image>(); //存放图片组
        Timer t_remain = new Timer(); //切换
        Timer t_roll = new Timer();   //滚动
        int n_index = 0;    //滚动索引
        int n_height;   //滚动高度
        int n_width;    //滚动宽度
        int n_top;  //滚动上边距
        Graphics gh_bg;    //画笔

        void InitPicRoll()
        {
       //获取所有要滚动的图片
            string[] img_files = Directory.GetFiles(string.Format("{0}/Images", Application.StartupPath), "*.png");
       //将图片存放到数组中
            foreach (string img_path in img_files)
            {
                ls_images.Add(Image.FromFile(img_path));
            }
            n_height = pb_PicRoll.Height;
            n_width = pb_PicRoll.Width;
            gh_bg = pb_PicRoll.CreateGraphics();
            t_remain.Interval = 5 * 1000;
            t_remain.Tick += new EventHandler(t_remain_Tick);
            t_roll.Interval = 30;
            t_roll.Tick += new EventHandler(t_roll_Tick);
            t_remain.Start();
            t_roll.Start();
        }
在初始化跑马灯的时候,同时初始化了两个时钟,t_remain用来调整滚动的频率,t_roll用来完成绘图的工作,代码如下:
 void t_remain_Tick(object sender, EventArgs e)
        {
            n_index = ++n_index % ls_images.Count;
            n_top = 0;
            t_roll.Start();
        }

        void t_roll_Tick(object sender, EventArgs e)
        {
            n_top -= 5;
            if (n_top <= -n_height)
            {
                t_roll.Stop();
            }
            Bitmap bt = new Bitmap(n_width, n_height);
            Graphics gh = Graphics.FromImage(bt);
            for (int i = 0; i < 2; i++)
            {
          /*向上滚动*/
                /*gh.DrawImage(Image.FromFile(string.Format("{0}/Images/bg.jpg", Application.StartupPath)), new Rectangle(new Point(0, n_top + i * n_height), new Size(n_width, n_height)));
                gh.DrawImage(ls_images[(n_index + i) % ls_images.Count], new Rectangle(new Point(0, n_top + i * n_height), new Size(n_width, n_height)));*/
          /*向左滚动*/
                gh.DrawImage(Image.FromFile(string.Format("{0}/Image/123.jpg", Application.StartupPath)), new Rectangle(new Point(n_top + i * n_height,50), new Size(n_width, n_height)));
                gh.DrawImage(ls_images[(n_index + i) % ls_images.Count], new Rectangle(new Point(n_top + i * n_height,50), new Size(n_width, n_height)));
            }
            gh_bg.DrawImage(bt, new Rectangle(new Point(0, 0), new Size(n_width, n_height)));
            gh.Dispose();
            bt.Dispose();
        }
需要注意的是,绘图的采用的方式是,先new一个bitmap,然后在bitmap上完成绘制动作,最后将绘制完成的bitmap绘制到演示用的pictruebox区域上,这样做可以避免直接在最终演示区域进行复杂的绘制动作,能够有效减少屏幕闪烁的情况。另外绘制的时候,不用频繁的清除之前的绘图痕迹,可以如本例中的一样,先绘制一个jpg的背景图片,背景不是透明色的图片可以简单的覆盖掉之前残留的绘图痕迹,而后绘制上背景为透明png图片。


