在看官方教程时,无意中发现别人写的一个脚本,非常简洁。
官方教程地址:http://pytorch.org/tutorials/beginner/data_loading_tutorial.html#sphx-glr-beginner-data-loading-tutorial-py
使用的是dlib自带的特征点检测库,初期用来测试还是不错的


 1 """Create a sample face landmarks dataset.
 2
 3 Adapted from dlib/python_examples/face_landmark_detection.py
 4 See this file for more explanation.
 5
 6 Download a trained facial shape predictor from:
 7     http://dlib.net/files/shape_predictor_68_face_landmarks.dat.bz2
 8 """
 9 import dlib
10 import glob
11 import csv
12 from skimage import io
13
14 detector = dlib.get_frontal_face_detector()
15 predictor = dlib.shape_predictor('shape_predictor_68_face_landmarks.dat')
16 num_landmarks = 68
17
18 with open('face_landmarks.csv', 'w', newline='') as csvfile:
19     csv_writer = csv.writer(csvfile)
20
21     header = ['image_name']
22     for i in range(num_landmarks):
23         header += ['part_{}_x'.format(i), 'part_{}_y'.format(i)]
24
25     csv_writer.writerow(header)
26
27     for f in glob.glob('*.jpg'):
28         img = io.imread(f)
29         dets = detector(img, 1)  # face detection
30
31         # ignore all the files with no or more than one faces detected.
32         if len(dets) == 1:
33             row = [f]
34
35             d = dets[0]
36             # Get the landmarks/parts for the face in box d.
37             shape = predictor(img, d)
38             for i in range(num_landmarks):
39                 part_i_x = shape.part(i).x
40                 part_i_y = shape.part(i).y
41                 row += [part_i_x, part_i_y]
42
43             csv_writer.writerow(row)
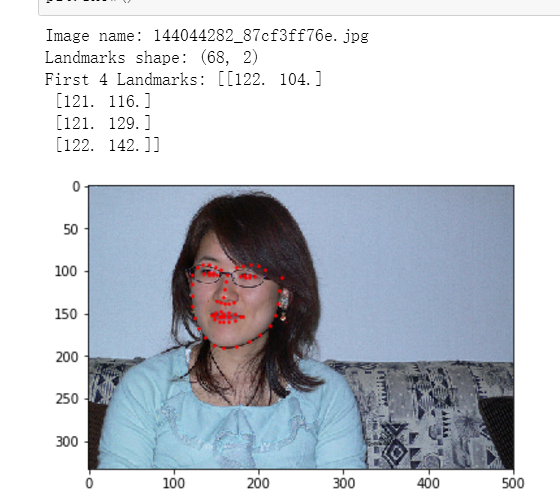
附上使用matplotlib显示特征点的脚本:
 1 from __future__ import print_function, division
 2 import os
 3 import torch
 4 import pandas as pd
 5 from skimage import io, transform
 6 import numpy as np
 7 import matplotlib.pyplot as plt
 8 from torch.utils.data import Dataset, DataLoader
 9 from torchvision import transforms, utils
10
11 # Ignore warnings
12 import warnings
13 warnings.filterwarnings("ignore")
14
15 plt.ion()   # interactive mode
16
17 landmarks_frame = pd.read_csv('faces/face_landmarks.csv')
18
19 n = 5
20 img_name = landmarks_frame.iloc[n, 0]
21 landmarks = landmarks_frame.iloc[n, 1:].as_matrix()
22 landmarks = landmarks.astype('float').reshape(-1, 2)
23
24 print('Image name: {}'.format(img_name))
25 print('Landmarks shape: {}'.format(landmarks.shape))
26 print('First 4 Landmarks: {}'.format(landmarks[:4]))
27
28 def show_landmarks(image, landmarks):
29     """Show image with landmarks"""
30     plt.imshow(image)
31     plt.scatter(landmarks[:, 0], landmarks[:, 1], s=10, marker='.', c='r')
32     plt.pause(0.001)  # pause a bit so that plots are updated
33
34 plt.figure()
35 show_landmarks(io.imread(os.path.join('faces/', img_name)),
36                landmarks)
37 plt.show()
效果图:

 浙公网安备 33010602011771号