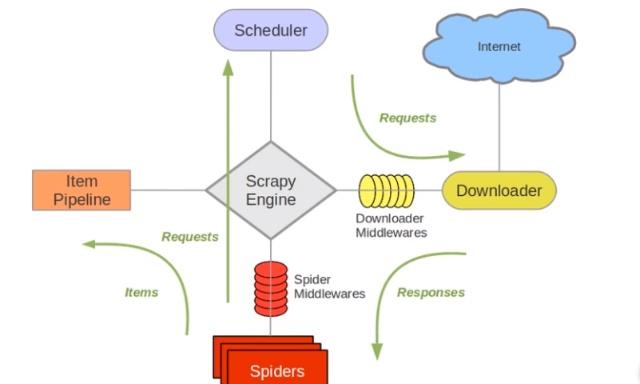
Scrapy框架
Scrapy架构
- Engine:引擎,负责整个系统的数据流处理,触发事务,是整个框架的核心
- Scheduler:调度器,负责组织请求队列
- Downloader:下载器,负责发送请求,下载内容
- Spiders:蜘蛛,负责解析策略
- Item、Pipline:管道组件,负责处理spider中获取到的数据,包括过滤、验证和存储等
- Downloader Middlewares:下载器中间件,位于引擎和下载器之间,它是一个自定义扩展组件,常用于封装代理,伪装请求等
- Spider Middlewares:蜘蛛中间件,位于引擎和蜘蛛之间的自定义组件,主要处理向蜘蛛输入的响应和输出的结果及新的请求

数据流向
1、首先在spider中编写请求的url,相当于引擎问spider想处理那些request请求,这时spider就会做出回应,将已编写的request请求发送给engin引擎;
2、engine引擎将spider发送过的的请求发给scheduler调度器,调度器会将request请求排序成队列;
3、engine引擎将会请求scheduler调度器是否已将request请求入队,若已入队,则scheduler调度器将请求队列发送给engine引擎;
4、engine引擎将scheduler调度器发送过来的的request请求队列,发送给downloader下载器。downloader下载器若成功下了请求的内容,则将response发送给引擎,引擎再将response发送给spider进行处理。若downloader下载器下载出错,则downloader下载器会将出错的请求发送给engine引擎,engine引擎再讲请求发送给scheduler调度器再次进行排队调度;
5、spider接收engine引擎发送过来的数据,对数据进行分析。该数据由两部分组成,一部分是我们请求的数据,这部分数据会交给Item、Pipline进行数据存储或者清洗;另一部分是新的请求,spider会将新的请求发送给引擎,然后引擎再将这些新的请求发送到调度器进行排队。然后重复1、2、3、4操作,直到获取到全部的信息为止。
入门项目
# -*- coding: UTF-8 -*-

import scrapy


class QuotesSpider(scrapy.Spider):  # 这是一段Spider代码,因为它继承了scrapy.Spider类
    name = 'quotes'  # name属性用来区分不同的Spider
    start_urls = [  # 初始请求列表
        'http://quotes.toscrape.com/tag/humor/',
    ]

    def parse(self, response):  # 定义了Spider的解析规则
        for quote in response.css('div.quote'):  # css选择器:选择class="quote" 的div元素。
            yield {  # 返回一个生成器
                'text': quote.css('span.text::text').get(),  # 更多选择器用法见:https://docs.scrapy.org/en/latest/topics/selectors.html
                'author': quote.xpath('span/small/text()').get(),
            }

        next_page = response.css('li.next a::attr("href")').get()
        if next_page is not None:
            yield response.follow(next_page, self.parse)  # 【这一句的意思还没搞懂,可能要在response的api里找找】
运行方法:
保存上述代码为quotes_spider.py,然后在同一目录下运行:
scrapy runspider quotes_spider.py -o quotes.json
模块笔记
Spider
解析数据
selector调试:scrapy shell "http://quotes.toscrape.com/page/1/"
使用Selenium配合selector调试:
from scrapy.selector import Selector
import selenium
from selenium import webdriver

options = webdriver.FirefoxOptions()
options.headless = True
browser = webdriver.Firefox(options=options)

url = 'https://www.lagou.com/jobs/list_%E7%88%AC%E8%99%AB?labelWords=&fromSearch=true'
browser.get(url)
data = browser.page_source
browser.quit()

list_elements = Selector(text=data).xpath("//ul[@class='item_con_list']/li")
for list_element in list_elements:
#     print(list_element.get())
#     print("_______________________________________________________________________")
    print(list_element.xpath(".//span[@class='add']/em/text()").get())
    print(list_element.xpath('./@data-positionname').get())
    print(list_element.xpath('./@data-salary').get())
    print(list_element.xpath(".//a[@class='position_link']/@href").get())
常用css选择器语句:
- CSS 选择器参考手册
- 选择属性:
response.css('div.quote span a::attr(href)') - 选择内容:
response.css('span.text::text')
xpath比css选择器更加灵活,所以能用XPath尽量用XPath:
- XPath 语法
- 选择内容:
"//span[@class='text']/text()" - 选择属性:
"//a[contains(text(),'(about)')]/@href" - XPath匹配含有指定文本的标签
返回解析结果
【官方文档】Extracting data in our spider

保存数据
- 小规模:使用Feed exports
- 大规模:使用 Item Pipeline
Following links
在Spider的parse()函数中返回一个scrapy.Request:
        next_page = response.css('li.next a::attr(href)').get()  # 获得链接str
        if next_page is not None:
            next_page = response.urljoin(next_page)  # 相对地址→绝对地址
            yield scrapy.Request(next_page, callback=self.parse)  # 注意回调
response.follow()可以接受相对地址,因此不需要urljoin
        next_page = response.css('li.next a::attr(href)').get()
        if next_page is not None:
            yield response.follow(next_page, callback=self.parse)
follow的更多用法:

更酷炫的用法:先follow links再提取数据:
import scrapy


class AuthorSpider(scrapy.Spider):
    name = 'author'

    start_urls = ['http://quotes.toscrape.com/']

    def parse(self, response):
        # follow links to author pages
        for href in response.css('.author + a::attr(href)'):
            yield response.follow(href, self.parse_author)

        # follow pagination links
        for href in response.css('li.next a::attr(href)'):
            yield response.follow(href, self.parse)

    def parse_author(self, response):
        def extract_with_css(query):
            return response.css(query).get(default='').strip()

        yield {
            'name': extract_with_css('h3.author-title::text'),
            'birthdate': extract_with_css('.author-born-date::text'),
            'bio': extract_with_css('.author-description::text'),
        }
注意:Scrapy会自动过滤已经访问过的url,This can be configured by the setting DUPEFILTER_CLASS
使用多个网页的数据来产生一个item:trick to pass additional data to the callbacks
通过定义规则来实现:全站爬虫

