


Nginx防盗链、访问控制、解析PHP相关配置及Nginx代理
6月11日任务
12.13 Nginx防盗链
12.14 Nginx访问控制
12.15 Nginx解析php相关配置
12.16 Nginx代理
扩展
502问题汇总 http://ask.apelearn.com/question/9109
location优先级 http://blog.lishiming.net/?p=100
12.13 Nginx防盗链
设置防盗链的配置内容可以和前一章静态文件不记录日志和过期时间放同一个配置文件里面
[root@jimmylinux-001 ~]# vim /usr/local/nginx/conf/vhost/test.com.conf

把之前的配置内容加#注释掉,然后增加以下内容。

location ~* ^.+\.(gif|jpg|png|swf|flv|rar|zip|doc|pdf|gz|bz2|jpeg|bmp|xls)$
{
    expires 7d;
    valid_referers none blocked server_names  *.test.com ;  定义白名单内容
    if ($invalid_referer) {  如果不是白名单内容的
        return 403;          就会直接返回403报错
    }
    access_log off;
}
重新加载配置文件并测试
[root@jimmylinux-001 ~]# /usr/local/nginx/sbin/nginx -t
nginx: the configuration file /usr/local/nginx/conf/nginx.conf syntax is ok
nginx: configuration file /usr/local/nginx/conf/nginx.conf test is successful

[root@jimmylinux-001 ~]# /usr/local/nginx/sbin/nginx -s reload

[root@jimmylinux-001 ~]# curl -x127.0.0.1:80 -I test.com/1.gif
HTTP/1.1 200 OK
Server: nginx/1.12.1
Date: Sat, 09 Jun 2018 10:34:45 GMT
Content-Type: image/gif
Content-Length: 11
Last-Modified: Fri, 08 Jun 2018 15:16:15 GMT
Connection: keep-alive
ETag: "5b1a9dbf-b"
Expires: Sat, 16 Jun 2018 10:34:45 GMT
Cache-Control: max-age=604800
Accept-Ranges: bytes

[root@jimmylinux-001 ~]# curl -e "http://www.baidu.com/1.txt" -x127.0.0.1:80 -I test.com/1.gif
HTTP/1.1 403 Forbidden
Server: nginx/1.12.1
Date: Sat, 09 Jun 2018 10:51:04 GMT
Content-Type: text/html
Content-Length: 169
Connection: keep-alive

[root@jimmylinux-001 ~]# curl -e "http://www.test.com/1.txt" -x127.0.0.1:80 -I test.com/1.gif
HTTP/1.1 200 OK
Server: nginx/1.12.1
Date: Sat, 09 Jun 2018 10:51:55 GMT
Content-Type: image/gif
Content-Length: 11
Last-Modified: Fri, 08 Jun 2018 15:16:15 GMT
Connection: keep-alive
ETag: "5b1a9dbf-b"
Expires: Sat, 16 Jun 2018 10:51:55 GMT
Cache-Control: max-age=604800
Accept-Ranges: bytes

[root@jimmylinux-001 ~]# cat /tmp/test.com.log
127.0.0.1 - [08/Jun/2018:23:17:04 +0800] test.com "/1.jif" 404 "-" "curl/7.29.0"
127.0.0.1 - [08/Jun/2018:23:19:02 +0800] test.com "/index.html" 200 "-" "curl/7.29.0"
127.0.0.1 - [08/Jun/2018:23:19:37 +0800] test.com "/index.html" 200 "-" "curl/7.29.0"
127.0.0.1 - [08/Jun/2018:23:20:59 +0800] test.com "/2.jsfsdfsd" 404 "-" "curl/7.29.0"
12.14 Nginx访问控制
对很重要或者机密的目录,不想让别人查看访问,只有指定的白名单才能够访问。
需求1:访问/admin/目录的请求,只允许某几个IP访问。
1、编辑配置文件vhost/test.com.conf
[root@jimmylinux-001 ~]# vim /usr/local/nginx/conf/vhost/test.com.conf

添加以下内容

location /admin/  指定目录
    {
    allow 192.168.52.128;  先允许的白名单,如果匹配,不再执行后面的。
    allow 127.0.0.1;
    deny all;              如果不匹配白名单,所有非白名单都被禁止访问。
    }
2、重新加载配置文件并测试
[root@jimmylinux-001 ~]# /usr/local/nginx/sbin/nginx -s reload  重新加载配置文件

[root@jimmylinux-001 ~]# curl -e "http://www.baidu.com/1.txt" -x127.0.0.1:80 -I test.com/admin/  测试白名单IP
HTTP/1.1 200 OK  白名单IP可以正常访问
Server: nginx/1.12.1
Date: Sun, 10 Jun 2018 14:02:57 GMT
Content-Type: text/html
Content-Length: 19
Last-Modified: Thu, 07 Jun 2018 16:24:10 GMT
Connection: keep-alive
ETag: "5b195c2a-13"
Accept-Ranges: bytes

[root@jimmylinux-001 ~]# curl -x192.168.52.128:80 -I test.com/admin/
HTTP/1.1 200 OK
Server: nginx/1.12.1
Date: Sun, 10 Jun 2018 14:07:54 GMT
Content-Type: text/html
Content-Length: 19
Last-Modified: Thu, 07 Jun 2018 16:24:10 GMT
Connection: keep-alive
ETag: "5b195c2a-13"
Accept-Ranges: bytes

[root@jimmylinux-001 ~]# ifconfig
ens33: flags=4163<UP,BROADCAST,RUNNING,MULTICAST>  mtu 1500
        inet 192.168.52.128  netmask 255.255.255.0  broadcast 192.168.52.255
        inet6 fe80::897e:66dd:a48a:880a  prefixlen 64  scopeid 0x20<link>
        ether 00:0c:29:b6:7b:45  txqueuelen 1000  (Ethernet)
        RX packets 1003  bytes 102498 (100.0 KiB)
        RX errors 0  dropped 0  overruns 0  frame 0
        TX packets 815  bytes 112177 (109.5 KiB)
        TX errors 0  dropped 0 overruns 0  carrier 0  collisions 0

ens37: flags=4099<UP,BROADCAST,MULTICAST>  mtu 1500
        ether 00:0c:29:b6:7b:4f  txqueuelen 1000  (Ethernet)
        RX packets 0  bytes 0 (0.0 B)
        RX errors 0  dropped 0  overruns 0  frame 0
        TX packets 0  bytes 0 (0.0 B)
        TX errors 0  dropped 0 overruns 0  carrier 0  collisions 0

lo: flags=73<UP,LOOPBACK,RUNNING>  mtu 65536
        inet 127.0.0.1  netmask 255.0.0.0
        inet6 ::1  prefixlen 128  scopeid 0x10<host>
        loop  txqueuelen 1  (Local Loopback)
        RX packets 62  bytes 5189 (5.0 KiB)
        RX errors 0  dropped 0  overruns 0  frame 0
        TX packets 62  bytes 5189 (5.0 KiB)
        TX errors 0  dropped 0 overruns 0  carrier 0  collisions 0

[root@jimmylinux-001 ~]# dhclient ens37    自动获取ens37网卡的IP地址

[root@jimmylinux-001 ~]# ifconfig
ens33: flags=4163<UP,BROADCAST,RUNNING,MULTICAST>  mtu 1500
        inet 192.168.52.128  netmask 255.255.255.0  broadcast 192.168.52.255
        inet6 fe80::897e:66dd:a48a:880a  prefixlen 64  scopeid 0x20<link>
        ether 00:0c:29:b6:7b:45  txqueuelen 1000  (Ethernet)
        RX packets 1084  bytes 109978 (107.4 KiB)
        RX errors 0  dropped 0  overruns 0  frame 0
        TX packets 855  bytes 117457 (114.7 KiB)
        TX errors 0  dropped 0 overruns 0  carrier 0  collisions 0

ens37: flags=4163<UP,BROADCAST,RUNNING,MULTICAST>  mtu 1500
        inet 192.168.228.128  netmask 255.255.255.0  broadcast 192.168.228.255
        inet6 fe80::3ffa:fcb5:66bb:be03  prefixlen 64  scopeid 0x20<link>
        ether 00:0c:29:b6:7b:4f  txqueuelen 1000  (Ethernet)
        RX packets 30  bytes 3789 (3.7 KiB)
        RX errors 0  dropped 0  overruns 0  frame 0
        TX packets 20  bytes 2786 (2.7 KiB)
        TX errors 0  dropped 0 overruns 0  carrier 0  collisions 0

lo: flags=73<UP,LOOPBACK,RUNNING>  mtu 65536
        inet 127.0.0.1  netmask 255.0.0.0
        inet6 ::1  prefixlen 128  scopeid 0x10<host>
        loop  txqueuelen 1  (Local Loopback)
        RX packets 62  bytes 5189 (5.0 KiB)
        RX errors 0  dropped 0  overruns 0  frame 0
        TX packets 62  bytes 5189 (5.0 KiB)
        TX errors 0  dropped 0 overruns 0  carrier 0  collisions 0

[root@jimmylinux-001 ~]# curl -x192.168.228.128:80 -I test.com/admin/  再次访问自动获取的IP地址
HTTP/1.1 403 Forbidden  报错403状态码,因为自动获取的IP地址并不是白名单
Server: nginx/1.12.1
Date: Sun, 10 Jun 2018 14:16:38 GMT
Content-Type: text/html
Content-Length: 169
Connection: keep-alive

[root@jimmylinux-001 ~]# cat /tmp/test.com.log  查看日志
127.0.0.1 - [08/Jun/2018:23:17:04 +0800] test.com "/1.jif" 404 "-" "curl/7.29.0"
127.0.0.1 - [08/Jun/2018:23:19:02 +0800] test.com "/index.html" 200 "-" "curl/7.29.0"
127.0.0.1 - [08/Jun/2018:23:19:37 +0800] test.com "/index.html" 200 "-" "curl/7.29.0"
127.0.0.1 - [08/Jun/2018:23:20:59 +0800] test.com "/2.jsfsdfsd" 404 "-" "curl/7.29.0"
127.0.0.1 - [10/Jun/2018:22:02:57 +0800] test.com "/admin/" 200 "http://www.baidu.com/1.txt" "curl/7.29.0"
192.168.52.128 - [10/Jun/2018:22:07:54 +0800] test.com "/admin/" 200 "-" "curl/7.29.0"
192.168.228.128 - [10/Jun/2018:22:16:38 +0800] test.com "/admin/" 403 "-" "curl/7.29.0"  日志记录非白名单IP访问,直接报错403状态码
需求2:还可以针对正则匹配,只要是符合关键词内容的,都被拒绝访问。
1、同样编辑配置文件。
[root@jimmylinux-001 ~]# vim /usr/local/nginx/conf/vhost/test.com.conf

添加以下内容

    location ~ .*(upload|image)/.*\.php$
{
    deny all;
}
2、重新加载配置文件并测试
[root@jimmylinux-001 ~]# /usr/local/nginx/sbin/nginx -s reload  加载配置文件

[root@jimmylinux-001 ~]# mkdir /data/wwwroot/test.com/upload/   创建测试目录

[root@jimmylinux-001 ~]# echo "welcome" > /data/wwwroot/test.com/upload/1.php  创建测试文件1.php

[root@jimmylinux-001 ~]# curl -x127.0.0.1:80 test.com/upload/1.php  访问测试
<html>
<head><title>403 Forbidden</title></head>  符合正则条件以php结尾的都被拒绝访问,使用报错403状态码。
<body bgcolor="white">
<center><h1>403 Forbidden</h1></center>
<hr><center>nginx/1.12.1</center>
</body>
</html>

[root@jimmylinux-001 ~]# echo "welcome" > /data/wwwroot/test.com/upload/1.txt  创建另外一个非正则条件的测试文件1.txt

[root@jimmylinux-001 ~]# curl -x127.0.0.1:80 test.com/upload/1.txt  访问测试
welcome    可以正常访问,因为txt结尾的不匹配配置文件中定义的关键词。

[root@jimmylinux-001 ~]# !cat
cat /tmp/test.com.log
127.0.0.1 - [08/Jun/2018:23:17:04 +0800] test.com "/1.jif" 404 "-" "curl/7.29.0"
127.0.0.1 - [08/Jun/2018:23:19:02 +0800] test.com "/index.html" 200 "-" "curl/7.29.0"
127.0.0.1 - [08/Jun/2018:23:19:37 +0800] test.com "/index.html" 200 "-" "curl/7.29.0"
127.0.0.1 - [08/Jun/2018:23:20:59 +0800] test.com "/2.jsfsdfsd" 404 "-" "curl/7.29.0"
127.0.0.1 - [10/Jun/2018:22:02:57 +0800] test.com "/admin/" 200 "http://www.baidu.com/1.txt" "curl/7.29.0"
192.168.52.128 - [10/Jun/2018:22:07:54 +0800] test.com "/admin/" 200 "-" "curl/7.29.0"
192.168.228.128 - [10/Jun/2018:22:16:38 +0800] test.com "/admin/" 403 "-" "curl/7.29.0"
127.0.0.1 - [10/Jun/2018:22:41:13 +0800] test.com "/upload/1.php" 403 "-" "curl/7.29.0"
127.0.0.1 - [10/Jun/2018:22:42:46 +0800] test.com "/upload/1.txt" 200 "-" "curl/7.29.0"
需求3:根据user_agent设置限制
1、同样编辑配置文件
[root@jimmylinux-001 ~]# vim /usr/local/nginx/conf/vhost/test.com.conf

添加以下内容

    if ($http_user_agent ~ 'Spider/3.0|YoudaoBot|Tomato')
{
    return 403;  deny all 和 return 403效果一样
}
2、重新加载配置文件并测试
[root@jimmylinux-001 ~]# /usr/local/nginx/sbin/nginx -s reload

[root@jimmylinux-001 ~]# curl -A "Tomatofsldjfs" -x127.0.0.1:80 test.com/upload/1.txt
<html>
<head><title>403 Forbidden</title></head>
<body bgcolor="white">
<center><h1>403 Forbidden</h1></center>
<hr><center>nginx/1.12.1</center>
</body>
</html>

[root@jimmylinux-001 ~]# curl -A "Tomatofsldjfs" -x127.0.0.1:80 -I test.com/upload/1.txt
HTTP/1.1 403 Forbidden
Server: nginx/1.12.1
Date: Sun, 10 Jun 2018 14:58:30 GMT
Content-Type: text/html
Content-Length: 169
Connection: keep-alive

[root@jimmylinux-001 ~]# curl -A "tomatofsldjfs" -x127.0.0.1:80 -I test.com/upload/1.txt  小写字母tom开头的就可以正常访问,因为匹配的是大写Tom开头。
HTTP/1.1 200 OK
Server: nginx/1.12.1
Date: Sun, 10 Jun 2018 14:58:54 GMT
Content-Type: text/plain
Content-Length: 8
Last-Modified: Sun, 10 Jun 2018 14:42:31 GMT
Connection: keep-alive
ETag: "5b1d38d7-8"
Accept-Ranges: bytes

[root@jimmylinux-001 ~]# vim /usr/local/nginx/conf/vhost/test.com.conf
if ($http_user_agent ~* 'Spider/3.0|YoudaoBot|Tomato') 如果不区分大小写tom开头,编辑配置文件,在匹配后面加一个*即可。
   {
   return 403;
   }
[root@jimmylinux-001 ~]# /usr/local/nginx/sbin/nginx -s reload
[root@jimmylinux-001 ~]# curl -A "tomatofsldjfs" -x127.0.0.1:80 -I test.com/upload/1.txt 小写tom也会报错
HTTP/1.1 403 Forbidden
Server: nginx/1.12.1
Date: Sun, 10 Jun 2018 15:00:36 GMT
Content-Type: text/html
Content-Length: 169
Connection: keep-alive
[root@jimmylinux-001 ~]# curl -A "Tomatofsldjfs" -x127.0.0.1:80 -I test.com/upload/1.txt 大写Tom也会报错
HTTP/1.1 403 Forbidden
Server: nginx/1.12.1
Date: Sun, 10 Jun 2018 15:00:45 GMT
Content-Type: text/html
Content-Length: 169
Connection: keep-alive
12.15 Nginx解析php相关配置
1、编辑配置文件test.com.conf
[root@jimmylinux-001 ~]# vim /usr/local/nginx/conf/vhost/test.com.conf

添加以下内容

location ~ \.php$
    {
        include fastcgi_params;
        fastcgi_pass unix:/tmp/php-fcgi.sock;
        fastcgi_index index.php;
        fastcgi_param SCRIPT_FILENAME /data/wwwroot/test.com$fastcgi_script_name;
    }
2、新建一个php文件
[root@jimmylinux-001 ~]# vim /data/wwwroot/test.com/3.php

写入以下内容

<?php
phpinfo();
3、以上2步都没有-s重新加载配置文件,我们先进行测试。
[root@jimmylinux-001 ~]# curl -x127.0.0.1:80 test.com/3.php
<?php          并没有解析成功,而是直接显示了源代码。
phpinfo();
如果-s重新加载配置文件,在测试就可以正常解析了。
4、遇到502状态码报错的可能性分析
第①种情况:
[root@jimmylinux-001 ~]# vim /usr/local/nginx/conf/vhost/test.com.conf 修改配置文件

这个时候去访问就会出现502报错
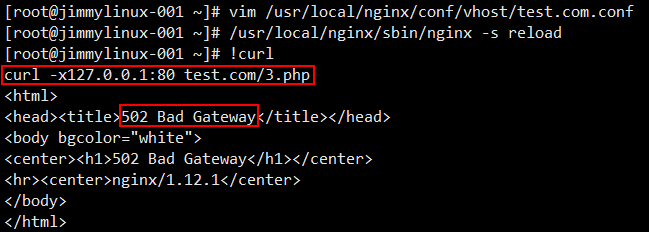

遇到这样的情况,需要先看看这个文件 php-fpm.conf 里面定义的listen是什么路径,那么在test.com.conf配置文件中就要写成一致的。
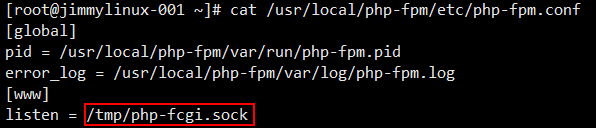
第②种情况:
不监听sock,改为监听IP和端口。
[root@jimmylinux-001 ~]# vim /usr/local/php-fpm/etc/php-fpm.conf 编辑配置文件,不监听sock,在listen前面加#注释掉。
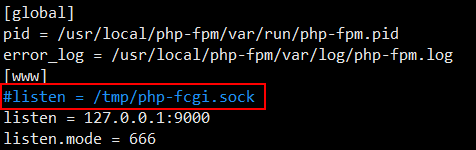
[root@jimmylinux-001 ~]# /etc/init.d/php-fpm reload 修改完配置文件,需要重启php。

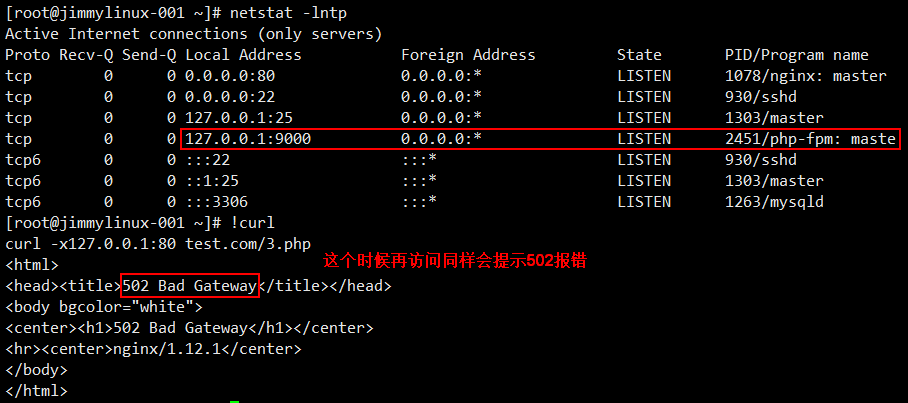
此时既然知道监听的是IP和端口,那么就要在test.com.conf配置文件中修改内容(9000端口后面忘记加;)。
[root@jimmylinux-001 ~]# vim /usr/local/nginx/conf/vhost/test.com.conf
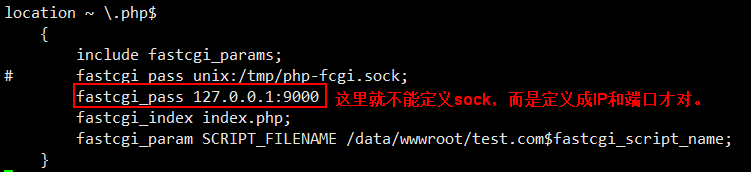
[root@jimmylinux-001 ~]# /usr/local/nginx/sbin/nginx -s reload  重新加载

[root@jimmylinux-001 ~]# curl -x127.0.0.1:80 test.com/3.php  再次访问就正常了
另外还需要注意的是

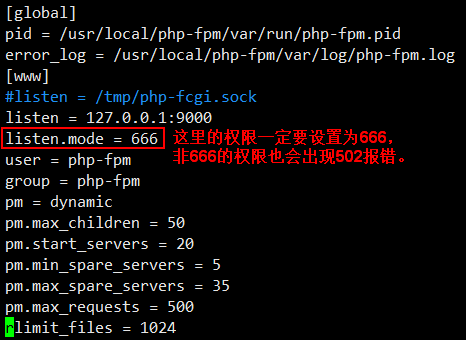
第③种情况:
php-fpm.conf配置文件中listen.mode的权限
[root@jimmylinux-001 ~]# vim /usr/local/php-fpm/etc/php-fpm.conf 这个配置文件中listen.mode = 666(一定要设置成666权限)
第④种情况:
php-fpm服务资源耗尽了,比如查询mysql很慢的时候,也会出现502报错。
12.16 Nginx代理
例如:用户需要访问web服务器,但是这个web服务器是私网,用户没有办法直接访问,需要找一个中间者,那么这个中间者必须要有一个特性,可以和web服务器及用户互通,所以就可以成为一个中间者,作为用户和web服务器的一个代理者,帮你去访问,然后把结果返回给用户。

操作步骤如下:
1、进入到vhost目录
[root@jimmylinux-001 ~]# cd /usr/local/nginx/conf/vhost
2、新建proxy.conf文件
[root@jimmylinux-001 vhost]# vim proxy.conf  新建proxy.conf文件

加入以下内容

server
{
    listen 80;
    server_name ask.apelearn.com;  定义域名

    location /
    {
        proxy_pass      http://121.201.9.155/;  远程服务端(web服务器)
        proxy_set_header Host   $host;
        proxy_set_header X-Real-IP      $remote_addr;
        proxy_set_header X-Forwarded-For $proxy_add_x_forwarded_for;
    }
}
3、重新加载配置文件并测试
[root@jimmylinux-001 vhost]# /usr/local/nginx/sbin/nginx -t
nginx: the configuration file /usr/local/nginx/conf/nginx.conf syntax is ok
nginx: configuration file /usr/local/nginx/conf/nginx.conf test is successful

[root@jimmylinux-001 vhost]# /usr/local/nginx/sbin/nginx -s reload

[root@jimmylinux-001 vhost]# curl ask.apelearn.com/robots.txt    robots是针对蜘蛛索引的一个列表,一般网站都有这个robots。
#
# robots.txt for MiWen
#

User-agent: *

Disallow: /?/admin/
Disallow: /?/people/
Disallow: /?/question/
Disallow: /account/
Disallow: /app/
Disallow: /cache/
Disallow: /install/
Disallow: /models/
Disallow: /crond/run/
Disallow: /search/
Disallow: /static/
Disallow: /setting/
Disallow: /system/
Disallow: /tmp/
Disallow: /themes/
Disallow: /uploads/
Disallow: /url-*
Disallow: /views/

