


    中间件
        中间件就类似于是django的门户,django的中间件是设计比较完善的
            1.django默认有七个中间件
                session
                csrf
                authenticate
            2.django还支持用户自定义自己的中间件并且暴露给用户五个可以自定义的方法
                需要掌握的方法
                    1.process_request
                        请求来的时候会从上往下依次经过settings配置文件注册了的中间件里面的该方法,如果没有执行跳过执行下一个
                        该方法可以实现对用户身份的校验,访问频率的限制,用户权限的校验...
                        注意:如果你在该方法中直接返回了HttpResponse对象,那么就不会再往后执行
                            会跳到同级别的process_response方法 从下往上依次执行返回
                    2.process_response
                        响应走的时候会从下往上依次经过settings配置文件注册了中间件里面的该方法
                        该方法有一个形参response你再不拦截返回的过程 应该将该形参返回
                        注意:该方法可以帮你实现缓存机制
                需要了解的方法
                    3.process_view
                        路由匹配成功之后执行视图函数之前触发
                    4.process_exception
                        视图函数出现bug的时候 会触发
                    5.process_templates_response
                        视图函数返回的对象中包含了render方法
                        obj = HttpResponse('aaa')
                        def render():
                            return HttpResponse('用户能够看到的结果')
                        obj.render = render
                        return obj
                如何自定义中间件
                    新建一个文件夹(放在全局或者应用内)
                    写一个类继承MiddlewareMiXin类
                    里面书写方面的五个方法任意几个即可
                    一定要在setting文件注册
            必须要会的:自己能够画出一个特别特别完整的django请求生命周期流程图


    csrf跨站请求伪造
        钓鱼网站
        如何区分当前用户朝我们网站发送的请求页面是否是我们本网站给的
        1.如何避免csrf校验问题
            form表单内
                {% csrf_token %}  # 自动生成一个name属性值为csrfmiddlewaretoken value值为随机字符串的一个input标签并且是隐藏的
            ajax
                1.通过标签查询获取属性的方式
                    $('[name=csrfmiddlewaretoken]').val()
                2.直接利用模板语法提供的快捷方式
                    '{{ csrf_token }}'
                3.参考官方文档推荐  自定义js文件 自动获取并传递csrf校验
                    通过script标签直接引入 即可解决csrf校验的问题
        csrf装饰器相关
            csrf_exempt就他不校验,csrf_protect就他校验
            method_decorator(CBV)

            在给CBV装饰的时候,上面两个装饰器有一点不同
            csrf_protect有三种方式
                1.利用method_decorator直接加在方法上
                2.还可以直接加在类上面 同name指定
                3.加在dispatch方法上
            csrf_exempt只有两种
                1.只能加在dispatch方法上
            针对其他的装饰  都和csrf_protect一致  都有三种方式

    auth认证
        用户相关的模块
            from django.contrib import auth
            1.查询用户是否存在
                auth.authenticate(username=username,password=password)
                该方法会有一个返回值  返回值要么是对象要么是None
            2.记录用户状态
                auth.login(request,user_obj)
                该方法的优点在于 知道执行了 就可以在任意位置通过request.user获取到当前登录对象
            3.获取用户对象
                request.user
                用户登录了直接获取用户对象  用户没有登录获取到的匿名用户
            4.如何判断用户是否登录
                request.user.is_authenticated
                返回的结果是布尔值
            5.注销用户
                auth.logout(request)
                等价于request.session.flush()
            6.修改密码
                确认旧密码是否正确
                    request.user.check_password(old_password)
                    该方法也会有一个返回值 并且是布尔值类型
                修改密码
                    request.user.set_password(new_password)
                    request.user.save()
            7.校验用户是否登录装饰器
                login_required
                该装饰在不传参的情况下 如果用户没有登录 会默认跳到一个不是我们自己写的登陆页面(报错)
                你可以通过配置 来让它跳到你自己的登陆配置
                局部配置
                    login_required(login_url='/login/')

                全局配置
                    settings文件中
                    LOGIN_URL = '/login/'
            8.注册用户
                from django.contrib.auth.models import User
                不能再直接调用create方法 因为该方法存储的密码是明文的
                    User.objects.create_user()
                    User.objects.create_superuser()
            9.自定义模型表
                自定义模型类一定要继承AbstractUser
                from django.contrib.auth.models import AbstractUser
                class User(AbstractUser):
                    # 不要跟原来表中已经有的字段冲突
                    phone = ...
                    avatar = ...
                    create_time = ...

                一定要去配置文件中注册
                AUTH_USER_MODELS = '应用名.类名'

设计思想(******)
    参考django中间件,后面的所学的restframework等
今日内容 django中间键 csrf跨站请求伪造 auth模块 settings功能插拔式源码 今日内容 django中间件 django中间件是类似于是django的保安 请求的时候需要先经过中间件才能到达django后端(urls,views,templates,models) 响应走的时候也需要经过中间件才能到达web服务网关接口 自定义-day59 mymiddleware /mdd.py django默认的七个中间件 MIDDLEWARE = [ 'django.middleware.security.SecurityMiddleware', # 安全相关 'django.contrib.sessions.middleware.SessionMiddleware', # session存取相关 'django.middleware.common.CommonMiddleware', 'django.middleware.csrf.CsrfViewMiddleware', 'django.contrib.auth.middleware.AuthenticationMiddleware', # 认证 'django.contrib.messages.middleware.MessageMiddleware', 'django.middleware.clickjacking.XFrameOptionsMiddleware', ] # 1.安全相关的 class SecurityMiddleware(MiddlewareMixin): def __init__(self, get_response=None): self.sts_seconds = settings.SECURE_HSTS_SECONDS self.sts_include_subdomains = settings.SECURE_HSTS_INCLUDE_SUBDOMAINS self.sts_preload = settings.SECURE_HSTS_PRELOAD self.content_type_nosniff = settings.SECURE_CONTENT_TYPE_NOSNIFF self.xss_filter = settings.SECURE_BROWSER_XSS_FILTER self.redirect = settings.SECURE_SSL_REDIRECT self.redirect_host = settings.SECURE_SSL_HOST self.redirect_exempt = [re.compile(r) for r in settings.SECURE_REDIRECT_EXEMPT] self.get_response = get_response def process_request(self, request): path = request.path.lstrip("/") if (self.redirect and not request.is_secure() and not any(pattern.search(path) for pattern in self.redirect_exempt)): host = self.redirect_host or request.get_host() return HttpResponsePermanentRedirect( "https://%s%s" % (host, request.get_full_path()) ) def process_response(self, request, response): if (self.sts_seconds and request.is_secure() and 'strict-transport-security' not in response): sts_header = "max-age=%s" % self.sts_seconds if self.sts_include_subdomains: sts_header = sts_header + "; includeSubDomains" if self.sts_preload: sts_header = sts_header + "; preload" response["strict-transport-security"] = sts_header if self.content_type_nosniff and 'x-content-type-options' not in response: response["x-content-type-options"] = "nosniff" if self.xss_filter and 'x-xss-protection' not in response: response["x-xss-protection"] = "1; mode=block" return response class CsrfViewMiddleware(MiddlewareMixin): if settings.CSRF_USE_SESSIONS: request.session[CSRF_SESSION_KEY] = request.META['CSRF_COOKIE'] else: response.set_cookie( settings.CSRF_COOKIE_NAME, request.META['CSRF_COOKIE'], max_age=settings.CSRF_COOKIE_AGE, domain=settings.CSRF_COOKIE_DOMAIN, path=settings.CSRF_COOKIE_PATH, secure=settings.CSRF_COOKIE_SECURE, httponly=settings.CSRF_COOKIE_HTTPONLY, ) # Set the Vary header since content varies with the CSRF cookie. patch_vary_headers(response, ('Cookie',)) def process_request(self, request): csrf_token = self._get_token(request) if csrf_token is not None: # Use same token next time. request.META['CSRF_COOKIE'] = csrf_token def process_view(self, request, callback, callback_args, callback_kwargs): if getattr(request, 'csrf_processing_done', False): return None # Wait until request.META["CSRF_COOKIE"] has been manipulated before # bailing out, so that get_token still works if getattr(callback, 'csrf_exempt', False): return None # Assume that anything not defined as 'safe' by RFC7231 needs protection if request.method not in ('GET', 'HEAD', 'OPTIONS', 'TRACE'): if getattr(request, '_dont_enforce_csrf_checks', False): # Mechanism to turn off CSRF checks for test suite. # It comes after the creation of CSRF cookies, so that # everything else continues to work exactly the same # (e.g. cookies are sent, etc.), but before any # branches that call reject(). return self._accept(request) if request.is_secure(): # Suppose user visits http://example.com/ # An active network attacker (man-in-the-middle, MITM) sends a # POST form that targets https://example.com/detonate-bomb/ and # submits it via JavaScript. # # The attacker will need to provide a CSRF cookie and token, but # that's no problem for a MITM and the session-independent # secret we're using. So the MITM can circumvent the CSRF # protection. This is true for any HTTP connection, but anyone # using HTTPS expects better! For this reason, for # https://example.com/ we need additional protection that treats # http://example.com/ as completely untrusted. Under HTTPS, # Barth et al. found that the Referer header is missing for # same-domain requests in only about 0.2% of cases or less, so # we can use strict Referer checking. referer = force_text( request.META.get('HTTP_REFERER'), strings_only=True, errors='replace' ) if referer is None: return self._reject(request, REASON_NO_REFERER) referer = urlparse(referer) # Make sure we have a valid URL for Referer. if '' in (referer.scheme, referer.netloc): return self._reject(request, REASON_MALFORMED_REFERER) # Ensure that our Referer is also secure. if referer.scheme != 'https': return self._reject(request, REASON_INSECURE_REFERER) # If there isn't a CSRF_COOKIE_DOMAIN, require an exact match # match on host:port. If not, obey the cookie rules (or those # for the session cookie, if CSRF_USE_SESSIONS). good_referer = ( settings.SESSION_COOKIE_DOMAIN if settings.CSRF_USE_SESSIONS else settings.CSRF_COOKIE_DOMAIN ) if good_referer is not None: server_port = request.get_port() if server_port not in ('443', '80'): good_referer = '%s:%s' % (good_referer, server_port) else: # request.get_host() includes the port. good_referer = request.get_host() # Here we generate a list of all acceptable HTTP referers, # including the current host since that has been validated # upstream. good_hosts = list(settings.CSRF_TRUSTED_ORIGINS) good_hosts.append(good_referer) if not any(is_same_domain(referer.netloc, host) for host in good_hosts): reason = REASON_BAD_REFERER % referer.geturl() return self._reject(request, reason) csrf_token = request.META.get('CSRF_COOKIE') if csrf_token is None: # No CSRF cookie. For POST requests, we insist on a CSRF cookie, # and in this way we can avoid all CSRF attacks, including login # CSRF. return self._reject(request, REASON_NO_CSRF_COOKIE) # Check non-cookie token for match. request_csrf_token = "" if request.method == "POST": try: request_csrf_token = request.POST.get('csrfmiddlewaretoken', '') except IOError: # Handle a broken connection before we've completed reading # the POST data. process_view shouldn't raise any # exceptions, so we'll ignore and serve the user a 403 # (assuming they're still listening, which they probably # aren't because of the error). pass if request_csrf_token == "": # Fall back to X-CSRFToken, to make things easier for AJAX, # and possible for PUT/DELETE. request_csrf_token = request.META.get(settings.CSRF_HEADER_NAME, '') request_csrf_token = _sanitize_token(request_csrf_token) if not _compare_salted_tokens(request_csrf_token, csrf_token): return self._reject(request, REASON_BAD_TOKEN) return self._accept(request) def process_response(self, request, response): if not getattr(request, 'csrf_cookie_needs_reset', False): if getattr(response, 'csrf_cookie_set', False): return response if not request.META.get("CSRF_COOKIE_USED", False): return response # Set the CSRF cookie even if it's already set, so we renew # the expiry timer. self._set_token(request, response) response.csrf_cookie_set = True return response class AuthenticationMiddleware(MiddlewareMixin): def process_request(self, request): assert hasattr(request, 'session'), ( "The Django authentication middleware requires session middleware " "to be installed. Edit your MIDDLEWARE%s setting to insert " "'django.contrib.sessions.middleware.SessionMiddleware' before " "'django.contrib.auth.middleware.AuthenticationMiddleware'." ) % ("_CLASSES" if settings.MIDDLEWARE is None else "") request.user = SimpleLazyObject(lambda: get_user(request)) django中间件中有五个用户可以自定义的方法 需要我们掌握的的方法: 1.process_request() 2.process_response()方法 # response 响应 需要了解的方法 3.process_view() 4.process_exception() # 例外 5.process_template_response() django中间件可以用来做什么(***********************) 1.网站全局的身份校验,访问频率限制,权限校验...只要是涉及到全局的校验你都可以在中间件中完成 2.django的中间件是所有web框架中 做的最好的 需要我们掌握的方法有 1.process_request()方法 规律 1.请求来的时候 会经过每个中间件里面的process_request方法(从上往下) 2.如果方法里面直接返回了HttpResponse对象 那么会直接返回 不再往下执行 ps:flask 框架 不是这样,他是,无论在哪返回的,都是从头开始依次执行 process_response() 基于该特点就可以做访问频率限制,身份校验,权限校验 2.process_response()方法 规律 1.必须将response形参返回 因为这个形参指代的就是要返回给前端的数据 2.响应走的时候 会依次经过每一个中间件里面的process_response方法(从下往上) 需要了解的方法 3.process_view() 1.在路由匹配成功执行视图函数之前 触发 4.process_exception() 1.当你的视图函数报错时 就会自动执行 5.process_template_response() 1.当你返回的HttpResponse对象中必须包含render属性才会触发 def index(request): print('我是index视图函数') def render(): return HttpResponse('什么鬼玩意') obj = HttpResponse('index') obj.render = render return obj 总结:你在书写中间件的时候 只要形参中有repsonse 你就顺手将其返回 这个reponse就是要给前端的消息 如何自定义我们自己的中间件,研究这上面五个方法都有哪些特点 1.如果你想让你写的中间件生效 就必须要先继承MiddlewareMixin 2.在注册自定义中间件的时候 一定要确保路径不要写错 csrf跨站请求伪造 钓鱼网站 通过制作一个跟正儿八经的网站一模一样的页面,骗取用户输入信息 转账交易 从而做手脚 转账交易的请求确确实实是发给了中国银行,账户的钱也是确确实实少了 唯一不一样的地方在于收款人账户不对 内部原理 在让用户输入对方账户的那个input上面做手脚 给这个input不设置name属性,在内部隐藏一个实现写好的name和value属性的input框 这个value的值 就是钓鱼网站受益人账号 防止钓鱼网站的思路 网站会给返回给用户的form表单页面 偷偷塞一个随机字符串 请求到来的时候 会先比对随机字符串是否一致 如果不一致 直接拒绝(403) 该随机字符串有以下特点 1.同一个浏览器每一次访问都不一样 2.不同浏览器绝对不会重复 1.form表单发送post请求的时候 需要你做得仅仅书写一句话 {% csrf_token %} 2.ajax发送post请求 如何避免csrf校验 1.现在页面上写{% csrf_token %},利用标签查找 获取到该input键值信息 {'username':'jason','csrfmiddlewaretoken':$('[name=csrfmiddlewaretoken]').val()} $('[name=csrfmiddlewaretoken]').val() 2.直接书写'{{ csrf_token }}' {'username':'jason','csrfmiddlewaretoken':'{{ csrf_token }}'} {{ csrf_token }} 3.你可以将该获取随机键值对的方法 写到一个js文件中,之后只需要导入该文件即可 新建一个js文件 存放以下代码 之后导入即可 function getCookie(name) { var cookieValue = null; if (document.cookie && document.cookie !== '') { var cookies = document.cookie.split(';'); for (var i = 0; i < cookies.length; i++) { var cookie = jQuery.trim(cookies[i]); // Does this cookie string begin with the name we want? if (cookie.substring(0, name.length + 1) === (name + '=')) { cookieValue = decodeURIComponent(cookie.substring(name.length + 1)); break; } } } return cookieValue; } var csrftoken = getCookie('csrftoken'); function csrfSafeMethod(method) { // these HTTP methods do not require CSRF protection return (/^(GET|HEAD|OPTIONS|TRACE)$/.test(method)); } $.ajaxSetup({ beforeSend: function (xhr, settings) { if (!csrfSafeMethod(settings.type) && !this.crossDomain) { xhr.setRequestHeader("X-CSRFToken", csrftoken); } } }); 1.当你网站全局都需要校验csrf的时候 有几个不需要校验该如何处理 2.当你网站全局不校验csrf的时候 有几个需要校验又该如何处理 from django.utils.decorators import method_decorator from django.views.decorators.csrf import csrf_exempt,csrf_protect # 这两个装饰器在给CBV装饰的时候 有一定的区别 如果是csrf_protect 那么有三种方式 # 第一种方式 # @method_decorator(csrf_protect,name='post') # 有效的 class MyView(View): # 第三种方式 # @method_decorator(csrf_protect) def dispatch(self, request, *args, **kwargs): res = super().dispatch(request, *args, **kwargs) return res def get(self,request): return HttpResponse('get') # 第二种方式 # @method_decorator(csrf_protect) # 有效的 def post(self,request): return HttpResponse('post') 如果是csrf_exempt 只有两种(只能给dispatch装) 特例 @method_decorator(csrf_exempt,name='dispatch') # 第二种可以不校验的方式 class MyView(View): # @method_decorator(csrf_exempt) # 第一种可以不校验的方式 def dispatch(self, request, *args, **kwargs): res = super().dispatch(request, *args, **kwargs) return res def get(self,request): return HttpResponse('get') def post(self,request): return HttpResponse('post') 总结 装饰器中只有csrf_exempt是特例,其他的装饰器在给CBV装饰的时候 都可以有三种方式 课后作业: 将昨天的写的登陆认证装饰器 加载CBV上 auth模块 如果你想用auth模块 那么你就用全套 跟用户相关的功能模块 用户的注册 登陆 验证 修改密码 ... 执行数据库迁移命令之后 会生成很多表 其中的auth_user是一张用户相关的表格 添加数据 createsuperuser 创建超级用户 这个超级用户就可以拥有登陆django admin后台管理的权限 auth模块的功能 查询用户 from django.contrib import auth user_obj = auth.authenticate(username=username,password=password) # 必须要用 因为数据库中的密码字段是密文的 而你获取的用户输入的是明文 记录用户状态 auth.login(request,user_obj) # 将用户状态记录到session中 判断用户是否登录 print(request.user.is_authenticated) # 判断用户是否登录 如果是你们用户会返回False 用户登录之后 获取用户对象 print(request.user) # 如果没有执行auth.login那么拿到的是匿名用户 校验用户是否登录 from django.contrib.auth.decorators import login_required @login_required(login_url='/xxx/') # 局部配置 def index(request): pass # 全局配置 settings文件中 LOGIN_URL = '/xxx/' 验证密码是否正确 request.user.check_password(old_password) 修改密码 request.user.set_password(new_password) request.user.save() # 修改密码的时候 一定要save保存 否则无法生效 退出登陆 auth.logout(request) # request.session.flush() 注册用户 # User.objects.create(username =username,password=password) # 创建用户名的时候 千万不要再使用create 了 # User.objects.create_user(username =username,password=password) # 创建普通用户 User.objects.create_superuser(username =username,password=password,email='123@qq.com') # 创建超级用户 邮箱必填 自定义auth_user表 from django.contrib.auth.models import AbstractUser # Create your models here. # 第一种 使用一对一关系 不考虑 # 第二种方式 使用类的继承 class Userinfo(AbstractUser): # 千万不要跟原来表中的字段重复 只能创新 phone = models.BigIntegerField() avatar = models.CharField(max_length=32) # 一定要在配置文件中 告诉django # 告诉django orm不再使用auth默认的表 而是使用你自定义的表 AUTH_USER_MODEL = 'app01.Userinfo' # '应用名.类名' 1.执行数据库迁移命令 所有的auth模块功能 全部都基于你创建的表 而不再使用auth_user settings功能插拔式源码 参考django 配置文件中的 中间件等功能模块
1.中间键:
function getCookie(name) {
    var cookieValue = null;
    if (document.cookie && document.cookie !== '') {
        var cookies = document.cookie.split(';');
        for (var i = 0; i < cookies.length; i++) {
            var cookie = jQuery.trim(cookies[i]);
            // Does this cookie string begin with the name we want?
            if (cookie.substring(0, name.length + 1) === (name + '=')) {
                cookieValue = decodeURIComponent(cookie.substring(name.length + 1));
                break;
            }
        }
    }
    return cookieValue;
}
var csrftoken = getCookie('csrftoken');


function csrfSafeMethod(method) {
  // these HTTP methods do not require CSRF protection
  return (/^(GET|HEAD|OPTIONS|TRACE)$/.test(method));
}

$.ajaxSetup({
  beforeSend: function (xhr, settings) {
    if (!csrfSafeMethod(settings.type) && !this.crossDomain) {
      xhr.setRequestHeader("X-CSRFToken", csrftoken);
    }
  }
});
from django.utils.deprecation import MiddlewareMixin
from django.shortcuts import  HttpResponse

class MyMdd(MiddlewareMixin):
    def process_request(self,request):
        print('我是第一个中间键里面的process_request方法')
        # return HttpResponse('嘿嘿')

    def process_response(self,request,response):
        print('我是第一个中间件里面的process_response方法')
        return response

    def process_view(self,request,view_func,view_args,view_kwargs):
        print(view_func)
        print(view_args)
        print(view_kwargs)
        print('我是第一个中间件里面的process_view方法')

    def process_exception(self,request,exception):
        print('我是第一个中间件里面的process_exception')

    def process_template_response(self,request,response):
        print('我是第一个中间件里面的process_template_response')
        return response

class MyMdd1(MiddlewareMixin):
    def process_request(self,request):
        print('我是第二个中间件里面的process_request方法')

    def process_response(self,request,response):
        print('我是第二个中间件里面的process_response方法')
        return response
    def process_view(self,request,view_func,view_args,view_kwargs):
        print(view_func)
        print(view_args)
        print(view_kwargs)
        print('我是第二个中间件里面的process_view方法')


    def process_exception(self, request, exception):
        print('我是第二个中间件里面的process_exception')

    def process_template_response(self, request, response):
        print('我是第二个中间件里面的process_template_response')
        return response
class MyMdd2(MiddlewareMixin):
    def process_request(self,request):
        print('我是第三个中间件里面的process_request方法')

    def process_response(self,request,response):
        print('我是第三个中间件里面的process_response方法')
        return response

    def process_view(self,request,view_func,view_args,view_kwargs):
        print(view_func)
        print(view_args)
        print(view_kwargs)
        print('我是第三个中间件里面的process_view方法')

    def process_exception(self, request, exception):
        print('我是第三个中间件里面的process_exception')


    def process_template_response(self, request, response):
        print('我是第三个中间件里面的process_template_response')
        return response
ps:
1.mymiddleware/mdd.py 自定义中间键
2.csrf: 跨站请求,有唯一token
"""
Django settings for day59 project.

Generated by 'django-admin startproject' using Django 1.11.11.

For more information on this file, see
https://docs.djangoproject.com/en/1.11/topics/settings/

For the full list of settings and their values, see
https://docs.djangoproject.com/en/1.11/ref/settings/
"""

import os

# Build paths inside the project like this: os.path.join(BASE_DIR, ...)
BASE_DIR = os.path.dirname(os.path.dirname(os.path.abspath(__file__)))


# Quick-start development settings - unsuitable for production
# See https://docs.djangoproject.com/en/1.11/howto/deployment/checklist/

# SECURITY WARNING: keep the secret key used in production secret!
SECRET_KEY = '@x7!%j31=fg$2q9&50_mg&j9t%8jnma2ap6)&rv1^$+%ch+ohp'

# SECURITY WARNING: don't run with debug turned on in production!
DEBUG = True

ALLOWED_HOSTS = []


# Application definition

INSTALLED_APPS = [
    'django.contrib.admin',
    'django.contrib.auth',
    'django.contrib.contenttypes',
    'django.contrib.sessions',
    'django.contrib.messages',
    'django.contrib.staticfiles',
    'app01.apps.App01Config',
]

MIDDLEWARE = [
    'django.middleware.security.SecurityMiddleware',
    'django.contrib.sessions.middleware.SessionMiddleware',
    'django.middleware.common.CommonMiddleware',
    # 跨站伪造保护 有唯一token
    'django.middleware.csrf.CsrfViewMiddleware',
    'django.contrib.auth.middleware.AuthenticationMiddleware',
    'django.contrib.messages.middleware.MessageMiddleware',
    'django.middleware.clickjacking.XFrameOptionsMiddleware',
    # 'mymiddleware.mdd.MyMdd',
    # 'mymiddleware.mdd.MyMdd1',
    # 'mymiddleware.mdd.MyMdd2',
]

ROOT_URLCONF = 'day59.urls'

TEMPLATES = [
    {
        'BACKEND': 'django.template.backends.django.DjangoTemplates',
        'DIRS': [os.path.join(BASE_DIR, 'templates')]
        ,
        'APP_DIRS': True,
        'OPTIONS': {
            'context_processors': [
                'django.template.context_processors.debug',
                'django.template.context_processors.request',
                'django.contrib.auth.context_processors.auth',
                'django.contrib.messages.context_processors.messages',
            ],
        },
    },
]

WSGI_APPLICATION = 'day59.wsgi.application'


# Database
# https://docs.djangoproject.com/en/1.11/ref/settings/#databases

DATABASES = {
    'default': {
        'ENGINE': 'django.db.backends.mysql',
        'NAME': 'day59',
        'USER':'root',
        'PASSWORD':'llx20190411',
        "HOST":'127.0.0.1',
        'PORT':3306
    }
}


# Password validation
# https://docs.djangoproject.com/en/1.11/ref/settings/#auth-password-validators

AUTH_PASSWORD_VALIDATORS = [
    {
        'NAME': 'django.contrib.auth.password_validation.UserAttributeSimilarityValidator',
    },
    {
        'NAME': 'django.contrib.auth.password_validation.MinimumLengthValidator',
    },
    {
        'NAME': 'django.contrib.auth.password_validation.CommonPasswordValidator',
    },
    {
        'NAME': 'django.contrib.auth.password_validation.NumericPasswordValidator',
    },
]


# Internationalization
# https://docs.djangoproject.com/en/1.11/topics/i18n/

LANGUAGE_CODE = 'en-us'

TIME_ZONE = 'UTC'

USE_I18N = True

USE_L10N = True

USE_TZ = True


# Static files (CSS, JavaScript, Images)
# https://docs.djangoproject.com/en/1.11/howto/static-files/

STATIC_URL = '/static/'
STATICFILES_DIRS = [
    os.path.join(BASE_DIR,'static')
]

# auth登陆认证装饰器 跳转的url
LOGIN_URL = '/xxx/'

# 告诉django  orm不再使用auth默认的表  而是使用你自定义的表
AUTH_USER_MODEL = 'app01.Userinfo'  # '应用名.类名'
from django.db import models
from django.contrib.auth.models import AbstractUser
# Create your models here.
# 第一种 使用一对一关系  在建一张表 不考虑

# 第二种方式   使用类的继承
class Userinfo(AbstractUser):
    # 千万不要跟原来表中的字段重复 只能创新
    phone = models.BigIntegerField()
    avatar = models.CharField(max_length=32)


# 需要在settings 中声明 使用 Userinfo替换 auth_user
import pymysql
pymysql.install_as_MySQLdb()
同步迁移
python3 manage.py makemigrations
python3 manage.py migrate
<!DOCTYPE html>
<html lang="en">
<head>
    <meta charset="UTF-8">
    <title>Title</title>
    <script src="https://cdn.bootcss.com/jquery/3.4.1/jquery.min.js"></script>
    {% load static %}
    <link rel="stylesheet" href="{% static 'bootstrap-3.3.7-dist/css/bootstrap.min.css' %}">
    <script src="{% static 'bootstrap-3.3.7-dist/js/bootstrap.min.js' %}"></script>
</head>
<body>
<h2>这是正儿八经的网站</h2>
<form action="" method="post">
{#    {% csrf_token %}#}
    <p>本人用户名:<input type="text" name="username"></p>
    <p>转账金额:<input type="text" name="money"></p>
    <p>对方账户:<input type="text" name="target_user"></p>
    <input type="submit">
</form>
{#<button id="b1">发送ajax请求</button>#}
{#// 第三种方式 :直接引入js文件#}
{#<script src="{% static 'setjs.js' %}"></script>#}
{#<script>#}
{#    $('b1').click(function () {#}
{#        $.ajax({#}
{#            url:'',#}
{#            type:'post',#}
{#            // 第一种方式#}
            {#data:{'username':'jason','csrfmiddlewaretoken':$('[name=csrfmiddlewaretoken]').val()},#}
{#            // 第二种方式#}
{#            data:{'username':'jason','csrfmiddlewaretoken':'{{ csrf_token }}'},#}
{#            // 第三种方式 :直接引入js文件#}
            {#data:{'username':'jason'},#}
{#            success:function (data) {#}
{#                alert(data)#}
{#            },#}
{#        })#}
{#    })#}
{#</script>#}
</body>
</html>
1.form表单发送post请求的时候  需要你做得仅仅书写一句话
   {% csrf_token %}

2.ajax发送post请求 如何避免csrf校验
   1.现在页面上写{% csrf_token %},利用标签查找  获取到该input键值信息
      {'username':'jason','csrfmiddlewaretoken':$('[name=csrfmiddlewaretoken]').val()}
      $('[name=csrfmiddlewaretoken]').val()

   2.直接书写'{{ csrf_token }}'
      {'username':'jason','csrfmiddlewaretoken':'{{ csrf_token }}'}
      {{ csrf_token }}

   3.你可以将该获取随机键值对的方法 写到一个js文件中,之后只需要导入该文件即可
      新建一个js文件 存放以下代码 之后导入即可
<!DOCTYPE html>
<html lang="en">
<head>
    <meta charset="UTF-8">
    <title>Title</title>
    <script src="https://cdn.bootcss.com/jquery/3.4.1/jquery.min.js"></script>
</head>
<body>
<form action="" method="post">
    {% csrf_token %}
    <p>username:<input type="text" name="username"></p>
    <p>password:<input type="text" name="password"></p>
    <input type="submit">
</form>
</body>
</html>
<!DOCTYPE html>
<html lang="en">
<head>
    <meta charset="UTF-8">
    <title>Title</title>
    <script src="https://cdn.bootcss.com/jquery/3.4.1/jquery.min.js"></script>
</head>
<body>
<form action="" method="post">
    {% csrf_token %}
    <p>username:<input type="text" name="username" value="{{ request.user.username }}" disabled></p>
    <p>old_password:<input type="password" name="old_password"></p>
    <p>new_password:<input type="password" name="new_password"></p>
    <input type="submit">
</form>
</body>
</html>
<!DOCTYPE html>
<html lang="en">
<head>
    <meta charset="UTF-8">
    <title>Title</title>
    <script src="https://cdn.bootcss.com/jquery/3.4.1/jquery.min.js"></script>
</head>
<body>
<form action="" method="post">
    {% csrf_token %}
    <p>username:<input type="text" name="username"></p>
    <p>password:<input type="text" name="password"></p>
    <input type="submit">
</form>
</body>
</html>
"""day59 URL Configuration

The `urlpatterns` list routes URLs to views. For more information please see:
    https://docs.djangoproject.com/en/1.11/topics/http/urls/
Examples:
Function views
    1. Add an import:  from my_app import views
    2. Add a URL to urlpatterns:  url(r'^$', views.home, name='home')
Class-based views
    1. Add an import:  from other_app.views import Home
    2. Add a URL to urlpatterns:  url(r'^$', Home.as_view(), name='home')
Including another URLconf
    1. Import the include() function: from django.conf.urls import url, include
    2. Add a URL to urlpatterns:  url(r'^blog/', include('blog.urls'))
"""
from django.conf.urls import url
from django.contrib import admin
from app01 import views
urlpatterns = [
    url(r'^admin/', admin.site.urls),
    url(r'^index',views.index),
    # 钓鱼网站模仿的网站
    url(r'^transfer',views.transfer),
    url(r'^login/',views.login),
    url(r'^lll/',views.lll),
    url(r'^ooo/',views.MyView.as_view()),
    # 登录
    url(r'^xxx/', views.xxx),
    # 测试 request.user
    url(r'^yyy/', views.yyy),
    url(r'^set_password/', views.set_password),
    url(r'^logout/', views.logout),
    url(r'^register/', views.register),
]
from django.shortcuts import render,HttpResponse

# Create your views here.
def index(request):
    print('我是index视图函数')
    def render():
        return HttpResponse('什么玩意')
    obj = HttpResponse('index')
    obj.render = render
    return obj

def transfer(request):
    if request.method == 'POST':
        username = request.POST.get('username')
        money = request.POST.get('money')
        target_user = request.POST.get('target_user')
        print('%s 给 %s 转了 %s元'%(username,target_user,money))
    return render(request,'t.html')


from django.views.decorators.csrf import csrf_exempt,csrf_protect
@csrf_exempt  # 都校验,就他不校验
def login(request):
    return HttpResponse('login')

@csrf_protect # 都不校验 ,就他校验
def lll(request):
    return HttpResponse('lll')

from django.views import View
from django.utils.decorators import method_decorator
"""第一种可以校验的方式"""
# @method_decorator(csrf_protect,name='post') # 有效的
# @method_decorator(csrf_exempt,name='post')  # 无效的
"""第二种可以不校验的方式"""
@method_decorator(csrf_exempt,name='dispatch')
class MyView(View):
    # @method_decorator(csrf_exempt)  # 第一种可以不校验的方式
    # 第三种
    @method_decorator(csrf_protect) #校验
    def dispatch(self, request, *args, **kwargs):
        res = super().dispatch(request,*args,**kwargs)
        return res
    def get(self,request):
        return HttpResponse('get')

    # 第二种方式
    # @method_decorator(csrf_exempt)  # 无效的
    # @method_decorator(csrf_protect)  # 有效的
    @method_decorator(csrf_protect)
    def post(self,request):
        return HttpResponse('post')

from django.contrib import auth

# 登录
def xxx(request):
    if request.method == 'POST':
        username = request.POST.get('username')
        password = request.POST.get('password')
        # 取数据库查询当前用户数据
        # models.User.objects.filter(username=username,password=password).first()
        user_obj = auth.authenticate(username=username,password=password)
        # 必须要用 因为数据库中的密码字段是密文的 而你获取的用户输入的是明文
        print(user_obj)

        print(user_obj.username)
        print(user_obj.password)
        # 保存用户状态
        # request.session['user'] = user_obj
        auth.login(request,user_obj) # 将用户状态记录到session中
        """只要执行了这一句话  你就可以在后端任意位置通过request.user获取到当前用户对象"""
    return render(request,'xxx.html')

"""测试 获取用户对象 request.user"""

def yyy(request):
    print(request.user) # 如果没有执行auth.login那么拿到的是匿名用户
    print(request.user.is_authenticated)  # 判断用户是否登录  如果是你们用户会返回False
    print(request.user.username)
    print(request.user.password)
    return HttpResponse('yyy')


# # 修改用户密码
from django.contrib.auth.decorators import login_required
# @login_required(login_url='/xxx/')
@login_required # 路径写在settings
# 自动校验当前用户是否登录  如果没有登录 默认跳转到 一个莫名其妙的登陆页面
def set_password(request):
    if request.method == 'POST':
        old_password = request.POST.get('old_password')
        new_password = request.POST.get('new_password')
        # 先判断原密码是否正确
        is_right = request.user.check_password(old_password) # 将获取的用户密码 自动加密 然后去数据库中对比当前用户的密码是否一致
        if is_right:
            print(is_right)
            # 修改密码
            request.user.set_password(new_password)
            request.user.save() # 修改密码的时候 一定要save保存 否则无法生效
    return render(request, 'set_password.html')

# @login_required(login_url='/xxx/')
@login_required # 路径写在settings
def logout(request):
    # request.session.flush()
    auth.logout(request)
    return HttpResponse("logout")

from django.contrib.auth.models import User
def register(request):
    if request.method == 'POST':
        username = request.POST.get('username')
        password = request.POST.get('password')
        user_obj = User.objects.filter(username=username)
        if not user_obj:
            # User.objects.create(username=username,password=password) # 创建用户名的时候 千万不要再使用create 了
            User.objects.create_user(username=username,password=password) # 创建普通用户
            # User.objects.create_superuser(username=username,password=password,email='123@qq.com')  # 创建超级用户
    return render(request, 'register.html')
 1 """错误:'auth.User' has been swapped for 'app01.Userinfo'"""
 2 """原因:扩展出错, 加如下代码
 3 from django.contrib.auth import get_user_model
 4 User = get_user_model()
 5 """
 6 # from django.contrib.auth.models import User
 7 from django.contrib.auth import get_user_model
 8 User = get_user_model()
 9 def register(request):
10     if request.method == 'POST':
11         username = request.POST.get('username')
12         password = request.POST.get('password')
13         user_obj = User.objects.filter(username=username) # 这个出错
14         if not user_obj:
15             # User.objects.create(username=username,password=password) # 创建用户名的时候 千万不要再使用create 了
16             User.objects.create_user(username=username,password=password) # 创建普通用户
17             # User.objects.create_superuser(username=username,password=password,email='123@qq.com')  # 创建超级用户
18     return render(request, 'register.html')
diaoyuwangzhan 钓鱼网站
<!DOCTYPE html>
<html lang="en">
<head>
    <meta charset="UTF-8">
    <title>Title</title>
    <script src="https://cdn.bootcss.com/jquery/3.4.1/jquery.min.js"></script>
</head>
<body>
<h2>这是钓鱼网站</h2>
<form action="http://127.0.0.1:8000/transfer/" method="post">
    <p>本人用户名:<input type="text" name="username"></p>
    <p>转账金额:<input type="text" name="money"></p>
    <p>对方账户:<input type="text"></p>
    <input type="text" name="target_user" value="jason" style="display: none">
    <input type="submit">
</form>
</body>
</html>
"""diaoyuwangzhan URL Configuration

The `urlpatterns` list routes URLs to views. For more information please see:
    https://docs.djangoproject.com/en/1.11/topics/http/urls/
Examples:
Function views
    1. Add an import:  from my_app import views
    2. Add a URL to urlpatterns:  url(r'^$', views.home, name='home')
Class-based views
    1. Add an import:  from other_app.views import Home
    2. Add a URL to urlpatterns:  url(r'^$', Home.as_view(), name='home')
Including another URLconf
    1. Import the include() function: from django.conf.urls import url, include
    2. Add a URL to urlpatterns:  url(r'^blog/', include('blog.urls'))
"""
from django.conf.urls import url
from django.contrib import admin
from app01 import views
urlpatterns = [
    url(r'^admin/', admin.site.urls),
    url(r'^transfer/', views.transfer),
]
from django.shortcuts import render

# Create your views here.
def transfer(request):
    return render(request,'ttt.html')
importidea
版本1:
lowb版本
def wechat(content):
    print('微信通知:%s' % content)

def msg(content):
    print('短信通知:%s' % content)

def email(content):
    print('邮件通知:%s' % content)

def QQ(content):
    print('qq通知:%s' % content)
from lowb版本.notify import *

def run(content):
    wechat(content)
    msg(content)
    email(content)
    QQ(content)

if __name__ == '__main__':
    run('国庆八天假 我该去哪玩?')
版本2:
notify
import settings
import importlib

def send_all(content):
    for path_str in settings.NOTIFY_LIST:# 1.拿出一个个的字符串   'notify.email.Email'
        module_path,class_name = path_str.rsplit('.',maxsplit=1)  # 2.从右边开始 按照点切一个 ['notify.email','Email']
        module = importlib.import_module(module_path) # from notity import msg,email,wechat
        cls = getattr(module,class_name)  # 利用反射 一切皆对象的思想 从文件中获取属性或者方法 cls = 一个个的类名
        obj = cls() # 类实例化生成对象
        obj.send(content) # 对象调方法
class Email(object):
    def __init__(self):
        pass # 发送邮件需要的代码配置
    def send(self,content):
        print('邮件通知:%s' % content)
class  Msg(object):
    def __init__(self):
        pass  # 发送短信需要的代码配置

    def send(self,content):
        print('短信通知:%s' % content)
class QQ(object):
    def __init__(self):
        pass  # 发送qq需要的代码准备

    def send(self,content):
        print('qq通知:%s'%content)
class WeChat(object):
    def __init__(self):
        pass  # 发送微信需要的代码配置

    def send(self,content):
        print('微信通知:%s'%content)
# notify_list = []
NOTIFY_LIST = [
    'notify.email.Email',
    'notify.msg.Msg',
    # 'notify.wechat.Wechat',
    'notify.qq.QQ',
]
import notify

notify.send_all('国庆放假了 记住放八天哦')
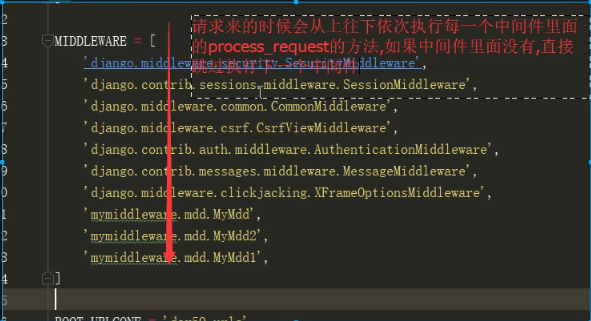
django中间件规律一.png
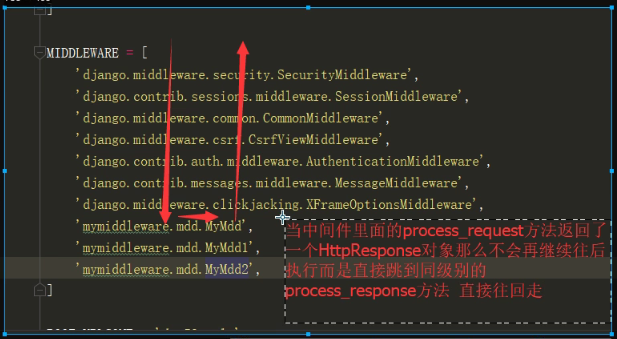
django中间件规律二.png

django中间件重点 基于此做校验.png
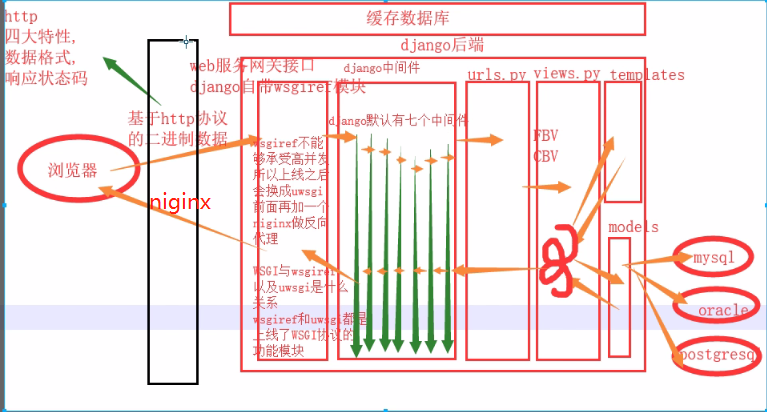
django后端全部逻辑.png

django后端全部逻辑更完整版 复习辅助.png
day59
diaoyuwangzhan
1 from django.conf.urls import url
2 from django.contrib import admin
3 from app01 import views
4 urlpatterns = [
5     url(r'^admin/', admin.site.urls),
6     url(r'^transfer/', views.transfer),
7 ]
 1 from django.shortcuts import render
 2
 3 # Create your views here.
 4 def transfer(request):
 5     if request.method == "POST":
 6         username = request.POST.get('username')
 7         money = request.POST.get('money')
 8         target_user = request.POST.get('target_user')
 9         print(f"{username}给{target_user}转了{money}元")
10     return render(reque
 1 <!DOCTYPE html>
 2 <html lang="en">
 3 <head>
 4     <meta charset="UTF-8">
 5     <title>Title</title>
 6     <script src="https://cdn.bootcss.com/jquery/3.4.1/jquery.min.js"></script>
 7
 8 </head>
 9 <body>
10 <h2>这是钓鱼网站</h2>
11 <form action="http://127.0.0.1:8000/transfer/" method="post">
12     <p>本人用户名:<input type="text" name="username"></p>
13     <p>转账金额:<input type="text" name="money"></p>
14     <p>对方账户:<input type="text"></p>
15     <input type="text" name="target_user" value="jason" style="display: none">
16     <input type="submit">
17 </form>
18 </body>
19 </html>
importidea
 1 notify.py
 2 def wechat(content):
 3     print('微信通知:%s' % content)
 4
 5 def msg(content):
 6     print('短信通知:%s' % content)
 7
 8 def email(content):
 9     print('邮件通知:%s' % content)
10
11 run.py
12 from lowb.notify import *
13 def run(content):
14     wechat(content)
15     msg(content)
16     email(content)
17
18
19 if __name__ == '__main__':
20     run('国庆八天假 我该去哪玩?')
 1 notify/email.py
 2 class Email(object):
 3     def __init__(self):
 4         pass # 发送邮件需要的代码配置
 5     def send(self,content):
 6         print('邮件通知:%s' % content)
 7 notify/msg.py
 8 class  Msg(object):
 9     def __init__(self):
10         pass  # 发送短信需要的代码配置
11
12     def send(self,content):
13         print('短信通知:%s' % content)
14 notify/qq.py
15 class QQ(object):
16     def __init__(self):
17         pass  # 发送qq需要的代码准备
18
19     def send(self,content):
20         print('qq通知:%s'%content)
21 notify/wechat.py
22 class WeChat(object):
23     def __init__(self):
24         pass  # 发送微信需要的代码配置
25
26     def send(self,content):
27         print('微信通知:%s'%content)
28 notify/__init__.py
29 import settings
30 import importlib
31
32 def send_all(content):
33     for path_str in settings.NOTIFY_LIST: # 1.拿出一个个的字符串   'notify.email.Email'
34         module_path, class_name = path_str.rsplit('.',maxsplit=1) # 2.从右边开始 按照点切一个 ['notify.email','Email']
35         module = importlib.import_module(module_path) # from notity import msg,email,wechat
36         cls = getattr(module, class_name) # 利用反射 一切皆对象的思想 从文件中获取属性或者方法 cls = 一个个的类名
37         obj = cls() # 类实例化生成对象
38         obj.send(content) # 对象调方法
39 settings.py
40 # notify_list = []
41 NOTIFY_LIST = [
42     'notify.email.Email',
43 'notify.msg.Msg',
44     # 'notify.wechat.Wechat',
45     'notify.qq.QQ',
46 ]
47 start.py
48 import notify
49 notify.send_all('国庆放假了 记住放八天哦')


【推荐】国内首个AI IDE,深度理解中文开发场景,立即下载体验Trae
【推荐】编程新体验,更懂你的AI,立即体验豆包MarsCode编程助手
【推荐】抖音旗下AI助手豆包,你的智能百科全书,全免费不限次数
【推荐】轻量又高性能的 SSH 工具 IShell:AI 加持,快人一步
· 分享一个免费、快速、无限量使用的满血 DeepSeek R1 模型,支持深度思考和联网搜索!
· 基于 Docker 搭建 FRP 内网穿透开源项目(很简单哒)
· ollama系列01:轻松3步本地部署deepseek,普通电脑可用
· 25岁的心里话
· 按钮权限的设计及实现