
使用docker compose组合多个容器构成一个完整的项目
一.前言和项目的准备
1.前言
这几天做docker-compose查找了很多博客,踩了很多坑,人都emo了,就记录此次实验

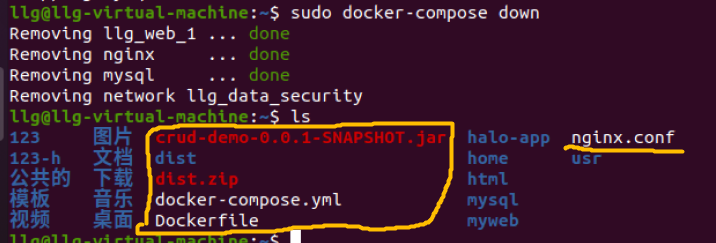
2.项目准备
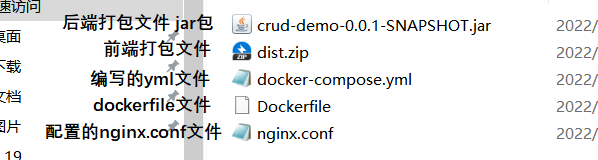
一般来说有以下几个文件
crud-demo-0.0.1-SNAPSHOT.jar 后端打包文件
dist.zip 前端打包文件
docker-compose.yml 自己参考他人进行编写的yml文件
Dockerfile 构建镜像的文件
nginx.conf 配置前端的文件
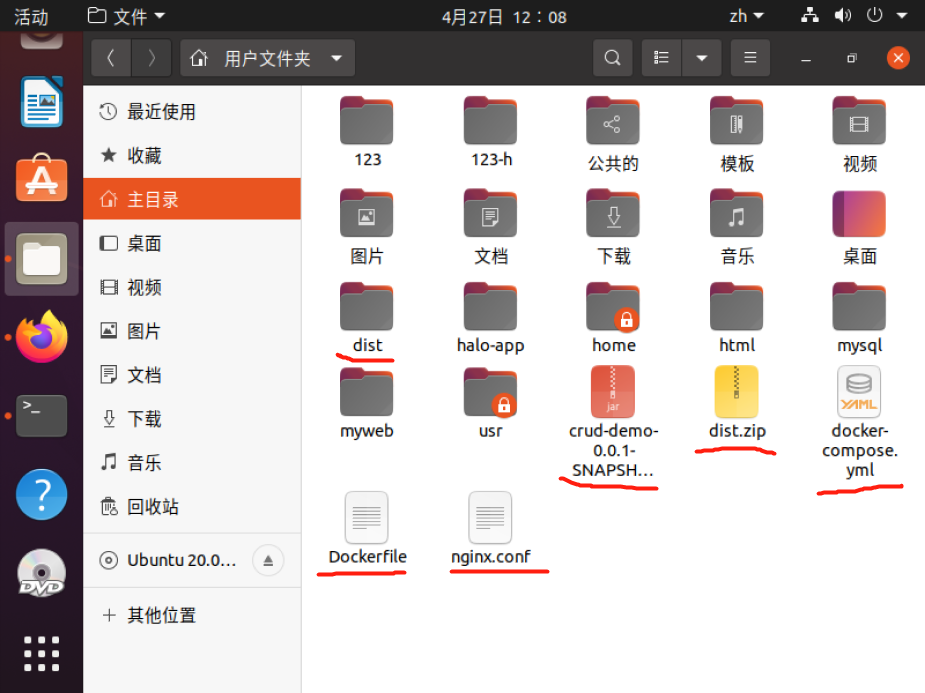
tip:dist.zip记得解压到当前路径
二.docker-compose.yml和Dockerfile详解
1.docker-compose.yml的文件结构
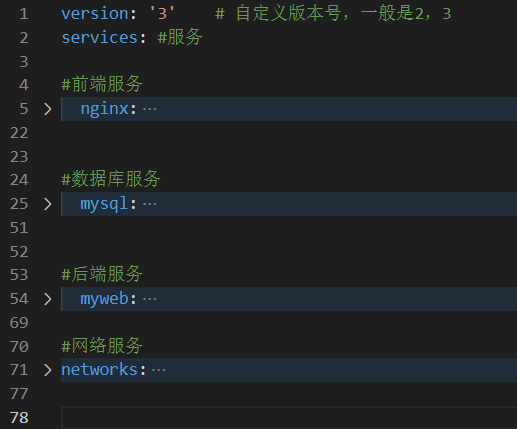
docker-compose.yml
version: '3'        # 自定义版本号,一般是2,3
services:

#前端服务
  nginx:
    image: nginx:latest     #镜像选择最新版本的
    container_name: nginx
    restart: always
    volumes:
    # :号左边是宿主机的nginx的文件路径,右边是nginx容器的文件路径
      - ./nginx.conf:/etc/nginx/nginx.conf   # nginx配置文件
      - ./dist/:/usr/local/nginx/html/        # 前端打包文件

      #网址访问的端口 与Dockerfile文件的EXPOSE端口不同
      # :号左边是网址访问端口,右边是nginx.conf文件的listen端口,一般是默认80,不用改
    ports:
      - "8082:80"
    networks:
      data_security:
        ipv4_address: 192.128.0.8
    privileged: true      # 这个必须要,解决nginx的文件调用的权限问题


#数据库服务
  mysql:
    image: mysql:8.0.19
    container_name: mysql
    restart: always
    environment:
      - TZ=Asia/Shanghai                          #默认时区
      - MYSQL_ROOT_PASSWORD=123456                #数据库初始话为root用户设置的默认密码,如果你的用户名不是root,记得添加用户名参数
      - MYSQL_DATABASE=cruddemo_db                        # 项目数据库名
      # - MYSQL_USER:                           #自定义数据库的用户,权限只作用于MYSQL_DATABASE配置的数据库
      # - MYSQL_PASSWORD:                    #自定义数据库的用户,权限只作用于MYSQL_DATABASE配置的数据库
    volumes:
      # - ./config/mysql/cnf/my.cnf:/etc/my.cnf
      # - ./config/mysql/data:/var/lib/mysql

      # 数据库文件最好和Dockerfile放在一起,下面的文件路径是相对路径, : 号左边路径从当前路径写起, : 右边基本不用改
      - ./123-h/20220425144248.nb3:/docker-entrypoint-initdb.d/20220425144248.nb3        # 自己数据库sql文件

      #

      #数据库默认端口
    ports:
      - "3306:3306"
    networks:
      data_security:
        ipv4_address: 192.128.0.2
    command: --default-authentication-plugin=mysql_native_password --character-set-server=utf8mb4 --collation-server=utf8mb4_unicode_ci --sql-mode='' --max-execution-time=1000


  # redis:
  #   image: redis:latest
  #   container_name: redis
  #   restart: always
  #   environment:
  #     - TZ=Asia/Shanghai
  #     - REDIS_ROOT_PASSWORD=passwd            # redis密码
  #   volumes:
  #     - ./config/redis/conf/redis.conf:/etc/redis/redis.conf   #挂载redis.conf不然后续重启redis密码会失效
  #     - ./config/redis/data:/data
  #     # - ./config/redis/log/redis.log:/logs/redis.log
  #   ports:
  #     - "6379:6379"
  #   networks:
  #     data_security:
  #       ipv4_address: 192.128.0.3
  #   # privileged: true
  #   command: redis-server /etc/redis/redis.conf --requirepass passwd          #指定配置文件启动redis

#后端服务
  myweb:
    image: web/test1     # 镜像名
    build: .        # 表示以当前目录下的Dockerfile开始构建镜像

    # 后端服务端口,与Dockerfile的EXPOSE是一致的
    #容器的端口(: 号右边的端口)与项目代码的端口是一致的
    ports:
      - "8081:8081"

      #依赖
    depends_on:
      - mysql
    networks:
      data_security:
        ipv4_address: 192.128.0.4

#网络服务
networks:
  data_security:      # 自定义网络名字
    driver: bridge
    ipam:
      config:
        - subnet: 192.128.0.0/16           #自定义固定容器ip 实现容器间通讯,增强docker-compose项目可移植性
dockerfile
FROM java:8

EXPOSE 8081
VOLUME /tmp

ADD crud-demo-0.0.1-SNAPSHOT.jar app.jar
RUN bash -c 'touch /app.jar'
ENTRYPOINT ["java", "-jar", "/app.jar"]
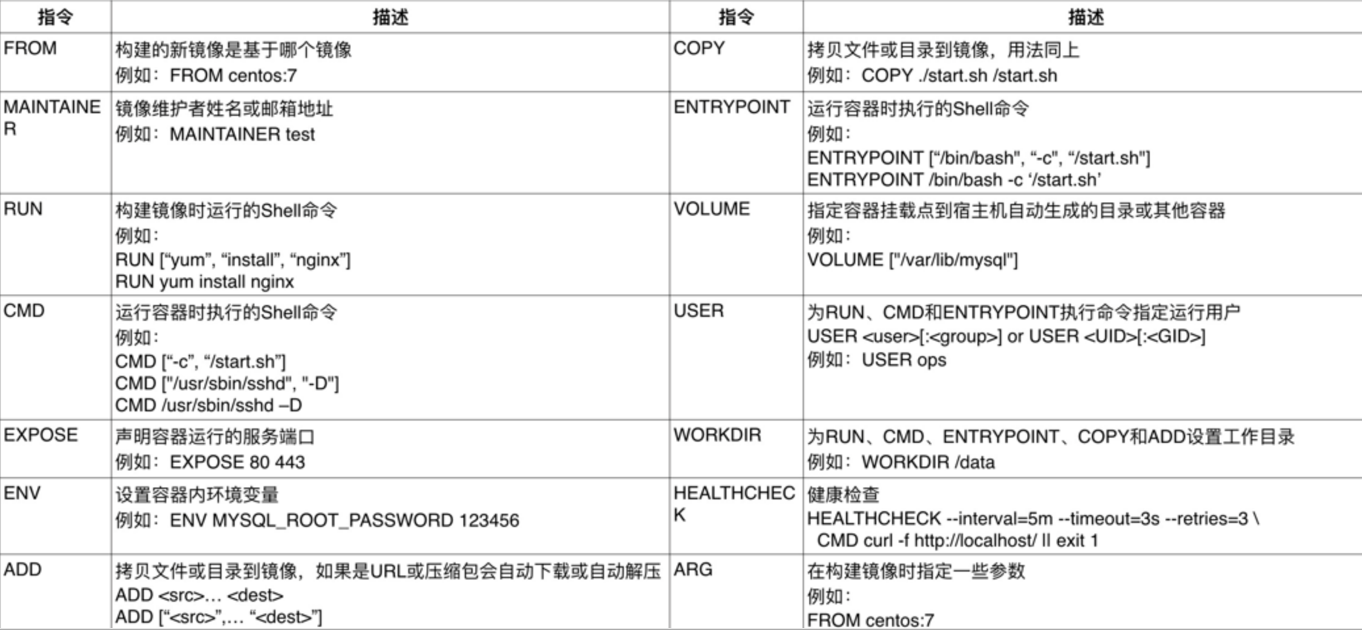
FROM 是基于那个镜像
EXPOSE 运行的服务端口
VOLUME 指定容器挂载点在宿主机生成的目录
ADD 拷贝当前文件或目录到镜像
RUN 构建镜像时执行的Shell命令
ENTERPOINT 运行容器时执行的shell命令,在这里是复制jar包到某个路径
三.nginx.conf文件详解
nginx.conf
#user  nobody;
worker_processes  1;

#error_log  logs/error.log;
#error_log  logs/error.log  notice;
#error_log  logs/error.log  info;

#pid        logs/nginx.pid;


events {
    worker_connections  1024;
}


http {
    include       mime.types;
    default_type  application/octet-stream;

    #log_format  main  '$remote_addr - $remote_user [$time_local] "$request" '
    #                  '$status $body_bytes_sent "$http_referer" '
    #                  '"$http_user_agent" "$http_x_forwarded_for"';

    #access_log  logs/access.log  main;

    sendfile        on;
    #tcp_nopush     on;

    #keepalive_timeout  0;
    keepalive_timeout  65;

    #gzip  on;

    server {
        #监听端口
        listen       80;

        #如果前端的ip地址有变动,localhost改成相应的ip地址
        server_name  localhost;

        #charset koi8-r;

        #access_log  logs/host.access.log  main;

        location / {
            #root的路径记得不要搞错
            root   /usr/local/nginx/html;
            index  index.html index.htm;
        }


        #error_page  404              /404.html;

        # redirect server error pages to the static page /50x.html
        #
        error_page   500 502 503 504  /50x.html;
        location = /50x.html {
            root   html;
        }

        # proxy the PHP scripts to Apache listening on 127.0.0.1:80
        #
        #location ~ \.php$ {
        #    proxy_pass   http://127.0.0.1;
        #}

        # pass the PHP scripts to FastCGI server listening on 127.0.0.1:9000
        #
        #location ~ \.php$ {
        #    root           html;
        #    fastcgi_pass   127.0.0.1:9000;
        #    fastcgi_index  index.php;
        #    fastcgi_param  SCRIPT_FILENAME  /scripts$fastcgi_script_name;
        #    include        fastcgi_params;
        #}

        # deny access to .htaccess files, if Apache's document root
        # concurs with nginx's one
        #
        #location ~ /\.ht {
        #    deny  all;
        #}
    }


    # another virtual host using mix of IP-, name-, and port-based configuration
    #
    #server {
    #    listen       8000;
    #    listen       somename:8080;
    #    server_name  somename  alias  another.alias;

    #    location / {
    #        root   html;
    #        index  index.html index.htm;
    #    }
    #}


    # HTTPS server
    #
    #server {
    #    listen       443 ssl;
    #    server_name  localhost;

    #    ssl_certificate      cert.pem;
    #    ssl_certificate_key  cert.key;

    #    ssl_session_cache    shared:SSL:1m;
    #    ssl_session_timeout  5m;

    #    ssl_ciphers  HIGH:!aNULL:!MD5;
    #    ssl_prefer_server_ciphers  on;

    #    location / {
    #        root   html;
    #        index  index.html index.htm;
    #    }
    #}

}
四.其他
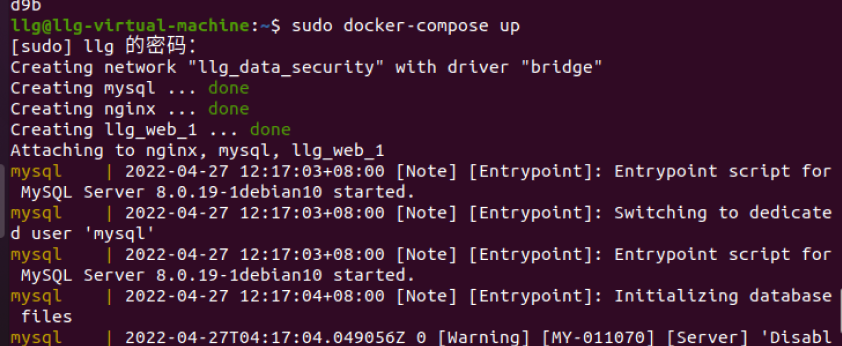
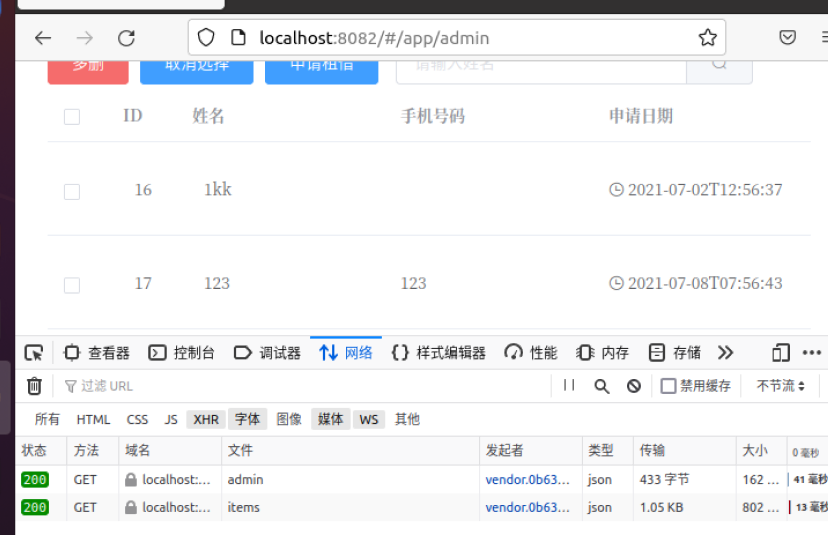
1.项目运行截图
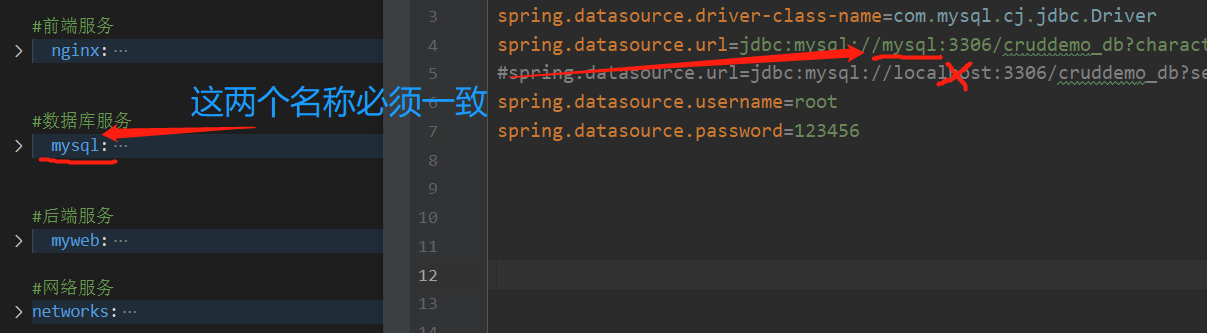
2.前端访问后端出现500问题
这与你后端项目代码有问题,在连接数据库端jdbc那里的localhost要改成yml文件的数据库端服务名
更改前的数据库连接代码

更改后的数据库连接代码
与yml文件的数据库服务名保持一致
3.参考博客:
Docker-compose 部署前后端项目 | Ztop の 空间站 (zeker.top) <-- 郑同学
(21条消息) 【超详细】docker部署前后端分离的项目,前端vue后端Springboot和MySQL_yoghurts666的博客-CSDN博客
在这篇 超详细的博客中,个人测试发现可以不用更改default.conf文件
(21条消息) win10下vue+Springboot前后端分离项目部署到nginx上_sradmin的博客-CSDN博客
4.感谢环节
在此非常感谢郑同学的倾力支持和老师细心的讲解,创作中难免有不足之处,欢迎大家不吝指正,再次非常感谢


 浙公网安备 33010602011771号