需要环境:eclipse4.7.3 + jdk1.8 +maven3.6.1 + tomcat(web需要)
spring boot官网介绍:https://spring.io/guides/gs/spring-boot/
sts官网:https://spring.io/tools/sts/ 找到合适的版本
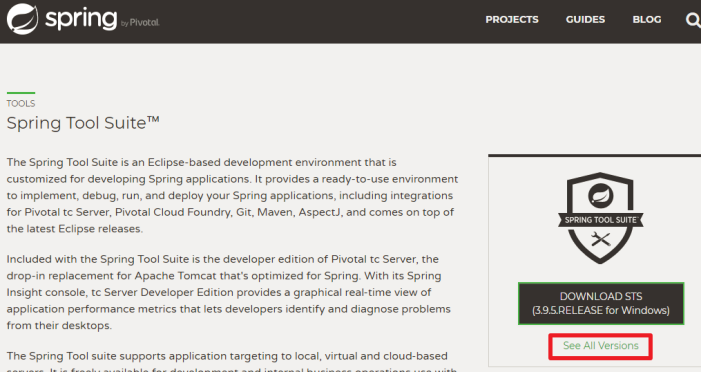
选择安装方式 如果是离线安装下载对应的离线安装包

查看自己对应的版本信息
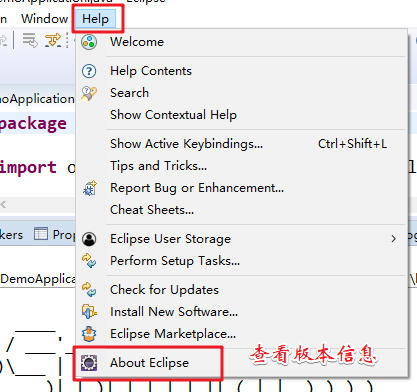

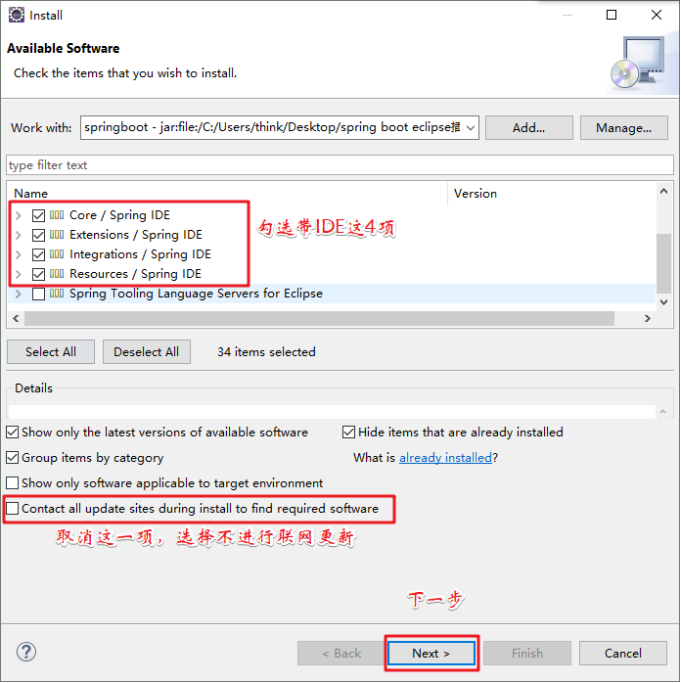
Eclipse进行安装
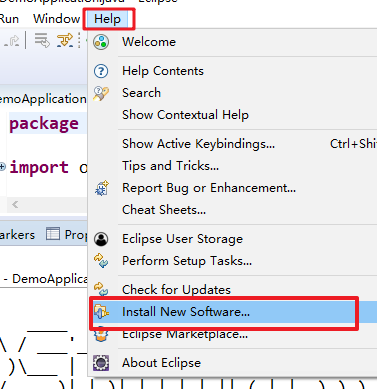
在线安装复制对应的版本连接到安装目录

离线安装打开目录选择下载的文件
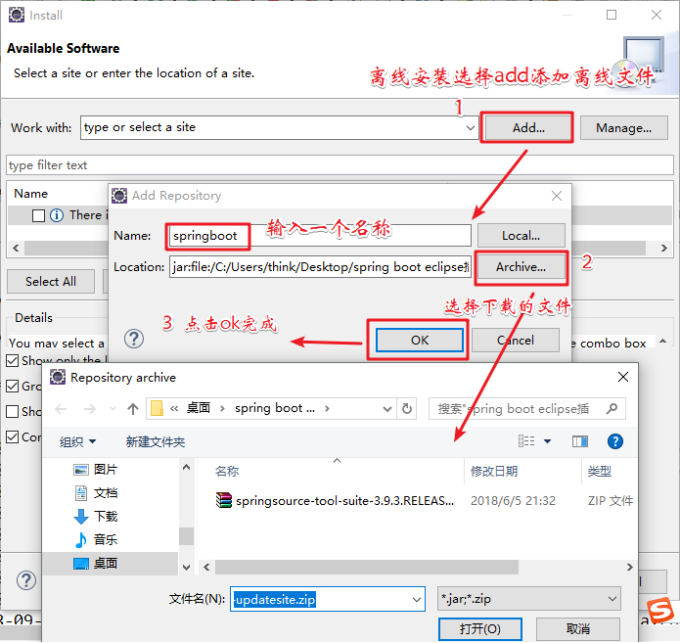
创建示例:
打开eclipse:file ->new -> spring starter project
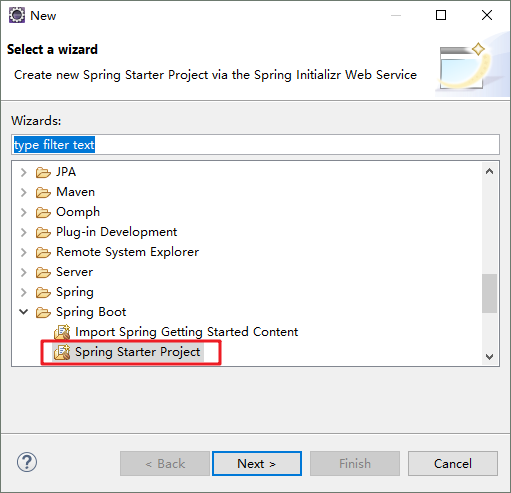
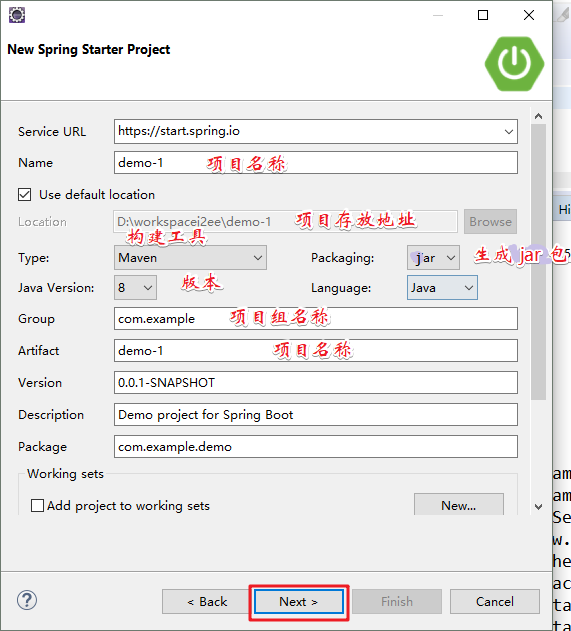
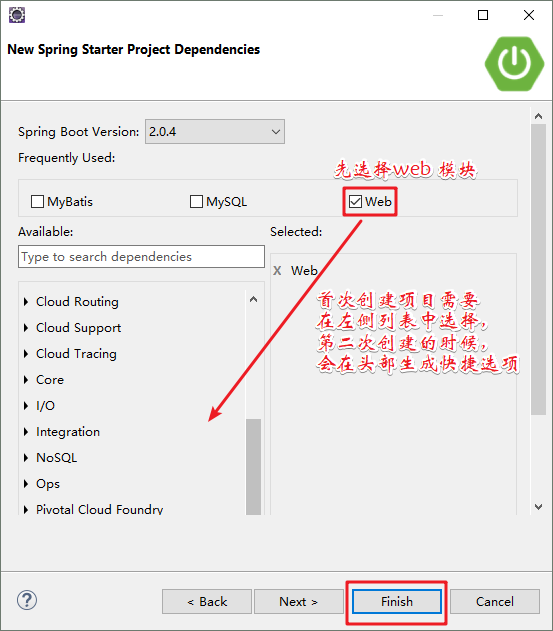
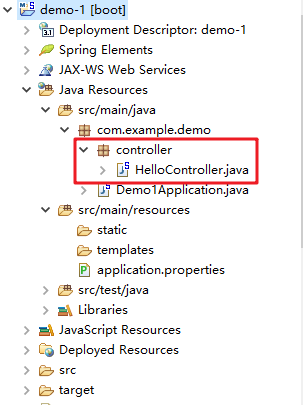

运行Demo1Application.java,右键->run as->Spring Boot App,控制台出现如下结果并无报错:
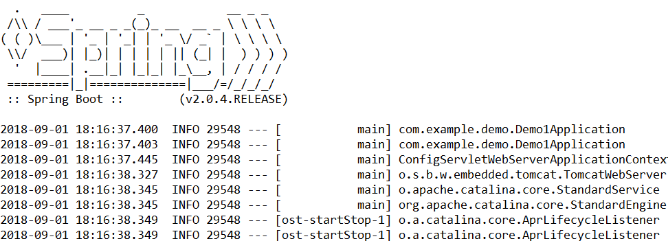
这里需要注意的是:每次运行一定要先将上次的停掉,否则会报错:tomcat端口被占用。
打开浏览器,输入http://localhost:8080/hello,则会出现如下结果。成功!!!

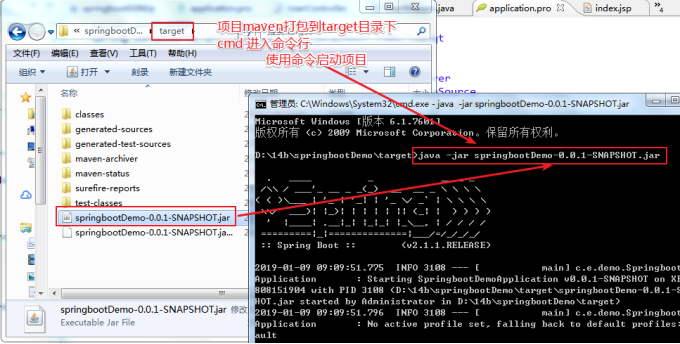
项目部署启动方式 java -jar 项目名称 -port 端口(可以指定配置文件中的参数)
创建spring mybatis 整合项目
在pom.xml文件中添加依赖包 或者从新创建一个项目
添加的依赖包
<dependency>
            <groupId>org.mybatis.spring.boot</groupId>
            <artifactId>mybatis-spring-boot-starter</artifactId>
            <version>1.3.2</version>
        </dependency>

        <dependency>
            <groupId>mysql</groupId>
            <artifactId>mysql-connector-java</artifactId>
            <scope>runtime</scope>
        </dependency>
        <dependency>
            <groupId>org.springframework.boot</groupId>
            <artifactId>spring-boot-starter-tomcat</artifactId>
            <scope>provided</scope>
        </dependency>
新建项目的过程
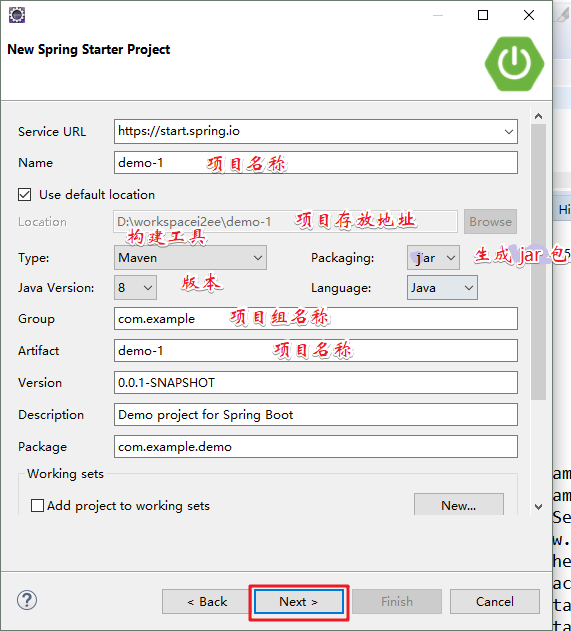

这样,Spring boot就搭建好了,pom.xml里已经有了Spring boot的jar包,包括我们的mysql数据连接的jar包。Spring boot内置了类似tomcat这样的中间件,所以,只要运行DemoApplication中的main方法就可以启动项目了,不过需要先配置数据库。
配置数据库连接在application.properties中
server.port=8080
spring.datasource.url=jdbc:mysql://localhost:3306/shop1
spring.datasource.username=root
spring.datasource.password=root
spring.datasource.driver-class-name=com.mysql.jdbc.Driver
spring.datasource.type=com.alibaba.druid.pool.DruidDataSource
# 初始化大小,最小,最大
spring.datasource.initialSize=5
spring.datasource.minIdle=5
spring.datasource.maxActive=20
# 配置获取连接等待超时的时间
spring.datasource.maxWait=60000
这里配置druid数据库连接池
在pom.xml中加入druid
 <dependency>
       <groupId>com.alibaba</groupId>
       <artifactId>druid</artifactId>
       <version>1.0.29</version>
 </dependency>
创建对应的结构

UserMapper.xml
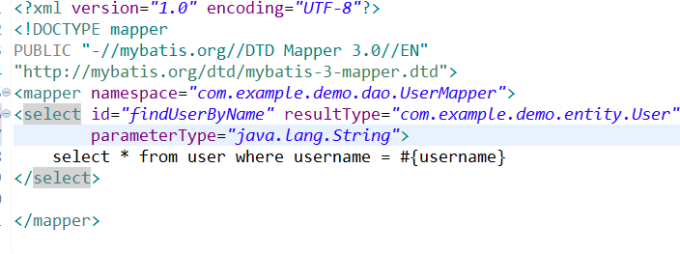
UserMapper.java

还可以通过注解方式进行查询

这样可以不配做mapper.xml
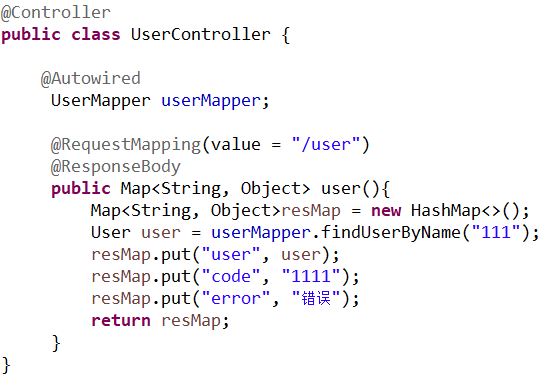
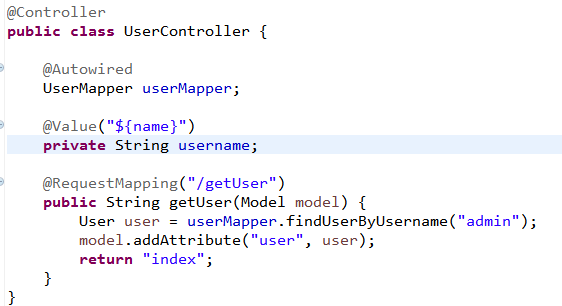
UserController.java
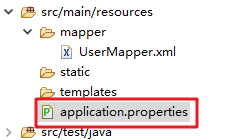
Application.properties文件配置
mybatis.mapper-locations=classpath*:mapper/*Mapper.xml
mybatis.type-aliases-package=com.example.demo.entity
配置热部署,修改代码不需要重启,在pom.xml中
<!-- 热部署模块 -->
        <dependency>
            <groupId>org.springframework.boot</groupId>
            <artifactId>spring-boot-devtools</artifactId>
            <optional>true</optional> <!-- 这个需要为 true 热部署才有效 -->
        </dependency>
如果使用Thymeleaf模板引擎,需要把模板默认缓存设置为false
#禁止thymeleaf缓存(建议:开发环境设置为false,生成环境设置为true)
spring.thymeleaf.cache=false
3、针对devtools的可以指定目录或者排除目录来进行热部署
#添加那个目录的文件需要restart
spring.devtools.restart.additional-paths=src/main/java
#排除那个目录的文件不需要restart
spring.devtools.restart.exclude=static/**,public/**
4、默认情况下,/META-INF/maven,/META-INF/resources,/resources,/static,/templates,/public这些文件夹下的文件修改不会使应用重启,但是会重新加载(devtools内嵌了一个LiveReload Server,当资源发生改变时,浏览器刷新)
5、在application.properties中配置spring.devtools.restart.enabled=false,此时restart类加载器还会初始化,但不会监视文件更新。在SprintApplication.run之前调用System.setProperty(“spring.devtools.restart.enabled”, “false”);可以完全关闭重启支持。
运行结果

Spring Boot 支持 JSP
Spring Boot 的默认视图支持是 Thymeleaf 模板引擎,但是这个我们不熟悉啊,我们还是想要使用 JSP 怎么办呢?
· 第一步:修改 pom.xml 增加对 JSP 文件的支持
<!-- servlet依赖. -->
        <dependency>
            <groupId>javax.servlet</groupId>
            <artifactId>javax.servlet-api</artifactId>
            <scope>provided</scope>
        </dependency>
        <dependency>
            <groupId>javax.servlet</groupId>
            <artifactId>jstl</artifactId>
        </dependency>

        <!-- tomcat的支持.-->
        <dependency>
            <groupId>org.apache.tomcat.embed</groupId>
            <artifactId>tomcat-embed-jasper</artifactId>
            <scope>provided</scope>
        </dependency>
· 第二步:配置试图重定向 JSP 文件的位置
修改 application.properties 文件,将我们的 JSP 文件重定向到 /WEB-INF/views/ 目录下:

· 第三步:新建 index.jsp 文件
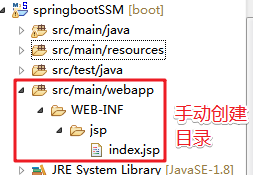
在【src/main】目录下依次创建 webapp、WEB-INF、jsp目录,并创建一个 index.jsp 文件:
Index页面内容
<%@ page language="java" contentType="text/html; charset=UTF-8"
    pageEncoding="UTF-8"%>
<%@ taglib uri="http://java.sun.com/jsp/jstl/core" prefix="c"%>
<!DOCTYPE html PUBLIC "-//W3C//DTD HTML 4.01 Transitional//EN" "http://www.w3.org/TR/html4/loose.dtd">
<html>
<head>
<meta http-equiv="Content-Type" content="text/html; charset=UTF-8">
<title>Insert title here</title>
</head>
<body>
${user.username}
</body>
</html>
· 第四步 修改 HelloController
修改 @RestController 注解为 @Controller:

html和templates
静态页面
spring boot项目只有src目录,默认没有webapp目录,会将静态访问(html/图片等)映射到其自动配置的静态目录,如下
/static
/public
/resources
/META-INF/resources
比如,在resources建立一个static目录和index.htm静态文件,访问地址 http://localhost:8080/index.html
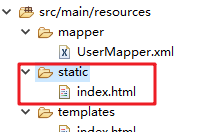
如果要从后台跳转到静态index.html,代码如下。
@Controller
public class HtmlController {
    @GetMapping("/html")
    public String html() {
        return "/index.html";
    }
动态页面
动态页面需要先请求服务器,访问后台应用程序,然后再转向到页面,比如访问JSP。spring boot建议不要使用JSP,默认使用Thymeleaf来做动态页面。
在pom.xml 中添加Thymeleaf组件
<dependency>
            <groupId>org.springframework.boot</groupId>
            <artifactId>spring-boot-starter-thymeleaf</artifactId>
        </dependency>
UserController.java
@Controller
public class UserController {

    @Autowired
     UserMapper userMapper;

     @RequestMapping(value = "/user")
     public String user(HttpServletRequest request){
         User user = userMapper.findUserByName("111");
         request.setAttribute("user", user);
         return "/index";
     }
}
return "/index": 跳转到 templates/index.html动态页面,templates目录为spring boot默认配置的动态页面路径。
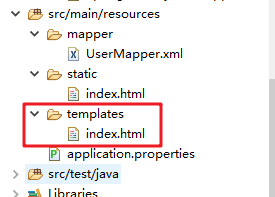
index.html 将后台传递的key参数打印出来
<!DOCTYPE html>
<html>
<head>
<meta charset="UTF-8">
<title>Insert title here</title>
</head>
<body>
<span th:text="${user.username}"></span>

</body>
</html>
访问http://localhost:8080/user

动态和静态区别
静态页面的return默认是跳转到/static/index.html,当在pom.xml中引入了thymeleaf组件,动态跳转会覆盖默认的静态跳转,默认就会跳转到/templates/index.html,注意看两者return代码也有区别,动态没有html后缀。
重定向
如果在使用动态页面时还想跳转到/static/index.html,可以使用重定向return "redirect:/index.html"。
Thymelea模板配置
在application.properties文件中增加Thymeleaf模板的配置。
#thymelea模板配置
spring.thymeleaf.prefix=classpath:/templates/
spring.thymeleaf.suffix=.html
spring.thymeleaf.mode=HTML5
spring.thymeleaf.encoding=UTF-8
spring.thymeleaf.content-type=text/html
spring.thymeleaf.cache=false
spring.resources.chain.strategy.content.enabled=true
spring.resources.chain.strategy.content.paths=/**
在html文件中引用命名空间 。
<html xmlns:th="http://www.thymeleaf.org"> (非必须,建议加上)
输出内容
<p th:text="${user.username}">Welcome to our grocery store!</p>
Spring boot mybatis 逆向工程生成
Pom.xml中添加generator插件 (生成文件之后删除,如果不删除在打包的时候会重复生成)
<plugin>
                <groupId>org.mybatis.generator</groupId>
                <artifactId>mybatis-generator-maven-plugin</artifactId>
                <version>1.3.2</version>
                <dependencies>
                    <dependency>
                        <groupId> mysql</groupId>
                        <artifactId> mysql-connector-java</artifactId>
                        <version>5.1.28</version>
                    </dependency>
                    <dependency>
                        <groupId>org.mybatis.generator</groupId>
                        <artifactId>mybatis-generator-core</artifactId>
                        <version>1.3.2</version>
                    </dependency>
                </dependencies>
                <executions>
                    <execution>
                        <id>Generate MyBatis Artifacts</id>
                        <phase>package</phase>
                        <goals>
                            <goal>generate</goal>
                        </goals>
                    </execution>
                </executions>
                <configuration>
                    <!--允许移动生成的文件 -->
                    <verbose>true</verbose>
                    <!-- 是否覆盖 -->
                    <overwrite>false</overwrite>
                    <!-- 自动生成的配置 -->
                    <configurationFile>
                        src/main/resources/generatorConfig.xml</configurationFile>
                </configuration>
            </plugin>


