第六模块: WEB框架开发之Django框架开发学习笔记2
上接本课笔记第二部分: 第六模块: WEB框架开发之Django框架开发学习笔记1
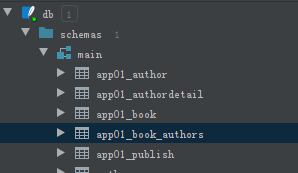
五十六. ORM生成表模型
参考:https://www.cnblogs.com/yuanchenqi/articles/8963244.html 多表操模型
表的创建步骤: 先创建出所有的基本表,再在基本表中建立一对多,一对一表之间的关系字段,最后创建多对多的关系表.


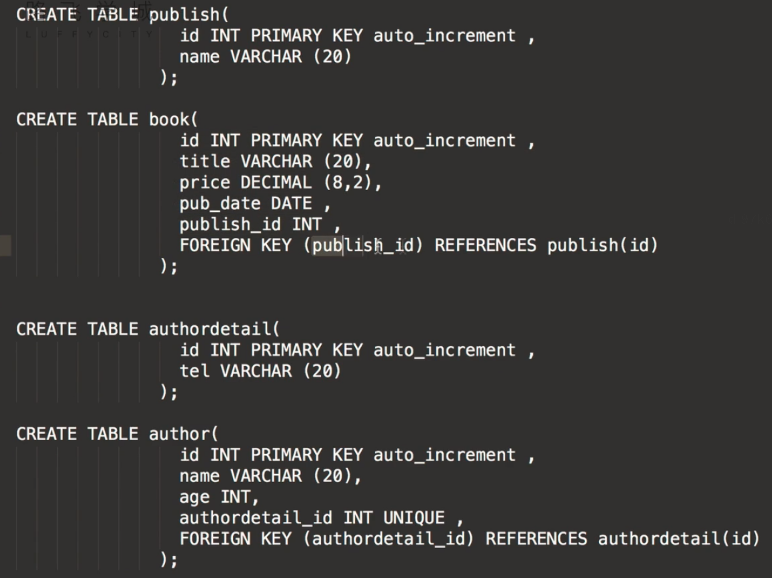
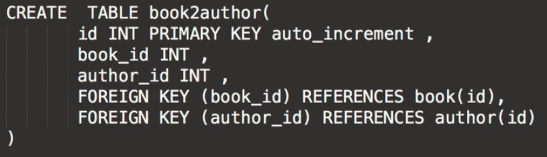
from django.db import models

# Create your models here.

"""
建表时,应当先建立普通表,普通字段.最后建立关联字段,关联表.
"""

# 出版社表
class Publish(models.Model):
    nid = models.AutoField(primary_key=True)
    name = models.CharField(max_length=20)

# 图书表
class Book(models.Model):
    nid = models.AutoField(primary_key=True)
    title = models.CharField(max_length=20)
    price = models.DecimalField(max_digits=8, decimal_places=2)
    pub_date = models.DateField()

    # 图书对应出版社, 一个出版社对应多个图书, 一对多关系
    # 下面的建立的publish字段会自动变成publish_id
    # 参数意思:to='Publish'对应的表, to_field='nid'对应表的对应字段(可以省略)
    publish = models.ForeignKey(to='Publish', to_field='nid', on_delete=models.CASCADE)  # on_delete=models.CASCADE级联删除,也就是当删除主表的数据时候从表中的数据也随着一起删除
    """
    上面的一句,相当于sql语句的两句.
    publish_id INT,
    FOREIGN KEY (publish_id) REFERENCES publish(id)
    """

    # 图书和作者多对多关系表的建立,简单做法, 传统做法请看最下面.
    authors = models.ManyToManyField(to='Author')  # 这里默认建立的表名是book_authors
    """
    上面的一句,相当于sql语句创建book2author图书与作者的关系表
    CREATE TABLE book2author(
    id INT PRIMARY KEY auto_increment,
    book_id INT,
    author_id INT,
    FOREIGN KEY (book_id) REFERENCES book(id),
    FOREIGN KEY (author_id) REFERENCES author(id)
    )
    """
上面代码的最终效果, 创建了如下的五个表:
代码对应的sql语句:
五十七. 多表操作之一对多添加记录
多表就是指与其他表有关联关系的.
57.1 一对多表添加数据
from django.db import models

# Create your models here.

"""
建表时,应当先建立普通表,普通字段.最后建立关联字段,关联表.
"""

# 出版社表
class Publish(models.Model):
    nid = models.AutoField(primary_key=True)
    name = models.CharField(max_length=20)

# 图书表
class Book(models.Model):
    nid = models.AutoField(primary_key=True)
    title = models.CharField(max_length=20)
    price = models.DecimalField(max_digits=8, decimal_places=2)
    pub_date = models.DateField()

    # 图书对应出版社, 一个出版社对应多个图书, 一对多关系
    # 下面的建立的publish字段会自动变成publish_id
    # 参数意思:to='Publish'对应的表, to_field='nid'对应表的对应字段(可以省略)
    publish = models.ForeignKey(to='Publish', to_field='nid', on_delete=models.CASCADE)  # on_delete=models.CASCADE级联删除,也就是当删除主表的数据时候从表中的数据也随着一起删除
    """
    上面的一句,相当于sql语句的两句.
    publish_id INT,
    FOREIGN KEY (publish_id) REFERENCES publish(id)
    """

    # 图书和作者多对多关系表的建立,简单做法, 传统做法请看最下面.
    authors = models.ManyToManyField(to='Author')  # 这里默认建立的表名是book_authors
    """
    上面的一句,相当于sql语句创建book2author图书与作者的关系表
    CREATE TABLE book2author(
    id INT PRIMARY KEY auto_increment,
    book_id INT,
    author_id INT,
    FOREIGN KEY (book_id) REFERENCES book(id),
    FOREIGN KEY (author_id) REFERENCES author(id)
    )
    """


# 作者详情表
class Authordetail(models.Model):
    nid = models.AutoField(primary_key=True)
    tel = models.CharField(max_length=20)

# 作者表
class Author(models.Model):
    nid = models.AutoField(primary_key=True)
    name = models.CharField(max_length=20)
    age = models.IntegerField()

    # 作者表对应作者详情表, 一对一关系
    # 注意一对一使用.OneToOneField,与一对多是不一样的.
    authordetail = models.OneToOneField(to="Authordetail", to_field='nid', on_delete=models.CASCADE)
    """
    上面一句,相当于sql语句的两句.
    authordetail_id INT UNIQUE,   一对一关系,需要有unique约束,否则就变成了一对多了.
    FOREIGN KEY (authordetail_id) REFERENCES authordetail(id)
    """


"""
# 图书与作者的多对多关系表, 传统做法, 简单做法请看上面的Book表
class Book2author(models.Model):
    nid = models.AutoField(primary_key=True)
    book = models.ForeignKey(to="Book", to_field='nid')  # 默认关联主键,可以不加to_field
    author = models.ForeignKey(to="Author", to_field='nid')
"""
下面的代码为views.py
Book.objects.create(nid=2, title='红楼梦', price=120, pub_date='2015-01-08', publish=pub_obj)
print(book_obj.publish)
from django.shortcuts import render, HttpResponse
from app01.models import *
# views.py添加一对多表数据的方法演示

def add(request):
    # 单表添加数据, 为publish表添加出版社
    # Publish.objects.create(nid=1, name='人民出版社')

    # 一对多表,添加数据,方法一,   为book表添加书籍信息,注意该表中有publish_id字段
    # Book.objects.create(nid=1, title='西游记', price=100, pub_date='2012-02-01', publish_id=1)
    # 上面语句中的publish_id = 1是book表的字段,这里直接给字段赋值1

    # 一对多表,添加数据,方法二,
    # 先查询出书籍的出版社对象
    pub_obj = Publish.objects.filter(nid=1).first()
    # 再将出版社对象直接赋值给publish参数, 为什么能这么做,因为models.py中Book类里面有publish属性
    Book.objects.create(nid=2, title='红楼梦', price=120, pub_date='2015-01-08', publish=pub_obj)

    # 知道了这种添加一对多表数据的方法,我们就可以这么用.
    # 比如,想获取'红楼梦'这本书的出版社名称
    # book_obj = Book.objects.filter(title='红楼梦').first()
    # print(book_obj.publish)  # 获取'红楼梦'图书对应的出版社对象
    # print(book_obj.publish.name)  # 获取出版社名称

    return HttpResponse('ok')
五十八. 多表操作之多对多添加记录
book_obj.authors.add(alex, egon)
from django.shortcuts import render, HttpResponse
from app01.models import *

def add(request):

    # 为authordetail表,单表添加数据,作者详情表
    # Authordetail.objects.create(nid=1, tel=1391450000)
    # Authordetail.objects.create(nid=2, tel=1391580000)
    # 为author表,单表添加数据,作者表, 此表和上面的表是一对一的关系
    # Author.objects.create(nid=1, name='alex', age=33, authordetail_id=1)
    # Author.objects.create(nid=2, name='egon', age=53, authordetail_id=2)

    # 多对多表添加数据,为book_authors表添加数据,图书与作者的关系表, 该表不能直接用.create方法添加数据,因为在models.py中没有定义这个表的类.
    # 先为book表添加一条"python从入门到放弃"新记录
    # book_obj = Book.objects.create(nid=3, title='python从入门到放弃', price=130, pub_date='2019-08-07',publish_id=1)
    # 为'python从入门到放弃'这本书添加作者, 这里要注意了,因为书籍和作者是多对多的关系.在models.py中没有对book_authors进行类的定义,所以这里不能用前面的方法来添加记录.
    # alex = Author.objects.filter(name='alex').first()  # 获取作者对象
    # egon = Author.objects.filter(name='egon').first()  # 获取作者对象

    # 绑定多对多关系的API, .add()
    # book_obj.authors.add(alex, egon)  # 为该书绑定两个作者,两天记录为3,1和3,2,即id为3的这本书对应id为1,和2作者
    # book_obj.authors.add(1, 2)  # 上面的.add方法简单的用,为该书添加作者表中id是1, 2的作者, .authors是Book类中定义的属性,用于定义book表与author表关系的.
    # book_obj.authors.add(*[1, 2])  # 上面的.add方法简单的用, 列表方式添加,为该书添加作者表中id是1, 2的作者

    # 解除多对多的关系, .remove()
    book_obj2 = Book.objects.filter(nid=3).first()  # 获取到"python从入门到放弃"这本书的对象
    # book_obj2.authors.remove(2)  # 解除(删除)该书与作者编号为2的作者的关系(记录)

    # 清空该书的所有与作者的关系记录, .clear()
    # book_obj2.authors.clear()

    # 查询所有id为3的书籍的所有作者名字
    print(book_obj2.authors.all())  # 与这本书相关的所有作者记录, 该返回值是QuerySet类型, [obj1, boj2, ...]
    ret = book_obj2.authors.all().values('name')  # 返回值:<QuerySet [{'name': 'alex'}]>
    print(ret)

    return HttpResponse('ok')
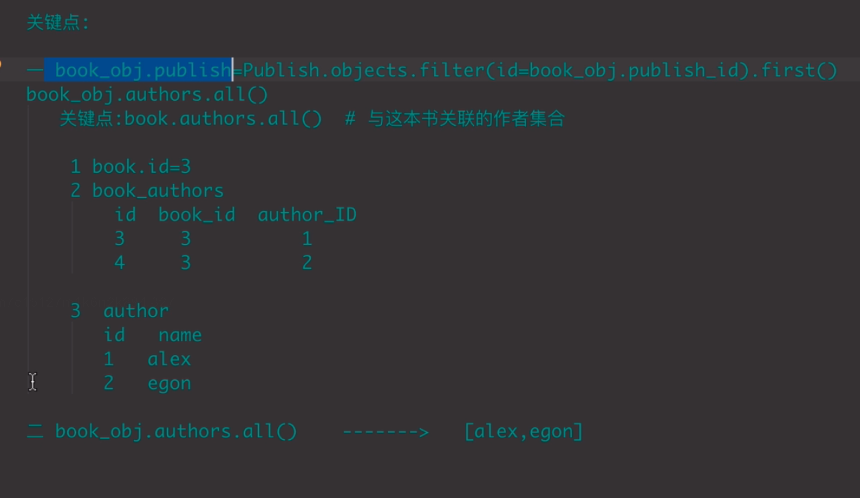
上图是57,58的知识点,它,也是59的查询的开始
五十九. 基于对象跨表查询简介
参考:https://www.cnblogs.com/yuanchenqi/articles/8963244.html 基于对象的跨表查询
六十. 基于对象跨表查询之一对多
views.py
def query(request):
    """
    跨表查询:一对多
        1 基于对象查询
        2 基于双下划线查询
        3 聚合和分组查询
        4 F 与 Q查询
    :param request:
    :return:
    """

    # ------------------------基于对象的跨表查询(对应sql的子查询)------------------------
    # 一对多查询(正向查询)
    # 查询红楼梦的出版社名称(正向查询)
    # book_obj = Book.objects.filter(title='红楼梦').first()  # 获取红楼梦图书对象
    # print(book_obj.publish)  # 获取红楼梦的出版社对象
    # print(book_obj.publish.name)  # 获取出版社名称

    # 一对多查询(反向查询)
    # 查询出人民出版社出版的所有书籍名称(反向查询)
    publish_obj = Publish.objects.filter(name='人民出版社').first()
    book_qt = publish_obj.book_set.all()  # 返回值是queryset数据类型
    print(book_qt)
    for book in book_qt:
        print(book.title, book.price)

    return HttpResponse('OK')

"""
A-B
关联属性在A表中
正向查询: A------>B
反向查询:B------>A
# 一对多查询
        正向查询:按字段
        反向查询:按表名小写_set

                              (正向查询)book_obj.publish
        Book(关联属性:publish)对象 -----------------------------> Publish对象
                    <-----------------------------
                  (反向查询)publish_obj.book_set.all() # 返回值是queryset

"""
六十一. 基于对象跨表查询之多对多
views.py
def query(request):
    """
    基于对象跨表:多对多查询
    :param request:
    :return:
    """
    # 基于对象跨表多对多查询
    # 查询"python从入门到放弃"这本书的作者姓名(正向查询)
    book_obj = Book.objects.filter(title="python从入门到放弃").first()
    authors_list = book_obj.authors.all()
    for author in authors_list:
        print(author.name)

    # 查询alex参与编写的所有书籍名称(反向查询)
    author_obj = Author.objects.filter(name='alex').first()
    book_list = author_obj.book_set.all()
    for book in book_list:
        print(book.title)

    return HttpResponse('OK')

"""
# 多对多查询
    正向查询:按字段
    反向查询:表名小写_set.all()
                            book_obj.authors.all()
    Book(关联属性:authors)对象 ------------------------> Author对象
                            <------------------------
                            author_obj.book_set.all()
"""
六十二. 基于对象跨表查询之一对一
views.py
def query(request):
    """
    基于对象的跨表查询:一对一
    """
    # 一对一(语法与一对多,多对多的不一样,请留意)
    # 查询alex的手机号码(正向查询)
    # author_obj = Author.objects.filter(name='alex').first()  # 从作者表里面查询出alex对象
    # authordetail_obj = author_obj.authordetail  # 注意语法:这里直接用Author类中定义的属性authordetail
    # print(authordetail_obj.tel)

    # 查询手机号1391450000的姓名(反向查询)
    authordetail_obj = Authordetail.objects.filter(tel='1391450000').first()
    author_obj = authordetail_obj.author  # 这里反向使用author的表的表名
    print(author_obj.name, author_obj.age)  # 获取姓名, 年龄

    return HttpResponse("ok")

"""
# 一对一
    正向查询:按字段
    反向查询:表名小写   # 注意这里语法变了,没了_set()因为只有一对一的结果只有一个,所以就没有set了.(set的意思是集合)

                                    author_obj.authordetail(正向)
    Author(关联属性:authordetail)对象----------------------->AuthorDetail对象
                                  <-----------------------
                                  authordetail_obj.author(反向)
"""
六十三. 基于对象跨表查询的sql语句
六十四. 基于双下划线的跨表查询之一对多1
基于双下划线的跨表查询,语法中不区分一对多,多对多,一对一
基于双下划线的跨表查询对应与sql的join连表
正向查询按字段,反向查询按表名小写,用来告诉ORM引擎join哪张表
64.1 在pycharm中使用sql语句的操作步骤
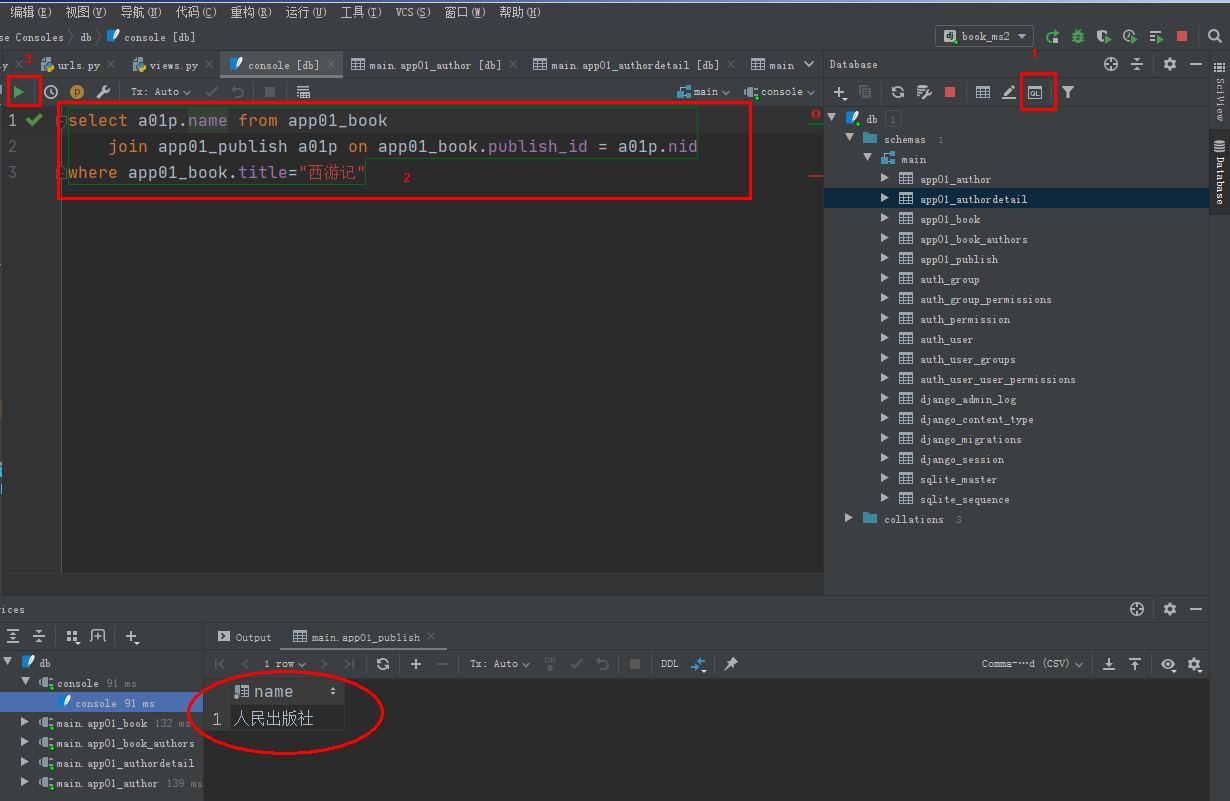
64.2 查询西游记的出版社名称sql语句,采用join连表方式进行查询
select a01p.name from app01_book
    join app01_publish a01p on app01_book.publish_id = a01p.nid
where app01_book.title="西游记"
64.3 ORM中基于双下划线的查询方法
views.py
def query(request):
    #--------------------------------基于双下划线的跨表查询(join查询)--------------------------------
    # 查询西游记的出版社名称
    # 方法1(正向查询)(正向查询用字段)
   # .values()是app01_book表中关于西游记的所有信息的queryset对象
    # "publish__name"中的publish相当于sql的join连表操作,即按照app01_book表中的publish字段来连接app01_book与app01_publish两个表
    # name是需要显示的最终信息的字段名称
    ret = Book.objects.filter(title='西游记').values("publish__name")
    print(ret)
    print(ret.first())
    print(ret.first()['publish__name'])

    return HttpResponse('ok')
上面代码print的显示结果:
<QuerySet [{'publish__name': '人民出版社'}]>
{'publish__name': '人民出版社'}
人民出版社
六十五. 基于双下划线的跨表查询之一对多2
def query(request):
    # 接上面的方法一.
    # 查询西游记的出版社
    # 方法二(反向查询)(用表名小写)
    ret = Publish.objects.filter(book__title='西游记').values('name')
    print(ret)
六十六. 基于双下划线的跨表查询之多对多1
66.1 查询西游记的作者(假设西游记有多个作者),sql的join方法语句
select app01_author.name from app01_book inner join app01_book_authors
on app01_book.nid = app01_book_authors.book_id
inner join app01_author
on app01_book_authors.author_id = app01_author.nid
where app01_book.title='西游记'
66.2 ORM中采用正向查询
    # 查询西游记的所有作者(这里假设有多个作者)
    # 多对多表查询  方法一 (正向查询)(正向查询看字段)
    # 需求:通过Book表join与其关联的Author表,属于正向查询, 按字段authors通知ORM引擎join book_authors与author

    # 'authors__name', Book类(book表)中包含authors属性(字段), 所以这里是正向查询, 这里的意思就是join作者表,
    # name就是作者表的姓名字段
    ret = Book.objects.filter(title='西游记').values('authors__name')
    print(ret)  # 返回值:<QuerySet [{'authors__name': 'alex'}, {'authors__name': 'egon'}]>
六十七. 基于双下划线的跨表查询之多对多2
67.1 ORM中采用反向查询
# 查询西游记的所有作者(这里假设有多个作者)
    # 多对多表查询  方法二 (反向查询)(反向查询表名小写)
    # 需求:通过Author表join与其关联的Book表,属于反向查询:按表名小写book通知ORM引擎join book_authors
    ret = Author.objects.filter(book__title='西游记').values('name')
    print(ret)  # <QuerySet [{'name': 'alex'}, {'name': 'egon'}]>
六十八. 基于双下划线的跨表查询之一对一
    # 一对一查询
    # 查询alex的手机号码, 涉及作者表与作者详情表

    # 方法一, 正向查询:
    # 需求: 通过Author表join与其关联的Authordetail表,属于正向查询:按字段authordetail通知ORM引擎join authordetail表
    # ret = Author.objects.filter(name='alex').values("authordetail__tel")  # Author类中有authordetail属性
    # print(ret)  # <QuerySet [{'authordetail__tel': '1391450000'}]>


    # 方法二, 反向查询:
    # 需求: 通过Authordetail表join与其关联的Author表,属于反向查询: 按表名小写author通知ORM引擎join author表
    ret = Authordetail.objects.filter(author__name='alex').values('tel')  # author__name author表name字段
    print(ret) # <QuerySet [{'tel': '1391450000'}]>
六十九.基于双下划线的跨表查询之连续跨表1 进阶练习
参考:https://www.cnblogs.com/yuanchenqi/articles/8963244.html 进阶练习(连续跨表)
    # 进阶练习(连续跨表)

    # 练习: 查询出手机号码以139开头的作者出版过的所有书籍名称以及出版社名称
    # 正向查询(用字段), 反向查询(用表名小写), 正向反向混合使用
    # 需求: 通过Book表join Authordetail表, Book与Authordetail无关联,所以必须连续跨表

    ret = Book.objects.filter(authors__authordetail__tel__startswith='139').values('title', "publish__name")
    print(ret)  # <QuerySet [{'title': 'python从入门到放弃', 'publish__name': '人民出版社'}, {'title': '西游记', 'publish__name': '人民出版社'}, {'title': '西游记', 'publish__name': '人民出版社'}]>
七十.基于双下划线的跨表查询之连续跨表2 进阶练习
# 进阶练习(连续跨表)
# 练习: 查询出手机号码以139开头的作者出版过的所有书籍名称以及出版社名称
    # 方法二
    # 需求: 由Author表join Authordetai表查询出139开头的作者, 再由作者反向查询出书籍名称和出版社名称
    ret = Author.objects.filter(authordetail__tel__startswith='139').values("book__title", "book__publish__name")
    print(ret)
    # 练习: 查询人民出版社出版过的所有书籍的名字以及作者的姓名

    # 方式一,正向查询
    ret = Book.objects.filter(publish__name='人民出版社').values('title', 'authors__name')
    print(ret)
    # 方式二,反向查询
    # ret = Publish.objects.filter(name='人民出版社').values('book__title', "book__authors__name")
    # print(ret)
七十一.聚合查询
聚合统计函数:.aggregate
views.py
    # 聚合查询, aggregate的返回值是一个字典,不再是queryset
    from django.db.models import Avg, Max, Min, Count  # 引入聚合函数
    # 统计所有图书的平均价格, 和最高价格,  下面的book_avg是自定义的变量名
    ret = Book.objects.all().aggregate(book_avg=Avg('price'), book_max=Max('price'))  # .aggregate聚合查询
    print(ret)  # {'book_avg': Decimal('116.666666666667'), 'book_max': Decimal('130')}
七十二.单表下的分组查询1
单表分组查询的ORM语法: 单表模型.objects.values('group by 的字段').annotate(聚合函数("统计字段"))
建立emp表:
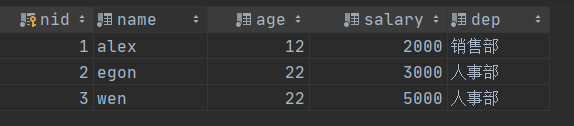
#------------------------分组查询 annotate统计函数,返回值依然是queryset-----------------------------

def query2(request):
    # 查询每一个部门名称以及对应的员工的平均薪水
    from django.db.models import Avg, Max, Min, Count
    ret = Emp.objects.values('dep').annotate(avg_salary=Avg('salary'))  #.values('dep').annotate的意思就是按照部门分组
    print(ret) # <QuerySet [{'dep': '人事部', 'avg_salary': Decimal('4000')}, {'dep': '销售部', 'avg_salary': Decimal('2000')}]> return HttpResponse('ok')

""" sql:
      select dep, Avg(salary) from emp group by dep
"""
def query3(request):
    # 查询每一个部门名称以及员工数
    from django.db.models import Avg, Max, Min, Count
    ret = Emp.objects.values('dep').annotate(c=Count('nid'))
    return HttpResponse('OK')
"""
sql:
    select dep, Count(nid) from emp group by dep;
"""
七十三.单表下的分组查询2
补充知识点:
    Emp.objects.all()
    # 翻译成sql语句: select * from emp;

    Emp.objects.all().values('name')  # 等同于Emp.object.values('name')
    # 翻译成sql语句: select name from emp;

    Emp.objects.values("dep").annotate(Avg('salary'))  # 按照dep进行分组, Emp.objects.values("dep").annotate
    # select dep, Avg(salary) from emp group by dep;

    Emp.objects.values("nid").annotate(Avg('salary'))  # 按照nid进行分组,这个没有意义
    Emp.objects.all().annotate(Avg('salary'))  # 等同于按照nid主键进行分组,没有意义
    Emp.objects.annotate(Avg('salary'))  # 等同于上面

    # 在单表分组下,按着主键进行group by是没有任何意义的
七十四. 多表下的分组查询1
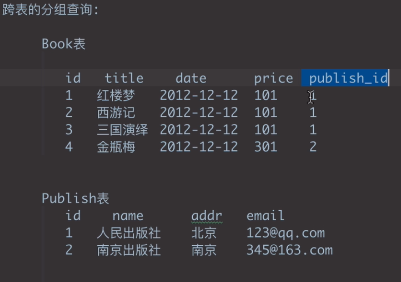
# 多表分组查询(跨表分组查询):查询每一个出版社名称以及出版的书籍个数,下面为sql查询语句
select a01p.name, count(app01_book.id) from app01_book inner join app01_publish a01p
    on app01_book.publish_id = a01p.id
group by publish_id;
七十五. 多表下的分组查询2
解决思路:1. 先使用join方法将两张表拼成一张表如下图所示;
2. 再按照单表分组查询的ORM语法: 单表模型.objects.values('group by 的字段').annotate(聚合函数("统计字段"))

def query(request):
    from django.db.models import Avg, Max, Min, Count

    # 多表分组查询:查询每一个出版社名称以及出版的书籍个数

    # 方法1
    # ret = Book.objects.values('publish_id__name').annotate(c=Count('id'))
    # print(ret)  # <QuerySet [{'publish_id__name': '人民出版社', 'c': 3}, {'publish_id__name': '南京出版社', 'c': 1}]>

    # 方法2
    # Publish.objects.values('name')相当于sql中的goup by name
    # ret = Publish.objects.values('name').annotate(c=Count('book__id'))
    # print(ret)  # <QuerySet [{'name': '人民出版社', 'c': 3}, {'name': '南京出版社', 'c': 1}]>

    # 方法3(推荐使用此方法----------分组------------------合并表---统计---------显示字段----
    ret = Publish.objects.values('id').annotate(c=Count('book__id')).values('name', 'c')
    print(ret)
    return HttpResponse('OK')
七十六. 多表下的分组查询3
# 查询每一个作者的名字以及出版过的书籍的最高价格,sql语句如下:
select name, MAX(a01b.price) from app01_author inner join app01_book_author a01ba
    on app01_author.id = a01ba.author_id
inner join app01_book a01b on a01ba.book_id = a01b.id
group by app01_author.id
    # 查询每一个作者的名字以及出版过的书籍的最高价格
    from django.db.models import Avg, Max, Min, Count
    # 方法1
    # ret = Book.objects.values('author__id').annotate(m=Max('price')).values('author__name', 'm')
    # print(ret) # <QuerySet [{'author__name': 'alex', 'm': Decimal('301')}, {'author__name': 'egon', 'm': Decimal('301')}]>
    # 方法2(推荐)
    ret = Author.objects.values('id').annotate(max_price=Max('book__price')).values('name', 'max_price')
    print(ret)  # <QuerySet [{'name': 'alex', 'max_price': Decimal('301')}, {'name': 'egon', 'max_price': Decimal('301')}]>

    # 总结跨表的分组查询的模型:
    # 每一个后的表模型.objects.values(分组字段).annotate(聚合函数(关联表__统计字段)).values(需要显示的字段)
七十七. 多表下的分组查询4
    # 查询每一个书籍的名称以及对应的作者个数
    ret = Book.objects.values('id').annotate(c=Count('author__id')).values('title', 'c')
    print(ret)  # <QuerySet [{'title': '红楼梦', 'c': 2}, {'title': '西游记', 'c': 2}, {'title': '三国演义', 'c': 1}, {'title': '金瓶', 'c': 1}]>
理解靠sql, 编写靠模型
七十八. 多表下的分组查询5
补充:
    # 跨表分组查询的另一种玩法
    # 查询每一个出版社的名称以及出版的书籍个数
    # ret = Publish.objects.values('id').annotate(c=Count('book__title')).values('name', 'email', 'c')  # 这个是上面介绍的玩法.下面是新玩法.


    #------------按照每一个字段分组-----------------------------------------这里可以用任意的字段-----
    ret = Publish.objects.all().annotate(c=Count('book__title')).values('name', 'email', 'c')
    ret = Publish.objects.annotate(c=Count('book__title')).values('name', 'email', 'c')  # all()可以省略,和上面一个意思
    print(ret)
    # 跨表的分组查询的模型2:
    # 每一个后的表模型.objects.annotate(聚合函数(关联表__统计字段)).values("表模型的所有字段以及统计字段")
上面查询代码对应的sql语句:all()就是group by所有字段.

七十九. 多表下的分组查询6
参考:https://www.cnblogs.com/yuanchenqi/articles/8963244.html 多表下的分组查询练习
    # (3)    统计每一本以'三'开头的书籍的作者个数:(增加了一个filter过滤)
    # ret = Book.objects.filter(title__startswith='三').values('id').annotate(c=Count('publish__id')).values("title", 'c')
    print(ret)
    # (4)  统计不止一个作者的图书
    # 先,每一本图书的作者个数,   再,筛选出大于1的,在sql中这里就是having过滤了
    ret = Book.objects.values('id').annotate(c=Count('author__id')).filter(c__gt=1).values('title', 'c')
    print(ret)
八十. F查询与Q查询
参考:https://www.cnblogs.com/yuanchenqi/articles/8963244.html F与Q查询
80.1 更改表结构,原表中有数据,所以新增字段应当设置默认值.
    # models.py中的Book类下
    # 临时更改表结构,新增字段.新增完成后,再执行迁移命令,即可.
    read_num = models.IntegerField(default=0)  # 阅读数, 新增字段需要设置默认值
    comment_num = models.IntegerField(default=0)  # 评论数, 新增字段需要设置默认值
新增字段后的book表

80.2 F查询,当两个字段要同时使用时,比如等号的右边需要用某个字段,就需要用F查询.比如查询所有的评论数大于阅读数的书籍时,就用F.
再比如给所有的图书价格增加1元,也需要F.
    from django.db.models import F, Q
    # 查询评论数大于阅读数的书籍
    ret = Book.objects.filter(read_num__gt=F("comment_num"))
    # 给每一本书的价格增加1
    ret = Book.objects.all().update(price=F('price')+1)
    print(ret)  # 返回值4
80.3 Q查询,比如需要过滤,这时有两个条件,这两个条件是或者关系,这时就需要用Q查询.
比如查询:价格是103或者评论数时120的书籍
    ret = Book.objects.filter(price=103, comment_num=260)  # 两个参数之间是逗号的,表示且的关系,及两个条件是同时成立的.
    # 查询:价格是103或者评论数时260的书籍
    ret = Book.objects.filter(Q(price=103) | Q(comment_num=260))  # 两个Q加上中间|,代表或者关系.
    print(ret)  # <QuerySet [<Book: Book object (1)>, <Book: Book object (2)>, <Book: Book object (4)>]>

    Book.objects.filter(Q(price=103) & Q(comment_num=260))  # 两个Q加上中间&,代表且的关系.
    Book.objects.filter(~Q(price=103))  # Q前加上~,代表非的关系.
八十一. 作业,多表图书管理系统
八十二. 基于多表的图书管理系统添加功能1 作业
注意点:
publish.pk等价于publish.id, pk的意思是主键,publish表的主键.
html下拉式单选:
                        <select name="publish" id="" class="form-control">
                            {% for publish in publish_list %}
                                <option value="{{ publish.pk }}">{{ publish.name }}</option>
                            {% endfor %}
                        </select>
html多选:
                      <select name="authors" id="" multiple class="form-control">
                            {% for author in author_list %}
                                <option value="{{ author.pk }}">{{ author.name }}</option>
                            {% endfor %}
                        </select>
bootstrap常用class:
<div class="container">
<div class="row">
<div class="col-md-6 col-md-offset-3">
<form action="" method="post">
<div class="form-group">
<input type="text" name="title" class="form-control">
<input type="submit" class="btn btn-success pull-right">
不完全源代码
from django.db import models

# Create your models here.


class Book(models.Model):
    id = models.AutoField(primary_key=True)
    title = models.CharField(max_length=32)
    date = models.DateField()
    price = models.DecimalField(max_digits=5, decimal_places=2)
    publish = models.ForeignKey(to='Publish', to_field="id", on_delete=models.CASCADE)
    author = models.ManyToManyField(to='Author')


class Publish(models.Model):
    id = models.AutoField(primary_key=True)
    name = models.CharField(max_length=32)
    city = models.CharField(max_length=32)
    email = models.CharField(max_length=32)


class Author(models.Model):
    id = models.AutoField(primary_key=True)
    name = models.CharField(max_length=32)
    age = models.IntegerField()
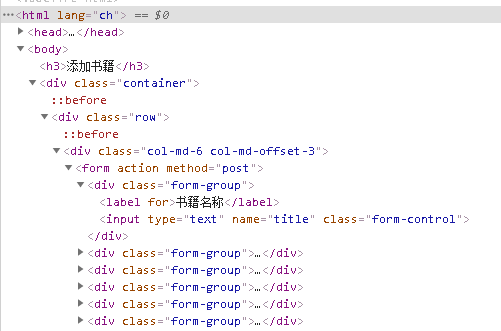
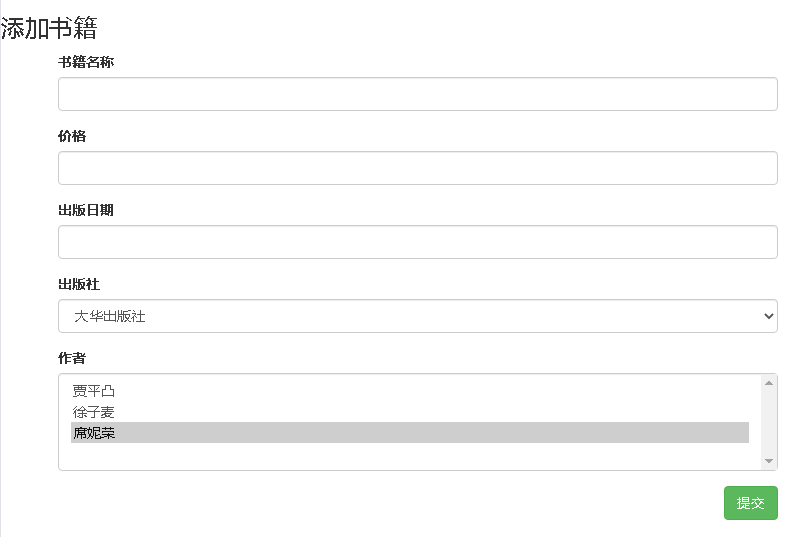
<!DOCTYPE html>
<html lang="ch">
<head>
    <meta charset="UTF-8">
    <title>添加书籍</title>
    <link rel="stylesheet" href="/static/bootstrap/css/bootstrap.css">
</head>
<body>
    <h3>添加书籍</h3>
    <div class="container">
        <div class="row">
            <div class="col-md-6 col-md-offset-3">
                <form action="" method="post">
                    <div class="form-group">
                        <label for="">书籍名称</label>
                        <input type="text" name="title" class="form-control">
                    </div>
                    <div class="form-group">
                        <label for="">价格</label>
                        <input type="text" name="price" class="form-control">
                    </div>
                    <div class="form-group">
                        <label for="">出版日期</label>
                        <input type="text" name="pub_date" class="form-control">
                    </div>
                    <div class="form-group">
                        <label for="">出版社</label>
                        <select name="publish" id="" class="form-control">
                            {% for publish in publish_list %}
                                <option value="{{ publish.pk }}">{{ publish.name }}</option>
                            {% endfor %}
                        </select>
                    </div>
                    <div class="form-group">
                        <label for="">作者</label>
                        <select name="authors" id="" multiple class="form-control">
                            {% for author in author_list %}
                                <option value="{{ author.pk }}">{{ author.name }}</option>
                            {% endfor %}
                        </select>
                    </div>
                    <div  class="form-group">
                        <input type="submit" class="btn btn-success pull-right">
                    </div>
                </form>
            </div>
        </div>
    </div>

</body>
</html>
addbook页面的最终效果:
八十三. 基于多表的图书管理系统添加功能2 作业
注意: 多选标签取值用getlist
一对多,多对多的数据添加
        authors_id_list = request.POST.getlist('authors_id_list')  # 多选标签checkbox和select, 使用getlist.

        # publish_id=publish_id 一对多关系添加数据
        book_obj = Book.objects.create(title=title, price=price, date=date, publish_id=publish_id)

        # 多对多关系添加数据
        book_obj.author.add(*authors_id_list)
        print(authors_id_list) # ['2', '3']
        return HttpResponse('OK')
from django.shortcuts import render, HttpResponse
from book.models import *

# Create your views here.


def add(request):
    if request.method == 'POST':
        title = request.POST.get('title')
        price = request.POST.get('price')
        date = request.POST.get('pub_date')
        publish_id = request.POST.get('publish_id')
        authors_id_list = request.POST.getlist('authors_id_list')  # 多选标签checkbox和select, 使用getlist.

        # publish_id=publish_id 一对多关系添加数据
        book_obj = Book.objects.create(title=title, price=price, date=date, publish_id=publish_id)

        # 多对多关系添加数据
        book_obj.author.add(*authors_id_list)
        print(authors_id_list) # ['2', '3']
        return HttpResponse('OK')

    author_list = Author.objects.all()
    publish_list = Publish.objects.all()

    return render(request, 'book/add.html', {"author_list": author_list, "publish_list": publish_list})
<!DOCTYPE html>
<html lang="ch">
<head>
    <meta charset="UTF-8">
    <title>添加书籍</title>
    <link rel="stylesheet" href="/static/bootstrap/css/bootstrap.css">
</head>
<body>
    <h3>添加书籍</h3>
    <div class="container">
        <div class="row">
            <div class="col-md-6 col-md-offset-3">
                <form action="" method="post">
                    {% csrf_token %}
                    <div class="form-group">
                        <label for="">书籍名称</label>
                        <input type="text" name="title" class="form-control">
                    </div>
                    <div class="form-group">
                        <label for="">价格</label>
                        <input type="text" name="price" class="form-control">
                    </div>
                    <div class="form-group">
                        <label for="">出版日期</label>
                        <input type="date" name="pub_date" class="form-control">
                    </div>
                    <div class="form-group">
                        <label for="">出版社</label>
                        <select name="publish_id" id="" class="form-control">
                            {% for publish in publish_list %}
                                <option value="{{ publish.pk }}">{{ publish.name }}</option>
                            {% endfor %}
                        </select>
                    </div>
                    <div class="form-group">
                        <label for="">作者</label>
                        <select name="authors_id_list" id="" multiple class="form-control">
                            {% for author in author_list %}
                                <option value="{{ author.pk }}">{{ author.name }}</option>
                            {% endfor %}
                        </select>
                    </div>
                    <div  class="form-group">
                        <input type="submit" class="btn btn-success pull-right">
                    </div>
                </form>
            </div>
        </div>
    </div>

</body>
</html>
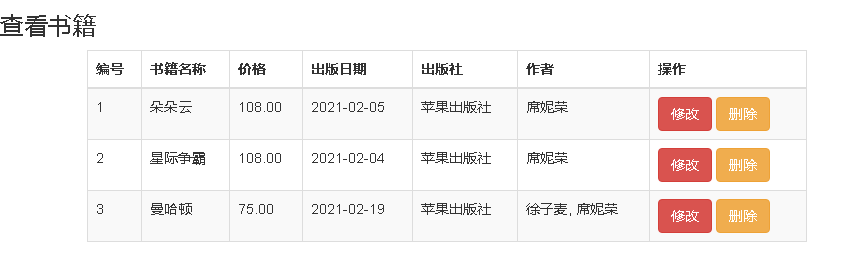
八十四. 基于多表的图书管理系统查看功能 作业
注意:
编号采用 forloop.counter
循环列出所有作者的名字, book.author.all就是Django中多对多查询语句
<tbody>
                        {% for book in books_list %}
                            <tr>
                                {#编号采用 forloop.counter 避免了数据库中个别ID数字被删除的情况,造成不连贯#}
                                <td>{{ forloop.counter }}</td>
                                <td>{{ book.title }}</td>
                                <td>{{ book.price }}</td>
                                <td>{{ book.date|date:"Y-m-d" }}</td>
                                <td>{{ book.publish.name }}</td>
                                <td>
                                {# 循环列出所有作者的名字, book.author.all就是Django中多对多查询语句 #}
                                    {% for author in book.author.all %}
                                        {# 如果是最后一个作者了,后面不加逗号. #}
                                        {% if forloop.last %}
                                            <span>{{ author.name }}</span>
                                        {% else %}
                                            <span>{{ author.name }}</span>,
                                        {% endif %}
                                    {% endfor %}

                                </td>
                                <td>
                                    <a href="/{{ book.id }}/edit/" class="btn btn-warning">修改</a>
                                    <a href="/{{ book.id }}/delete/" class="btn btn-danger">删除</a>
                                </td>
                            </tr>
                        {% endfor %}
                    </tbody>
表格样式的class类:
-------------------------边框---------悬浮----------条纹----
<table class="table table-bordered table-hover table-striped">
<!DOCTYPE html>
<html lang="ch">
<head>
    <meta charset="UTF-8">
    <title>查看书籍</title>
    <link rel="stylesheet" href="/static/bootstrap/css/bootstrap.css">
</head>
<body>
    <h3>查看书籍</h3>
    <div class="container">
        <div class="row">
            <div class="col-md-6 col-md-offset-3">
                <table class="table table-bordered table-hover table-striped">
                    <thead>
                        <tr>
                            <th>编号</th>
                            <th>书籍名称</th>
                            <th>价格</th>
                            <th>出版日期</th>
                            <th>出版社</th>
                            <th>作者</th>
                            <th>操作</th>
                        </tr>
                    </thead>
                    <tbody>
                        {% for book in books_list %}
                            <tr>
                                {#编号采用 forloop.counter 避免了数据库中个别ID数字被删除的情况,造成不连贯#}
                                <td>{{ forloop.counter }}</td>
                                <td>{{ book.title }}</td>
                                <td>{{ book.price }}</td>
                                <td>{{ book.date|date:"Y-m-d" }}</td>
                                <td>{{ book.publish.name }}</td>
                                <td>
                                {# 循环列出所有作者的名字, book.author.all就是Django中多对多查询语句 #}
                                    {% for author in book.author.all %}
                                        {# 如果是最后一个作者了,后面不加逗号. #}
                                        {% if forloop.last %}
                                            <span>{{ author.name }}</span>
                                        {% else %}
                                            <span>{{ author.name }}</span>,
                                        {% endif %}
                                    {% endfor %}

                                </td>
                                <td>
                                    <a href="" class="btn btn-danger">修改</a>
                                    <a href="" class="btn btn-warning">删除</a>
                                </td>
                            </tr>
                        {% endfor %}


                    </tbody>
                </table>
            </div>
        </div>
    </div>

</body>
</html>
from django.shortcuts import render, HttpResponse
from book.models import *

# Create your views here.


def add(request):
    if request.method == 'POST':
        title = request.POST.get('title')
        price = request.POST.get('price')
        date = request.POST.get('pub_date')
        publish_id = request.POST.get('publish_id')
        authors_id_list = request.POST.getlist('authors_id_list')  # 多选标签checkbox和select, 使用getlist.

        # publish_id=publish_id 一对多关系添加数据
        book_obj = Book.objects.create(title=title, price=price, date=date, publish_id=publish_id)

        # 多对多关系添加数据
        book_obj.author.add(*authors_id_list)
        print(authors_id_list) # ['2', '3']
        return HttpResponse('OK')

    author_list = Author.objects.all()
    publish_list = Publish.objects.all()

    return render(request, 'book/add.html', {"author_list": author_list, "publish_list": publish_list})


def books(request):
    books_list = Book.objects.all()
    return render(request, 'book/books.html', {'books_list': books_list})
八十五. 基于多表的图书管理系统编辑功能1 作业
注意:
{# 判断当前书籍的出版社,并设为默认选中状态 #}
                        <label for="">出版社</label>
                        <select name="publish_id" id="" class="form-control">
                            {% for publish in publish_list %}
                                {# 判断当前书籍的出版社,并设为默认选中状态 #}
                                {% if book_obj.publish.name == publish.name %}
                                    <option selected value="{{ publish.pk }}">{{ publish.name }}</option>
                                {% else %}
                                    <option value="{{ publish.pk }}">{{ publish.name }}</option>
                                {% endif %}

                            {% endfor %}
                        </select>
{# 判断当前循环的作者是不是在本书的作者当中,如果是就默认选中 #}
                    <div class="form-group">
                        <label for="">作者</label>
                        <select name="authors_id_list" id="" multiple class="form-control">
                            {% for author in authors_list %}
                                {# 判断当前循环的作者是不是在本书的作者当中,如果是就默认选中 #}
                                {% if author in book_obj.author.all %}
                                    <option selected value="{{ author.pk }}">{{ author.name }}</option>
                                {% else %}
                                    <option value="{{ author.pk }}">{{ author.name }}</option>
                                {% endif %}

                            {% endfor %}
                        </select>
                    </div>
<!DOCTYPE html>
<html lang="ch">
<head>
    <meta charset="UTF-8">
    <title>编辑书籍</title>
    <link rel="stylesheet" href="/static/bootstrap/css/bootstrap.css">
</head>
<body>
    <h3>编辑书籍</h3>
    <div class="container">
        <div class="row">
            <div class="col-md-6 col-md-offset-3">
                <form action="" method="post">
                    {% csrf_token %}
                    <div class="form-group">
                        <label for="">书籍名称</label>
                        <input type="text" name="title" class="form-control" value="{{ book_obj.title }}">
                    </div>
                    <div class="form-group">
                        <label for="">价格</label>
                        <input type="text" name="price" class="form-control" value="{{ book_obj.price }}">
                    </div>
                    <div class="form-group">
                        <label for="">出版日期</label>
                        <input type="date" name="pub_date" class="form-control" value="{{ book_obj.date|date:"Y-m-d" }}">
                    </div>
                    <div class="form-group">
                        <label for="">出版社</label>
                        <select name="publish_id" id="" class="form-control">
                            {% for publish in publish_list %}
                                {# 判断当前书籍的出版社,并设为默认选中状态 #}
                                {% if book_obj.publish.name == publish.name %}
                                    <option selected value="{{ publish.pk }}">{{ publish.name }}</option>
                                {% else %}
                                    <option value="{{ publish.pk }}">{{ publish.name }}</option>
                                {% endif %}

                            {% endfor %}
                        </select>
                    </div>
                    <div class="form-group">
                        <label for="">作者</label>
                        <select name="authors_id_list" id="" multiple class="form-control">
                            {% for author in authors_list %}
                                {# 判断当前循环的作者是不是在本书的作者当中,如果是就默认选中 #}
                                {% if author in book_obj.author.all %}
                                    <option selected value="{{ author.pk }}">{{ author.name }}</option>
                                {% else %}
                                    <option value="{{ author.pk }}">{{ author.name }}</option>
                                {% endif %}

                            {% endfor %}
                        </select>
                    </div>
                    <div  class="form-group">
                        <input type="submit" class="btn btn-success pull-right">
                    </div>
                </form>
            </div>
        </div>
    </div>

</body>
</html>
from django.shortcuts import render, HttpResponse, redirect
from book.models import *

# Create your views here.


def add(request):
    if request.method == 'POST':
        title = request.POST.get('title')
        price = request.POST.get('price')
        date = request.POST.get('pub_date')
        publish_id = request.POST.get('publish_id')
        authors_id_list = request.POST.getlist('authors_id_list')  # 多选标签checkbox和select, 使用getlist.

        # publish_id=publish_id 一对多关系添加数据
        book_obj = Book.objects.create(title=title, price=price, date=date, publish_id=publish_id)

        # 多对多关系添加数据
        book_obj.author.add(*authors_id_list)
        print(authors_id_list) # ['2', '3']
        return HttpResponse('OK')

    author_list = Author.objects.all()
    publish_list = Publish.objects.all()

    return render(request, 'book/add.html', {"author_list": author_list, "publish_list": publish_list})


def books(request):
    books_list = Book.objects.all()
    return render(request, 'book/books.html', {'books_list': books_list})


def edit(request, book_id):
    book_obj = Book.objects.filter(id=book_id).first()  # first不要丢掉
    publish_list = Publish.objects.all()
    authors_list = Author.objects.all()

    return render(request, 'book/edit.html', {"book_obj": book_obj, 'publish_list': publish_list, "authors_list": authors_list})
八十六. 基于多表的图书管理系统编辑功能2 作业
注意:
获取多个作者,用getlist
authors_id_list = request.POST.getlist('authors_id_list') # 多个作者用getlist
修改书与多个作者的绑定关系,有两种方法,第二种方法只需set
        Book.objects.filter(id=book_id).update(title=title, price=price, date=pub_date, publish_id=publish_id)  # 这里的返回值是更新的条数int
        # book_obj.author.clear()  # 清除(解绑)这本书与作者的关系
        # book_obj.author.add(*authors_id_list)  # 再绑定书与作者的关系
        book_obj.author.set(authors_id_list)  # 这一步相当于上面的两步
from django.shortcuts import render, HttpResponse, redirect
from book.models import *

# Create your views here.


def add(request):
    if request.method == 'POST':
        title = request.POST.get('title')
        price = request.POST.get('price')
        date = request.POST.get('pub_date')
        publish_id = request.POST.get('publish_id')
        authors_id_list = request.POST.getlist('authors_id_list')  # 多选标签checkbox和select, 使用getlist.

        # publish_id=publish_id 一对多关系添加数据
        book_obj = Book.objects.create(title=title, price=price, date=date, publish_id=publish_id)

        # 多对多关系添加数据
        book_obj.author.add(*authors_id_list)
        print(authors_id_list) # ['2', '3']
        return HttpResponse('OK')

    author_list = Author.objects.all()
    publish_list = Publish.objects.all()

    return render(request, 'book/add.html', {"author_list": author_list, "publish_list": publish_list})


def books(request):
    books_list = Book.objects.all()
    return render(request, 'book/books.html', {'books_list': books_list})


def edit(request, book_id):
    book_obj = Book.objects.filter(id=book_id).first()  # first不要丢掉
    if request.method == "POST":
        title = request.POST.get('title')
        price = request.POST.get('price')
        pub_date = request.POST.get('pub_date')
        publish_id = request.POST.get('publish_id')
        authors_id_list = request.POST.getlist('authors_id_list')  # 多个作者用getlist

        Book.objects.filter(id=book_id).update(title=title, price=price, date=pub_date, publish_id=publish_id)  # 这里的返回值是更新的条数int
        # book_obj.author.clear()  # 清除(解绑)这本书与作者的关系
        # book_obj.author.add(*authors_id_list)  # 再绑定书与作者的关系
        book_obj.author.set(authors_id_list)  # 这一步相当于上面的两步

        return redirect('/books/')


    publish_list = Publish.objects.all()
    authors_list = Author.objects.all()

    return render(request, 'book/edit.html', {"book_obj": book_obj, 'publish_list': publish_list, "authors_list": authors_list})
八十七. 基于多表的图书管理系统删除功能 作业
Book.objects.filter(id=book_id).delete() # 删除命令,会自动删除相关的图书和作者的关系表中的记录
多表图书管理系统所有源码:
# models.py

from django.db import models

# Create your models here.


class Book(models.Model):
    id = models.AutoField(primary_key=True)
    title = models.CharField(max_length=32)
    date = models.DateField()
    price = models.DecimalField(max_digits=5, decimal_places=2)
    publish = models.ForeignKey(to='Publish', to_field="id", on_delete=models.CASCADE)
    author = models.ManyToManyField(to='Author')


class Publish(models.Model):
    id = models.AutoField(primary_key=True)
    name = models.CharField(max_length=32)
    city = models.CharField(max_length=32)
    email = models.CharField(max_length=32)


class Author(models.Model):
    id = models.AutoField(primary_key=True)
    name = models.CharField(max_length=32)
    age = models.IntegerField()
# urls.py
from django.contrib import admin
from django.urls import path, re_path
from book import views

urlpatterns = [
    path('admin/', admin.site.urls),
    path('add/', views.add),
    path('books/', views.books),
    re_path(r'(\d+)/edit/', views.edit),
    re_path(r'(\d+)/delete/', views.delete),
]
# views.py

from django.shortcuts import render, HttpResponse, redirect
from book.models import *

# Create your views here.


def add(request):
    if request.method == 'POST':
        title = request.POST.get('title')
        price = request.POST.get('price')
        date = request.POST.get('pub_date')
        publish_id = request.POST.get('publish_id')
        authors_id_list = request.POST.getlist('authors_id_list')  # 多选标签checkbox和select, 使用getlist.

        # publish_id=publish_id 一对多关系添加数据
        book_obj = Book.objects.create(title=title, price=price, date=date, publish_id=publish_id)

        # 多对多关系添加数据
        book_obj.author.add(*authors_id_list)
        print(authors_id_list) # ['2', '3']
        return redirect('/books/')

    author_list = Author.objects.all()
    publish_list = Publish.objects.all()

    return render(request, 'book/add.html', {"author_list": author_list, "publish_list": publish_list})


def books(request):
    books_list = Book.objects.all()
    return render(request, 'book/books.html', {'books_list': books_list})


def edit(request, book_id):
    book_obj = Book.objects.filter(id=book_id).first()  # first不要丢掉
    if request.method == "POST":
        title = request.POST.get('title')
        price = request.POST.get('price')
        pub_date = request.POST.get('pub_date')
        publish_id = request.POST.get('publish_id')
        authors_id_list = request.POST.getlist('authors_id_list')  # 多个作者用getlist

        Book.objects.filter(id=book_id).update(title=title, price=price, date=pub_date, publish_id=publish_id)  # 这里的返回值是更新的条数int
        # book_obj.author.clear()  # 清除(解绑)这本书与作者的关系
        # book_obj.author.add(*authors_id_list)  # 再绑定书与作者的关系
        book_obj.author.set(authors_id_list)  # 这一步相当于上面的两步

        return redirect('/books/')


    publish_list = Publish.objects.all()
    authors_list = Author.objects.all()

    return render(request, 'book/edit.html', {"book_obj": book_obj, 'publish_list': publish_list, "authors_list": authors_list})


def delete(request, book_id):
    Book.objects.filter(id=book_id).delete()  # 删除命令,会自动删除相关的图书和作者的关系表中的记录

    return redirect('/books/')
# add.html

<!DOCTYPE html>
<html lang="ch">
<head>
    <meta charset="UTF-8">
    <title>添加书籍</title>
    <link rel="stylesheet" href="/static/bootstrap/css/bootstrap.css">
</head>
<body>
    <h3>添加书籍</h3>
    <div class="container">
        <div class="row">
            <div class="col-md-6 col-md-offset-3">
                <form action="" method="post">
                    {% csrf_token %}
                    <div class="form-group">
                        <label for="">书籍名称</label>
                        <input type="text" name="title" class="form-control">
                    </div>
                    <div class="form-group">
                        <label for="">价格</label>
                        <input type="text" name="price" class="form-control">
                    </div>
                    <div class="form-group">
                        <label for="">出版日期</label>
                        <input type="date" name="pub_date" class="form-control">
                    </div>
                    <div class="form-group">
                        <label for="">出版社</label>
                        <select name="publish_id" id="" class="form-control">
                            {% for publish in publish_list %}
                                <option value="{{ publish.pk }}">{{ publish.name }}</option>
                            {% endfor %}
                        </select>
                    </div>
                    <div class="form-group">
                        <label for="">作者</label>
                        <select name="authors_id_list" id="" multiple class="form-control">
                            {% for author in author_list %}
                                <option value="{{ author.pk }}">{{ author.name }}</option>
                            {% endfor %}
                        </select>
                    </div>
                    <div  class="form-group">
                        <input type="submit" class="btn btn-success pull-right">
                    </div>
                </form>
            </div>
        </div>
    </div>

</body>
</html>
# books.html

<!DOCTYPE html>
<html lang="ch">
<head>
    <meta charset="UTF-8">
    <title>查看书籍</title>
    <link rel="stylesheet" href="/static/bootstrap/css/bootstrap.css">
</head>
<body>
    <h3>查看书籍</h3>
    <div class="container">
        <div class="row">
            <div class="col-md-6 col-md-offset-3">
                <a href="/add/" class="btn btn-primary">添加书籍</a>
                <table class="table table-bordered table-hover table-striped">
                    <thead>
                        <tr>
                            <th>编号</th>
                            <th>书籍名称</th>
                            <th>价格</th>
                            <th>出版日期</th>
                            <th>出版社</th>
                            <th>作者</th>
                            <th>操作</th>
                        </tr>
                    </thead>
                    <tbody>
                        {% for book in books_list %}
                            <tr>
                                {#编号采用 forloop.counter 避免了数据库中个别ID数字被删除的情况,造成不连贯#}
                                <td>{{ forloop.counter }}</td>
                                <td>{{ book.title }}</td>
                                <td>{{ book.price }}</td>
                                <td>{{ book.date|date:"Y-m-d" }}</td>
                                <td>{{ book.publish.name }}</td>
                                <td>
                                {# 循环列出所有作者的名字, book.author.all就是Django中多对多查询语句 #}
                                    {% for author in book.author.all %}
                                        {# 如果是最后一个作者了,后面不加逗号. #}
                                        {% if forloop.last %}
                                            <span>{{ author.name }}</span>
                                        {% else %}
                                            <span>{{ author.name }}</span>,
                                        {% endif %}
                                    {% endfor %}

                                </td>
                                <td>
                                    <a href="/{{ book.id }}/edit/" class="btn btn-warning">修改</a>
                                    <a href="/{{ book.id }}/delete/" class="btn btn-danger">删除</a>
                                </td>
                            </tr>
                        {% endfor %}


                    </tbody>
                </table>
            </div>
        </div>
    </div>

</body>
</html>
# edit.html

<!DOCTYPE html>
<html lang="ch">
<head>
    <meta charset="UTF-8">
    <title>编辑书籍</title>
    <link rel="stylesheet" href="/static/bootstrap/css/bootstrap.css">
</head>
<body>
    <h3>编辑书籍</h3>
    <div class="container">
        <div class="row">
            <div class="col-md-6 col-md-offset-3">
                <form action="" method="post">
                    {% csrf_token %}
                    <div class="form-group">
                        <label for="">书籍名称</label>
                        <input type="text" name="title" class="form-control" value="{{ book_obj.title }}">
                    </div>
                    <div class="form-group">
                        <label for="">价格</label>
                        <input type="text" name="price" class="form-control" value="{{ book_obj.price }}">
                    </div>
                    <div class="form-group">
                        <label for="">出版日期</label>
                        <input type="date" name="pub_date" class="form-control" value="{{ book_obj.date|date:"Y-m-d" }}">
                    </div>
                    <div class="form-group">
                        <label for="">出版社</label>
                        <select name="publish_id" id="" class="form-control">
                            {% for publish in publish_list %}
                                {# 判断当前书籍的出版社,并设为默认选中状态 #}
                                {% if book_obj.publish.name == publish.name %}
                                    <option selected value="{{ publish.pk }}">{{ publish.name }}</option>
                                {% else %}
                                    <option value="{{ publish.pk }}">{{ publish.name }}</option>
                                {% endif %}

                            {% endfor %}
                        </select>
                    </div>
                    <div class="form-group">
                        <label for="">作者</label>
                        <select name="authors_id_list" id="" multiple class="form-control">
                            {% for author in authors_list %}
                                {# 判断当前循环的作者是不是在本书的作者当中,如果是就默认选中 #}
                                {% if author in book_obj.author.all %}
                                    <option selected value="{{ author.pk }}">{{ author.name }}</option>
                                {% else %}
                                    <option value="{{ author.pk }}">{{ author.name }}</option>
                                {% endif %}

                            {% endfor %}
                        </select>
                    </div>
                    <div  class="form-group">
                        <input type="submit" class="btn btn-success pull-right">
                    </div>
                </form>
            </div>
        </div>
    </div>

</body>
</html>
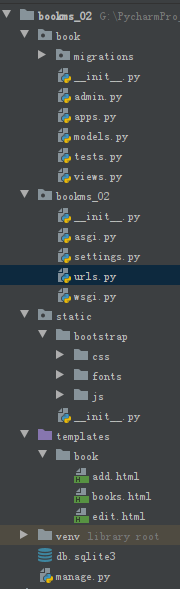
完整目录:
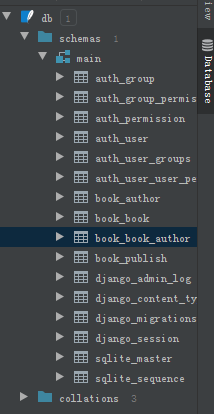
完整数据库:
八十八. Ajax简介
参考: https://www.cnblogs.com/yuanchenqi/articles/9070966.html
Ajax使用的更多
88.1 请求的途径与方式
向服务器发送请求的途径
1 浏览器地址栏, 默认get请求
2 form表单:
get请求 post请求
3 a标签, 默认get请求
4 Ajax也支持get, post请求
特点:一 异步请求, 二 局部刷新
88.2 异步与同步
什么叫同步请求:客户端发出一个请求后,需要等待服务器响应结束后,才能发出第二个请求
什么叫异步请求:客户端发出一个请求后,无需等待服务器响应结束,就可以发出第二个请求
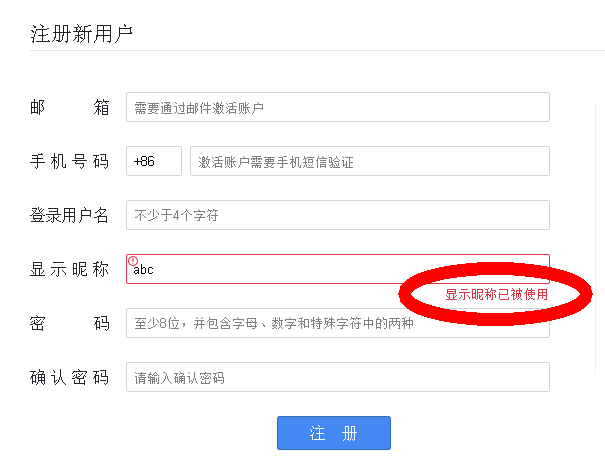
88.3 Ajax异步请请求实例
用户注册界面,没有点击注册,就显示昵称已经被使用,这里用的就是Ajax请求.
八十九. Ajax的简单实现
https://www.cnblogs.com/yuanchenqi/articles/9070966.html 基于jquery的Ajax实现
一个ajax请求,views.py中要有一个视图函数.
ajax请求执行过程解析:1. 客户端发ajax请求, 2.服务端视图函数test_ajax接收到请求, 3.将视图函数的返回值结果'hello ajax传递给客户端的回调函数的参数data
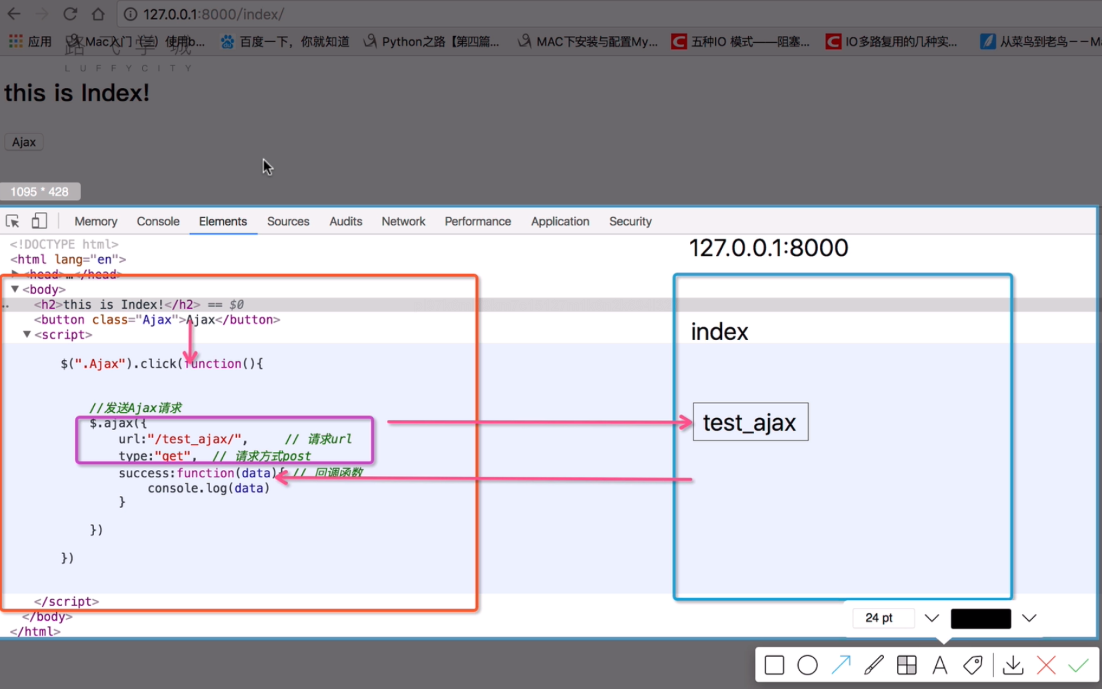
ajax的关键代码在index.html中:
    <script>
        $('.Ajax').click(function () {
            // alert('你好ajax'),

            // 发送Ajax请求
            $.ajax({
                url: "/test_ajax/",  // 请求url
                type: 'get',  // 请求方式 get 或post
                success: function (data) {  //回调函数
                    console.log(data)
                    $(".content").html(data)
                }
            })
        })
    </script>
源代码:
"""AjaxDemo URL Configuration

The `urlpatterns` list routes URLs to views. For more information please see:
    https://docs.djangoproject.com/en/3.1/topics/http/urls/
Examples:
Function views
    1. Add an import:  from my_app import views
    2. Add a URL to urlpatterns:  path('', views.home, name='home')
Class-based views
    1. Add an import:  from other_app.views import Home
    2. Add a URL to urlpatterns:  path('', Home.as_view(), name='home')
Including another URLconf
    1. Import the include() function: from django.urls import include, path
    2. Add a URL to urlpatterns:  path('blog/', include('blog.urls'))
"""
from django.contrib import admin
from django.urls import path
from app01 import views

urlpatterns = [
    path('admin/', admin.site.urls),
    path('index/', views.index),
    path('test_ajax/', views.test_ajax),
]
from django.shortcuts import render, HttpResponse

# Create your views here.


def index(request):

    return render(request, 'index.html')


def test_ajax(request):

    return HttpResponse('hello ajax')
<!DOCTYPE html>
<html lang="en">
<head>
    <meta charset="UTF-8">
    <title>Title</title>

</head>
<body>

    <h2>Ajax简单实现</h2>

    <button class="Ajax">Ajax</button>
    <p class="content"></p>

    <!-- 百度jquery cdn -->
    <script src="http://libs.baidu.com/jquery/2.0.0/jquery.min.js"></script>
    <script>
        $('.Ajax').click(function () {
            // alert('你好ajax'),

            // 发送Ajax请求
            $.ajax({
                url: "/test_ajax/",  // 请求url
                type: 'get',  // 请求方式 get 或post
                success: function (data) {  //回调函数
                    console.log(data)
                    $(".content").html(data)
                }
            })
        })
    </script>

</body>
</html>
九十. Ajax传递数据
90.1 通过Ajax发送数据到服务器
    <script>
        $('.Ajax').click(function () {
            // alert('你好ajax'),

            // 发送Ajax请求
            $.ajax({
                url: "/test_ajax/",
                type: 'get',
                data:{a:1, b:2},  // 发送的数据
                success: function (data) {
                    console.log(data)
                    $(".content").html(data)
                }
            })
        })
    </script>
服务端接收到的数据:
def test_ajax(request):
    print(request.GET)  # 服务端的视图函数中打印客户端发送的数据

    return HttpResponse('hello ajax')

90.2 制作一个加法计算器, 客户端输入两个加数, 然后传递给服务端, 服务端计算出结果,再传递给客户端,显示出来.

index.html中关键代码:
    <h2>加法计算器</h2>
    <input type="text" id="num1">+<input type="text" id="num2">=<input type="text" id="sum"><button id="cal">计算</button>

    <!-- 百度jquery cdn -->
    <script src="http://libs.baidu.com/jquery/2.0.0/jquery.min.js"></script>
    <script>

        // 加法计算器
        $('#cal').click(function () {
            $.ajax({
                url: '/test_ajax/',
                type: 'get',
                data: {  // 获取两个加数, 这里的data是从客户端获取的数据
                    'n1': $("#num1").val(),  // 获取input输入框的值
                    'n2': $('#num2').val()
                },
                success: function (data) {  // 这里的data与上面的data不是一回事,这里的data是服务器返回的值
                    $('#sum').val(data)  // 给input输入框赋值
                }
            })
        })
views.py中的关键代码:
def test_ajax(request):
    # print(request.GET)
    # return HttpResponse('hello ajax')

    n1 = request.GET.get('n1')  // 获取客户端发来的值
    n2 = request.GET.get('n2')
    cal_sum = int(n1) + int(n2)
    return HttpResponse(cal_sum)  // 将计算结果传递给客户端
完整代码:
from django.shortcuts import render, HttpResponse

# Create your views here.


def index(request):

    return render(request, 'index.html')


def test_ajax(request):
    # print(request.GET)
    # return HttpResponse('hello ajax')

    n1 = request.GET.get('n1')
    n2 = request.GET.get('n2')
    cal_sum = int(n1) + int(n2)
    return HttpResponse(cal_sum)
<!DOCTYPE html>
<html lang="en">
<head>
    <meta charset="UTF-8">
    <title>Title</title>

</head>
<body>

    <h2>Ajax简单实现</h2>

    <button class="Ajax">Ajax</button>
    <p class="content"></p>
    <hr>
    <h2>加法计算器</h2>
    <input type="text" id="num1">+<input type="text" id="num2">=<input type="text" id="sum"><button id="cal">计算</button>

    <!-- 百度jquery cdn -->
    <script src="http://libs.baidu.com/jquery/2.0.0/jquery.min.js"></script>
    <script>

        // Ajax简单实现
        $('.Ajax').click(function () {
            // alert('你好ajax'),

            // 发送Ajax请求
            $.ajax({
                url: "/test_ajax/",  // 请求url
                type: 'get',  // 请求方式 get 或post
                data:{a:1, b:2},  // 发送的数据
                success: function (data) {  //回调函数
                    console.log(data)
                    $(".content").html(data)
                }
            })
        })


        // 加法计算器
        $('#cal').click(function () {
            $.ajax({
                url: '/test_ajax/',
                type: 'get',
                data: {  // 获取两个加数
                    'n1': $("#num1").val(),
                    'n2': $('#num2').val()
                },
                success: function (data) {
                    $('#sum').val(data)
                }
            })
        })

    </script>

</body>
</html>
九十一.基于 Ajax的登录验证
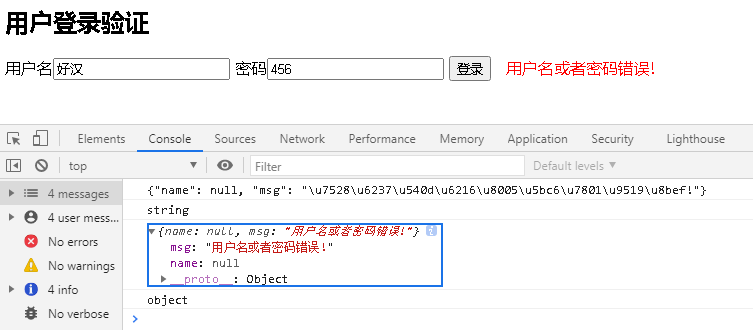
91.1 程序效果:
蓝框部分是经过json反序列化后得到的object.蓝框上面是反序列化前,前端接收到的后端传来的字符串.
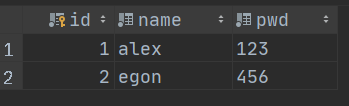
后端数据库,用户表:
91.2 关键代码, 注意后端传递数据给前端时使用json格式. 注意一般传送用户名密码使用post方式,但这里使用了get,如果要使用post需要在setting中关闭相关验证的设置.
// 用户登录验证
        $('#login').click(function () {
            $.ajax({
                url: '/login/',
                type: "get",
                data:{
                    'name': $('#name').val(),
                    "pwd": $('#pwd').val()
                },
                success: function (data) {
                    console.log(data);  // 从服务器发来的data是json字符串格式
                    console.log(typeof data);  // data是json字符串

                    var data = JSON.parse(data);  // 反序列化,变成 object{}
                    console.log(data);
                    console.log(typeof data);  // object格式,类似字典

                    if (data.name){  // name有值说明用户登录成功
                        location.href = 'http://www.baidu.com'  //跳转到其它网页
                    }
                    else{  // name为None,则显示错误信息.  css后面为渲染的样式
                        $(".error").html(data.msg).css({'color':"red", 'margin-left':'10px'})
                    }
                }

            })
        })
def login(request):
    # 获取客户端传过来的用户名密码数据
    name = request.GET.get('name')
    pwd = request.GET.get('pwd')

    # 从数据库中提取用户名密码,并与客户端传送过来的进行比对, 如果能filter出数据,说明用户名密码正确
    user_obj = User.objects.filter(name=name, pwd=pwd).first()

    # 定义需要传送到客户端的数据,一般传送是都会转换成json格式,进行字符串传送
    res = {'name': None, "msg": None}  # name是否有值,就是客户端判断是否成功的标志. msg是登录认证失败后,显示在客户端的信息

    if user_obj:
        res['name'] = user_obj.name
    else:
        res['msg'] = '用户名或者密码错误!'

    import json
    # 序列化成字符串
    return HttpResponse(json.dumps(res))
91.3 完整代码
from django.contrib import admin
from django.urls import path
from app01 import views

urlpatterns = [
    path('admin/', admin.site.urls),
    path('index/', views.index),
    path('test_ajax/', views.test_ajax),
    path('login/', views.login),
]
from django.shortcuts import render, HttpResponse
from app01.models import User

# Create your views here.


def index(request):

    return render(request, 'index.html')


def test_ajax(request):
    # print(request.GET)
    # return HttpResponse('hello ajax')

    n1 = request.GET.get('n1')
    n2 = request.GET.get('n2')
    cal_sum = int(n1) + int(n2)
    return HttpResponse(cal_sum)


def login(request):
    # 获取客户端传过来的用户名密码数据
    name = request.GET.get('name')
    pwd = request.GET.get('pwd')

    # 从数据库中提取用户名密码,并与客户端传送过来的进行比对, 如果能filter出数据,说明用户名密码正确
    user_obj = User.objects.filter(name=name, pwd=pwd).first()

    # 定义需要传送到客户端的数据,一般传送是都会转换成json格式,进行字符串传送
    res = {'name': None, "msg": None}  # name是否有值,就是客户端判断是否成功的标志. msg是登录认证失败后,显示在客户端的信息

    if user_obj:
        res['name'] = user_obj.name
    else:
        res['msg'] = '用户名或者密码错误!'

    import json
    # 序列化成字符串
    return HttpResponse(json.dumps(res))
from django.db import models

# Create your models here.


class User(models.Model):
    name = models.CharField(max_length=20)
    pwd = models.CharField(max_length=20)
<!DOCTYPE html>
<html lang="en">
<head>
    <meta charset="UTF-8">
    <title>Title</title>

</head>
<body>

    <h2>Ajax简单实现</h2>

    <button class="Ajax">Ajax</button>
    <p class="content"></p>
    <hr>
    <h2>加法计算器</h2>
    <input type="text" id="num1">+<input type="text" id="num2">=<input type="text" id="sum"><button id="cal">计算</button>
    <hr>
    <h2>用户登录验证</h2>
{#    // 虽然form表单对ajax来说没有用处,此处是为了阅读代码方便.#}
    <form>
        用户名<input type="text" id="name">
        密码<input type="text" id="pwd">
        <input type="button" value="登录" id="login">
        <span class="error"></span>

    </form>


    <!-- 百度jquery cdn -->
    <script src="http://libs.baidu.com/jquery/2.0.0/jquery.min.js"></script>
    <script>

        // Ajax简单实现
        $('.Ajax').click(function () {
            // alert('你好ajax'),

            // 发送Ajax请求
            $.ajax({
                url: "/test_ajax/",  // 请求url
                type: 'get',  // 请求方式 get 或post
                data:{a:1, b:2},  // 发送的数据
                success: function (data) {  //回调函数
                    console.log(data)
                    $(".content").html(data)
                }
            })
        })


        // 加法计算器
        $('#cal').click(function () {
            $.ajax({
                url: '/test_ajax/',
                type: 'get',
                data: {  // 获取两个加数
                    'n1': $("#num1").val(),
                    'n2': $('#num2').val()
                },
                success: function (data) {
                    $('#sum').val(data)
                }
            })
        })


        // 用户登录验证
        $('#login').click(function () {
            $.ajax({
                url: '/login/',
                type: "get",
                data:{
                    'name': $('#name').val(),
                    "pwd": $('#pwd').val()
                },
                success: function (data) {
                    console.log(data);  // 从服务器发来的data是json字符串格式
                    console.log(typeof data);  // data是json字符串

                    var data = JSON.parse(data);  // 反序列化,变成 object{}
                    console.log(data);
                    console.log(typeof data);  // object格式,类似字典

                    if (data.name){  // name有值说明用户登录成功
                        location.href = 'http://www.baidu.com'  //跳转到其它网页
                    }
                    else{  // name为None,则显示错误信息.  css后面为渲染的样式
                        $(".error").html(data.msg).css({'color':"red", 'margin-left':'10px'})
                    }
                }

            })
        })

    </script>

</body>
</html>
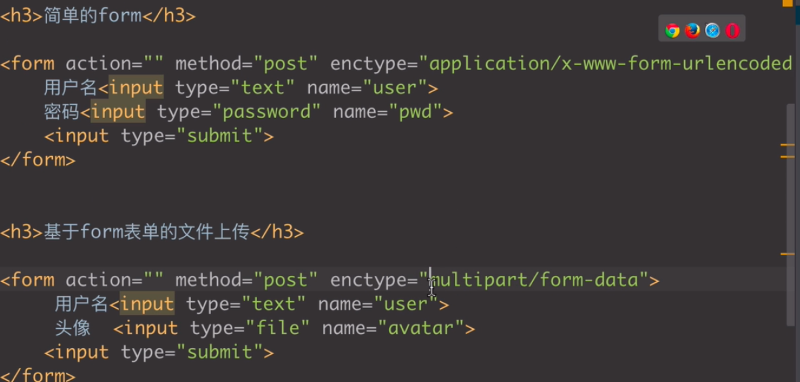
九十二.基于 Form表单的文件上传

html中,注意上传文件表单中的enctype属性
    <h3>基于form表单的上传文件</h3>
    <form action="" method="post" enctype="multipart/form-data">  // 上传文件特殊的语法
        {% csrf_token %}
        用户名<input type="text" name="user">
        头像  <input type="file" name="avatar">
        <input type="submit">
    </form>
views.py文件中,注意后端获取上传文件的方法用FILE,不再是get或是post了.
def file_put(request):
    if request.method == 'POST':
        print(request.POST)
        print(request.FILES)  # 注意上传文件用的不一样
        file_obj = request.FILES.get('avatar')
        with open(file_obj.name, 'wb') as f:  # file_obj.name就是原文件名,这里没有上传路径默认上传至根目录
            for line in file_obj:
                f.write(line)

        return HttpResponse('OK')

    return render(request, 'file_put.html')
后端print效果:
<QueryDict: {'csrfmiddlewaretoken': ['zhzV7HEvWizBRwrNJanQnaI44V6EQ1EdZq8ultOFQdLA1CdFlRHCvPungouX2SQ5'], 'user': ['alex']}>
<MultiValueDict: {'avatar': [<InMemoryUploadedFile: 微信图片_20201230140507.jpg (image/jpeg)>]}>
九十三.请求头之contentType
93.1 <form>表单的enctype属性值决定提交数据(请求体)的编码格式,默认是urlencoed
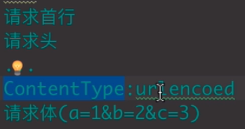
文件上传用的enctype属性是multipart/form-data
93.2 基于Ajax文件上传
ajax默认请求头contentType也是用urlencoed,一般不写出来.即传送时按照a=1&b=2进行传送数据.
九十四. Ajax传递json数据
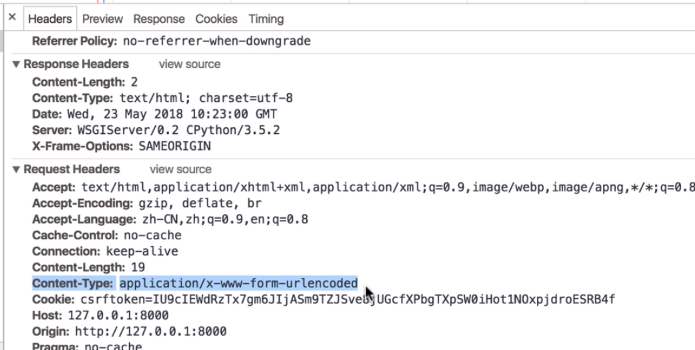
94.1 请求头contentType是urlencoed时,从客户端传送到服务端的数据形态:
print("body", request.body) # 请求报文中的请求体
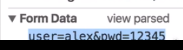
print("POST", request.POST) # if contentType==urlencoded

94.2 客户端发送json数据
<form>
    用户名<input type="text">
    <input type="button" value="ajax" class="btn">
</form>
   <script>
        $('.btn').click(function () {
            $.ajax({
                url: '/ajax_json/',
                type: 'post',
                contentType: 'application/json', // 指定数据为json格式
                data: JSON.stringify({  //json.stringify对数据进行序列化,这一步不能丢
                    a: 1,
                    b: 2
                }),
                success: function (data) {
                    console.log(data)
                }
            })
        })
    </script>
def ajax_json(request):
    print("body", request.body)  # 这里存放请求报文中的请求体
    print("POST", request.POST)  # 此时这个无值, 当contentType==urlencoded时有数据.
    import json
    ret = json.loads(request.body)  # 解码,反序列化
    print(ret)
    print(type(ret))

    return HttpResponse('ok')
服务端的print:
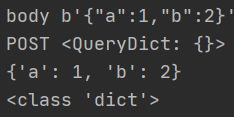
可以看出,客户端contentType是 'application/json'是,服务端接收的数据不再是以前的a=1&b=2了,而是json格式.并且request.POST中也没有了数据.要获得数据用request.body
源代码:
from django.shortcuts import render, HttpResponse
from app01.models import User

# Create your views here.


def index(request):

    return render(request, 'index.html')


def test_ajax(request):
    # print(request.GET)
    # return HttpResponse('hello ajax')

    n1 = request.GET.get('n1')
    n2 = request.GET.get('n2')
    cal_sum = int(n1) + int(n2)
    return HttpResponse(cal_sum)


def login(request):
    # 获取客户端传过来的用户名密码数据
    name = request.GET.get('name')
    pwd = request.GET.get('pwd')

    # 从数据库中提取用户名密码,并与客户端传送过来的进行比对, 如果能filter出数据,说明用户名密码正确
    user_obj = User.objects.filter(name=name, pwd=pwd).first()

    # 定义需要传送到客户端的数据,一般传送是都会转换成json格式,进行字符串传送
    res = {'name': None, "msg": None}  # name是否有值,就是客户端判断是否成功的标志. msg是登录认证失败后,显示在客户端的信息

    if user_obj:
        res['name'] = user_obj.name
    else:
        res['msg'] = '用户名或者密码错误!'

    import json
    # 序列化成字符串
    return HttpResponse(json.dumps(res))


def file_put(request):
    if request.method == 'POST':
        print(request.POST)
        print(request.FILES)  # 注意上传文件用的不一样
        file_obj = request.FILES.get('avatar')
        with open(file_obj.name, 'wb') as f:  # file_obj.name就是原文件名,这里没有上传路径默认上传至根目录
            for line in file_obj:
                f.write(line)

        return HttpResponse('OK')

    return render(request, 'file_put.html')


def ajax_json(request):
    print("body", request.body)  # 这里存放请求报文中的请求体
    print("POST", request.POST)  # 此时这个无值, 当contentType==urlencoded时有数据.
    import json
    ret = json.loads(request.body)  # 解码,反序列化
    print(ret)
    print(type(ret))

    return HttpResponse('ok')
<!DOCTYPE html>
<html lang="en">
<head>
    <meta charset="UTF-8">
    <title>上传文件</title>
    <!-- 百度jquery cdn -->
    <script src="http://libs.baidu.com/jquery/2.0.0/jquery.min.js"></script>
</head>
<body>

    <h3>基于form表单的上传文件</h3>
    <form action="" method="post" enctype="multipart/form-data">  // 上传文件特殊的语法
        {% csrf_token %}
        用户名<input type="text" name="user">
        头像  <input type="file" name="avatar">
        <input type="submit">
    </form>
    <hr>
    <h3>Ajax传递json数据</h3>
    <form>
        用户名<input type="text">
        <input type="button" value="ajax" class="btn">
    </form>


    <script>
        $('.btn').click(function () {
            $.ajax({
                url: '/ajax_json/',
                type: 'post',
                contentType: 'application/json', // 指定数据为json格式
                data: JSON.stringify({
                    a: 1,
                    b: 2
                }),
                success: function (data) {
                    console.log(data)
                }
            })
        })
    </script>

</body>
</html>
九十五. 基于Ajax的文件上传
95.1 下图为找到上传文件对象的步骤

95.2 关键代码:
    <h3>基于Ajax的文件上传</h3>
    <form>
        用户名<input type="text" id="user">
        头像<input type="file" id="avatar">
        <input type="button" value="提交" class="btn">
    </form>
    <script>
        $('.btn').click(function () {
            // {# 组装待发的文件数据 #}
            var formdata = new FormData();  // 定义数据格式,这是上传文件的标准格式
            formdata.append("user", $('#user').val());  // 用户名
            formdata.append("avatar", $('#avatar')[0].files[0]);  // 文件实体

            $.ajax({
                url: '/file_put_ajax/',
                type: 'post',
                data: formdata,  // 待发文件数据
                contentType: false,  // 不做任何编码, 编码的工作已经交给了FormData了
                processData: false, // 对数据不做预处理
                success: function (data) {
                    console.log(data)
                }

            })
        })
    </script>
def file_put_ajax(request):
    if request.method == "POST":
        print('body', request.body)
        print('post', request.POST)
        file_obj = request.FILES.get('avatar')
        with open(file_obj.name, 'wb') as f:
            for line in file_obj:
                f.write(line)
        return HttpResponse('ok')

    return render(request, 'file_put_ajax.html')
服务器端print:
body内为文件实体, post内为用户名
95.3 基于Ajax上传文件的源代码:
from django.contrib import admin
from django.urls import path
from app01 import views

urlpatterns = [
    path('admin/', admin.site.urls),
    path('file_put_ajax/', views.file_put_ajax),
]
from django.shortcuts import render, HttpResponse
from app01.models import User

# Create your views here.

def file_put_ajax(request):
    if request.method == "POST":
        print('body', request.body)
        print('post', request.POST)  // 用户名从这里获取
        file_obj = request.FILES.get('avatar')  // 文件实体从FILES中获取
        with open(file_obj.name, 'wb') as f:  // 文件将存储在项目根目录
            for line in file_obj:
                f.write(line)
        return HttpResponse('ok')

    return render(request, 'file_put_ajax.html')
<!DOCTYPE html>
<html lang="en">
<head>
    <meta charset="UTF-8">
    <title>基于Ajax上传文件</title>
    <!-- 百度jquery cdn -->
    <script src="http://libs.baidu.com/jquery/2.0.0/jquery.min.js"></script>
</head>
<body>
    <h3>基于Ajax的文件上传</h3>
    <form>
        用户名<input type="text" id="user">
        头像<input type="file" id="avatar">
        <input type="button" value="提交" class="btn">
    </form>
    <script>
        $('.btn').click(function () {
            // {# 组装待发的文件数据 #}
            var formdata = new FormData();  // 定义数据格式,这是上传文件的标准格式
            formdata.append("user", $('#user').val());  // 用户名
            formdata.append("avatar", $('#avatar')[0].files[0]);  // 文件实体

            $.ajax({
                url: '/file_put_ajax/',
                type: 'post',
                data: formdata,  // 待发文件数据
                contentType: false,  // 不做任何编码, 编码的工作已经交给了FormData了
                processData: false, // 对数据不做预处理
                success: function (data) {
                    console.log(data)
                }

            })
        })
    </script>


</body>
</html>
九十六. 分页器1
参考: https://www.cnblogs.com/yuanchenqi/articles/9036515.html
96.1 向数据库批量添加数据,使用bulk_create()
批量添加图书,数据库中有两个字段title,price
from django.shortcuts import render,HttpResponse
from app01.models import *

def index(request):
    # 向数据库批量添加数据
    books_list = []
    for i in range(100):
        book_obj = Book(title=f'book_{i}', price=i*2)  # 先创建书籍对象
        books_list.append(book_obj)  # 批量
    Book.objects.bulk_create(books_list)  # 批量添加进数据库

    return HttpResponse('OK')
96.2 paginator分页器常用属性
    # 取所有数据
    book_list = Book.objects.all()
    # 分页
    paginator = Paginator(book_list, 8)  # 为所有数据分页, 每页8条数据
    print("count", paginator.count)  # 数据总数
    print("num_pages", paginator.num_pages)  # 分成的总页数
    print("page_range", paginator.page_range)  # 页码列表
print输出:
count 100  # 总共有100条记录
num_pages 13  # 总共分为13页
page_range range(1, 14)  # 从1页~到13页的列表, range()顾头不顾尾
96.3 分页显示数据
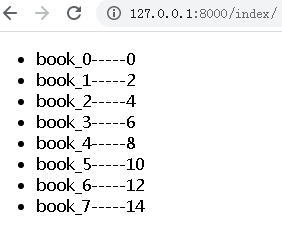
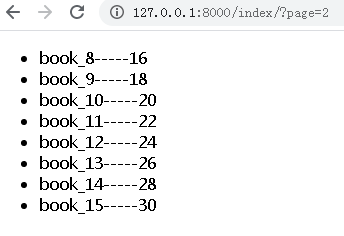
    # 分页,显示出数据
    page1 = paginator.page(1)  # 取第一页的数据对象, 获取第几页就输入第几.

    # 显示第一页的所有数据对象
    print('object_list', page1.object_list)  # 这里每一个元素任然是一个object
    # object_list <QuerySet [<Book: Book object (1)>, <Book: Book object (2)>, <Book: Book object (3)>, <Book: Book object (4)>, <Book: Book object (5)>, <Book: Book object (6)>, <Book: Book object (7)>, <Book: Book object (8)>]>

    # 遍历第一页的数据对象
    for i in page1:
        print(i)
    # Book object (1)
    # Book object (2)
    # Book object (3)
    # Book object (4)
    # Book object (5)
    # Book object (6)
    # Book object (7)
    # Book object (8)
96.4 将分页数据传递到客户端
# views.py

    book_list = Book.objects.all()
    paginator = Paginator(book_list, 8)  # 为所有数据分页, 每页8条数据
    current_page_num = int(request.GET.get('page', 1))  # 获取当前请求的页码数,如第2页,就是2, 如果page没有值,则取后面的默认值1
    current_page = paginator.page(current_page_num)  # 获取当前页码的数据对象,如获取第2页.
# index.html

    <ul>
        {% for book in current_page %}
            <li>{{ book.title }}-----{{ book.price }}</li>
        {% endfor %}

    </ul>
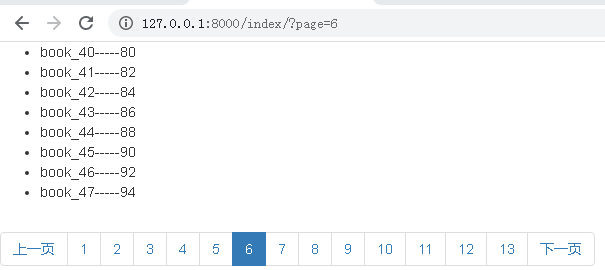
显示效果:
在地址栏手动输入页码,可以访问不同的页.输入: ?page=2
96.5 页码输入超出范围,出错的解决.EmptyPage错误
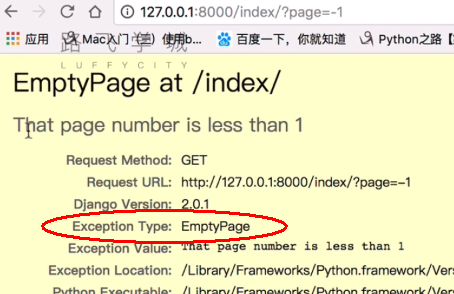
解决方法:
    # 分页,解决页码超范围
    book_list = Book.objects.all()
    paginator = Paginator(book_list, 8)  # 为所有数据分页, 每页8条数据
    try:
        # 下面的request.GET.get('page', 1),就是从客户端地址栏获取的page值,比如http://127.0.0.1:8000/index/?page=2
        current_page_num = int(request.GET.get('page', 1))  # 获取当前请求的页码数,如第2页,就是2, 如果page没有值,则取后面的默认值1
        current_page = paginator.page(current_page_num)  # 获取当前页码的数据对象,如获取第2页.
    except EmptyPage as e:
        current_page = paginator.page(1)  # 超过页码范围的,使用默认page=1
完整代码:
from django.shortcuts import render,HttpResponse
from app01.models import *
from django.core.paginator import Paginator, EmptyPage  # 导入分页器Paginator, 超过页面范围的错误类EmptyPage

# Create your views here.


def index(request):
    """
    # 向数据库批量添加数据
    books_list = []
    for i in range(100):
        book_obj = Book(title=f'book_{i}', price=i*2)  # 先创建书籍对象
        books_list.append(book_obj)  # 批量
    Book.objects.bulk_create(books_list)  # 批量添加进数据库

    return HttpResponse('OK')

    """
    """
    # 取所有数据
    book_list = Book.objects.all()
    # 分页,和常用属性
    paginator = Paginator(book_list, 8)  # 为所有数据分页, 每页8条数据
    print("count", paginator.count)  # 数据总数
    print("num_pages", paginator.num_pages)  # 分成的总页数
    print("page_range", paginator.page_range)  # 页码列表

    # 分页,显示出数据
    page1 = paginator.page(1)  # 取第一页的数据对象, 获取第几页就输入第几.

    # 显示第一页的所有数据对象
    print('object_list', page1.object_list)  # 这里每一个元素任然是一个object
    # object_list <QuerySet [<Book: Book object (1)>, <Book: Book object (2)>, <Book: Book object (3)>, <Book: Book object (4)>, <Book: Book object (5)>, <Book: Book object (6)>, <Book: Book object (7)>, <Book: Book object (8)>]>

    # 遍历第一页的数据对象
    for i in page1:
        print(i)
    # Book object (1)
    # Book object (2)
    # Book object (3)
    # Book object (4)
    # Book object (5)
    # Book object (6)
    # Book object (7)
    # Book object (8)
    """

    # 分页,解决页码超范围
    book_list = Book.objects.all()
    paginator = Paginator(book_list, 8)  # 为所有数据分页, 每页8条数据
    try:
        # 下面的request.GET.get('page', 1),就是从客户端地址栏获取的page值,比如http://127.0.0.1:8000/index/?page=2
        current_page_num = int(request.GET.get('page', 1))  # 获取当前请求的页码数,如第2页,就是2, 如果page没有值,则取后面的默认值1
        current_page = paginator.page(current_page_num)  # 获取当前页码的数据对象,如获取第2页.
    except EmptyPage as e:
        current_page = paginator.page(1)  # 超过页码范围的,使用默认page=1

    return render(request, 'index.html', locals())
<!DOCTYPE html>
<html lang="ch">
<head>
    <meta charset="UTF-8">
    <title>分页显示数据</title>
</head>
<body>

    <ul>
        {% for book in current_page %}
            <li>{{ book.title }}-----{{ book.price }}</li>
        {% endfor %}

    </ul>

</body>
</html>
九十七. 分页器2
97.1 为页面增加页码. 完成以下图所示的功能.需要先导入bootstarp,从bootstarp网站中复制粘贴 组件---分页 的代码. 然后再对页码进行修改.
关键代码:
# index.html

    <ul>
        {% for book in current_page %}
            <li>{{ book.title }}-----{{ book.price }}</li>
        {% endfor %}

    </ul>

    <nav aria-label="Page navigation">
      <ul class="pagination">
        <li>
          <a href="#" aria-label="Previous">
            <span aria-hidden="true">上一页</span>
          </a>
        </li>
        {# paginator.page_range页码列表 #}
        {% for item in paginator.page_range %}
            {# 让当前页面的页码显示颜色变深, current_page_num是服务端当前获取的请求页码 #}
            {% if item == current_page_num %}
                {#      href="?page={{ item }}"实现点击进入相应的页面 ,class="active"页码颜色变深         #}
                <li class="active"><a href="?page={{ item }}">{{ item }}</a></li>
            {% else %}
                <li><a href="?page={{ item }}">{{ item }}</a></li>
            {% endif %}
        {% endfor %}
        <li>
          <a href="#" aria-label="Next">
            <span aria-hidden="true">下一页</span>
          </a>
        </li>
      </ul>
    </nav>
完整代码:
from django.shortcuts import render,HttpResponse
from app01.models import *
from django.core.paginator import Paginator, EmptyPage  # 导入分页器Paginator, 超过页面范围的错误类EmptyPage

# Create your views here.


def index(request):
    """
    # 向数据库批量添加数据
    books_list = []
    for i in range(100):
        book_obj = Book(title=f'book_{i}', price=i*2)  # 先创建书籍对象
        books_list.append(book_obj)  # 批量
    Book.objects.bulk_create(books_list)  # 批量添加进数据库

    return HttpResponse('OK')

    """
    """
    # 取所有数据
    book_list = Book.objects.all()
    # 分页,和常用属性
    paginator = Paginator(book_list, 8)  # 为所有数据分页, 每页8条数据
    print("count", paginator.count)  # 数据总数
    print("num_pages", paginator.num_pages)  # 分成的总页数
    print("page_range", paginator.page_range)  # 页码列表

    # 分页,显示出数据
    page1 = paginator.page(1)  # 取第一页的数据对象, 获取第几页就输入第几.

    # 显示第一页的所有数据对象
    print('object_list', page1.object_list)  # 这里每一个元素任然是一个object
    # object_list <QuerySet [<Book: Book object (1)>, <Book: Book object (2)>, <Book: Book object (3)>, <Book: Book object (4)>, <Book: Book object (5)>, <Book: Book object (6)>, <Book: Book object (7)>, <Book: Book object (8)>]>

    # 遍历第一页的数据对象
    for i in page1:
        print(i)
    # Book object (1)
    # Book object (2)
    # Book object (3)
    # Book object (4)
    # Book object (5)
    # Book object (6)
    # Book object (7)
    # Book object (8)
    """

    # 分页,解决页码超范围
    book_list = Book.objects.all()
    paginator = Paginator(book_list, 8)  # 为所有数据分页, 每页8条数据
    try:
        # 下面的request.GET.get('page', 1),就是从客户端地址栏获取的page值,比如http://127.0.0.1:8000/index/?page=2
        current_page_num = int(request.GET.get('page', 1))  # 获取当前请求的页码数,如第2页,就是2, 如果page没有值,则取后面的默认值1
        current_page = paginator.page(current_page_num)  # 获取当前页码的数据对象,如获取第2页.
    except EmptyPage as e:
        current_page = paginator.page(1)  # 超过页码范围的,使用默认page=1

    return render(request, 'index.html', locals())
<!DOCTYPE html>
<html lang="ch">
<head>
    <meta charset="UTF-8">
    <title>分页显示数据</title>
    <!-- 最新版本的 Bootstrap 核心 CSS 文件 -->
    <link rel="stylesheet" href="https://cdn.jsdelivr.net/npm/bootstrap@3.3.7/dist/css/bootstrap.min.css" integrity="sha384-BVYiiSIFeK1dGmJRAkycuHAHRg32OmUcww7on3RYdg4Va+PmSTsz/K68vbdEjh4u" crossorigin="anonymous">
</head>
<body>

    <ul>
        {% for book in current_page %}
            <li>{{ book.title }}-----{{ book.price }}</li>
        {% endfor %}

    </ul>

    <nav aria-label="Page navigation">
      <ul class="pagination">
        <li>
          <a href="#" aria-label="Previous">
            <span aria-hidden="true">上一页</span>
          </a>
        </li>
        {# paginator.page_range页码列表 #}
        {% for item in paginator.page_range %}
            {# 让当前页面的页码显示颜色变深, current_page_num是服务端当前获取的请求页码 #}
            {% if item == current_page_num %}
                {#      href="?page={{ item }}"实现点击进入相应的页面 ,class="active"页码颜色变深         #}
                <li class="active"><a href="?page={{ item }}">{{ item }}</a></li>
            {% else %}
                <li><a href="?page={{ item }}">{{ item }}</a></li>
            {% endif %}
        {% endfor %}
        <li>
          <a href="#" aria-label="Next">
            <span aria-hidden="true">下一页</span>
          </a>
        </li>
      </ul>
    </nav>

</body>
</html>
九十八. 分页器3
97.1 完成上一页, 下一页功能
关键代码:
    # 用于上一页下一页功能的相关属性
    # page2 = paginator.page(2)
    # print(page2.has_next())            # 是否有下一页
    # print(page2.next_page_number())    # 下一页的页码
    # print(page2.has_previous())        # 是否有上一页
    # print(page2.previous_page_number())  # 上一页的页码
            {# 判断上一页是否有,如果没有则class="disabled" #}
            {% if current_page.has_previous %}
                <li><a href="?page={{ current_page.previous_page_number }}" aria-label="Previous"><span aria-hidden="true">上一页</span></a></li>
            {% else %}
                <li class="disabled"><a href="" aria-label="Previous"><span aria-hidden="true">上一页</span></a></li>
            {% endif %}
        {#  判断是否还有下一页    #}
        {% if current_page.has_next %}
            <li><a href="?page={{ current_page.next_page_number }}" aria-label="Next"><span aria-hidden="true">下一页</span></a></li>
        {% else %}
            <li class="disabled"><a href="#" aria-label="Next"><span aria-hidden="true">下一页</span></a></li>
        {% endif %}
完整代码:
<!DOCTYPE html>
<html lang="ch">
<head>
    <meta charset="UTF-8">
    <title>分页显示数据</title>
    <!-- 最新版本的 Bootstrap 核心 CSS 文件 -->
    <link rel="stylesheet" href="https://cdn.jsdelivr.net/npm/bootstrap@3.3.7/dist/css/bootstrap.min.css" integrity="sha384-BVYiiSIFeK1dGmJRAkycuHAHRg32OmUcww7on3RYdg4Va+PmSTsz/K68vbdEjh4u" crossorigin="anonymous">
</head>
<body>

    <ul>
        {% for book in current_page %}
            <li>{{ book.title }}-----{{ book.price }}</li>
        {% endfor %}

    </ul>

    <nav aria-label="Page navigation">
      <ul class="pagination">
            {# 判断上一页是否有,如果没有则class="disabled" #}
            {% if current_page.has_previous %}
                <li><a href="?page={{ current_page.previous_page_number }}" aria-label="Previous"><span aria-hidden="true">上一页</span></a></li>
            {% else %}
                <li class="disabled"><a href="" aria-label="Previous"><span aria-hidden="true">上一页</span></a></li>
            {% endif %}

        {# paginator.page_range页码列表 #}
        {% for item in paginator.page_range %}
            {# 让当前页面的页码显示颜色变深, current_page_num是服务端当前获取的请求页码 #}
            {% if item == current_page_num %}
                {#      href="?page={{ item }}"实现点击进入相应的页面 ,class="active"页码颜色变深         #}
                <li class="active"><a href="?page={{ item }}">{{ item }}</a></li>
            {% else %}
                <li><a href="?page={{ item }}">{{ item }}</a></li>
            {% endif %}
        {% endfor %}

        {#  判断是否还有下一页    #}
        {% if current_page.has_next %}
            <li><a href="?page={{ current_page.next_page_number }}" aria-label="Next"><span aria-hidden="true">下一页</span></a></li>
        {% else %}
            <li class="disabled"><a href="#" aria-label="Next"><span aria-hidden="true">下一页</span></a></li>
        {% endif %}
      </ul>
    </nav>

</body>
</html>
from django.shortcuts import render,HttpResponse
from app01.models import *
from django.core.paginator import Paginator, EmptyPage  # 导入分页器Paginator, 超过页面范围的错误类EmptyPage

# Create your views here.


def index(request):
    """
    # 向数据库批量添加数据
    books_list = []
    for i in range(100):
        book_obj = Book(title=f'book_{i}', price=i*2)  # 先创建书籍对象
        books_list.append(book_obj)  # 批量
    Book.objects.bulk_create(books_list)  # 批量添加进数据库

    return HttpResponse('OK')

    """
    """
    # 取所有数据
    book_list = Book.objects.all()
    # 分页,和常用属性
    paginator = Paginator(book_list, 8)  # 为所有数据分页, 每页8条数据
    print("count", paginator.count)  # 数据总数
    print("num_pages", paginator.num_pages)  # 分成的总页数
    print("page_range", paginator.page_range)  # 页码列表

    # 分页,显示出数据
    page1 = paginator.page(1)  # 取第一页的数据对象, 获取第几页就输入第几.

    # 显示第一页的所有数据对象
    print('object_list', page1.object_list)  # 这里每一个元素任然是一个object
    # object_list <QuerySet [<Book: Book object (1)>, <Book: Book object (2)>, <Book: Book object (3)>, <Book: Book object (4)>, <Book: Book object (5)>, <Book: Book object (6)>, <Book: Book object (7)>, <Book: Book object (8)>]>

    # 遍历第一页的数据对象
    for i in page1:
        print(i)
    # Book object (1)
    # Book object (2)
    # Book object (3)
    # Book object (4)
    # Book object (5)
    # Book object (6)
    # Book object (7)
    # Book object (8)
    """

    # 分页,解决页码超范围
    book_list = Book.objects.all()
    paginator = Paginator(book_list, 8)  # 为所有数据分页, 每页8条数据
    try:
        # 下面的request.GET.get('page', 1),就是从客户端地址栏获取的page值,比如http://127.0.0.1:8000/index/?page=2
        current_page_num = int(request.GET.get('page', 1))  # 获取当前请求的页码数,如第2页,就是2, 如果page没有值,则取后面的默认值1
        current_page = paginator.page(current_page_num)  # 获取当前页码的数据对象,如获取第2页.
    except EmptyPage as e:
        current_page = paginator.page(1)  # 超过页码范围的,使用默认page=1

    # 用于上一页下一页功能的相关属性
    # page2 = paginator.page(2)
    # print(page2.has_next())            # 是否有下一页
    # print(page2.next_page_number())    # 下一页的页码
    # print(page2.has_previous())        # 是否有上一页
    # print(page2.previous_page_number())  # 上一页的页码

    return render(request, 'index.html', locals())
九十九. 分页器3
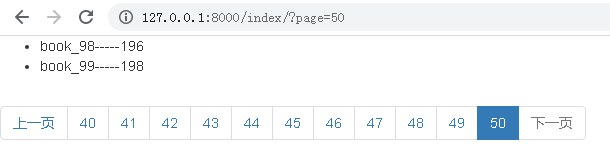
解决分页数量太多,页码数显示太多问题

关键代码:
    # 分页,解决页码超范围
    book_list = Book.objects.all()
    paginator = Paginator(book_list, 2)  # 为所有数据分页, 每页8条数据

    try:
        # 下面的request.GET.get('page', 1),就是从客户端地址栏获取的page值,比如http://127.0.0.1:8000/index/?page=2
        current_page_num = int(request.GET.get('page', 1))  # 获取当前请求的页码数,如第2页,就是2, 如果page没有值,则取后面的默认值1
        current_page = paginator.page(current_page_num)  # 获取当前页码的数据对象,如获取第2页.
    except EmptyPage as e:
        current_page = paginator.page(1)  # 超过页码范围的,使用默认page=1


    # 解决页码显示太多的问题,固定最多显示11个页码.  paginator.num_pages获取分出的总页数
    if paginator.num_pages > 11:  # 注意,最多显示11个页码,多出的暂时隐藏.
        if current_page_num-5 < 1:  # 当前页码-5小于1,说明显示页码左边到头了.
            page_range = range(1, 12)  # 显示11个页码
        elif current_page_num + 5 > paginator.num_pages:  # 当前页码+5大于总页码数,说明显示页码到最右边了.
            page_range = range(paginator.num_pages-10, paginator.num_pages+1)
        else:
            page_range = range(current_page_num-5, current_page_num+6)  # 让当前页码位于中间.顾头不顾尾所以是+6
    else:
        page_range = paginator.page_range  # 小于11页时,不用做处理.paginator.page_range是页码列表
        {# page_range页码列表 #}
        {% for item in page_range %}
            {# 让当前页面的页码显示颜色变深, current_page_num是服务端当前获取的请求页码 #}
            {% if item == current_page_num %}
                {#      href="?page={{ item }}"实现点击进入相应的页面 ,class="active"页码颜色变深         #}
                <li class="active"><a href="?page={{ item }}">{{ item }}</a></li>
            {% else %}
                <li><a href="?page={{ item }}">{{ item }}</a></li>
            {% endif %}
        {% endfor %}
完整代码:
<!DOCTYPE html>
<html lang="ch">
<head>
    <meta charset="UTF-8">
    <title>分页显示数据</title>
    <!-- 最新版本的 Bootstrap 核心 CSS 文件 -->
    <link rel="stylesheet" href="https://cdn.jsdelivr.net/npm/bootstrap@3.3.7/dist/css/bootstrap.min.css" integrity="sha384-BVYiiSIFeK1dGmJRAkycuHAHRg32OmUcww7on3RYdg4Va+PmSTsz/K68vbdEjh4u" crossorigin="anonymous">
</head>
<body>

    <ul>
        {% for book in current_page %}
            <li>{{ book.title }}-----{{ book.price }}</li>
        {% endfor %}

    </ul>

    <nav aria-label="Page navigation">
      <ul class="pagination">
            {# 判断上一页是否有,如果没有则class="disabled" #}
            {% if current_page.has_previous %}
                <li><a href="?page={{ current_page.previous_page_number }}" aria-label="Previous"><span aria-hidden="true">上一页</span></a></li>
            {% else %}
                <li class="disabled"><a href="" aria-label="Previous"><span aria-hidden="true">上一页</span></a></li>
            {% endif %}

        {# page_range页码列表 #}
        {% for item in page_range %}
            {# 让当前页面的页码显示颜色变深, current_page_num是服务端当前获取的请求页码 #}
            {% if item == current_page_num %}
                {#      href="?page={{ item }}"实现点击进入相应的页面 ,class="active"页码颜色变深         #}
                <li class="active"><a href="?page={{ item }}">{{ item }}</a></li>
            {% else %}
                <li><a href="?page={{ item }}">{{ item }}</a></li>
            {% endif %}
        {% endfor %}

        {#  判断是否还有下一页    #}
        {% if current_page.has_next %}
            <li><a href="?page={{ current_page.next_page_number }}" aria-label="Next"><span aria-hidden="true">下一页</span></a></li>
        {% else %}
            <li class="disabled"><a href="#" aria-label="Next"><span aria-hidden="true">下一页</span></a></li>
        {% endif %}
      </ul>
    </nav>

</body>
</html>
from django.shortcuts import render,HttpResponse
from app01.models import *
from django.core.paginator import Paginator, EmptyPage  # 导入分页器Paginator, 超过页面范围的错误类EmptyPage

# Create your views here.


def index(request):
    """
    # 向数据库批量添加数据
    books_list = []
    for i in range(100):
        book_obj = Book(title=f'book_{i}', price=i*2)  # 先创建书籍对象
        books_list.append(book_obj)  # 批量
    Book.objects.bulk_create(books_list)  # 批量添加进数据库

    return HttpResponse('OK')

    """
    """
    # 取所有数据
    book_list = Book.objects.all()
    # 分页,和常用属性
    paginator = Paginator(book_list, 8)  # 为所有数据分页, 每页8条数据
    print("count", paginator.count)  # 数据总数
    print("num_pages", paginator.num_pages)  # 分成的总页数
    print("page_range", paginator.page_range)  # 页码列表

    # 分页,显示出数据
    page1 = paginator.page(1)  # 取第一页的数据对象, 获取第几页就输入第几.

    # 显示第一页的所有数据对象
    print('object_list', page1.object_list)  # 这里每一个元素任然是一个object
    # object_list <QuerySet [<Book: Book object (1)>, <Book: Book object (2)>, <Book: Book object (3)>, <Book: Book object (4)>, <Book: Book object (5)>, <Book: Book object (6)>, <Book: Book object (7)>, <Book: Book object (8)>]>

    # 遍历第一页的数据对象
    for i in page1:
        print(i)
    # Book object (1)
    # Book object (2)
    # Book object (3)
    # Book object (4)
    # Book object (5)
    # Book object (6)
    # Book object (7)
    # Book object (8)
    """

    # 分页,解决页码超范围
    book_list = Book.objects.all()
    paginator = Paginator(book_list, 2)  # 为所有数据分页, 每页8条数据

    try:
        # 下面的request.GET.get('page', 1),就是从客户端地址栏获取的page值,比如http://127.0.0.1:8000/index/?page=2
        current_page_num = int(request.GET.get('page', 1))  # 获取当前请求的页码数,如第2页,就是2, 如果page没有值,则取后面的默认值1
        current_page = paginator.page(current_page_num)  # 获取当前页码的数据对象,如获取第2页.
    except EmptyPage as e:
        current_page = paginator.page(1)  # 超过页码范围的,使用默认page=1

    # 用于上一页下一页功能的相关属性
    # page2 = paginator.page(2)
    # print(page2.has_next())            # 是否有下一页
    # print(page2.next_page_number())    # 下一页的页码
    # print(page2.has_previous())        # 是否有上一页
    # print(page2.previous_page_number())  # 上一页的页码


    # 解决页码显示太多的问题,固定最多显示11个页码.  paginator.num_pages获取分出的总页数
    if paginator.num_pages > 11:  # 注意,最多显示11个页码,多出的暂时隐藏.
        if current_page_num-5 < 1:  # 当前页码-5小于1,说明显示页码左边到头了.
            page_range = range(1, 12)  # 显示11个页码
        elif current_page_num + 5 > paginator.num_pages:  # 当前页码+5大于总页码数,说明显示页码到最右边了.
            page_range = range(paginator.num_pages-10, paginator.num_pages+1)
        else:
            page_range = range(current_page_num-5, current_page_num+6)  # 让当前页码位于中间.顾头不顾尾所以是+6
    else:
        page_range = paginator.page_range  # 小于11页时,不用做处理.paginator.page_range是页码列表

    return render(request, 'index.html', locals())
一百. forms组件的校验功能
下转: 第六模块: WEB框架开发之Django框架开发学习笔记3
class="container"
八十七. 基于多表的图书管理系统删除功能 作业
'hello ajax'

 浙公网安备 33010602011771号