spring-boot、spring-data-jpa整合
一、Spring Boot是由Pivotal团队提供的全新框架,其设计目的是用来简化新Spring应用的初始搭建以及开发过程。该框架使用了特定的方式来进行配置,从而使开发人员不再需要定义样板化的配置。通过这种方式,Spring Boot致力于在蓬勃发展的快速应用开发领域(rapid application development)成为领导者。
二、Spring Boot 在配置上面都做了很多的简化。配置文件在resource目录里面,会自动做加载,优先resource下面的config目录配置文件加载,并且,spring-boot里面提供了许多相关的配置包,不需要在像mvc那样配置很多的xml配置文件
三、JPA这里我不多做介绍,可以参考,我原来通过springmvc和spring-data-jpa的整合:http://www.cnblogs.com/ll409546297/p/6992188.html
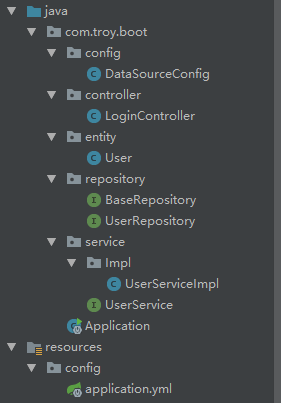
四、这里介绍spring-boot和JPA的相关配置(简易配置)。看一下目录结构

五、pom.xml配置
<?xml version="1.0" encoding="UTF-8"?>
<project xmlns="http://maven.apache.org/POM/4.0.0"
         xmlns:xsi="http://www.w3.org/2001/XMLSchema-instance"
         xsi:schemaLocation="http://maven.apache.org/POM/4.0.0 http://maven.apache.org/xsd/maven-4.0.0.xsd">
    <modelVersion>4.0.0</modelVersion>

    <groupId>com.troy</groupId>
    <artifactId>springboot</artifactId>
    <version>1.0-SNAPSHOT</version>
    <parent>
        <groupId>org.springframework.boot</groupId>
        <artifactId>spring-boot-starter-parent</artifactId>
        <version>1.5.6.RELEASE</version>
    </parent>
    <dependencies>
        <dependency>
            <groupId>org.springframework.boot</groupId>
            <artifactId>spring-boot-starter-web</artifactId>
            <version>1.5.6.RELEASE</version>
        </dependency>
        <dependency>
            <groupId>org.springframework.boot</groupId>
            <artifactId>spring-boot-starter-data-jpa</artifactId>
            <version>1.5.6.RELEASE</version>
        </dependency>
        <dependency>
            <groupId>org.springframework.boot</groupId>
            <artifactId>spring-boot-autoconfigure</artifactId>
            <version>1.5.6.RELEASE</version>
        </dependency>
        <dependency>
            <groupId>mysql</groupId>
            <artifactId>mysql-connector-Java</artifactId>
            <version>5.1.9</version>
        </dependency>
    </dependencies>
</project>
注释:里面的一些包可以不用加入,结合自己进行增删包
六、yml配置部分,这里只需要配置需要的部分,idea会根据提示来。
server:
  port: 8080
spring:
  datasource:
    driver-class-name: com.mysql.jdbc.Driver
    url: jdbc:mysql://localhost:3306/model?useUnicode=true&characterEncoding=utf8
    username: root
    password: root
  jpa:
    show-sql: true
    hibernate:
      ddl-auto: update
七、配置启动入口application把这个类放到目录的最外层,他会自动扫描相应的子包
package com.troy.boot;

import org.springframework.boot.SpringApplication;
import org.springframework.boot.autoconfigure.SpringBootApplication;
import org.springframework.boot.web.support.SpringBootServletInitializer;

@SpringBootApplication
public class Application extends SpringBootServletInitializer{

    public static void main(String[] args) {
        SpringApplication.run(Application.class,args);
    }
}
八、针对于entity、dao层进行控制的配置
package com.troy.boot.config;

import org.springframework.boot.autoconfigure.domain.EntityScan;
import org.springframework.context.annotation.Configuration;
import org.springframework.data.jpa.repository.config.EnableJpaRepositories;

@Configuration
@EnableJpaRepositories(basePackages = "com.troy.boot.repository")
@EntityScan(basePackages = "com.troy.boot.entity")
public class DataSourceConfig {

}
注意:这里也提供了@Configuration来配置具体属性,当然这是jpa提供的
九、entity层
package com.troy.boot.entity;

import javax.persistence.*;

@Entity
@Table(name = "USER")
public class User {

    @Id
    @Column(name = "ID")
    @GeneratedValue(strategy = GenerationType.AUTO)
    private Long id;
    @Column(name = "NAME")
    private String name;
    @Column(name = "AGE")
    private String age;

    public Long getId() {
        return id;
    }

    public void setId(Long id) {
        this.id = id;
    }

    public String getName() {
        return name;
    }

    public void setName(String name) {
        this.name = name;
    }

    public String getAge() {
        return age;
    }

    public void setAge(String age) {
        this.age = age;
    }
}
十、repository层
BaseRepository.class
package com.troy.boot.repository;

import org.springframework.data.jpa.repository.JpaSpecificationExecutor;
import org.springframework.data.repository.NoRepositoryBean;
import org.springframework.data.repository.PagingAndSortingRepository;

import java.io.Serializable;

@NoRepositoryBean
public interface BaseRepository<T,I extends Serializable> extends PagingAndSortingRepository<T,I>,JpaSpecificationExecutor<T>{
}
UserRepository.class
package com.troy.boot.repository;

import com.troy.boot.entity.User;

public interface UserRepository extends BaseRepository<User,Long> {

}
十一、service层
package com.troy.boot.service;

import com.troy.boot.entity.User;

import java.util.List;

public interface UserService {

    /**
     * 查询全部用户
     * @return
     */
    public List<User> queryUsers();
}
Impl
package com.troy.boot.service.Impl;

import com.troy.boot.entity.User;
import com.troy.boot.repository.UserRepository;
import com.troy.boot.service.UserService;
import org.springframework.beans.factory.annotation.Autowired;
import org.springframework.data.jpa.domain.Specification;
import org.springframework.stereotype.Service;

import javax.persistence.criteria.CriteriaBuilder;
import javax.persistence.criteria.CriteriaQuery;
import javax.persistence.criteria.Predicate;
import javax.persistence.criteria.Root;
import java.util.ArrayList;
import java.util.List;

@Service
public class UserServiceImpl implements UserService {

    @Autowired
    private UserRepository userRepository;

    @Override
    public List<User> queryUsers() {
        Specification<User> specification = new Specification<User>() {
            @Override
            public Predicate toPredicate(Root<User> root, CriteriaQuery<?> query, CriteriaBuilder cb) {
                List<Predicate> querys = new ArrayList<Predicate>();
                Predicate[] predicates = new Predicate[querys.size()];
                return cb.and(querys.toArray(predicates));
            }
        };
        List<User> list = userRepository.findAll(specification);
        return list;
    }
}
十二、controller层
package com.troy.boot.controller;

import com.troy.boot.entity.User;
import com.troy.boot.service.UserService;
import org.springframework.beans.factory.annotation.Autowired;
import org.springframework.web.bind.annotation.RequestMapping;
import org.springframework.web.bind.annotation.RestController;

import java.util.List;

@RestController
@RequestMapping(value = "/api/login")
public class LoginController {

    @Autowired
    private UserService userService;

    @RequestMapping(value = "/init")
    public String init() {
        return "hello world!";
    }

    @RequestMapping(value = "/queryUsers")
    public List<User> queryUsers() {
        return userService.queryUsers();
    }
}
基本上的spring-boot加JPA的配置和使用过程就这个样子了。spring-boot的使用主要是在高效和应用方面。能很好的使用相应的功能,并且简化配置


