【转载】Oracle - 数据库打补丁最佳实践
一、概述
本文将介绍如何给oracle数据库打最新补丁,数据库版本为11.2.0.4单实例,操作系统为redhat6.5
二、下载相关升级包
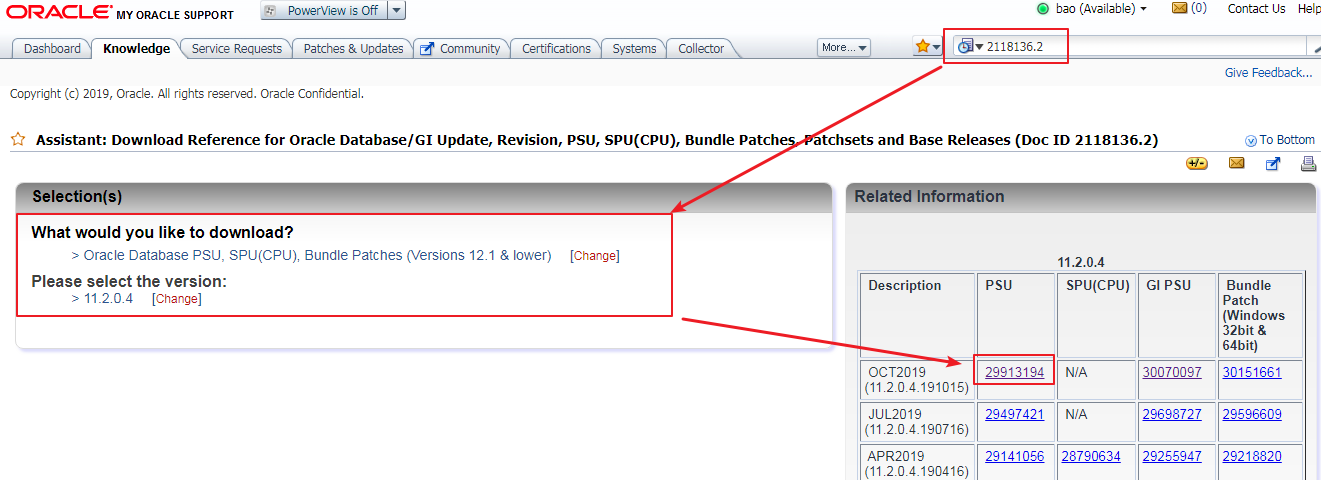
1. 登录MOS,查阅(ID 2118136.2),下载最新补丁包
PSU (Patch Set Update),数据库补丁
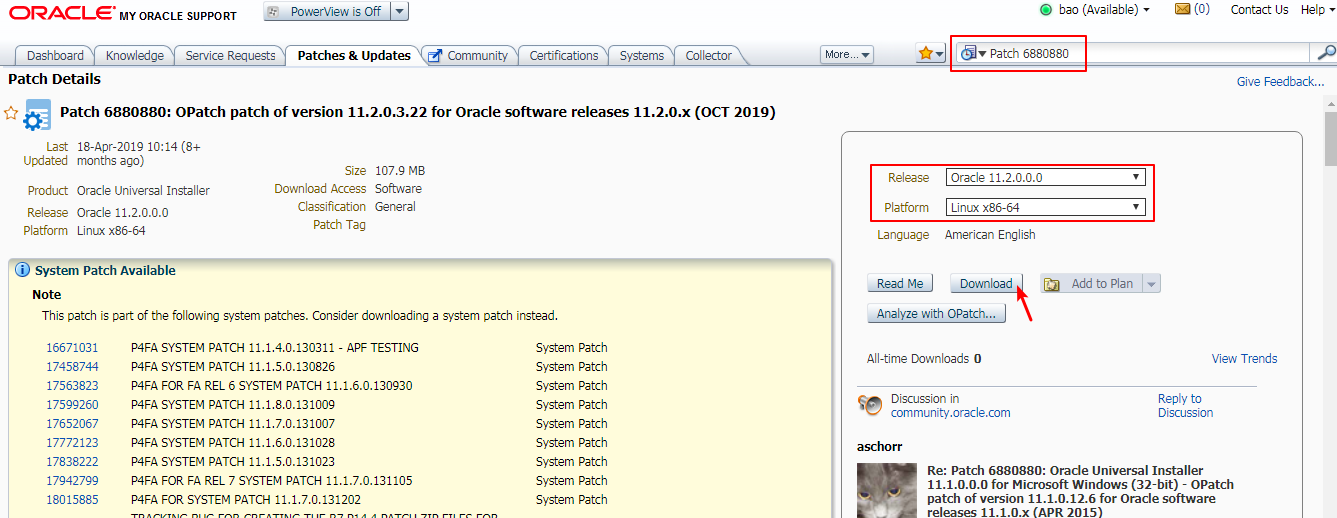
2. 搜索"Patch 6880880",下载最新opatch
opatch是安装补丁的程序,数据库软件安装完成后,就自带了opatch,但是版本太旧了,所以这里下载最新的opatch
至此已下载两个文件
p6880880_112000_Linux-x86-64.zip:opatch升级包
p29913194_112040_Linux-x86-64.zip:数据库补丁
三、升级opatch
opatch的升级比较简单,就是个文件覆盖
3. 查看原始opatch信息
[oracle@orasingle ~]$ cd $ORACLE_HOME/OPatch
[oracle@orasingle OPatch]$ ./opatch version # 查看版本信息
OPatch Version: 11.2.0.3.4

OPatch succeeded.
[oracle@orasingle OPatch]$ ./opatch lsinventory # 查看打补丁的情况
Oracle Interim Patch Installer version 11.2.0.3.4
Copyright (c) 2012, Oracle Corporation.  All rights reserved.

Oracle Home       : /u01/app/oracle/product/11.2.0/db_1
Central Inventory : /u01/app/oraInventory
   from           : /u01/app/oracle/product/11.2.0/db_1/oraInst.loc
OPatch version    : 11.2.0.3.4
OUI version       : 11.2.0.4.0
Log file location : /u01/app/oracle/product/11.2.0/db_1/cfgtoollogs/opatch/opatch2019-12-25_14-26-47PM_1.log

Lsinventory Output file location : /u01/app/oracle/product/11.2.0/db_1/cfgtoollogs/opatch/lsinv/lsinventory2019-12-25_14-26-47PM.txt

--------------------------------------------------------------------------------
Installed Top-level Products (1):
Oracle Database 11g                                                  11.2.0.4.0
There are 1 products installed in this Oracle Home.
There are no Interim patches installed in this Oracle Home.
--------------------------------------------------------------------------------

OPatch succeeded.
4. 备份原opatch
[oracle@orasingle ~]$ cd $ORACLE_HOME
[oracle@orasingle db_1]$ mv OPatch OPatch.bak
5. 解压新下载的opatch包
将下载的opatch包上传到oracle的家目录
[oracle@orasingle db_1]$ cd ~
[oracle@orasingle ~]$ unzip p6880880_112000_Linux-x86-64.zip -d $ORACLE_HOME
6. 再来查看opatch信息
[oracle@orasingle ~]$ cd $ORACLE_HOME/OPatch
[oracle@orasingle OPatch]$ ./opatch version # 查看版本信息
OPatch Version: 11.2.0.3.21

OPatch succeeded.
至此opatch升级完毕
四、打数据库补丁
7. 关闭em、监听、数据库
[oracle@orasingle ~]$ emctl stop dbconsole # 如果没有开启em,这步可以跳过
[oracle@orasingle ~]$ lsnrctl stop
[oracle@orasingle ~]$ sqlplus / as sysdba
SQL> shutdown immediate
SQL> exit
8. 解压新下载的补丁包
将下载的补丁包上传到oracle的家目录
[oracle@orasingle ~]$ cd ~
[oracle@orasingle ~]$ unzip p29913194_112040_Linux-x86-64.zip
9. 校验该补丁包是否与之前的补丁有冲突
[oracle@orasingle ~]$ cd 29913194
[oracle@orasingle 29913194]$ $ORACLE_HOME/OPatch/opatch prereq CheckConflictAgainstOHWithDetail -ph ./
Oracle Interim Patch Installer version 11.2.0.3.21
Copyright (c) 2019, Oracle Corporation.  All rights reserved.

PREREQ session

Oracle Home       : /u01/app/oracle/product/11.2.0/db_1
Central Inventory : /u01/app/oraInventory
   from           : /u01/app/oracle/product/11.2.0/db_1/oraInst.loc
OPatch version    : 11.2.0.3.21
OUI version       : 11.2.0.4.0
Log file location : /u01/app/oracle/product/11.2.0/db_1/cfgtoollogs/opatch/opatch2019-12-25_14-46-26PM_1.log

Invoking prereq "checkconflictagainstohwithdetail"

Prereq "checkConflictAgainstOHWithDetail" passed.

OPatch succeeded.
由于这个测试库之前并没有打什么补丁,所以这里就不可能有补丁冲突的问题,如果这里显示有冲突,再去mos上查找相关解决方案。
10. 正式升级
[oracle@orasingle 29913194]$ $ORACLE_HOME/OPatch/opatch apply
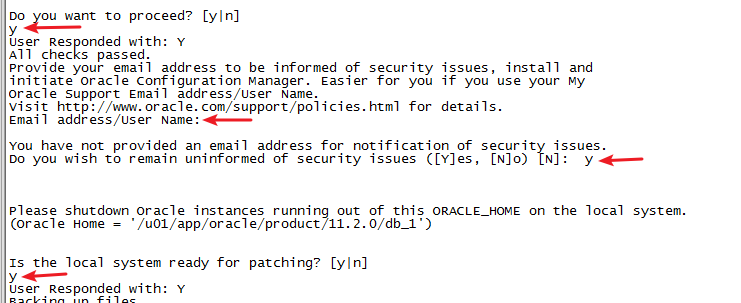
这里要输入3次y和一次回车,这个是时间耗时比较久的,耐心等待
升级完成后报上面的错误,通过查阅mos(ID 2265726.1),可知这个错误可以被忽略
11. 再次查看打补丁的情况
[oracle@orasingle 29913194]$ $ORACLE_HOME/OPatch/opatch lsinventory # 查看打补丁的情况
内容较多,略
12. 启动数据库,并运行sql文件
[oracle@orasingle 29913194]$ cd $ORACLE_HOME/rdbms/admin
[oracle@orasingle admin]$ sqlplus / as sysdba
SQL> startup
SQL> @catbundle.sql psu apply
SQL> quit
验证:通过查询dba_registry_history;
select action_time,action from dba_registry_history;

ACTION_TIME ACTION
--------------------------------------------------------------------------- ------------------------------
21-APR-15 08.52.24.728992 AM APPLY
08-OCT-18 09.43.41.923815 AM APPLY

2 rows selecte
13. 启动监听、em
[oracle@orasingle ~]$ lsnrctl start
[oracle@orasingle ~]$ emctl start dbconsole # 如果没有开启em,这步可以跳过
至此数据库打补丁已全部完成!
五、回退数据库补丁
数据库在做变更时,当然要考虑回退方案了,接下来介绍如何回退数据库补丁
14. 关闭em、监听、数据库
[oracle@orasingle ~]$ emctl stop dbconsole # 如果没有开启em,这步可以跳过
[oracle@orasingle ~]$ lsnrctl stop
[oracle@orasingle ~]$ sqlplus / as sysdba
SQL> shutdown immediate
SQL> exit
15. 回退补丁
[oracle@orasingle ~]$ $ORACLE_HOME/OPatch/opatch rollback -id 29913194
这里要输入一次y,时间比较久,耐心等待
这里提示warning,查阅mos(ID 1448337.1),得知可以忽略
16. 启动数据库,并运行sql文件
[oracle@orasingle 29913194]$ cd $ORACLE_HOME/rdbms/admin
[oracle@orasingle admin]$ sqlplus / as sysdba
SQL> startup
SQL> @catbundle_PSU_ORCLTEST_ROLLBACK.sql # 注意这里可能每个人都不一样,orcltest是我的实例名
SQL> quit
17. 再查看打补丁的情况
[oracle@orasingle ~]$ cd $ORACLE_HOME/OPatch
[oracle@orasingle OPatch]$ ./opatch lsinventory # 查看打补丁的情况
OPatch Version: 11.2.0.3.21

OPatch succeeded.
[oracle@orasingle OPatch]$ ./opatch lsinv
Oracle Interim Patch Installer version 11.2.0.3.21
Copyright (c) 2019, Oracle Corporation.  All rights reserved.

Oracle Home       : /u01/app/oracle/product/11.2.0/db_1
Central Inventory : /u01/app/oraInventory
   from           : /u01/app/oracle/product/11.2.0/db_1/oraInst.loc
OPatch version    : 11.2.0.3.21
OUI version       : 11.2.0.4.0
Log file location : /u01/app/oracle/product/11.2.0/db_1/cfgtoollogs/opatch/opatch2019-12-25_16-15-41PM_1.log

Lsinventory Output file location : /u01/app/oracle/product/11.2.0/db_1/cfgtoollogs/opatch/lsinv/lsinventory2019-12-25_16-15-41PM.txt

--------------------------------------------------------------------------------
Local Machine Information::
Hostname: orasingle
ARU platform id: 226
ARU platform description:: Linux x86-64
Installed Top-level Products (1):
Oracle Database 11g                                                  11.2.0.4.0
There are 1 products installed in this Oracle Home.
There are no Interim patches installed in this Oracle Home.
--------------------------------------------------------------------------------

OPatch succeeded.
可以看到补丁都被卸载了
18. 启动监听和em
[oracle@orasingle ~]$ lsnrctl start
[oracle@orasingle ~]$ emctl start dbconsole # 如果没有开启em,这步可以跳过
六、问题汇总
问题1:
cd $GRID_HOME/bin
touch fuser
chmod 755 fuser
ls -tlr fuser
-rwxr-xr-x 1 grid oinstall 0 Aug 30 01:51 fuser
七、附录
本文给大家介绍了最简单的单实例数据库打补丁步骤,仅作参考,实际应以补丁包中的readme为准。
https://www.cnblogs.com/ddzj01/p/12097467.html
 微信赞赏
微信赞赏

 支付宝赞赏
支付宝赞赏


【推荐】国内首个AI IDE,深度理解中文开发场景,立即下载体验Trae
【推荐】编程新体验,更懂你的AI,立即体验豆包MarsCode编程助手
【推荐】抖音旗下AI助手豆包,你的智能百科全书,全免费不限次数
【推荐】轻量又高性能的 SSH 工具 IShell:AI 加持,快人一步