老冯课堂笔记SpringBoot
1.SpringBoot简介
Spring Boot是由Pivotal团队提供的全新框架,其设计目的是用来简化新Spring应用的初始搭建以及开发过程。该框架使用了特定的方式来进行配置,从而使开发人员不再需要定义样板化的配置。通过这种方式,Spring Boot致力于在蓬勃发展的快速应用开发领域(rapid application development)成为领导者。
1.1 设计初衷
- 为Spring开发者提供了一种更快捷,体验更好的Spring应用开发方式
- 开箱即用,同时也能快速扩展
- 嵌入式的tomcat
- 绝对没有冗余代码,无需xml配置
1.2 核心功能
- Spring容器
- 日志
- 自动配置(AutoConfiguration)
- Starters(起步依赖)
1.3 使用版本
- 如果项目要使用SpringCloud,先确定SpringCloud的版本再去确定它支持的SpringBoot
- 如果不用SpringCloud,可以参考支持的时间
SpringBoot的版本区别:
	GA:正式发布的版本,官方推荐使用
	SNAPSHOT:快照版,可以稳定使用,且仍在继续改进的版本
	PRE:预览版,内部测试版,主要是给开发人员和测试人员和找Bug用的,不建议使用

我们要讲的版本是:2.6.13
2.SpringBoot入门案例
2.1 pom文件
<?xml version="1.0" encoding="UTF-8"?>
<project xmlns="http://maven.apache.org/POM/4.0.0"
         xmlns:xsi="http://www.w3.org/2001/XMLSchema-instance"
         xsi:schemaLocation="http://maven.apache.org/POM/4.0.0 http://maven.apache.org/xsd/maven-4.0.0.xsd">
    <modelVersion>4.0.0</modelVersion>

    <groupId>com.darksnow</groupId>
    <artifactId>SpringBoot_Demo</artifactId>
    <version>1.0-SNAPSHOT</version>

    <!--  继承SpringBoot父POM文件  -->
    <parent>
        <groupId>org.springframework.boot</groupId>
        <artifactId>spring-boot-starter-parent</artifactId>
        <version>2.6.13</version>
    </parent>

    <dependencies>
        <!-- web开发的相关依赖 -->
        <dependency>
            <groupId>org.springframework.boot</groupId>
            <artifactId>spring-boot-starter-web</artifactId>
        </dependency>
    </dependencies>
</project>
2.2 controller
package com.darksnow.controller;

import org.springframework.web.bind.annotation.RequestMapping;
import org.springframework.web.bind.annotation.RestController;

@RestController
public class HelloController {

    @RequestMapping("/hello")
    public String hello(String name) {
        return "Hi SpringBoot~";
    }
}
2.3 启动类
package com.darksnow;

import org.springframework.boot.SpringApplication;
import org.springframework.boot.autoconfigure.EnableAutoConfiguration;
import org.springframework.context.annotation.ComponentScan;
import org.springframework.context.annotation.Configuration;

@Configuration //配置类注解,表明当前类是一个配置类
@EnableAutoConfiguration //开启自动配置
@ComponentScan //包扫描注解,不写扫描的配置basePackages,扫描当前包及其子包
public class DemoApplication {
    public static void main(String[] args) {
        SpringApplication.run(DemoApplication.class,args);
    }
}
3.SpringBoot原理分析
3.1 starters的原理
starters是依赖关系的整理和封装。是一套依赖坐标的整合,可以让导入应用开发的依赖坐标更方便。
利用依赖传递的特性:帮你把依赖打包了,而且用的是一个整体,这就是所谓的starters(起步依赖)

有了这些starters,你就可以获得Spring和其整合的所有技术的一站式服务。无需配置(自动配置)。
3.2 依赖管理的原理
为什么starter不需要写版本?

因为我们在自己的项目的pom文件中继承了spring-boot-starter-parent,它负责:明确了开发中使用的java版本,明确了代码的编码格式,maven的编译以及部分插件的依赖管理
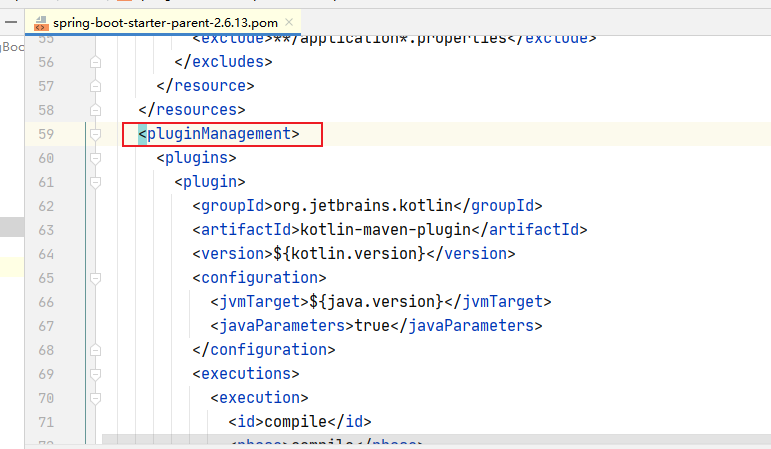
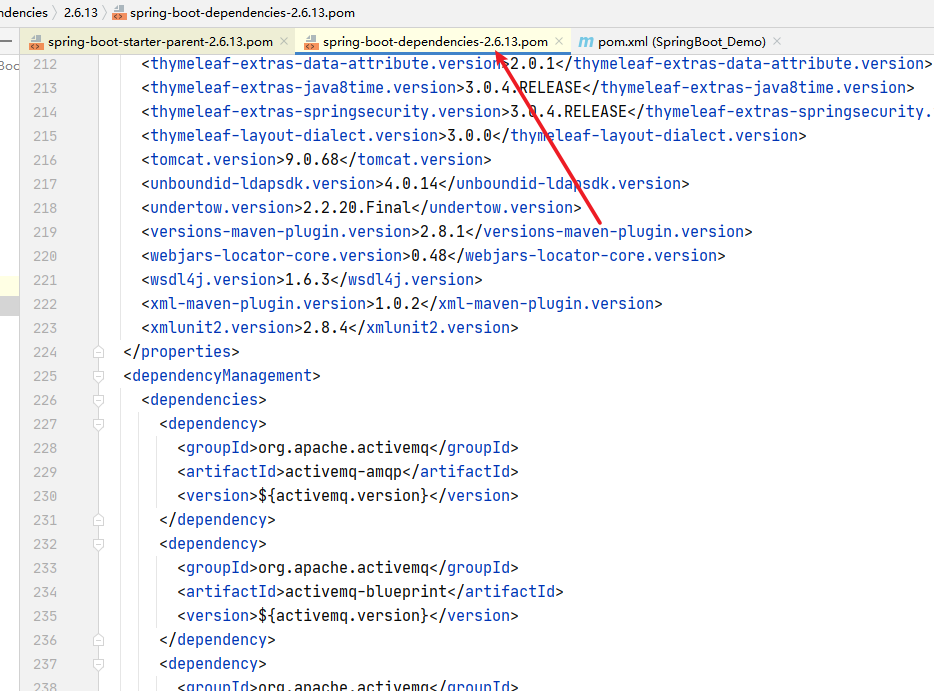
而且在spring-boot-starter-parent中还继承了spring-boot-dependencies,而它通过dependencyManagement标签来进行依赖版本的管理。
3.3 自动配置的原理
我们常用的配置,其实SpringBoot开发团队已经帮我们写好了,主要通过@Configuration实现的(配置类)
SpringBoot采用约定大于配置的设计思想,将所有可能遇到的配置信息提前配置好,写在自动配置的jar包中,
每个starter基本都会有对应的自动配置。
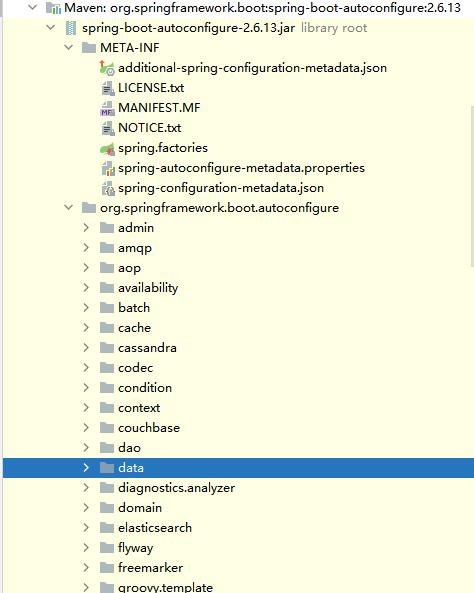
SpringBoot帮我们把配置信息写好,存在一个jar包中:spring-boot-autoconfigure,这个jar包里,存放的都是配置类
自动配置怎么才能生效?
过程:
@EnableAutoConfiguration 该注解负责自动配置
在这个注解里面有一个@Import({AutoConfigurationImportSelector.class})
AutoConfigurationImportSelector类里面实现了过滤配置类的功能
举个例子:在SpringBoot提供的配置类(WebMvcAutoConfiguration)里面有
@ConditionalOnClass({Servlet.class, DispatcherServlet.class, WebMvcConfigurer.class})
表示当前环境下得有Servlet类,DispatcherServlet类,WebMvcConfigurer类,
才会导入该配置类,否则就不导入,这个判断是由AutoConfigurationImportSelector类做的。
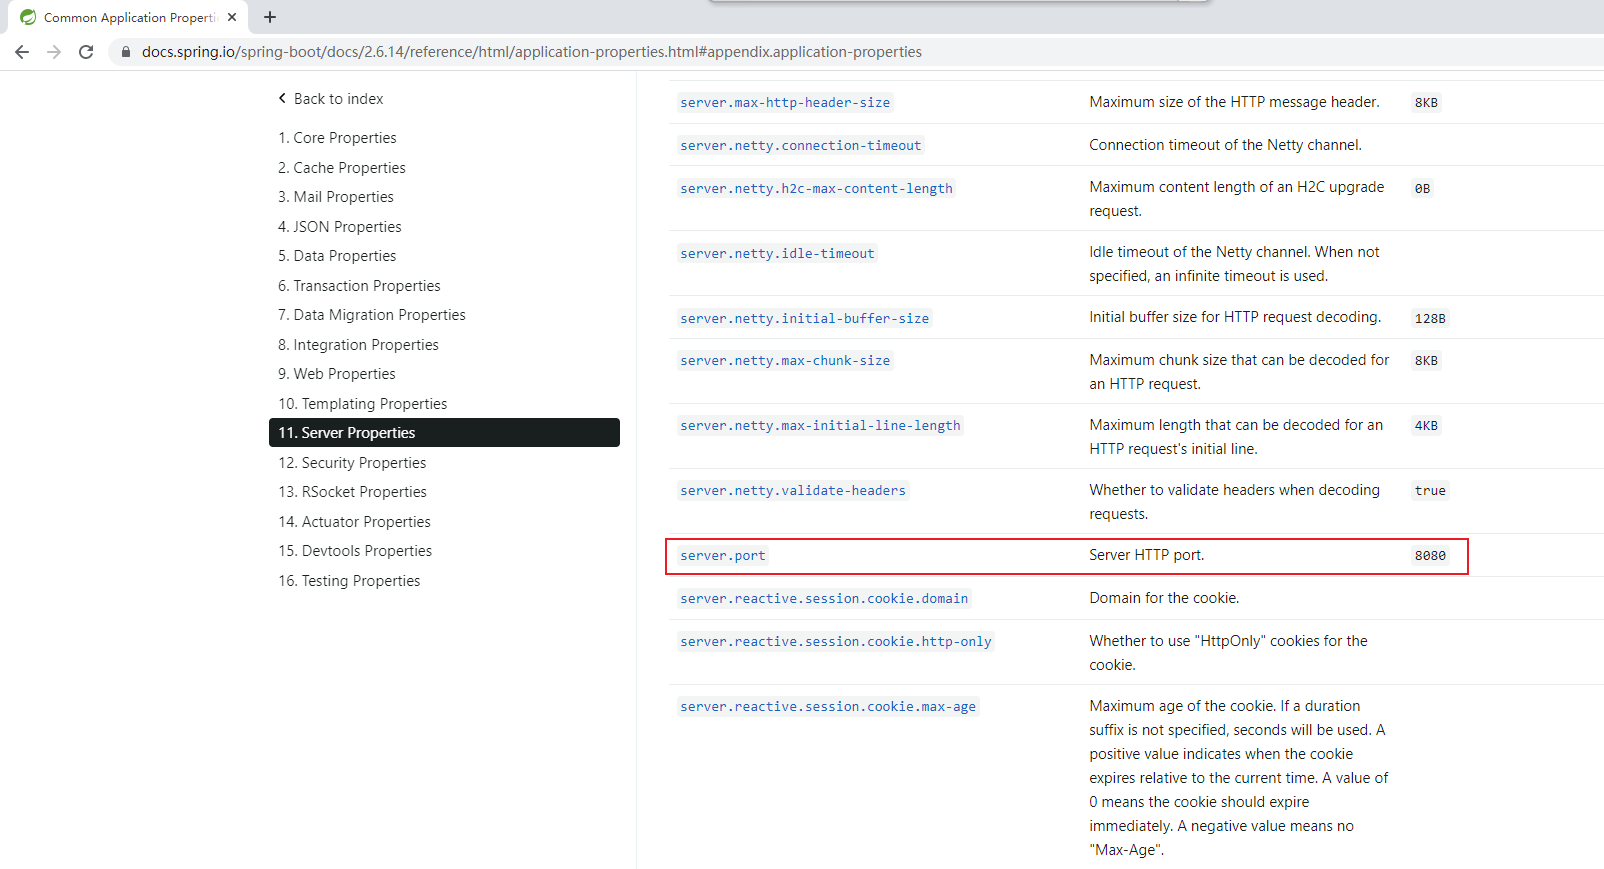
有了自动配置,那么基本全部采用默认配置,当然也可以做修改,怎么改?
可以参考官网的自动配置:
https://docs.spring.io/spring-boot/docs/2.6.14/reference/html/application-properties.html#appendix.application-properties
也可以去spring-boot-autoconfigure这个jar包里面的META-INF里面的spring-autoconfigure-metadata.json这个文件里面去找。
4.启动类上的注解
启动类上的注解:
	@Configuration //配置类注解,表明当前类是一个配置类
	@EnableAutoConfiguration //开启自动配置
	@ComponentScan //包扫描注解,不写扫描的配置basePackages,扫描当前包及其子包
	@SpringBootApplication //此注解包含上面的三个注解
5.SpringBoot的配置文件
5.1 配置文件
properties
	比如:
		server.port=8080
		server.address=127.0.0.1

xml
	比如:
		<server>
			<port>8080</port>
			<address>127.0.0.1</address>
		</server>

yml/yaml
	server:
 	 port: 8080
	 address: 127.0.0.1
5.2 yml
yml文件格式是yaml编写的文件格式,可以支持各种编程语言(c/c++,python,java,c#,php等),比xml更简洁,扩展名为.yml或者.yaml
5.3 yml配置文件语法
1.大小写敏感
2.内部以空格作为分隔符
3.使用缩进表示层级关系
4.缩进不允许使用tab,允许使用空格
5.元素要对齐
6.'#'表示注释
7.数组和集合使用'-'表示数组每个元素
5.4 yaml案例
application.yml
# 双引号识别转义字符
message1: "darksnow \n test"
# 单引号忽略转义字符
message2: 'darksnow \n test'

#配置引用,通过${}来引用
myPort: 9090
server:
  port: ${myPort}

# 生成随机字符串
my.secret: ${random.value}
# 随机数
my.number: ${random.int}
# 小于20的随机数
my.number.less: ${random.int(20)}
# 生成指定范围的随机数
my.number.range: ${random.int[1024,2048]}
YmlTest类
package com.darksnow.test;

import org.springframework.beans.factory.annotation.Value;
import org.springframework.stereotype.Component;

@Component
public class YmlTest {
    //使用@Value注解,可以将配置文件的值映射到Spring管理的Bean属性中
    @Value("${message1}")
    private String message1;
    @Value("${message2}")
    private String message2;
    @Value("${my.secret}")
    private String mySecret;

    @Override
    public String toString() {
        return "YmlTest{" +
                "message1='" + message1 + '\'' +
                ", message2='" + message2 + '\'' +
                ", mySecret='" + mySecret + '\'' +
                '}';
    }
}
controller代码
package com.darksnow.controller;

import com.darksnow.test.YmlTest;
import org.springframework.beans.factory.annotation.Autowired;
import org.springframework.web.bind.annotation.RequestMapping;
import org.springframework.web.bind.annotation.RestController;

@RestController
public class HelloController {

    @Autowired
    private YmlTest ymlTest;

    @RequestMapping("/hello")
    public String hello(String name) {
        System.out.println(ymlTest);
        return "Hi SpringBoot~";
    }
}
application.yml的常用配置
# 常见的配置
server:
  # 端口号
  port: 9090
  # 项目的contextpath路径
  servlet:
    context-path: /darksnow
# 开启debug模式
debug: true
# 配置日志级别,为debug,指定包路径
logging:
  level:
    com:
      darksnow:
        debug

# properties和yml互相转换的网址:
https://toyaml.com/index.html
其他的配置方式
#对象(map):键值对的集合
person:
  name: lisi
  age: 18
  addr: shanghai
#行内写法
person1: {name: lisi,age: 18,addr: shanghai}

#数组:一组按次序排列的值
city:
  - beijing
  - shanghai
  - hangzhou
# 行内写法
city1: [beijng,shanghai,hangzhou]

#集合中的元素是对象的形式
animals:
  - name: dog
    age: 1
  - name: cat
    age: 2
  - name: pig
    age: 3
5.5 SpringBoot配置信息的查询
配置信息查询方式一
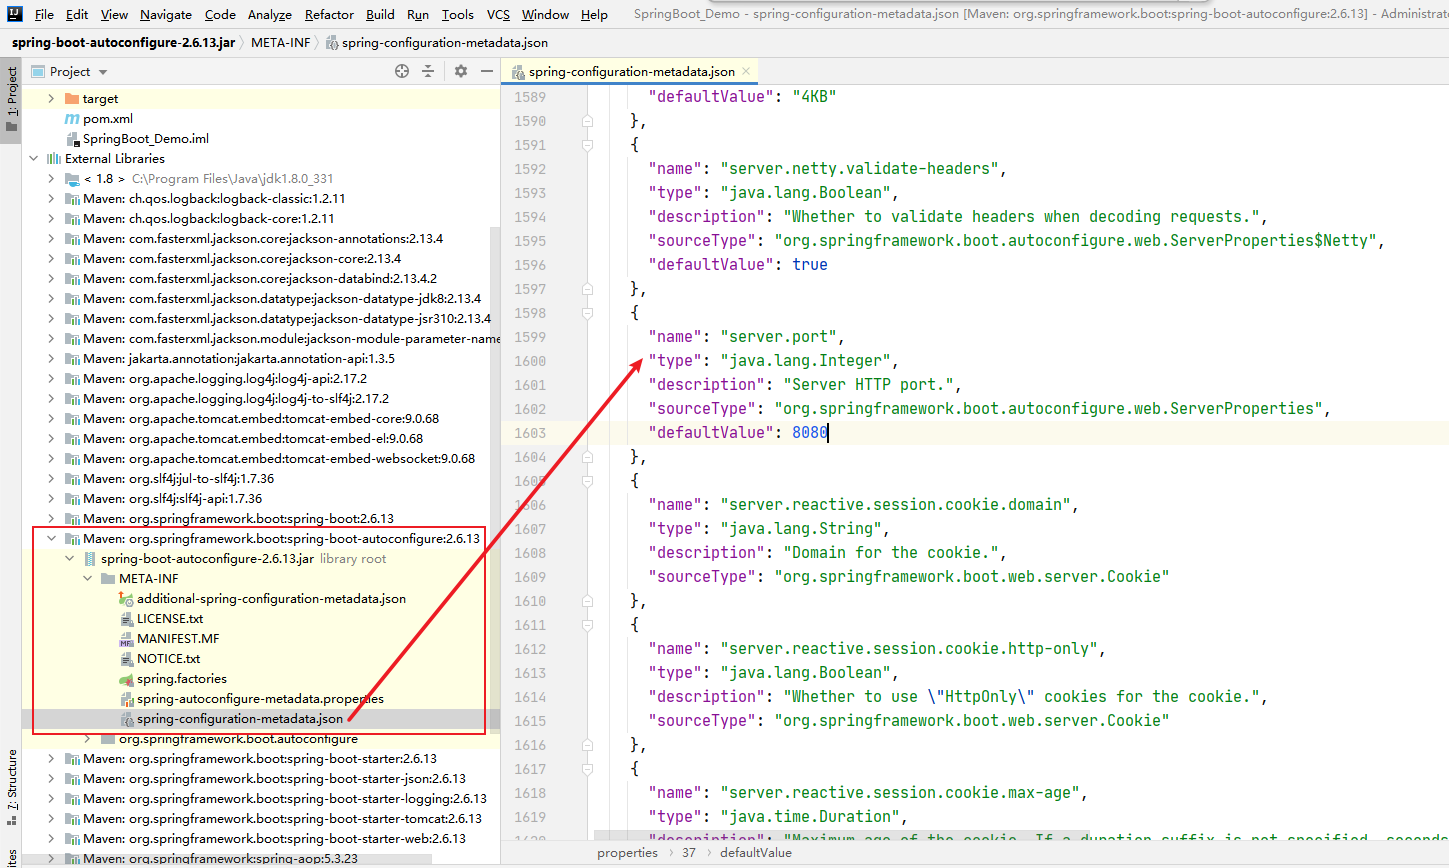
配置信息查询方式二
5.6 配置文件属性注入Bean
方式一
使用注解@Value注入,参考5.4中的例子
方式二
使用注解@ConfugurationProperties注入
pom文件
		<dependency>
            <groupId>org.springframework.boot</groupId>
            <artifactId>spring-boot-configuration-processor</artifactId>
        </dependency>
application.yml
person:
  name: darksnow
  age: 25
  addr: china
  city:
    - 广州
    - shanghai
    - beijing
  animals:
    - name: dog
      age: 1
    - name: cat
      age: 2
    - name: pig
      age: 3
实体对象
package com.darksnow.pojo;

public class Animal {
    private String name;
    private Integer age;

	//省略getter,setter,toString方法
}
package com.darksnow.pojo;

import org.springframework.beans.factory.annotation.Value;
import org.springframework.boot.context.properties.ConfigurationProperties;
import org.springframework.stereotype.Component;

import java.util.Arrays;
import java.util.List;


/**
 * 使用@ConfigurationProperties 需要的条件:
 *  1.导入spring-boot-configuration-processor依赖坐标
 *  2.把当前对象,由Spring容器管理
 *
 *  @ConfigurationProperties注解的属性:
 *  1.ignoreUnknownFields = true    告诉springboot,在有属性不能匹配到声明的内容的时候抛出异常
 *  2.prefix    前缀,需要你去参考配置文件来写
 *
 *  使用@ConfigurationProperties是必须要提供Setter方法,使用@Value方式可以不提供Setter方法
 */
@ConfigurationProperties(prefix = "person")
@Component
public class Person {
    private String name;
    private Integer age;
    private String addr;
    private String[] city;
    private List<Animal> animals;

    //省略getter,setter,toString方法
}
controller代码
package com.darksnow.controller;

import com.darksnow.pojo.Person;
import org.springframework.beans.factory.annotation.Autowired;
import org.springframework.core.env.Environment;
import org.springframework.web.bind.annotation.RequestMapping;
import org.springframework.web.bind.annotation.RestController;

@RestController
public class HelloController {

    @Autowired
    private Person person;

    @Autowired
    private Environment environment;

    @RequestMapping("/hello")
    public String hello(String name) {
        //从Environment对象中获取配置文件中的值
        System.out.println(environment.getProperty("person.name"));
        System.out.println(environment.getProperty("person.city[0]"));
        System.out.println(environment.getProperty("person.animals[0].name"));
        return "Hi SpringBoot~" + person;
    }
}
6.SpringBoot整合MyBatis
6.1 pom文件
<?xml version="1.0" encoding="UTF-8"?>
<project xmlns="http://maven.apache.org/POM/4.0.0"
         xmlns:xsi="http://www.w3.org/2001/XMLSchema-instance"
         xsi:schemaLocation="http://maven.apache.org/POM/4.0.0 http://maven.apache.org/xsd/maven-4.0.0.xsd">
    <modelVersion>4.0.0</modelVersion>

    <groupId>com.darksnow</groupId>
    <artifactId>SpringBoot_Demo</artifactId>
    <version>1.0-SNAPSHOT</version>

    <!--  继承SpringBoot父POM文件  -->
    <parent>
        <groupId>org.springframework.boot</groupId>
        <artifactId>spring-boot-starter-parent</artifactId>
        <version>2.6.13</version>
    </parent>

    <dependencies>
        <!-- web开发的相关依赖 -->
        <dependency>
            <groupId>org.springframework.boot</groupId>
            <artifactId>spring-boot-starter-web</artifactId>
        </dependency>
        <dependency>
            <groupId>org.springframework.boot</groupId>
            <artifactId>spring-boot-configuration-processor</artifactId>
        </dependency>
        <!--  SpringBoot与Mybatis整合的坐标 -->
        <dependency>
            <groupId>org.mybatis.spring.boot</groupId>
            <artifactId>mybatis-spring-boot-starter</artifactId>
            <version>2.1.1</version>
        </dependency>
        <dependency>
            <groupId>mysql</groupId>
            <artifactId>mysql-connector-java</artifactId>
            <scope>runtime</scope>
        </dependency>
    </dependencies>
</project>
6.2 application.yml
spring:
  datasource:
    driver-class-name: com.mysql.jdbc.Driver
    url: jdbc:mysql:///darksnow?characeter=utf-8
    username: root
    password: root

mybatis:
  type-aliases-package: com.darksnow.pojo
  mapper-locations: classpath:mapper/*Mapper.xml
6.3 实体类
package com.darksnow.pojo;

public class User {
    private Integer id;
    private String username;
    private String password;
    private String name;

    //省略getter,setter,toString方法
}
6.4 dao层代码
package com.darksnow.mapper;

import com.darksnow.pojo.User;
import org.apache.ibatis.annotations.Mapper;
import org.apache.ibatis.annotations.Select;

import java.util.List;

/**
 * 使用@Mapper注解标记该类是一个Mapper接口,可以被SpringBoot自动扫描
 * 如果不使用这个注解就需要在启动类上加上MapperScan注解
 */
//@Mapper
public interface UserMapper {
//    @Select("select * from user")
    List<User> findAll();
}
6.5 service层代码
package com.darksnow.service;

import com.darksnow.pojo.User;

import java.util.List;

public interface UserServer {
    List<User> findAll();
}
package com.darksnow.service.impl;

import com.darksnow.mapper.UserMapper;
import com.darksnow.pojo.User;
import com.darksnow.service.UserServer;
import org.springframework.beans.factory.annotation.Autowired;
import org.springframework.stereotype.Service;

import java.util.List;

@Service
public class UserServerImpl implements UserServer {

    @Autowired
    private UserMapper userMapper;

    @Override
    public List<User> findAll() {
        return userMapper.findAll();
    }
}
6.6 controller层代码
package com.darksnow.controller;

import com.darksnow.pojo.User;
import com.darksnow.service.UserServer;
import org.springframework.beans.factory.annotation.Autowired;
import org.springframework.web.bind.annotation.RequestMapping;
import org.springframework.web.bind.annotation.RestController;

import java.util.List;

@RestController
@RequestMapping("/user")
public class UserController {

    @Autowired
    private UserServer userServer;

    @RequestMapping("findAll")
    public List<User> findAll() {
        return userServer.findAll();
    }
}
6.7 启动类
package com.darksnow;

import org.mybatis.spring.annotation.MapperScan;
import org.springframework.boot.SpringApplication;
import org.springframework.boot.autoconfigure.SpringBootApplication;

/**
 * @MapperScan(basePackages = "com.darksnow.mapper")
 * 扫描指定包下的所有Mapper接口,将动态代理的实现类对象注入Spring容器中
 * basePackages属性:指定扫描的包路径地址
 * 作用相当于:
 *      <bean class="org.mybatis.spring.mapper.MapperScannerConfigurer">
 *          <property name="basePackages" value="com.darksnow.mapper"/>
 *      </bean>
 */
@SpringBootApplication
@MapperScan(basePackages = "com.darksnow.mapper")
public class DemoApplication {
    public static void main(String[] args) {
        SpringApplication.run(DemoApplication.class,args);
    }
}
6.8 UserMapper.xml
该文件建立在resources下的mapper目录下
<?xml version="1.0" encoding="UTF-8" ?>
<!DOCTYPE mapper
        PUBLIC "-//mybatis.org//DTD Mapper 3.0//EN"
        "https://mybatis.org/dtd/mybatis-3-mapper.dtd">
<mapper namespace="com.darksnow.mapper.UserMapper">
    <select id="findAll" resultType="User">
        select * from user
    </select>
</mapper>
7.SpringBoot集成定时器
需求:使用SpringBoot开发定时器,每个5秒输出一个当前时间
实现过程:
1.开启定时器注解
package com.darksnow;

import org.springframework.boot.SpringApplication;
import org.springframework.boot.autoconfigure.SpringBootApplication;
import org.springframework.scheduling.annotation.EnableScheduling;

@SpringBootApplication
@EnableScheduling //开启定时器
public class TestApplication {
    public static void main(String[] args) {
        SpringApplication.run(TestApplication.class,args);
    }
}
2.配置定时器方法
package com.darksnow.utils;

import org.springframework.scheduling.annotation.Scheduled;
import org.springframework.stereotype.Component;

import java.time.LocalDateTime;

@Component
public class TimerUtil {

    /**
     * 使用@Scheduled注解,可以设置当前方法执行的规则
     * initialDelay:初始延迟多长时间执行
     * fixedDelay:以一个固定的延迟时间执行,上一个任务完成之后,多久执行下一个任务
     * fixedRate:以一个固定的频率执行,不管上一个任务执行的时间
     *
     * cron属性:设置通用时间规则
     * 比如:cron = "0 0 0 18 12 ?"
     * https://cron.qqe2.com/
     * https://www.cnblogs.com/yanghj010/p/10875151.html
     */
    @Scheduled(initialDelay = 8000,fixedDelay = 4000)
    public void myTask() {
        System.out.println(LocalDateTime.now());
    }
}
8.发送HTTP请求
使用Spring的RestTemplate发送请求,RestTemplate是Rest的HTTP客户端模板工具类。
对基于HTTP的客户端进行封装。
实现对象与JSON的序列化与反序列化
不限定客户端类型,目前常用的3种客户端都支持:HttpClient,OKHttp,JDK原生URLConnection
package com.darksnow.config;

import org.springframework.context.annotation.Bean;
import org.springframework.context.annotation.Configuration;
import org.springframework.web.client.RestTemplate;

@Configuration
public class MyConfiguration {

    @Bean
    public RestTemplate restTemplate() {
        return new RestTemplate();
    }
}
package com.darksnow.controller;

import org.springframework.beans.factory.annotation.Autowired;
import org.springframework.web.bind.annotation.RequestMapping;
import org.springframework.web.bind.annotation.RestController;
import org.springframework.web.client.RestTemplate;

import java.util.List;

@RestController
public class TestRestTemplateController {

    @Autowired
    private RestTemplate restTemplate;

    @RequestMapping(value = "/testRestTemplate")
    public String testRestTemplate() {
        String url = "http://baidu.com";
        String result = restTemplate.getForObject(url, String.class);
        System.out.println(result);
        return result;
    }
}
9.整合单元测试
引入依赖坐标
		<dependency>
            <groupId>org.springframework.boot</groupId>
            <artifactId>spring-boot-starter-test</artifactId>
        </dependency>
        <dependency>
            <groupId>junit</groupId>
            <artifactId>junit</artifactId>
            <scope>test</scope>
        </dependency>
测试类

package com.darksnow;

import org.junit.Test;
import org.junit.runner.RunWith;
import org.springframework.boot.autoconfigure.SpringBootApplication;
import org.springframework.boot.test.context.SpringBootTest;
import org.springframework.test.context.junit4.SpringRunner;

@RunWith(SpringRunner.class) //指定Spring提供的测试引擎
@SpringBootTest
@SpringBootApplication
public class ApplicationTest {

    @Test
    public void test() {
        System.out.println("单元测试....");
    }
}
10.SpingBoot打包部署
1.在pom.xml引入插件
	<!-- 作用:将一个SpringBoot工程打包成为可执行的jar包-->
    <build>
        <plugins>
            <plugin>
                <groupId>org.springframework.boot</groupId>
                <artifactId>spring-boot-maven-plugin</artifactId>
            </plugin>
        </plugins>
    </build>
2.然后通过maven里面install进行打包
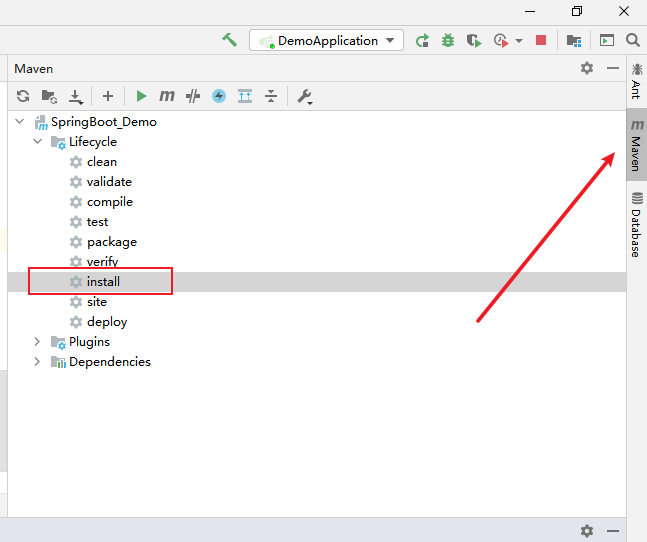
3.找到打出jar包
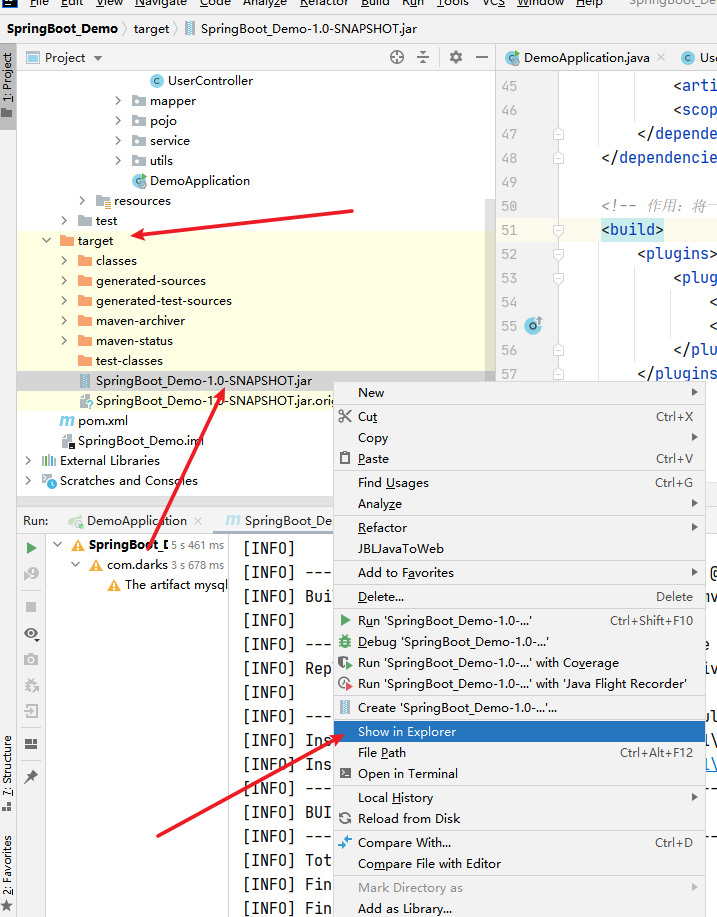
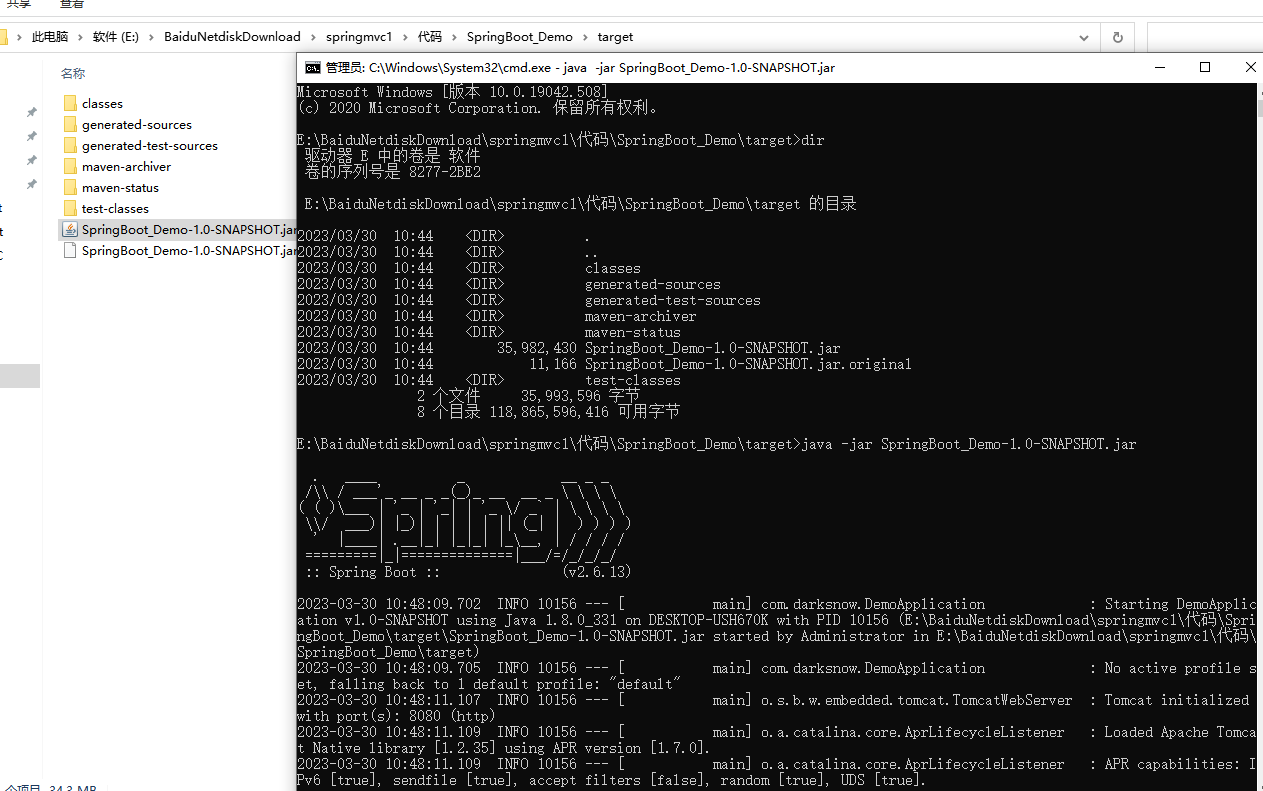
4.通过java -jar xxx.jar执行
11.SpringBoot工程热部署
导入依赖坐标
		<!-- SpringBoot开发工具jar包,支持热部署 -->
        <dependency>
            <groupId>org.springframework.boot</groupId>
            <artifactId>spring-boot-devtools</artifactId>
        </dependency>
1.手动构建项目
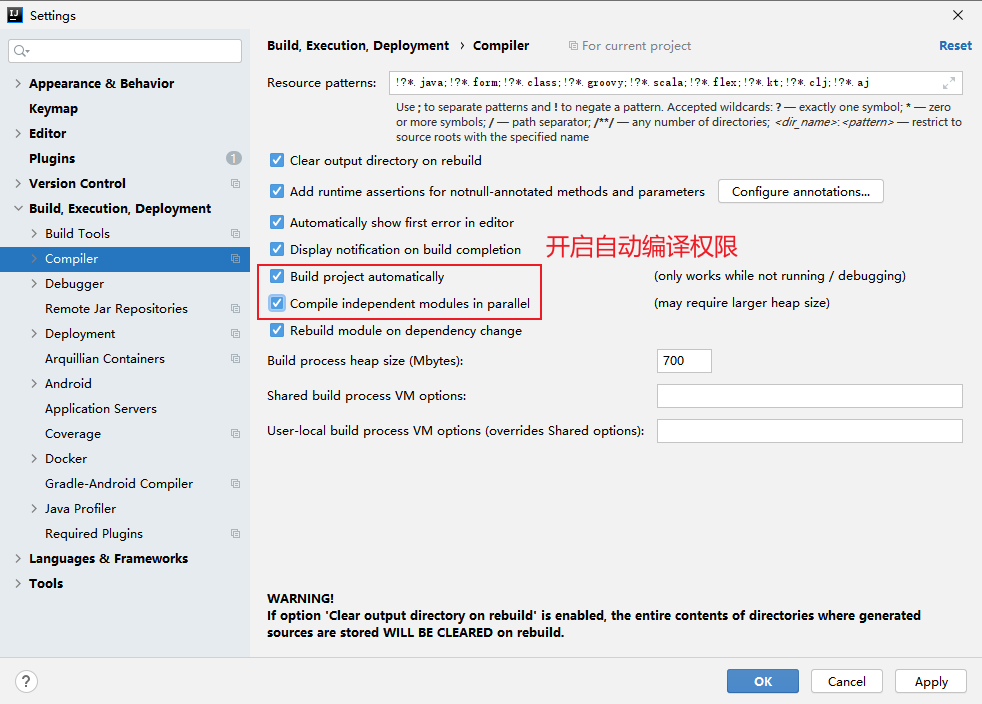
2.自动构建项目
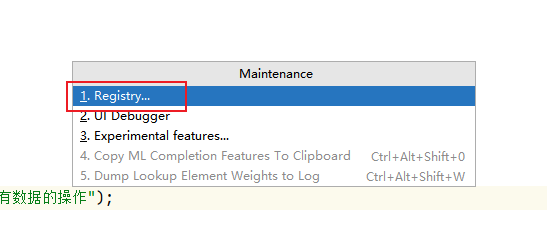
按下Shift + Ctrl + Alt + /,弹出下图选项窗,选择第一项

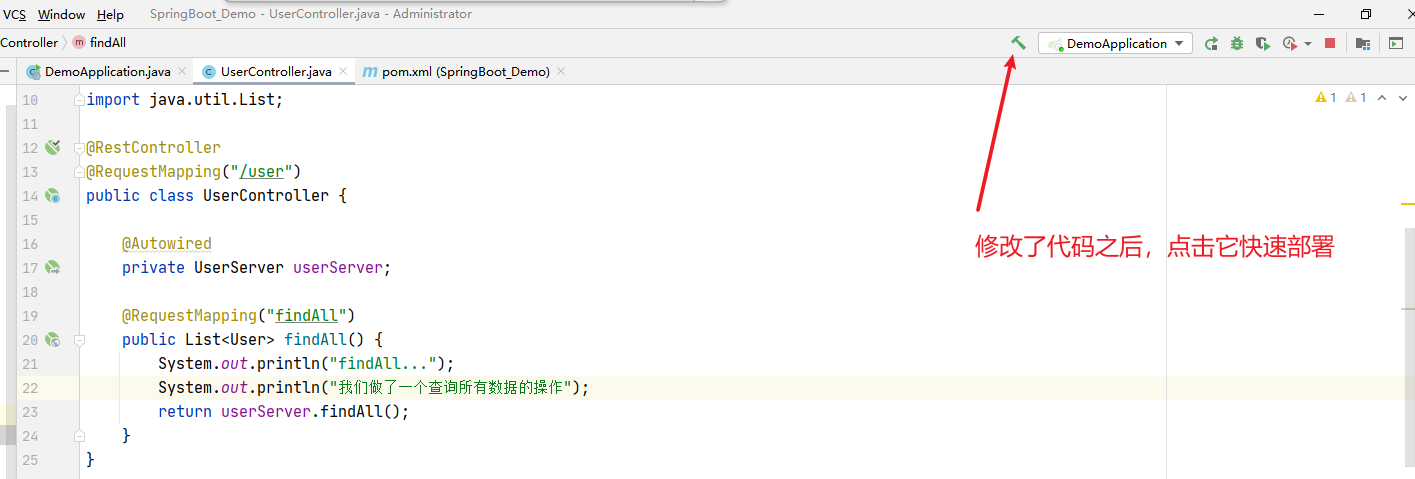
效果:我们修改了代码并不需要重新运行项目,而是等待一些时间,它会自动构建项目,然后修改的代码得以生效
12.多配置文件
我们在开发SpringBoot应用时,通常一套程序会被安装到不同的环境中,比如:开发环境dev,测试环境test,生产环境pro等。那么其中可能数据库的地址,服务器的端口等等都有可能不同或者改变。如果每次打包时,都要去修改配置文件,那么就会很麻烦。
12.1 方式一(三种环境下的配置写在一起)
#修改的是application.yml文件
#激活多配置文件中的一个,激活的是测试环境
spring:
  profiles:
    active: test

---
#生产环境配置
spring:
  datasource:
    driver-class-name: com.mysql.jdbc.Driver
    url: jdbc:mysql:///darksnow?characeter=utf-8
    username: root
    password: root
  profiles: pro
mybatis:
  type-aliases-package: com.darksnow.pojo
  mapper-locations: classpath:mapper/*Mapper.xml
server:
  port: 8083

---
#测试环境配置
spring:
  datasource:
    driver-class-name: com.mysql.jdbc.Driver
    url: jdbc:mysql:///darksnow?characeter=utf-8
    username: root
    password: root
  profiles: test
mybatis:
  type-aliases-package: com.darksnow.pojo
  mapper-locations: classpath:mapper/*Mapper.xml
server:
  port: 8082

---
#开发环境配置
spring:
  datasource:
    driver-class-name: com.mysql.jdbc.Driver
    url: jdbc:mysql:///darksnow?characeter=utf-8
    username: root
    password: root
  profiles: dev
mybatis:
  type-aliases-package: com.darksnow.pojo
  mapper-locations: classpath:mapper/*Mapper.xml
server:
  port: 8081
12.2 方式二

三种环境分别对应三个文件
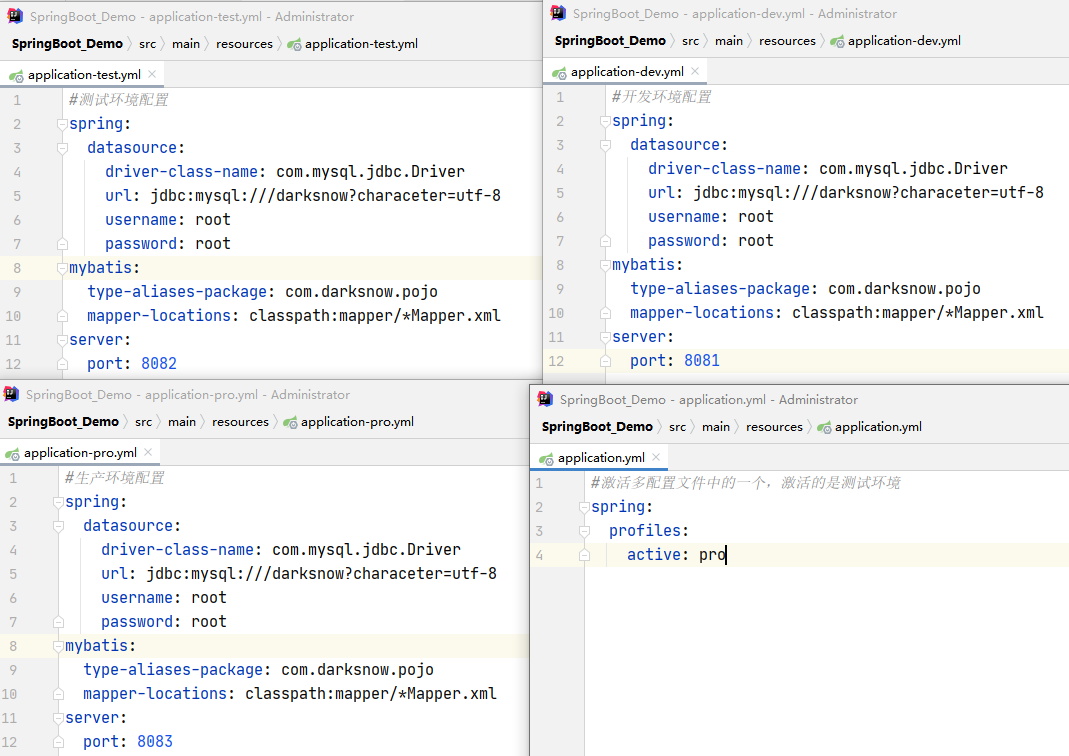
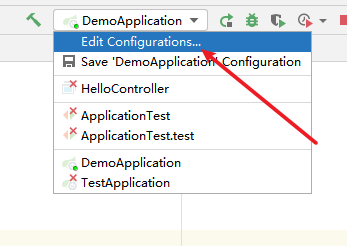
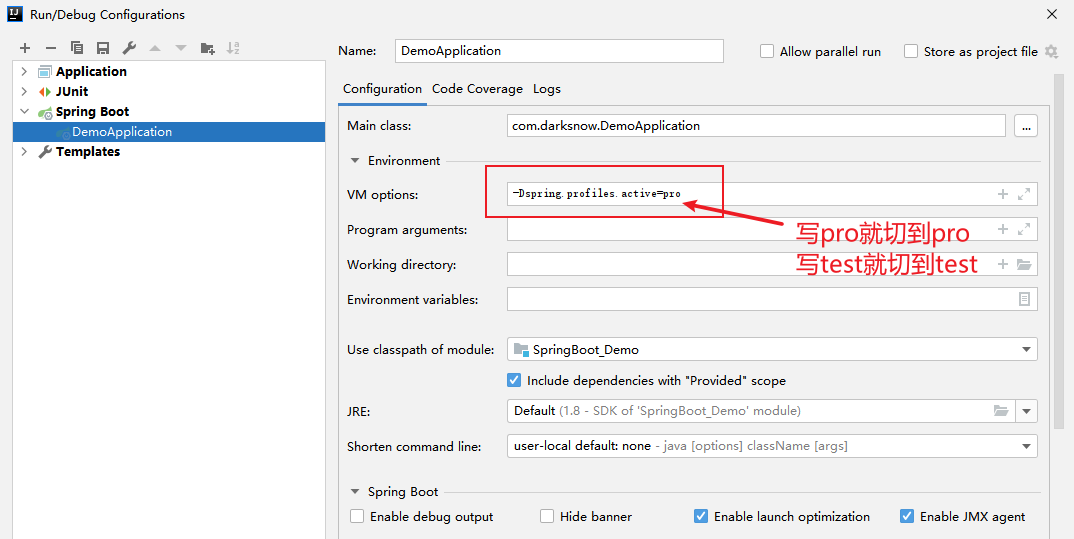
12.3 方式三(推荐)
站在方式二的基础上,但是可以去掉方式二中application.yml文件
写代码的时候,切换环境
项目如果部署到服务器上,怎么切环境
在服务器上运行SpringBoot程序的时候可以直接加上参数,来指定切换环境。
执行命令:
	java -jar SpringBoot_Demo-1.0-SNAPSHOT.jar -Dspring.profiles.active=dev
13.SpringBoot的监听器
事件源:被监听的对象
监听器:监听事件源对象,事件源对象的状态的变化都会触发监听器
响应行为:监听器监听到事件源的状态变化时所涉及的功能代码,由程序员编写

以前SSM框架整合的时候在web.xml中配置过监听器
<listener-class>org.springframework.web.context.ContextLoaderListener</listener-class>
ContextLoaderListener可以指定在web应用程序启动时载入IOC容器,它时IOC容器的初始化工作

StringBoot中的监听器
CommandLineRunner:应用程序启动完成之后可以做一些事情
ApplicationRunner:应用程序启动完成之后可以做一些事情,优先级高于CommandLineRunner
ApplicationContextInitializer:应用程序初始化之前可以做一些事情(对框架开发者有意义)
SpringApplicationRunListener:应用程序全阶段监听(对框架开发者有意义)

SpringBoot的扩展机制:Spring Factories
主要目的是解耦:将监听器的配置权交给第三方厂商,插件开发者,框架提供接口,实现类由你来写,释放原生API的能力,可以增加定制性
13.1 CommandLineRunner监听器
package com.darksnow.listener;

import org.springframework.boot.CommandLineRunner;

import java.util.Arrays;

@Component
public class MyCommandLineRunner implements CommandLineRunner {
    /**
     * 应用程序启动完成之后可以做一些事情
     * @param args 主函数的参数列表
     */
    @Override
    public void run(String... args) throws Exception {
        System.out.println("应用程序启动完成了~" + Arrays.toString(args));
    }
}
13.2 ApplicationRunner监听器
package com.darksnow.listener;

import org.springframework.boot.ApplicationArguments;
import org.springframework.boot.ApplicationRunner;
import org.springframework.stereotype.Component;


@Component
public class MyApplicationRunner implements ApplicationRunner {
    /**
     * 应用程序启动完成之后可以做一些事情
     * 此监听器要优先于CommandLineRunner监听器执行
     * @param args 应用的参数对象
     */
    @Override
    public void run(ApplicationArguments args) throws Exception {
        System.out.println("应用程序启动完成了~ ApplicationRunner");
    }
}
13.3 ApplicationContextInitializer监听器
package com.darksnow.listener;

import org.springframework.context.ApplicationContextInitializer;
import org.springframework.context.ConfigurableApplicationContext;

public class MyApplicationContextInitializer implements ApplicationContextInitializer {

    /**
     * 应用程序初始化之前可以做一些事情
     * 对于框架的开发者有意义
     */
    @Override
    public void initialize(ConfigurableApplicationContext applicationContext) {
        System.out.println("Spring容器开始初始化了~");
    }
}
13.4 SpringApplicationRunListener监听器
package com.darksnow.listener;

import org.springframework.boot.ConfigurableBootstrapContext;
import org.springframework.boot.SpringApplication;
import org.springframework.boot.SpringApplicationRunListener;
import org.springframework.context.ConfigurableApplicationContext;
import org.springframework.core.env.ConfigurableEnvironment;

import java.time.Duration;

public class MySpringApplicationRunListener implements SpringApplicationRunListener {

    public MySpringApplicationRunListener(SpringApplication application,String[] args) {

    }

    @Override
    public void starting(ConfigurableBootstrapContext bootstrapContext) {
        System.out.println("应用程序开始启动~starting");
    }

    @Override
    public void environmentPrepared(ConfigurableBootstrapContext bootstrapContext, ConfigurableEnvironment environment) {
        System.out.println("环境准备完成~environmentPrepared");
    }

    @Override
    public void contextPrepared(ConfigurableApplicationContext context) {
        System.out.println("sping容器准备完成~contextPrepared");
    }

    @Override
    public void contextLoaded(ConfigurableApplicationContext context) {
        System.out.println("spring容器加载完成~contextLoaded");
    }

    @Override
    public void started(ConfigurableApplicationContext context, Duration timeTaken) {
        System.out.println("应用程序启动完成~started");
    }

    @Override
    public void running(ConfigurableApplicationContext context) {
        System.out.println("应用程序运行中~running");
    }

    @Override
    public void failed(ConfigurableApplicationContext context, Throwable exception) {
        System.out.println("应用程序运行时抛出异常~" + exception.getMessage());
    }
}
注意:使用ApplicationContextInitializer监听器或者SpringApplicationRunListener监听器,需要在resources目录下建立一个META-INF目录,然后里面再建立一个名为spring.factories的文件
下面是spring.factories文件的内容
#org.springframework.boot.SpringApplicationRunListener=com.darksnow.listener.MySpringApplicationRunListener
org.springframework.context.ApplicationContextInitializer=com.darksnow.listener.MyApplicationContextInitializer
14.Banner
14.1 修改Banner
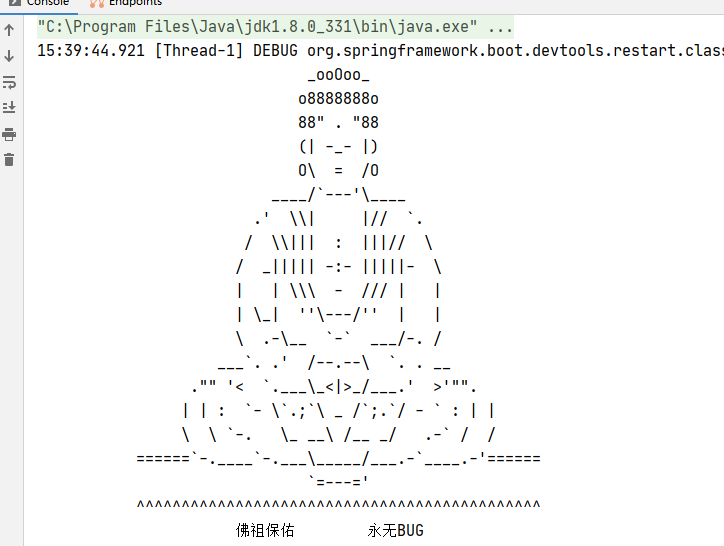
方式一:
	在resources目录下放一张名为banner的图片,它会给你自动转换,
	但是如果名字不为banner就会失败(假设名为test.jpg),
	那么就需要在配置文件中指定配置:spring.banner.image.location=test.jpg

方式二:
	在resources目录下建立一个banner.txt的文件,里面写入内容即可,banner.txt的文件名不能随便取
14.2 关闭Banner
@SpringBootApplication
public class DemoApplication {
    public static void main(String[] args) {
        SpringApplication application = new SpringApplication(DemoApplication.class);
        application.setBannerMode(Banner.Mode.OFF); //关闭Banner
        application.run(args);
    }
}


【推荐】国内首个AI IDE,深度理解中文开发场景,立即下载体验Trae
【推荐】编程新体验,更懂你的AI,立即体验豆包MarsCode编程助手
【推荐】抖音旗下AI助手豆包,你的智能百科全书,全免费不限次数
【推荐】轻量又高性能的 SSH 工具 IShell:AI 加持,快人一步
· 震惊!C++程序真的从main开始吗?99%的程序员都答错了
· 别再用vector<bool>了!Google高级工程师:这可能是STL最大的设计失误
· 单元测试从入门到精通
· 【硬核科普】Trae如何「偷看」你的代码?零基础破解AI编程运行原理
· 上周热点回顾(3.3-3.9)